Modes Trio - Car seat GRACO - Free user manual and instructions
Find the device manual for free Modes Trio GRACO in PDF.

User questions about Modes Trio GRACO
0 question about this device. Answer the ones you know or ask your own.
Ask a new question about this device
Download the instructions for your Car seat in PDF format for free! Find your manual Modes Trio - GRACO and take your electronic device back in hand. On this page are published all the documents necessary for the use of your device. Modes Trio by GRACO.
USER MANUAL Modes Trio GRACO
3-F To Open Toddler Seat
4-B To Attach/Remove Toddler Seat
4-G Removing Front Wheels
- Retrait des roulettes avant • Para retirar las ruedas delanteras
4-H To Use Toddler Seat in Infant Pramette Position
4-I To Attach Graco® Infant Car Seat to Toddler Seat
4-J To Attach Graco® Infant Car Seat to Stroller Frame
4-K To Fold Stroller with Toddler Seat
4-L To Fold Stroller without Toddler Seat
5-A Care & Maintenance
5-B Replacement Parts • Warranty Information (USA)
5-C Product Registration (USA)
Failure to follow these warnings and the assembly instructions could result in serious injury or death. Only use product as instructed.
PLEASE SAVE OWNER'S MANUAL FOR FUTURE USE.
ADULT ASSEMBLY REQUIRED.
NEVER LEAVE CHILD
UNATTENDED. Always keep child in view while in stroller.
AVOID SERIOUS INJURY from falling or sliding out. Always use seat belt or infant car seat harness. After fastening buckles, adjust belts to get a snug fit around your child.
AVOID FINGER ENTRAPMENT.
Use care when folding or unfolding the stroller. When making adjustments to stroller, ALWAYS ENSURE that all parts of child's body are clear of any moving parts.
STAIRS or escalators. You may suddenly lose control of the stroller or your child may fall out. Also, use extra care when going up or down a step or curb.
AVOID STRANGULATION.
DO NOT place items with a string around your child's neck, suspend strings from this product, or attach strings to toys.
USE OF THE STROLLER. The product will become unstable with a child weighing more than 50 lb (22.5 kg) or taller than 45 in (114.3 cm). Use stroller with only one child at a time.
ALWAYS check that the infant car seat, toddler seat, or infant pramette is securely attached to the frame by pulling up on it.
TO PREVENT A HAZARDOUS, UNSTABLE CONDITION, never place purses, shopping bags, parcels or accessory items on the handle (other than approved Graco stroller bags). Never place anything on the canopy.
TO PREVENT A HAZARDOUS, UNSTABLE CONDITION, do not place more than 10 lb (4.5 kg) in the storage basket.
TO AVOID BURNS, never put hot liquids in the cup holder.
TO PREVENT TIPPING, do not place more than 1 lb (0.45 kg) in the cup holder.
DO NOT use storage basket as a child carrier.
ONLY USE toddler seat/infant pramette on the stroller, and DO NOT use toddler seat/infant pramette in an automobile as car bed or booster seat.
DO NOT remove, reverse, or carry the toddler seat/infant pramette while child is in it.
DO NOT ALLOW your child to stand on the basket. It may collapse and cause injury.
NEVER PLACE child in the toddler seat or infant pramette mode with head toward footrest.
DO NOT use stroller frame without toddler seat or car seat attached.
NEVER ALLOW YOUR
STROLLER to be used as a toy.
WARNING
STROLLER TO BE USED only at walking speed. Product not intended for use while jogging, skating, etc.
This product is NOT safe for sleep.
NEVER LIFT OR CARRY toddler seat by the footrest.
DISCONTINUE USING YOUR STROLLER should it become damaged or broken.
CAREGIVER MUST always help child get into and out of the stroller.
CAREGIVER MUST always ensure the brakes are engaged when placing child into stroller.
ONLY USE THE TODDLER SEATS PROVIDED WITH THIS STROLLER OR PURCHASED SEPARATELY AND SPECIFIED FOR USE WITH THIS STROLLER.
USING GRACO® INFANT CAR SEAT WITH STROLLER:
TO AVOID INJURY TO YOUR CHILD: THIS STROLLER IS ONLY COMPATIBLE WITH GRACO® SNUGRIDE® INFANT CAR SEATS WITH CLICK CONNECT™. Only use with
Graco® infant car seats that have the Click Connect™ logo. Improper use of this stroller with other manufacturers' car seats may result in serious injury or death.


text_image
click CONNECT.Sticker varies by model
READ THE
MANUAL provided with your Graco® car seat before using it with your stroller.
FALL HAZARD: Always check that infant car seat is securely attached to stroller by pulling up on the car seat.
TO AVOID FALLING OUT always ensure that the toddler seat is securely attached on both sides of the stroller frame.
ALWAYS SECURE your child with the car seat harness when using the car seat in the stroller. If your child is already in the car seat, check that the child is secured with the harness.
Improper use of this stroller with a car seat may result in serious injury or death.
See Graco infant car seat owners manual for maximum size of child.
WARNING
NEVER ATTACH infant car seat in the toddler seat without the child's tray and side armrests attached.
FALL HAZARD: To prevent falls, do not use this product in the infant pramette mode when the infant begins to push up on hands and knees or weighs over 15 lb (6.8 kg), whichever comes first.
ALWAYS release the webbing strap buckle to lower the foot end of the toddler seat before placing child in the infant pramette.
DO NOT place anything other than a child inside the infant pramette.
REMOVE CHILD when adjusting the seat from or to infant pramette mode.
▲MISE EN GARDE
natural_image
Line drawing of a baby stroller with adjustable arms and wheels (no text or symbols)
natural_image
Line drawing of a baby stroller with decorative wings and wheels (no text or symbols)
natural_image
Line drawing of a baby stroller with a canopy and two wheels (no text or symbols)
natural_image
Line drawing of a baby stroller with open lid and wheels (no text or symbols)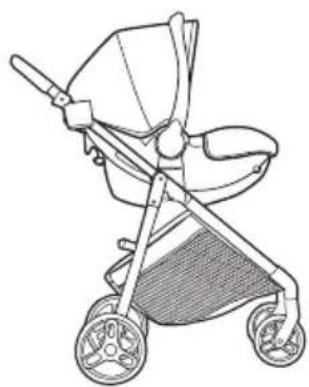
natural_image
Line drawing of a baby stroller with four wheels and seat (no text or symbols)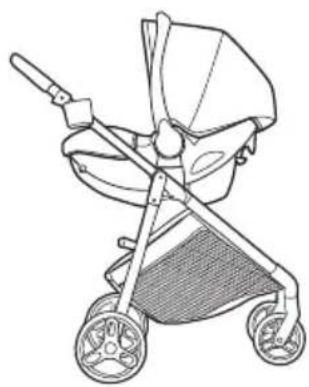
natural_image
Line drawing of a baby stroller with wheels and seat (no text or symbols)
natural_image
Line drawing of a baby stroller with wheels and a seat cover (no text or symbols)Características
Caractéristiques
2-B • Parts List
Check that you have all the parts for this model BEFORE assembling your product. If any parts are missing, call Customer Service. 1-800-345-4109.
NO TOOLS REQUIRED.
text_image
QR code image containing encoded data, no visible human-readable textMISSING PARTS? US consumers only
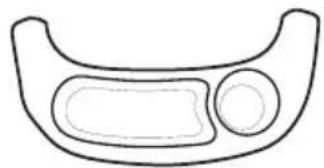
natural_image
Anatomical line drawing of a human ear with visible callosum and surrounding structures (no labels or text)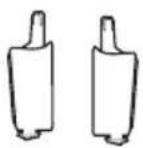
natural_image
Simple line drawing of a curved mechanical component with two circular cutouts (no text or symbols)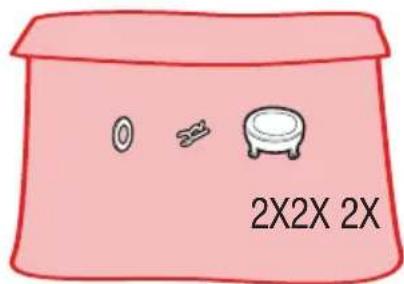
text_image
0 = 2 2X2X 2X
text_image
QR code image containing encoded data, no visible human-readable textSCAN ME
LISEZ-MOI
ESCANÉEME
2X
* Red bag contains hardware, do not discard
* Le sac rouge contient de la quincaillerie; ne pas jeter
* La bolsa roja contiene las herramientas, no la deseche
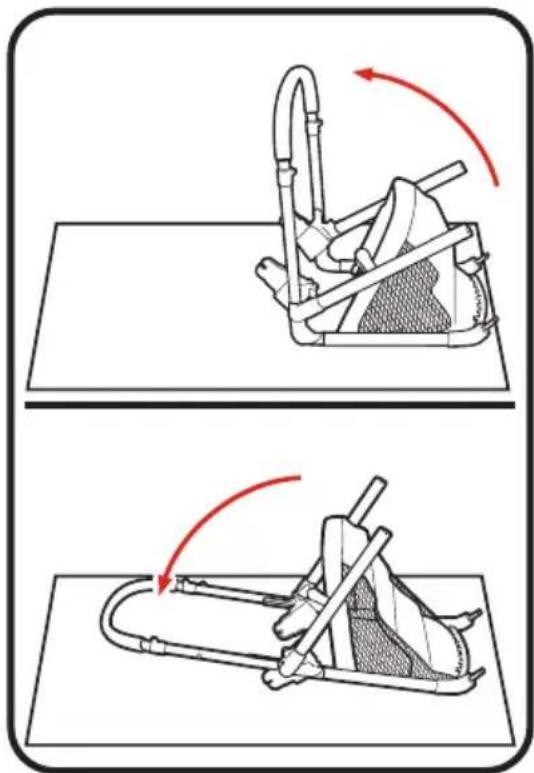
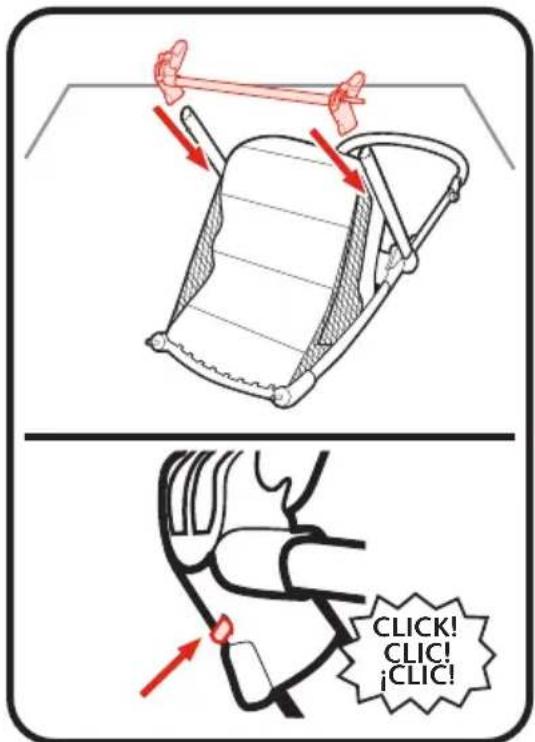
3-A • To Open Stroller
• Ouverture de la poussette
- Abrir el cochecito
Before assembly, be sure to place stroller on top of a piece of cardboard or other protective cover to prevent damage to floor surface.
text_image
Diagram illustrating a mechanical device with a lock mechanism and a close-up of the internal structure, showing motion and assembly steps.- Lift handle of stroller up.
- Soulever la poignée de la poussette.
- Levante la manija del cochecito hacia arriba.
natural_image
Two-step diagram showing a mechanical device with red arrows indicating motion, no text or symbols present.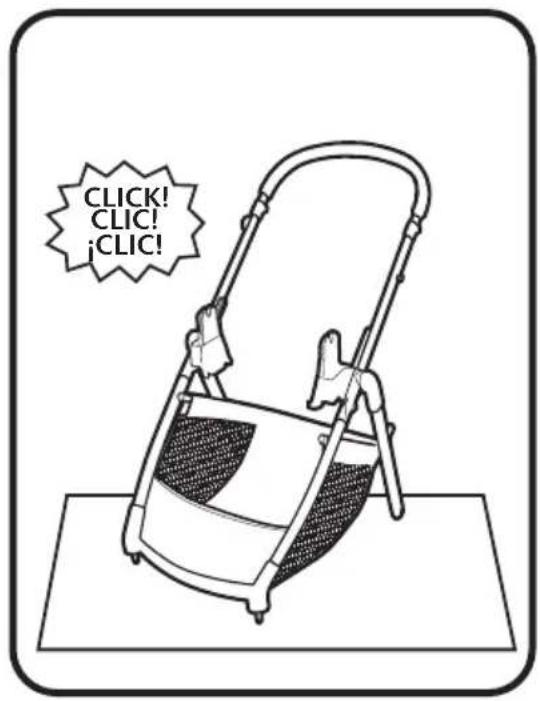
text_image
CLICK! CLICK! iCLICK!- CHECK that the stroller is completely latched open every time you open the stroller and before continuing with the rest of the assembly steps.
- VÉRIFIER que la poussette est entièrement verrouillée en position ouverte à chaque ouverture et avant d'effectuer les autres étapes du montage.
- VERIFIQUE que el cochecito esté completamente abierto y trabado cada vez que lo abre y antes de continuar los pasos de ensamblaje restantes.
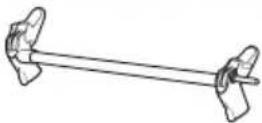
3-BRearAxle • Essieu arrière • Eje Trasero
text_image
CLICK! CLIC! iCLIC!- Push rear axle onto the stroller frame. Brake levers point toward rear of stroller. CHECK that rear axle is securely attached by pulling on brake assembly.
- Pousser l'essieu arrière sur le cadre de la poussette. Les leviers de frein pointent vers l'arrière de la poussette. S'ASSURER que l'essieu arrière est fixé solidement en tirant sur le module de freinage.
- Empuje el eje trasero para sujetarlo al armazón del cochecito. Las palancas del freno deben apuntar hacia la parte trasera del cochecito. VERIFIQUE que el eje trasero esté bien conectado tirando del equipo de frenos.
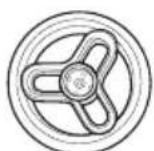
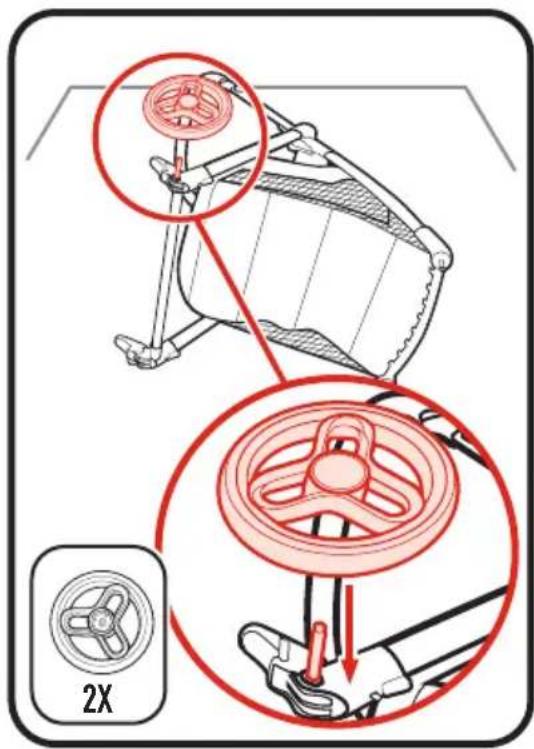
3-C • Rear Wheels
-
Roulettes arrière
• Ruedas traseras -
Attach rear wheels to stroller as shown.
- Fixer les roulettes arrière à la poussette, tel qu'illustré.
-
Sujete las ruedas traseras al cochecito como se indica.
-
Locate the red bag and remove its cotter pins and hardware. Place washer over axle as shown.
- Localiser le sac rouge, puis retirer les goupilles et la quincaillerie. Placer la rondelle sur l'essieu, tel qu'illustré.
- Localice la bolsa roja y saque las chavetas y las herramientas. Ponga la arandela en el eje. Ponga la arandela sobre el eje como se muestra.
text_image
2X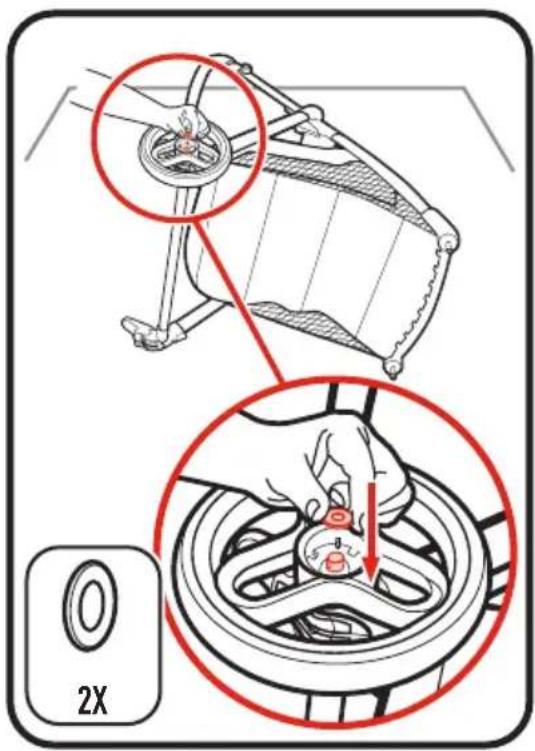
text_image
2XEnsamblaje
Assemblage
3 Assembly
text_image
Technical diagram illustrating car wheel assembly and valve mechanism, with labeled parts and 2X magnification indicator.- Push straight side of pin through axle hole. Pin will separate around the axle. Curved end of pin MUST face out as shown. Repeat on other end. If you have trouble, use pliers to grab the cotter pin and route it through axle.
- Pousser le côté droit de la tige dans l'orifice de l'essieu. La tige va se séparer autour de l'essieu. La partie recourbée de la tige DOIT pointer vers le haut, tel qu'illustré. En cas de difficulté, utiliser une pince pour saisir la goupille fendue et la faire passer à travers l'essieu.
- La clavija se separará alrededor del eje. El lado curvo de la clavija DEBE mirar hacia afuera como se indica. Repita el procedimiento en el otro lado. Si tiene problemas, utilice un alicate para tomar la clavija y guiarla a través del eje.
- Attach hub cap as shown.
CHECK that wheel is securely attached by pulling on wheel.
Repeat on other side.
natural_image
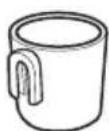
Diagram of a car wheel and steering wheel assembly with red arrows indicating motion direction (no text or symbols)3-E • Cup Holders
- Porte-gobelets
- Portavasos
text_image
CLICK! CLIC! jCLIC!natural_image
Diagram of a cable or wire being lifted by a red object, showing rope routing and a magnified view (no text or symbols)CHECK that button is visible in opening.
natural_image
Diagram of a firearm with red curved arrow indicating motion (no text or symbols)
text_image
CLICK! CLIC! iCLIC!Ensamblaje
Assemblage
3 Assembly
text_image
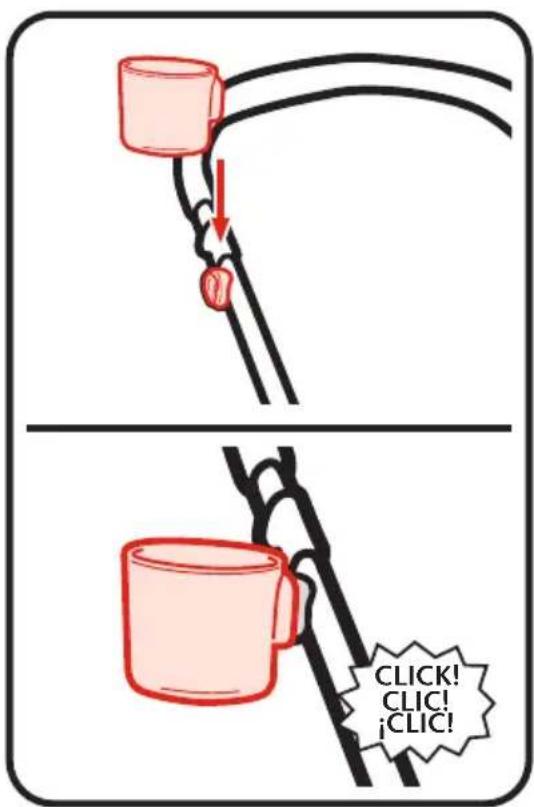
Diagram illustrating safety rules for a device, showing a bracket with a red box and a prohibition symbol.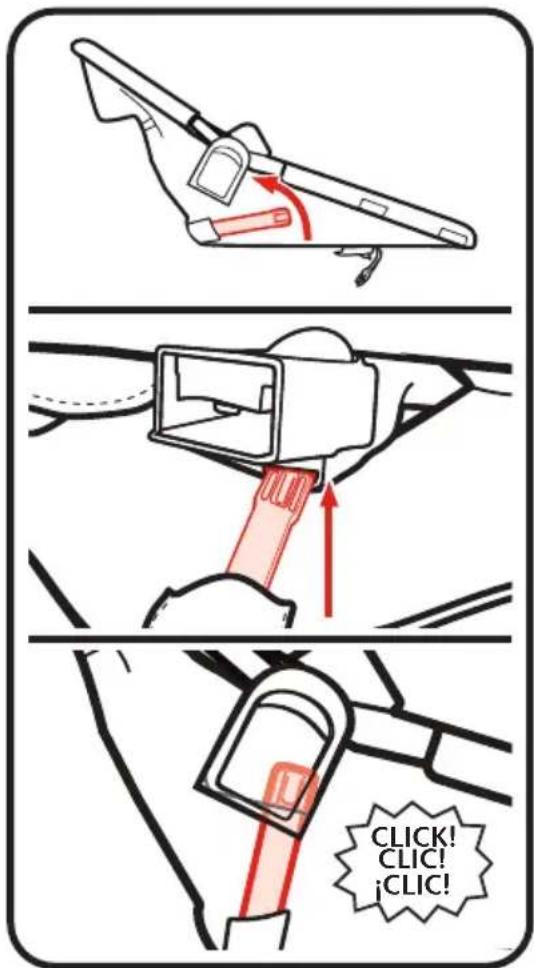
MAKE SURE brace is secured in mount by pulling on brace.
REPEAT on other side.
Always secure your child with the seat belt. The tray is not a restraint device. DO NOT lift the stroller by the child's tray. Use care when snapping the tray on the stroller with a child in the stroller.
MISE EN GARDE
text_image
Diagram illustrating car seatbelt usage with red arrows indicating movement and a highlighted red bandage on the seatbelt.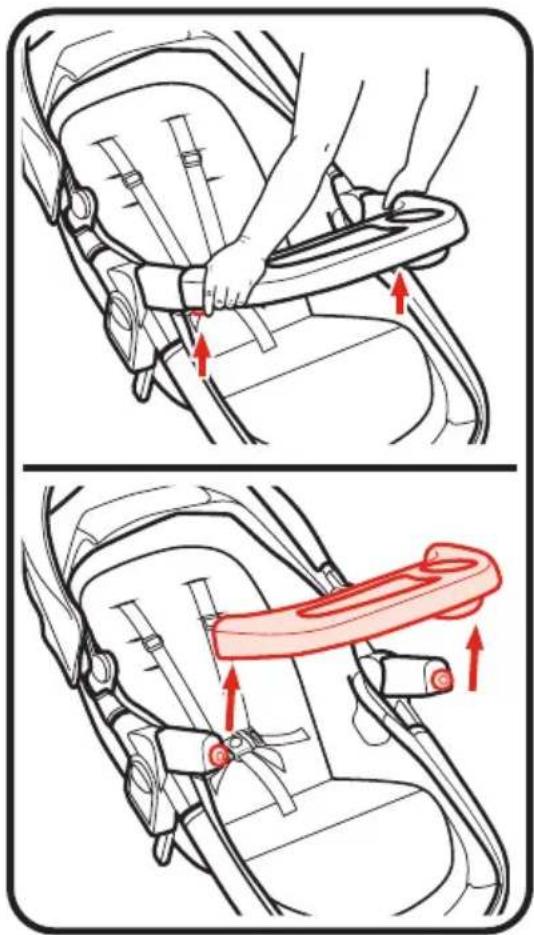
text_image
Diagram illustrating car seatbelt usage with red arrows indicating movement and a highlighted belt component-
To remove child's tray, press buttons on bottom of both ends, and lift off.
-
Pour retirer le plateau pour enfant, appuyer sur les boutons en dessous, aux deux extrémités, et soulever.
-
Para sacar la bandeja para niños, oprima los botones de abajo de ambos extremos, y levántela.
4-B • To Attach/Remove Toddler Seat
• Installation/retrait du siège pour bambin
- Sujetar/sacar el asiento para niño pequeño
• To Attach Toddler Seat
• Pour fixer le siège pour bambin
- Sujetar el asiento para niño pequeño

WARNING
- ONLY USE toddler seat on the stroller, and do not remove, reverse, or carry the toddler seat while child is in it.
See warnings for additional information.

MISE EN GARDE
text_image
Diagram illustrating the use of a baby seatbelt with red arrows indicating force or pressure, and an icon of a lock symbol.text_image
Diagram showing a hand adjusting a seatbelt with a red arrow indicating the lock mechanism, alongside a padlock icon.natural_image
Illustration of a baby seat with red outline and arrows indicating movement or positioning (no text or symbols)4-CCanopy • Baldaquin • Capota
- MAKE SURE canopy is always fastened with the hook and loop tape when used with infant car seat or when toddler seat is in use.
- S'ASSURER que le baldaquin est toujours bien fixé à l'aide des bandes autoagrippantes lors de l'utilisation avec siège d'auto pour bébé ou siège pour bambin.
- ASEGÚRESE de que la capota esté siempre sujetada con la cinta de nudo y gancho cuando la usa con el asiento de automóvil para bebé o cuando usa el asiento para niño pequeño.
- CHECK canopy mounts are attached with button on frame in the mounts as shown.
- S'ASSURER que les attaches du baldaquin sont fixées aux boutons des attaches du cadre, tel qu'illustré
- VERIFIQUE que los montantes de la capota estén sujetados con el botón en el armazón a los montantes como se indica.
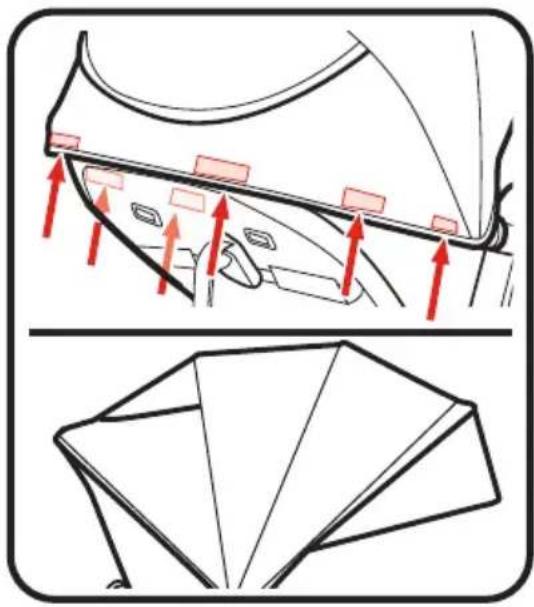
text_image
Diagram illustrating car door and window components with red arrows indicating movement, alongside a folded paper folding view.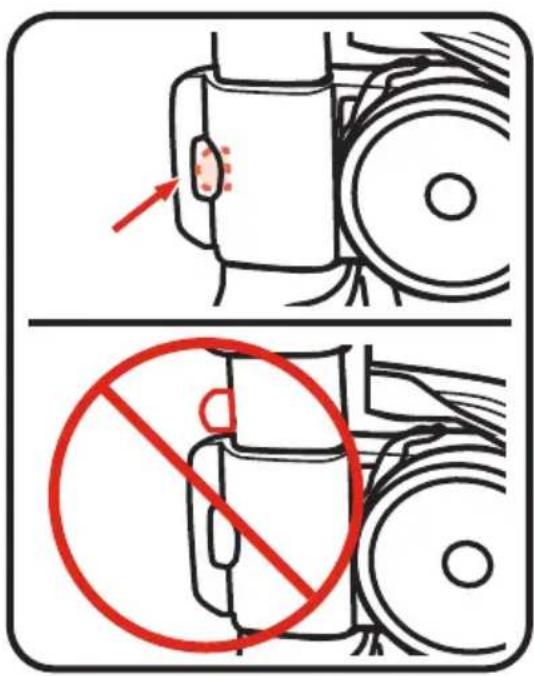
text_image
Diagram illustrating safety rules for vehicle door lockers, showing no protection and a red circle indicating no protection.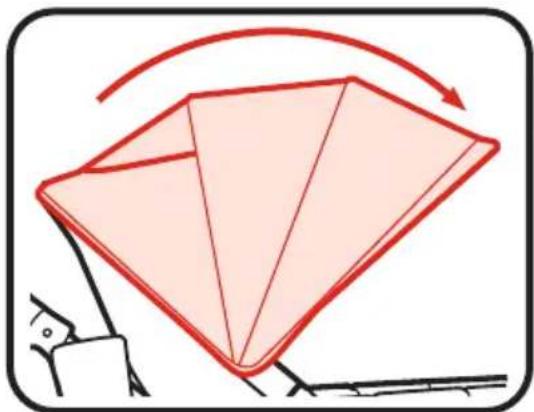
natural_image
Illustration of a folded paper or envelope being folded with red arrows indicating rotation (no text or symbols)- Pull forward to open canopy.
- Tirer vers l'avant pour ouvrir le baldaquin.
- Tire hacia adelante para abrir la capota.

natural_image
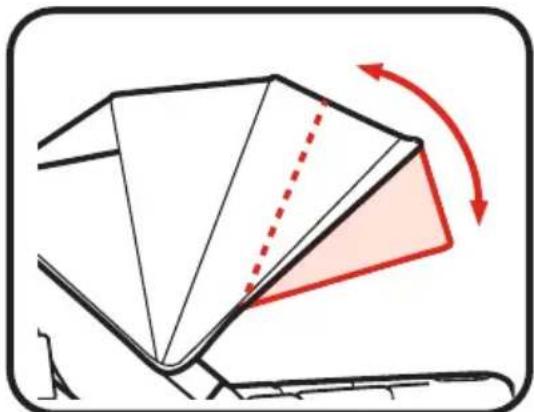
Diagram showing a red arrow indicating clockwise motion around a mechanical component (no text or symbols)- Push backwards to close canopy.
- Pousser vers l'arrière pour fermer le baldaquin.
- Empuje hacia atrás para cerrar la capota.
natural_image
Diagram of a folded paper or envelope with red arrows indicating rotation, no text or symbols present- To open or close canopy visor.
- Pour ouvrir et fermer la visière du baldaquin.
- Para abrir o cerrar la visera de la capota.
natural_image
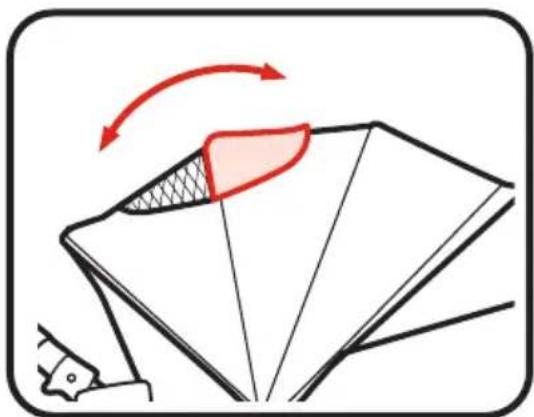
Diagram of folding a folding fan with red arrows indicating rotation (no text or symbols)- Pull flap forward to open and backward to close canopy window.
- Tirer le rabat vers l'avant pour ouvrir et vers l'arrière pour fermer la fenêtre du baldaquin.
- Tire la aleta hacia adelante para abrirla y hacia atrás para cerrar la ventana de la capota.
4-D • To Secure Child
Falling Hazard: Always use the seat belt.

MISE EN GARDE
text_image
Diagram illustrating a lock mechanism with red arrows indicating clockwise motion and directional arrows for movement or positioning.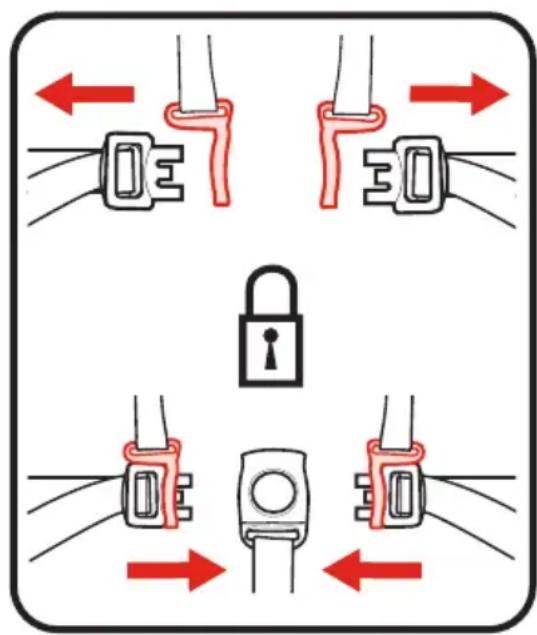
text_image
Diagram illustrating four types of car seatbelt buckle mechanisms with red directional arrows indicating movement or force.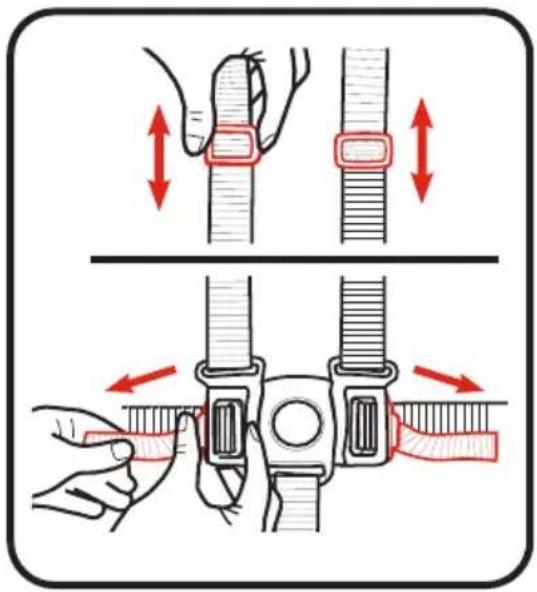
text_image
Diagram illustrating how to adjust a belt buckle, showing step-by-step assembly with red arrows indicating movement.- Use slide adjuster at shoulder and waist for tighter adjustment. To change shoulder harness slots, see page 34.
- Utiliser le dispositif de réglage coulissant à l'épaule et à la taille pour un ajustement plus précis. Pour changer les fentes des sangles du harnais, consulter les pages 34.
- Use el ajustador deslizable en el hombro y la cintura para lograr un calce más apretado. Para cambiar las ranuras del arnés del hombro, consulte las página 34.
• 3 Point Buckle
- Boucle à 3 point
- Hebilla de 3 puntos
text_image
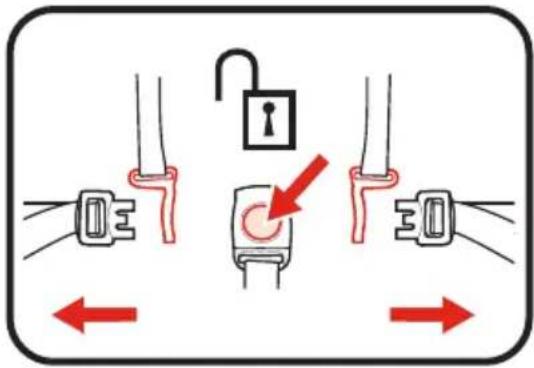
Diagram illustrating correct and incorrect ways to switch a lock, with red arrows indicating direction of movement.- To open, press button on buckle to release the waist straps.
- Pour ouvrir, appuyer sur le bouton de la boucle pour libérer les courroies abdominales.
- Para abrirlo, oprima el botón de la hebilla para liberar las correas de la cintura.
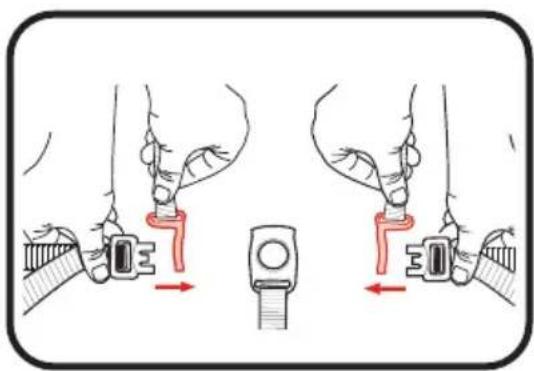
- Slide shoulder strap connectors off of waist straps.
- Faire glisser les connecteurs de courroies d'épaule pour les détacher des courroies abdominales.
- Deslice los conectores de la correa para los hombros de las correas para la cintura.
text_image
Diagram illustrating two mechanical assembly steps with red arrows indicating movement or force directions.- Remove shoulder straps from stroller.
- Retirer les courroies d'épaule de la poussette.
- Saque las correas del hombro del cochecito.
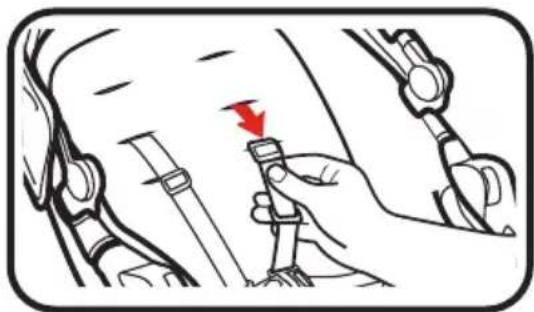
- Attach waist straps to harness buckle as shown.
- Fixer les courroies abdominales à la boucle du harnais, tel qu'illustré.
- Sujete las correas para la cintura a la hebilla del arnés como se indica.
- Use slide adjuster at waist for tighter adjustment.
- Utiliser les boucles de réglage à la taille pour un ajustement plus précis.
- Use el ajustador deslizable de la cintura para ajustarlo más apretadamente.
- To open, press button on buckle to release the waist straps.
- Pour ouvrir, appuyer sur le bouton de la boucle pour libérer les courroies abdominales.
- Para abrirlo, oprima el botón de la hebilla para liberar las correas de la cintura.
natural_image
Illustration of a robotic arm joint with a red arrow indicating force or movement (no text or symbols present)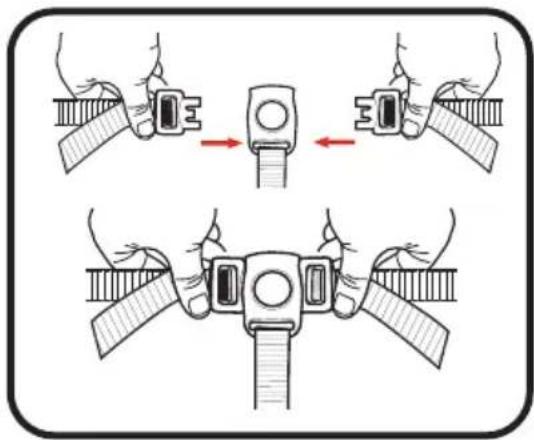
text_image
Diagram illustrating how to adjust a belt buckle, showing step-by-step assembly with arrows indicating motion.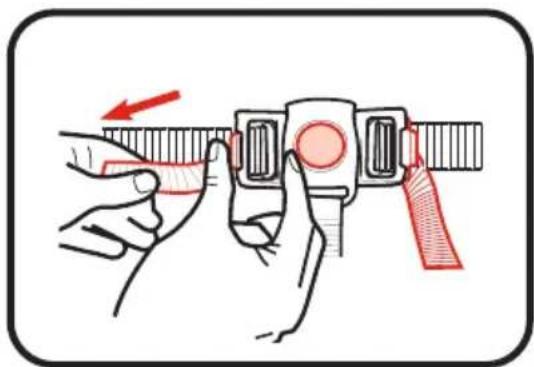
natural_image
Illustration of hands adjusting a wristwatch with a red-handled clip (no text or symbols)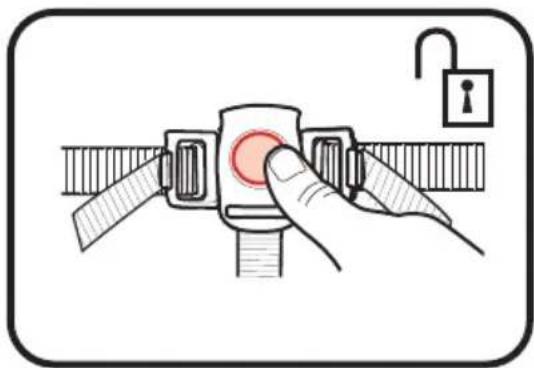
natural_image
Illustration of a hand adjusting a seatbelt with an open lock and red circular button (no text or symbols)natural_image
Illustration of a hand adjusting a car seatbelt with a red arrow pointing to the seatbelt (no text or symbols present)Push harness anchor through the front of the seat then re-insert through desired slots at the same height level. Use slide adjuster for further adjustment.
4-E • To Recline Seat
When making adjustments to the stroller seat, make sure child's head, arms, and legs are clear of moving seat parts and stroller frame.

MISE EN GARDE
text_image
Medical illustration showing a hand using a tool to lift a car seatbelt, with red arrows indicating the step and direction of the belt.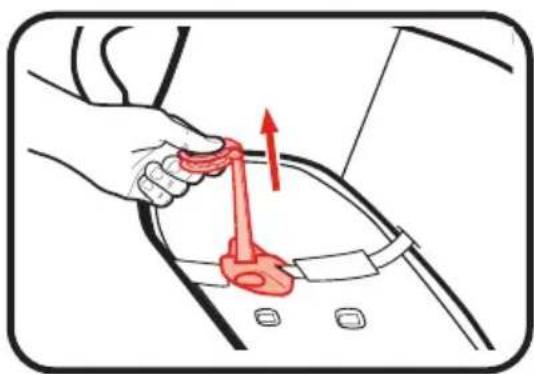
natural_image
Illustration of a hand holding a red object with an upward arrow, next to a car body (no text or symbols)4-F·Brakes
• Freins
•Frenos

WARNING
CHECK that brakes are on by trying to push stroller.

MISE EN GARDE
text_image
Diagram showing a bicycle steering wheel with red arrows indicating the mechanism, highlighting a key symbol.text_image
Diagram showing a stroller with red arrows indicating left-hand rule and a lock icon, likely illustrating vehicle safety or security instructions.- Lift up on both brakes to unlock.
- Relever les deux freins pour les déverrouiller.
- Tire de ambos frenos hacia arriba para destrabarlos.
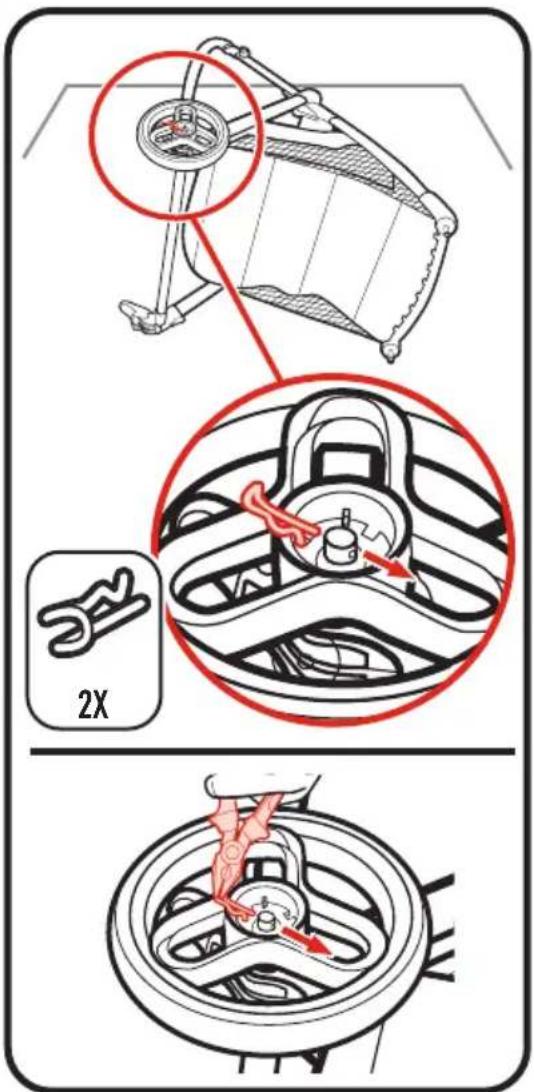
4-G • Removing Front Wheels
- Retrait des roulettes avant • Para retirar las ruedas delanteras
text_image
Diagram illustrating three stages of a bicycle steering wheel, showing progressive change with red arrows indicating motion direction.4-H To Use Toddler Seat in Infant Pramette Position • Utilisation du siège pour bambin en position de petit landau pour bébé • Para usar el asiento para niño pequeño en la posición de pramette para bebé
WARNING
- Child may slip into leg openings and strangle.
- NEVER use in full recline position unless footrest is in the infant pramette position.
- NEVER use any head support in the reclined infant pramette position.
- ONLY USE infant pramette on the stroller and do not remove, reverse, or carry the infant pramette while child is in it.
• DO NOT adjust with child in seat. - ALWAYS release the webbing strap buckle to lower the foot end of the toddler seat before placing child in the infant pramette.
- FALL HAZARD: To help prevent falls, do not use this product in infant pramette mode when the infant begins to push up on hands and knees or weighs over 15 lbs (6.8 kg), whichever comes first.
- NEVER PLACE child in the toddler seat or infant pramette mode with head toward footrest.
See warnings for additional information.
MISE EN GARDE
text_image
Diagram illustrating a car seatbelting technique with magnified detail showing force application and adjustment of the seatbelt.
text_image
CLICK! CLIC! iCLIC!- Pull infant pramette handle, then raise toddler seat. Release infant pramette handle to lock in place.
DONOTadjust with child in seat.
text_image
Diagram showing hand positioning of a stroller with magnified detail, highlighting the handle and grip mechanism.- From the bottom of the seat, disconnect buckle on the foot end.
ALWAYS release the webbing strap buckle to lower the foot end of the toddler seat before placing child in the infant pramette.
natural_image
Illustration of a stroller with two buckets and wheels, showing seat loading direction (no text or symbols)natural_image
Line drawing of a baby stroller with a box and two wheels, accompanied by an open padlock icon (no text or symbols)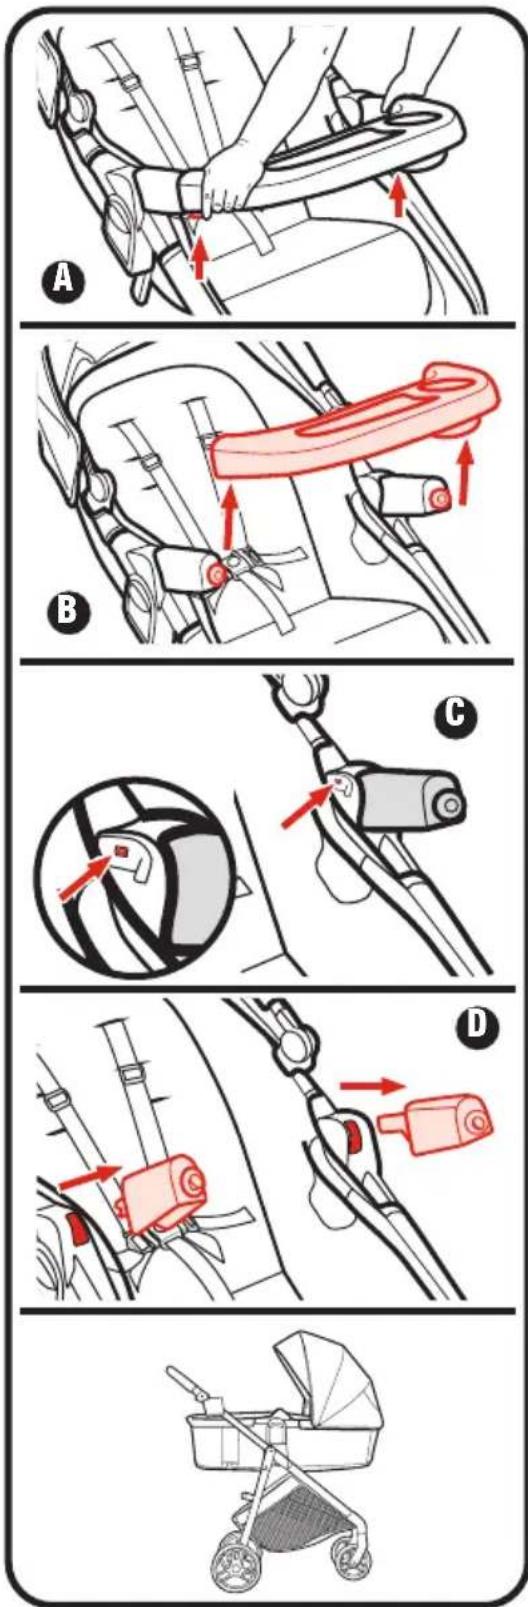
natural_image
Line drawing of a baby stroller with wheels and canopy (no text or symbols)- If desired, you can remove child's tray and armrest by:
A Pressing buttons on bottom of both ends of child's tray
B Lift child's tray off of armrests.
C Press button on inside of armrests
D Remove armrest, repeat on other armrest.
4-I • To Attach Graco® Infant Car Seat to Toddler Seat
For models that do not come with an infant car seat one may be purchased separately.

WARNING
Use only a GRACO® SnugRide® Click Connect™ car seat with this stroller. This stroller is only compatible with Graco® SnugRide® infant car seats with Click Connect™. Only use with Graco® infant car seats that have the Click Connect™ logo. Improper use of this stroller with other manufacturers' car seats may result in serious injury or death. Read the manual provided with your Graco car seat before using it with your stroller.

text_image
click CONNECTSticker varies by model
- Always secure your child with the car seat harness when using the car seat in the stroller. If your child is already in the car seat, check that the child is secured with the harness.
- NEVER ATTACH infant car seat in the toddler seat without the child's tray and side armrests attached.
text_image
Diagram showing two scenarios of a stroller with a diagonal line crossing and a prohibition symbol crossed out.text_image
Diagram illustrating mechanical assembly with red arrows indicating motion and a magnified view of a joint or component.
natural_image
Line drawing of a car seat with red arrows indicating directional movement or force points (no text or symbols)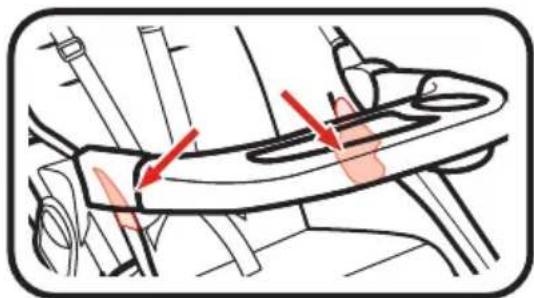
natural_image
Technical diagram of a mechanical component with red arrows indicating features (no text or symbols present)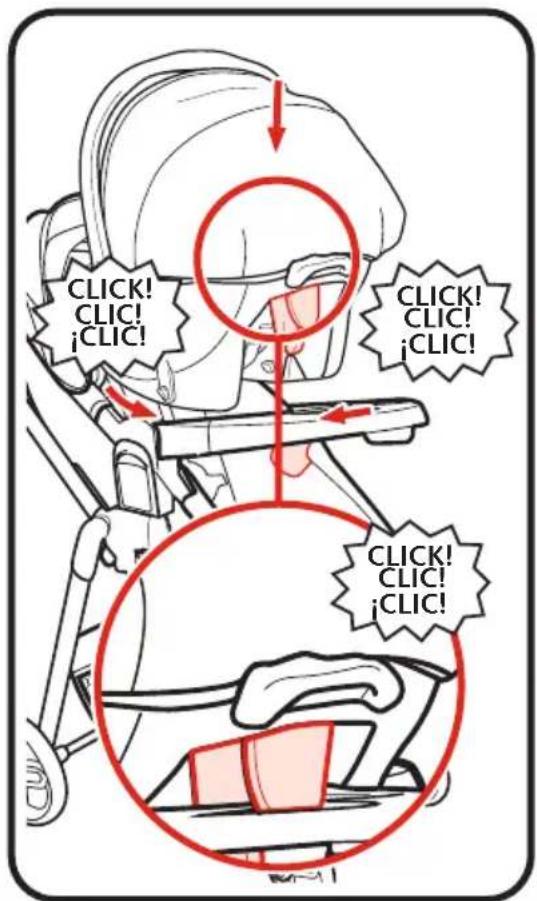
natural_image
Illustration of a person wearing a car seatbelt with a red arrow indicating upward motion (no text or symbols)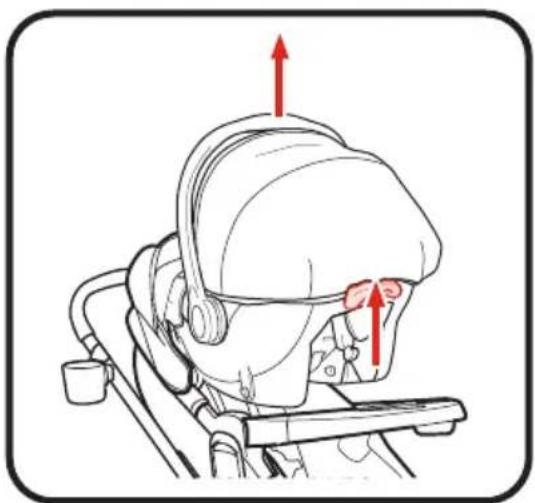
natural_image
Illustration of a person wearing a helmet and holding a device, with red arrows indicating upward motion (no text or symbols)-
Insert car seat into stroller and push down on car seat until the latches snap into the Click Connect™ mounts and the child's tray.
-
Insérer le siège d'auto dans la poussette en appuyant dessus jusqu'à ce que les loquets s'enclenchent sur les supports Click Connect™ et le plateau.
-
Inserte el asiento de automóvil en el cochecito y empuje el asiento de automóvil hacia abajo hasta que se trabe en los montantes Click Connect™ y la bandeja.
-
CHECK that infant car seat is securely attached by pulling up on it.
-
VÉRIFIER si le siège de bébé est bien attaché en tirant vers le haut.
-
VERIFIQUE QUE el asiento de automóvil para bebé esté apretadamente sujetado tirando hacia arriba de la misma.
-
To remove car seat, squeeze release handle at back of car seat, then lift car seat out of the stroller.
-
Pour retirer le siège d'auto, appuyer sur la poignée de déverrouillage à l'arrière du siège d'auto, puis soulevez le siège d'auto hors de la poussette.
-
Para sacar el asiento de automóvil, apriete la manija de liberación de atrás del asiento de automóvil, luego levante el asiento de automóvil fuera del cochecito.
4-J • To Attach Graco® Infant Car Seat to Stroller Frame
- Pour attacher le siège-auto pour bébé Graco ® au cadre de la poussette
-
Para sujetar el asiento de automóvil para bebé Graco® al armazón del cochecito
-
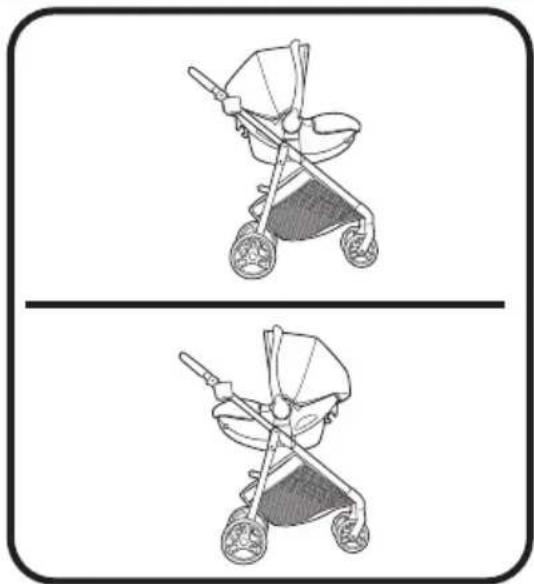
NOTE: Infant car seat can be inserted in stroller frame rear or forward facing.
- REMARQUE : Le siège d'auto pour bébé peut s'insérer dans le cadre de la poussette en position orientée vers l'avant ou l'arrière.
-
NOTA: El asiento de automóvil para bebé se puede poner en el armazón del cochecito orientado hacia atrás o hacia adelante.
-
DO NOT INSTALL the SnugRide® 35 Platinum featuring TrueShield Technology forward-facing. Only install the car seat facing the back of the stroller.
- NE PAS INSTALLER le SnugRide® 35 Platinum avec technologie TrueShield en position orientée vers l'avant. Installer le siège d'auto pour enfant uniquement en position orientée vers l'arrière de la poussett.
- NO INSTALE el SnugRide® 35 Platinum con tecnología TrueShield orientado hacia adelante. Solo instale el asiento de automóvil orientado hacia la parte trasera del cochecito.
natural_image
Two line drawings of a baby stroller with wheels, shown from top and side views (no text or symbols)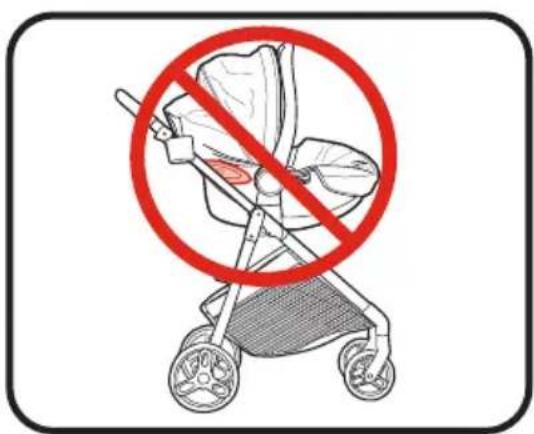
text_image
Safety warning sign for a stroller with no pictogram, indicating no need for use or absence of usage.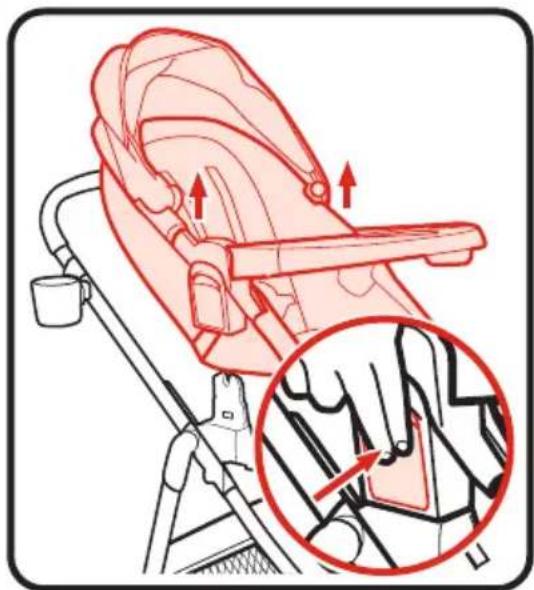
text_image
Diagram illustrating the use of a baby seatbelt with a magnified inset showing hand positioning and adjustment mechanism.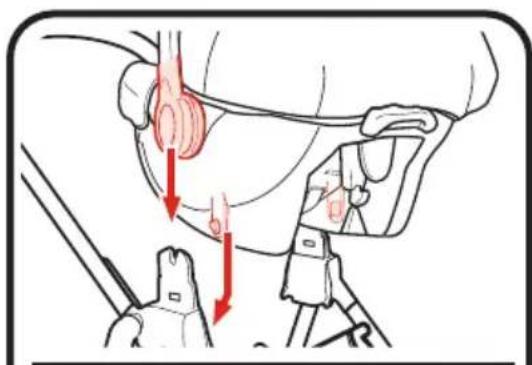
text_image
Medical illustration showing surgical procedure with red arrows indicating movement or force direction, likely from a laparoscopic procedure.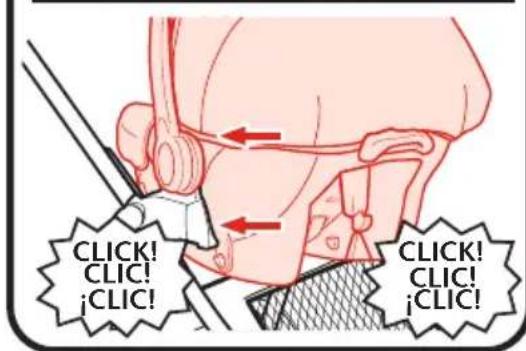
natural_image
Illustration of a person performing a medical or surgical procedure on head (no text or symbols present)-
Squeeze buttons on both sides of the seat and pull up as shown.
-
Comprimer les boutons situés des deux côtés du siège et soulever, tel qu'illustré.
-
Apriete los botones de ambos costados del asiento y tire hacia arriba como se indica.
-
Insert car seat into stroller and push down on car seat until the latches snap into the Click Connect™ mounts.
-
Insérer le siège d'auto dans la poussette en appuyant dessus jusqu'à ce que les loquets s'enclenchent sur les supports Click Connect™.
-
Inserte el asiento de automóvil en el cochecito y empuje el asiento de automóvil hacia abajo hasta que las trabas se encajen en los montantes Click Connect™.
-
CHECK that infant car seat is securely attached by pulling up on it.
-
VÉRIFIER si le siège de bébé est bien attaché en tirant vers le haut.
-
VERIFIQUEQUE el asiento de automóvil para bebé esté apretadamente sujetado tirando hacia arriba de la misma.
-
To remove car seat:
A. Squeeze release handle at back of car seat.
B. Lift car seat out of the stroller.
4-K • To Fold Stroller with Toddler Seat
text_image
Diagram illustrating a mechanical device with red arrows indicating rotation and a magnified inset showing the internal structure.text_image
Diagram showing a bicycle steering wheel with red arrows indicating force or movement, and an open padlock icon highlighting the lock.- Before folding, remove car seat if installed, and lock brakes.
- Avant de replier la poussette, retirer le siège d'auto pour enfant, le cas échéant, et verrouiller les freins.
- Antes de plegar el cochito, saque el asiento de automóvil si está instalado, y fije los frenos.

natural_image
Illustration of a robotic arm with a red-handled lever and curved motion arrow (no text or symbols)- Close the canopy when folding the stroller.
- Fermer le baldaquin pour replier la poussette.
-
Cierre la capota al plegar el cochecito.
-
To fold the stroller, pull both fold triggers up.
- Pour replier la poussette, tirer les deux leviers de pliage vers le haut.
-
Para plegar el cochecito, empuje ambos gatillos de pliegue hacia arriba.
-
Push handle down.
- Pousser la poignée vers le bas.
- Empuje la manija hacia abajo.
- Storage latch will engage and stroller will rest on the rear wheels and front wheels.
- Le loquet de rangement s'enclenchera et la poussette reposera sur les roulettes arrière et roulettes avant.
- La traba de almacenamiento se activará y el cochecito se apoyará en las ruedas traseras y ruedas delanteras.
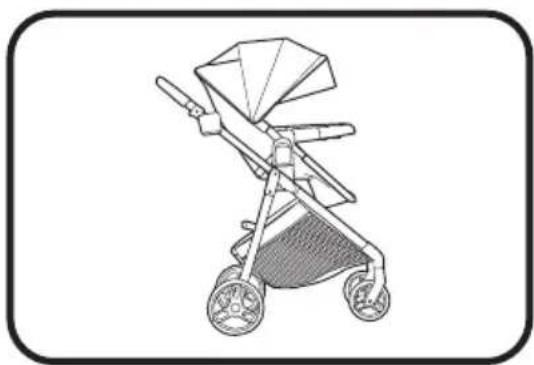
NOTE: Fold the stroller ONLY when toddler seat is in the upright forward facing position.
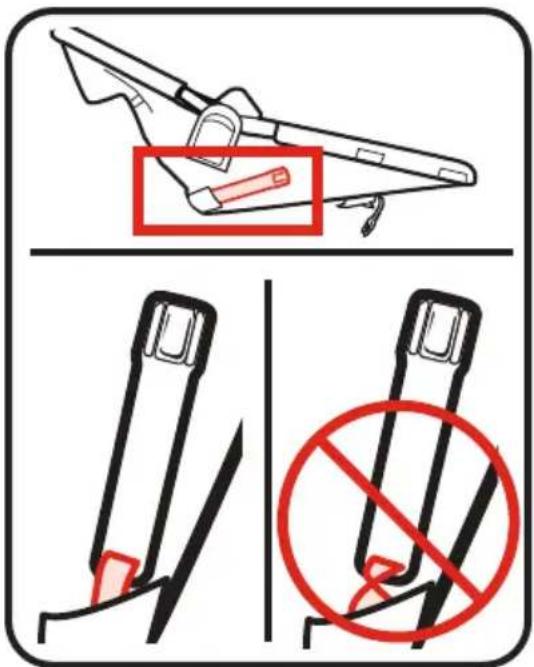
text_image
Diagram illustrating two steps of a lock operation: adding a mug to a lock and adjusting the lock mechanism.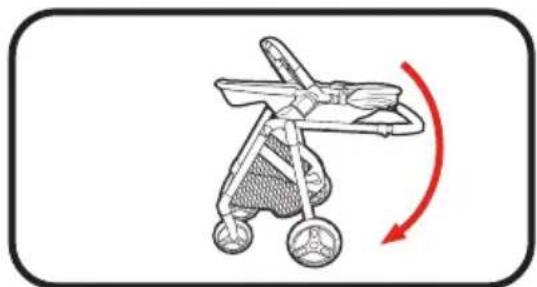
natural_image
Illustration of a baby stroller with a red curved arrow indicating rotation (no text or symbols)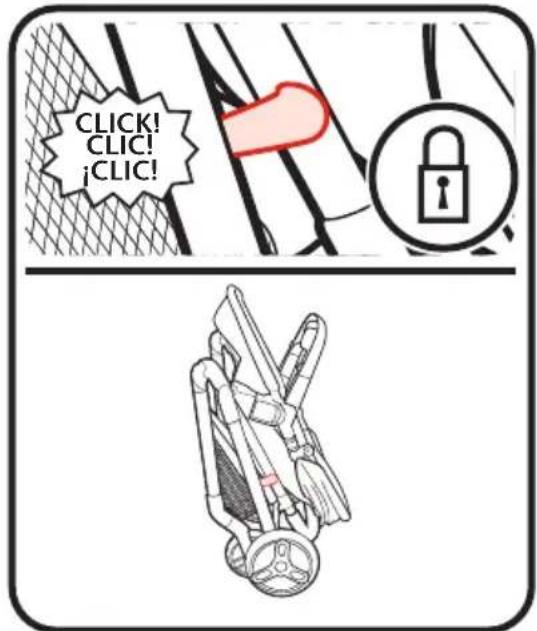
natural_image
Line drawing of a stroller with four wheels and handlebars (no text or symbols)4-L • To Fold Stroller without Toddler Seat
natural_image
Illustration of a baby in a stroller with a red arrow indicating upward motion (no text or symbols)
text_image
Diagram illustrating hand positioning and foot movement in a baby seat, with labeled parts and magnified detail view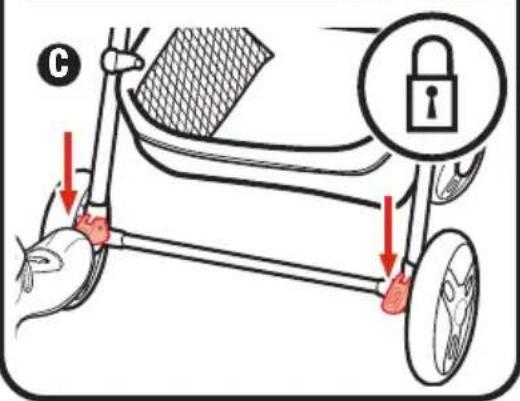
text_image
Diagram illustrating a bicycle steering mechanism with labeled parts and lock icon- Before folding stroller:
A. Remove infant car seat if in use.
B. Remove toddler seat if in use.
C. Lock brake.
text_image
Diagram illustrating two steps of a lock operation: adding a mug to a lock and opening a lock, with a lock icon indicating lock status.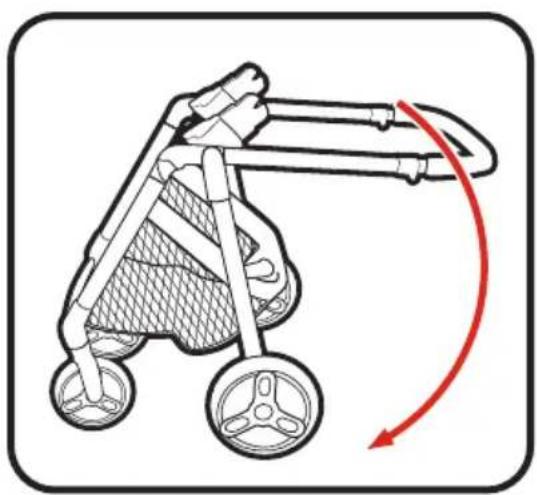
natural_image
Illustration of a stroller with wheels and a red curved arrow indicating motion (no text or symbols)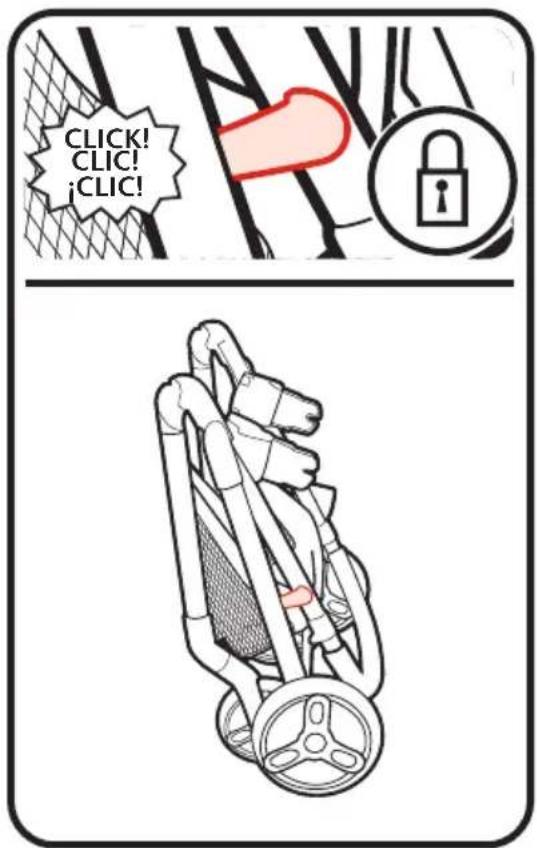
To purchase parts or accessories or for warranty information in the
United States, please contact us at the following:
To purchase parts or accessories or for warranty information in
Canada, please contact us at the following:
5-C • Product Registration (USA)
To register your Graco product from within the U.S.A. visit us online at www.gracobaby.com/productregistration or return registration card provided with your product. We currently do not accept product registrations from those living outside the United States of America.