PCFT 3094 - Thermometer ProfiCare - Free user manual and instructions
Find the device manual for free PCFT 3094 ProfiCare in PDF.

User questions about PCFT 3094 ProfiCare
0 question about this device. Answer the ones you know or ask your own.
Ask a new question about this device
Download the instructions for your Thermometer in PDF format for free! Find your manual PCFT 3094 - ProfiCare and take your electronic device back in hand. On this page are published all the documents necessary for the use of your device. PCFT 3094 by ProfiCare.
USER MANUAL PCFT 3094 ProfiCare
text_image
36.5°C B/O R/WKontaktloses Stirnthermometer PC-FT 3094
Contactloze voorhoofdthermometer • Thermomètre frontal sans contact Termómetro para frente sin contacto • Termometro da fronte senza contatto Contactless Forehead Thermometer • Bezdotykowy termometr czołowy Érintés nélküli homlokhómérő • Бесконтактный налобный термометр
C€0197
natural_image
Technical line drawing of a mechanical component with no visible text or symbolsWenzhou Yosun Medical Technology Co., Ltd.
Adresse: No. 17, Shahong Road. Lingmen, Beibaixiang Town. Yueqing, Wenzhou, 325603 Zhejiang, China
14
natural_image
Technical line drawing of a mechanical component with no visible text or symbolsWenzhou Yosun Medical Technology Co., Ltd.
Adresse: No. 17, Shahong Road. Lingmen,
Beibaixiang Town. Yueqing, Wenzhou, 325603
Zhejiang, China
natural_image
Technical line drawing of a mechanical component with no visible text or symbolsChamp de vision : ......D/S = Approx. 5:1 ratio (D = distance; S = point ou cible)
Wenzhou Yosun Medical Technology Co., Ltd.
Adresse : No. 17, Shahong Road. Lingmen, Beibaixiang Town. Yueqing, Wenzhou, 325603 Zhejiang, Chine
natural_image
Technical line drawing of a mechanical component with no visible text or symbolsUso del aparato
Wenzhou Yosun Medical Technology Co., Ltd.
Beibaixiang Town. Yueqing, Wenzhou, 325603
Zhejiang, China
natural_image
Technical line drawing of a mechanical component with no visible text or symbolsWenzhou Yosun Medical Technology Co., Ltd.
Indirizzo: No. 17, Shahong Road. Lingmen,
Beibaixiang Town. Yueqing, Wenzhou, 325603
Zhejiang, Cina
Thank you for choosing our product. We hope you will enjoy using the device.
Contents
Thermometer Description ....3
Display Description 4
Introduction 65
Considerations and Warnings ....65
Measurement Notes 66
Storage and Maintenance 66
Thermometer Description 66
Display Description (Page 4)....66
Battery Installation Direction 67
Operation Instructions ....67
Temperature Mode Settings 67
Body Temperature Measurements ....68
Object Temperature Measurements 69
Data Memory....70
Battery Replacement 70
IR Measurement Notes 70
Signs and Symbols ....71
Specifications....72
Guidance and Manufactures Declaration – Electromagnetic Emissions ......73
Guidance and Manufactures Declaration – Electromagnetic Immunity .....73
Recommended Minimum Separation Distances ....74
Introduction
This thermometer is intended for scanning groups of individuals or monitoring an individual for elevated temperatures. Always use a clinical thermometer when high accuracy body temperature measurements are required.
Considerations and Warnings

- Read all instructions before using the product.
-
For the most accurate results, make reading with an ambient (room) temperature of 10 °C to 40 °C (50 °F to 104 °F).
-
Make sure the skin is dry and that no hair interferes with the measurement.
- Do not immerse the thermometer in water.
- Avoid touching and / or scratching the infrared sensor lens.
- Always use a clinical thermometer to verify any abnormal temperature measurements.
- Clean the lens area by gently blowing with compressed air and use a damp cotton bud to wipe the lens. Do not use any solvents to clean the lens.
Measurement Notes
- If the thermometer has been stored in a cold or hot environment, allow it at least 30 minutes to acclimate to room temperature before making measurements.
• To prevent transmissions of disease, avoid direct contact with the skin. - After heavy exercise always wait at least 10 minutes before taking forehead temperature readings.
Storage and Maintenance
- Clean the sensor tip after each use. Use a clean cloth or cotton bud that can be moistened with disinfectant, alcohol or warm water.
- To clean the entire device, please use a soft cloth slightly moistened with a mild soapy solution.
- Do not use any harsh cleaning products.
- If prolonged storage is intended, you should remove the battery.
- The device must not be stored or used at an excessively high or low temperature or humidity (see technical data), in sunlight, in association with an electrical current or in dusty locations. Otherwise inaccuracies can occur.
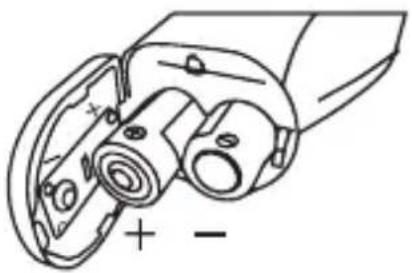
Thermometer Description
(Page 3)
| 1 | LCD display |
| 2 | IR sensor |
| 3 | “” (sound off / on) & “+” button |
| 4 | Measurement trigger |
| 5 | Handle |
| 6 | Battery compartment |
| 7 | “ Memory / Mode ” setting button |
| 8 | “ B / O ” (Body / Object) & ” button |
Display Description (Page 4)
| 9 | Memory / Memory space number |
| 10 | Low battery icon |
| 11 | Sound status |
| 12 | Measurement unit |
| 13 | Body temperature mode |
| 14 | Object temperature mode |
| 15 | Temperature |
66
Battery Installation Direction
natural_image
Technical line drawing of a mechanical component with no visible text or symbolsOperation Instructions
Temperature Mode Settings
- With the device switched on, press the "Memory/Mode" button for three seconds until to "F - 1" is shown to enter the long term calibration drift correction mode. On entering the mode, the previous temperature correction factor will appear on the display. To make a correction, measure a known, fixed temperature source. Enter the correction mode and press the + or -button to change the correction value and minimize the difference in readings. Repeat and adjust the correction value as needed until the measurement on the device matches the known temperature.
The mode is applied to Body Temp.
- Press the "Memory/Mode" button a second time "F-2" shown to set the alarm temperature limit. Press the + or - button to change the value. The mode is applied to Body Temp.
- Press the "Memory/Mode" button a third time "F-3" shown to set the °C/°F temperature units. The temperature units °C or °F will be shown. Press the + or - button to change the unit.
- Press the "Memory/Mode" button a forth time "F-4" shown to set the backlit status. Press the +or button to switch from ON to OFF.
- Press the "Memory/Mode" button a fifth time "F-5" shown to set the laser status. Press the +or button to switch from ON to OFF.
Notice: Only when the laser head is installed.
| Mode Function | “+” | “-” Default Remark | |||
| F-1 | Setting deviation value | Increase 0.1 °C | Decrease 0.1 °C | 0 °C | Body mode availableEffective Range: ±2 °C |
| F-2 | Setting alarm value | Increase 0.1 °C | Decrease 0.1 °C | 38.0 °C | Body mode availableEffective Range:37.0 ~ 42.5 °C |
| F-3 | Setting measurement unit | °F °C | °C | ||
| F-4 | Backlit ON / OFF On Off On | ||||
| F-5 | Laser setting On Off Off | Only when the laser head installed | |||
| Save S | Save and automatic shut off | ||||
Body Temperature Measurements
Please note that the forehead / temples must be free from sweat and cosmetics and that taking vasoconstrictive medication and skin irritations can distort the result when measuring temperature on the forehead.
- Press the trigger to switch the thermometer on with one beeper. The device performs a brief self test: all elements of the display are shown for approx. 1 second. Following a successful self test with backlit (Red - Orange - Green).
- Press the "B/O" button for "Body temp" for accurate measurements in the range of 32.0 °C to 42.9 °C (89.6 °F to 109.2 °F).
- Hold the device by its handle and point it toward the spot to be measured. Measurement distance should be < 2.5 cm (< 1 in).
- Press the trigger to take a temperature reading. The temperature reading appears in the display.
If the F - 4 mode of backlit is activated & with the "B2/10" button the sound is set to ON & F - 3 mode set alarm temperature is 38.0 °C:
| Temperature (°C) | Temperature (°F) | Fever Teller | Beep |
| T<32.0 | T<89.6 | Green | Three beeps |
| 32.0≤T≤37.5 | 89.6≤T≤99.5 | Green | One beep |
| 37.6≤T≤37.9 | 99.7≤T≤100.2 | Orange | One beep |
| 38.0≤T≤42.9 | 100.4≤T≤109.2 | Red | Ten rapid beeps |
| T>42.9 | T>109.2 | Three beeps |
Notice: Red Backlit is followed alarm temperature limit (fever alarm).
- Release the trigger and the reading will hold for approximately 15 seconds after which the thermometer will automatically shut off.
Note: Before shutting off, you can take further measurement.
68
- If the temperature goes above 42.9 °C (109.2 °F), “H” (high) will appear in the display. If the temperature goes below 32.0 °C (89.6 °F), “Lo” (low) will appear in the display.

Notice:
When the surrounding temperature is lower than 10.0 °C (50 °F) or higher than 40.0 °C (104 °F), it's not allowed to measure as accuracy in not assured.
Object Temperature Measurements
- Press the trigger to switch the thermometer on with one beeper. The device performs a brief self test: all elements of the display are shown for approx. 1 second. Following a successful self test with backlit (Red - Orange - Green).
- Press the "B/O" button for "Object temp" for accurate measurements in the range of 0.0 °C to 100.0 °C (32.0 °F to 212.0 °F).
- Hold the device by its handle and point it toward the surface to be measured.
- Press the trigger to take a temperature reading. The temperature reading appears in the display.
- Release the trigger and the reading will hold for approximately 15 seconds after which the thermometer will automatically shut off.
Note: Before shutting off, you can take further measurements. - If the temperature goes above 100 °C (212 °F), “H” (high) will appear in the display. If the temperature goes below 0 °C (32 °F), “Lo” (low) will appear in the display.

Notice:
- The value under this mode is object temperature instead of core temperature.
- The defaulted infrared from the real temperature according to different emissivity. For example, the reading on stainless steel will be obviously lower than the actual temperature. Not all surfaces can be measured correctly due to the material (e.g. transparent material, dirty or reflective surfaces). Deviations may also occur when measuring liquids. Be careful to avoid burns / scalds. BE CAUTIONS FOR SCALDING!
Data Memory
- To review the logged data points, press the "Memory/Mode" button for one second while the device is switched on until the "M" symbol shown on the display. Use the +or button to scroll through the stored measurements and memory locations.
To delete all memory data, simply remove the batteries while the device is switched on.
Notice:
If the "Body temp" mode is selected with the "B/O" button, the body temperature memories are displayed;
If the "Object temp" mode is selected with the "B/O" button, the object temperature memories are displayed.
Battery Replacement
When the low battery symbol 📄 appears in the display, replace the meter's battery. The battery compartment is located on the bottom of the handle. Press down on the battery compartment lock and at the same time slide the battery compartment downwards. Replace the 2 AA batteries and close the battery compartment cover. You, as the end user, are legally bound (Battery ordinance) to return all used batteries and accumulators; disposal in the household garbage is prohibited! You can hand over your used batteries / accumulators at collection points in your community or wherever batteries / accumulators are sold!

Disposal: Follow the valid legal stipulations in respect of the disposal of the device at the end of its life cycle.
IR Measurement Notes
- Before measuring, be sure to clean surfaces that are covered with frost, oil, grime, etc.
- If an object's surface is highly reflective, apply masking tape or flat black paint to the surface before measuring. Allow time for the paint or tape to adjust to the temperature of the surface it is covering.
• Measurements through transparent surfaces such as glass may not be accurate. - Steam, dust, smoke, etc. can obscure measurements.
- The device automatically compensates for deviations in ambient temperature. However, it can take up to 30 minutes for the device to adjust to extremely wide changes.
Signs and Symbols
The following symbols appear in these instructions for use and on the device:
text_image
Symbol for "THE OPERATION GUIDE MUST BE READ" (The sign background colour: blue. The sign graphical symbol: white.) Symbol for "CAUTION" Symbol for "APPLICATION PART, TYPE BF" Symbol for "ENVIRONMENT PROTECTION" Do not dispose of the device with household waste at the end of its service life. Bring it to an official collection point for recycling. By doing so, you help protect the environment. Symbol for "KEEP DRY" Symbol for "MANUFACTURER" LOT Symbol for "LOT NUMBER" Symbol for "DATE OF MANUFACTURE"EC REP Symbol for "EUROPEAN REPRESENTATIVE"
REF Symbol for „MANUFACTURER IDENTIFICATION“
CE0197 The CE marking indicates the conformity with the essential requirements of Medical Device directive 93 / 42 / EEC.
Specifications
| Range Accuracy | ||
| Body Temp | 35.0 to 42.0 °C (95.0 to 107.6 °F)=± 0.2 | °C / ± 0.4 °F |
| In the remaining measurement range ±0.3 | °C/±0.5°F | |
| Object Temp 0 to 1 | 00.0 °C (32.0 to 212.0 °F)=± 1.0 °C / ± 1.8 | °F |
Model: PC-FT 3094 (YI-400)
Body Temp range: 32.0 to 42.9°C (89.6 to 109.2°F)
Surface Temp range: 0 to 100.0 °C (32.0 to 212.0 °F)
Emissivity: 0.95 fixed
Field of view: ......D/S = Approx. 5:1 ratio (D = distance; S = spot or target)
IR Spectral response: 8 to 14 μm (wavelength)
Display:......Backlit LCD display with function indicators
Response time: 500 ms
Over range indication:....„H,“ or „Lö
Operating Temperature/Humidity: 10 to 40°C (50 to 104°F), ≤85% RH
Operating/Storage ATM: 70 kPa \~ 106kPa
Storage Temperature/Humidity: -20 to 55 °C (-4 to 131 °F), ≤93 % RH
Power supply: 2 AA Batteries
Automatic Power Off: 15 seconds (approx.)
Weight: ....approx. 144g

YI-400

0197
In the event of queries, contact:
European Representation:
Lotus NL B.V.
Address: Koningin Julianaplein 10, le Verd, 2595AA,
The Hague, Netherlands
Importer:
CTC
Clatronic International GmbH
Industriering Ost 40
47906 Kempen / Germany
72
Manufacturer:

Wenzhou Yosun Medical Technology Co., Ltd.
Address: No. 17, Shahong Road. Lingmen,
Beibaixiang Town. Yueqing, Wenzhou, 325603
Zhejiang, China
Guidance and Manufactures Declaration – Electromagnetic Emissions
The infrared forehead thermometer is suitable for use in the specified electromagnetic environment(s) and it has meets the following standards emission requirements.
| Phenomenon | Profession healthcare facility environment | Home healthcare environment |
| Radiated RF emissions | CISPR 11, Group 1, Class B | CISPR 11, Group 1, Class B |
Guidance and Manufactures Declaration – Electromagnetic Immunity
The infrared forehead thermometer is suitable for use in the specified electromagnetic environment(s) and it has meets the following immunity test levels. Higher immunity levels may cause the Infrared forehead thermometer' essential performance lost or degraded.
| Phenomenon | Basic EMC standard or test method | Professional healthcare facility environment | Home healthcare facility environment |
| Electrostatic discharge | IEC 61000-4-2 | +/- 8 kV contact+/- 2 kV, +/- 4 kV, +/- 8 kV, +/- 15 kV air | |
| Radiated RF EM fields | IEC 61000-4-3 | 3 V/m80 MHz - 2.7 GHz80 %AM at 1 kHz or 2 Hz | 10 V/m80 MHz - 2.7 GHz80 %AM at 1 kHz or 2 Hz |
| Proximity fields from RF wireless communications equipment | IEC 61000-4-3 | See the RF wireless communication equipment table in “Recommended minimum separation distances”. | |
| Rated power frequency magnetic fields | IEC 61000-4-8 | 30 A/m; 50 Hz or 60 Hz | |
Recommended Minimum Separation Distances
Nowadays, many RF wireless equipments have been used in various healthcare locations where medical equipment and / or systems are used. When they are used in close proximity to medical equipment and / or systems, the medical equipment and / or systems' basic safety and essential performance may be affected. Infrared forehead thermometer has been tested with the immunity test level in the below table and meet the related requirements of IEC 60601-1-2:2014. The customer and / or user should help keep a minimum distance between RF wireless communications equipment and Infrared forehead thermometer as recommended below.
| Test frequency (MHz) | Band (MHz) | Service Modulation | Maximum power (W) | Distance (m) | Immunity test level (V/m) | |
| 385 | 380 - 390 | TETRA 400 | Pulse modulation 18 Hz | 1.8 0.3 27 | ||
| 450 | 430 - 470 | GMRS 460 FRS 460 | FM ±5 kHz deviation 1 kHz sine | 2 | 0 | . |
| 710 | 704 - 787 | LTE Band 13, 17 | Pulse modulation 217 Hz | 0.2 0.3 9 | ||
| 745 | ||||||
| 780 | ||||||
| 810 | 800 - 960 | GSM 800 / 900, TETRA 800, iDEN 820, CDMA 850, LTE Band 5 | Pulse modulation 18 Hz | 2 | 0 | . |
| 870 | ||||||
| 930 | ||||||
| 1720 | 1700 - 1990 | Bluetooth, WLAN, 802.11 b/g/n, RFID 2450, LTE Band 7 | Pulse modulation 217 Hz | 2 | 0 | . |
| 1845 | ||||||
| 1970 | ||||||
| 2450 | 2400 - 2570 | Bluetooth, WLAN, 802.11 b/g/n, RFID 2450, LTE Band 7 | Pulse modulation 217 Hz | 2 | 0 | . |
| 5240 | 5100 - 5800 | WLAN 802.11 a/n | Pulse modulation 217 Hz | 0.2 0.3 95500 | ||
| 5785 | ||||||
3 2
3 2
3 2
GB
Instrukcja obsługi
natural_image
Technical line drawing of a mechanical component with no visible text or symbolsPL
Używanie urządzenia
CTC Clatronic Sp. z o.o
Ul. Brzeska 1
45-960 Opole
Wenzhou Yosun Medical Technology Co., Ltd.
Adres: No. 17, Shahong Road. Lingmen,
Beibaixiang Town. Yueqing, Wenzhou, 325603
Zhejiang, Chiny
natural_image
Technical line drawing of a mechanical component with no visible text or symbolsThe Hague, Hollandia
Importör:
CTC
Clatronic International GmbH
Industriering Ost 40
Wenzhou Yosun Medical Technology Co., Ltd.
Cím: No. 17, Shahong Road. Lingmen,
Beibaixiang Town. Yueqing, Wenzhou, 325603
Zhejiang, Kína
H
natural_image
Technical line drawing of a mechanical component with no visible text or symbolsWenzhou Yosun Medical Technology Co., Ltd.
Адрес: No. 17, Shahong Road. Lingmen, Beibaixiang Town. Yueqing, Wenzhou, 325603 Zhejiang, Китай
Wenzhou Yosun Medical Technology Co., Ltd.
No. 17, Shahong Road. Lingmen: العنوان
Beibaixiang Town. Yueqing, Wenzhou, 325603
الصين, Zhejiang

الشاه : LCD bearing LCD bearing LCD bearing LCD bearing LCD bearing LCD bearing LCD bearing LCD bearing LCD bearing LCD bearing LCD bearing LCD bearing LCD bearing LCD bearing LCD bearing LCD bearing LCD bearing LCD bearing LCD bearing LCD bearing LCD bearing LCD bearing LCD bearing LCD bearing LCD bearing LCD bearing LCD bearing LCD bearing LCD bearing LCD bearing LCD bearing LCD bearing LCD bearing LCD bearing LCD bearing LCD bearing LCD bearing LCD bearing LCD bearing LCD bearing LCD bearing LCD bearing LCD bearing LCD bearing LCD bearing LCD bearing LCD bearing LCD bearing LCD bearing LCD bearing LCD wearing a plastic bag.