
633548 - Air compressor accessories SILVERLINE - Free user manual and instructions
Find the device manual for free 633548 SILVERLINE in PDF.

| Product type | Pneumatic accessory kit for air compressor |
| Brand | Silverline |
| Model | 633548 |
| Kit contents | Spray gun, degreasing/undercoating gun, tire inflator, blow gun, coiled hose |
| Power source | Compressed air (via compressor) |
| Operating pressure | Spray gun: 3.5 bar; Degreasing gun: 3.5 bar; Inflator: 0-4 bar; Blow gun: 2-6 bar |
| Maximum pressure | 8 bar |
| Air consumption | Spray gun: 85-170 l/min; Degreasing gun: 85-170 l/min; Inflator: 170-255 l/min; Blow gun: 85-170 l/min |
| Fluid reservoir capacity | Spray gun: 750 ml; Degreasing gun: 900 ml |
| Fluid flow rate | Spray gun: 110-200 ml/min |
| Nozzle diameter | Spray gun: 1.5 mm; Degreasing gun: 4.5 mm; Blow gun: 2.0 mm |
| Main function | Paint spraying, degreasing, undercoat application, tire inflation, dust blowing |
| Maintenance and cleaning | Clean immediately after use with a suitable product; lubricate if necessary; rinse thoroughly |
| Safety | Wear protective equipment (goggles, mask, gloves, hearing protection); read the manual; do not point at people or animals |
| Spare parts and repairability | Repairs by a qualified technician using genuine Silverline parts; modification voids warranty |
| Warranty | 3 years after online registration within 30 days |
| Standards | Complies with Directive 2006/42/EC; EN 1953:1998+A1:2009; EN 792 |
| Country of origin | China |
Frequently Asked Questions - 633548 SILVERLINE
User questions about 633548 SILVERLINE
0 question about this device. Answer the ones you know or ask your own.
Ask a new question about this device
Download the instructions for your Air compressor accessories in PDF format for free! Find your manual 633548 - SILVERLINE and take your electronic device back in hand. On this page are published all the documents necessary for the use of your device. 633548 by SILVERLINE.
USER MANUAL 633548 SILVERLINE
JISILVERLINEC® RANGE Professor Accessories Kit

Air Tools & Compressor Accessories Kit

natural_image
Collection of spray guns and a coiled hose assembly on a blue dotted background (no text or symbols visible)GB 5pce Air Tools & Compressor Accessories Kit
5 Accessoires outils pneumatiques et compresseurs
Druckluftwerkzeug u. Kompressor-Zubehör, 5-tlg. Satz
ESP Juego de 5 herramientas neumáticas y accesorios
1 Kit di Compressione a 5pz
NL 5-delige perslucht compressor accessoire set
text_image
Labeled diagram of spray gun components with numbered parts for identificationSILVERLINEC® RANGE Acceptor Accessories K
5 PCE
Air Tools & Compressor Accessories Kit
English 4
Français 8
Deutsch 12
Español ...... 16
Italiano 20
Nederlands......24
Description of Symbols
The rating plate on your tool may show symbols. These represent important information about the product or instructions on its use

Wear hearing protection
Wear eye protection
Wear breathing protection
Wear head protection

Wear hand protection

Read instruction manual

Conforms to relevant legislation and safety standards
Specification
| Spray Gun | Degreasing Gun | Tyre Inflator | Blow Gun | Hose | |
| Working Pressure | 55psi (3.5 Bar) | 55psi (3.5 Bar) | 0-60psi (0-4 Bar) | 30-90psi (2-6 Bar) | 120psi (8 Bar) Max Pressure |
| Air Consumption* | 3-6CFM 3-6 | CFM 6-9CFM 3-6 | CFM N/A | ||
| Fluid Capacity 750ml | 900ml N/A | N/A N/A | |||
| Fluid Delivery | 110-200ml/min | - N/A N/A | N/A | ||
| Nozzle 1.5m | 4.5mm N/A | 2.0mm N/A |
*CFM figures based on SCFM figures and approximate figures only
Silverline Tools reserves the right to alter product specifications without notice.
Even when used as prescribed it is not possible to eliminate all residual risk factors. Use with
caution. If you are at all unsure of the correct and safe manner in which to use this product, do not attempt to use it.
As part of our on-going product development, specifications of Silverline products may alter without notice.
Carefully read and understand this manual and any label before use. Even when used as prescribed it is not possible to eliminate all residual risk factors. Use with caution.
Carefully read and understand this manual and any label attached to the tool before use. Keep these instructions with the product for future reference. Ensure all persons who use this product are fully acquainted with this manual.
If you are at all unsure of the correct and safe manner in which to use this tool, do not attempt to use it.
General Safety Warnings
WARNING Read all safety warnings and all instructions. Failure to follow the warnings and instructions may result in electric shock, fire and/or serious injury Save all warnings and instructions for future reference.
Work area safety
- Keep work area clean and well lit. Cluttered or dark areas invite accidents
- Do not operate tools in explosive atmospheres, such as in the presence of flammable liquids, gases or dust
- Keep children and bystanders away while operating a powered tool. Distractions can cause you to lose control
Personal safety
- Stay alert, watch what you are doing and use common sense when operating a powered tool. Do not use a powered tool while you are tired or under the influence of drugs, alcohol or medication. A moment of inattention while operating a powered tool may result in serious personal injury
- Use personal protective equipment. Always wear eye protection. Protective equipment such as dust mask, non-skid safety shoes, hard hat, or hearing protection used for appropriate conditions will reduce personal injuries
- Prevent unintentional starting. Ensure the switch is in the off-position when not operating the tool and make use of other safety features which prevent unintentional starting
- Remove any adjusting key or wrench before turning the powered tool on. A wrench or a key left attached to a rotating part of the tool may result in personal injury
- Do not overreach. Keep proper footing and balance at all times. This enables better control of the tool in unexpected situations
- Dress properly. Do not wear loose clothing or jewelry. Keep your hair, clothing and gloves away from moving parts. Loose clothes, jewelry or long hair can be caught in moving parts
- If devices are provided for the connection of dust extraction and collection facilities, ensure these are connected and properly used. Use of dust collection can reduce dust-related hazards
WARNING: User exposure to tool vibration can result in loss of sense of touch, numbness, tingling and reduced ability to grip. Long term exposure can lead to a chronic condition. If necessary limit the length of time exposed to vibration. Use the figures provided in the specification relating to vibration if provided to calculate the duration and frequency of operating the tool. The 2002/44/EC directive relating to vibration in the workplace may provide useful information even for domestic use of tools. In the first instance of feeling uncomfortable due to vibration STOP using the tool immediately
WARNING: Always wear ear protection where the sound level exceeds 80dB and limit the time of exposure if necessary. If sound levels are uncomfortable even with ear protection stop using the tool immediately and check the ear protection is correctly fitted and provides the right level of sound attenuation for the level of sound produced by your tool
Tool use and care
- Maintain tools. Check for misalignment or binding of moving parts, breakage of parts and any other condition that may affect the tool's operation. If damaged, have the tool repaired before use. Many accidents are caused by poorly maintained tools
- Keep cutting tools sharp and clean. Properly maintained cutting tools with sharp cutting edges are less likely to bind and are easier to control
- Use the tool's accessories and tool bits etc. in accordance with these instructions, taking into account the working conditions and the work to be performed. Use of the tool for operations different from those intended could result in a hazardous situatio
Service
- Have your tool serviced by a qualified repair person using only identical replacement parts. This will ensure that the safety of the tool is maintained
Air Tool Safety
Dangerous environment
- Ensure there is adequate clear space around the work area. Only use spraying tools in a well-ventilated area or a specialist spray booth. Be aware that air hoses can present a trip hazard; always lay hoses in a way that minimises hazards.
Protect your eyes
• Always wear safety goggles or safety glasses.
Protect your hearing
• Always wear ear protection.
Protection from vibration
- Hand-held air tools may produce vibration and should not be used for long periods without a break. Vibration can cause disease. Gloves may help to maintain good blood circulation in the fingers.
Protective clothing
- Always wear appropriate protective equipment including but not limited to overalls, gloves, facemask etc.
- It is the user's responsibility to ensure that other persons in the vicinity of the work area are also equipped with the appropriate protective equipment.
Use the correct air hose
• Use lightweight hose to connect the tool to the air compressor.
- Most air tools should be fitted with a coil hose; only use a straight hose with spray guns.
- When spraying, ensure that the gun is connected to a clean, filtered air supply.
Always disconnect
- Ensure that your air tool has completely stopped functioning before putting it down.
- Disconnect an air tool from the air supply before performing any servicing, or changing any blades, discs, or other attachments.
- Ensure the air tool is switched OFF before connecting to air supply. Be aware that air tools may hold residual pressure after use. Always bleed air pressure from the tool after shutting off air supply.
Do not abuse the tool
- Do not overload the tool. Allowing the machine to work at its optimum speed is more efficient and prolongs its service life.
- Do not increase air pressure above the recommended level; excessive pressure leads to wear of moving parts, possible failure and may cause the tool casing to split.
- Do not attempt to modify air tools. Any attempt to modify this air tool could result in serious injury to you or others, and will invalidate its warranty.
Use of spray guns
• Do not aim a spray gun at people or animals!
- When spraying keep away from heat and naked flames!
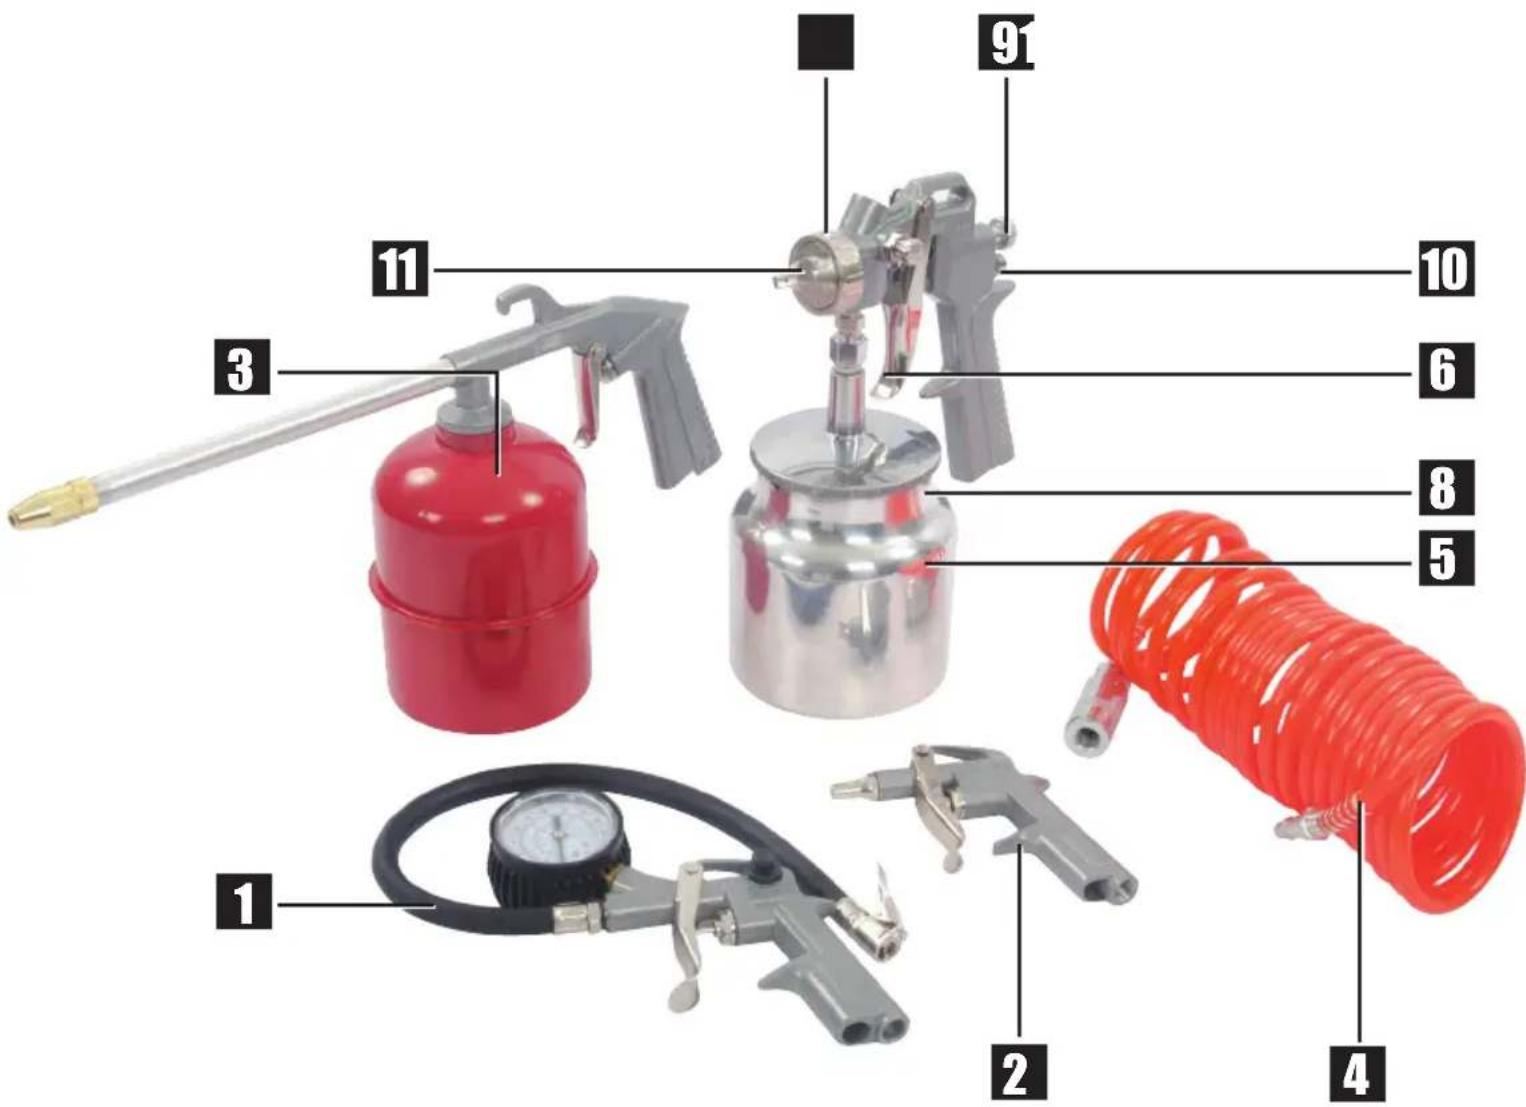
Product Familiarisation
| 1 | Tyre Inflator |
| 2 | Blow Gun |
| 3 | Degreasing & Undercoating Gun |
| 4 | Recoil Air Hose |
| 5 | Spray Gun |
| 6 | Trigger |
| 7 | Nozzle |
| 8 | Canister |
| 9 | Trigger Restrictor |
| 10 | Pattern Control Knob |
| 11 | Air Cap |
Unpacking Your Tool
- Carefully unpack and inspect your tool. Fully familiarise yourself with all its features and functions
- Ensure that all parts of the tool are present and in good condition. If any parts are missing or damaged, have such parts replaced before attempting to use this tool
Operating Instructions
NOTE: Check that all connections are secure, and that line pressure does not exceed the stated maximum pressure for the tool to be used. See diagram below for recommended air connection which shows a fitted air filter removing moisture from the air line. If vibration is apparent during operation of any of these tools, the use of a rubber whip/leader hose is recommended.
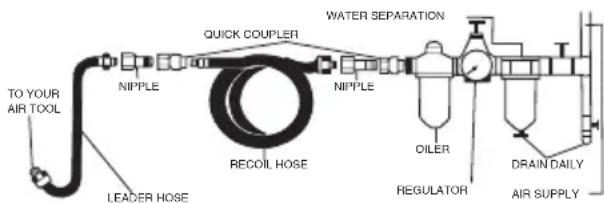
flowchart
graph LR
    A["TO YOUR AIR TOOL"] --> B["LEADER HOSE"]
    B --> C["NIPPLE"]
    C --> D["QUICK COUPLER"]
    D --> E["RECOIL HOSE"]
    E --> F["WATER SEPARATION"]
    F --> G["OILER"]
    G --> H["REGULATOR"]
    H --> I["DRAIN DAILY"]
    I --> J["AIR SUPPLY"]
    F --> K["NEAR TUBE OUT"]
If the quick connectors are not pre-fitted to the tools, fit them by screwing them into the bottom of the handles of each tool. To eliminate any air leaks the use of PTFE tape may be required around the thread of the quick connectors.
Blow Gun
- To operate the Blow Gun (2) connect to the air-line and press the trigger. This tool is useful for cleaning swarf or dust from worktops or recessed areas
Tyre Inflator
- To operate the Tyre Inflator (1), connect to air-line, and to tyre valve
- To inflate the tyre, squeeze the trigger. Be aware that the inflation rate is high - do not over-inflate and damage the tyre
- To check tyre pressure, release the trigger and the gauge will display the current pressure. While inflating, regularly check the gauge by releasing the trigger
Note: During inflation, the pressure shown on the gauge is the airline pressure, not the tyre pressure.
Degreasing & Undercoating Gun
NOTE: Always disconnect the Degreasing & Undercoating Gun (3) from the air supply before filling the Canister (8)
- Unscrew the Canister (8) from the trigger/nozzle assembly
- Fill the canister with a suitable fluid (this product is suitable for use with a wide range of oils, cleaning and rustproofing liquids)
- Replace the trigger/nozzle assembly securely onto the canister
- To operate the degreasing gun, squeeze the trigger
- The Nozzle (7) can be adjusted to vary the spray pattern. Unscrew the locking collar to allow adjustment of the main nozzle. Adjust the nozzle and then rotate the locking collar to secure the nozzle. The viscosity of the liquid will affect the spray pattern
- Correct adjustment of the nozzle and the air pressure level for the liquid used will allow you to find the ideal spray pattern for your intended application, for example undercoating
Spray Gun
Filling
- Always disconnect the Spray Gun (5) from the air supply before filling
- Paint should always be pre-mixed and thinned according to the paint manufacturer's guidance for use with air spray guns or similar equipment
- Remove the Canister (8) by unscrewing from its lid. The canister can then be filled
- Refit the canister and tighten
Set Up
- Connect the spray gun to the air supply. It is important to provide clean, filtered air to the spray gun. If you have an inline oiler switch it off and make sure water is filtered from the air line. Any oil or water in the airline will contaminate the paint
- To change the orientation of the spray pattern slightly unscrew the Air Cap (11) and rotate the Nozzle (7) to the desired orientation and then re-tighten the air cap
-
To adjust the shape of the spray pattern, rotate the Pattern Control Knob (10)
-
To adjust and limit the paint delivery rate, adjust the Trigger Restrictor (9) which controls the allowable movement of the trigger and therefore the maximum flow rate
Painting
- Prepare by ensuring you are wearing appropriate safety equipment, and ensure any surfaces that do not require painting are masked off
- Prime the sprayer by spraying away from the intended surface until paint-spraying consistency is achieved
- It is important to ensure the paint is sprayed at the correct distance from the workpiece, and that consistency in both distance and speed is maintained throughout
- Depending on the surface to be painted, you may need to start spraying before the gun is passed over the surface, to ensure an even coat is applied
- Do not overload the surface with too much paint, otherwise the paint may run
- Allow the paint to dry slightly before applying a second coat
- Do not allow the paint to dry in the gun - always clean the gun immediately after use
Cleaning
- Remove the Canister (8), and drain out any remaining paint
• Pour a suitable cleaning agent into the canister and re-attach to the paint gun
• Shake the gun to release paint from inside the canister - Reconnect the gun to the air supply and set to a high flow rate. Spray onto scrap material until the spray becomes clear. Repeat if necessary
- For a more thorough clean unscrew the air cap and remove the nozzle, then soak in a cleaning agent
- Remove any remaining paint with a small, stiff, brush. Do not attempt to clean air passageways with a metal object
- Remove the needle by fully unscrewing the Trigger Restrictor (9). Clean the needle, and check that it is not bent or damaged
- When thoroughly clean and dry, reassemble the gun, and store in a dry place
- It may be necessary to lubricate the needle to maintain working condition of the tool. Use a suitable lubricant sparingly and flush through the tool with a cleaning solution afterwards to make sure no lubricant residue can contaminate the paint
Troubleshooting
Note: Before checking other causes, make sure there are no air leaks in the main air line or fittings at the compressor or tool end
| Symptom Possible Cause Remedy | ||
| Volume of paint being sprayed very low | Air pressure low Increase air pressure | |
| Excessive paint being sprayed | Air pressure high Decrease air pressure | |
| Inconsistency of paint being sprayed | Blockage in air hole of Canister (8), blocked nozzle or poor assembly | Unblock air hole in lid of canister and clean spray gun and re-assemble correctly. Also needle may require lubrication |
Silverline Tools Guarantee
This Silverline product comes with a 3 year guarantee
Register this product at www.silverlinetools.com within 30 days of purchase in order to qualify for the 3 year guarantee. Guarantee period begins according to the date of purchase on your sales receipt.
Registering your purchase
Registration is made at silverlinetools.com by selecting the Guarantee Registration button. You will need to enter:-
- Your personal details
• Details of the product and purchase information
Once this information is entered your guarantee certificate will be created in PDF format for you to print out and keep with your purchase.
Terms & Conditions
Guarantee period becomes effective from the date of retail purchase as detailed on your sales receipt.
PLEASE KEEP YOUR SALES RECEIPT
If this product develops a fault within 30 days of purchase, return it to the stockist where it was purchased, with your receipt, stating details of the fault. You will receive a replacement or refund.
If this product develops a fault after the 30 day period, return it to:
Silverline Tools Service Centre
PO Box 2988
Yeovil
BA21 1WU, UK
The guarantee claim must be submitted during the guarantee period.
You must provide the original sales receipt indicating the purchase date, your name, address and place of purchase before any work can be carried out.
You must provide precise details of the fault requiring correction.
Claims made within the guarantee period will be verified by Silverline Tools to establish if the deficiencies are related to material or manufacturing of the product.
Carriage will not be refunded. Items for return must be in a suitably clean and safe state for repair, and should be packaged carefully to prevent damage or injury during transportation. We may reject unsuitable or unsafe deliveries.
All work will be carried out by Silverline Tools or its authorised repair agents.
The repair or replacement of the product will not extend the period of guarantee
Defects recognised by us as being covered by the guarantee shall be corrected by means of repair of the tool, free of charge (excluding carriage charges) or by replacement with a tool in perfect working order.
Retained tools, or parts, for which a replacement has been issued, will become the property of Silverline Tools.
The repair or replacement of your product under guarantee provides benefits which are additional to and do not affect your statutory rights as a consumer.
What is covered:
The repair of the product, if it can be verified to the satisfaction of Silverline Tools that the deficiencies were due to faulty materials or workmanship within the guarantee period.
If any part is no longer available or out of manufacture, Silverline Tools will replace it with a functional replacement part.
Use of this product in the EU.
What is not covered:
Silverline Tools does not guarantee repairs required as a result of:
Normal wear and tear caused by use in accordance with the operating instructions eg blades, brushes, belts, bulbs, batteries etc.
The replacement of any provided accessories drill bits, blades, sanding sheets, cutting discs and other related items.
Accidental damage, faults caused by negligent use or care, misuse, neglect, careless operation or handling of the product.
Use of the product for anything other than normal domestic purposes.
Change or modification of the product in any way.
Use of parts and accessories which are not genuine Silverline Tools components.
Faulty installation (except installed by Silverline Tools).
Repairs or alterations carried out by parties other than Silverline Tools or its authorised repair agents.
Claims other than the right to correction of faults on the tool named in these guarantee conditions are not covered by the guarantee.
EC Declaration of Conformity
The undersigned: Mr Darrell Morris
as authorised by: Silverline Tools
Declares that the
Description: 5pce Air Tools & Compressor Accessories Kit
Product Code: 633548
Conforms to the following Directives:
• Machinery Directive 2006/42/EC
• EN 1953:1998+A1:2009
• EN 792
The technical documentation is kept by: Silverline Tools
Notified body: Intertek Testing Services
Place of declaration: Shanghai, China
Date: 27/11/12
Signed by:

text_image
Dum Mone DirectorName and address of Manufacturer or Authorised representative:
Silverline Tools, Boundary Way, Lufton Trading Estate, Yeovil, Somerset, BA22 8HZ United
Kingdom
Silverline Tools Service Centre
PO Box 2988
Yeovil
BA21 1WU
Royaume-Uni
Silverline Tools Service Centre
PO Box 2988
Yeovil
text_image
Dum Mone Director Generalnatural_image
Collection of spray guns and hoses including a red fire extinguisher, a metallic spray can, a coiled red hose, and a pressure gauge against a blue dotted background (no text or symbols visible)
3 Year Guarantee
*Register online within 30 days. Terms & Conditions apply
