PureMix JB7001 - Blender BRAUN - Free user manual and instructions
Find the device manual for free PureMix JB7001 BRAUN in PDF.
| Product Type | Blender |
| Brand | Braun |
| Model | PureMix JB7001 |
| Pitcher Capacity | 56 fl. oz. (7 cups) |
| Smoothie2Go Accessory Capacity | 12 fl. oz. (1½ cups) |
| Pitcher Material | Plastic or glass (depending on model) |
| Number of Speeds | 5 pre-programmed speeds |
| Pulse Function | Yes, for precise chopping control |
| Crush Ice Program | Yes, automatic ice crushing cycle |
| Included Accessories | Pitcher, Smoothie2Go accessory with lid and seal, measuring cap |
| Control Type | Touch buttons with indicator lights |
| Safety | Pitcher lock, automatic shut-off after 5 minutes of inactivity |
| Cleaning | Wipeable motor base, removable parts dishwasher safe |
| Plug Type | Polarized (one wider blade) |
| Use | Household use only |
| Dimensions (approx.) | Not specified in the manual |
| Weight (approx.) | Not specified in the manual |
Frequently Asked Questions - PureMix JB7001 BRAUN
User questions about PureMix JB7001 BRAUN
0 question about this device. Answer the ones you know or ask your own.
Ask a new question about this device
Download the instructions for your Blender in PDF format for free! Find your manual PureMix JB7001 - BRAUN and take your electronic device back in hand. On this page are published all the documents necessary for the use of your device. PureMix JB7001 by BRAUN.
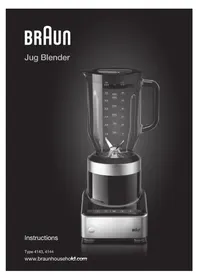
USER MANUAL PureMix JB7001 BRAUN
When using electrical appliances, basic safety precautions should always be followed to reduce the risk of fire, electric shock and/or injury to persons, including the following:
READ ALL INSTRUCTIONS.
-
To protect against the risk of electrical shock, do not put motor body of blender in water or other liquids.
-
The appliance is not intended for use by persons (including children) with reduced physical, sensory or mental capabilities, or lack of experience and knowledge, unless they have been given supervision or instructions concerning use of the appliance by a person responsible for their safety.
-
Unplug from outlet when not in use, before putting on or taking off parts, and before cleaning or removing contents from the pitcher. Never put hands into the pitcher, or handle the blades with appliance plugged in.
-
Avoid any contact with blades or moveable parts.
-
Regularly inspect the power cord, power plug and actual appliance for any damage. Do not operate if damaged in any way or after the appliance malfunctions. Immediately cease use of the appliance and call Braun Customer Service for examination, repair or adjustment.
-
The use of attachments, including canning or ordinary jars, not recommended or sold by Braun may cause fire, electrical shock, or risk of injury to persons.
-
Do not use outdoors or for anything other than its intended purpose.
-
Do not let cord hang over edge of counter or table, or touch hot surfaces.
-
Do not use the blender for anything other than food and/or beverage preparation. Misuse may cause injury.
-
Keep hands and utensils out of the pitcher while blending, to reduce the risk of severe injury to persons or damage to blender itself. A rubber or plastic spatula may be used but must be used only when the blender is turned OFF.
-
Flashing light indicates ready to operate. Avoid any contact with blades.
-
Blades are sharp. Handle carefully. Store out of reach of children.
-
To reduce the risk of injury, never place blade assembly on base unless assembled to the pitcher.
-
Do not operate without the lid in place. Leave the measuring cap in place when blending hot liquids.
-
Do not blend hot liquids or carbonated food in the Smoothie2Go attachment.
-
Never leave your blender unattended while it is running.
-
This appliance (type 4143 and 4144) has a polarized plug (one blade is wider than the other). To reduce the risk of electric shock, this plug will fit in a polarized outlet only one way. If the plug does not fit fully in the outlet, reverse the plug. If it still does not fit, contact a qualified electrician. Do not modify the plug in any way.
-
This symbol states ON/OFF.
- We suggest you save all packing materials in the event that future shipping of the machine is needed. Keep all plastic bags away from children.
SAVE THESE INSTRUCTIONS
MISE EN GARDE IMPORTANTES
Our products are engineered to meet the highest standards of quality, functionality and design. We hope you thoroughly enjoy the new Braun appliance.
Please read instructions carefully and completely before using the appliance.
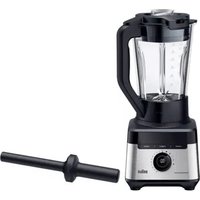
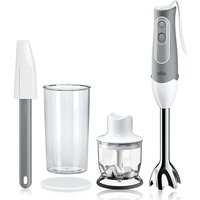
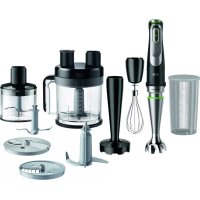
Parts and Accessories
1 Measuring cap
2 Lid
3 Lid gasket
4 Pitcher (plastic)
4a Pitcher (glass)
5 Blade assembly (pitcher)
5a Blade gasket
5b Blade group (black)
5c Locking ring
6 Motor body
7 On/Off button
8 Pulse button
9 Speed selection buttons
10 Crush ice button
11 Cord storage compartment
12 Smoothie2Go attachment
12a Lid with drinking spout
12b Lid gasket
12c Cup
13 Blade assembly (Smoothie2Go attachment)
13a Blade gasket
13b Blade group (grey)
13c Locking ring
Max. capacity:
Pitcher: 56 fl. oz./7 cups
Smoothie cup: 12 fl. oz./1½ cups
Before Use
Clean all parts before using the blender for the first time - refer to «Care and Cleaning».
Uncoil amount of cord needed from storage compartment (11) at the bottom of the motor body.
Pitcher (A)
Assembly
- Ensure that the blade gasket (5a) is positioned on the inside rim of the blade group (5b).
- Carefully place the blade group into the locking ring (5c).
- Screw the blade assembly (5) to the pitcher (4, 4a) in a clockwise motion until it can go no further.
12
Blending with the Pitcher
Make sure the appliance is turned off.
- Position the line on the locking ring (5c) in front of you and push the pitcher down until it is securely locked into place. The pitcher handle should be on the right or left side of the motor body. When properly positioned, the pitcher will rest completely on the motor body.
- Add liquid ingredients first, followed by solid ingredients. This will ensure all ingredients are uniformly blended and prevent unnecessary stress on the motor. Firmly place the complete lid (1,2,3) on top.
- Plug in the power cord.
- Turn the appliance on by pressing the On/Off button (7).
- The On/Off button will illuminate indicating that the appliance is in stand-by mode and all other indicator lights (8,9,10) will flash. To start operation select a pre-programmed speed (refer to «Operating Instructions»).
Always stop the blender when adding more ingredients. Ensure the complete lid including the measuring cap is replaced.
- During operation, you may add liquids through the drip hole in the measuring cap.
- When finished, press the pre-selected speed button.
- To switch off the appliance, press the On/Off button and unplug blender before removing the pitcher.
Smoothie2Go Attachment (B)
NOTE: The Smoothie2Go must only be operated using its special blade group (13b) and for preparing drinks and smoothies.
When preparing protein shakes using powder and liquids only, use the pitcher.
Assembly
- Ensure that the blade gasket is positioned on the inside rim of the blade group (13b).
- Hold the blade group at the coupling from underneath and place it upside down in the cup.
- Screw the locking ring (13c) to the cup (12c) in a clockwise motion until it can go no further.
Blending with the Smoothie2Go Attachment
Make sure the appliance is turned off.
- Fill the cup (12c) with ingredients. Ingredients should be added in reverse order of the regular pitcher - solids first, then liquids.
- Carefully place the blade group including gasket onto the cup.
- Screw the locking ring in a clockwise motion until it can go no further.
- Turn the cup upside down, position the line on the locking ring (13c) in front of you and push the cup down until it is securely locked into place.
- Plug in the power cord.
- Turn the appliance on by pressing the On/Off button (7).
- The On/Off button will illuminate indicating that the appliance is ready for operation and all other indicator lights (8,9,10) will flash. To start operation select a pre-programmed speed (refer to «Operating Instructions»).
- When finished, press the pre-selected speed button.
- To switch off the appliance, press the On/Off button and unplug blender before removing the Smoothie2Go attachment.
- When finished blending, pull the cup straight up to remove from the base.
- Turn the cup upright and remove the blade assembly by twisting it counterclockwise.
- To remove the blade group from the locking ring, push with both thumbs from inside the ring until it snaps out.
- To attach the lid to the cup, ensure the gasket (12b) is inside the rim of the lid (12a) and twist clockwise. Carefully close the drinking spout.
NOTE: The Smoothie2Go attachment must not be used to blend hot foods or carbonated liquids.
Operating Instructions
NOTE:
The blender will only operate when the On/Off button is pressed before selecting the desired speed or mode.
If the appliance is in the stand-by mode and no speed or mode is selected, it turns off automatically after 5 minutes. To activate the stand-by mode, press the On/Off button.
Speed Selection
- Start blending by pressing one of the speed buttons (9).
- The indicator light of the selected function will glow and all other lights will turn off.
- Change the operating speed by pressing a higher or lower speed button.
- To stop blending, press the selected speed button again.
- When finished, press the On/Off button (7) to switch off the appliance. Unplug blender.
Pulse Mode (type 4142 + 4143)
The pulse mode can be used to break apart larger pieces of food or to control the texture of food when chopping. It can be activated with any speed.
- Press the pulse button (8).
- The indicator light will glow and the indicator lights of each speed program will flash to signify all speeds are in pulse mode.
- Start pulsing by pressing one of the speed buttons (9). Hold the selected speed button as long as the pulse mode should run. You determine the duration of each pulse.
- To finish the pulse mode, press the pulse button again.
- When finished, press the On/Off button (7) to switch off the appliance. Unplug blender.
Pulse Mode (type 4144)
- Press and release the pulse button (8) for short bursts of power. You determine the duration of each pulse. Repeat as desired.
- When finished, press the On/Off button (7) to switch off the appliance. Unplug blender.
NOTE: Pulse mode will not work with the crush ice feature.
Crush Ice Mode
When selected, the blender will automatically run at staggered intervals (30 seconds) at a pre-set speed.
- Press the crush ice button (10) to begin crushing.
The indicator light will glow.
The blender will cycle through a pre-programmed time and stop automatically when finished. - To stop the program earlier, press the crush ice button again.
- When finished, press the On/Off button (7) to switch off the appliance. Unplug blender.
For Best Results
- When mixing solid ingredients, cut them up into small pieces (1 inch).
Always start by mixing solid ingredients with a small amount of liquid. Then gradually add more liquid. - When pureeing solid ingredients, feed small portions into the pitcher (4/4a) gradually rather than adding a large quantity at one time.
- If blending action stops during blending or ingredients stick to sides of the pitcher, there may not be enough liquid to blend efficiently.
- Use the pulse mode when mixing solid or highly viscous ingredients to avoid the blade becoming stagnant
-
For preparing small amounts of foodstuff use a low speed level.
-
When preparing mayonnaise, oil can be added through the drip hole in the measuring cap.
- Do not store food or liquids in the pitcher.
- Avoid bumping or dropping the blender when in operation or at any time.
- We recommend keeping your hand on top of the pitcher when operating the blender.
- Do not fill the pitcher beyond 32 fl. oz./4 cups when preparing milk based drinks.
Blending Hot Ingredients
Blending very hot ingredients may result in hot liquid and steam being forced past the lid or measuring cap and cause severe personal injury.
- When preparing hot foods or liquids the complete lid (including the gasket and measuring cap) must be placed on the pitcher.
- Do not fill the pitcher beyond 24 fl. oz./3 cups for hot foodstuff.
- If preparing greater amounts, the ingredients must cool down to room temperature and the pitcher must not be filled beyond 48 fl. oz./6 cups.
Care and Cleaning (C)
Motor body
Disconnect power before cleaning.
Do not immerse the motor body in water or any other liquid. Wipe motor body, control panel and power cord with a damp or dry cloth only. Do not use abrasive cleaners or scouring pads.
Pitcher and Smoothie2Go Attachments
Make sure the pitcher is empty before you unscrew the locking ring. Handle the blade with caution.
- All detachable parts including the Smoothie2Go attachments are dishwasher-safe. Do not use the sanitizing program. The sanitization cycle could damage your product.
- Parts may also be washed with hot, soapy water. Rinse and dry thoroughly.
- For an efficient clean of the lids and the blades, remove the gaskets (3/12b, 5a/13a).
Both the design specifications and these user instructions are subject to change without notice.
Do not dispose the product in household waste at the end of its useful life.
Troubleshooting Guide
| Problem Potential Causes | Solution | |
| Blender does not operate. | No power. Check the fuse /circuit | breaker in your home. If none of the above works, contact Braun Customer Service. |
| Pitcher is not attached properly. | Check the position of the pitcher. The pitcher handle should be on the right or left side of the motor body. | |
| Pitcher is leaking Gasket is loose, or even torn. Check if gasket is mounted properly and in the right order. | ||
| Liquid splashing out of the pitcher. | Pitcher is overfilled. Check maximum quantity recommendation. | |
| Speed selected is too high. Check speed recommendation. | ||
RECIPES FOR THE PITCHER
MANGO SALSA
Ingredients:
2 semi-ripe mangos, pitted, chunked, unpeeled
- 112 cups fresh cilantro
- 12 medium red onion, peeled (chopped into 1 inch chunks)
1 jalapeno, halved and seeded
- 1 tbsp lime or lemon juice
Place all ingredients into the blender, in the order listed and secure lid. Blend for 15 seconds on speed 3 «mix» (on speed 1 «stir» for type 4144), short stop, then blend another 10 seconds using the same speed.
BABY FOOD
Ingredients:
- 2 cups (or 7 oz) potatoes
- 2 cups (or 7 oz) carrots
- 1 cup (or 3.5 oz) cooked beef
- 112 cups (or 12 fl. oz.) water
All ingredients should be cooked, peeled and cut into 12 - 1 inch.
Place all ingredients into the blender, in the order listed and secure lid. Blend for 30 - 60 seconds on speed 3 «mix» (on speed 1 «stir» for type 4144).
MANGO PINEAPPLE PASSIONFRUIT JUICE SMOOTHHIE
1 serving (1 ¼ cup or 10 fl.oz.)
Ingredients:
- 12 cup (5 fl. oz.) freshly squeezed orange juice
- 3 oz ripe mango (chopped into 1 inch chunks)
- 2.5 oz pineapple (chopped into 1 inch chunks)
· 12 passionfruit
1-3 ready to eat dried apricots (chopped into ½ inch pieces)
Place all ingredients into the blender, in the order listed and secure lid. Blend for 40 - 60 seconds on speed 4 «puree» (on speed 2 «liquify» for type 4144).
MARGARITA
Ingredients:
3% cup (or 6 fl. oz.) water
- 12 cup (or 4 fl. oz.) orange syrup
- 12 cup (or 4 fl. oz.) lime juice
- 1/4 cup sugar
10 ice cubes
Place all ingredients into the blender, in the order listed and secure lid. Blend using the "crush ice" program.
GUACAMOLE
Ingredients:
- 1/4 cup yoghurt
· 1 / 4 cup sunflower oil - 1/4 cup lemon juice
- 1/4 cup onions, peeled and chopped
- 1 tsp salt
- 2 ripe avocados, peeled, pitted and chopped into 1 inch chunks
1 cup fresh cilantro leaves
1 medium tomato, quartered or 3 / 4 cup chopped
Place all ingredients (except the tomato) into the blender, in the order listed and secure lid. Blend for 10 - 15 seconds on speed 1 «stir». Turn off the blender. Stir in the tomato with a spoon or spatula. Pulse another 1 - 3 times on speed 5 «liquify» (on speed 2 «liquify» for type 4144).
RECIPES FOR THE SMOOTHHIE2GO ATTACHMENT
ENERGY SMOOTHHIE
Ingredients:
- 2 handfuls rinsed spring greens
- 1 banana
1 cup red grapes
1 cored pear
cup walnuts - 12 cup (or 4 fl. oz.) water
Place all ingredients into the cup, in the order listed. Blend on speed 5 "liquify" (max. speed) for 40 seconds.
PROTEIN SHAKE
Ingredients:
8 fl. oz. skimmed milk
- 1 banana (chopped into 1 inch chunks)
- 12 cup rolled oats
- 2 scoops protein powder
cup almonds
Place all ingredients into the cup, in the order listed. Blend on speed 5 Liquify (max. speed) for 60 seconds.
When preparing protein shakes using powder and liquids only, use the pitcher.