
07707 - Waffle Maker N8WERK - Free user manual and instructions
Find the device manual for free 07707 N8WERK in PDF.
| Product type | Waffle maker |
| Brand | N8WERK |
| Model | 07707 |
| Power supply | 220-240 V ~ 50-60 Hz |
| Max power | 1600 W |
| Protection class | I |
| Dimensions (approx.) | 30 x 20 x 10 cm |
| Weight (approx.) | 2.5 kg |
| Number of preset programs | 4 (Belgian, Classic, Chocolate, Buttermilk) + Manual |
| Browning levels | 7 |
| Consistency options | Crispy exterior/soft interior or uniform texture |
| Automatic preheating | Yes |
| Safety lock | Yes (for transport) |
| Non-stick coating | Yes |
| Dishwasher safe | No |
| Recommended cleaning | Damp cloth, soft brush for residues |
| Material | Plastic and metal |
| Color | Black (as per illustration) |
| Warranty | 2 years (excluding normal wear and improper use) |
| Included accessories | 1 waffle maker, 1 instruction manual |
| Country of origin | Not specified |
Frequently Asked Questions - 07707 N8WERK
User questions about 07707 N8WERK
0 question about this device. Answer the ones you know or ask your own.
Ask a new question about this device
Download the instructions for your Waffle Maker in PDF format for free! Find your manual 07707 - N8WERK and take your electronic device back in hand. On this page are published all the documents necessary for the use of your device. 07707 by N8WERK.
USER MANUAL 07707 N8WERK
GEFAHR - STROMSCHLAG- GEFAHR
Before Initial Use 16
Setting Up and Connecting the
Device 16
Functions 16
Use 17
Cleaning and Storage 18
Troubleshooting 19
Disposal 19
Technical Data 19
Waffle Recipes 20
ITEMS SUPPLIED
- Waffle maker 1 x
○ Operating instructions 1 x
Check the device for any transport damage. If you find any damage, do not use the device but contact our customer service department.
Remove any possible films, stickers or transport protection from the device.
Never remove the rating plate and any possible warnings!
Key numbers are shown as follows: (1)
Picture references are shown as follows: (Picture A)
Displays are shown as follows: UNIFORM TEXTURE
Operating elements are shown as follows: POWER
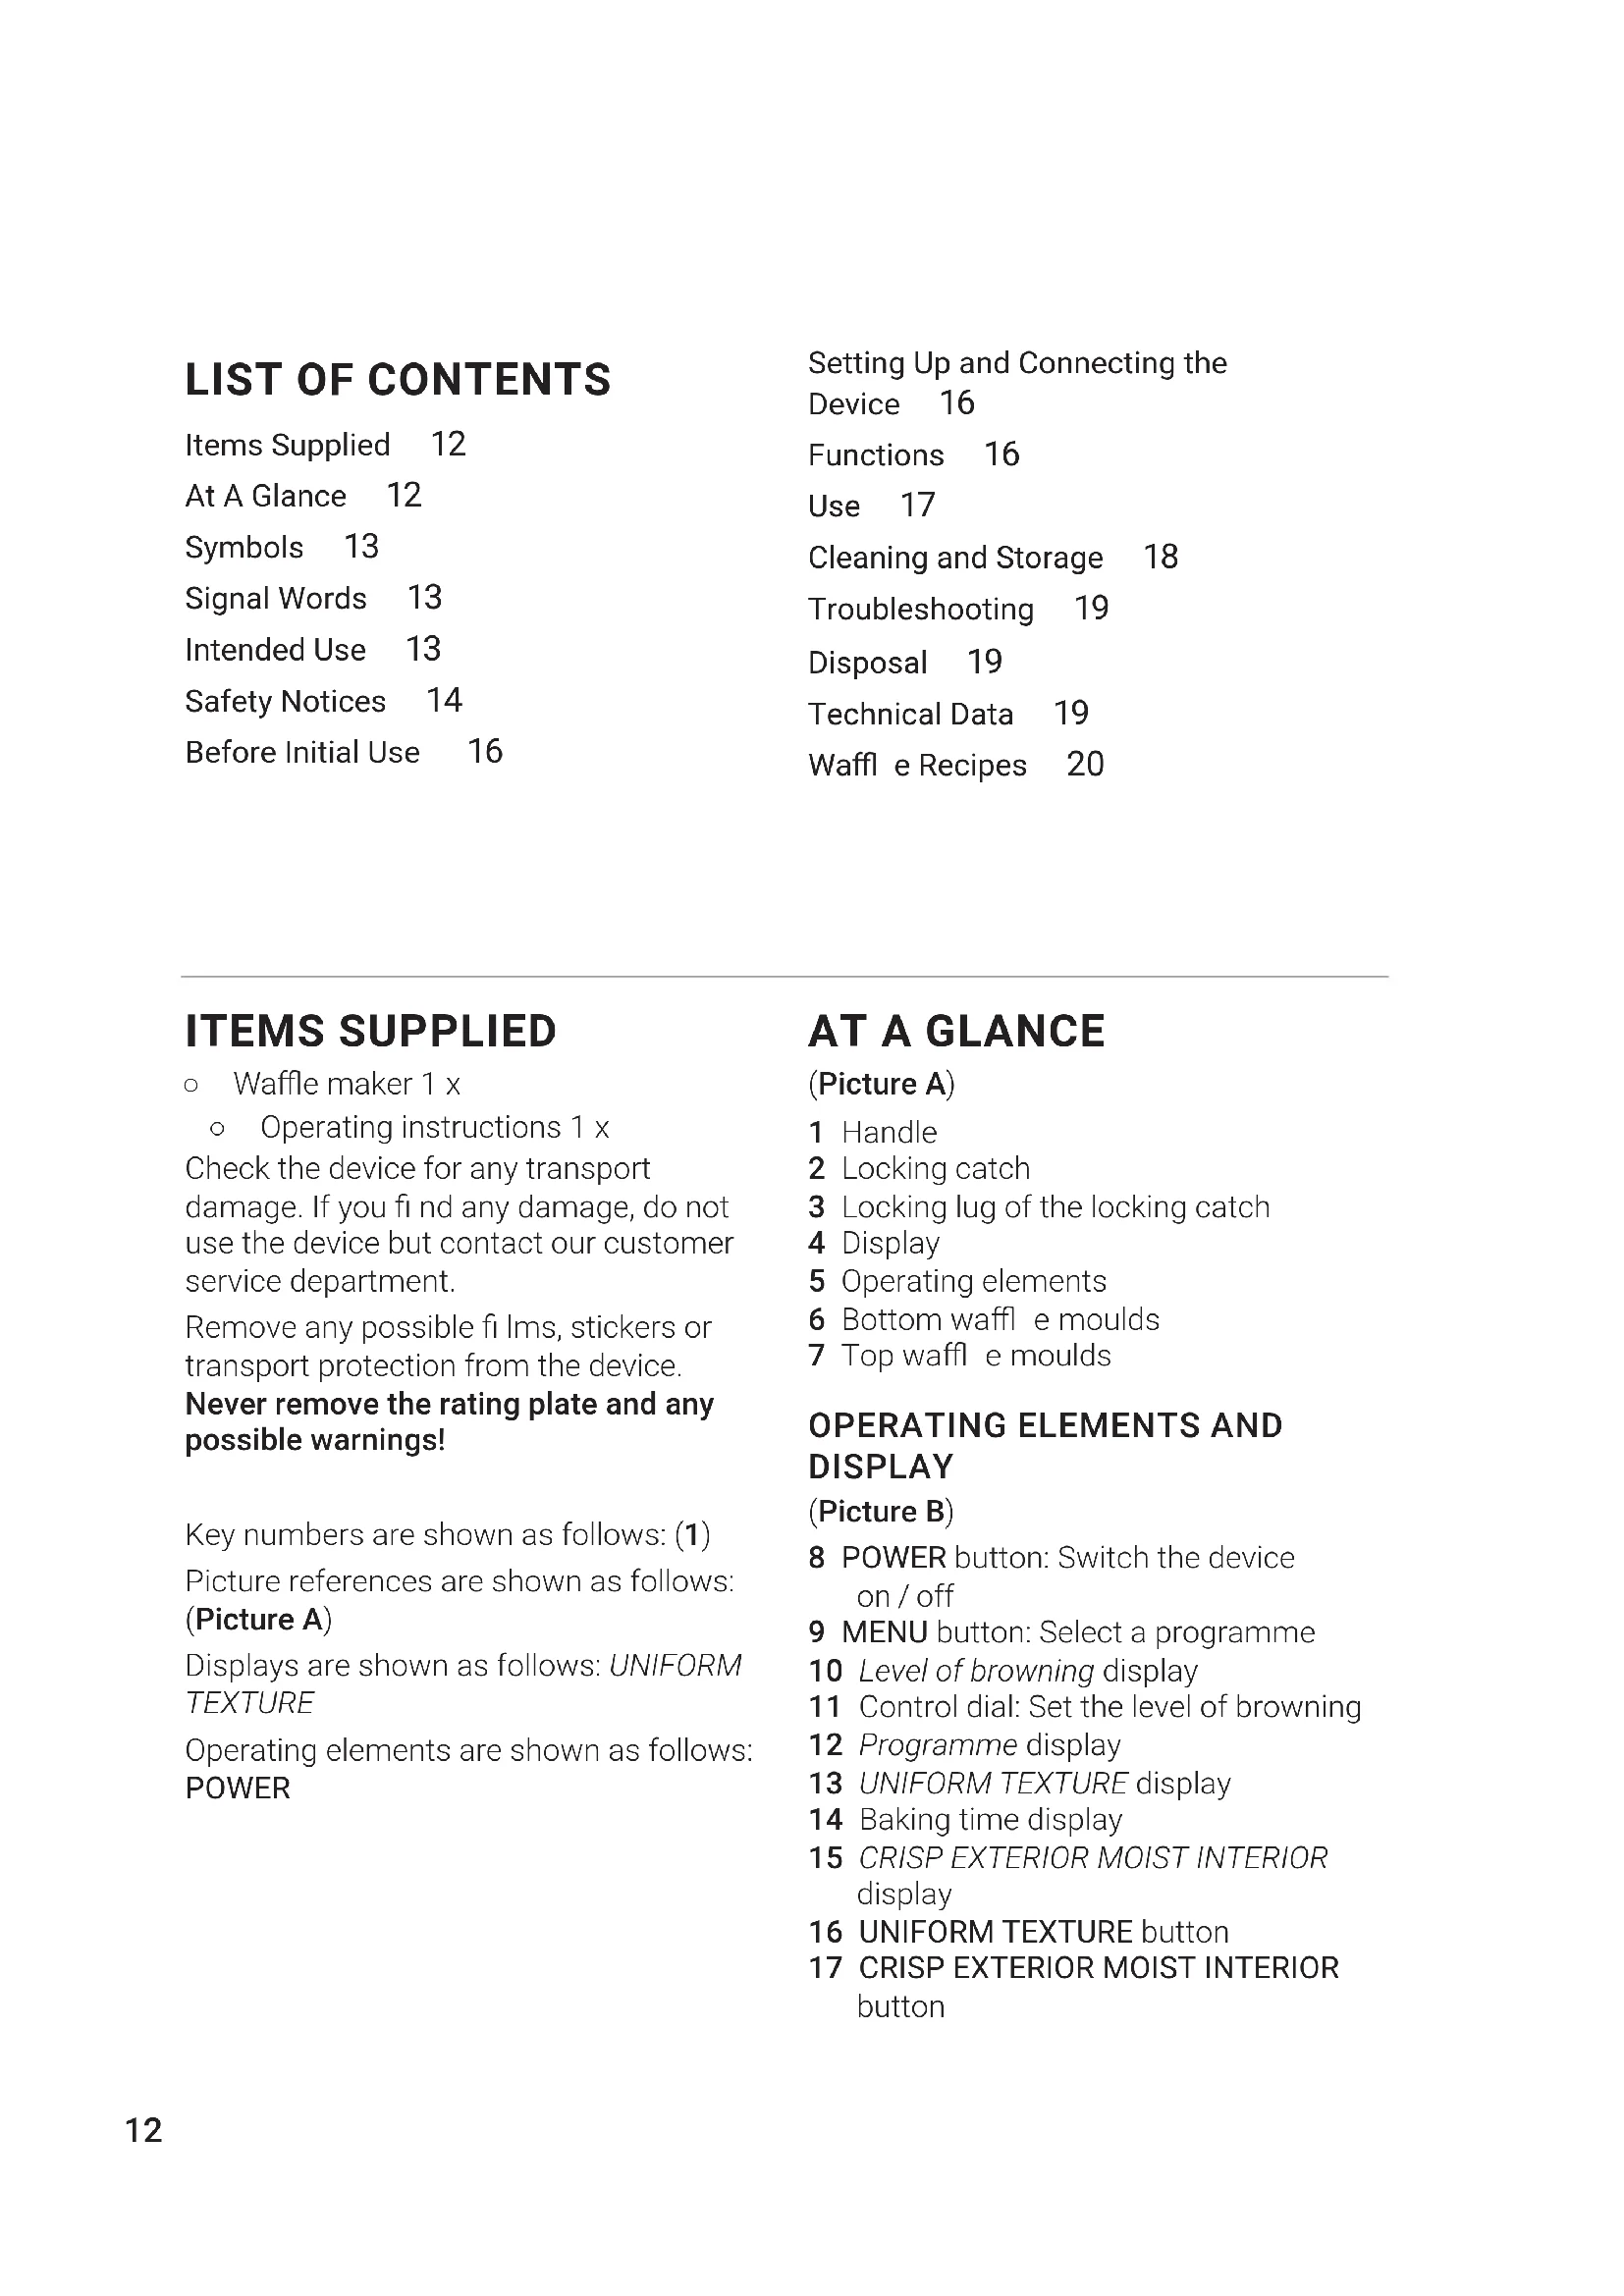
AT A GLANCE
(Picture A)
1 Handle
2 Locking catch
3 Locking lug of the locking catch
4 Display
5 Operating elements
6 Bottom waffl e moulds
7 Top waffl e moulds
OPERATING ELEMENTS AND DISPLAY
(Picture B)
8 POWER button: Switch the device on / off
9 MENU button: Select a programme
10 Level of browning display
11 Control dial: Set the level of browning
12 Programme display
13 UNIFORM TEXTURE display
14 Baking time display
15 CRISP EXTERIOR MOIST INTERIOR display
16 UNIFORM TEXTURE button
17 CRISP EXTERIOR MOIST INTERIOR button
Dear Customer,
We are delighted that you have chosen the N8WERK premium waffle maker.
If you have any questions about the device and about spare parts / accessories, contact the customer service department via our website: n8werk.net
We hope you have a lot of fun with your N8WERK premium waffle maker.
Information About the Operating Instructions
Before using the device for the first time, please read through these operating instructions carefully and keep them for future reference and other users. They form an integral part of the device. The manufacturer and importer do not accept any liability if the information in these operating instructions is not complied with.
SYMBOLS


Danger symbols: These symbols indicate possible dangers. Read the associated safety notices carefully and follow them.
Supplementary information
Read the operating instructions before use!
Circuit symbol for alternating current
Caution: Hot surfaces!
Suitable for use with food.
SIGNAL WORDS
Signal words indicate hazards if the associated notices are not followed.
DANGER – high risk, results in serious injury or death
WARNING – medium risk, may result in serious injury or death
CAUTION – low risk, may result in minor or moderate injury
NOTICE – may result in risk of damage to material
INTENDED USE
■ The device is intended to be used to bake waffles.
■ The device is for personal use only and is not intended for commercial or domestic-like applications, e.g. in hotels, bed and breakfasts, offices, staff kitchens or similar places.
■ Use the device only for the specified purpose and as described in the operating instructions. Any other use is deemed to be improper.
■ The warranty does not cover faults caused by incorrect handling, damage or attempted repairs. The same applies to normal wear and tear.
SAFETY NOTICES

WARNING: Note all safety notices, instructions, illustrations and technical data provided with this device. Failure to follow the safety notices and instructions may result in electric shock, fire and / or injuries.
■ This device may be used by children aged 8 and over and by people with reduced physical, sensory or mental abilities or a lack of experience and / or knowledge if they are supervised or have received instruction on how to use the device safely and have understood the dangers resulting from failure to comply with the relevant safety precautions.
■ Children must not play with the device.
■ Cleaning and user maintenance must not be carried out by children, unless they are older than 8 years of age and are supervised.
■ Children younger than 8 years of age and animals must be kept away from the device and the connecting cable.

CAUTION: Hot surface! The device will get very hot during use. It is essential to make sure that no heated parts are touched while using and after using the device. Only ever touch the handle and the operating elements while the device is in operation or immediately after it has been switched off. Only transport or store away the device when it has cooled down completely. Use appropriate oven gloves.
■ The device is not designed to be operated with an external timer or a separate remote control system.
If the device or the connecting cable are damaged, they must be replaced by the manufacturer, customer service department or a similarly qualified person (e.g. specialist workshop) in order to avoid any hazards.
■ It is essential to follow the cleaning instructions in the “Cleaning and Storage” chapter!

DANGER - DANGER OF ELECTRICSHOCK
■ Use the device only in closed rooms.
■ Do not use the device in rooms with high humidity.
■ Never immerse the device and the connecting cable in water or other liquids and ensure that these components cannot fall into water or become wet.
■ If the device does fall into water, switch off the power supply immediately. Do not attempt to pull the device out of the water while it is connected to the mains power!
■ Never touch the device and the connecting cable with wet hands when the device is connected to the mains power.

WARNING - DANGER OF FIRE
■ Do not use the device in rooms containing easily ignitable dust or poisonous and explosive fumes.
■ Do not connect the device along with other consumers (with a high wattage) to a multiple socket in order to prevent overloading and a possible short circuit (fi re).
■ Do not use the device in conjunction with extension cables.
■ Do not operate the device in the vicinity of combustible material. Do not place any combustible or easily meltable materials (e.g. cardboard, paper, wood, plastic) in or on the device.
■ Do not cover the device during operation in order to prevent it from catching fire. Ensure that there is sufficient ventilation while the device is in operation.
In the event of a fire: Do not extinguish with water! Smother the flames with a fireproof blanket or a suitable fire extinguisher.

WARNING - DANGER OF INJURY
- Keep children and animals away from the packaging material. There is a danger of suffocation.
■ Make sure that the connecting cable is always kept out of the reach of small children and animals. There is a danger of strangulation.
■ Hot steam can escape from the device during operation. You should therefore keep your head and hands out of the danger zone. There is a danger of scalding from heat and hot steam.
■ The baking surfaces of the device will become very hot. Be careful when inserting and removing the waffl es! If necessary, use kitchen tongs made of plastic or wood. There is a danger of burns.
■ The device must not be moved during operation. There is a danger of burns.
■ Make sure that the connecting cable does not present a trip hazard. It may not hang down from the surface on which the device is placed in order to prevent the device from being pulled down.
NOTICE - RISK OF DAMAGE TO MATERIAL AND PROPERTY
■ Only connect the device to a plug socket that is properly installed and matches the technical data of the device. The plug socket must also be readily accessible after connection so that the connection to the mains can quickly be isolated.
■ Make sure that the connecting cable is not squashed, bent or laid over sharp edges and does not come into contact with hot surfaces (this also applies to the hot surfaces of the device!).
- Keep metal objects or other sharp objects away from the device. These objects could damage the non-stick coating of the baking surfaces.
■ Switch off the device and pull the mains plug out of the plug socket if an error occurs during operation, when there is a power cut or before a thunderstorm.
■ When you pull the mains plug out of the plug socket, always pull on the mains plug and never the mains cable!
■ Protect the device from other heat sources, naked flames, sub-zero temperatures, persistent moisture, wet conditions and impacts.
■ Use only original accessories from the manufacturer in order to guarantee that there is no interference that may prevent the device from working and to avoid possible damage.
BEFORE INITIAL USE
There may still be some production residues on the device. To avoid harmful effects to your health, clean the device thoroughly before you first use it and then heat it up for a few minutes. To do this, follow the instructions in the "Cleaning and Storage", "Setting Up and Connecting the Device" and "Use" chapters.
SETTING UP AND CONNECTING THE DEVICE
Please Note!
■ Do not place the device below kitchen wall units or similar cupboards. The rising steam could cause damage to them!
■ The device may only be operated in a horizontal position, never on its side or tilted.
- Always set up the closed device with a clear space at the sides (at least 20 cm) and clear space above it (at least 30 cm) on a fl at, solid and heat-resistant surface.
- Connect the device to an easily accessible plug socket. Make sure that the connecting cable is not jammed between the baking surfaces. A beep is heard and the display lights up briefly.
FUNCTIONS
What is special about this device is the way that the required baking time is calculated automatically. Factors such as the chosen programme, the level of browning and the desired consistency all influence the baking time.
In addition, the device recognises when mixture is poured into the baking moulds and then starts the baking time automatically.

Please bear in mind: As soon as the mixture has been poured into the baking moulds, the settings can no longer be adjusted!
SWITCHING ON / OFF AND START / STOP
The device is switched on or off via the POWER button (8).
PRESET PROGRAMMES
The device has 4 preset programmes which are selected by repeatedly pressing the MENU button (9):
BELGIAN: for Belgian waffles
CLASSIC: for classic waffles
CHOCOLATE: for chocolate waffles
BUTTERMILK: for buttermilk waffl es
The arrow on the Programmes display (12) indicates which programme has been selected.
With the preset programmes, the baking time is set automatically. It starts to count down as soon as mixture has been poured into the baking moulds. You will hear six beeps at the end of the baking time.
MANUAL PROGRAMME
The device also has a manual Custom programme. Instead of the preset baking time, the Baking time display indicates how long the mixture has been in the device since it was poured into the baking moulds.
To end the programme, the device needs to be switched off via the POWER button (8).

Please bear in mind: In the manual programme, you will not hear a beep indicating the end of the baking time. The baking process must be actively monitored.
LEVEL OF BROWNING
The level of browning you want can be chosen using the control dial (11). The device has 7 different levels of browning (10) which are shown as a bar on the display (4).
PREHEATING
The device automatically preheats first on each programme, which is indicated by the Level of browning display (10) flashing. The device has only reached the desired temperature for the selected programme once you hear a beep and the display is lit up constantly.
After the end of a baking programme, the device automatically carries on heating so that the next portion can be made straight away.

If the level of browning is increased between two baking processes, bear in mind that the device will need to preheat for longer. It is essential to wait until the device has reached the correct temperature.
CONSISTENCY
As well as the level of browning, the consistency of the waffles can also be adjusted. You can use the CRISP EXTERIOR MOIST INTERIOR button (17) to set the waffles to be fluffy on the inside and crispy on the outside. Press the UNIFORM TEXTURE button (16) to create waffles with a uniform texture.
The chosen option (13, 15) is correspondingly shown on the display (4).
LOCKING CATCH
The device has a transport safeguard in the form of a locking catch (2) in order to prevent the device from unintentionally flipping open. To secure the two halves of the device, slide the locking catch over the locking lug (3) until you hear and feel it engage (Picture C).
USE
Please Note!
■ The device must not be left unattended during operation!
In the interest of your own safety, inspect the device and the connecting cable for damage each time before you use it. Use the device only if it is in working order.

Although the baking surfaces (6, 7) have a non-stick coating, we still recommend that you lightly grease them before first use. Do not use any cooking spray as it can attack the non-stick coating!
- Prepare the waffle mixture as you wish. Suggested recipes can be found later on in these operating instructions.
- If you have not already done so, release the locking catch (Picture D).
- Press the POWER button (8) to switch on the device. The display (4) lights up. The default presetting is the BELGIUM programme, browning level 4 and the consistency option CRISP EXTERIOR MOIST INTERIOR.

If no changes are made, the device starts to preheat.
- Adjust the settings as you wish (see the "Functions" chapter).
- Wait until the device has reached the correct operating temperature.

Always keep the device closed to speed up the preheating process.
- Pour a ladle of waffle mixture into the middle of both bottom baking moulds. Make sure that you do not pour too much mixture into the baking moulds to prevent the mixture from spilling over.

Please bear in mind: As soon as the mixture has been poured into the baking moulds, the settings can no longer be adjusted!
- Carefully close the lid. Allow the waffles to bake until the specified baking time has elapsed or the desired level of browning has been reached.
- Open the device and remove the waffles.
Please Note: Use only heat-resistant wooden or plastic utensils to remove the food.
- Switch off the device after use by pressing the POWER button.
- Disconnect the device from the mains power and allow it to cool before it is cleaned.
CLEANING AND STORAGE
Please Note!
■ No liquid must get into the device. Never immerse the device in water!
■ The device is not dishwasher-safe.
■ Never spray cold water onto the baking surfaces during or immediately after use of the device. This could damage the non-stick coating!
■ Do not use any sharp or abrasive cleaning agents or cleaning pads to clean the device. They may damage the surfaces.
Clean the device immediately after every use to prevent the formation of germs.
- Make sure that the device has completely cooled down and has been disconnected from the mains power!
- Carefully remove any crumbs and residues from the baking surfaces (6, 7). Use a soft brush to do this if necessary.
- Wipe out and wipe down the housing and the baking moulds with a damp cloth. If necessary, use a little detergent to remove more intense soiling.
- Then dry off the device with a soft cloth.
- Close the device and fix together the two halves with the locking catch (2) and the locking lug (3).
- Store the device in a dry, clean, frost-free place that cannot be accessed by children or animals.
TROUBLESHOOTING
If the device does not work properly, check whether you are able to rectify the problem yourself. If the problem cannot be solved with the steps below, contact the customer service department.

Do not attempt to repair an electrical device yourself!
The device does not work.
The plug socket is defective.
▶ Try another plug socket.
There is no mains voltage.
▶ Check the fuse of the mains connection.
The fuse in the fuse box is triggered.
Too many devices connected to the same circuit.
▶ Reduce the number of devices in the circuit.
DISPOSAL

Dispose of the packaging material in an environmentally friendly manner so that it can be recycled.

This device is governed by the European Directive 2012/19/EU on waste electrical and electronic equipment (WEEE). Do not dispose of this device as normal domestic waste, but rather in an environmentally friendly manner via an officially approved waste disposal company.
TECHNICAL DATA
Article number: 07707
Model number: ST5403T-GS
Power supply: 220 - 240 V \~ 50 - 60 Hz
Power: max. 1600 W
Protection class: I
ID of the operating instructions: Z 07707 M N8W V1 0820 dk
All rights reserved.

WAFFLE RECIPES
BELGIAN WAFFLE MIXTURE
(BELGIUM programme)
Ingredients (for 8 waffles)
3 separated eggs (Class M) • 420 ml of milk • 125 g of unsalted butter • 1 vanilla pod (alternatively: 1 teaspoon of vanilla flavouring) • 200 g of flour • 1 teaspoon of baking powder • 1 pinch of baking soda • 50 g of sugar
Preparation
- Separate the eggs and melt the butter.
- Stir together the egg yolk, melted butter, milk and vanilla fl avouring with a whisk in a medium-sized bowl to create a uniform mixture.
- Mix together the fl our, baking powder, baking soda and sugar in a large bowl. Form a hollow in the middle.
- Pour the butter / egg / milk / vanilla mixture into the hollow and carefully stir everything together to create a homogeneous batter.
- Beat the three egg whites with a hand mixer to create beaten egg white. Then carefully fold the beaten egg white into the batter mixture.
This will make the waffles deliciously light and airy.
CLASSIC WAFFLE MIXTURE
(Classic programme)
Ingredients (for 8 waffles)
3 eggs (Class M) • 420 ml of milk • 125 g of unsalted butter • 1 vanilla pod (alternatively: 1 teaspoon of vanilla flavouring) • 200 g of flour • 1 teaspoon of baking powder • 1 pinch of baking soda • 50 g of sugar
Preparation
- Melt the butter.
- Stir together the eggs, melted butter, milk and vanilla fl avouring with a whisk in a medium-sized bowl to create a uniform mixture.
- Mix together the fl our, baking powder, baking soda and sugar in a large bowl. Form a hollow in the middle.
- Pour the butter / egg / milk / vanilla mixture into the hollow and carefully stir everything together to create a homogeneous batter.
WAFFLE MIXTURE WITH BUTTERMILK
(BUTTERMILK programme)
Ingredients (for 8 waffles)
3 eggs (Class M) • 600 ml of buttermilk • 80 ml of vegetable oil • 300 g of fl our • 1 teaspoon of baking powder • ½ teaspoon of salt • 60 g of sugar
Preparation
- Stir together the buttermilk, oil and eggs with a whisk in a medium-sized bowl to create a uniform mixture.
- Mix together the fl our, baking powder and sugar in a large bowl. Form a hollow in the middle.
- Pour the buttermilk / oil / egg mixture into the hollow and carefully stir everything together to create a homogeneous batter.
CHOCOLATE WAFFLES
(CHOCOLATE programme)
Ingredients (for 8 waffles)
150 g of chopped dark chocolate · 30 g of cocoa powder · 2 eggs (Class M) · 90 g of butter · 170 g of sugar · 360 ml of milk ·
1 vanilla pod (alternatively: 1 teaspoon of vanilla flavouring) • 250 g of flour •
1 teaspoon of baking powder • 1 teaspoon of salt
Preparation
-
Melt the chopped chocolate and the butter over a water bath or in the microwave. The consistency is just right when the chocolate and the butter are mixed together well. Then allow the mixture to cool briefly.
-
Stir together the milk, eggs, vanilla fl avouring and chocolate mixture with a whisk in a medium-sized bowl to create a uniform mixture.
-
Mix together the fl our, cocoa, baking powder, salt and sugar in a large bowl. Form a hollow in the middle.
-
Pour the chocolate / egg mixture into the hollow and carefully stir everything together to create a mixture with as few lumps as possible.
POTATO RÖSTI WAFFLES
(CUSTOM programme)
Ingredients (for 8 waffles)
2 kg of floury, grated potatoes • 3 eggs (Class M) • 250 g of sour cream • 2 tablespoons of horseradish cream • salt and pepper • optionally salted butter
Preparation
- Grate the potatoes.
- Wrap the grated potatoes in a clean kitchen towel and press out the rest of the moisture
- Stir together the eggs, sour cream, horseradish cream and grated potatoes in a large bowl to create a homogeneous mixture.
- Season the mixture well with salt and pepper.
HAM AND CHEESE WAFFLES
(CUSTOM programme)
Ingredients (for 14 waffles)
8 eggs (Class M) • 700 ml of milk • 440 g of unsalted butter • 700 g of flour • 500 g of grated cheese • 250 g of ham (fi nely diced) • salt and pepper
Preparation
- Melt the butter.
- Stir together the eggs, melted butter and milk with a whisk in a bowl to create a uniform mixture.
- Pour the flour into a large bowl and form a hollow in the middle.
- Pour the butter / egg / milk mixture into the hollow and carefully stir everything together to create a homogeneous batter.
- Fold the grated cheese and the diced ham into the mixture.
- Season the mixture well with salt and pepper.
SOMMAIRE
Composition 22
Aperçu général 22
Symboles 23
GAUFRES AU JAMBON-FROMAGE
(programme CUSTOM (individuel))
(Programa CHOCOLATE)
Ingredientes (para 8 gofres)
IMPASTO PER WAFFLE CLASSICO
(Programma Classic (classico))
Ingredienti (per 8 waffl e)


- GEFAHR - STROMSCHLAG- GEFAHR
- ITEMS SUPPLIED
- AT A GLANCE
- (Picture A)
- OPERATING ELEMENTS AND DISPLAY
- (Picture B)
- Dear Customer,
- Information About the Operating Instructions
- SYMBOLS
- SIGNAL WORDS
- INTENDED USE
- SAFETY NOTICES
- DANGER - DANGER OF ELECTRICSHOCK
- WARNING - DANGER OF FIRE
- WARNING - DANGER OF INJURY
- NOTICE - RISK OF DAMAGE TO MATERIAL AND PROPERTY
- BEFORE INITIAL USE
- SETTING UP AND CONNECTING THE DEVICE
- Please Note!
- FUNCTIONS
- SWITCHING ON / OFF AND START / STOP
- PRESET PROGRAMMES
- MANUAL PROGRAMME
- LEVEL OF BROWNING
- PREHEATING
- CONSISTENCY
- LOCKING CATCH
- USE
- CLEANING AND STORAGE
- TROUBLESHOOTING
- Do not attempt to repair an electrical device yourself!
- The device does not work.
- The fuse in the fuse box is triggered.
- DISPOSAL
- TECHNICAL DATA
- WAFFLE RECIPES
- BELGIAN WAFFLE MIXTURE
- Preparation
- CLASSIC WAFFLE MIXTURE
- WAFFLE MIXTURE WITH BUTTERMILK
- CHOCOLATE WAFFLES
- Ingredients (for 8 waffles)
- POTATO RÖSTI WAFFLES
- HAM AND CHEESE WAFFLES
- Ingredients (for 14 waffles)
- SOMMAIRE
- GAUFRES AU JAMBON-FROMAGE
- Ingredientes (para 8 gofres)
- IMPASTO PER WAFFLE CLASSICO
Brand : N8WERK
Model : 07707
Category : Waffle Maker