
EasyRoll - Paint roller WAGNER - Free user manual and instructions
Find the device manual for free EasyRoll WAGNER in PDF.
| Product type | Manual paint roller |
| Brand | Wagner |
| Model | EasyRoll |
| Use | Application of water-based paints (latex, dispersion, acrylic) |
| Compatible paint type | Water-based paints only (non-solvent) |
| Roll thickness (standard) | 12 mm |
| Roll thickness (option) | 20 mm |
| Feed | Manual (piston pump) |
| Cleaning | With hot water and detergent immediately after use |
| Recommended lubrication | Petroleum jelly on the piston O-rings |
| Main materials | Plastic, rubber, metal (roller frame) |
| Safety | Do not use solvent-based paints; protect floor and furniture |
| Included accessories | Inner roller, 12 mm roller, roller frame, suction tube, packet of petroleum jelly |
| Spare parts available | Yes (references in the manual: inner roller 2422071, roller 0998230, etc.) |
| Warranty | 3 years + 1 year after online registration |
| Manufacturer | J. Wagner GmbH, Germany |
| After-sales service (France) | 12 Avenue des Tropiques, Z.A. de Courtaboeuf, 91978 Les Ulis Cedex |
| Number of pages in manual | 40 pages |
Frequently Asked Questions - EasyRoll WAGNER
User questions about EasyRoll WAGNER
0 question about this device. Answer the ones you know or ask your own.
Ask a new question about this device
Download the instructions for your Paint roller in PDF format for free! Find your manual EasyRoll - WAGNER and take your electronic device back in hand. On this page are published all the documents necessary for the use of your device. EasyRoll by WAGNER.
USER MANUAL EasyRoll WAGNER
natural_image
Line drawing of a handheld electric shaver with a roller roller (no text or symbols)EASYROLL
ORIGINAL-
BETRIEBSANLEITUNG


natural_image
Line drawing of a hand gripping a cable or rod, no text or symbols present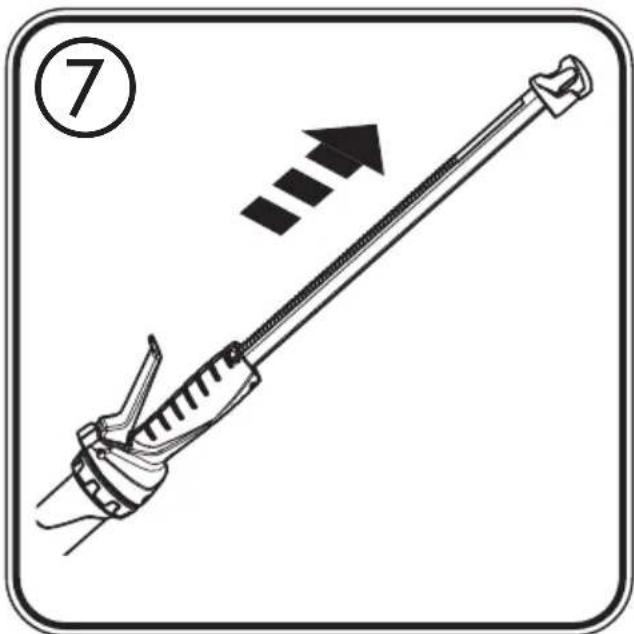

natural_image
Illustration of hands connecting a pipe to a cylindrical device, no text or symbols present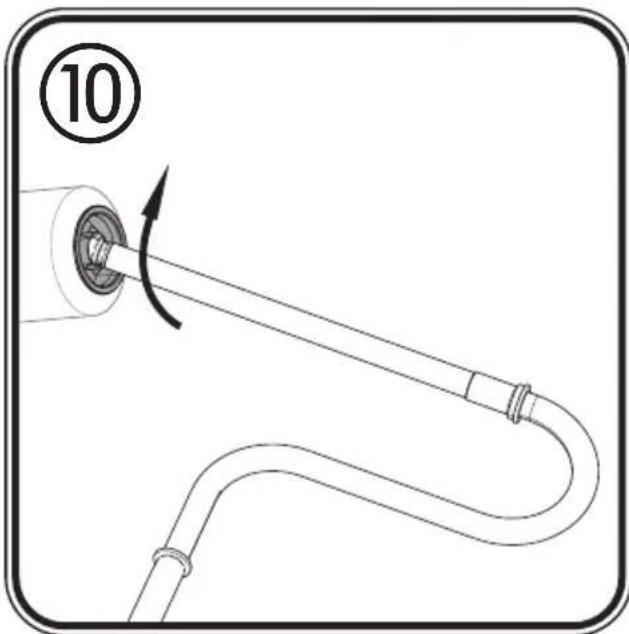
natural_image
Diagram of a pipe fitting with a circular component and curved tube, labeled with number 10 (no text or symbols on the diagram itself)
natural_image
Diagram of a cylindrical device with attached tubing and a curved pipe, labeled with number 11 (no text or symbols on the diagram itself)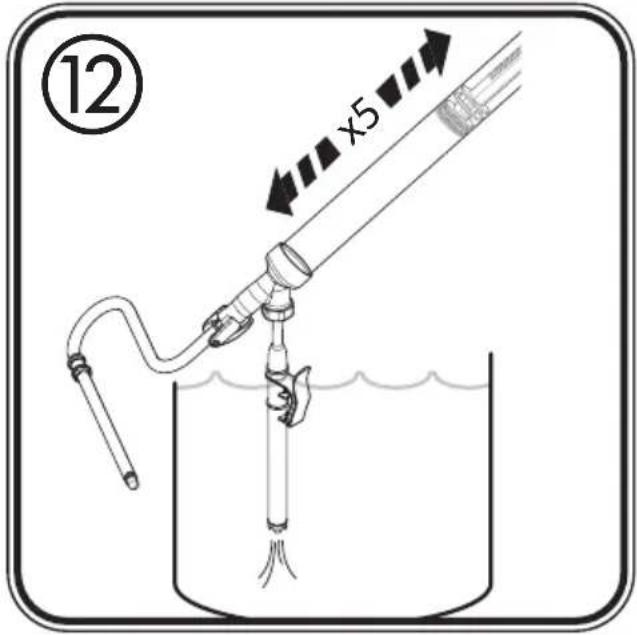


natural_image
Mechanical assembly diagram showing a rotating shaft and gear mechanism (no text or symbols)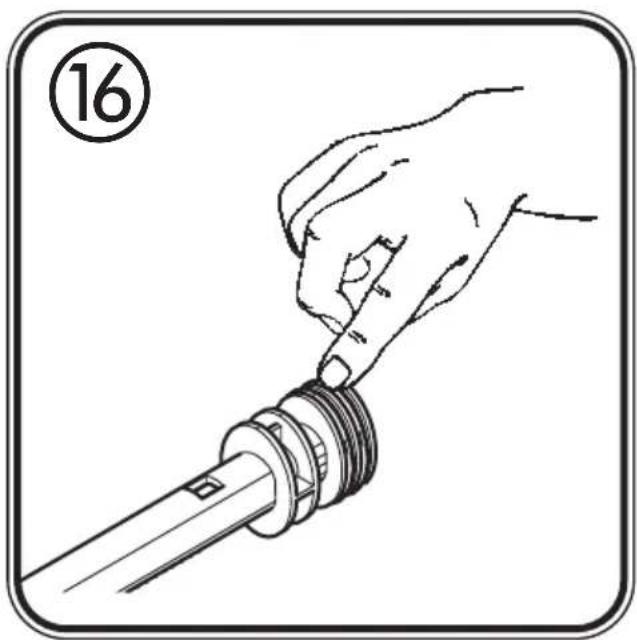
natural_image
Illustration of a hand adjusting a threaded pipe fitting (no text or symbols)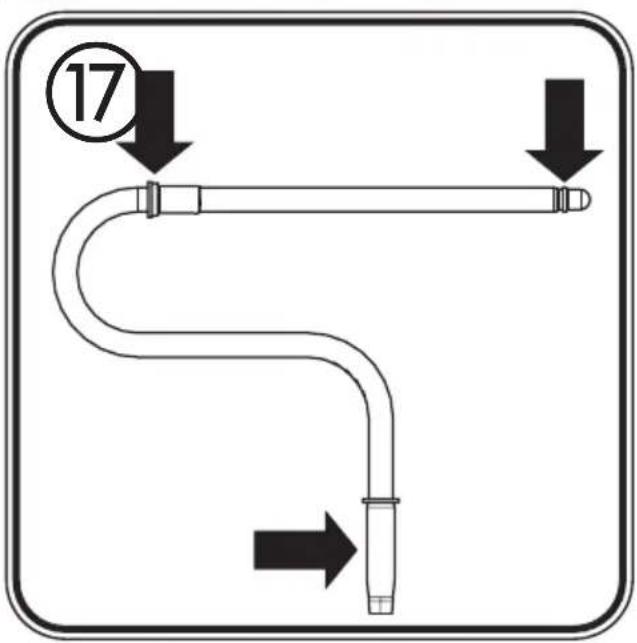

DE 1 - 4
EN 5-8
FR 9 - 12
NL 13 - 16
IT 17 - 20
CS 21 - 24
SK 25 - 28
RO 29 - 32
34
ALLGEMEINE HINWEISE
natural_image
Hand holding a tool interacting with a threaded pipe fitting (no text or symbols visible)CAUTION: You should only use the EasyRoll for diluted liquids and dilutable paints, such as water soluble, latex and acrylic paints, as not all components are solvent resistant. To ensure as long a useful life as possible of your EasyRoll, it should be thoroughly cleaned immediately after each use.
PREPARING THE WORKPLACE AN
Before beginning work, cover or tape up the floor, furniture, door frames and other objects.
Place the unit on a sufficiently sized piece of plastic or cardboard.
- Stir the paint well and thin up to 10% if necessary (observe information from manufacturer).
START-UP

Depending on the version, EasyRoll comes already pre-assembled. If it is not, please follow the steps below.
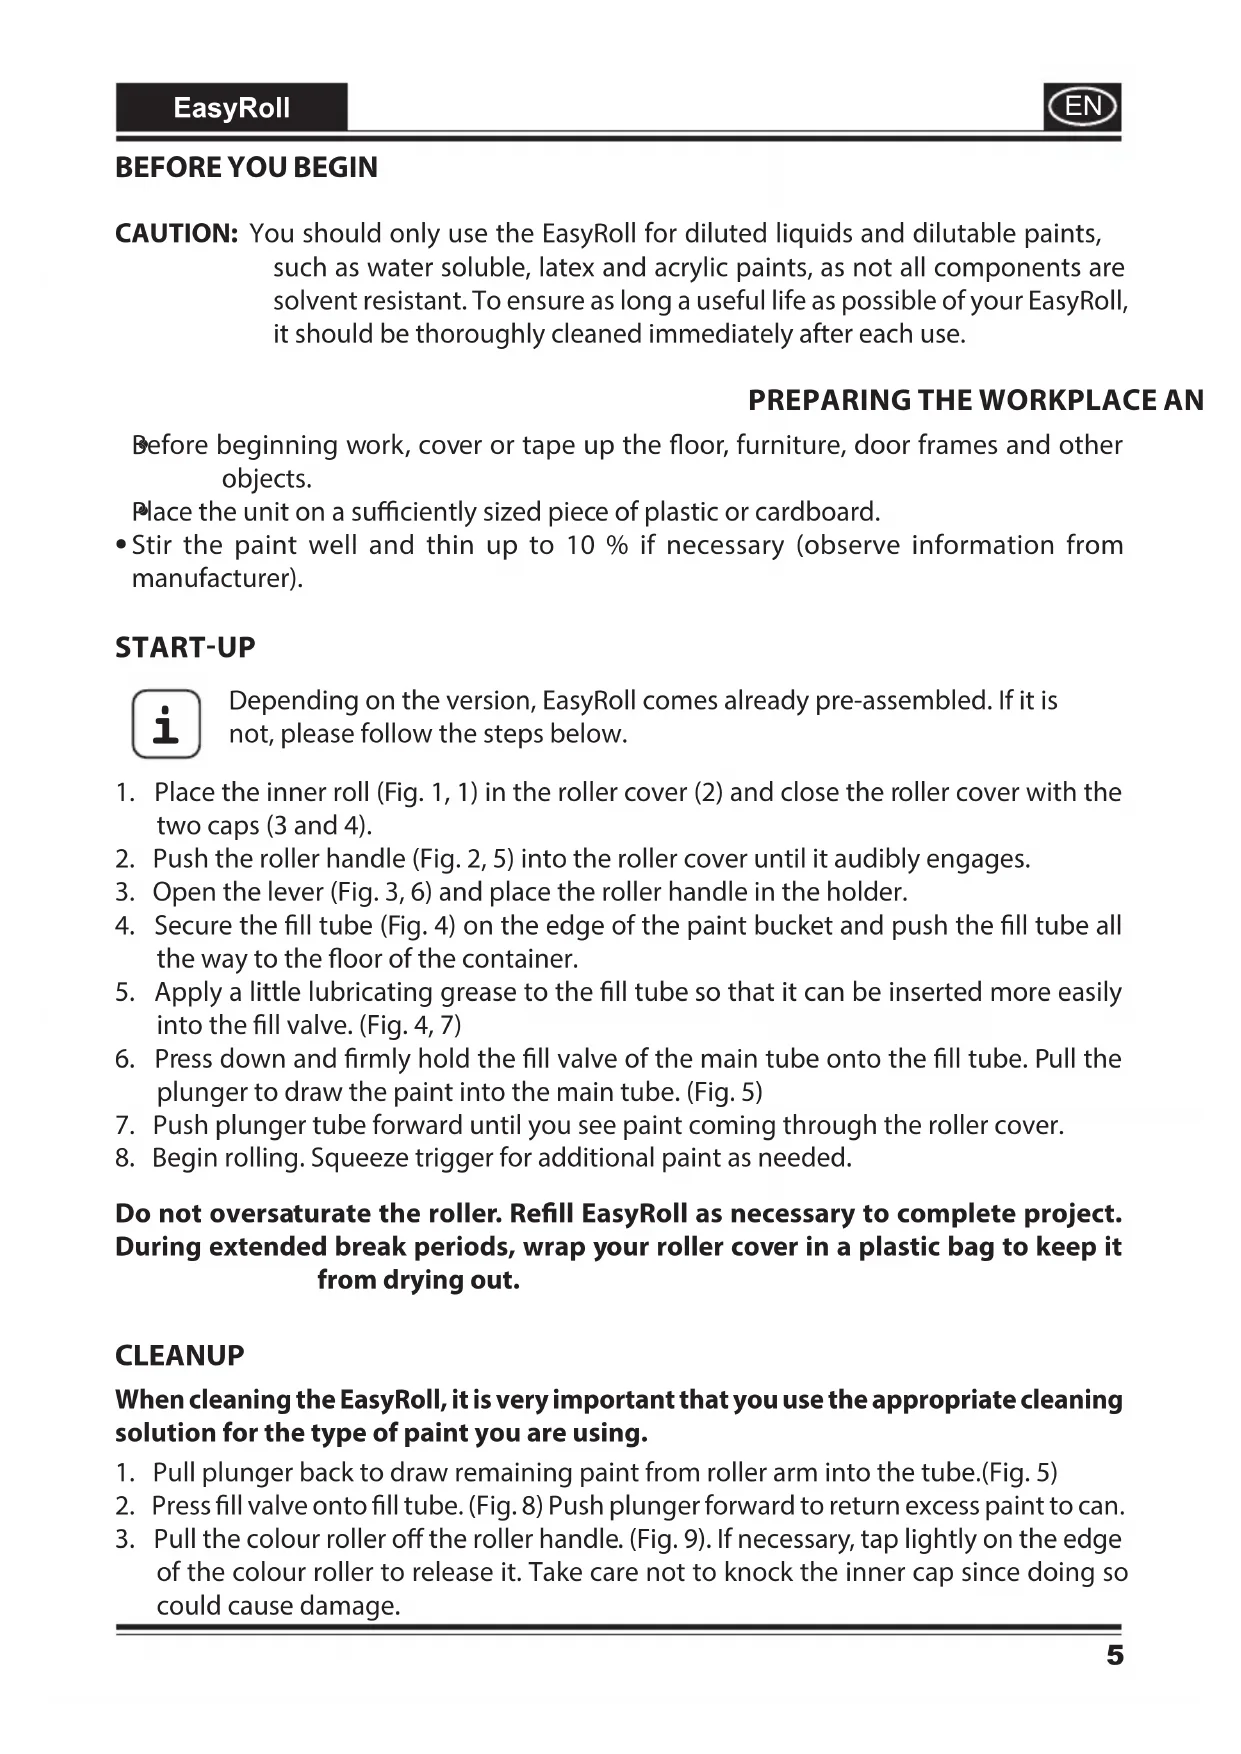
- Place the inner roll (Fig. 1, 1) in the roller cover (2) and close the roller cover with the two caps (3 and 4).
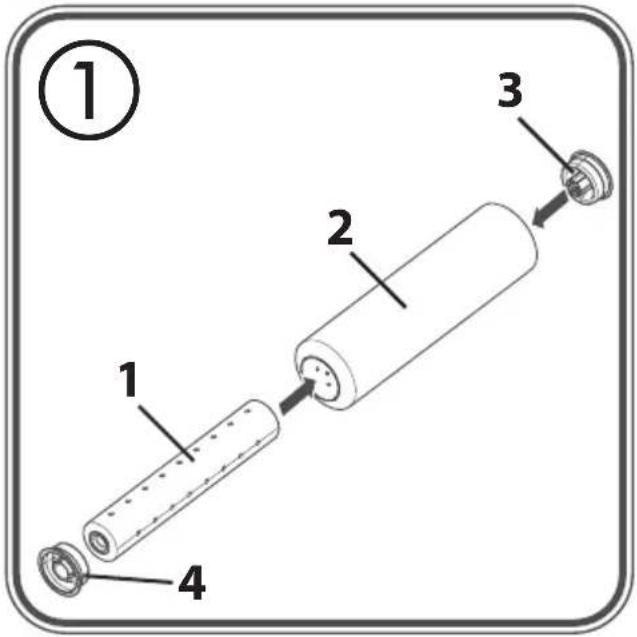
- Push the roller handle (Fig. 2, 5) into the roller cover until it audibly engages.
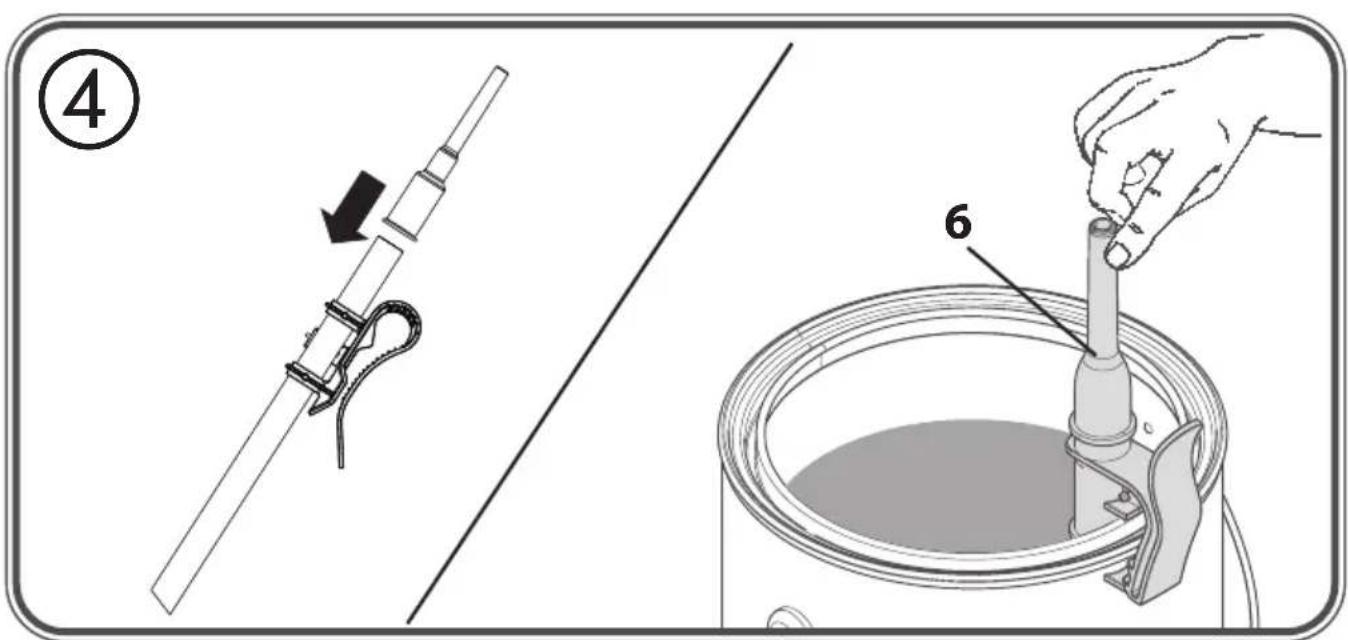
- Open the lever (Fig. 3, 6) and place the roller handle in the holder.
- Secure the fill tube (Fig. 4) on the edge of the paint bucket and push the fill tube all the way to the floor of the container.
- Apply a little lubricating grease to the fill tube so that it can be inserted more easily into the fill valve. (Fig. 4, 7)
- Press down and firmly hold the fill valve of the main tube onto the fill tube. Pull the plunger to draw the paint into the main tube. (Fig. 5)
- Push plunger tube forward until you see paint coming through the roller cover.
- Begin rolling. Squeeze trigger for additional paint as needed.
Do not oversaturate the roller. Refill EasyRoll as necessary to complete project. During extended break periods, wrap your roller cover in a plastic bag to keep it from drying out.
CLEANUP
When cleaning the EasyRoll, it is very important that you use the appropriate cleaning solution for the type of paint you are using.
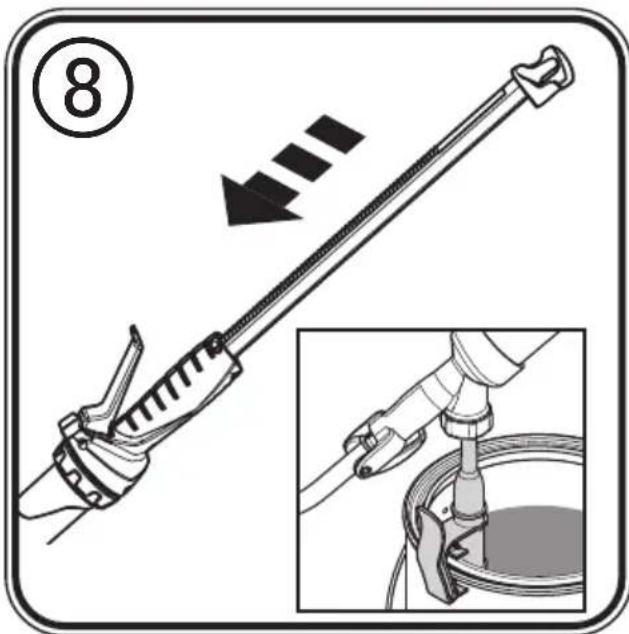
- Pull plunger back to draw remaining paint from roller arm into the tube.(Fig. 5)
- Press fill valve onto fill tube. (Fig. 8) Push plunger forward to return excess paint to can.
-
Pull the colour roller off the roller handle. (Fig. 9). If necessary, tap lightly on the edge of the colour roller to release it. Take care not to knock the inner cap since doing so could cause damage.
-
Lever the two caps out of the roller cover using the roller handle. (Fig. 10).
- Push the inner roller out of the roller cover. (Fig. 11).
- Clean the roller cover, inner roller and caps with water.
- Clean the fill tube, roller arm and fill valve in sequence by immersing the components in a bucket of water and moving the piston rod back and forth around 5 times. (Fig. 12, 13 and 14)
STORAGE
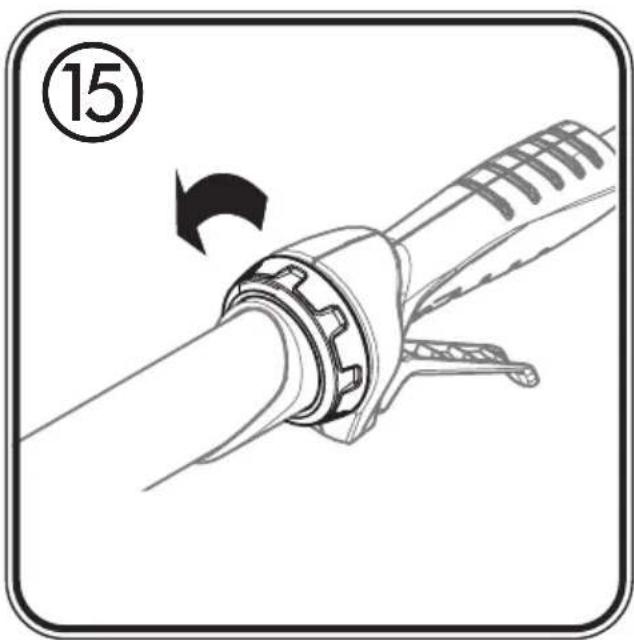
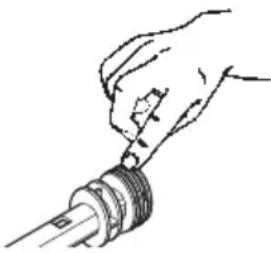
- Turn the locking collar next to the trigger counterclockwise (fig. 15) until the main tube slides off the plunger.
- Pack a generous amount of petroleum jelly around and in between the O-rings on the plunger. (Fig. 16)
- Clean and pack a generous amount of petroleum jelly on the indicated bearing areas of the arm. (Fig. 17)
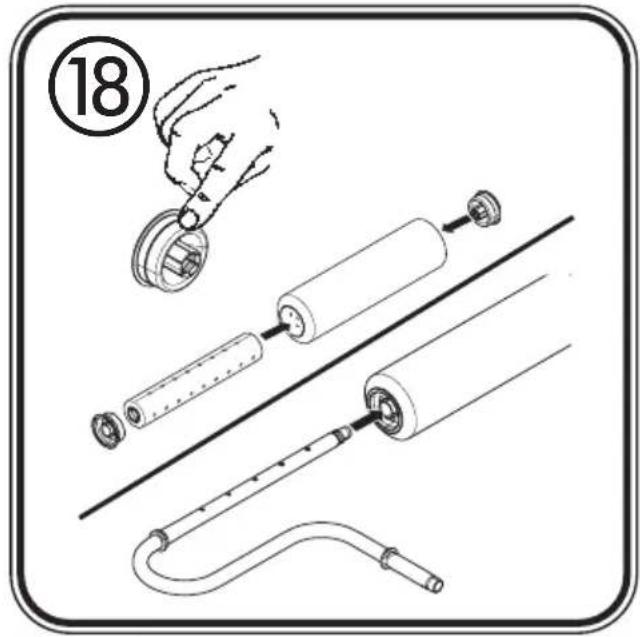
- Grease the two caps and put the roller cover and roller arm back together. (Fig. 18)
| PROBLEM CAUSE SOLUTION | ||
| A. There is paint leakage on the roller arm assembly | 1) The seal on the arm is backward2) Parts or connecting points of the roller not properly cleaned3) Paint residue on connecting areas4) The roller cover is worn or damaged5) The inner roller or sealing cap is worn or damaged6) The bearing areas are worn | 1) Turn the seal around2) Clean and properly lubricate (see "Cleanup" and "Storage" sections)3) Clean connecting areas4) Replace roller cover5) Replace the inner roller or sealing cap6) Call customer service |
| B. Plunger is difficult to pull/push | 1) O-rings are not lubricated 1) Lubricate the O-rings on the plunger | |
| C. The fill tube will not fill with paint or paint leaks from fill valve | 1) Paint residue on fill valve components | 1) Insert fill tube firmly into fill valve and twist fill tube several times to break up paint residue.2) If the problem persists, refer to the steps below to clean the fill valve components. |
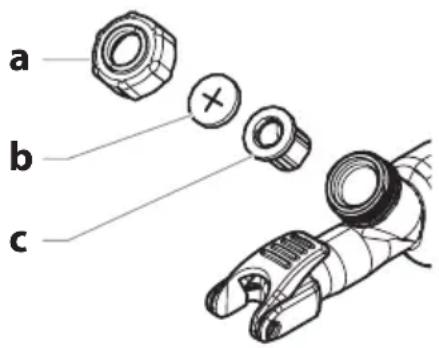
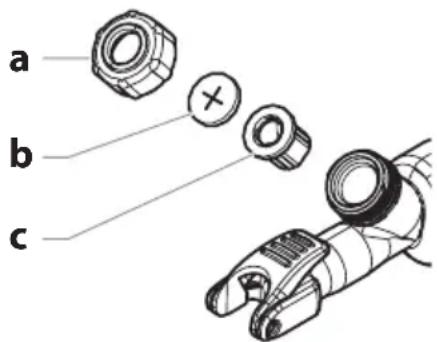
1) Unscrew the locking cap (a) on the valve housing by turning counterclockwise.
2) Remove the retaining disk (b) and the duckbill valve (c) from the valve housing
3) Clean these parts thoroughly using water.
4) Allow all parts to dry before reassembling.
5) Grease the tip of the rubber valve (c) with Vaseline.
6) Replace the duckbill valve (c) and retainer disk (b).
7) Screw the locking cap (a) on the valve housing by turning it counterclockwise.
Parts List (Fig. 19)
| Item Description Part No. Qty. | ||
| 1,3,5 Roller core and cap 2422071 1 | ||
| 2 Roller cover 12 mm | 0998230 | 1 |
| Roller cover 20 mm (accessories) | 0245717 | 1 |
| 4 Roller arm 2422073 1 | ||
| 6,7,8 Locking cap, retainer disk, duckbill valve 2325721 1 | ||
| 9 O-ring 2326966 2 | ||
| 10 Suction system 2423178 1 |
NOTICE: If after extended use you find the plunger difficult to pull while filling, apply a generous amount of petroleum jelly around the o-rings located at the end of the plunger. We have included a packet of petroleum jelly for you convenience.
natural_image
Hand holding a tool interacting with a threaded pipe fitting (no text or symbols visible)Important Note regarding Product Liability!
Due to an EC ordinance in effect since 01.01.1990, the manufacturer is liable for his product only if all parts originate from or were approved by the manufacturer and the devices are assembled and operated correctly. The use of other accessories and spare parts can partially or completely invalidate the liability.
3+1 years guarantee
J. Wagner GmbH, based in 88677 Markdorf, hereby guarantees the purchaser an extension to the statutory warranty for this product of a period of 36 months. This warranty is extended by a further 12 months if the product is registered within 4 weeks of the purchase on the Internet at www.wagner-group.com/3plus1. The start of the warranty and registration period is the date of purchase (original receipt). The warranty includes the free repair of defects which are demonstrably caused by the use of unsuitable materials in the product's manufacture or by assembly errors, as well as the free replacement of faulty components. If a problem occurs with the product during the specified period, you can return or bring the product back to us. We expressly reserve the right to provide the warranty. The warranty does not cover components subject to wear, improper use or commissioning or assembly or repairs carried out by the user. The warranty does not cover commercial use of the product. Transport damage, maintenance work and damage or defects cause by inadequate maintenance work are not covered by the warranty. Your statutory material defect rights, to which you are entitled for a period of two years from the handover of the purchased item, are not restricted by the above warranty. The warranty, along with your statutory warranty rights, will expire if the device has been opened by persons other than WAGNER service personnel.
Proof of purchase of the device must be provided when making a claim under the warranty by presenting the original receipt. For warranty claims, please contact Wagner Customer Services. If you are sending the product to us, please package it so that no further damage is sustained in transit. The relevant address for your country is shown on the last page.
Please note: Registration is only possible if the purchaser agrees to the storage of the data that has to be entered during the registration process. To the extent permitted by law, we exclude all liability for personal injury, property damage or consequential damage, in particular if the device has been used for purposes other than those specified in the operating instructions, has not been commissioned or repaired in accordance with our operating instructions or repairs have been carried out independently by a non-expert.
INDICATIONS GENERALES
natural_image
Hand holding a threaded pipe fitting (no text or symbols visible)PROBLEEM OORZAAK OPLOSSING
natural_image
Hand holding a threaded pipe fitting (no text or symbols visible)PROBLEMA CAUSA SOLUZIONE
natural_image
Hand holding a threaded pipe fitting (no text or symbols visible)natural_image
Hand holding a threaded pipe fitting (no text or symbols visible)natural_image
Hand holding a tool interacting with a mechanical component (no text or symbols visible)PROBLEMA CAUZA SOLUTIE
| C. Tubul de umplere nu umple cu vopsea sau vopseaua curge pe langa valva de umplere | 1) Reziduuri de vopsea pe componentele valvei de umplere. | 1) Introduceti tubul de umplere cu fermitate in valva de umplere si rasuciti tubul de umplere pana rupeti reziduurile de vopsea.2) In cazul in care problema persista, urmati pasii de mai jos pentru a curata componentele valvei de umplere. |
natural_image
Hand holding a tool interacting with a threaded pipe fitting (no text or symbols visible)41-605 Swietochlowice
T+48/32/346 37 00
F +48/32/346 37 13

ORKLA HOUSE CARE AB
Box 133
564 23 Bankeryd
Sweden
T +46(0)36 37 63 00

ROMIB S.R.L.


Brand : WAGNER
Model : EasyRoll
Category : Paint roller