
AlertEasy 314C - Other phone accessories DORO - Free user manual and instructions
Find the device manual for free AlertEasy 314C DORO in PDF.

| Product Type | Cordless phone with emergency call function |
| Approximate Dimensions | 22 x 20 x 8 cm (W x D x H) |
| Approximate Weight | 0.6 kg |
| Power Supply | 9 V DC mains adapter (supplied) and 4 AA 1.5 V batteries (not supplied) |
| Battery Life | Approximately 1 year (depending on usage) |
| Main Features | Automatic emergency call, phonebook (30 contacts), call log (CLIP), hands-free, voice guide, wireless remote control, direct memories (3), pre-dial, redial, mute key |
| Display | Backlit LCD screen with date, time and indicators |
| Phonebook | 30 contacts (22 digits max, 16 letters max), voice recording of names possible |
| Caller Log | Chronological recording of calls (maximum capacity: 50 entries) |
| Emergency Call | Automatic loop call up to 20 times to 3 numbers (M1, M2, +), customizable alert message (20 seconds max) |
| Wireless Remote Control | Variable range depending on environment, 12 V battery (type A23 or equivalent), can be used to trigger the alert and answer calls |
| Hearing Aid Compatibility | Yes, "T" position of induction coils |
| Connectivity | PSTN telephone line (T socket), wired handset |
| Warranty | 2 years (France) |
| Maintenance and Cleaning | Clean with a soft, dry cloth. Do not use abrasive products or solvents. |
| Safety | Use only high-quality alkaline batteries. Disconnect during thunderstorms. Do not expose to humidity, heat or frost. |
| Spare Parts and Repairability | Contact the after-sales service of the retailer. No specific spare parts mentioned. |
| Box Contents | Telephone base, handset with coiled cord, power adapter, telephone cable, wireless remote control, wall brackets, manual |
Frequently Asked Questions - AlertEasy 314C DORO
User questions about AlertEasy 314C DORO
0 question about this device. Answer the ones you know or ask your own.
Ask a new question about this device
Download the instructions for your Other phone accessories in PDF format for free! Find your manual AlertEasy 314C - DORO and take your electronic device back in hand. On this page are published all the documents necessary for the use of your device. AlertEasy 314C by DORO.
USER MANUAL AlertEasy 314C DORO
text_image
D&RO AlertEasy 08:26 12/11 462805000 0080 1 ABC 3 DEF 4 GHI 5 JXG 6 MNO 7 PQRS 8 TUV 9 WXYZ * 0 # QQ#R R 回doro AlertEasy 314C
text_image
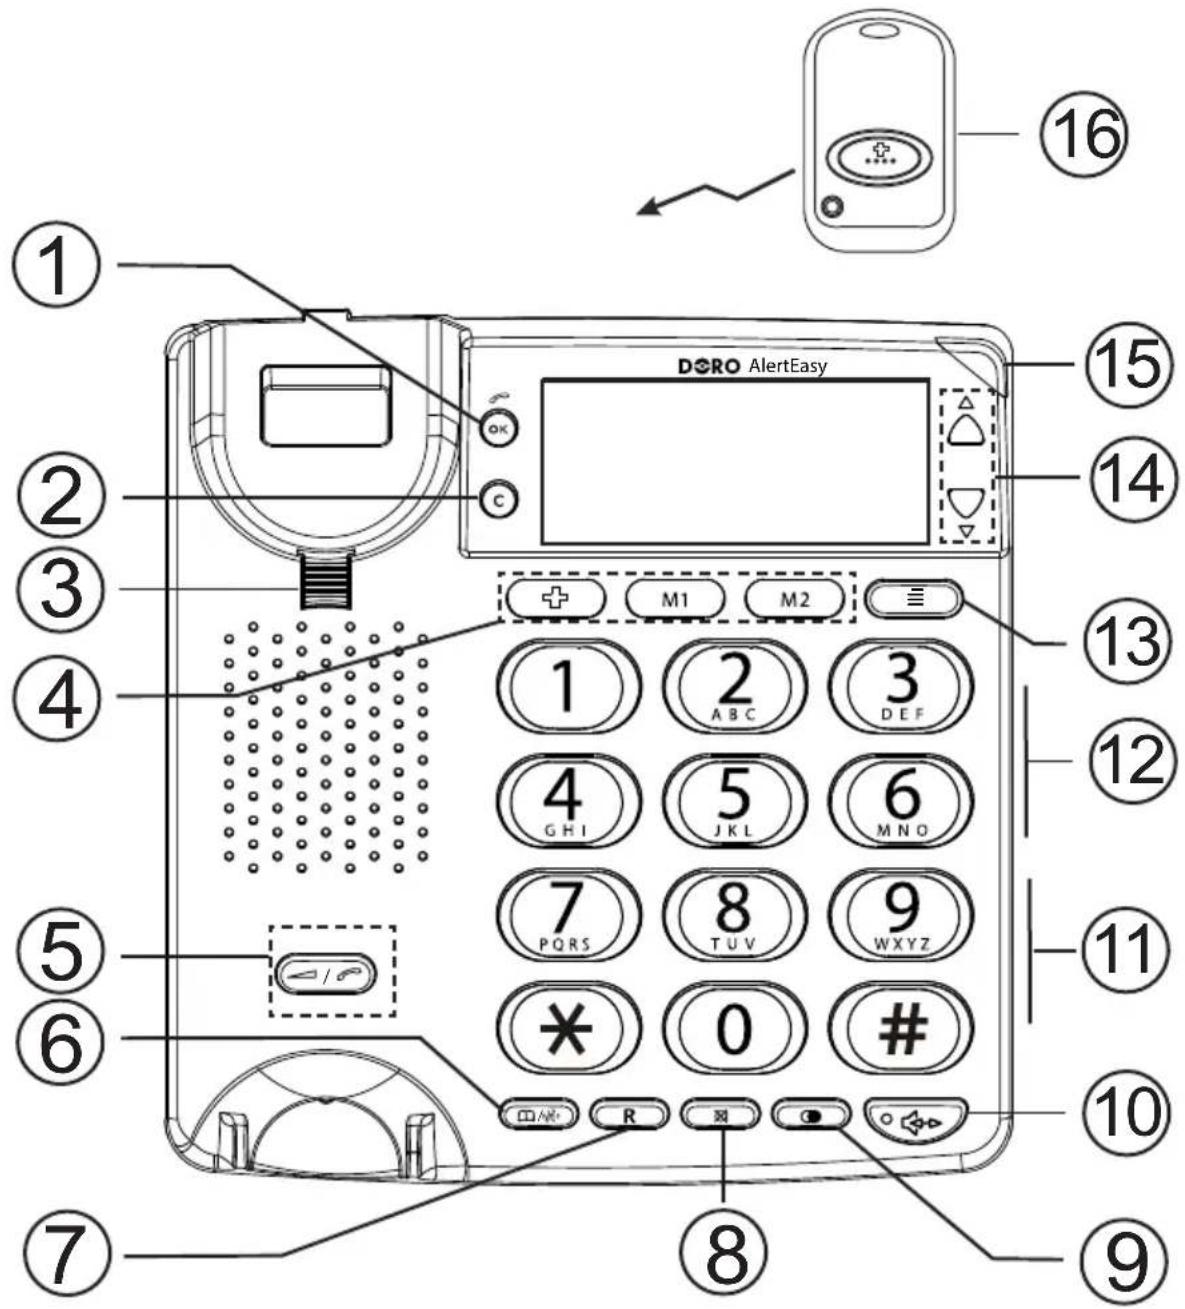
DORO AlertEasy 1 2 3 4 5 6 7 8 9 10 11 12 13 14 15 16 OK M1 M2 ≡ 1 2 3 ABC DEF 4 5 6 GHI JKL MNO 7 PQRS 8 TUV WXYZ * 0 # #English
1 Confirm/Call number
2 Delete
3 Hanging peg for handset
4 Alarm buttons
5 Handset volume control
6 Phonebook/Caller ID
7 Flash (recall)
8 Mute
9 Redialling
10 Handsfree button and LED
11 Control for speaker volume
12 Control for ring signal volume
13 Menu button
14 Scrolling buttons
15 Indicator for new number and ring signal
16 Cordless alarm button
Français
- Connect the spiral cord to the handset and to the socket marked 📋 on the telephone.
- Hang up.
- Connect the mains adapter to the mains power wall socket and to the DC 9V socket on the telephone.
- Insert batteries according to the markings in the battery compartment underneath the phone (see Batteries chapter).
- Connect the telephone cord to the network wall socket and to the socket marked 📞 on the telephone.
- Lift the handset and listen for the dial tone.
Batteries
In order to prevent caller identification, memory and other functions being lost in the event of power failure, the telephone requires four type AA 1.5V batteries.
When the batteries are running low, the symbol will illuminate.
Only use high quality batteries.
- Unplug the telephone cable and remove the cover on the base of the telephone.
- Insert the batteries according to the markings for plus and minus terminals.
- Replace the battery cover.
To change batteries in the remote control
If the remote control ceases to function change the battery as follows:
- Use a Phillips screwdriver to unscrew the screw on the back and separate the parts by gently turning a flat screwdriver in the groove on the underside.
- Exchange the 12V battery for a new one following the markings for plus and minus terminals.
- Reassemble the parts and screw together.
Wall mounting
- Attach the wall bracket to the base of the telephone as well as two screws vertically 83 mm apart.
- Position the telephone above the screws and slide it downward into place.
- Remove the hanging peg (by the hook switch) by pushing it upwards.
- Rotate the hanging peg 180 degrees, and then replace it.
The display
In standby mode the date and time are shown, as well as the number of new phone numbers and the total number of phone numbers that have been stored in the Caller ID memory.
Immediately following the connection of a call, a call timer will be shown on the display. The timer is a simple way to help you keep track of how long the call lasts.
Settings
To access settings, press ≡ button.
To exit settings, press 📄/0.32 It is possible to alter just the setting you require and then exit. It is also possible to skip backwards in the menu using C. Start by selecting the correct language to ensure that the settings can be made as effortlessly as possible.
Select language
- Press ≡. Scroll to LANGUAGE with △/▽. Press OK.
- Scroll to the desired language with / . Press OK.
- To exit, press 📄/°20.
Time/date
- Press ≡. Scroll to TIME/DATE with △/▽. Press OK.
- Scroll to the desired hour with / . Press OK.
- Scroll to the desired minute with / . Press OK.
- Scroll to the desired day with / . Press OK.
- Scroll to the desired month with / . Press OK.
- To exit, press 📄/° ^3 ° ^2 ° ^4 .
Contrast
- Press ≡. Scroll to CONTRAST with △/▽. Press OK.
- Scroll to the desired contrast setting (3=normal) with / . Press OK.
- To exit, press /0^3264 .
Voice Function
- Press ≡. Scroll to VOICE with △/▽. Press OK.
- Select ON/OFF with / . Press OK.
- To exit, press / ^0.32_4 .
When VOICE is ON numbers 0-9, caller ID, phone book and caller's name (if recorded, see Phone Book/Storing name recording) will be announced in the loudspeaker.
Tone/pulse dialling
- Press ≡. Scroll to TONE/PULSE with △/▽. Press OK.
- Scroll to the desired call method with / . Press OK.
- To exit, press 📄/° ^3 20.
Flash (recall)
- Press ≡. Scroll to FLASH with △/▽. Press OK.
- Scroll to desired Flash (recall) time with / . Choose between 100 / 270 / 300 / 600. 100 is standard. Press OK.
- To exit, press /0^3264 .
Making a call
Regular dialling
- Pick up the handset.
- Enter the desired number.
Dialling using correcting function
- Enter the required number. Mistakes can be erased using C.
- Pick up the handset OR press OR press, and the number is dialled.
If VOICE is activated the numbers 0-9 will be heard as the numbers are dialled.
Redialling
If the number dialled is engaged or if you wish to redial the last number dialled, lift the handset (or press 🔊) and press the redial button Ⓐ.
Volume control
The handset volume may be adjusted during a call using ↗ ↗.
To adjust the speaker volume, use (on the side of the phone).
Ring Signal
There is a ring signal strength switch on the side of the telephone:

Ring volume
Mute button
Press and hold ✗ to disable the handset microphone, release ✗ to reconnect the microphone.
Speaker
- Press 🔍. The handsfree function (speaker) will be activated and the LED indicator next to the button will illuminate.
- Dial the telephone number. Adjust the speaker volume with the volume control on the side.
- Speak towards the microphone located on the front edge of the telephone.
- Press ◀▶ to terminate the call.
If you wish, you can switch between handset mode and handsfree mode during the call by pressing 🔊.
Please note!
Please remember that in handsfree speaker mode, it is only possible for one person at a time to talk. The switch-over between speaker and microphone is automatic and dependent on the sound level of the incoming call and the microphone respectively. It is therefore essential that there are no loud noises, e.g. music, in the immediate vicinity of the telephone, as this will disrupt the handsfree function.
Hearing aid compatible
This telephone is hearing aid compatible. Select the T mode on your hearing aid to enable this feature.
Phonebook
30 telephone numbers (max. 22 digits) with names (max. 16 letters) can be stored in the phonebook.
If you subscribe to a caller ID service the name in the phonebook will be shown for incoming calls.
Letters
Each number key has been allocated certain letters. The phone book is arranged according to the order of the buttons, which is not the same for all languages.
1 [Space]
Storing names/numbers
- Press ≡. Scroll to STORE NUMBER with △/▽. Press OK.
- Enter the phone number to be stored (up to 22 digits). Press OK.
- Enter name. Press the corresponding number key one or more times for the first letter (see the table above). Press OK.
- First SAVED is shown and then NAME RECORDING. If a name is to be read aloud with its associated number press down OK until a tone is heard. Say the desired name and then release OK. Speak clearly and about 15-20 cm from the machine. If you do not wish to record a name, press C. Repeat steps 1-4 to store more numbers/names.
- To exit, press ☐/
Press ☐ if you want a break in the telephone number.
Store/change name recording
- Press ≡. Scroll to NAME RECORDING with △/▽. Press OK.
- Scroll among entries with / until the desired speed dial number is shown.
- Hold down OK until a tone is heard. Say the desired name and then release OK. Speak clearly and about 15-20 cm from the machine. Repeat steps 1-3 to record more names. The recording can be up to 3 seconds long
- To exit, press ☐/ Ⓜ ^20
Delete name recording
- Press ≡. Scroll to NAME RECORDING with △/▽. Press OK.
- Scroll among entries with / until the desired speed dial number is shown.
- Press C while the recording is played back. Repeat steps 1-3 to delete more recordings.
- To exit, press 📄/ Ⓤ ^20
Dialling from the phonebook
- Press 📄.
- Scroll through the entries using / . It is also possible to quick-search in the phonebook by pressing the corresponding number key one or more times for the first letter (refer to the table on the previous page).
- Press 📋, the number is dialled, wait or press 📄/ 🔍 to return to standby mode.
If names have been recorded, they will be read aloud for the chosen entry.
Changing telephone numbers/names
- Press 📄.
- Scroll to desired entry as above.
- Press down ≡ until the display shows EDIT?. Press OK.
- Correct/edit the number using C and / . Press OK.
- Correct/change the name using C and / . Press OK.
Please note!
Remember that any name recordings will be deleted and must be re-recorded after the number/name has been changed.
Deleting a phonebook entry
- Press 📄.
- Scroll to desired entry as above.
- Press C, DELETE? will be shown.
- Press and hold C until the number disappears.
Deleting all entries in the phonebook
- Press 📐.
- Scroll to any entry as above.
- Press and hold C until the display shows DELETE ALL?
- Press and hold C until the number disappears.
Caller ID
Explanation of Caller ID
Caller ID allows you to see who is calling before you answer a call or to see who has called in your absence. If the number is stored in the phonebook, the name is shown instead.
Received calls are stored chronologically. The sequence number is shown in the top right-hand side of the display.
When the memory is full, the oldest number will be deleted automatically as the new call is logged. New calls are indicated in plain text and by the red indicator flashing in standby mode.
Please note!
You must subscribe to this service from your network operator in order for this feature to function.
Retrieving and dialling incoming numbers.
- Press and to scroll through phone numbers of calls received.
- Press 🔍 to dial the number, or just wait to return to standby mode.
Messages
Apart from phone numbers, the display can show:
OUT OF AREA No information received, e.g. an international call.
PRIVATE The call comes from a blocked number or a PBX.
☒ Number not previously seen.
✉ (double envelope) Several calls have been received from this particular person.
Deleting numbers
- Scroll to the desired entry with or .
- Press C, DELETE? is displayed or press and hold until DELETE ALL? is displayed.
- Press and hold C until the number disappears.
Transferring numbers to the phonebook
- Scroll to required entry according to description above.
- Press down ≡ until the display shows COPY TO MEMORY. Press OK.
Name registration is performed in the same way as making changes to the phonebook (see previous page).
Alarm function
This function makes it possible to get immediate help/contact with those people/numbers that are stored on the buttons M1-M2 .
Alarm message
The alarm message is a voice message that is heard automatically when the alarm is activated. The pre-recorded message says:
- "This is an emergency call. To accept this call press zero."
Recording your own emergency message
- Press ≡.
-
Scroll to RECORD MESSAGE with / . Press down OK until a tone is heard. Say the desired alarm message and then release OK. Speak clearly and about 15-20 cm from the machine.
-
The recorded alarm message will be played back now. End with /%_4^20 .
If you want to change the message repeat steps 1-3.
The message should include your name, address and how to activate the handsfree function. The message can be up to 20 seconds long.
Example of an outgoing message:
-This is an emergency call from John Smith from 10, Long Street, Middleton. I require your immediate assistance. Press zero to connect this call.
To check the emergency message
- Press ≡.
- Scroll to CHECK MESSAGE with / . Press OK.
- The recorded alarm message will be played back now. End with ☐/☐20.
To delete own message and return to pre-recorded alarm message
- Press ≡.
-
Scroll to CHECK MESSAGE with / . Press OK.
-
When the recorded alarm message is played, press C to delete. End with /18
Alarm number memory
This telephone has 3 alarm number memories.
Once a number has been stored in a memory location, you only need to press one button to make the call. The alarm buttons are numbered ✦M1-M2.
All 3 alarm buttons should have a number stored.
Storing alarm numbers
- Press ≡.
- Scroll to STORE NUMBER with / . Press OK.
- Enter the phone number to be stored (up to 22 digits). Press OK.
- Select speed dial (,M1-M2) by pressing the corresponding button.
If no number has been stored on the alarm buttons (, M1-M2) the phone will beep and flash for 15 seconds, but no number will be dialled.
Even if 3 different alarm numbers are not needed, you should store the same number on different buttons.
If you need to change a number, store the new number in the same location as the old one.
Making an emergency call with alarm numbers
- Hold down the desired alarm button +, M1-M2 or the cordless alarm button (approx. 2 seconds) until the phone starts to beep and the light flashes.
- If you want to terminate the alarm, hold down the desired alarm button, M1-M2 or the cordless alarm button (approx. 2 seconds) until the phone stops to beep and the light stops flashing. It is also possible to interrupt an alarm by lifting the handset or by pressing the handsfree button.
When an alarm call is activated the phone will start to beep and flash for 15 seconds.
Then the number attached to the activated alarm button ( ± M1-M2) will be dialled.
If the cordless alarm button activates the alarm call the phone will start dialling ✝
When the first alarm call is connected, the alarm message will be heard by the person receiving the call. The recipient should then press zero on his telephone to accept the call and be connected to the loudspeaker on the caller's phone. The call is kept in speaker mode for 3 minutes. If no one replies or the recipient does not accept the call within 60 seconds, a new alarm call will be initiated to the next number (M1-M2). This procedure is repeated until the call is answered and accepted, though not more than 20 times per alarm button.
It is also possible to answer incoming calls with the cordless alarm button. When the phone rings press the button on the cordless alarm button and the call is answered in speaker mode. End the call by pressing the same button.
IMPORTANT INFORMATION
DORO AlertEasy 314C and the cordless alarm button are designed and manufactured to provide a good level of security for a long period of time.
DORO AlertEasy 314C is specially developed so that both installation and use are as simple as possible.
Automatic calls to police, fire brigade etc are not normally allowed. Therefore, you should not program these numbers in the list of numbers to be called automatically in an emergency situation. Some private security companies can accept automatic calls from their clients with DORO AlertEasy 314C. Always contact the security company before programming in their number.
The range of the cordless alarm button varies depending on different factors in the surrounding environment. The radio waves carrying the signal encounter many obstacles in the path between telephone and alarm button that partly reflect and partly absorb the radio waves which result in damping effects, The range is limited by walls, floors, ceilings, metal and concrete constructions. Therefore, you should always check that the alarm button actually does have contact with the phone by activating the alarm in different places around the dwelling/premises.
Troubleshooting
Check that the telephone cord is undamaged and properly plugged in.
Disconnect any additional equipment that may be connected, e.g. extension cords and other phones. If the problem is resolved, the fault is with the other equipment.
Test the equipment on a known working line (e.g. at a neighbour's). If the product works then the fault is with your telephone line. Please inform your local telephone company.
No number shown when ringing
- In order for this feature to function, you must subscribe to the Caller ID service from your network provider.
- If a text message is shown on the display, the call may be an international call (no data received), or from a private or withheld number.
- It may not be possible to receive Caller ID information if the phone is connected to a PBX system.
If the telephone still does not work, contact the place of purchase. Don't forget the receipt or copy of the invoice.
UK
If you cannot resolve the fault using the faultfinder section, technical support is available via a premium rate telephone number: 0905 895 0854, calls cost 50 pence per minute (prices correct at the time of publication). Further contact details are available on our website: www.doro-uk.com
Alternatively you may e-mail or write to the following:
e-mail: tech@doro-uk.com
Customer Services
Doro UK Ltd
1 High Street
Chalfont St Peter
Buckinghamshire
SL9 9QE
Guarantee
This product is guaranteed for a period of 12 months from the date of purchase. In the unlikely event of a fault occurring during this period, please return the item with a copy of the purchase receipt to your place of purchase. Proof of purchase is required for any service or support required during the guarantee period.
This guarantee shall not apply to a fault caused by an accident or a similar incident or damage, liquid ingress, negligence, abnormal usage or any other circumstances on the user's part. Furthermore, this guarantee shall not apply to a fault caused by a thunderstorm or any other voltage fluctuations. (As a matter of precaution, we recommend disconnecting the telephone during a thunderstorm.)
This guarantee does not in any way affect your statutory rights.
Declaration of conformity
Doro hereby declares that the Doro AlertEasy 314C product conforms to the essential requirements and other relevant regulations contained in the Directive 1999/5/EC, 2002/95/EC.
A copy of the manufacturer's declaration is available from www.doro.com/dofc
Australia and New Zealand
Products permitted for connection to the telephone network are marked with in Australia and in New Zealand. These marks indicate the
products comply with the regulations and can be used without concern in the country of purchase.
If you believe this product is malfunctioning, please refer to the relevant section and/or consult the troubleshooting guide in this manual to ensure that you have followed the instructions carefully. As an alternative you can visit our web site for FAQ's or send an e-mail for a prompt reply.
Guarantee
This product is guaranteed for a period of 12 months from the date of purchase.
Should you experience difficulties with the product, please contact us for assistance. If the product is then found to be faulty you will be asked to return it directly to us with a copy of the purchase receipt. This guarantee shall not apply to a fault caused by an accident or a similar incident or damage, liquid ingress negligence, abnormal usage, not reasonably maintained or any other circumstances on the purchaser's part. Furthermore, this guarantee shall not apply to a fault caused by a thunderstorm or lightning, excessive or any other voltage fluctuations or faults on the telephone line. (As a matter of precaution, we recommend disconnecting the telephone during a thunderstorm).
This guarantee does not affect your statutory rights.
AUSTRALIA NEW ZEALAND
DORO Australia Pty Ltd Atlas Gentech (NZ) Limited
PO Box 6760 Private Bag 14927
Baulkham Hills BC NSW 2153 Panmure
Australia Auckland
New Zealand
Consumer Support Consumer Support
Ph: 1300 885 023 Ph: 0900-500-25 (Toll Call)
Fax: (02) 8853-8489 Fax: (09) 574-2722
Email: support@doro.com.au Email: support@atlasgentech.co.nz
Web site: www.doro.com.au
REN (RN for New Zealand)
The REN (Ringer Equivalence Number) or (RN) is of significance only if you wish to connect more than 1 telephone to your telephone line. A standard telephone line has a maximum REN capacity of 3 (RN of 5). It is possible to connect 3 devices with a REN of 1 (RN of 1) with no degradation to the product's performance. Exceeding this limit may cause the volume of the ringer in any phone to decrease or not ring at all.
Notes for operation in New Zealand
ALL PRODUCTS
The grant of a Telepermit for any item of terminal equipment indicates only that Telecom has accepted that the item complies with the minimum conditions for connection to its network. It indicates no endorsement of the product by Telecom, nor does it provide any sort of warranty. Above all, it provides no assurance that any item will work correctly in all respects with another item of Telepermitted equipment of a different make or model, nor does it imply that any product is compatible with all of Telecom's network services.
This equipment shall not be set to make automatic calls to the Telecom “111” Emergency Service.
This equipment may not provide for the effective hand-over of a call to another device connected to the same line.
This equipment should not be used under any circumstances that may constitute a nuisance to other Telecom Customers.
CND PRODUCTS
If a charge for local calls is unacceptable, the “DIAL” button should NOT be used for local calls. Only the 7 digits of the local number should be dialled from your telephone. DO NOT dial the area code digit or the “0” prefix.
Raccordement
Declaration of conformity
natural_image
Simple line drawing of a trash bin with no text or symbolsKytkeminen
natural_image
Symbol of a trash bin crossed with no text or numbers, representing environmental restriction (no text present)ODCINEK GWARANCYJNY NR 1
MODEL: doro AlertEasy 314C
pieczęć sklepu
ODCINEK GWARANCYJNY NR 2
MODEL: doro AlertEasy 314C
pieczęć sklepu
ODCINEK GWARANCYJNY NR 3
MODEL: doro AlertEasy 314C
pieczęć sklepu
ODCINEK GWARANCYJNY NR 4
MODEL: doro AlertEasy 314C
ODCINEK GWARANCYJNY NR 5
pieczęć sklepu