
OFFICEJET 9100 ALL-IN-ONE PRINTER - Multifunction Printer HP - Free user manual and instructions
Find the device manual for free OFFICEJET 9100 ALL-IN-ONE PRINTER HP in PDF.

| Product type | Multifunction printer (print, copy, scan, fax) |
| Brand | HP |
| Model | Officejet 9100 All-in-One Printer |
| Main functions | Print, copy, scan, fax, photo, email |
| Printing technology | Inkjet |
| Tray capacity | Tray 1: 150 sheets, Tray 2 (optional): 250 sheets |
| Automatic document feeder (ADF) | Yes, capacity not specified |
| Automatic duplex printing | Yes, via auto-duplex unit |
| Connections | USB, parallel, Ethernet network (via HP Jetdirect), phone jack |
| Display | Control panel display with menus and status messages |
| Ink cartridges | 4 individual cartridges (black, cyan, magenta, yellow) |
| Print heads | 4 replaceable print heads |
| Power supply | 100-240 V AC, 50/60 Hz |
| Approximate weight | 16 kg |
| Approximate dimensions | 508 x 413 x 356 mm |
| Included software | Print drivers, OCR software, configuration tools |
| Warranty | 1 year for hardware, 90 days for ink cartridges |
| Safety | Grounded power outlet, avoid water, do not open |
| Maintenance | Unplug before cleaning, no user-serviceable parts |
| Optional accessories | Keyboard, DIMM modules, HP Jetdirect print server |
Frequently Asked Questions - OFFICEJET 9100 ALL-IN-ONE PRINTER HP
User questions about OFFICEJET 9100 ALL-IN-ONE PRINTER HP
0 question about this device. Answer the ones you know or ask your own.
Ask a new question about this device
Download the instructions for your Multifunction Printer in PDF format for free! Find your manual OFFICEJET 9100 ALL-IN-ONE PRINTER - HP and take your electronic device back in hand. On this page are published all the documents necessary for the use of your device. OFFICEJET 9100 ALL-IN-ONE PRINTER by HP.
USER MANUAL OFFICEJET 9100 ALL-IN-ONE PRINTER HP
Starter CD 1: Microsoft® Windows® software installation program
Starter CD 2: Mac OS software installation program • Windows NT 4.0 printer drivers • OCR Software (Windows)
Contenu du CD
Copyright information
© 2004 Copyright Hewlett-Packard Development Company, L.P.
Edition 1,3/2004
Reproduction, adaptation or translation without prior written permission is prohibited, except as allowed under the copyright laws.
The information contained herein is subject to change without notice.
The only warranties for HP products and services are set forth in the express warranty statements accompanying such products and services. Nothing herein should be construed as constituting an additional warranty. HP shall not be liable for technical or editorial errors or omissions contained herein.
Trademark credits
Microsoft® and Windows® are U.S. registered trademarks of Microsoft Corporation. All other products mentioned herein may be trademarks of their respective companies.
© 2004 Copyright Hewlett-Packard Development Company, L.P.
Édition 1, 3/2004
Always follow basic safety precautions when using this product to reduce the risk of injury from fire or electric shock.
1 Read and understand all of the instructions in the documentation that comes with the product.
2 Use only a grounded electrical outlet when connecting this product to a power source. If you do not know whether the outlet is grounded, check with a qualified electrician.
3 Observe all warnings and instructions that are marked on the product.
4 Unplug this product from AC power outlets before cleaning.
5 Do not install or use this product near water, or when you are wet.
6 Install the product securely on a stable surface.
7 Install the product in a protected location where no one can step on or trip over the power cable, and the power cable cannot be damaged.
8 If the product does not operate normally, see "Maintaining and troubleshooting" in the onscreen user's guide on the Starter CD for your operating system.
9 No user-serviceable parts are inside of this product. Refer servicing questions to qualified service personnel.
Setup solution overview
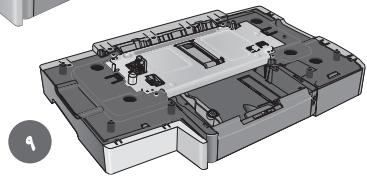
Front view 6
Printing supplies area. 7
Back view. 8
Control panel. 9
Before you begin. 10
Prepare the location. 11
Unpack and assemble the all-in-one 13
Step 1: Check the package contents. 13
Step 2: Remove the packing materials. 14
Step 3: Unlock the scanner and the keyboard tray. ....... 15
Step 4: Install tray 2^ 15
Step 5: Replace the control-panel overlay. 16
Step 6: Install the auto-duplex unit. 17
Step 7: Install the ADF input tray. 17
Load paper and ink supplies. 18
Step 1: Load the paper into tray 1 or tray 2. 18
Step 2: Connect the power cable and turn on the all-in-one. 20
Step 3: Set the language, country/region, date, and time. 20
Step 4: Install the ink cartridges. 21
Step 5: Install the printheads. 22
Set up the fax 25
Step 1: Connect the all-in-one to a telephone line. 25
Step 2: Configure the fax features. 26
Connect the all-in-one to a network 26
Step 1: Connect the all-in-one to a network. 27
Step 2: Configure the network settings. 27
Step 3: Configure the e-mail settings. 28
Step 4: Install the software. 29
Connect directly to a computer 30
Connect the all-in-one directly to a computer with a USB or parallel cable. 30
Install optional accessories. 32
Install any optional accessories. 32
Install the keyboard. 33
Install DIMMs. 35
Verify setup 37
Verify that the all-in-one is set up correctly. 37
Verify that the all-in-one software is installed correctly. ... 39
Complete the installation 40
Register the all-in-one. 40
Congratulations! 40
Finding more information 41
Connect an additional telephone device (optional).... 43
Configure the fax settings 43
Using the basic features of the all-in-one 44
Solving installation problems 45
Hewlett-Packard limited warranty statement 62
Installation de la presentation des solutions
Vue de face 6
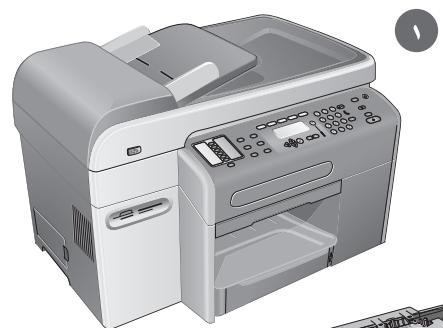
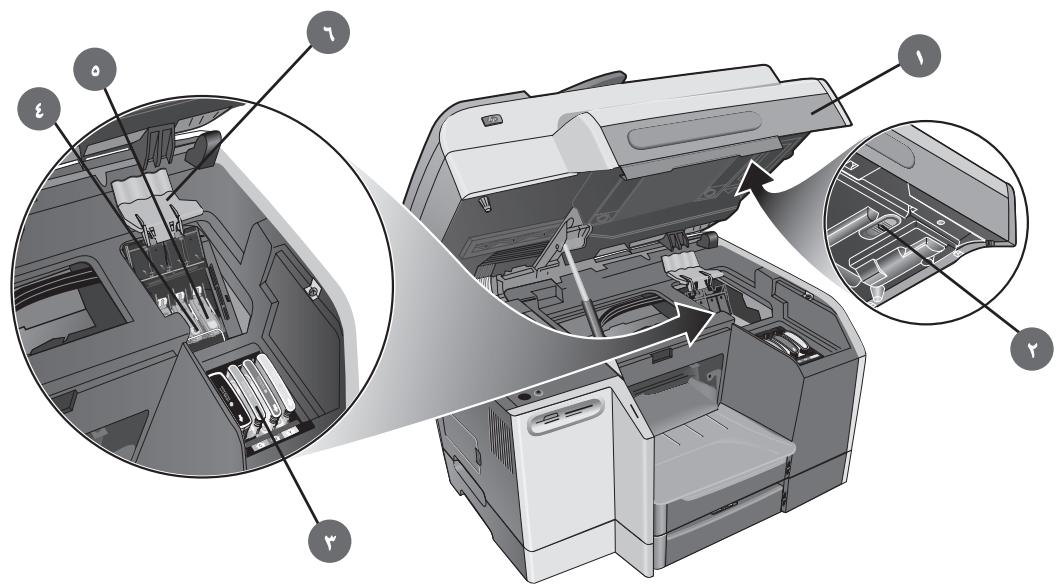
1) Flatbed scanner lid, 2) scanner glass, 3) control panel,
4) keyboard tray, 5) output tray, 6) paper-level indicator,
7) tray 1, 8) tray 2^ , 9) output tray extension, 10) print-carriage access-door handle, 11) DIMM access side cover,
12) memory card slots.
Available for some models.

CAUTION: To ensure that the all-in-one software is installed successfully and functions properly, do not connect the all-in-one directly to a computer with a USB or parallel cable until prompted by the installer software.
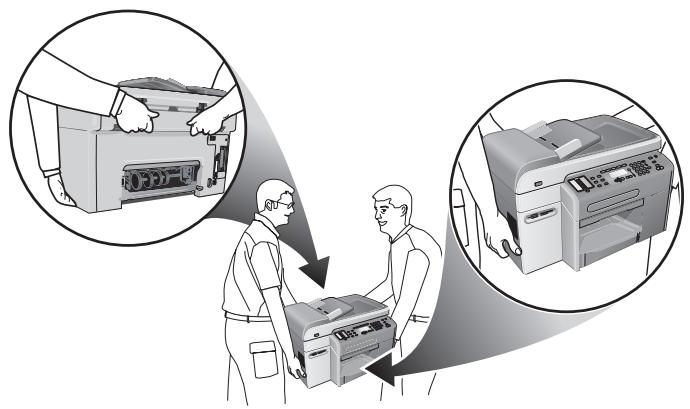

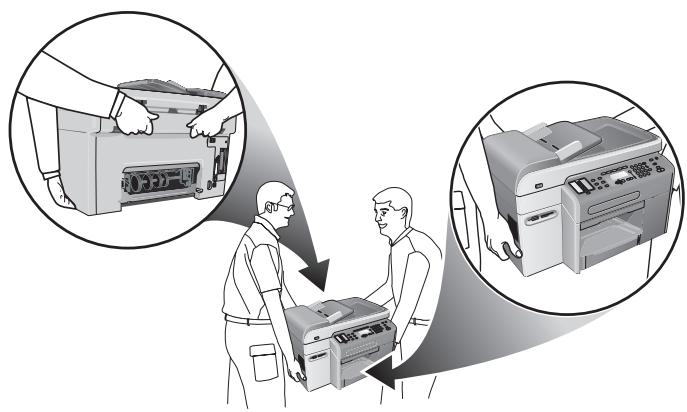
CAUTION: The all-in-one is heavy. To prevent physical injury, two people should lift and move it. Each person should grasp the back of the all-in-one and the hand grips on each side of it.
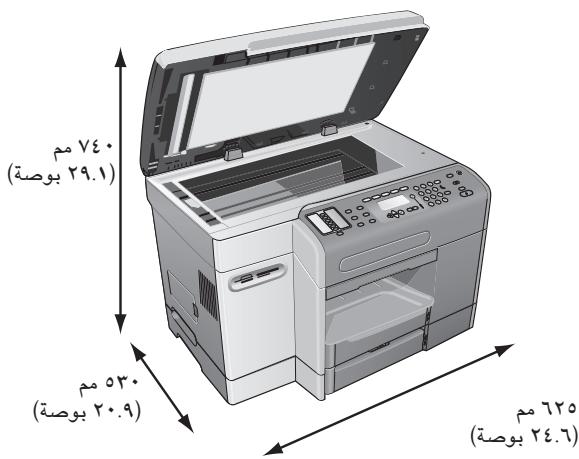
Prepare the location.
The surface must be sturdy, level, and located in a well-ventilated area. Allow space around the all-in-one, including 50 mm (2 inches) for ventilation. Also, make sure that you leave enough room so that you can gain access to the back of the all-in-one and open the flatbed scanner lid.
Note: Includes the height of tray 2 (65 mm or 2.6 inches), which is available for some models.
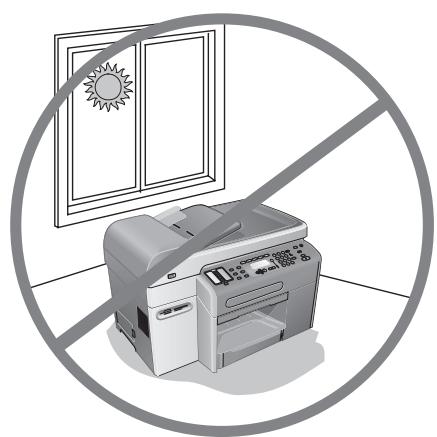
Do not place the all-in-one in direct sunlight or near chemicals. Make sure that the environment does not experience abrupt changes in temperature or humidity.
Temperature: 15^ to 35^ Celsius (C) (59^ to 95^ Fahrenheit [F])
- Relative humidity: 10 percent to 80 percent
Make sure that the location has an adequate power supply. Check the voltage rating on your all-in-one. The rating is located on the right, rear corner next to the alternating current (AC) socket (power input).
Power requirements:
100 to 240 volts AC
50/60 hertz (Hz) (± 3Hz)
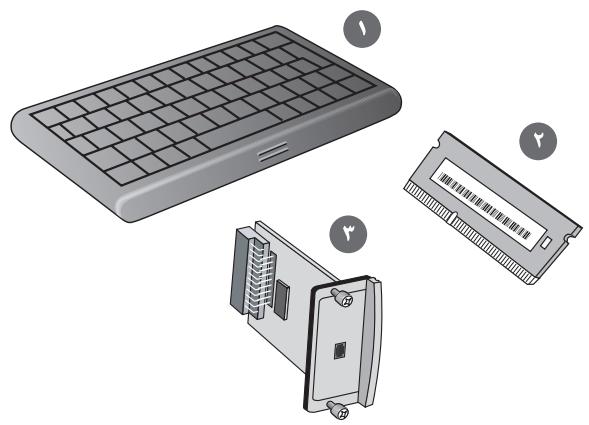
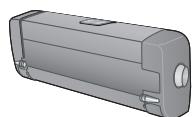
Step 1: Check the package contents.
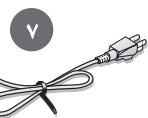
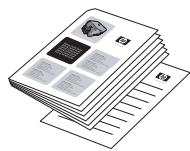
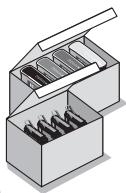
1) All-in-one, 2) auto-duplex unit, 3) printed documentation, 4) phone cord, 5) ink cartridges and printheads, 6) Starter CDs, 7) power cord, 8) control-panel overlay, 9) tray 2^* .
*Available for some countries/regions.
**Included with the HP Officejet 9120 all-in-one and HP Officejet 9130 all-in-one.
4) Yazici kafasi mandali. 5) Yazirma taşıyicensi alanı.
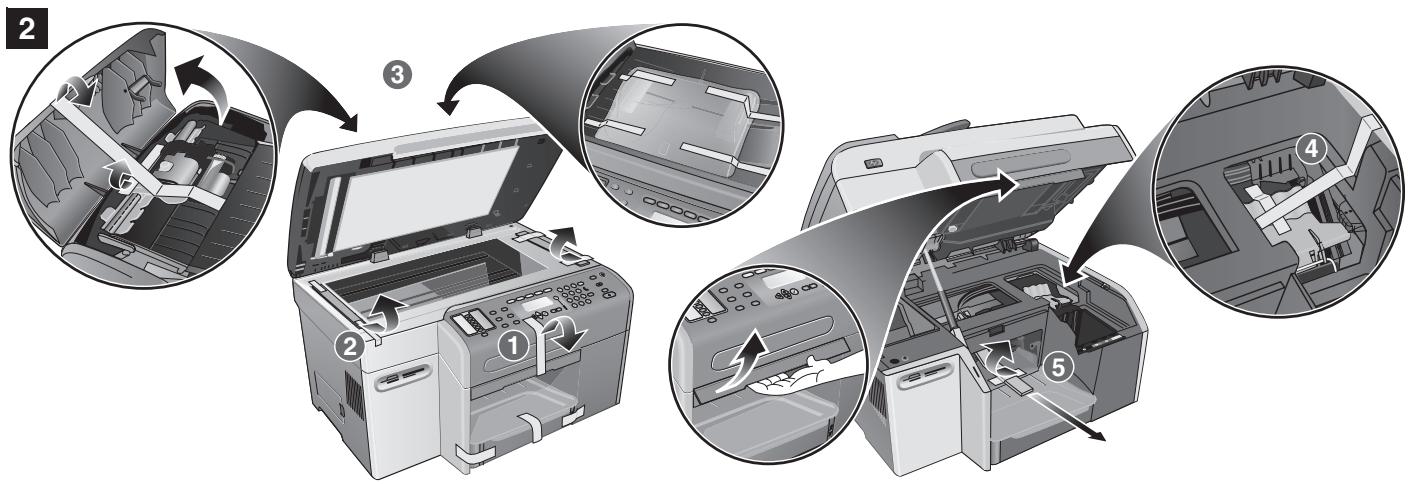
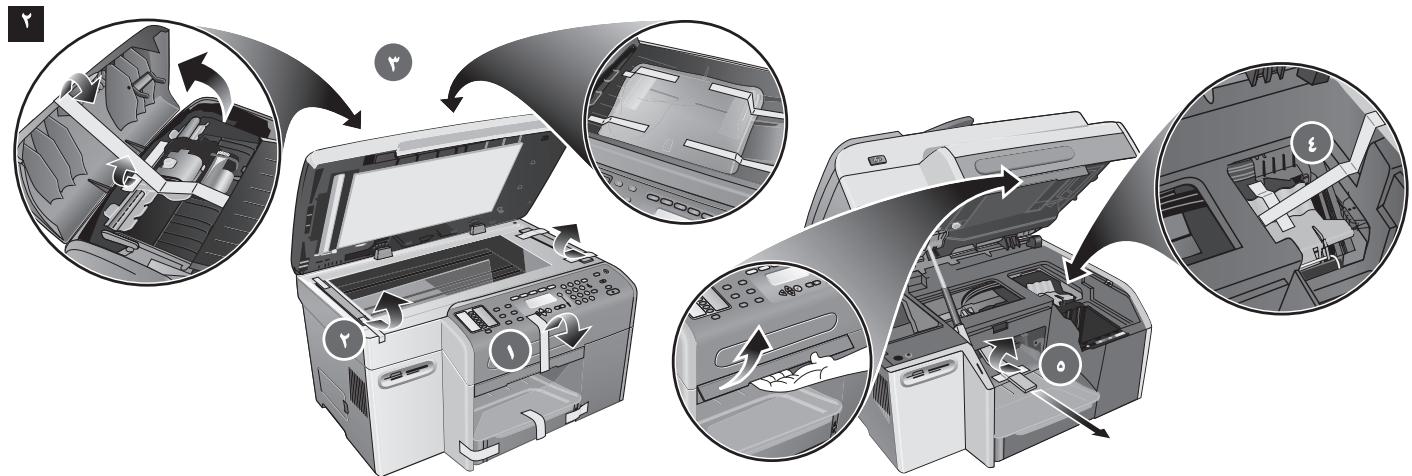
Remove all packing materials from the following locations:
1) The exterior of the all-in-one. 2) The flatbed scanner glass area.
3) The automatic document feeder (ADF) area and the ADF output tray.
Step 2: Remove the packing materials.
4) The printhead latch. 5) The print carriage area.
3
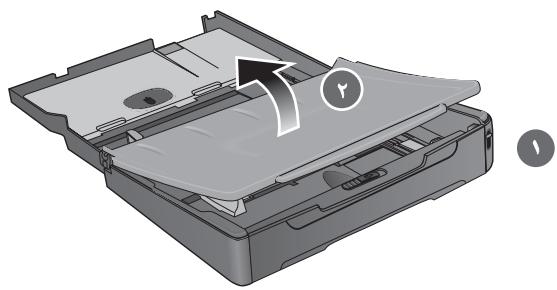
Step 3: Unlock the scanner and the keyboard* tray.
1) Slide the scanner lock to the unlocked position. 2) Remove the keyboard tray lock from the underside of the print-cartridge access door. 3) Close the print-carriage access door.
*Included with the HP Officejet 9130 all-in-one.
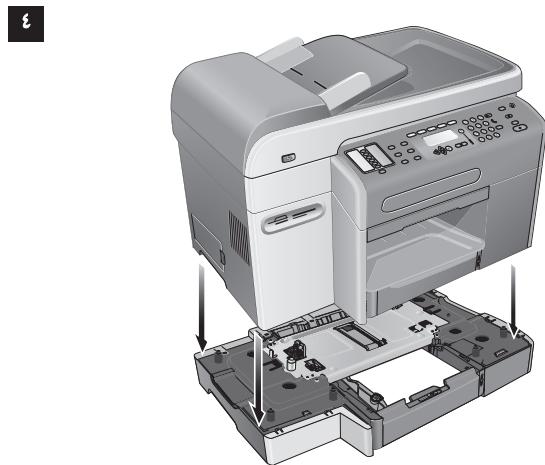
CAUTION: When installing tray 2, be careful to keep your fingers and hands clear of the bottom of the all-in-one.
1) Unpack tray 2 and remove the packing materials. 2) Place tray 2 on the prepared location, and then place the all-in-one on top of tray 2. *Included with the HP Officejet 9120 all-in-one and HP Officejet 9130 all-in-one.
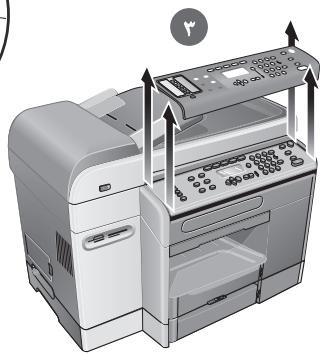
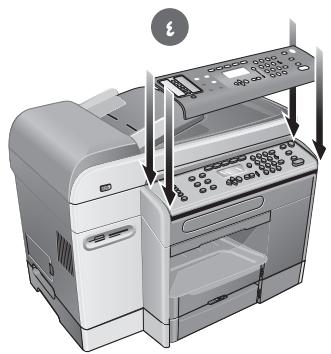
Step 5: Replace the control-panel overlay.
CAUTION: Make sure that the power is off before performing this step.
1) Choose a control-panel overlay with your preferred language.
2) Use your fingers to pry the front edge of the control-panel overlay loose from the all-in-one. 3) Lift it off the control panel.
4) Align the new overlay with the holes on the control panel, insert the top portion first, and then press down to snap it into place.
Etapa 6: Instale a unidade duplex automatica.
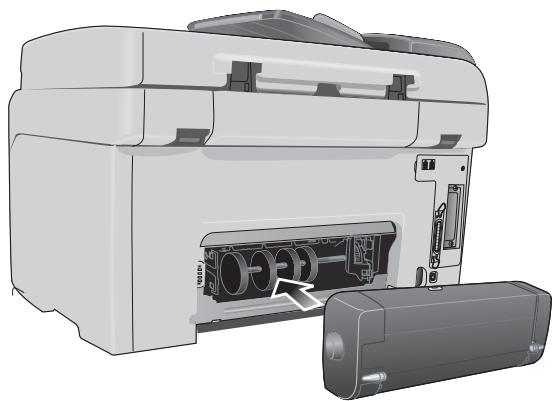
Slide the auto-duplex unit into the back of the all-in-one until it locks into place.
Step 6: Install the auto-duplex unit.
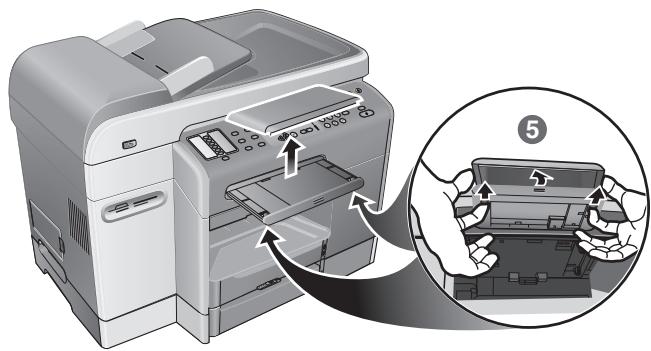
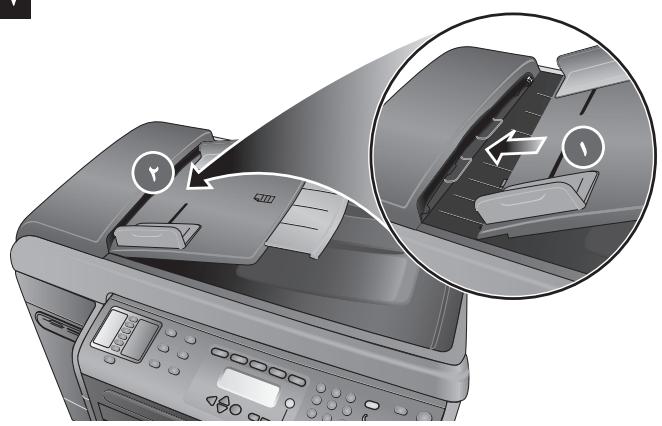
Adim 7: ADF giris tepsisini takin.
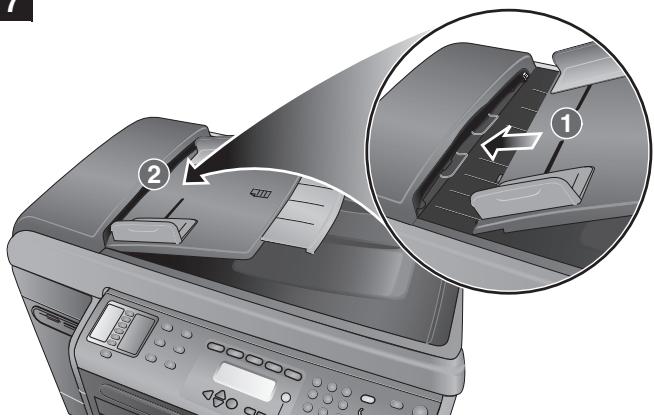
1) Align the tabs on the ADF input tray with the slots on the all-in-one.
2) Slide the ADF input tray into the slots until it snaps into place.
Step 7: Install the ADF input tray.
1
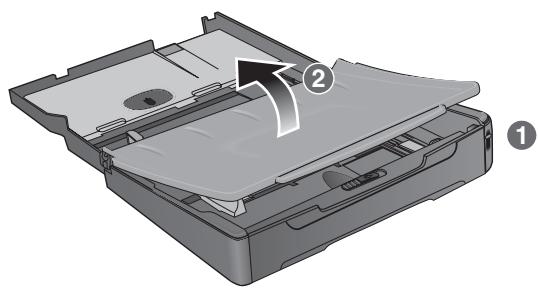
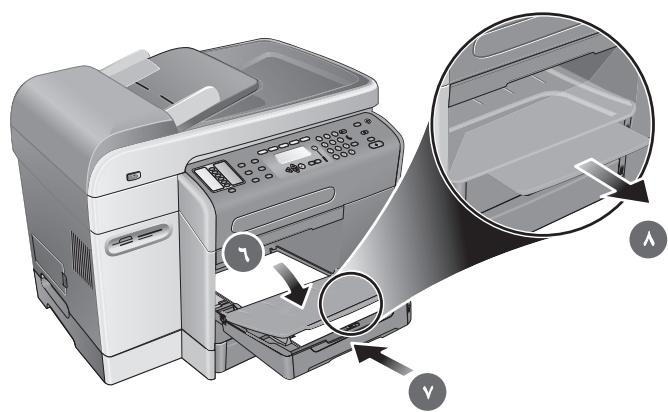
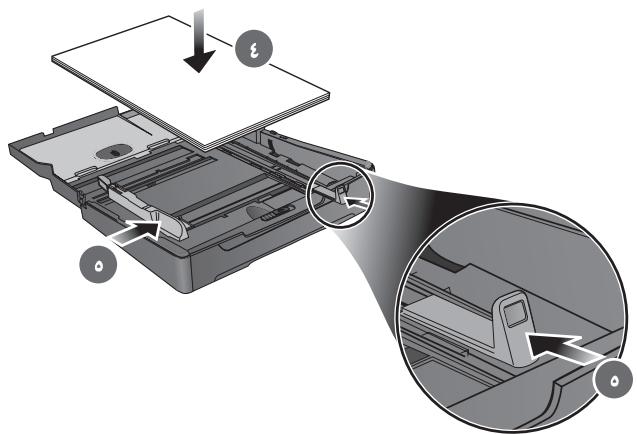
Step 1: Load the paper into tray 1 or tray 2.
1) Pull the tray out. 2) If you are loading tray 1, raise and remove the output tray.
3) For paper between 279 mm and 356 mm (11 inches and 14 inches) long, move the latch on the tray to the right and lower the front of the tray.
Étape 1 : Chargement de papier dans le bac 1 ou 2.
1) Retirez le bac. 2) Si vous chargez le bac 1, soulevez et retirez le bac de sortie.
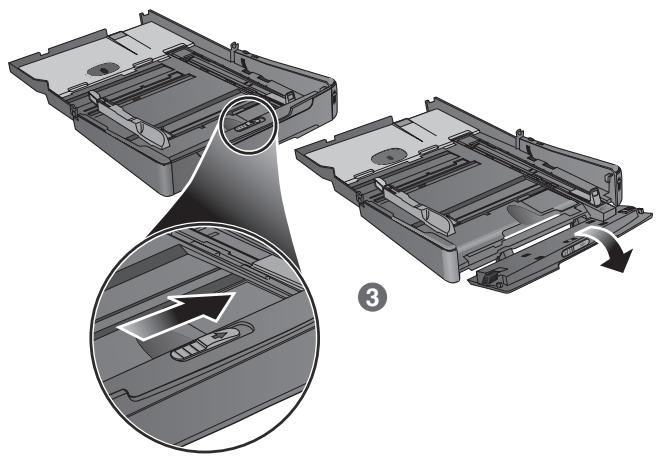
4) Place up to 150 sheets of paper into tray 1 or up to 250 sheets of paper into tray 2. 5) Slide the media length and width adjusters to the edges of the media.
6) If you are loading tray 1, reattach and close the output tray. 7) Slide the tray into the all-in-one. 8) Pull out the extension on the output tray.
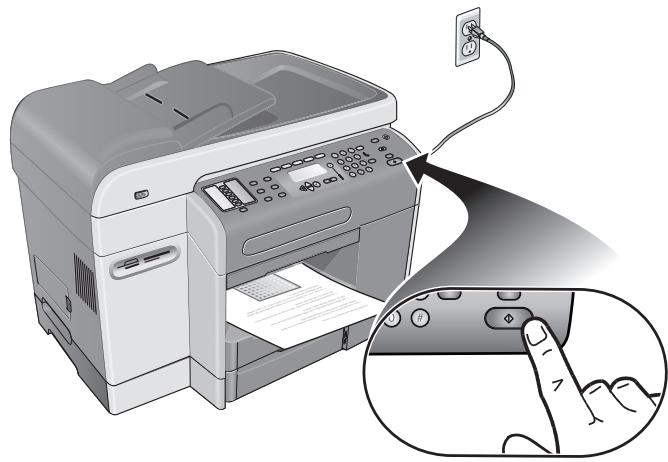
Step 2: Connect the power cable and turn on the all-in-one.
Paso 3: Defina el idioma, pais/region, Fecha y hora.
When you first turn on the power, the control panel prompts you to set the language. 1) Press - or + to locate your Language, and then press (select).
Step 3: Set the language, country/region, date, and time.
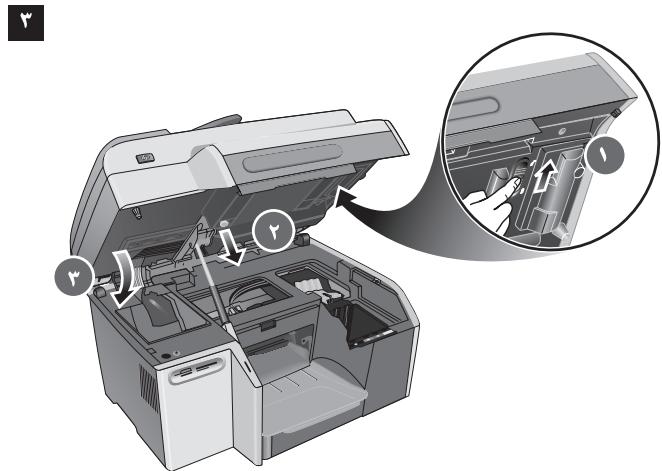
3) Align the arrow on each cartridge with the arrow on its color-coded slot, and then insert the cartridge into the slot. 4) Press firmly on each cartridge until it snaps into place.

Step 5: Install the printheads.
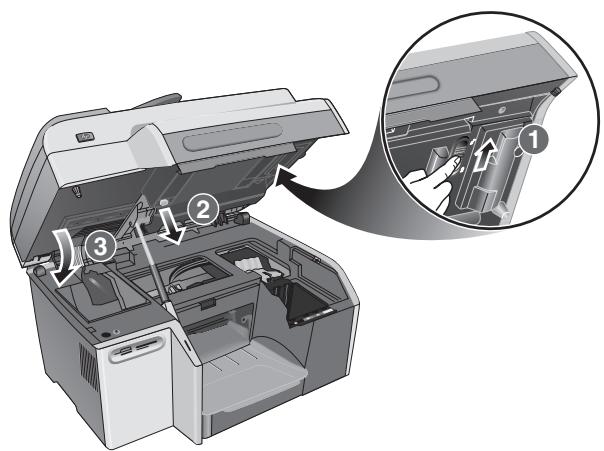
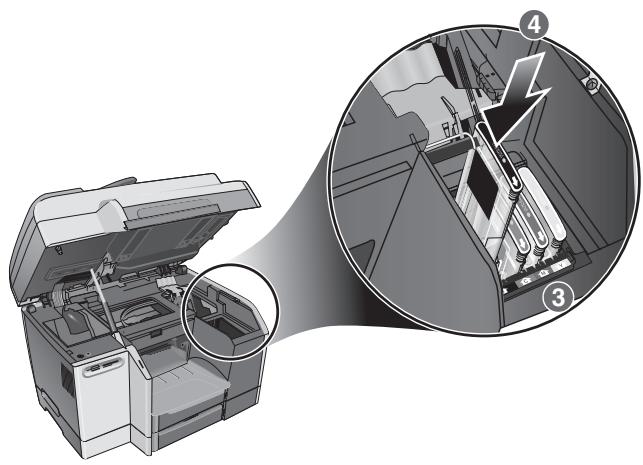
1) With the print-carriage access door open, lift the printhead latch from the rear, and then pull it forward and down to release the hook from the metal catch. 2) Lift and push the latch toward the back of the all-in-one.
3) Remove the packing materials from the printhead area. 4) Remove each printhead from its package, and then remove the protective tape from each printhead.
5) Insert each printhead into its color-coded slot, and then press firmly on each printhead to ensure proper contact after installation.
6) Pull the latch all the way forward and down, and engage the catch with the hook. 7) Push the latch towards the back of the all-in-one. Note: You might need to apply some pressure to close the latch.
8) Close the print-carriage access door. The all-in-one automatically aligns the printheads and prints two pages in about five minutes. If the control panel shows an error message, see the "Solving installation problems" section in this guide.
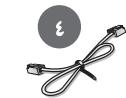
Step 1: Connect the all-in-one to a telephone line.
CAUTION: To reduce the risk of fire, use only No. 26 AWG or larger telecommunication line cord (provided with the all-in-one).
1) Unplug any telephone devices (such as a telephone or an answering machine) from the phone jack where you are connecting the all-in-one. 2) Connect the phone cord that came with the all-in-one between the (line-in) port on the all-in-one and the phone jack.
Step 1: Connect the all-in-one to a network.
1) Connect the network cable to the all-in-one.
Step 2: Configure the network settings.
Configure the network settings (such as the IP address and the HP Jetdirect print server settings). For more informations, see the onscreen user's guide and the HP Jetdirect Administrator's Guide on the Starter CD for your operating system.
Step 3: Configure the e-mail settings.
Note: You must have an all-in-one keyboard and an HP Jetdirect 615
or 620 print server installed to use the network e-mail feature.
1) Obtain the login and gateway information for the SMTP server.
Also, if you are connecting to an LDAP server, obtain the login information for the LDAP server.
2) In a supported Web browser on your computer, type the IP address that you assigned to the all-in-one, and then press ENTER. (The IP address appears on the control panel when the all-in-one is in the Ready state or on the Configuration page.) 3) Click the Settings tab.
4) Click E-mail in the left pane. 5) Use the tabs in the right pane to configure the e-mail settings. Click Apply to save the settings.
6) If necessary, change the default FROM e-mail address from the control panel. See the onscreen user's guide for more information.
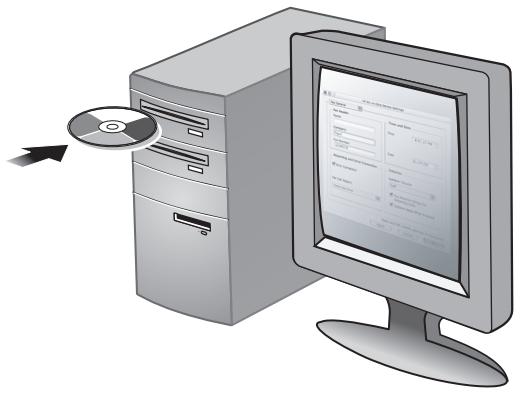
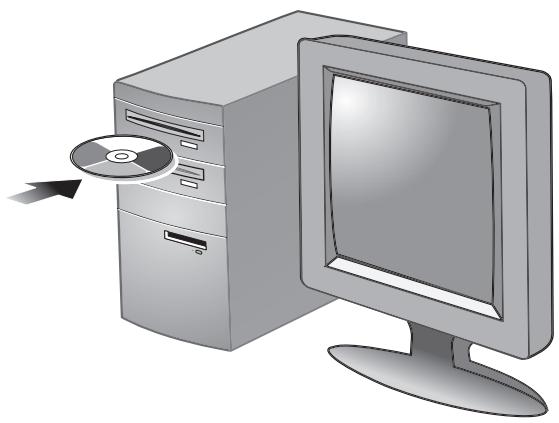
Step 4: Install the software.
1) Insert the Starter CD for your operating system into the CD-ROM drive and follow the instructions in the installation program. Note: For information about installing software on client computers or installing only the printer drivers, see the onscreen user's guide on the Starter CD for your operating system.
To convert scanned text into a format on a Microsoft® Windows® computer that you can edit, install the ReadIris optical character recognition (OCR) software from Starter CD 2 on the client computers.
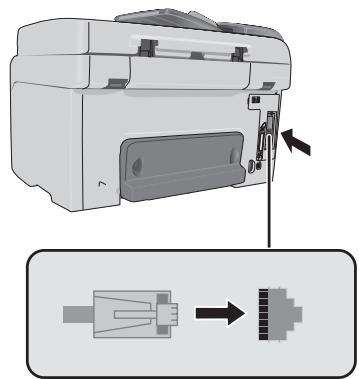
Connect the all-in-one directly to a computer with a USB or parallel cable.
1) Insert the Starter CD for your operating system into the CD-ROM drive and follow the instructions on the screen. To install all of the components on a computer running Windows, select the "Typical" installation option.
2) When prompted, connect the USB or parallel cable to the all-in-one and the computer.
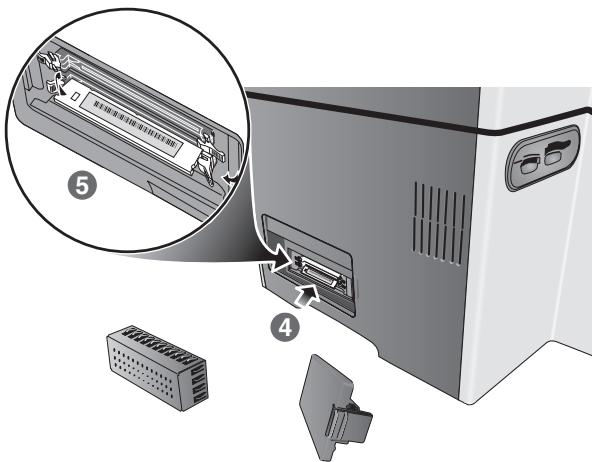
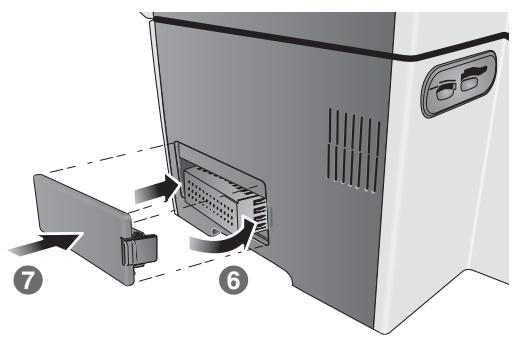
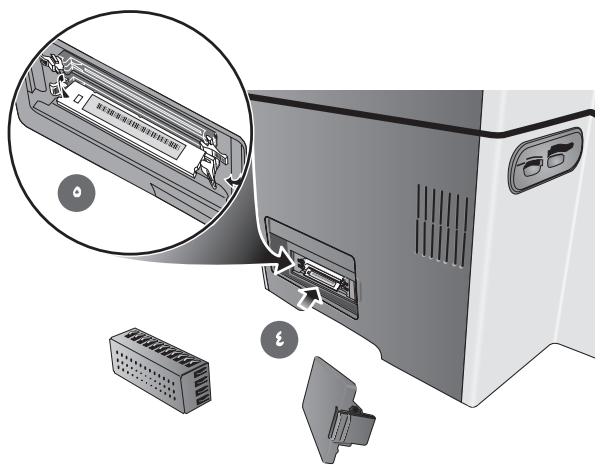
If you have purchased optional accessories for the all-in-one, install them at this time: 1) keyboard, 2) dual inline memory modules (DIMMs), 3) HP Jetdirect print server.
CAUTION: To prevent damage to the electronic components, turn off the all-in-one before you install any optional accessories.
Note: The HP Officejet 9120 all-in-one and the HP Officejet 9130 all-in-one come with an HP Jetdirect 620n print server installed. For a list of other supported print servers and installation instructions, see the onscreen user's guide on the Starter CD for your operating system.
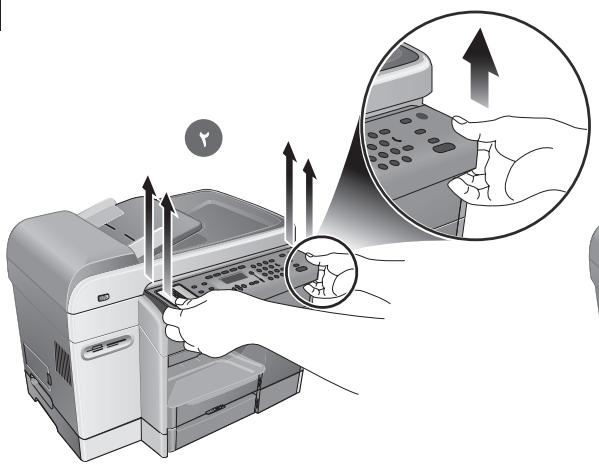
Install the keyboard.
Note: The keyboard is included, preinstalled, with the HP Officejet 9130 all-in-one. 1) Open the print-carriage access door. 2) Remove the keyboard tray lock from the underside of the print-carriage access door. 3) Close the print-carriage access door.
4) Press and release the keyboard tray to open the tray.
5) If there is a cover over the keyboard tray, remove it by pressing the two release latches on the underside of the tray.
CAUTION: Touch something metal or wear a grounding wrist strap to discharge static electricity. Failure to do so could result in damage to the parts.
1) On the left side of the all-in-one, unlatch and remove the side cover.
2) Remove the DIMM cover.
3) Remove the DIMM from the antistatic package.
Installation de modules DIMM.
4) Align the DIMM so that the notches on the lower edge line up with the raised marks in any empty DIMM slot. 5) Insert and press the DIMM into the slot until it snaps into place.
6) Replace the DIMM cover. 7) Replace the side cover.
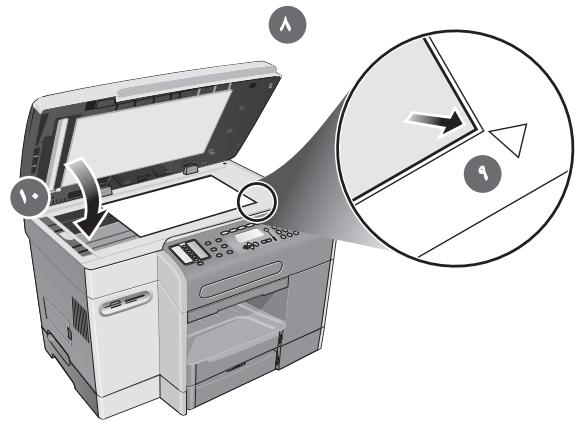
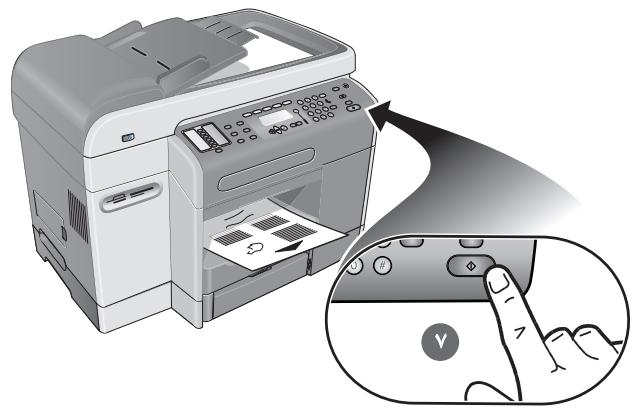
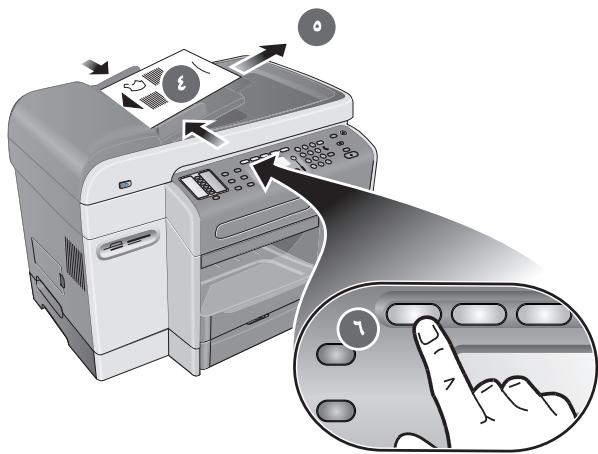
Verify that the all-in-one is set up correctly.
1) Press MENU. 2) Make sure Print Report is selected, and then press (select). 3) Press (down) to move to Device config., and then press (select), and then press (select) again to confirm. A Configuration page prints that shows the current all-in-one configuration, and the control-panel display returns to READY. (If an HP Jetdirect print server is installed, a second page also prints.)
4) Place the Configuration page in the ADF input tray top first, print-side up. 5) Adjust the ADF width adjusters to the size of the Configuration page. 6) Press COPY. The control-panel display indicates 01 COPIES on the first line and ADF on the third line.
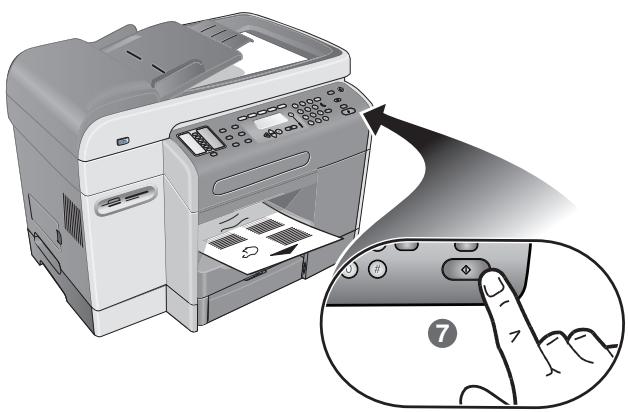
7) Press START. The all-in-one makes a copy of the Configuration page. If you encounter problems with these steps, see the "Solving installation problems" section in this guide.
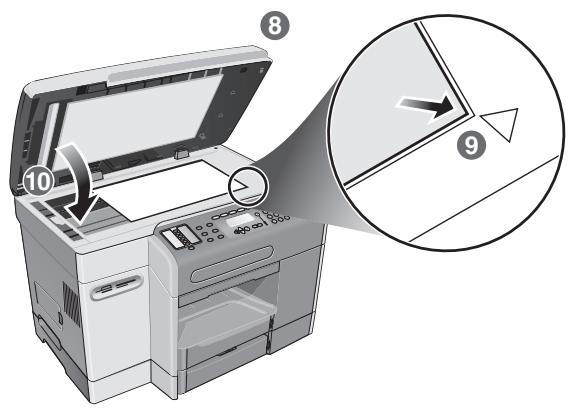
8) Open the flatbed scanner lid. 9) Place the Configuration page print-side down on the scanner glass with the top-left corner of the document located in the lower-right corner of the glass. 10) Close the flatbed scanner.
11) Press START. The all-in-one makes a copy of the Configuration page. If you encounter problems with these steps, see the "Solving installation problems" section in this guide.
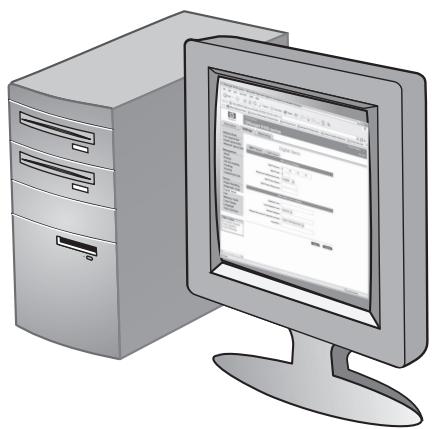
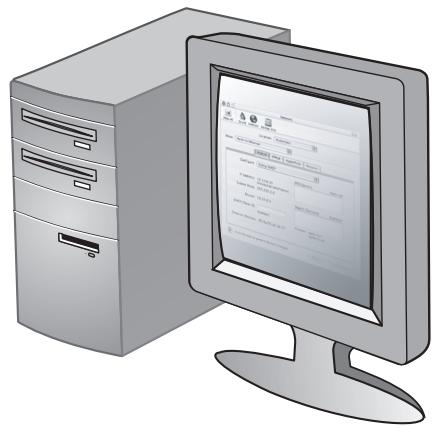
Verify that the all-in-one software is installed correctly. To verify that the all-in-one software has been installed correctly, start the software and complete basic tasks (such as printing a document or sending a scan to your computer). For more information about using the all-in-one software, see the online help for the software.
Register the all-in-one.
Register the all-in-one to receive important support and technical information. If you did not register the all-in-one while installing the software, you can register at a later time at http://www.registerer.hp.com.
Congratulations!
Your all-in-one is ready to use.
For information about using the all-in-one and troubleshooting, see the following resources:
- Onscreen user's guide on the Starter CD for your operating system
HP Instant Support (see the onscreen user's guide for more information about this resource)
HP Photo & Imaging software (Windows) or HP Image Zone software (Macintosh)
Product support site at http://www.hp.com/support/officejet9100
HP customer support guide (in the box)
- Logiciel HP Photo & Imaging (Windows) ou HP Image Zone (Macintosh)
-
Site de support technique du produit à l'adresse http://www_hp.com/support/officejet9100
Guide d'assistance clientèle HP (dans le carton) -
Software HP Foto e Imagem (Windows) ou software HP Image Zone (Macintosh)
- O site de assistência ao produit, no endereço http://www.hp.com/support/officejet9100
-
O guia de assistência ao cliente HP (na caixa)
-
Software HP Photo & Imaging (Windows) o software HP Image Zone (Macintosh)
- Sitio de soporte del producto en http://www.hp.com/support/officejet9100
La guía de servicios de atencion al cliente de HP (en la caja)
HP Fotograf ve Goruntuleme yazilimi (Windows) veya HP Image Zone yazilimi (Macintosh)
- http://www.hp.com/support/officejet9100 adresindeki ürundestek sitesi
HP mistersi destek kilavuzu (kutuda)
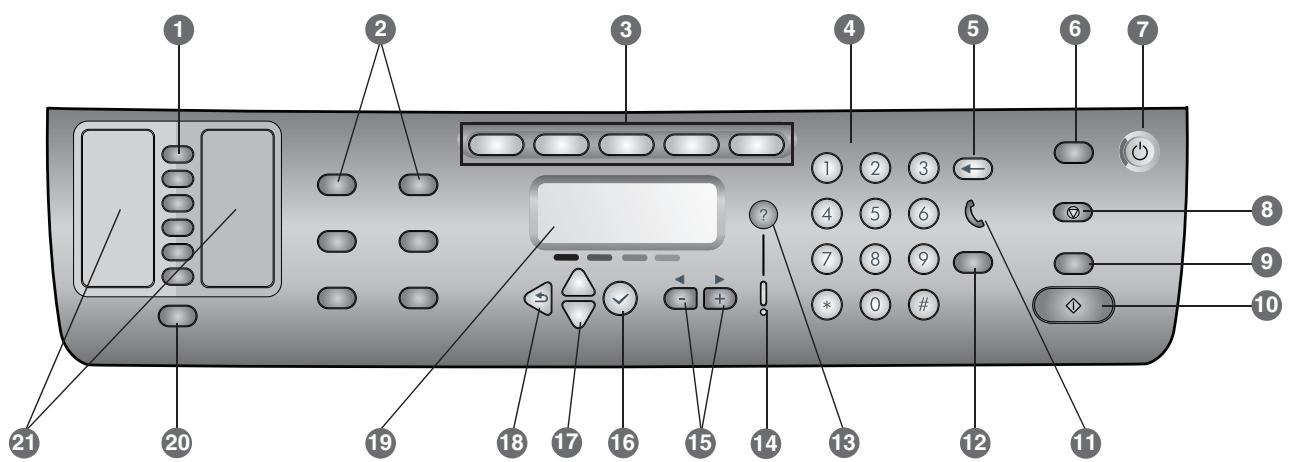
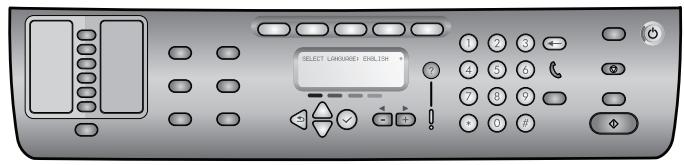
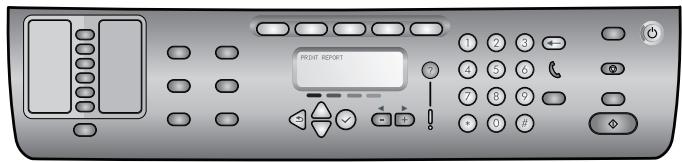
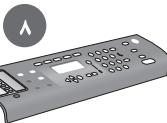
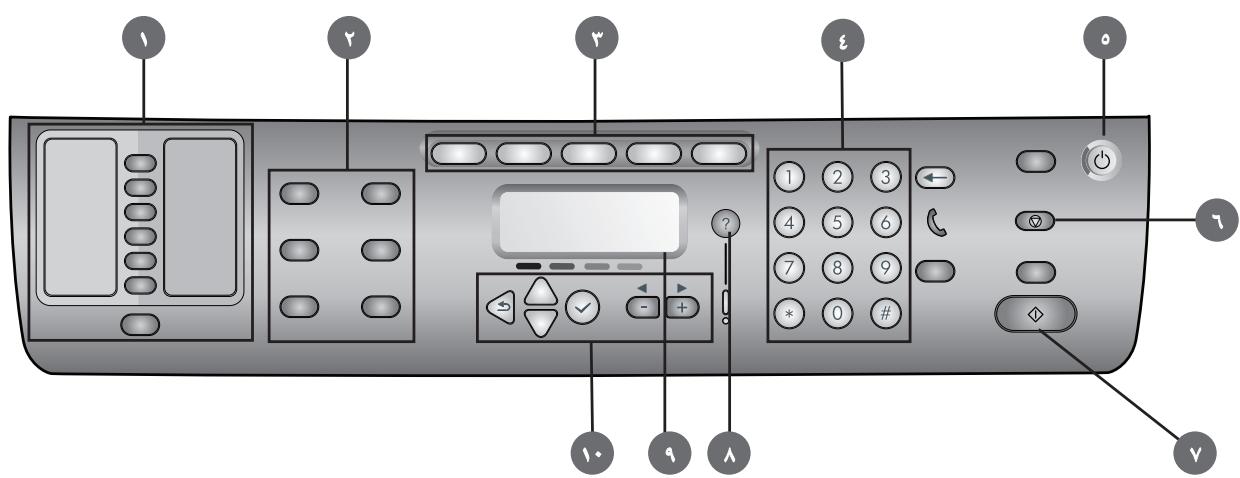
1 Speed-dial buttons: Use to select from a preconfigured list of speed-dial entries. The six buttons correspond to the first six entries in the Contacts lists. An entry might be a fax number or a group of fax numbers, an e-mail address or a group of e-mail addresses, or a folder on the network.
2 Option buttons: Use the REDUCE/ENLARGE, LIGHTER/DARKER, 2-SIDED OPTIONS, QUALITY/RESOLUTION, and TRAY/TYPE buttons to change the settings for jobs. The MENU button displays the control-panel menus that can be used to set the defaults for settings.
3 Mode buttons: Use the COPY, SCAN, PHOTO, E-MAIL, and Fax mode buttons to begin these types of jobs. A mode button lights when the button is pressed or when that mode is the active mode. A mode button blinks if the mode is not the active mode and is processing a job in the background.
4 Keypad: Use to dial fax numbers or type text. The text that you type is inserted. (It does not overwrite characters that are to the right of the cursor.)
5 (backspace) button: Erases the character to the left of the cursor in text input fields.
6 RESET/HOLD for pin button: Returns the all-in-one to the READY state; this resets all modes to their default values. If the administrator has configured the all-in-one for authorized users, holding the button down for 2 seconds or more locks the all-in-one. A personal identification number (PIN) is then required to resume operation.
7 POWER button and Ready light: The Ready light is green when the all-in-one is on.
8 STOP button
9 BLACK/COLOR button: Turns the color option on and off.
10 START button
11 (off-hook) light: Lights when the fax line is in use, and blinks when the fax line is ringing.
12 REDIAL/ANSWER button:
- Redials the most recently dialed fax number.
- Answers the phone manually for an incoming fax.
13 ? (help) button: Provides additional information about messages or menus that appear on the control-panel display. For hardware problems, displays a message that explains the problem.
14 Attention light: Blinks when there is a hardware problem that requires attention. Press ? (help) to display a message about the problem.
15 - and + buttons: Cycle through the values that are available for an option. In text input fields, move the text cursor left and right.
16 (select) button: Selects or saves the setting that appears on the control-panel display.
17 (up) and (down) buttons: Move up and down a list of options or entries.
18 (back) button: Returns to the previous level.
19 Control-panel display: Shows status and error messages, mode and setup menus and their options, help information, and ink cartridge levels.
20 CONTACTS button: Provides quick access to preconfigured lists of fax numbers and e-mail addresses, as well as e-mail addresses from an LDAP server.
21 Lists of speed-dial entries: Use these areas to identify the speed-dial entries that correspond to the six speed-dial buttons. You can write the entries on the lined paper that is provided, or print lists to insert.
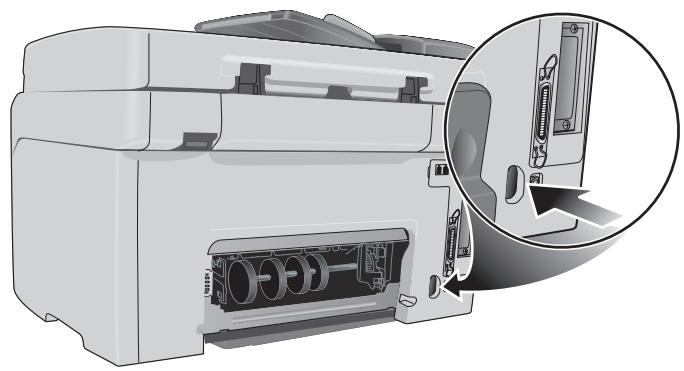
Connect an additional telephone device (optional)
The following steps provide information about adding a telephone device to an all-in-one that is connected to a dedicated phone line and does not share a voice line. For more information about fax features, see the onscreen user's guide on the Starter CD for your operating system.
Depending on the setup of your phone lines, you can connect any of the following devices to the phone line along with the all-in-one. Note: For optimal performance, HP recommends that you connect only one additional telephone device to the all-in-one.
- Modem: You can connect a computer modem (external or internal) to the fax line if you want to use the fax line for e-mail or for access to the Internet. However, you cannot send or receive faxes while using the line for these purposes.
- Extra phone: You can connect an extra phone to the fax line if you want to make outgoing calls on the fax line.
- Caller ID box: If you connect a caller ID box to the all-in-one, it must be the first device connected to the phone jack.
Note: You should not connect an answering machine or computer voice mail to the all-in-one. If you use computer voicemail, you must connect a modem (external or internal) to your dedicated voice line. Then, use the dedicated voice line to connect to the Internet and receive voicemail.
To connect a telephone device to the all-in-one
1 Unplug the power cord for the device that you want to connect.
2 Make sure that the 出 (line-in) port for the all-in-one is connected to a phone jack.
3 On the back of the all-in-one, remove the plastic insert from the (phone) port.
4 Plug one end of a phone cord into the (phone) port of the all-in-one.
CAUTION: To reduce the risk of fire, use only No. 26 AWG or larger telecommunication line cord.
5 Plug the other end of the cord into the "line" port of the telephone device.
Note: Some modems have a second "line" port to connect to a dedicated voice line. If you have two "line" ports, see your modem documentation to make sure that you connect to the correct "line" port.
6 Plug the telephone device into its power source.
Configure the fax settings
If you have connected your all-in-one to a network, or if your all-in-one is not connected to any computers or networks, use the following steps to configure the fax settings.
Note: If you have connected the all-in-one directly to a computer with a USB or parallel cable, the Fax Setup Wizard (Windows) or Setup Assistant (Macintosh) configures the fax features.
1 On the control panel, press MENU.
2 Press (down) to move to Fax Setup, and then press (select).
Configure the fax header
Note: The fax header must be set to use the fax functions in the all-in-one.
1 Press (down) to move to Fax header, and then press (select).
2 Use the keypad or keyboard to type your fax name, and then press (select). Note: The maximum number of characters allowed is 40 for the fax name.
3 Use the keypad or keyboard to type your fax number, and then press (select). Note: The maximum number of characters allowed is 20 for the fax number.
Set the answer mode (autoanswer)
Depending on your situation, you can set the all-in-one answer mode to automatic or manual.
1 Press (up) or (down) to move to Autoanswer, and then press (select).
2 Press - or + to select either ON or OFF, and then press (select).
Set the answering ring pattern
1 Press MENU.
2 Press (down) to move to ADU FAX SETUP, and then press (select).
3 Press (down) to move to Ans. ring Pattern, and then press (select).
4 Press - or + to select a ring pattern, and then press (select).
5 To determine whether the answer ring pattern is working, ask someone you know to send you a fax.
The following sections contain the steps for using the basic features of the copy, scan, fax, and photo modes of the all-in-one. For additional information about these modes, see the onscreen user's guide on the Starter CD for your operating system.
To copy a document or image
1 Load the original on the scanner glass or in the ADF.
2 If required, type your PIN on the keypad or keyboard.
3 Press COPY.
4 If the original has color and you want the copy to have color also, press the BLACK/COLOR button to turn the color setting on.
5 Press START.
To fax a document
1 Load the original on the scanner glass or in the ADF.
2 If required, type your PIN on the keypad or keyboard.
3 Press FAX.
4 Type the fax number on the keyboard or keyboard.
5 To change fax options, use one of the following methods:
- Press a control-panel option button (for example, LIGHTER/DARKER), select the value, and then press (select).
- Select an option from the control-panel display (for example, Resolution), select the value, and then press (select).
6 Press START.
To save a photo from a memory card in a network folder
1 Insert the memory card into the appropriate slot of the all-in-one.
2 If required, type your PIN on the keypad or keyboard.
3 Press PHOTO.
4 Press (down) to move to Save to network, and then press (select).
5 Type thepathname for a network folder on the keyboard or press the speed-dial button for the network folderpathname, and then press START. See the onscreen user's guide for more information about methods of specifying destinations.
6 If prompted, type your login user name, and then press (select).
7 If prompted, type your login password, and then press (select).
To print individual or all photos from a memory card
1 Insert the memory card into the appropriate slot on the all-in-one.
2 If required, type your PIN on the keypad or keyboard.
3 Press PHOTO.
4 Press (down) to move to Print Photos, and then press (select).
5 To print all photos: Press - or + to select ALL, and then press (select).
6 To print individual photos: Press - or + to select CUSTOM, press (select), type the numbers of the photos that you want to print, and then press (select).
7 Press START.
To send a scanned document or image as an e-mail attachment
1 Load the original on the scanner glass or in the ADF.
2 If required, type your PIN on the keyboard.
3 Press E-MAIL.
4 Type the e-mail address on the keyboard or press the speed-dial button for the e-mail address. See the onscreen user's guide for more information about methods of specifying destinations.
5 To change scan options, use one of the following methods:
- Press a control-panel option button (for example, LIGHTER/DARKER), select the value, and then press (select).
- Select an option from the control-panel display (for example, Resolution), select the value, and then press (select).
6 Press START.
To send a scanned document or image to a network folder
1 Load the original on the scanner glass or in the ADF.
2 Press SCAN.
3 Type thepathname for a network folder on the keyboard or press the speed-dial button for the network folderpathname, and then press START. See the onscreen user's guide for more information about methods of specifying destinations.
4 If prompted, type your login user name, and then press (select).
5 If prompted, type your login password, and then press (select).
Changing the administrator PIN
A temporary administrator PIN has been set to 1234 for the HP Officejet 9100 series all-in-one. Use the following steps to change this PIN.
1 On the control panel, press MENU.
2 Press (down) to move to ADMIN, and then press (select).
3 Press (down) to move the Set admin PIN, and then press (select).
4 Type the current PIN (the temporary PIN is 1234), and then press (select).
5 Type a new 4-digit number, and then press (select).
6 Type the new number again, and then press (select).
Using the keyboard to type accented characters
Depending on your keyboard, you can type accented characters with a one-, two-, or three-keystroke sequence. The following methods are most common:
- Press the button combination to make the accent, and then press the letter that you want to have the accent.
- Some keyboards also have the accented characters available by pressing the FN button in combination with another button.
- For those keyboards with the one-stroke accented characters, press the key.
This section provides troubleshooting suggestions for some of the most common issues associated with hardware and software installation.
See the following for additional information about installation problems:
- For late-breaking information, see theREADME file and release notes on the Starter CD for your operating system.
- For network installation problems, see the HP Jetdirect Administrator's Guide on the Starter CD for your operating system.
Hardware installation suggestions
Check the all-in-one
- Make sure that all packing tape and material have been removed from outside and inside the all-in-one.
- Make sure that the all-in-one is loaded with paper.
- Make sure the scanner lock (located on the underside of the print-carriage access door) has been moved to the unlocked position.
- Make sure that no lights are on or blinking except the Ready light, which should be on. If the Attention light is blinking, check for messages on the control panel. See the onscreen user's guide for explanations of messages.
- Make sure that the all-in-one can print a Configuration page. See the onscreen user's guide on the Starter CD for your operating system for more information.
- If the network does not have a DHCP server, manually set the IP address for the all-in-one. See the onscreen user's guide on the Starter CD for your operating system for more information.
Check the hardware connections
- Make sure that any cords and cables that you are using are in good working order.
- Make sure that the power cord is connected securely to both the all-in-one and to a working power outlet.
- Make sure that the phone cord is connected to the (line-in) port.
Check the printheads and ink cartridges
- Make sure that you have removed the tape from the printheads.
- Make sure that all of the printheads and ink cartridges are firmly installed in their correct, color-coded slot. Press down firmly on each one to ensure proper contact. The all-in-one cannot work if they are not all installed.
- Make sure that the printhead latch is closed properly.
- If the control-panel display shows a printhead error message, clean the contacts on the printheads. See the onscreen user's guide on the Starter CD for your operating system for more information.
Software installation suggestions
Check the computer system
- Make sure that your computer is running one of the supported operating systems (see the onscreen user's guide on the Starter CD for your operating system for more information).
- Make sure that the computer meets at least the minimum system requirements (see the onscreen user's guide on the Starter CD for your operating system for more information).
Verify installation preliminaries
- Make sure to use the Starter CD that contains the correct installation software for your operating system.
- Before installing software on a Windows computer, make sure that all other programs are closed.
- If the computer does not recognize the path to the CD-ROM drive that you type, make sure that you are specifying the correct drive letter.
- Make sure you are installing the software from the computer's local CD-ROM drive. Installation of the software from a shared CD-ROM drive is not supported.
- If the computer cannot recognize the Starter CD in the CD-ROM drive, inspect the Starter CD for damage. You can download the printer driver from http://www.hp.com/support/officejet9100.
Follow the recommended steps
If your computer is running a Windows operating system, HP recommends that you install the all-in-one software first. Connect the USB cable or parallel cable only when prompted by the software.

Verifique as connexoes de hardware
Siga as etapas recomendadas
| HP product | Duration of limited warranty |
| Software | 1 year |
| Accessories | 1 year |
| Ink cartridges | 90 days |
| Printheads | 1 year |
| All-in-one hardware (see the following details) | 1 year |
Extent of limited warranty
1 Hewlett-Packard warrants to the end-user customer that the HP products specified above will be free from defects in materials and workmanship for the duration specified above, which duration begins on the date of purchase by the customer.
2 For software products, HP's limited warranty applies only to a failure to execute programming instructions. HP does not warrant that the operation of any product will be uninterrupted or error free.
3 HP's limited warranty covers only those defects that arise as a result of normal use of the product, and does not cover any other problems, including those that arise as a result of:
a Improper maintenance or modification;
b Software, media, parts, or supplies not provided or supported by HP;
c Operation outside the product's specifications;
d Unauthorized modification or misuse.
4 For HP products, the use of a non-HP ink cartridge or a refilled ink cartridge does not affect either the warranty to the customer or any HP support contract with the customer. However, if product failure or damage is attributable to the use of a non-HP or refilled ink cartridge, HP will charge its standard time and materials charges to service the product for the particular failure or damage.
5 If HP receives, during the applicable warranty period, notice of a defect in any product which is covered by HP's warranty, HP shall either repair or replace the product, at HP's option.
6 If HP is unable to repair or replace, as applicable, a defective product which is covered by HP's warranty, HP shall, within a reasonable time after being notified of the defect, refund the purchase price for the product.
7 HP shall have no obligation to repair, replace, or refund until the customer returns the defective product to HP.
8 Any replacement product may be either new or like new, provided that it has functionality at least equal to that of the product being replaced.
9 HP products may contain remanufactured parts, components, or materials equivalent to new in performance.
10 HP's Limited Warranty Statement is valid in any country/region where the covered HP product is distributed by HP. Contracts for additional warranty services, such as on-site service, are available from any authorized HP service facility in countries/regions where the product is distributed by HP or by an authorized importer.
Limitations of warranty
TO THE EXTENT ALLOWED BY LOCAL LAW, NEITHER HP NOR ITS THIRD PARTY SUPPLIERS MAKES ANY OTHER WARRANTY OR CONDITION OF ANY KIND, WHETHER EXPRESS OR IMPLIED WARRANTY OR CONDITIONS OF MERCHANTABILITY, SATISFACTORY QUALITY, AND FITNESS FOR A PARTICULAR PURPOSE.
Limitations of liability
1 To the extent allowed by local law, the remedies provided in this Warranty Statement are the customer's sole and exclusive remedies.
2 TO THE EXTENT ALLOWED BY LOCAL LAW, EXCEPT FOR THE OBLIGATIONS SPECIFICALLY SET FORTH IN THIS WARRANTY STATEMENT, IN NO EVENT SHALL HP OR ITS THIRD PARTY SUPPLIERS BE LIABLE FOR DIRECT, INDIRECT, SPECIAL, INCIDENTAL, OR CONSEQUENTIAL DAMAGES, WHETHER BASED ON CONTRACT, TORT, OR ANY OTHER LEGAL THEORY AND WHETHER ADVISED OF THE POSSIBILITY OF SUCH DAMAGES.
Local law
1 This Warranty Statement gives the customer specific legal rights. The customer may also have other rights which vary from state to state in the United States, from province to province in Canada, and from country/region to country/region elsewhere in the world.
2 To the extent that this Warranty Statement is inconsistent with local law, this Warranty Statement shall be deemed modified to be consistent with such local law. Under such local law, certain disclaimers and limitations of this Warranty Statement may not apply to the customer. For example, some states in the United States, as well as some governments outside the United States (including provinces in Canada), may:
a Preclude the disclaimers and limitations in this Warranty Statement from limiting the statutory rights of a customer (e.g. the United Kingdom);
b Otherwise restrict the ability of a manufacturer to enforce such disclaimers or limitations; or
c Grant the customer additional warranty rights, specify the duration of implied warranties which the manufacturer cannot disclaim, or allow limitations on the duration of implied warranties.
3 FOR CONSUMER TRANSACTIONS IN AUSTRALIA AND NEW ZEALAND, THE TERMS IN THIS WARRANTY STATEMENT, EXCEPT TO THE EXTENT LAWFULLY PERMITTED, DO NOT EXCLUDE, RESTRICT, OR MODIFY, AND ARE IN ADDITION TO, THE MANDATORY STATUTORY RIGHTS APPLICABLE TO THE SALE OF THE HP PRODUCTS TO SUCH CUSTOMERS.
J 1 J 1 J 1 J 1 J 1 J 1 J 1 J 1 J 1 J 1 J 1 J 1 J 1 J 1 J 1 J 1 J 1 J 1 J 1 J 1 J 1 J 1 J 1 J 1 J 1 J 1 J 1 J 1 J 1 J 1 J 1 J 1 J 1 J 1 J
iI aaiiaal l i 1aaiiaaiiaaiiaaiiaaiiaaiiaaiiaaiiaaiiaaiiaaiiaaiiaaiiaaiiaaiiaaiiaaiiaaiiaaiiaaiiaaiiaaiiaaiiaaiiaaiiaaiiaaiiaaiiaaiiaaiiaaiiaaiiaaiiaaiiaaiiaaiiaaiiaaiiaaiiaaiiaaiiaaiiaaiiaaiiaaiiaaiiaaiiaaiiaaiiaaiiaai
gall l 1000000000000000000000000000000000000000000000000000000000000000000000
y jiaaiall lilaal all 100000000000000000000000000000000000000000000000000000000000000000000
a 1000000000000000000000000000000000000000000000000000000000000
HP 1 Hewlett-Packard 1
Jlll 21 HP Jnssy y, jy Jnll L oI 21 HHPnssy JnJHPnssy JnJnJnJnJnJnJnJnJnJnJnJnJnJnJnJnJnJnJnJnJnJnJnJnJnJnJnJnJnJnJnJnJnJnJnJnJnJnJnJnJnJnJnJnJnJnJnJnJnJnJn
yJlalll Jaiil jie a jilil lll lly ss uolld HP Ls bies 4
Lla iii lii gill dll jy Ls ySsiu 2 Ls ciinll
1
ciiial 1iioo go jbi cjiie jiaill
Jaae
HPJI JI JI JI JI JI JI JI JI JI JI JI JI JI JI JI JI JI JI JI JI JI JI JI JI JI JI JI JI JI JI JI JI JI JI JI JI JI JI JI JI JI JI JI JI JI JI JI JI JI JI
1 1
pgsiaa 1000000000000000000000000000000000000000000000000000000000000000
J 1 J 1 J 1 J 1 J 1 J 1 J 1 J 1 J 1 J 1 J 1 J 1 J 1 J 1 J 1 J 1 J 1 J 1 J 1 J 1 J 1 J 1 J 1 J 1 J 1 J 1 J 1 J 1 J 1 J 1 J 1 J 1 J 1 J 1 J
cuill 244gall oghall no
iill jil g 15 i 11 11 11 11 11 11 11 11 11 11 11 11
J 1
gill aagaaal glllgl 1e jysslljgs yprnll 1. dall llll
1 1 1 1 1 1 1 1 1 1 1 1 1 1 1 1 1 1 1 1 1 1 1 1 1 1 1 1 1 1
Jy d Jy jy yj yj yj yj yj yj yj yj yj yj yj yj yj yj yj yj yj yj yj yj yj yj yj yj yj yj yj yj yj yj yj yj yj yj yj yj yj yj yj yj yj yj yj yj yj yj yj yj yj yj y
a
(1) ① l_正方形 ABCD = 12 × 2^2 = 4t
(1) a3 = 2,a4 = 3,a_5 = 4
a 1
g c 1e b aall s yall ay l k s k d l l l a g j g j
jill jall lbeal p,25all Jaeal 111 1e bai
AC = BC = 2 AB = 2
FJ jll 15 11111111111111111111111
e 100000000000000000000000000000000000000000000000000000000
c = 12
.FAX 15
0
aill jialg. (iisj i/ijil, 1) pall aill jai j jle bai
(jui)√ le buiol
biolaii (aill)
(1) ⑤
. START 1234567890
i 1
all-in-one 1
aJg jLJI gJg JgJgJgJgJgJgJgJgJgJgJgJgJgJgJgJgJgJgJgJgJgJgJgJgJgJgJgJgJgJgJgJgJgJgJgJgJgJgJgJgJgJgJgJgJgJgJgJgJgJgJg
c = 12
PHOTO 4
(1) le biol lae, bie j! JiiJU JaiJle biol
10
LJLJLSTART. 1gE bIaI aIJI JIJI JIJI JIJI
yj yj yj yj yj yj yj yj yj yj yj yj yj yj yj yj yj yj yj yj yj yj yj yj yj yj yj yj yj yj yj yj yj yj yj yj yj
.
(1)
V
l = ( 1,232)
a 111111111111111111111111111
.all-in-one
aJg jLJIy JgJe du yolall PIN gssll joll iill lie
c = d 即
PHOTO 2
j 1 j 1 j 1 j all-in-one JJ J J
g 111111111111111111111111111111111111111111111111111111
all-in-one
. 1
J (line-in) (Jalalall) J
J all-in-one
- all-in-one 13.
JJI JI JI JI JI JI JI JI JI JI JI JI JI JI JI JI JI JI JI JI JI JI JI JI JI JI JI JI JI JI JI JI JI JI JI JI JI JI JI JI JI JI JI JI JI JI JI JI JI JI JI J1
AWG 17 pR JUsuJUdU Uuuu uuuuuuuuuuuuuuuuuuuuuuuuuuuuuuuuuuuuuuuuuuuuuuuuuuuuuuuuuuuuuuuuuuuuuuuuuuuuuuuuuuuuuuuuuuuuuuuuuuuuuuuUU
. 1 1 1 1 1 1 1 1 1 1 1 1 1 1 1 1 1 1 1 1 1 1 1 1 1 1 1 1 1 1 1 1 1 1 1 1 1 1 1
ii 1
loos Looie (off-hook) light: Jlll jusu
. slll b i j Loie oagogloisio
1
- 1111
a 1
gall glll lssll sllsll sllsll sllsll sllsll sllsll sllsll sllsll sllsll sllsll sllsll sllsll sllsll sllsll sllsll sllsll sllsll sllsll sllsll sllsll sllsll sllsll sllsll sllsll sllsll sllsll sll
ai = 12 - xi
1 1
all-in-one all in one
all-in-one JSSJLJ
1J.
all-in-one JSSJLJ
JSSJLJ
all-in-one JSSJLJ
JSSJLJ
http://www.registerer.hp.com
Logall jodjoll


http://www.hp.com/support/officejet9100

HP Image Zone HP Photo & Imaging
(w)
aaioll aci ci aiego
http://wwwHp.com/support/officejet9100
()HP
all-in-one all in one
ii 1
pulis yollll jilalw l yiljwglle wllg jld psslll
.
s (s) HP Instant Support s
Jlll jie logall no yjoll
j0 g jlll lal 9. gssall glall c1i aagglal aawll sbc (A
j0 jlll n0 jlll aagll jg k i y aagll alwll jgele agill aeg
aall jai (1. aagall aawll aagll jz jn o jy glall aayjjg jiaaall
. gssall glall c1i aagll
Joo all-in-one 10000000000000000000000000000000000000000000000000000000000000000000
Jall all-in-one 1000000000000000000000000000000000000000000000000000000000000000000000000000000000000000
Jaa all-in-one Jg jSll jLj 50 START. 1e le bai (1)
J"pwJbI, cIg JIa JIa JIa JIa JIa JIa JIa JIa JIa JIa

DIMM sSlll 1uBc g a u i (V.DIMM sSlll 1uBc g a u i
i 10
ADF ADF ADF ADF ADF ADF ADF ADF ADF ADF ADF ADF ADF ADF ADF ADF ADF ADF ADF ADF ADF ADF ADF ADF ADF ADF ADF ADF ADF ADF ADF ADF ADF ADF ADF ADF ADF ADF ADF ADF ADF ADF ADF ADF ADF ADF ADF ADF ADF ADF ADF
aalall aagaae baaai p 2jll aai aai aai aai aai
- gilso gaiw

-in-one 1
iLulol
aillgawlll ldyd llylll p aallll allll llllll l l 1le lglall: blll. ylllll glll glllll glllll glllll glllll glllll glllll glllll glllll glllll glllll glllll glllll glllll glllll glllll glllll glllll glllll glllll glllll glllll glllll glllll glllll glllll g ll
2
j all-in-one 1J (j) all-in-one .all-in-one j
slll lal: y gblall all-in-one jg kll jj j j j j j j j j j j j j j j j j j j j j j j j j j j j j j j j j j j j j j j j j j j j j j j j j j j j j j j j j j j j j j j
all-in-one 1
Y
.
品
all-in-one all-in-one all-in-one all-in-one all-in-one all-in-one all-in-one all-in-one all-in-one all-in-one all-in-one all-in-one all-in-one all-in-one all-in-one all-in-one all-in-one all-in-one all-in-one all-in-one all-in-one all-in-one all-in-one all-in-one all-in-one all-in-one all-in-one all-in-one all-in-one all-in-one all-in-one all-in-one all-in-one all-in-one all
√ bc baiol p. lay jaiil aaiil/laill jaii+gi -lc baiol (Y)
gbc baiol p. jaii lal yaii jaii gaii jaii jaii jaii (Y.(jai)
(1)√ bc baiol p. ai jaii jaii (E.(jaii)√
()

J 1 J
J 11 J 11 J 11 J 11 J 11 J 11
-
-
-
-
-
-
-
-
- 10.
-
-
-
-
-
-
-
。
gall jll kill gill gill gill gill gill gill gill gill gill gill gill gill gill
LgSo gjssgbsaol
aill iagl slj ljjw:0 yjzll
.8gbsll oip aill jai sall lssj no sli:
(1)
all-in-one JIJI JIJI JIJI JIJI JIJI JIJI JIJI JIJI JIJI JIJI JIJI JIJI JIJI JIJI JIJI JIJI JIJI JIJI JIJI JIJI JIJI JIJI JIJI JIJI JIJI JIJI JIJI JIJI JIJI JIJI JIJI JIJI JIJI
V
ADF+Jalll Jall jR:Vgabll
ADF 20111111111111111111111
ADF- all-in-one
A

sll 1c zslalil zelalld s j:gsbll
-in-one 1g jll jgsjglg jglg jglg jglg
all
aalilll aaiill algo jj 8gabll .acalall yc bdo (0. acalll wj cyo (e
ailll 1yall ygall
yll gall yall yall yall yall yall
yall yall yall yall yall yall yall
ALIINONEALLYGLLLJLGLLLJGLLL
ADF-ALLGLLLGGL (ADF) yllllllllllll
*YJdSj:Egall all-in-one JGLJLJGLJLJLHP Officejet 9120 all-in-one gLiJLHP Officejet 9130 all-in-one,
*jlll jlll llllllllllllllllllllllllllllllllllllllllllllllllllllllllllllllllllllllllllllllllllllllllllllllllllllllllllllllllllllllllllllllll l l l l l l l l l l l l l l l l l l l l l l l l l l l l l l l l l l l l l l l l l l l l l l l l l l l l l l l l l l l l l l l l l lll
aLs all-in-one JIJI JIJI (A) AC)
a1 + a2 + a_3 = 6
Joo Jui joi 1
(Hz) (±3 Hz) jz△ 0.17
all-in-one 14

abla/1jgl 2a
HP Officejet 9120 all-in-one liaiy
.HP Officejet 9130 all-in-one ,


.ajjol oljg jaojol: jgj
(1)
**rJ 9. *Sall aI gI sI J A.II bll (V.
aJyJyJyJyJyJyJyJyJyJyJyJyJyJyJyJyJyJyJyJyJyJyJyJyJyJyJyJyJyJyJyJyJyJyJyJyJyJyJyJyJyJyJyJyJyJyJyJyJyJyJ y J y J y J y J y J y J y J y J y J y J y J y J y J y J y J y J y J y J y J y J y J y J y J y J y J y J y J y J y J y J y J y J y J y J y J y J y J y J y J y J y J y J y J y J y J y J y J y J y J y J y

all-in-one jll jj jll jll jll jll jll jll jll jll jll jll jll jll jll jll jll jll jll jll jll jll jll jll jll jll jll jll jll jll jll jll jll jll jll jll jll jll jll jll jll jll jll jll jll jll jll jll jll jll jll jll jill jll jll jll jll jll jll jll

J 1 J 1 J 1 J 1 J 1 J 1 J 1 J 1 J 1 J 1 J 1 J 1 J 1 J 1 J 1 J 1 J 1 J 1 J 1 J 1 J 1 J 1 J 1 J 1 J 1 J 1 J 1 J 1 J 1 J 1 J 1 J 1 J 1 J 1 J
.([F] 90 90 10: aJrJ 10
aagaa
aLw 1000000000000000000000000000000000000000000000000000000000000000000000000000000000000
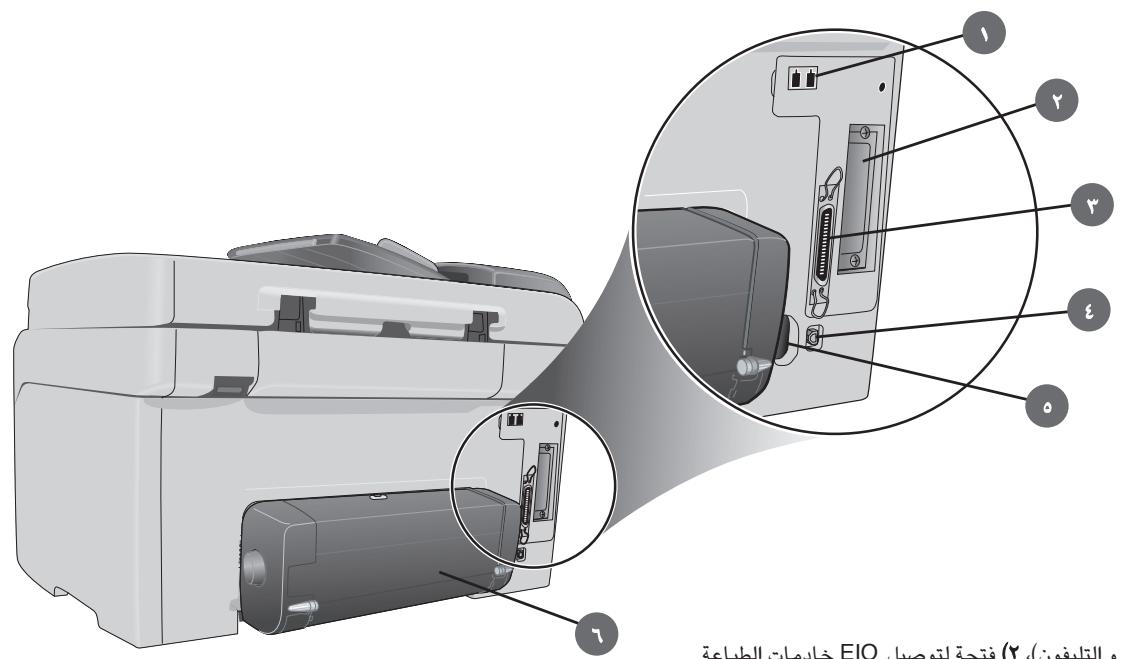
EIO 1 (y.(j) jlll bll) jll lio (204 aIbll J.(USB) jlll lalil (t. jill jiai HP Jetdirect .ggl gla
call angol
-
-
-
-
-
-
-
-
-
-
-
-
-
-
-
-
-
-
-
-
-
-
-
-
-
-
-
-
-
-
-
-
-
- 0, 0, 0, 0, 0, 0, 0, 0, 0, 0, 0, 0,
-
-
-
-
-
-
-
-
-
-
-
-
-
-
-
-
-
-
-
-
-
-
-
-
-
-
-
-
-
-
-
-
aLblllgyg yIyIyIyIyIyIyIyIyIyIyIyIyIyIy
.8slillblblaa (V.DIMM sllllg yll lglll
.
aclubill yjgo abio
()
printed on recycled paper
Hewlett-Packard Development Company, L.P.
printed in USA
