DN487 - Coffee machine BUFFALO - Free user manual and instructions
Find the device manual for free DN487 BUFFALO in PDF.
| Product Type | Filter Coffee Machine |
| Brand | Buffalo |
| Model | DN487 |
| Water Tank Capacity | 2.2 Litres |
| Power | 2200 W |
| Voltage / Frequency | 230 V / 50 Hz |
| Current | 9.1 A |
| Weight | 5.8 kg |
| Dimensions (H x W x D) | 455 x 205 x 405 mm |
| Carafe Material | Stainless Steel |
| Filter Type | Filter holder for disposable paper filters |
| Features | Automatic brewing, keep warm via hot plate, indicator lights (green brewing, red warning) |
| Safety | Automatic shut-off not specified; precautions: do not immerse, do not touch hot surfaces, do not leave unattended |
| Maintenance and Cleaning | External cleaning with damp cloth; descaling recommended every 3 months |
| Included Accessories | Filter holder, carafe, instruction manual |
| Repairability | Intervention by qualified technician or authorized Buffalo agent |
| Intended Use | Indoor only |
| Compliance | CE, WEEE (recycling at end of life) |
Frequently Asked Questions - DN487 BUFFALO
User questions about DN487 BUFFALO
0 question about this device. Answer the ones you know or ask your own.
Ask a new question about this device
Download the instructions for your Coffee machine in PDF format for free! Find your manual DN487 - BUFFALO and take your electronic device back in hand. On this page are published all the documents necessary for the use of your device. DN487 by BUFFALO.
USER MANUAL DN487 BUFFALO
natural_image
Exterior view of a modern stainless steel coffee maker with control panel and baseplate (no visible text or symbols)Location of Controls 2
Before Using for the First Time 2
Making Coffee 3
Cleaning, Care & Maintenance ....3
Descaling 3
Troubleshooting 4
Technical Specifications .... 4
Electrical Wiring 4
Compliance ....5
NL
Inhoudsopgave
Veiligheidstips 6
Inleiding 6
Verpakkingsinhoud 6
Bediening 7
- Position on a flat, stable surface.
- A service agent/qualified technician should carry out installation and any repairs if required. Do not remove any components on this product.
- Consult Local and National Standards to comply with the following:
• Health and Safety at Work Legislation
• BS EN Codes of Practice
- Fire Precautions
- IEE Wiring Regulations
• Building Regulations
- DO NOT immerse the appliance in water.
• DO NOT touch hot surfaces. - DO NOT leave the appliance unattended during operation.
- DO NOT remove the filter basket during the filtration process.
- Suitable for indoor use only.
-
Always switch off and disconnect the power supply to the appliance when not in use.
-
This appliance must only be used in accordance with these instructions and by persons competent to do so.
- This appliance is not intended for use by persons (including children) with reduced physical, sensory or mental capabilities, or lack of experience and knowledge, unless they have been given supervision or instruction concerning use of the appliance by a person responsible for their safety.
- Keep all packaging away from children. Dispose of the packaging in accordance to the regulations of local authorities.
- If the power cord is damaged, it must be replaced by an BUFFALO agent or a recommended qualified technician in order to avoid a hazard.
Introduction
Please take a few moments to carefully read through this manual. Correct maintenance and operation of this machine will provide the best possible performance from your BUFFALO product.
Pack Contents
The following is included:
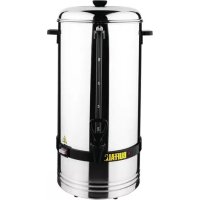
• BUFFALO Coffee Machine
- Filter basket
• V a c u u m J u g
- Instruction manual
BUFFALO prides itself on quality and service, ensuring that at the time of packaging the contents are supplied fully functional and free of damage.
Should you find any damage as a result of transit, please contact your BUFFALO dealer immediately.
Operation
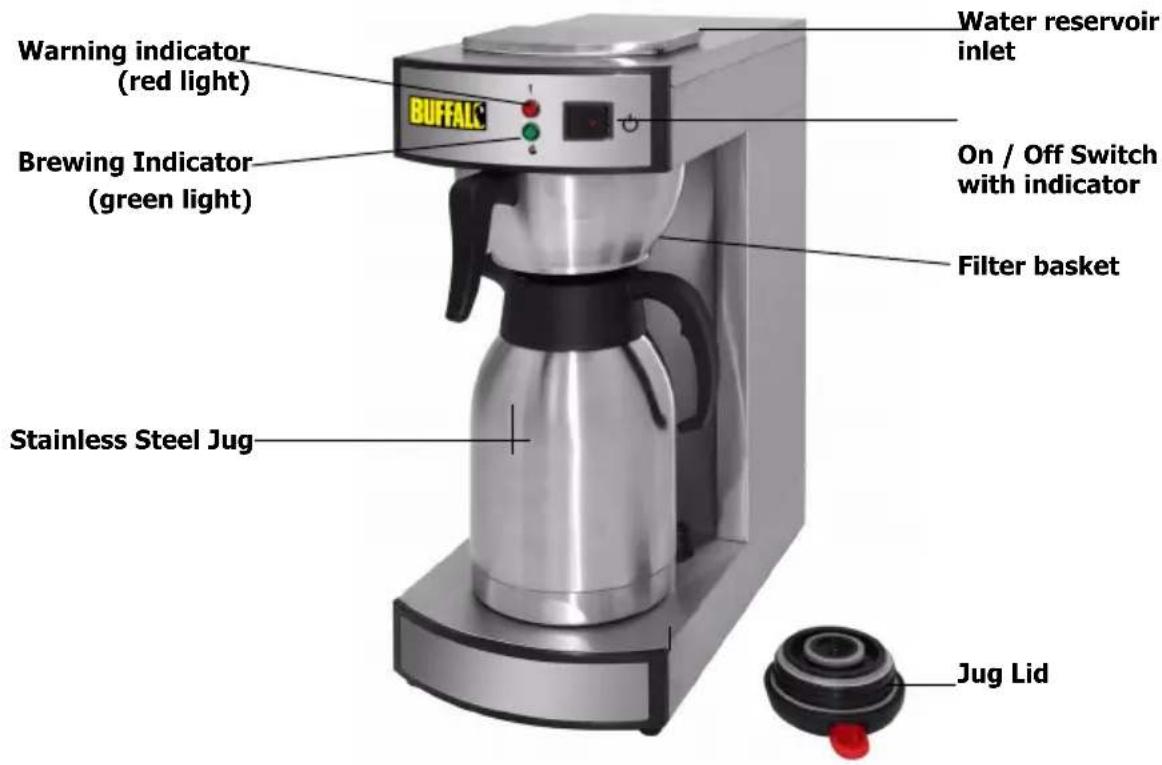
Location of Controls
text_image
Warning indicator (red light) Brewing Indicator (green light) Stainless Steel Jug Water reservoir inlet On / Off Switch with indicator Filter basket Jug LidBefore Using for the First Time
BUFFALO recommend that the appliance is cleaned out before using for the first time, or if the appliance has been sat unused for an extended period of time.
I. Fill the water reservoir with cold water.

Note: Use the jug to fill the reservoir to ensure the maximum capacity of the jug is not exceeded. The maximum amount of water the reservoir can contain is 2.2 litres.
-
Slide the empty filter basket into position between the two basket tabs.
-
Place the jug on the base beneath the basket.
-
Turn the power switch On . The Brewing Indicator lights up and hot water will begin to fill the jug.

Note: During operation, steam may rise from the appliance and loud bubbling noises may be heard. This is perfectly normal.
- Once finished the Brewing Indicator light will switch off. Discard the hot water in the jug.

WARNING: The jug becomes hot during operation. Always pick up the jug by the handle to avoid injury.
- Repeat steps 1-5. The appliance is now clean.
Making Coffee
I. Fill the water reservoir with cold water.

Note: Use the Jug to fill the reservoir to ensure it's maximum capacity is not exceeded. The maximum amount of water the reservoir can contain is 2.2 litres.
-
Place a filter paper inside the filter basket.
-
Measure the required amount of coffee into the filter paper and slide the filter basket into position.
-
Place the jug on the base beneath the filter basket.
-
Turn the power switch On . The Brewing Indicator lights up and hot water will begin to fill the jug.

Note: During operation, steam may rise from the appliance and loud bubbling noises may be heard. This is perfectly normal.
- Once finished the Brewing indicator will switch off.

WARNING: The jug becomes hot during operation. Always pick up the jug by the handle to avoid injury.
Cleaning, Care & Maintenance
• Always turn off and disconnect the appliance from the power supply before cleaning.
- Use soapy water and a damp cloth to clean the exterior of the appliance.
• Dry thoroughly after cleaning.
Descaling
In hard water areas limescale can build up within the appliance after prolonged use. To descale the appliance:
I. Pour a solution of descaler and water into the reservoir.

Note: Use a suitable descaler and follow the instructions on the container.
-
Turn thepower switch On.
-
After approximately 4 minutes turn the appliance Off to allow the descaling solution to work through the system.
-
After approximately 10 minutes turn the Brewing power switch back On . Allow the reservoir to empty.
-
Discard the solution collected in the jug.
-
Fill the reservoir with clean water and turn the appliance back On to flush out the system and remove any descaler residue. Discard the collected water and rinse the jug.
-
The appliance is now ready for use.

Note: BUFFALO recommend that this appliance is descaled every 3 months or more frequently in hard water areas.
Troubleshooting
| Fault Probable Cause Action | ||
| The unit is not working | The unit is not switched on Check the | unit is plugged in correctly and switched on |
| Plug and lead are damaged Call BUFFALO agent or qualified technician | ||
| Fuse in the plug has blown Replace the plug fuse | ||
| Power supply Check power supply | ||
| Internal wiring fault Call BUFFALO agent or qualified technician | ||
| Coffee is not coming from the filter basket | No water in reservoir Turn Off and fill | reservoir |
| Coffee is too compact within the filter | Turn off, loosen coffee within the filter and resume | |
| Loud noise coming from appliance | No water in reservoir Turn Off and fill | reservoir |
Technical Specifications
| Model | Voltage | Power | Current | Reservoir Capacity | Weight | Dimensions h x w x d mm |
| DN487 | 230V 50Hz | 2.2Kw | 9.1A | 2.2 litres | 5.8kg | 455 x 205 x 405 |
Electrical Wiring
This appliance is supplied with a 3 pin, moulded, BS1363 plug and lead, with a 13 amp fuse as standard.
The plug is to be connected to a suitable mains socket.
This appliance is wired as follows:
• Live wire (coloured brown) to terminal marked L
- Neutral wire (coloured blue) to terminal marked N
- Earth wire (coloured green/yellow) to terminal marked E
This appliance must be earthed, using a dedicated earthing circuit.
If in doubt consult a qualified electrician.
Electrical isolation points must be kept clear of any obstructions. In the event of any emergency disconnection being required they must be readily accessible.
Compliance
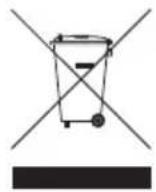
The WEEE logo on this product or its documentation indicates that the product must not be disposed of as household waste. To help prevent possible harm to human health and/or the environment, the product must be disposed of in an approved and environmentally safe recycling process. For further information on how to dispose of this product correctly, contact the product supplier, or the local authority responsible for waste disposal in your area.
BUFFALO parts have undergone strict product testing in order to comply with regulatory standards and specifications set by international, independent, and federal authorities.
BUFFALO products have been approved to carry the following symbol:

text_image
C€All rights reserved. No part of these instructions may be produced or transmitted in any form or by any means, electronic, mechanical, photocopying, recording or otherwise, without the prior written permission of BUFFALO. Every effort is made to ensure all details are correct at the time of going to press, however, BUFFALO reserve the right to change specifications without notice.
Veiligheidstips
text_image
Symbolic image showing a recycling bin with crossed-out arrows and a minus sign, alongside the letters 'CE' in bold black font.DECLARATION OF CONFORMITY
- Conformiteitsverklaring • Déclaration de conformité • Konformitätserklärung •
Application of Council Directives(s)
Toepassing van Europese Richtlijn(en) • Application de la/des directive(s) du Conseil • Anwendbare EU-Richtlinie(n) • Applicazione delle Direttive • Aplicación de la(s) directiva(s) del consejo • Aplicação de directiva(s) do Conselho
Standards
Standaarden • Normes • Normen • Standard • Estándares • Normas
Low Voltage Directive 2006/95/EC
EMC Directive 2004/108/EC
EN60335-1:2002+AII+AII+
A12+A2+A13+A14
EN60335-2-75:2004+AI
+A11+A2+A12
EN62233:2008
EN55014-1:2006
EN55014-2:1997+A1+A2
EN61000-3-2:2006
EN61000-3-3:2008
Buffalo
Fourth Way,
Avonmouth,
Bristol,
BSII 8TB
United Kingdom
I, the undersigned, hereby declare that the equipment specified above conforms to the above Directive(s) and Standard(s).