
ODL 32850FCTAB - TV OK - Free user manual and instructions
Find the device manual for free ODL 32850FCTAB OK in PDF.
| Product type | LED TV with integrated digital receiver |
| Brand and model | OK - ODL 32850FCTAB |
| Screen size (diagonal) | 32 inches (approx. 80 cm) |
| Screen resolution | HD (1366 x 768 pixels) |
| Dimensions without stand (W x H x D) | 719 x 421 x 81 mm |
| Net weight without stand | 3.9 kg |
| Power supply | 100-240 V ~ 50/60 Hz |
| Rated power consumption | 55 W |
| Television systems | DVB-T/T2/C/S/S2 (digital), PAL/SECAM BG/DK/I/NTSC-M (analog) |
| Network connectivity | Built-in Wi-Fi (2.4/5 GHz), LAN Ethernet port |
| HDMI ports | HDMI 1 (ARC) + HDMI 2 |
| USB ports | USB 2.0 |
| Other connectors | AV input (mini-jack), optical digital audio output, headphone jack |
| Smart functions | Android TV, Google Assistant, built-in Chromecast, Netflix, YouTube, Prime Video, Google Play |
| Parental control | Yes, via PIN code |
| Care and cleaning | Unplug before cleaning; use a soft, slightly damp cloth for the screen; do not use liquid or aerosol products. |
| Safety | Double insulation (Class II), surge protection, automatic shutdown in case of no signal, sleep timer. |
| Spare parts and repairability | Repairs must be carried out by an authorized technician. Only use accessories recommended by the manufacturer. |
| General information | Manufacturer: Imtron GmbH (Germany). Complies with Directive 2014/53/EU. See the declaration of conformity on the manufacturer's website. |
Frequently Asked Questions - ODL 32850FCTAB OK
User questions about ODL 32850FCTAB OK
0 question about this device. Answer the ones you know or ask your own.
Ask a new question about this device
Download the instructions for your TV in PDF format for free! Find your manual ODL 32850FCTAB - OK and take your electronic device back in hand. On this page are published all the documents necessary for the use of your device. ODL 32850FCTAB by OK.
USER MANUAL ODL 32850FCTAB OK
natural_image
Front view of a modern flat-screen TV with black screen and stand (no visible text or symbols)IM_ODL 32850FC-TAB_210412_V03


natural_image
Cartoon illustration of a smiling computer monitor character holding a book (no text or symbols present)natural_image
Cartoon illustration of a computer monitor with a sad face and raised fists, surrounded by a brain (no text or symbols)natural_image
Cartoon illustration of a computer monitor with a bandaged face and a megaphone, symbolizing online or video content (no text present)natural_image
Cartoon illustration of a computer monitor with a sad face and a fist, accompanied by a refrigerator (no text or symbols)natural_image
Illustration of a smiling man standing beside a computer monitor with a phone and cable (no text or symbols)natural_image
Cartoon illustration of a computer monitor with an angry face and electrical plug, showing stress or shock (no text or symbols)natural_image
Cartoon illustration of a smiling computer monitor with hands reaching toward it, surrounded by clouds and a small battery (no text or symbols)natural_image
Symbolic icon of a person climbing a ladder inside a circle with a diagonal line (no text or symbols)natural_image
Cartoon illustration of a smiling computer monitor and a worker holding a toolbox (no text or symbols)HINWEIS:
natural_image
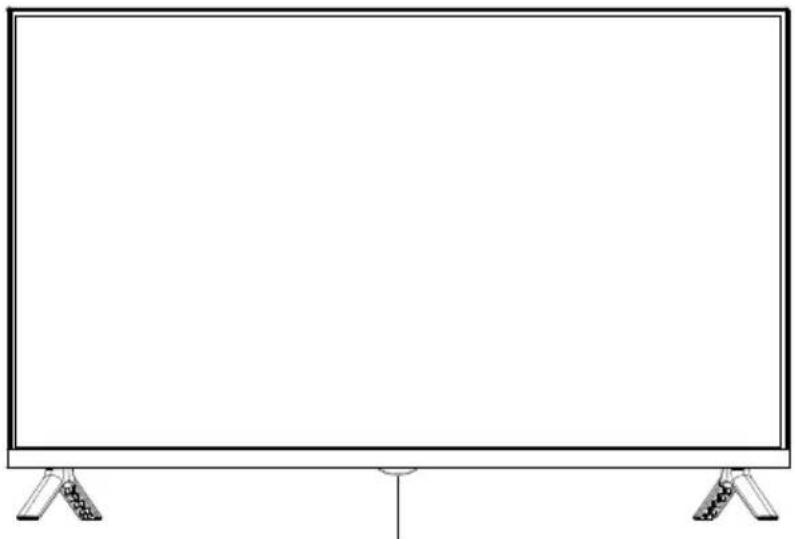
Line drawing of a flat-screen TV with two stand feet at the bottom (no text or symbols)natural_image
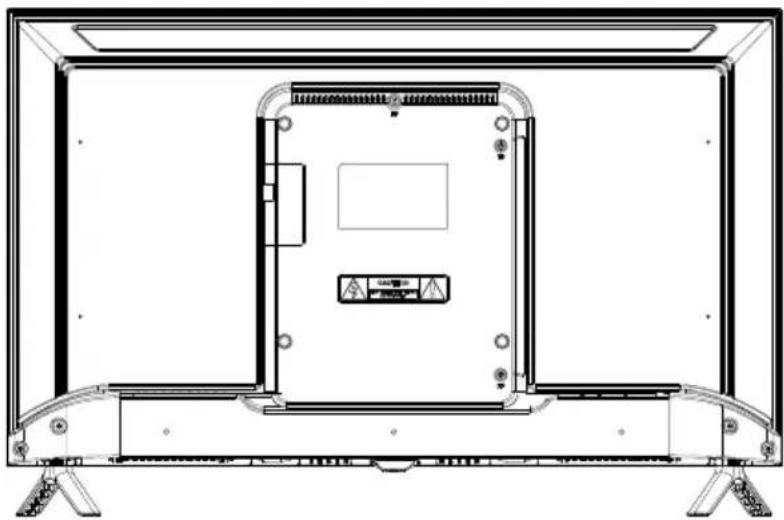
Line drawing of a flat-screen TV unit with front panel, rear panels, and control panel (no text or symbols)
text_image
LAN HDMI2 ANT1 13/18V=400mA ANT2 (SATELLITE) COMMON INTERFACE HDMI1 AV USB2.0 (5V=500mA) DIGITAL AUDIO OUTtext_image
DIGITAL AUDIO OUTnatural_image
Diagram showing a USB 2.0 connector next to an RJ48 connector (no text or symbols on the diagram itself)
flowchart
graph LR
    A["Common Interface"] --> B["CI CARD"]
    B --> C["SMART CARD"]

text_image
HV A A A A A A A Anatural_image
Simple line drawing of a device with a speaker icon and two cables (no text or symbols)Erste Schritte
Teletext (Videotext)
Teletext (Videotext) Information
Before operating, please read all these safety and operating instructions completely and then retain this manual for future reference.
Always comply with the following precautions to avoid dangerous situations and ensure peak performance of your product.
The Imtron GmbH assumes no liability for damage to the product, for property damage or for personal injury due to careless or improper usage of the product, or usage of product which does not meet the manufacturer's specified purpose.

CAUTION
RISK OF ELECTRIC SHOCK DO NOT OPEN

WARNING:
TO REDUCE THE RISK OF ELECTRIC SHOCK DO NOT REMOVE COVER (OR BACK). NO USER-SERVICEABLE PARTS INSIDE. REFER SERVICING TO QUALIFIED SERVICE PERSONNEL.

The lightning flash with arrowhead symbol, within an equilateral triangle, is intended to alert the user to the presence of uninsulated “dangerous voltage” within the products enclosure that may be of sufficient magnitude to constitute a risk of electric shock.

The exclamation point within an equilateral triangle is intended to alert the user to the presence of important operating and maintenance (servicing) instructions in the literature accompanying the appliance.
REGULATORY INFORMATION
This equipment generates uses and can radiate radio frequency energy and, if not installed and used in accordance with the instructions, may cause harmful interference to radio communication. However, there is no guarantee that interference will not occur in a particular installation. If this equipment does cause harmful interference to radio or television reception, which can be determined by turning the equipment off and on, the user is encouraged to try to correct the interference by one or more of the following measures:
a. Relocate the receiving antenna.
b. Increase the separation between the equipment and receiver.
c. Connect the equipment into an outlet on a circuit different from that to which the receiver is connected.
d. Consult the dealer or experienced radio/TV technician for help.
CAUTION
※ Do not attempt to modify this product in any way without written authorization from supplier. Unauthorized modification could void the user's authority to operate this product.
※ Figures and illustrations in this User Manual are provided for reference only and may differ from actual product appearance. Product design and specifications may be changed without notice.
Warning
IMPORTANT WARNINGS AND CAUTIONS!
Electrical energy can perform many useful functions, but it can also cause personal injuries and property damage if improperly handled. This product has been engineered and manufactured with the highest priority on safety. BUT IMPROPER USE CAN RESULT IN POTENTIAL ELECTRICAL SHOCK OR FIRE HAZARD. In order to prevent potential danger, please observe the following instructions when installing, operating and cleaning the product.
- Attachments---Only use attachments/accessories specified by the manufacturer. Do not use attachments not recommended by the manufacturer. Use of improper attachments can result in accidents.
- Water---To reduce the risk of fire or electric shock, do not expose this TV to rain or moisture. Do not expose the TV to dripping or splashing of liquids and do not place objects filled with liquids, such as vases, cups, etc. on or over the TV (e.g. on shelves above the unit).
- Fire or explosion---Do not expose the TV to direct sunlight or do not place open flames such as lit candles on the top of or near the TV. Do not place any heat sources such as electric heaters, radiators, etc. near the TV set.
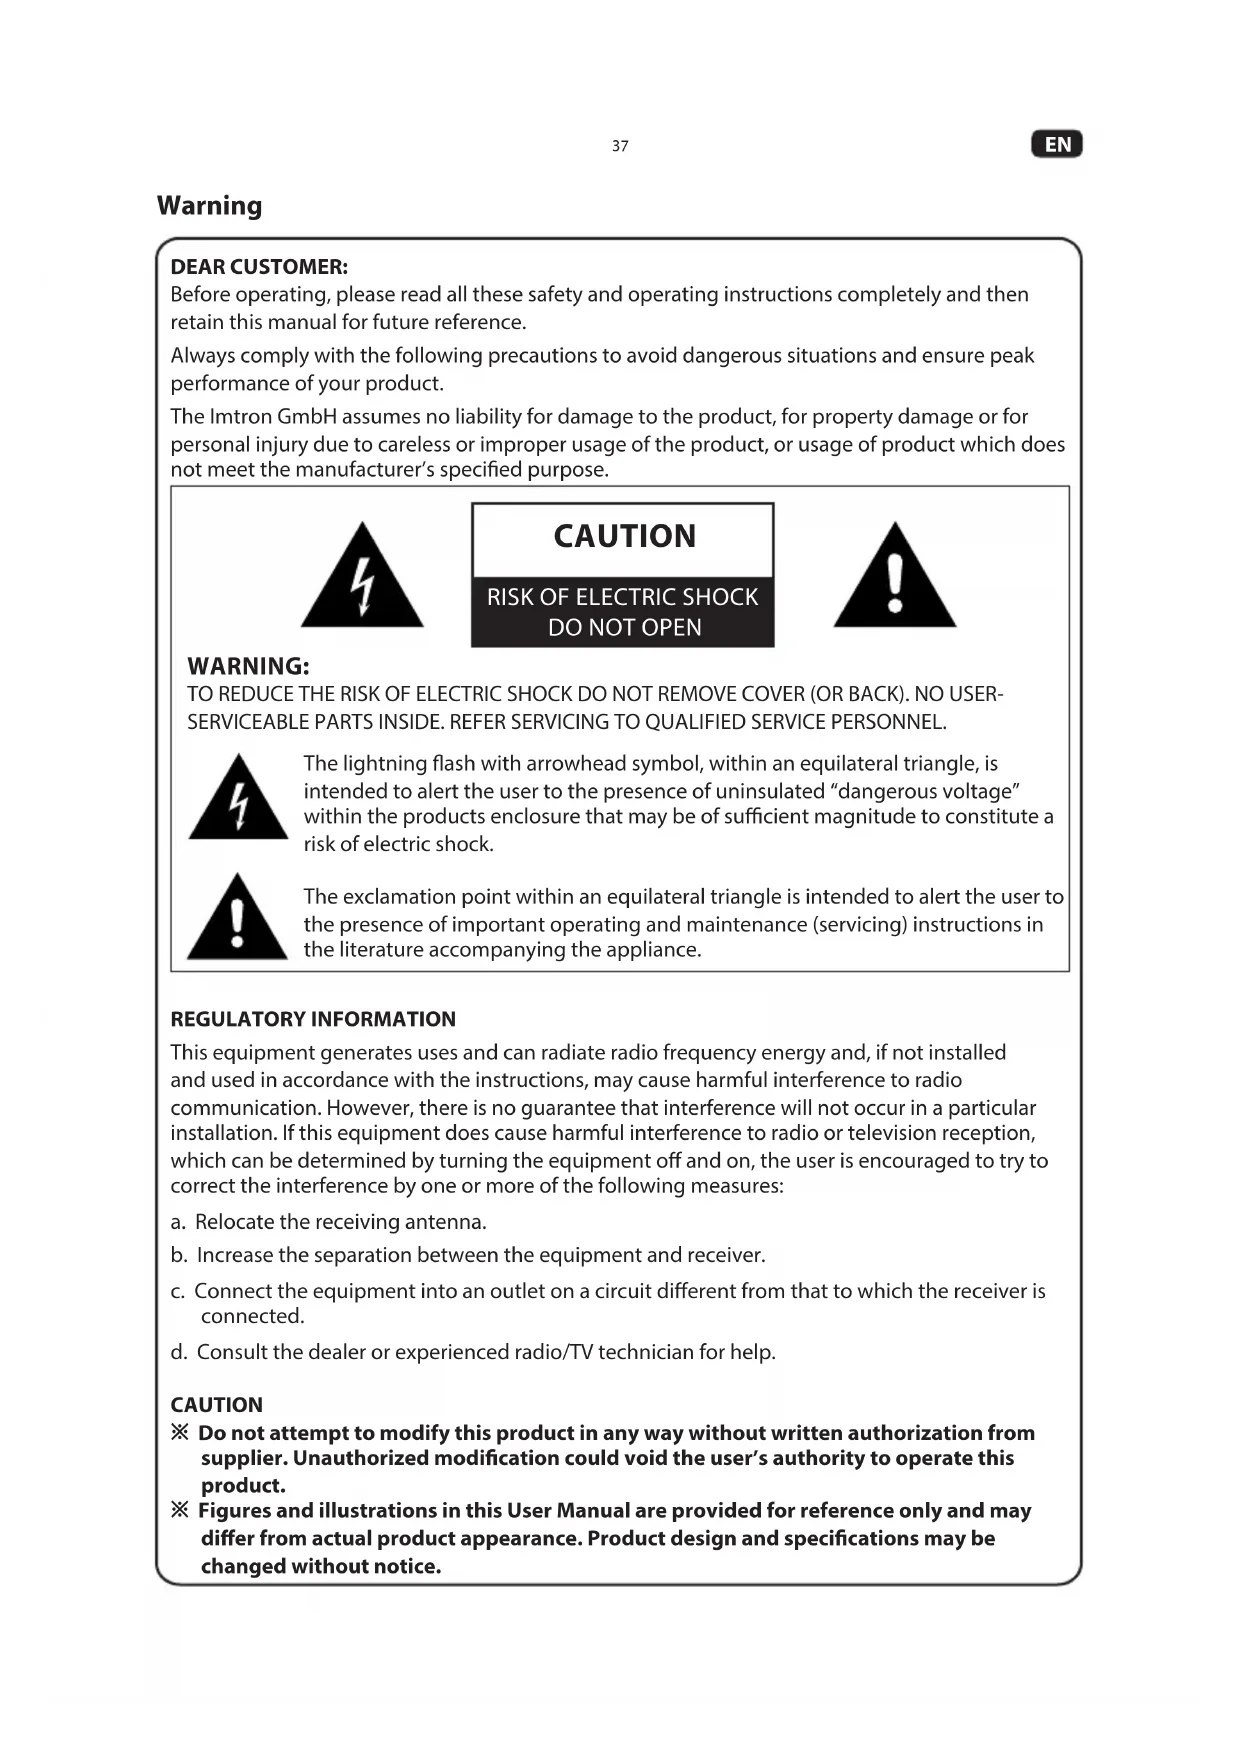
Warning: To prevent the spread of fire, keep candles or other open flames away from this product at all times. - Ventilation---For ventilation purposes, leave at least 5cm free space around the TV. The ventilation should not be impeded by covering or blocking the ventilation openings with items, such as newspapers, tablecloths, curtains, etc. Failing to maintain proper ventilation may result in a fire or a problem with the product caused by an increase in its internal temperature.
- This equipment is a Class II or double insulated electrical appliance. It has been designed in such a way that it does not require a safety connection to electrical earth.
- Power source---This product is intended to be supplied by a listed power supply indicated on the marking label. If you are not sure of the type of power supply to your home, consult your product dealer or local power company.
- Overloading---Do not overload wall outlets, extension cables, or convenience receptacles on other equipment as this can result in a risk of fire or electric shock.
- Voltage---Before installing this TV set, make sure your outlet voltage corresponds to the voltage stated on the appliance rating label.
- Power plug --- Do not defeat the safety purpose of the polarized or grounding-type plug. Most appliances recommend they be placed upon a dedicated circuit; that is, a single outlet circuit which powers only that appliance and has no additional outlets or branch circuits.
- The MAINS plug of the apparatus is used as the disconnect device, the disconnect device shall remain readily operable.
- Wall mounting---When mounting the product on a wall, be sure to install the product according to the method recommended by the manufacturer. The wall mount kit is optional. You can obtain from your local dealer, if not supplied with your TV. Do not install the TV on a ceiling or on an inclined wall. Use the specified wall mounting screws and other accessories. Tighten the wall mounting screws firmly to prevent the TV from fall. Do not overtighten the screws.
- Stand--- Do not place the TV on an unstable or slanted surfaces. Otherwise the TV may tip over and cause potentially fatal, serious injury. Many injuries, especially involving children, can be avoided if the following simple safety precautions are taken:
-
- Only use TV furniture or stands recommended by the device manufacturer
- Only use furniture that can carry the weight of the TV
- Make sure that the TV does not extend beyond the edges of the furniture
- Only use furniture that can carry the weight of the TV
- Make sure that the TV does not extend beyond the edges of the furniture
Warning
- Do not place the TV on high pieces of furniture (e.g. shelves or bookshelves) without securely supporting the furniture itself and the TV.
- Do not place the TV devices on fabrics or other materials that are located between the TV and the furniture.
- Inform your children about the dangers of climbing on high pieces of furniture to reach the TV or the remote control. If you change the location of your TV, follow the same safety precautions.
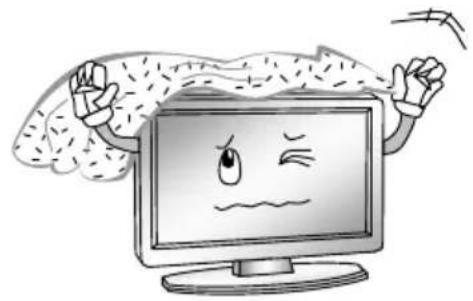
- Entering of objects and liquids---Never insert an object into the product through vents or openings. High voltage flows in the product, and inserting an object can cause electric shock and/or short internal parts. For the same reason, do not spill water or liquid on the product.
- Damage requiring service---This unit should only be serviced by an authorized and properly trained technician. Opening the cover or other attempts by the user to service this unit may result in serious injury or death from electrical shock, and may increase the risk of fire.
- Children ---Do not allow young children to play with the plastic bag that came with the television when you unpacked it. Failure to do so can result in suffocation, causing injury.
- Batteries---The batteries (battery pack or batteries installed) shall not be exposed to excessive heat such as sunshine, fire or the like.
Do not dispose of any batteries in with the domestic waste. Return them to a collection point for old batteries. - Antenna ---Install the antenna away from high-voltage power lines and communication cables and make sure it is installed securely. If the antenna touches a power line, contact with the antenna could result in fire, electric shock or serious injury.
- Panel protection--- The panel used in this product is made of glass. Therefore, it can break when the product is dropped or impacted upon by other objects. Be careful not to be injured by broken glass pieces in case the panel breaks.
- Indicates an alternating current.
: Indicates direct current.
If you would like to connect an external device with this product, a good quality shielded cable must be used, which ensures the electromagnetic compatibility of the product and the used cable as a whole.
WARNING
Never place a television set in an unstable location, A television set may fall, causing serious personal injury or death. Many injuries, particularly to children, can be avoided by taking simple precautions such as:
- Using cabinets or stands recommended by the manufacturer of the television set.
- Only using furniture that can safely support the television set.
- Ensuring the television set is not overhanging the edge of the supporting furniture.
- Not placing the television set on tall furniture (for example, cupboards or bookcases) without anchoring both the furniture and the television set to a suitable support.
- Not placing the television set on cloth or other materials that maybe located between the television set and supporting furniture.
- Educating children about the dangers of climbing on furniture to reach the television set or its controls.
If your existing television set is being retained and relocated. The same consider actions as above should be applied.
Warning
IMPORTANT SAFETY INSTRUCTIONS
- Read these instructions.
- Keep these instructions.
- Heed all warnings.
- Follow all instructions.

natural_image
Cartoon illustration of a smiling computer monitor character holding a book titled 'POSTA BANK' (no text on character or background)- Do not block any ventilation openings. Ventilation should not be impeded by covering the ventilation openings with items such as newspapers, table-cloths, curtains etc.
natural_image
Cartoon illustration of a computer monitor with a sad face and raised arms, surrounded by abstract brain-like shapes (no text or symbols)- Do not use this apparatus near water.
natural_image
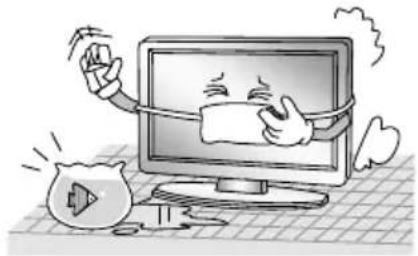
Cartoon illustration of a computer monitor with a smiling face and speech bubbles, surrounded by a sad film and cloud (no text or symbols)- Do not install near any heat source such as radiators, heat registers, stoves, or other apparatus (including amplifiers) that produce heat.
natural_image
Cartoon illustration of a distressed computer monitor with a fist and alarm, next to an electric shocker (no text or symbols)- Clean only with a dry cloth. Unplug this product from the wall outlet before cleaning. Do not use liquid cleaners or aerosol cleaners.

natural_image
Illustration of a smiling man presenting to a computer monitor with an electrical plug (no text or symbols)- Do not defeat the safety purpose of the polarized or grounding type plug. A polarized plug has two blades with one wider than other. A grounding type plug has two blades and a third grounding prong. The wide blade or the third prong is provided for your safety. When the provided plug does not fit into your outlet, consult an electrician for replacement of the obsolete outlet.
Warning
- Protect the power cord from being walked on or pinched particularly at plugs, convenience receptacles, and the point where they exit from the apparatus.
natural_image
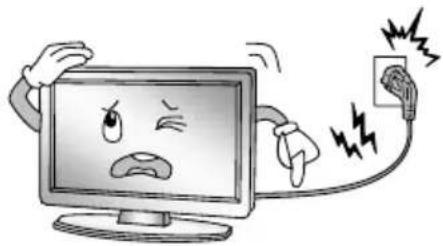
Cartoon illustration of a computer monitor with an angry face and lightning bolts, connected to an electrical outlet (no text or symbols)- For added protection for this product during a lightning storm, or when it is left unattended and unused for long periods of time, unplug it from the wall outlet and disconnect the cable system.
natural_image
Cartoon illustration of a smiling computer monitor character with arms and legs, surrounded by clouds and a small phone (no text or symbols)- Only use the attachments/ accessories specified by the manufacturer.
- When a cart is used, use caution when moving the cart/apparatus combination to avoid injury from tip-over. Sudden stops, excessive force and uneven floor surfaces can cause the product to fall from the Trolley.

natural_image
Symbolic icon of a person climbing a ladder inside a circle with no text or symbols- Refer all servicing to qualified service personnel. Servicing is required when the apparatus has been damaged in any way, such as power supply cord or plug is damaged, liquid has been spilled or objects have fallen into the apparatus, the apparatus has been exposed to rain or moisture, does not operate normally, or has been dropped.

natural_image
Cartoon illustration of a smiling computer monitor and a delivery worker holding a box (no text or symbols)NOTE:
◆ Disposal of this product must be carried out in accordance to the regulations of your local authority. Do not dispose of this product with general household waste disposal.
Some minute dot defects may be visible on the screen, appearing as tiny red, green, or blue spots. However there have no adverse effects on the monitor's performance.
Avoid touching the screen or holding your finger(s) against it for long periods of time. Doing so may produce some temporary distortion effect on the screen.
It is not recommended to keep a certain still image displayed on the screen for a long time as well as displaying extremely bright images on screen, reduce the 'brightness' and 'contrast' when displaying still images.
Main Unit Controls
Front
natural_image
Front view of a flat-screen monitor with stand holders at the bottom (no text or symbols visible)Remote sensor
Power Indicator
ON/OFF
Back view controls and sockets
natural_image
Technical line drawing of a flat-screen TV unit with front panel and control panel (no text or symbols)
text_image
LAN HDMI2 ANT1 ANT2 (SATELLITE) COMMON INTERFACE HDMI1 AV USB2.0 (5V 500mA) DIGITAL AUDIO OUT| No. Name | Description | |
| 1 LAN Local | area network (LAN) port. Connect a LAN cable to this port to connect to the Network. | |
| 2 HDMI Connect a HDMI input signal source, such as a DVD player, via the HDMI interfaces. | ||
| 3 ANT Connect a coaxial cable to receive a signal from the antenna, cable or satellite. | ||
| 4 USB2.0 USB port. Connect a USB Storage device for multimedia file playback. | ||
| 5 COMMON INTERFACE COMMON INTERFACE slot. | ||
| 6 AV Connect audio and video signal sources via AV IN. | ||
| 7 DIGITAL AUDIO OUT Use an optical cable to output your TV audio signal to a compatible audio receiver. | ||
| 8 | Ω | Earphones/headphones jack. |
NOTE: Input / Output connectivity options may change from model to model.
Note: If you would like to connect an external device with this product, a good quality shielded cable must be used, which ensures the electromagnetic compatibility of the product and the used cable as a whole.
Getting Started
Cable Installation
Before the installation and use, please read carefully the relevant content in "Warning and Safety instructions".
Take out the TV from the wrapping package and put it in a drafty and flat place.
NOTE:
The range of power input for the TV is 100-240V\~50/60Hz; do not connect the TV power input port with the power cable out of the above range.
Please hold the insulated part of the plug when you are unplugging the power cable, do not touch directly the metallic part of the cable.
Before connecting to an external device, please firstly make sure that the TV set and the external device have been turned off. When connecting, please make reference to the interface name and the interface color to connect the signal cable.
The unit has a built-in wireless network card, and can directly receive network signals from wireless router through WIFI antenna.
Using the Remote Control
When using the remote control, aim it at remote sensor on the television. If there is an object between the remote control and the remote sensor on the unit, the unit may not operate.
- Do not shake the remote control violently. Also, do not splash liquid on the remote control, also do not put the remote control in high humidity place.
- Do not place remote control under direct sunlight which might cause deformation of the unit by heat.
- When the remote sensor is under direct sunlight or strong lightning, the remote control might not function properly. If so please change the lightning or TV's position, or operate the remote control closer to the remote sensor.
• The recommended effective distance for using the remote control is about 7 meters.
Installing Batteries in the Remote Control
- Open the cover at the back of the remote control.
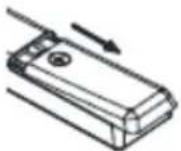
- In Install two AAA size batteries. Make sure to match the "+" and "-" ends of the with batteries the diagram inside the compartment.
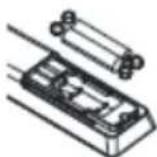
- Replace the cover.

Battery Replacement
You will need to install the batteries into the remote control to make it operate following the instruction below.
When the batteries become weak, the operating distance of the remote control will be greatly reduced and you will need to replace the batteries.
Notes on Using Batteries:
The use of the wrong type of batteries may cause chemical leakage and/or explosion. Please note the following:
- Please note the batteries polarity to avoid short circuit.
- Different types of batteries have different characteristics. Do not mix different types.
- Do not mix old and new batteries. Mixing old and new batteries will shorten battery life and/or cause chemical leakage.
- Replace batteries as soon as they do not work.
- Chemicals which leak from batteries may cause skin irritation. If any chemical matter seeps out of the batteries, wipe it up immediately with a dry cloth.
- The batteries may have a shorter life expectancy due to storage conditions. Remove the batteries whenever you anticipate that the remote control will not be used for an extended period.
- The batteries (battery pack or batteries installed) shall not be exposed to excessive heat such as sunshine, fire or the like.
CAUTION:
- It may result in an explosion if batteries are replaced incorrectly.
- Only replace batteries with the same or equivalent type.
CAUTION!
• Non-rechargeable batteries must not be recharged.
- Keep batteries out of reach of small children. If batteries have been swallowed, seek immediate medical attention.
- If the batteries leak, remove them with a cloth and dispose of them accordingly. Prevent battery acid from coming into contact with skin and eyes. If you do get battery acid in your eyes, flush them thoroughly with lots of water and consult a physician immediately. If battery acid comes into contact with your skin, wash the affected area with lots of water and soap.
- Do not store them haphazardly in a place where they may short-circuit each other or be short-circuited by other metal objects.
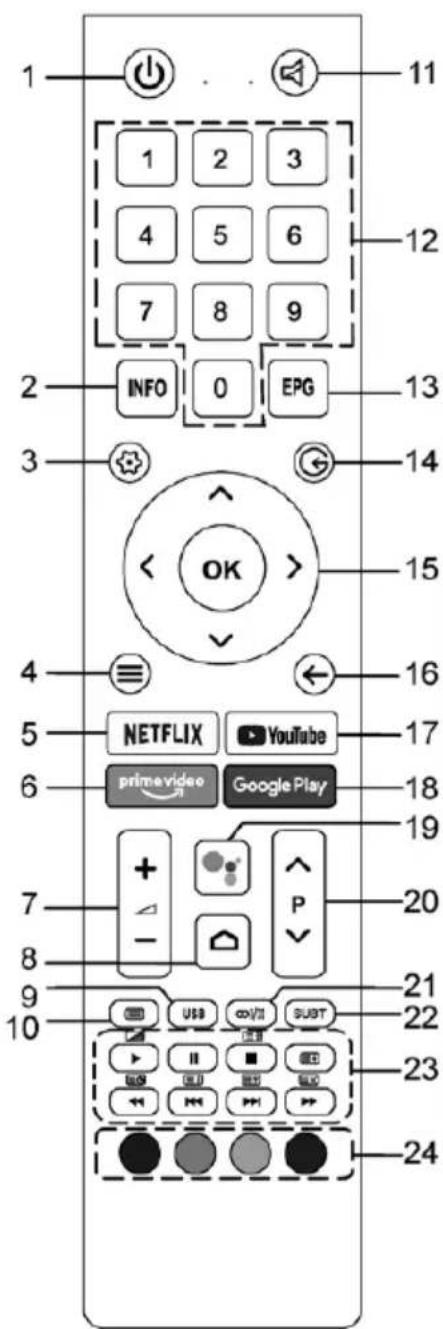
The buttons of the original remote control are as following:
text_image
1 11 1 2 3 4 5 6 7 8 9 INFO 0 EPG 2 3 14 OK 15 4 ← 16 5 NETFLIX YouTube 17 6 prime video Google Play 18 19 7 + - P 20 8 21 9 USB SUV SUBT 22 10 23 24| Serial No. | Button Description |
| 1 Power Turns on/off the TV | |
| 2 Info Displays program information | |
| 3 Settings Displays System Settings menu | |
| 4 Menu Displays main menu | |
| 5 NETFLIX Opens NETFLIX app | |
| 6 prime video Opens prime video app | |
| 7 Volume+/- Adjusts volume | |
| 8 Home Opens Android TV homepage | |
| 9 USB Switches to the USB source | |
| 10 Teletext Shows or hides Teletext | |
| 11 Mute Mutes or unmutes sound | |
| 12 Number Number buttons | |
| 13 EPG Launches Electronic Program Guide | |
| 14 Source Selects signal source | |
| 15 Direction/OK Press the direction buttons to select menu options or settings.OK button: Press OK to select or confirm the menu item; In the TV mode the channel list can be opened with the OK button. | |
| 16 Back Returns to the previous menu or setting | |
| 17 YouTube Opens YouTube app | |
| 18 Google play Opens Google play app | |
| 19 Voice Activates voice command function | |
| 20 Program /Selects programs in ascending or descending order | |
| 21 Audio Selects sound mode for current channel | |
| 22 Subtitle Selects subtitle | |
| 23 Media/Teletext Media play control except for the button / Teletext control except for the Pause II button | |
| 24 Color Use as per the operating interface instructions. | |
Using the remote control
- Point the remote control at the remote control sensor on the front of the device. Make sure there are no obstacles between the remote control and the sensor.
- Press the desired button on the remote control.
The remote control works at a range of up to 7 m. When using the remote control to control the
TV set, you should be at a maximum angle of 30^ from the front of the TV set, if possible. You should also make sure that there are no sources of bright light or even sunlight on the remote control sensor.

If the device stops responding to the remote control, the button or function is not supported by the current setting or the batteries in the remote control are empty. In this case, replace the batteries with new ones of the same type.
Connecting antennae, Internet and external devices
Connecting the TV antenna or cable TV
You can connect the cable from your indoor or outdoor antenna or cable TV to the antenna socket ANT1.
To switch to TV reception, press the Source button repeatedly to select the signal source "TV."
Connecting the satellite antenna
You can connect the cable of your satellite antenna to the ANT 2 SATELLITE socket.
To switch to satellite reception, select signal source "TV."
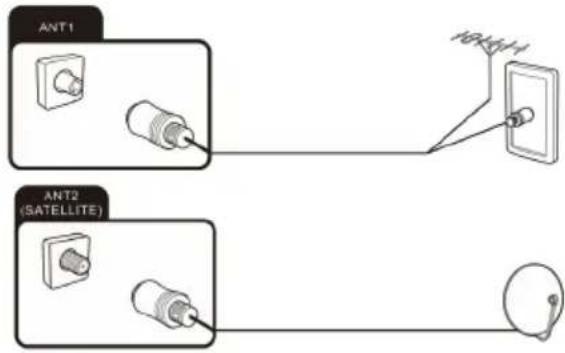
text_image
ANT1 ANT2 (SATELLITE)Connecting the network cable (LAN connection)

You can also establish an internet connection via WiFi.
Connect one end of the network cable (Cat. 5 or better) to the network port. Connect the other end of the network cable to a hub or router on your home network. The network cable is not supplied.

text_image
LANConnecting external equipment with HDMI interface
HDMI is the abbreviation for "High Definition Multimedia Interface" and allows the digital transmission of both audio and video signals over the same cable. This connection offers the best playback quality
and is the right choice for fans of HD content.
You can connect up to HDMI devices to your TV set. If you wish to connect an ARC-compatible HDMI device (e.g. a home cinema), you need to use socket HDMI 1. To transmit the audio via ARC you also have to enable the "ARC" option in "Setting", "System", "CEC".
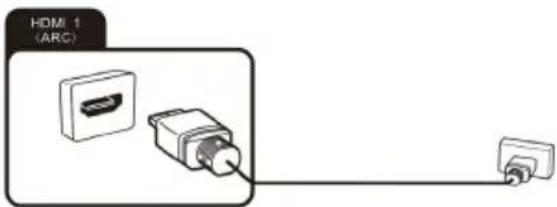
text_image
HDMI 1 (ARC)- Connect the output from a playback device, e.g. an HDMI-compliant computer or Blu-ray player, to one
of the HDMI inputs on the TV. To do this, you will need an HDMI cable (not supplied).
- In order to play the audio and video signal fed in from the external device on the TV, select the signal source as appropriate.
Connecting a PC
- Use an HDMI cable (not supplied) to connect the output from the graphics card of a PC or laptop to one of the HDMI inputs of the TV. This connection is used to transfer the video and audio from the PC to the TV set.
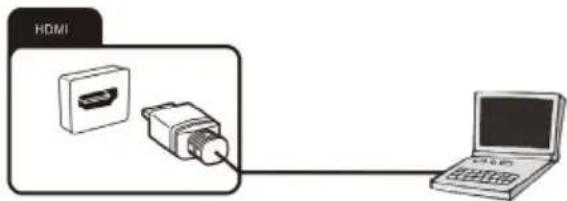
text_image
HDMI- In order to play the audio and video signal fed in from the PC on the TV, select the signal source as appropriate.

Your PC must have an HDMI-compliant graphics card in order to connect to your TV set. It is not possible to connect a PC with an analogue (VGA) output.
Connecting a digital audio system
You can connect your TV set to a digital audio system (e.g. amplifier, home cinema).
- Connect the plug at the end of a coaxial audio cable (not supplied) to the Digital Audio Out connection on your TV set.

text_image
DIGITAL AUDIO OUT- Connect the other end of the coaxial audio cable to the external device.
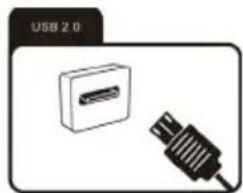
Connecting USB devices
Your TV set has USB 2.0 ports to which you can connect appropriate mass storage devices (e.g. USB sticks, USB hard drives, smartphones). You can then play back multimedia files from the USB mass storage devices (photos, videos, etc.).
natural_image
Diagram showing a USB 2.0 connector and its internal cable (no text or symbols on the diagram itself)
If you connect a USB keyboard, you can use it for input and cursor controls of the Smart TV functions.
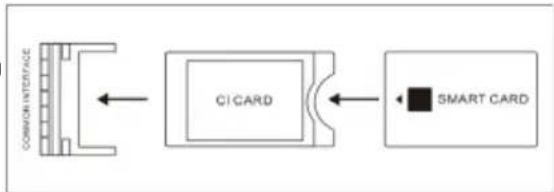
CI card slot
If you have purchased a subscription for watching scrambled programmes with a Pay TV provider, you can insert the module with the CI or CI+ card into this slot. For more information, please read the documentation supplied with your CI card.
flowchart
graph LR
    A["COMMON INTERFACE"] --> B["CI CARD"]
    B --> C["SMART CARD"]
    style A fill:#f9f,stroke:#333
    style B fill:#ccf,stroke:#333
    style C fill:#cfc,stroke:#333

Caution! Switch your TV set off before inserting or removing the CI module. Otherwise you could damage the module or the TV set.
Inserting the CI card
Insert the module with the CI or Cl+ card into the CI card slot. Make sure it is the right way around.
Removing the CI card
To remove the CI card, carefully pull it out of the CI card slot.
The CI/CI+ module is initialised after you switch the TV set on. This may take a little while. You should then be able to view the scrambled channels. If this is not the case, consult your Pay TV provider to check that the signal has been enabled for you.
The "CI Information" menu lets you select the CI/CI+ module detected and adjust further settings.
Connecting an external device with AV output
Connect external devices (e.g. camcorder, gaming console) via the AV Input jack directly to your TV by using the cinch standard (red, white and yellow).

text_image
A1 A2 A3-
Connect the Mini AV cable supplied to the socket..
-
Connect the external device to the sockets of the same colour on the Mini AV cable, using a conventional AV cable if required (not supplied).
-
In order to play the audio and video signal fed in from the external device on the TV, select the signal source "AV".
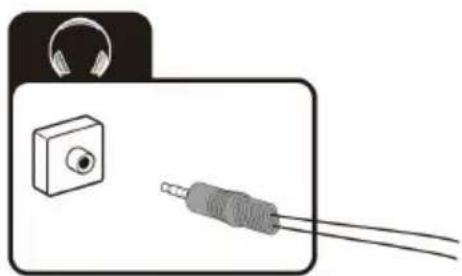
Connecting headphones
You can connect headphones or an analogue playback device (e.g. analogue audio amplifier) to the socket marked with a headphones symbol. Use an audio cable with a 3.5 mm jack-type plug.
natural_image
Illustration of a device with a speaker and two connected cables (no text or symbols)Getting started
Turn on and off the TV
Turn on the TV
Plug the power cord into a suitable power point, then press the POWER (button, under the TV panel or on the remote control, (making sure to aim it at the sensor at the front of the TV).
Turn off the TV
Press the button on the remote control to enter standby mode. To power down the TV completely, unplug the power cord from the mains socket.
Notes:
If you press and hold the Power button or standby button on the remote control for short period of time, the TV will go into fully standby mode. When it is powering on again, the TV will start from the original power on procedure.

If no input signal is available (no TV reception or no playback from external devices) the message "Weak or no signal" appears. It is also possible that the screen stays dark or displays noise.
Usage
Help function
The Help function offers a lot of information about your TV operation.
- Press the home button on the remote control. Select 'AI PONT' or Apps icon from the options
- Select 'Help' from the options- Select the desired Help topic. You can use the arrow and OK buttons to make a selection.
Please refer to the help on the TV for details.
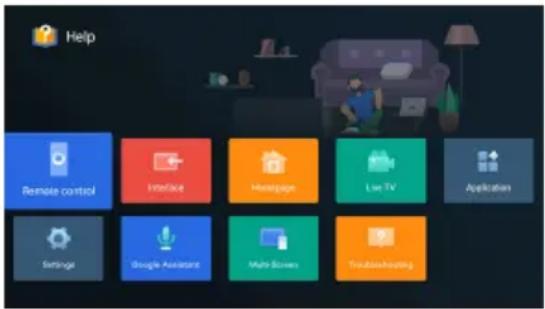
text_image
Help Remote control Interface Desktop Live TV Application Settings Google Assistant Multi-Screens TroubleshootingFirst install guide
When turning the TV on for the first time, the Welcome screen will appear. Use the and and OK buttons to navigate the following options.
1. Language and Location
Select your menu language, and select your country/region from the list.
2. Bluetooth
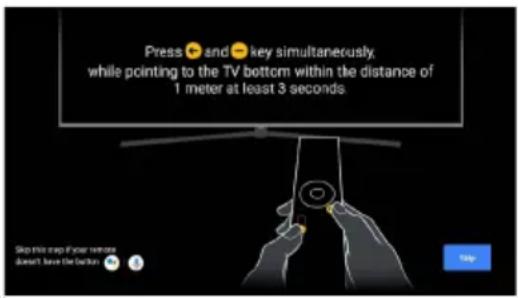
Your Android TV remote control has bluetooth capabilities! Follow the onscreen prompts to pair the remote with the TV, holding the ▲Volume and Back buttons simultaneously. Your remote's LED light will flash while pairing, and the TV will display 'Remote control paired' when successful. This will allow you to use voice commands with your remote via the Google Assistant button.
3. Quickly set up with Android phone
If you have an Android smartphone, you can easily Transfer your phone's Wi-Fi network and Google account to your TV. If not, select 'Skip'.
text_image
Press ⚫ and ⚫ key simultaneously, while pointing to the TV bottom within the distance of 1 meter at least 3 seconds Step this step for your remote Does't save Deletion Help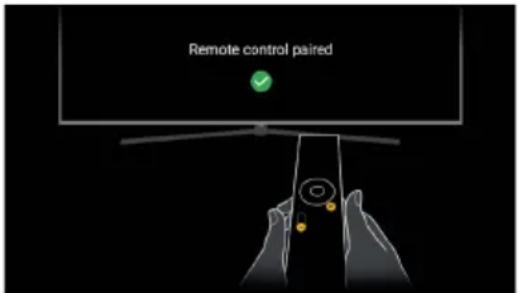
text_image
Remote control pairedPairing your bluetooth remote control with your Android TV will enable your remote's Google Assistant voice control function
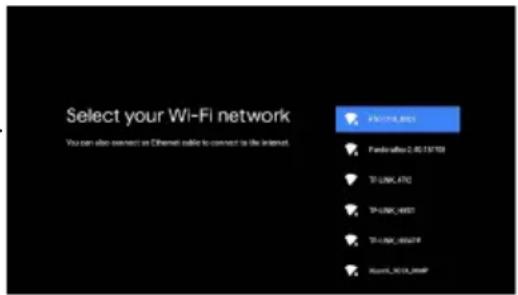
4. Select Wi-Fi network
Your Android TV will automatically scan for wireless networks nearby. Ensure the TV is within range of your wireless modem or router, and have your password handy. Follow the prompts to input your password and connect your TV to your selected network.
If you'd prefer to connect an Ethernet cable to connect to the internet, simply insert the cable (not supplied) to the LAN' input port at the back of the TV, and ensure that it is correctly connected to the internet.
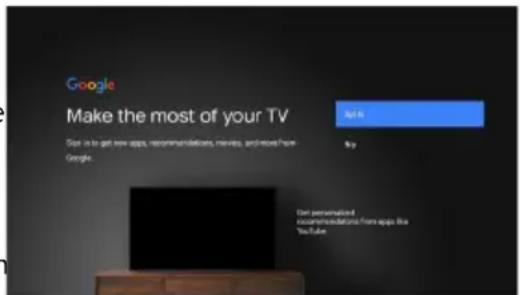
5. Google Account sign-in
Linking your Google Account to your Android TV will allow you to install new apps from the Play store, as well as receive recommendations from Google.
6. Terms of Service
This page will allow you to read each of the Google Terms of Service, Privacy Policy, and Google Play Terms of Service in full, and to accept.
7. Location permission
Grant permission for your Android TV to detect your location. You can adjust these permissions at any time from Settings.
8. Help improve Android
Grant permission for your Android TV to detect your location to automatically send diagnostic information to Google.
text_image
Select your Wi-Fi network You can also connect to Ethernet cable to connect to the Internet F:\WINDOWS\BCC1\NT Forderafter 2.05.157103 TF-UNK-4702 TF-UNK-6807 TF-UNK-88049 Routa_2018_RoutaPConnect to Wi-Fi by selecting your network and entering your password. A broadband internet connection is required for this step.
text_image
Google Make the most of your TV Sign in to get new apps, recommendations, movies, and more from Google. Get personalized recommendations from apps like YouTubeSign in to your Google account here. If you use Gmail, you already have a Google account.
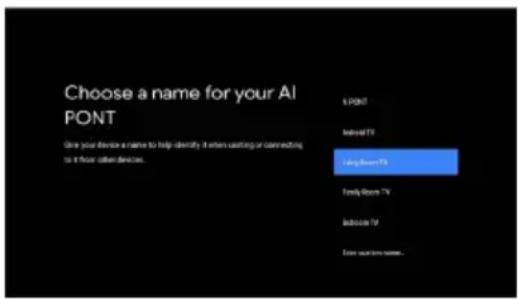
9. Choose a name for your TV
Give you TV a name to help identify it when casting or connecting to it from other devices. Select a preset option or enter a custom name.
10. Password
Set a default password.
11. Select TV mode
The home mode' is optimized for efficient usage for home use. The 'retail mode' is optimized for store Demo with fixed settings.
12. WOL
Select on or off for the Wake On LAN function (if using Ethernet cable).
text_image
Choose a name for your AI PONT Use your device a name to help identify it when casting or connecting to it flow other devices.POINT
Family TV King Room TV Family Room TV IndicBox TV Down your own name.Select 'home mode' or 'retail mode'.
13. Channel scan
Following these options, the Channel Scan screen will appear. Ensure you have an antenna cable connected to the 'ANT' input port at the back of the TV. User can choose between Antenna, Cable and Satellite.
The auto tuning function will search for and save all available free-to-air TV channels. After confirming your settings the process will automatically begin. The number of searched channels will be displayed on the screen.
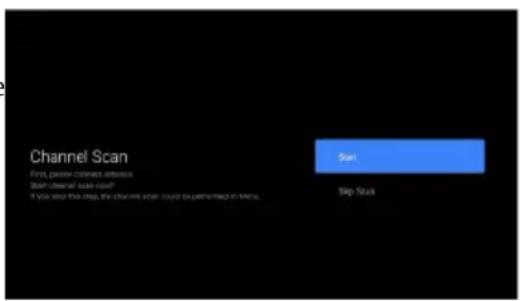
text_image
Channel Scan First, please connect to access. Start channel scan now? If you shop this step, the channel order could be performed in terms.Note: This pairing method only supports the original remote control and the TV, and does not support the remote control made by other manufacturers.
Figures and illustrations are provided for reference only and may differ from actual product appearance.
Chromecast built-in always available
Let this device be detected as a Google Cast device and allow Google Assistant and other services to wake this device up to respond to Cast commands, even when on standby and the screen is off.
Launcher
Press button to open the main interface.
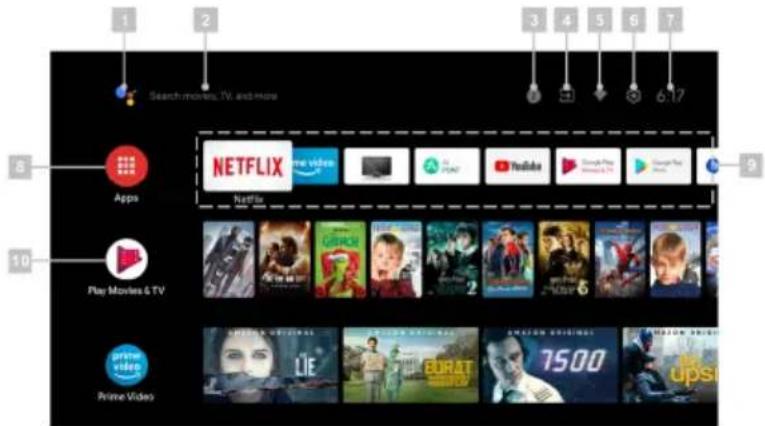
text_image
Search movies, TV, and more 6.17 3 4 5 6 7 8 NETFLIX Apps Play Movies & TV 10 2 3 4 5 6 7 8 9 Prime Video LIE BURAT 7500 upsi- Google Assistant
- Text search
- System notifications
- Source
- Internet connection
- Settings
- Clock
- Apps
- Favorites list
- Play next
Channel scan
This section describes how to search and store channels automatically. This may be done in any of the cases below:
- you have skipped the channel installation step in the initial setup;
- you are prompted that there are no channels in TV mode;
- you want to update channels list.
Channel search in Antenna mode
- Press buttons to open the "TV options" menu.
- Press < and > arrow buttons on the remote control, select the "Settings" option and press OK buttons to display the "Settings" submenu.
- Press and arrow buttons on the remote control, select the "Channel" option and press OK buttons to display the "Channel" submenu.
- Press and arrow buttons on the remote control, select the "Channel Installation Mode" option.
- In the "Channel Installation Mode" submenu, Select Antenna type then press the back button to return to previous page. When user click on Channel Scan, the auto scan will be started. The page is displayed as below. This kind of scan will auto install digital channels (Progress 0 \~ 50 %) and analog channels (Progress 51 \~ 100%
text_image
Channel Channels Channel Installation Mode Cable Auto Channel Update Parental Controls Audio Language German 2nd Audio Language English Open Source Licenses Version 2.28.5 build 16321512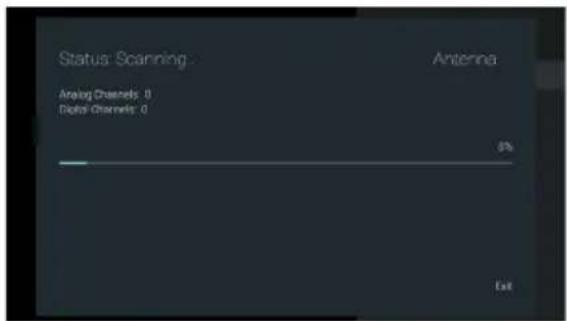
text_image
Status: Scanning Analog Channels: 0 Digital Channels: 0 Antenna 8% ExitEN
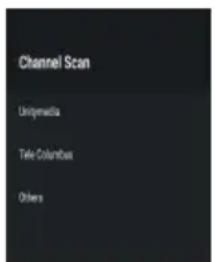
Channel search in Cable mode
a) Choose operator as shown in the figure below, you can choose the operator search method in your country, Such as UPC:
Please make sure that the correct operator parameters are set before searching the channel. You can get them from the member of operator. After finishing setting Frequency and Network ID, focus on Scan Item and press OK buttons to start scan.
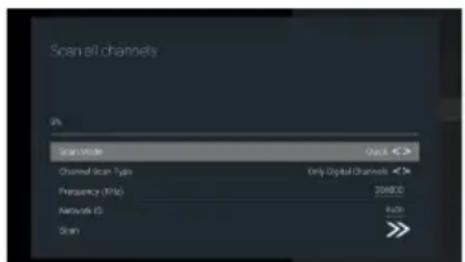
b) If we don't have operator to choose, Set Scan Mode to Full, change focus on Scan, and then press OK buttons to start scan. It will do full scanning of digital and analog channels. As shown:
text_image
Channel Scan UniJmedia Title Columbus Others(a-1) (a-2) (a-3)
text_image
Scan all channels 0% Scan Mode Open Channel Scan Type Only Digital Channels Frequency (MHz) 25687.0 Network ID Auto Scan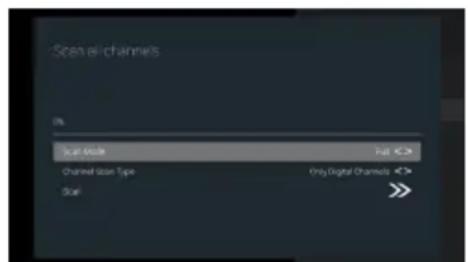
text_image
Scan all channels 0% Scan mode Channel size Type Only Digital Channels ScanChannel search in Satellite mode
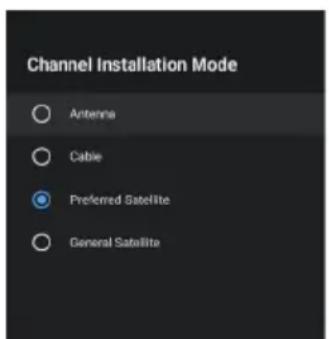
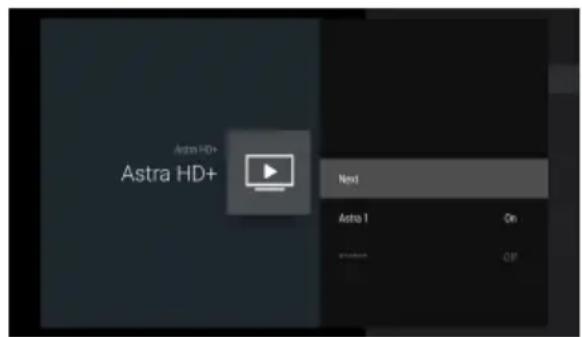
a) Preferred Satellite
In the "Channel Installation Mode" submenu, select Preferred Satellite type, and then select Channels.
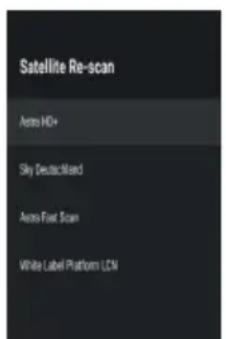
Choose operators, You can choose the operators search in your country, Press > arrow buttons Channels - Satellite Re-scan Next, there will be some operators, select one operator. As shown:
Some default satellites will be showing. Select Next to start scan.
b) General Satellite
If you cannot find your preferred operator, select General Satellite, Press > arrow buttons Channels -Satellite Re-scan Next to blind scan.
text_image
Channel Installation Mode Antenna Cable Preferred Satellite General Satellite(a-1)
text_image
Satellite Re-scan Auto HD+ Sky Deutec-Mead Auto Fast Scan White Label Platform LCD(a-2) (a-3)
text_image
Astra HD+ Next Astro 1 On Off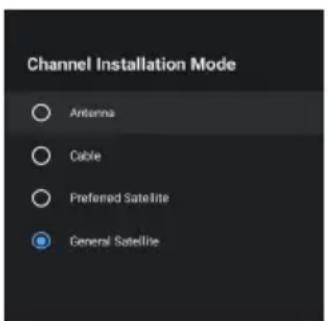
text_image
Channel Installation Mode Antenna Cable Preferred Satellite General Satellite(b-1)
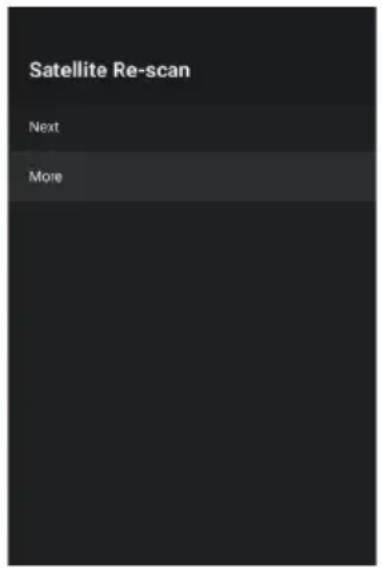
Note:
Steps to search for channels by Unicable: open the option menu, select Satellite Re-scan->More->Unicable I or Unicable II. Set correct Tuner and Frequency parameters, then select Next and corresponding satellite, then start searching. For Tuner and Frequency, please consult the Unicable equipment supplier.
text_image
Satellite Re-scan Next More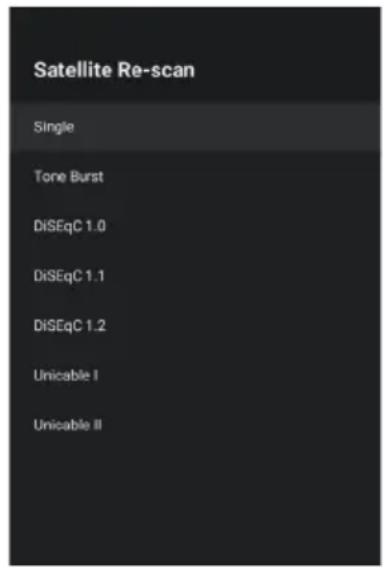
text_image
Satellite Re-scan Single Tone Burst DiSEqC 1.0 DiSEqC 1.1 DiSEqC 1.2 Unicable I Unicable II
text_image
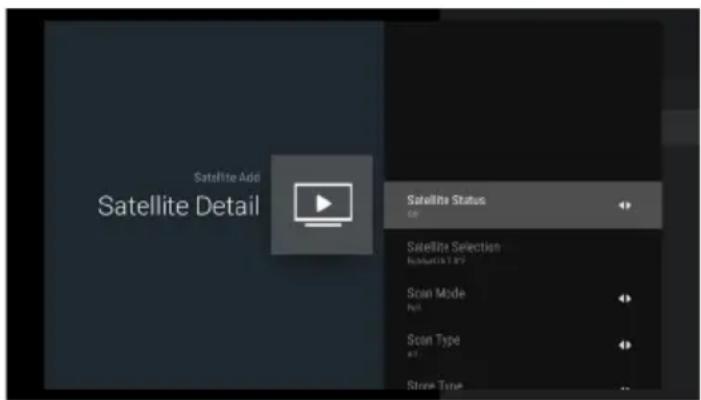
Unicable I Next Tuner User band 1 Band Frequency User Define User Define DSatellite Add
Satellite Add is used to add a satellite in the database.
The Satellite Add option is not selectable by default. The user needs to go to Satellite Re-scan → More to select the satellite device type, then return to the Channels page, select Satellite Add to add a satellite, Press OK buttons to set detail info for satellite.
Satellite Status: This item is not allowed to modify when user select Preferred satellite, but allowed in General satellite. This is used to set the Status (on, off) of the selected satellite.
text_image
Satellite Add Satellite Detail Satellite Status 08 Satellite Selection Resources 129 Scan Mode N/A Scan Type N/A Store TypeSatellite Selection: Cannot be set by user
Scan Mode: Press the < and > arrow buttons to select the scan mode. (Network/Full)
Scan Type: Scans for all active broadcast station channels and stores them in the TV. (All/Only Encrypted Channels/ Only Free Channels.
Store Type: Press the < and > arrow buttons to select the Store type. (All/Only Digital Channels/ Only Radio Channels)
LNB Configurations
- LNB Power: User can set LNB power state to on or off.
- LNB Frequency: One parameter of satellite, the some specific values (Universal, 5150 5750 etc.) are provided for user to select by pressing "enter" key.
- Tone 22KHz: This item is used to Tone 22Khz parameter of satellite, it is allowed to edit only when the LNB Frequency value select 5150 value and below items value.
Motor Settings
- Transponder: This item includes 3 sub items named Frequency, Symbol Rate and Polarization. User can modify these values by input manual (Frequency, Symbol Rate) or pressing. "enter" key (Polarization).
- Signal Quality: The value between 0 and 100 means current Signal Quality.
- Signal Level: The value between 0 and 100 means current Signal Level.
Satellite Manual Tuning
Satellite Manual Tuning is similar to Single RF Scan of Antenna. It is used to scan only one satellite by setting the Transponder of selected satellite. In this condition of scanning, user is only allowed to modify Transponder, other items are disabled.
Editing Channels
Swapping channels
This option is only available when LCN is off.
To swap two channels, we can use channel swap function.
- Press≡ buttons to open the "TV options" menu.
-
Press < and > arrow buttons on the remote control, select the "Settings" option and press OK buttons to display the "Settings" submenu.
-
Press ▲ and ▼arrow buttons on the remote control, select the "Channel" option and press OK buttons to display
-
Press ▲ and ▼arrow buttons on the remote control, select the "Channels" option and press OK buttons to get in subpage.
-
Press ∧ and ∨ arrow buttons on the remote control, select the "Channel Swap" option and press OK buttons to display the "Channel Swap" page.
-
Press^ and arrow buttons on the remote control and press OK buttons to select two channels which you want to swap.
-
You want to quickly jump to the target station number, you can do it through Press the blue buttons go to channel function.
text_image
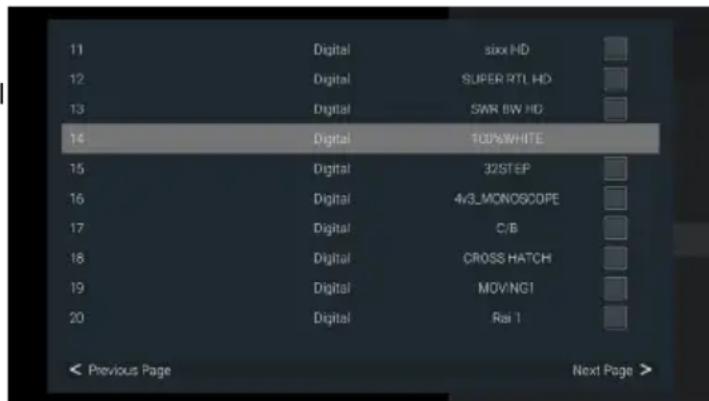
11 Digital sixx HD 12 Digital SUPER RTL HD 13 Digital SWR BW HD 14 Digital 100%WHITE 15 Digital 32STEP 16 Digital 4/3_MONOSCOPE 17 Digital C/B 18 Digital CROSS HATCH 19 Digital MOVING1 20 Digital Rai 1 < Previous Page Next Page >Skipping channels
- In the "Channels" submenu, press and arrow buttons on the remote control, select the "Channel Skip" option and press OK buttons to display the "Channel Skip" page.
- Press OK buttons on the remote control to mark it. An icon appears next to the channel name.
- From now on, when switching channels, this channel will be skipped. To make the channel available again for normal channel switching, repeat the above steps.
Channel list
These days, the range of TV channels is so massive that the Channel list normally contains several hundred channels. It is often difficult or time-consuming to find a specific channel. The search function makes it easier for you to find a specific channel:
- Open the channel list: press and arrow buttons to show channel list.
- Press YELLOW. This shows more operation for channel list.
- Select the "Find" using and arrow buttons and OK buttons. An input Dialog will display on screen.
Enter channel number or channel name, highlight the confirmation icon, and then press OK buttons. TV will find out the channels.
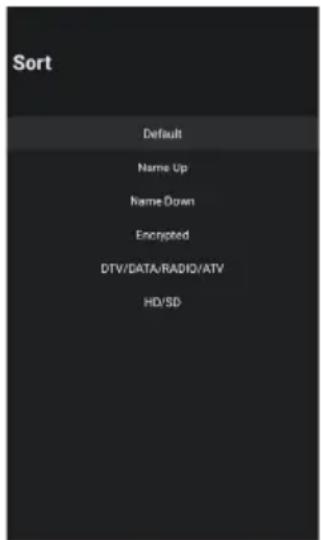
- Select the "Sort" using and arrow buttons and OK buttons.
Press and arrow buttons on the remote control, select the item and press OK buttons, this page will return to channel list and the channel will list as the order you select.
- Select the "Select Type" using and arrow buttons and OK buttons. Filter page will be shown. Press and arrow buttons on the remote control, select the item and press OK buttons, this page will return to channel list and the channel will list by the filter you select.

text_image
Select More Select Type Sort Find(2) (4) (5)
text_image
Sort Default Name Up Name Down Encrypted DTV/DATA/RADIO/ATV HD/SD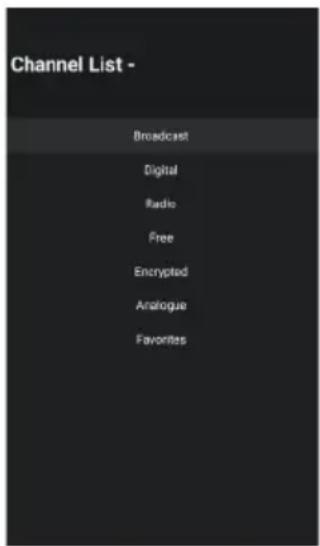
text_image
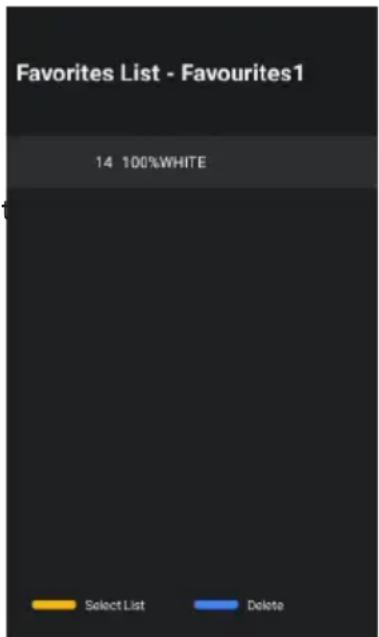
Channel List - Broadcast Digital Radio Free Encrypted Analogue FavoritesDefining favorite channels
This is how to add channels to the Favorites list or remove them:
- Press≡ buttons to open the "TV options" menu.
- Press ↗ arrow buttons on the remote control to select the "Channels" menu.
- Press < and > arrow buttons on the remote control, select the "Add to My Favorites" option and press OK buttons to add current displaying channel to favorites list, or select the "My Favorites" option and press OK buttons to remove current displaying channel from the favorites list.(Default add to favorite list 1)
- Press OK buttons to show channel list.
- Press BLUE key to change channel list into favorites list.
- Press BLUE key to delete focused channel.
- Press YELLOW key to change current page to favorites list select page.
Press and arrow buttons on the remote control to focus a favorites list, and press OK buttons to change current favorites list.
Then follow Step 1-3 to add favorites to the selected favorites list.
text_image
Favorites List - Favourites1 14 100%WHITE Select List Delete(5)
Connecting Google Home to the TV
- On the homepage of the mobile phone, open Google Home application
- Select the corresponding Device name in the devices list.
- Click "cast my screen"
- Choose "Cast screen"
- Click "Start now" to confirm again
Share photos, music and videos to TV
- Open the video, photo album, music and other applications on your mobile phone, find and click the key
- Select the corresponding Device name in the pop-up list.
- By the handheld device, select photos, music, and video to play and then share them on the TV.
How to use the multi-screen interactive function
- Connect the TV and mobile phone to the same network.
- Open the Multi-ScreenShare application on the TV, find the Machine name, and press the OK button key to select Android or IOS according to your mobile phone type;
- Open the video playback application on the mobile phone by Android, there will be the following keys in the video interface, click the key ☐After clicking, the available TV names in the current network will pop up, click the TV name prompted in the Multi-ScreenShare application to share it to the TV;
- By IOS, open the control center on the mobile phone, click Screen mirroring, the mobile phone will pop up the devices available on the current network, click the TV name prompted in the Multi-ScreenShare application to share it to the TV.

Some of the above signal sources open chargeable online streaming services. Further information on subscriptions and prices can be found on the relevant provider websites.
Using EPG (Electronic Program Guide)
EPG is an on-screen guide that displays scheduled digital TV program. You can navigate, select and view programs.
Note: The DTV EPG does not require an internet connection.
- To use the DTV EPG, Press EPG button on the remote control, the Program Guide menu will appear, which allows you to get information about the current or future program playing on each channel. Navigate through the different programs using the arrow buttons on the remote control.
- Use the related color buttons shown at the bottom of the screen to view EPG.
- It might have no information to be displayed. Please change channel first and TV can get proper EPG information from TV signal when the channel is on.
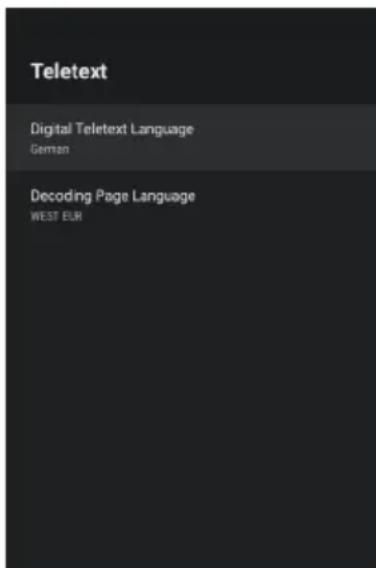
Teletext
Teletext is a one-way, or non-interactive, system for transmission of text and graphics via broadcasting or cable for display on a television set. A decoder or microchip resident in the TV set is needed to extract the teletext information.
Teletext can be transmitted over one-way cable or over-the-air broadcasting via radio or television. In the case of TV, it can occupy a full channel or be encoded in the vertical blanking interval, or VBL.
text_image
Teletext Digital Teletext Language German Decoding Page Language WEST EURTeletext Information
Teletext is a text (level 1.5) data which is carried in digital DVBT and analog network. The original concept is an electronic magazine based on current service (program, channel) broadcasted from headed.
Normally the Teletext stream is always open and is caching pages when service is started; in other words Teletext engine is always running when video is started; even the Teletext AP is hidden, the Teletext engine is running.
Show: Press the button to display the Teletext.
Exit: Press the EXIT button exit Teletext.
Note: When current channel does not have Teletext, a toast will show the message "No Teletext" as a reminder.
Details:
* Digital Teletext Language: It's designed to show the initial page number of teletext, which means different selection leads to different initial page number.
* Decoding Page Language: You can select a font to your own preference, and the teletext page will show in corresponding font style.
* TTX Presentation Level: This option defines system components which are to be shown of Teletext data.
HbbTV
HbbTV (Hybrid broadcast broadband TV) is a service offered by certain broadcasters and available only on some digital TV channels.
HbbTV delivers interactive television over broadband Intem et.
These interactive features are added to and enrich the normal digital programs, and include services such as digital teletext, electronic program guide, games, voting, specific information related to the current program, interactive advertising, information magazines, catch-up TV, etc. To use HbbTV please ensure your TV is connected to Internet and HbbTV is switched on.
There are some HBBTV settings, you can check them via "Enter Menu key > Select Advanced Options > HBBTV Settings".
Details:
HBBTV Support: It's used to control the HBBTV function.
Do Not Track/Cookie Settings/Persistent Storage/Block Tracking
Sites/Device ID/Reset Device ID: These are all HBBTV browser settings.

text_image
HBBTV Settings HBBTV Support Do Not Track Default Cookie Settings Default Persistent Storage Block Tracking Sites Device ID Reset Device ID
Your TV set requires an internet connection for HbbTV services to work.
HDMI1 or HDMI2 signal source

Caution: Power your TV set and the external device you wish to connect off before connecting the cables, otherwise you could damage the devices.
You can connect up to HDMI devices to your TV set. HDMI is the abbreviation for "High Definition Multimedia Interface" and allows the digital transmission of both audio and video signals over the same cable.
The HDMI1 port also supports the ARC function, which provides the option of Settings-->Device Preferences-->Inputs-->HDMI control.
- Connect the external device to the TV set using a conventional HDMI cable (not supplied).

Please note that the cable must be compatible for the desired application. For instance, use a cable of version 1.4 for ARC CEC or a cable of version 2.0 for Ultra HD.
EN
- Open the Live TV App, Press the Source button to display the signal source selection menu. select the signal source you require, HDMI1 or HDMI2, and confirm by pressing the OK button.
- Start playback on the connected device.
Using the TV set as a PC monitor

Your PC must have an HDMI-compliant graphics card in order to connect to your TV set. It is not possible to connect a PC with an analogue (VGA) output.

Caution: Power your TV set and the PC off before connecting the cables, otherwise you could damage the devices.
Connect the output from the graphics card of your PC with one of the HDMI ports on the TV. To do this, you will need an HDMI cable (not supplied).
AV signal source
You can connect a device with AV output (e.g. an analogue video camera, a video recorder) to your TV set.

Caution: Power your TV set and the external device you wish to connect off before connecting the cables, otherwise you could damage the devices.
- Connect the Mini AV cable supplied to the socket..
- Connect the external device to the sockets of the same colour on the Mini AV cable, using a conventional AV cable if required (not supplied).
- Open the Live TV App, Press the Source button to display the signal source selection menu. Press the ∧/∨ and > arrow buttons, select AV item and press the OK button.
- Start playback on the connected device.
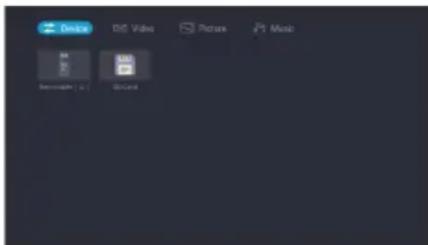
USB signal source (playback of multimedia files)
You can connect compatible USB devices to your TV set in order to play back supported multimedia files (e.g. photos, music) stored on the USB devices. Press the remote control USB shortcut key or press the home key to enter the home page and select the Media Player application. Above, there are options to filter by file type. Below, you can see the selected folder on the USB mass storage device (initially, you can only see the root folder of the device itself)
text_image
Device DVD Video Picture Music Smartphone (S) iCloud
You do not necessarily need to power off your TV set to connect or disconnect a USB mass storage device.
Menus
TV Options
Your TV has various menus which you can use to adapt the TV set to your individual requirements. You can press the≡button icon on home screen to access the Settings Menu.

text_image
TV options Picture Mode Display Mode Speakers Power CI Card Advanced OptionsPicture Mode: User, Standard, Vivid, sport, Movie, Game and Energy Saving
Display Mode: You can select a Display Mode to suit your personal preferences. You can choose between Automatic, Full, Super zoom, unscaled, 4:3, Movie expand 14:9, Movie expand 16:9
Speakers: You can select TV Speakers and External Audio System.
Power
- Sleep Timer: Sleep Timer switches the TV to standby after a defined period of time. To cancel the Sleep Timer, set to "Off".
- Picture off: Refer to page 21. description for details.
- Switch-Off Timer: Select the time you want. The TV will enter into standby mode automatically when there is no operation in set time.
- No-Signal Auto Power-Off: When set to "On", if there's no TV signal nor press-button operation, TV will enter into standby status automatically about 5 minutes later.
CI Card: CI Card information could display on the screen.
Advanced Options
- Setup: You can use this command to start Installation Wizard, which easily guides you through the configuration of the device.
- Blue Mute: Control Blue Mute on/off. The screen become blue at no signal state if you turned on Blue Mute.
- Default Channel: Set the default boot channel
- HBBTV Settings: You can activate or deactivate the HBBTV Settings functions.
- Subtitle: You can activate or deactivate the display of subtitles here. Not all programmes are broadcast with subtitles.
- Teletext: You could set Teletext language.
- Auto Sleep: Select the Auto Sleep time you want. The TV will enter into standby mode automatically when there is not any operation in set time.
- System Information: Display system information
- Version info: Display version info
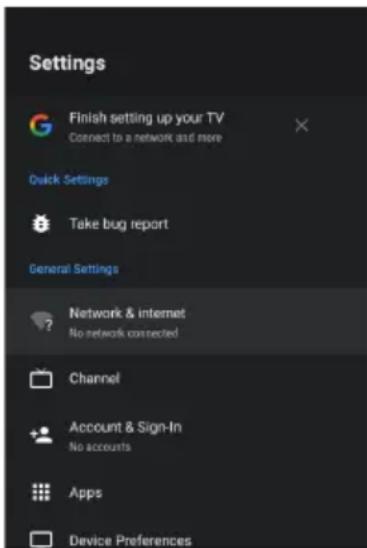
Settings
Network & Internet:
- Wi-Fi: Turn on the Wi-Fi to access the Internet via a wireless network connection. Select an available network, press OK buttons to confirm. A screen will appear prompting you to enter the password if necessary.
- See all: Press OK buttons to view all available network or fewer.
Other options
- Add new network: You can add wireless network.
- Scanning always available: Check to scan for networks even when Wi-Fi is turned off.
- Wow: Wake on wireless network.
- Wol: Wake up the wired network.
Ethernet
- Not connected: Show whether the Ethernet is connected.
- Proxy settings: You can set the proxy server.
- IP settings: Configure the IP setting for your network connection.
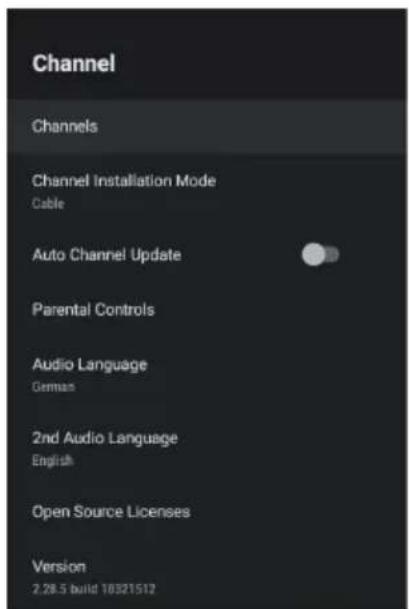
Channel
- Channel Installation Mode: Choose channel installation mode for Antenna or Cable.
- Auto Channel Update: Automatically update channels.
- Parental Controls: The Parental Controls setting allows you to block content that is not appropriate for children to watch.
- Audio Language: You can choose the audio language in DTV mode.
- 2nd Audio Language: You can choose the 2nd Audio Language in DTV mode.
text_image
Settings Finish setting up your TV Connect to a network and more Quick Settings Take bug report General Settings Network & internet No network connected Channel Account & Sign-In No accounts Apps Device PreferencesEN
- Open Source Licenses: Click to read the Licenses details.
- Version: The version of the channel.
Accounts & Sign In: Make the most of your TV. Choose account type and sign in to get new apps, recommendations movies and more.
Apps: You can view details about an app or other item listed. The information and controls available vary among different types of apps.
Remotes & Accessories: To connect your remote through Bluetooth, before pairing your Bluetooth devices, make sure they're in pairing mode.
Device Preferences: See other chapters for more information about these settings.
The "Device Preferences" submenu contains the following options:
About: Here will show the basic information of the TV, include System update / Device name / Production Name / Restart / Status / Legal information / Model / Version / Software Version / Netflix ESN / Android security patch level / Kernel version/Build. User can press and arrow buttons) to check the information.
Date & time: User can select this item to set time related items of TV device, include Automatic date & time, Set date, Set time, Set time zone, Use 24-hour format. When Automatic date & time is set to "Use network-provided time", Set date and Set time.
Automatic date & time: Use network-provided time. You can also set the current time manually when Off is selected.
- Set date: Set the date.
- Set time: Set the time.
- Set time zone: Select your time zone.
- Use 24-hour format: Set the time to display in a 12 or 24-hour format.
Timer
- Auto Power-On Type: Set the type Off, On, Once.
- Auto Power-On Time: Set the clock for the time you want the TV to turn on automatically.
- Auto Power-Off Type: Set the type Off, On, Once.
- Auto Power-Off Time: Set the clock for the time you want the TV to turn off automatically.
Language: Adjust the default Language settings for the TV.
Keyboard: Adjust the default settings for the keyboard.
Inputs: You can see the state of devices that the TV connected: Connected Input, Standby Inputs and Not connected Input etc.
Consumer Electronic Control (CEC)
- HDMI control: Allow the TV to control HDMI devices.
- Device auto power off: Power off HDMI devices with the TV.
- TV auto power on: Power on the TV with HDMI device.
Notes:
* HDMI cables must be used to connect HDMI CEC-compatible devices to your TV.
* The HDMI CEC feature of the connected device must be turned on.
* If you connect an HDMI device that is not HDMI CEC-compatible, all the HDMI-CEC Control features do not work.
* Depending on the connected HDMI device, the HDMI-CEC Control feature may not work.
- CEC Device List: You will see the CEC device list if the TV access CEC device.
Power
- Sleep Timer: Set the sleep timer to automatically turn the TV off within a specified time.
- Picture off: When you select this option, the screen will not display the picture. You can only listen the audio. Press any button except the button, Volume [+/-] buttons and button to restore operation.
- Switch-Off Timer: Set the timer to automatically turn the TV off within a specified time.
- No Signal Auto Power Off: You can set how long after no signal, the TV will automatically shut down.
Picture
- Picture Mode: If you'd like to configure the settings for your picture, then there are seven types of picture modes available.
- Backlight: Adjust Local Dimming, Backlight Level, Automatic Light Sensor and Minimum Backlight to change the overall brightness of the screen.
- Brightness: Adjust the Brightness level to generate lighter or darker images.
- Contrast: Adjust the Contrast level to increase or decrease how bright images appear.
- Saturation: Adjust the saturation of color settings.
- HUE: Adjust the hue of color settings.
- Sharpness: Adjust how sharp or soft edges of images appear.
- Gamma: Adjust gamma type.
- Color Temperature: Select a preset color temperature. Adjust how warm(red) or cool(blue) the white areas of an image appear.
- Color Tuner: Adjust the color tuner settings.
- 11 Point White Balance Correction: Adjust the intensity of red, green and blue lights to view the true colors of all images in the picture.
- Reset to Default: Reset current picture settings to factory mode.
Sound
- Balance: Adjust the left and right speaker strength to optimize audio for a specific location.
- Equalizer Detail: Boost the volume at different frequencies.
- Speakers: External Audio System.
- Digital Output: Select the digital audio output format that best suits the audio device type. Choose PCM if you have an amplifier that does not support Dolby Digital technology.
- SPDIF Delay: Adjust SPDIF Delay.
- Downmix Mode: Enable downmix, Convert multi-channel audio into two-channel audio.
- Dolby Audio Processing: Set Dolby sound On/Off.
- Reset to Default: Reset current audio settings to factory mode.
Storage: Used to display TV storage information. Device storage show current data info in system internal shared storage, removed storage show removable device storage information.

text_image
Device Preferences About Date & time Timer Language Keyboard Board Inputs Power Picture SoundHome screen: Home Screen settings, users can set whether to allow preview video and audio information, view recorder APPs or view open-source licenses.
Retail Mode: Retail Mode is used to set the mall mode, the user can open the mall mode and set which content is to be demonstrated in the mode, and the location of the presentation content. This includes the built-in APP information of the TV or a preset video file.
Google Assistant: Provide some common settings about Google, include Accounts/View permissions/Searchable apps/Safe Search filter / Block offensive words/Open source licenses
Chromecast built-in: You can view Open source licenses and Version number.
Screen saver: Provides user setting screen saver and auto standby function; Provides setting screen saver on time and auto standby time.
Location: Your TV can use different modes to access location information. Each mode uses different sources to estimate the TV's location.
Usage & diagnostics: Help improve your Android TV by automatically sending diagnostic and usage data to Google. This information won't be used to identify you and helps teams working on things like app performance and new Google features.
Accessibility
- Audio Description: Choose to leave the Audio Description feature On or Off.
- Visually Impaired: You can set Visually Impaired On or Off. The function can be used to meet the needs of visually impaired people.
- Hearing Impaired: You can set Hearing Impaired On or Off. The function can be used to meet the needs of hearing impaired people.
- Captions: Displays and sets the closed captions.
- High contrast text: Improves contrast for visually impaired. The function can be used to meet the needs of visually impaired people.
- Accessibility: Auxiliary settings for user preferences such Audio Description, Visually Impaired, Hearings Impared, Captions, High contrast text, etc.
Reset: Reset your TV back to the factory default.
Troubleshooting Guide
| Specification | |
| Working voltage 100 – 240 V 50/60 Hz | |
| Rated power consumption | 55 W |
| Dimensions (W x H x D) without stand | 719 X 421 X 81 mm |
| Net weight without stand 3.9 Kg | |
| RF aerial input 75Ωunbalanced | |
| Language of OSD Multiple options | |
| System DTV: DVB-T/T2/C/S/S2 | |
| ATV: PAL/SECAM BG/DK/I/NTSC-M | |
| Channel coverage DTV: DVB-T: 177.5 MHz ~ 226.5 MHz | |
| 474 MHz ~ 858 MHz | |
| DVB-C: 113 MHz~858 MHz | |
| DVB-S/S2: 950 MHz ~ 2150 MHz | |
ATV: 46MHz \~ 862 MHz
Note: Some specifications may different regions or models, and please take your actual as the standard.
Specification
Country restrictions
This device is intended or household and/or office use in all EU countries (and other countries where the corresponding EU guideline is in place) without any restrictions excluding the countries listed below.
| Country Restriction | |
| Bulgaria General permit for outdoor use and use in public facilities | |
| France Use in closed spaces only for 2454-2483.5 MHz. | |
| Italy A general permit is required for use outside of private spaces. | |
| Greece Use in closed spaces only for 5470-5725 MHz. | |
| Luxembourg General permit for network and service offers (not for spectrum) | |
| Norway Broadcasting radio waves is not permitted in a geographic radius of 20 km around the center of Ny-Ålesund. | |
| Russian Federation Use in closed spaces only permitted | |
The regulations of individual countries are subject to change at any time. It is recommended that the user make an inquiry to the relevant agencies about the current stand of national regulations for 2.4 GHz and 5 GHz WiFi.
Troubleshooting
Before contact the service technician, perform the following simple checks. If any program still persists, unplug the TV and calling for serving.
| PROBLEM POSSIBLE SOLUTION | |
| No sound and picture | - Check whether the main plug has been connected to a wall outlet.- Check whether you have pressed the POWER button on TV set.- Check the picture contrast and brightness settings. |
| Normal picture but no sound | - Check the volume.- Sound muted? Press the MUTE button.- Try another channel, the problem may be with the broadcast.- Are the audio cables installed properly? |
| The remote control does not work | - Check to see if there is any object between the product and remote control causing obstruction.- Are batteries installed with correct polarity (+ to +, - to -)?- Correct remote operating mode set: TV, VCR etc.?- Install new batteries. |
| Power is suddenly turned off | - Is the sleep timer set?- Check the power control settings. Power interrupted.- No broadcast on station tuned with auto activated. |
| Picture appears slowly after switching on | - This is normal; the image is muted during the product startup process. Please contact your service center, if the picture has not appeared after five minutes. |
| No or poor color or poor picture | - Adjust the color in menu option.- Keep a sufficient distance between the product and the VCR.- Try another channel, the problem may be with the broadcast.- Are the VIDEO cables installed properly?- Activate any function to restore the brightness of the picture. |
| Horizontal/vertical bars or picture shaking | - Check for local interference such as an electrical appliance or power tool. |
| The TV is not receiving all channels. | - Confirm that the coaxial cable is securely connected to the TV.- If you are using an antenna, verify it is positioned correctly and if all the connections are secured. |
| Poor reception on some channels | - Station or cable product experiencing problems. Tune to another station.- Station signal is weak, reorient antenna to receive weaker station.- Check for sources of possible interference. |
| No output from one of the speakers | - Adjust balance in menu option. |
| The TV audio is not being played through the receiver. | - Connect an optical cable to the TV and the receiver.- ARC enables digital sound to be outputted via the HDMI (ARC) port. However, ARC is only available when the TV is connected to an audio receiver that supports ARC. |
| The wireless network connection failed. | - Make sure the Network Connection is set to Wireless.- Make sure the TV is connected to a wireless IP router. |
| The software update over the Internet has failed. | - Check the network connection status.- If the TV is not connected to a network, connect to a network.- The upgrade stops if you already have the latest software version. |
| No picture when connecting HDMI | - If an HDMI cable doesn't support High Speed HDMI, it can cause flickers or no screen display. In this case use the latest cables that support High Speed HDMI. |
Maintenance
Early malfunctions can be prevented. Careful and regular cleaning can extend the amount of time you will have your new TV. Be sure to turn the power off and unplug the power cord before you begin any cleaning.
Cleaning the screen
- Here's a great way to keep the dust off your screen for a while. Wet a soft cloth in a mixture of lukewarm water and a little fabric softener or dish washing detergent. Wring the cloth until it's almost dry, and then use it to wipe the screen.
- Make sure the excess water is off the screen, and then let it air-dry before you turn on your TV.
Cleaning the cabinet
To remove dirt or dust, wipe the cabinet with a soft, dry, lint-free cloth. Please be sure not to use a wet cloth.
Extended Absence

If you expect to leave your TV dormant for a long time (such as a vacation), it's a good idea to unplug the power cord to protect against possible damage from lightning or power surges.
Disposal of old electrical appliances
The European directive 2012/19/EU on Waste Electrical and Electronic Equipment (WEEE), requires that old household electrical appliances must not be disposed of in the normal unsorted municipal waste stream. Old appliances must be collected separately in order to optimize the recovery and recycling of the materials they contain, and reduce the impact on human health and the environment.
The crossed out "wheeled bin" symbol on the product reminds you of your obligation, that when you dispose of the appliance, it must be separately collected.
Consumers should contact their local authority or retailer for information concerning the correct disposal of their old appliance.

This product complies with EU directive requirements on electromagnetic compatibility and electrical safety.
User information on the disposal of used devices and batteries
Devices that bear this symbol may not be disposed of with household waste. Please inform yourself about suitable recycling centers or systems to dispose of these products
DISPOSAL
The symbol with the crossed-out waste bin requires separate disposal of waste electrical and electronic devices (WEEE). Electrical and electronic devices may contain materials which represent a health and environmental hazard. Do not dispose of this device with unsorted household waste; dispose at a designated collection point for waste electrical and electronic devices. In this way, you will do your part to protect our natural resources and environment. For further information, please contact your retailer or your local authorities.
Please dispose of batteries in an environmentally friendly manner. Do not throw batteries away with household waste. Please use local recycling and collection points or contact the retailer where you purchased the product

THIS DESCRIPTIONS MULTIMEDIA INTERFACE
The terms HDMI and HDMI
High-Definition
Multimedia Interface, and the HDMI logo are trademarks of registered trademarks of HDMI Licensing LLC in the United States and other countries.

AUDIO
Manufactured under license from Dolby Laboratories. Dolby, Dolby Audio, and the double-D symbol are trademarks of Dolby Laboratories Licensing Corporation.
This product contains free software that is subject to the GNU General Public License (GPL) and/or the GNU Lesser General Public License (LGPL). You may redistribute and/or publish it under the terms of the GNU General Public License or the GNU Lesser General Public License as published by the Free Software Foundation, either according to Version 2 or (at your option) any later version.
This program is published in the hope that it is of use to you but WITHOUT ANY GUARANTEE and especially without the implicit guarantee of BEING READY FOR THE MARKET or USE FOR A CERTAIN PURPOSE. You can find details in the GNU General Public License (GPL) and the GNU Lesser General Public License (LGPL). You can obtain the software from Imtron GmbH's customer service (per email at contact@imtron.eu or via the postal address Imtron GmbH, Wankelstr. 5, 85046 Ingolstadt, Germany). You can download the GNU General Public License (GPL) and the GNU Lesser General Public License (LGPL) at www.gnu.org/licenses/.
This device is suited solely for use in closed spaces. This device may be used in all EU countries.
Imtron GmbH hereby declares that the radio equipment ODL 32850FC-TAB complies with the EU directive 2014/53/EU. Click on the following link to read the full text of the EU Declaration of Conformity: http://de.ok-online.com/nc/de/suche.html
Use the link https://eprel.ec.europa.eu/ to access the European product database (EPREL), in which more information about the product is saved. Type in the EPREL - registration number 557919, or simply scan the QR -code on the energy label to access the model information.
Avertissement
CHER CLIENT :
RISQUE D'ÉLECTROCUTION NE PAS OUVRIR

AVERTISSEMENT :
POUR ÉVITER LES RISQUES D'ÉLECTROCUTION, NE RETIREZ PAS LE COUVERCLE (OU L'ARRIÈRE). AUCUNE PIÈCE À L'INTÉRIEUR NE PEUT ÊTRE RÉPARÉE PAR L'UTILISATEUR. CONFIEZ TOUT ENTRETIEN À UN PERSONNEL TECHNIQUE QUALIFIÉ.

natural_image
Cartoon illustration of a smiling computer monitor holding a book titled 'POSTA BANK' (no text on screen or background)natural_image
Cartoon illustration of a computer monitor with a sad face and raised arms, surrounded by abstract brain-like shapes (no text or symbols)natural_image
Cartoon illustration of a computer monitor with a smiling face and speech bubbles, surrounded by a sad film and cloud (no text or symbols)natural_image
Cartoon illustration of a computer monitor with a sad face and a fist, accompanied by an air conditioner (no text or symbols present)natural_image
Illustration of a smiling computer monitor with a smiling face and a person standing beside it (no text or symbols present)natural_image
Cartoon illustration of a computer monitor with an angry face and electrical plug, showing stress or shock (no text or symbols)natural_image
Symbolic icon of a person climbing a ladder inside a circle with no text or symbolsnatural_image
Cartoon illustration of a smiling computer monitor character with arms and legs, surrounded by clouds and a small phone (no text or symbols)natural_image
Cartoon illustration of a smiling computer monitor and a delivery worker holding a box (no text or symbols)REMARQUE :
natural_image
Line drawing of a flat-screen monitor with two stand feet at the bottom (no text or symbols)natural_image
Line drawing of a flat-screen TV unit with front panel, rear panels, and internal components (no text or symbols)
text_image
LAN HDMI2 ANT1 13/18V=400mA ANT2 (SATELLITE) COMMON INTERFACE HDMI1 AV USB2.0 (5V 300mA) DIGITAL AUDIO OUTtext_image
DIGITAL AUDIO OUTnatural_image
Diagram showing a USB 2.0 connector next to an A16 port (no text or symbols on the diagram itself)
natural_image
Simple line drawing of a microphone connected to a USB cable (no text or symbols)Démarrage
text_image
Aide Telecommande Interface Page Document TV on Direct Applications Paramedics Assistant Google Multi-Icons Problemboxtext_image
Bolayage Chains Your channel, someone you, where I come to what it would be answered? To save again to these. It looks like that the following time (Yes) Finish Power to bolayagetext_image
Balayage Chains UniMedia Télé Columbus Divers
text_image
Recycle Image Measure Recycle (1) Image (2)
Power (Alimentation)
natural_image
Cartoon illustration of a smiling computer monitor holding a book titled 'POSTA BANK' (no text on screen or background)natural_image
Cartoon illustration of a computer monitor with a sad face and raised arms, surrounded by abstract brain-like shapes (no text or symbols)natural_image
Cartoon illustration of a computer monitor with a smiling face and a money bag, no text or symbols presentnatural_image
Cartoon illustration of a computer monitor with a sad face and two other devices (no text or symbols)natural_image
Illustration of a smiling computer monitor with a smiley face and a pointing hand, accompanied by a person standing beside it (no text or symbols present)natural_image
Cartoon illustration of a computer monitor with an angry face and electrical plug, showing stress or shock (no text or symbols)natural_image
Cartoon illustration of a smiling computer monitor character with arms and legs, surrounded by clouds and a small battery (no text or symbols)natural_image
Symbolic icon of a person using a ladder to lift a vehicle, enclosed in a circle (no text or symbols)natural_image
Cartoon illustration of a smiling computer monitor and a worker holding a toolbox (no text or symbols)MEGJEGYZÉS:
natural_image
Front view of a flat-screen monitor with two stand holders at the bottom (no text or symbols visible)natural_image
Line drawing of a flat-screen TV unit with front panel, rear panels, and internal components (no text or symbols)
text_image
LAN HDMI2 ANT1 13:18V=400mA ANT2 (SATELLITE) COMMON INTERFACE HDMI1 AV USB2.0 (5K=500mA) DIGITAL AUDIO OUTnatural_image
Illustration of an Ethernet device connected to a LAN (no text or symbols on the device itself)text_image
DIGITAL AUDIO OUTnatural_image
Illustration of an USB 2.0 connector with a separate package and cable (no text or symbols)
flowchart
graph LR
    A["Common Interface"] --> B["CICARD"]
    B --> C["SMART CARD"]

text_image
Diagram showing a device connected to a power supply via cable and three sensors, with an output terminal labeled 'A'.natural_image
Simple line drawing of a microphone connected to a resistor, no text or symbols presentElső lépések
natural_image
Cartoon illustration of a smiling computer monitor holding a book titled 'STOCK BANK' (no text on screen or background)natural_image
Cartoon illustration of a computer monitor with a smiling face and a speech bubble, symbolizing online content or media (no text present)natural_image
Cartoon illustration of a man standing beside a smiling computer monitor with a smiley face, next to an electrical plug (no text or symbols present)natural_image
Cartoon illustration of a computer monitor with a sad face and raised arms, surrounded by abstract brain-like shapes (no text or symbols)natural_image
Cartoon illustration of a computer monitor with a sad face and a fist, accompanied by an air conditioner (no text or symbols present)natural_image
Cartoon illustration of a computer monitor with an angry face and power cord, showing electrical connections (no text or symbols)natural_image
Cartoon illustration of a smiling computer monitor with arms and legs, surrounded by clouds and a small phone (no text or symbols)natural_image
Symbolic icon of a person climbing a ladder inside a circle with no text or symbolsnatural_image
Cartoon illustration of a smiling computer monitor and a worker pointing at a box (no text or symbols)OPMERKING:
natural_image
Line drawing of a flat-screen TV with two speakers at the base (no text or symbols)Afstandssensor
Aan/uit-controlelampje
ON/OFF (AAN/UIT)
natural_image
Technical line drawing of a flat-screen TV unit with front panel and control panel (no text or symbols)
text_image
LAN HDMI2 ANT1 ANT2 (SATELLITE) COMMON INTERFACE DIGITAL AUDIO OUT HDMI1 AV USB2.0 (5V 500mA)text_image
DIGITAL AUDIO OUTnatural_image
Diagram showing a USB 2.0 connector next to an SGA connector (no text or symbols on the diagram itself)
text_image
Diagram showing connection between a device and a power supply with multiple connected devicesnatural_image
Simple line drawing of a device with a switch and two cables (no text or symbols)Aan de slag
text_image
Help Refresh Course Preview Preview App Purchase Preview Preview App Purchasetext_image
Satelliet re-scan Voigende More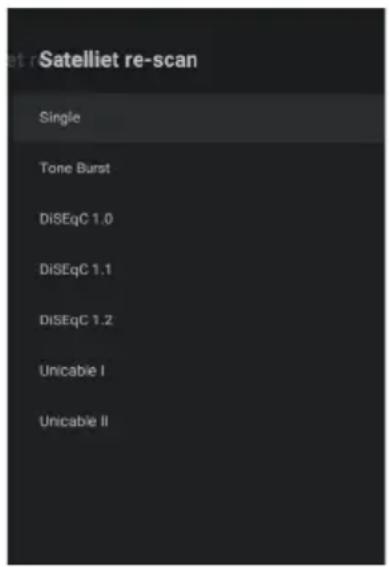
text_image
Satelliet re-scan Single Tone Burst DiSEqC 1.0 DiSEqC 1.1 DiSEqC 1.2 Unicable I Unicable II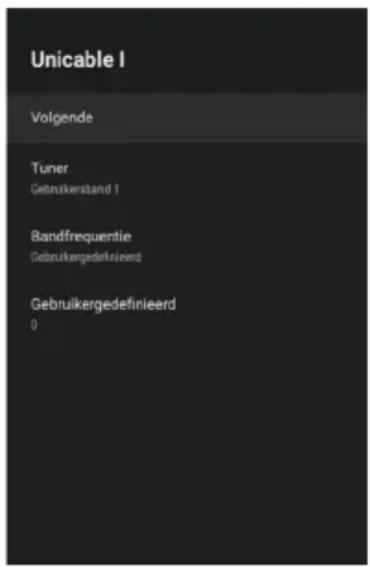
Teletext (Teletekst)
text_image
App Store Video Image Maze8 Recommendation (10) Edit Image
TV Options (TV-opties)
natural_image
Cartoon illustration of a smiling computer monitor holding an open book (no text or symbols present)natural_image
Cartoon illustration of a computer monitor with a smiling face and a speech bubble, no text or symbols present.natural_image
Cartoon illustration of a computer monitor with a sad face and raised arms, surrounded by abstract brain-like shapes (no text or symbols)natural_image
Cartoon illustration of a distressed computer monitor with a sad face and a ringing refrigerator (no text or symbols)natural_image
Illustration of a smiling computer monitor with a smiling face and a person standing beside it (no text or symbols present)natural_image
Cartoon illustration of a computer monitor with an angry face and lightning bolts, connected to an electrical outlet (no text or symbols)natural_image
Symbolic icon of a person climbing a ladder inside a circle with a diagonal line (no text or symbols)natural_image
Cartoon illustration of a smiling computer monitor with arms and legs, surrounded by clouds and a battery (no text or symbols)natural_image
Cartoon illustration of a smiling computer monitor and a worker holding a toolbox (no text or symbols)UWAGA:
natural_image
Line drawing of a flat-screen TV with two speakers at the base (no text or symbols)natural_image
Technical line drawing of a flat-screen TV unit with rear panel and front panel, showing internal components and no text or symbols.
text_image
LAN HDMI2 ANT1 13/18V=400mA ANT2 (SATELLITE) COMMON INTERFACE HDMI1 AV USB2.0 (5V 500mA) DIGITAL AUDIO OUTtext_image
DIGITAL AUDIO OUTnatural_image
Diagram showing a USB 2.0 connector next to an RJ48 cable (no text or symbols on the diagram itself)
natural_image
Simple line drawing of a device with a connector and two cables (no text or symbols)Pierwsze kroki
Teletext (Teletekst)
HAI-03FNTON-MULTMENIA INTERFACE
Termin HDMI oraz HDMI High-Definition
natural_image
Cartoon illustration of a smiling computer monitor holding a book titled 'STATION BANK' (no text on monitor or background)natural_image
Cartoon illustration of a computer monitor with a smiling face and a hand holding a document, surrounded by a pie and cloud (no text or symbols)natural_image
Cartoon illustration of a computer monitor with a sad face and raised fists, surrounded by a brain (no text or symbols)natural_image
Cartoon illustration of a computer monitor with a sad face and a fist, accompanied by an air conditioner (no text or symbols present)natural_image
Illustration of a smiling man standing beside a computer monitor with a power plug (no text or symbols)natural_image
Cartoon illustration of a distressed computer monitor with an angry face and electrical plug, showing electrical shock (no text or symbols)natural_image
Cartoon illustration of a smiling computer monitor with hands reaching toward it, emitting smoke and rain (no text or symbols)natural_image
Symbolic icon of a person using a device to lift a box, enclosed in a circle with no text or symbols.natural_image
Cartoon illustration of a smiling computer monitor and a worker holding a box (no text or symbols)NOTA:
natural_image
Front view of a flat-screen TV displaying with two stand feet (no text or symbols visible)natural_image
Technical line drawing of a flat-screen TV unit with front panel and side legs (no text or symbols)
text_image
LAN HDMI2 ANT1 13/18V=400mA ANT2 (SATELLITE) COMMON INTERFACE HDMI1 AV USB2.0 (5V=500mA) DIGITAL AUDIO OUTtext_image
DIGITAL AUDIO OUTnatural_image
Diagram showing a USB 2.0 connector next to a USB cable (no text or symbols on the diagram itself)
natural_image
Diagram showing a microphone connected to a USB cable, with a small inset device labeled ' headphones' (no text or symbols present)Primo utilizzo
text_image
Scansione del canale Per il face: cosmetto da scanesione (phi3). Find sure that it can be covered by scanes. For all scanesone, no scanesone is covered. Scankey Gains Scansionetext_image
Re-scan satellite Single Tone Burst DiSEqC 1.0 DiSEqC 1.1 DiSEqC 1.2 Unicable I Unicable II
Teletext (Televideo)
natural_image
Cartoon illustration of a smiling computer monitor holding a book titled 'POSTA BANK' (no text on screen or background)natural_image
Cartoon illustration of a computer monitor with a sad face and raised fists, surrounded by a brain (no text or symbols)natural_image
Cartoon illustration of a computer monitor with a smiling face and speech bubbles, no text or symbols present.natural_image
Cartoon illustration of a distressed computer monitor with a fist and alarm, accompanied by a refrigerator (no text or symbols)natural_image
Illustration of a smiling computer monitor with a smiley face and a pointing hand, accompanied by a person standing beside it (no text or symbols present)natural_image
Cartoon illustration of a distressed computer monitor with an angry face and lightning bolts, connected to an electrical outlet (no text or symbols)natural_image
Cartoon illustration of a smiling computer monitor with hands and lightning bolts, emitting smoke (no text or symbols)natural_image
Symbolic icon of a person climbing a ladder inside a circle with no text or symbolsnatural_image
Cartoon illustration of a smiling computer monitor and a worker holding a toolbox (no text or symbols)NOTA:
natural_image
Front view of a flat-screen TV displaying with two stand feet (no text or symbols visible)natural_image
Line drawing of a flat-screen TV unit with front panel, display screen, and control panel (no text or symbols)
text_image
LAN HDMI2 ANT1 ANT2 (SATELLITE) COMMON INTERFACE HDMI1 AV USB2.0 (5V=500mA) DIGITAL AUDIO OUTtext_image
DIGITAL AUDIO OUTConectar dispositivos USB
natural_image
Diagram showing a USB 2.0 connector and its internal structure (no text or symbols present)