04837 - Fridge Gourmetmaxx - Free user manual and instructions
Find the device manual for free 04837 Gourmetmaxx in PDF.

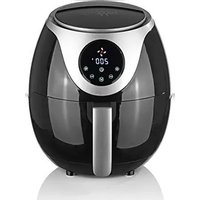
| Product Type | Mini refrigerator |
| Brand | Gourmetmaxx |
| Model | LY-0204A-AC/DC |
| Article Reference | 04837 (mint) |
| Power Supply | 220-240 V AC (mains plug) or 12 V DC (cigarette lighter) |
| Cooling Mode Power | 45 W (AC) / 40 W (DC) |
| Warm Keeping Mode Power | 40 W (AC) / 32 W (DC) |
| Cooling Capacity | Approximately 20 °C below ambient temperature |
| Warm Keeping Temperature | Approximately 50 °C |
| Intended Use | Cooling or keeping warm cans (0.33-0.5 L) and small bottles (0.33 L) |
| Capacity | A removable shelf for a volume adapted to cans and small bottles |
| Safety | Protection class II; do not obstruct vents; do not use in humid or explosive environments |
| Cleaning and Maintenance | Clean with a damp cloth and mild detergent; do not use abrasive products |
| Spare Parts and Accessories | Power cord, cigarette lighter adapter, shelf; after-sales service via website |
| Warranty | Exclusion for improper use or unauthorized repair attempts |
| Weight | Not specified (estimated: approximately 5 kg) |
| Dimensions (approx.) | Approximately 43 × 44 × 51 cm (not specified in the manual) |
| Manual Language | French (40 pages) |
Frequently Asked Questions - 04837 Gourmetmaxx
User questions about 04837 Gourmetmaxx
0 question about this device. Answer the ones you know or ask your own.
Ask a new question about this device
Download the instructions for your Fridge in PDF format for free! Find your manual 04837 - Gourmetmaxx and take your electronic device back in hand. On this page are published all the documents necessary for the use of your device. 04837 by Gourmetmaxx.
USER MANUAL 04837 Gourmetmaxx
Setting Up and Connecting the Device 18
Overview of Functions 18
Use 18
Cleaning and Storage 19
Troubleshooting 20
Technical Data 21
Disposal 21
Dear Customer,
We are delighted that you have chosen this mini fridge.
Before using the device for the first time, please read the instruction manual carefully and keep them for future reference. If the device is given to someone else, it should always be accompanied by this instruction manual. It is an integral part of the device.
The manufacturer and importer do not accept any liability if the information in this instruction manual is not complied with.
If you have any questions about the device and about spare parts / accessories, please contact the customer service department via our website:
1 Connecting cable with mains plug
2 Connecting cable with car adapter
3 Shelf
4 Mini fridge
Not shown:
- Operating instructions
Check the items supplied for completeness and transport damage. If you find any damage to the device or the connecting cables, do not use the device, but contact our customer service department.
Key
(Illustrations on the fold-out page)
Device Overview - Front
5 Door opener
6 Door
7 Adjustable feet
8 Ventilation slots on side
9 Carrying handle
Device Overview - Back
10 Fan
11 Ventilation slots on back
12 220 V connecting socket (AC)
13 12 V connecting socket (DC)
14 On/Off switch
HOT - Keep-warm mode
OFF-Off
COLD - Cooling mode
15 Keep-warm control lamp, red
16 Cooling control lamp, green
Explanation of the Symbols Explanation of the Signal Words


Danger symbols: These symbols indicate risks of injury (e.g. from electricity or fire). Read through the associated safety instructions carefully and follow them.
Circuit symbol for direct current
DANGER warns of serious injuries and danger to life
WARNING warns of possible serious injuries and danger to life
CAUTION warns of slight to moderate injuries
NOTICE warns of material damage


Protection class II
Supplementary information
Suitable for food use.
Read operating instructions before use!
Intended Use
- The device is intended to be used for cooling cans (0.33 l to 0.5 l) or bottles (0.33 l) and smaller food.
- The device is also suitable for keeping things warm.
- The device is not suitable for cooling conventional 0.5 l bottles or larger bottles.
- The device is not designed to be operated with an external timer or a separate remote control system.
- The device is for personal use only and is not intended for commercial applications.
- The device should only be used as described in the instruction manual. Any other use is deemed to be improper.
- The warranty does not cover faults caused by incorrect handling, damage or attempted repairs. The same applies to normal wear and tear.
Safety Notices
This device may be used by children aged 8 and over and by people with reduced physical, sensory or mental abilities or a lack of experience and / or knowledge if they are supervised or have received instruction on how to use the device safely and have understood the dangers resulting from failure to comply with the relevant safety precautions.
Children must not play with the device.
- Cleaning and user maintenance may not be performed by children, unless they are older than 8 years of age and are supervised.
Children younger than 8 years of age and animals must be kept away from the device and the connecting cable.
WARNING: Do not close up ventilation openings in the device housing. - Do not store any potentially explosive substances, such as aerosol cans containing a flammable propellant, in this device.
- Do not use the two connecting cables which are supplied with another device and never use the device with other connecting cables.
The device must always be disconnected from the mains power when left unattended and before cleaning it.
In the interest of your own safety, inspect the device and the connecting cables for damage each time before you use it. Use the device only if it is in working order. - Do not make any modifications to the device. If the device or the connecting cables of the device are damaged, they must be replaced by the manufacturer, customer service department or authorised distributors in order to avoid any hazards.
It is essential to follow the instructions in the "Cleaning and Storage" chapter.

DANGER - Risk of Electric Shock
Use and store the device only in enclosed areas. Do not operate the device in rooms with high humidity.
- Never immerse the device or the connecting cables in water or other liquids! Ensure that the device and the connecting cables cannot fall into water or become wet.
Should the device fall into water, switch off the power supply immediately. Do not attempt to pull the device out of the water while it is still connected to the mains power!
- Never touch the device and the connecting cables with wet hands when these components are connected to the mains power.
- Do not use the device if it has malfunctioned or been dropped in water. Have it checked in a specialist workshop before using it again.

WARNING - Danger of Injury
Danger of suffocation! Keep children and animals away from the packaging material.
Danger of burns! The device and its contents will become warm in keep-warm mode. Do not come into contact with heated parts while the device is in operation or immediately after it has been switched off.
Danger of strangulation!Make sure that the connecting cables are always kept out of the reach of small children and animals.
Danger of tripping! Make sure that the connected mains cable does not present a trip hazard.

WARNING - Danger of Fire
Do not use the device in rooms containing easily ignitable or explosive substances.
- Do not operate the device in the vicinity of combustible material. Do not place any combustible materials (e.g. cardboard, paper, wood or plastic) in or on the device.
Do not cover the device during operation.
NOTICE - Risk of Damage to Material and Property
The device should only be connected to a properly installed plug socket with safety contacts or a cigarette lighter. The plug socket or cigarette lighter must also be readily accessible after connection so that the connection to the mains can quickly be isolated. The mains voltage must match the rating plate of the device.
Only use suitable extension cables whose technical data is the same as that of the device.
- Lay the connecting cable in such a way that it is not squashed, bent or laid over sharp edges and do not come into contact with hot surfaces.
The connecting cable may not hang down from the surface on which the device is placed in order to prevent the device from being pulled down.
- Switch off the device and pull the mains plug out of the plug socket or the car adapter out of the cigarette lighter if an error occurs during operation, there is a power cut or before a thunderstorm.
The device must be switched off when the mains plug or car adapter is being unplugged or plugged into the plug socket or cigarette lighter.
- Never pull or carry the device by the connecting cable. When you pull it out of the plug socket or cigarette lighter, always pull on the mains plug or car adapter and never the mains cable!
Never wrap the connecting cables around the device.
Use only original spare parts from the manufacturer in order to guarantee that there is no interference that may prevent the device from working and to avoid damage.
- Protect the device from heat sources, naked flames, sub-zero temperatures, persistent moisture, wet conditions and impacts.
Setting Up and Connecting the Device
- Fully unwind the appropriate connecting cable (1, 2).
- Set up the device with a clear space at the sides and clear space above it (at least 30~cm ) on a flat, solid, heat-resistant and hard-wearing surface.
- Plug the connecting plug for the chosen connecting cable into the appropriate connecting socket on the back of the device:
Connecting cable with mains plug
220 V connecting socket (12)
Connecting cable with the car adapter
12 V connecting socket (13)
- Plug the mains plug or car adapter into a properly installed plug socket or cigarette lighter. PLEASE NOTE! The On / Off switch (14) should be in the OFF position during connection.
Overview of Functions
The device has two different modes: keep-warm mode and cooling mode. Move the On / Off switch (14) to the position you want to choose between the modes.
| Position Function | Control lamp | |
| OFF Device is switched off | Both control lamps switched off | |
| HOT | Device is in keep-warm mode (approx. 50°C) | Keep-warm control lamp is lit up red |
| COLD | Device is in cooling mode (approx. 20°C below ambient temperature) | Cooling control lamp is lit up green |
Use

PLEASE NOTE!
Before switching from one mode to another, the device must be switched off and you must wait for at least 5 minutes!

- When you first use the device, it can take up to 12 hours for the device to get to the optimum temperature. The more frequently the device is used, the faster the device will reach its target temperature.
-
To preserve the car battery, do not operate the device via the cigarette lighter when the car's engine is off.
We recommend that food, cans or bottles which are to be cooled are pre-chilled before they are laid down or placed in the device. -
Connect the device (see the "Setting Up and Connecting the Device" chapter).
-
Move the On / Off switch (14) to the HOT or COLD position to switch on the device in the mode you want. The corresponding control lamp goes out (see the "Overview of Functions" chapter).
-
Pull the opening handle (5) towards you and open the door (6).
- If necessary, slide the shelf (3) into the mounting inside the device or pull it out of the mounting and remove it.
- Lay or place the food, cans or bottles in the device.
- Close the door. You should feel and hear it click into place.
- Move the On / Off switch to the OFF position to switch off the device.
- Pull the mains plug (1) out of the plug socket or pull the car adapter (2) out of the cigarette lighter.
- Disconnect the connecting cable from the device.
- Allow the device to cool down if keep-warm mode was activated before it is stored away or cleaned (see the "Cleaning and Storage" chapter).
Cleaning and Storage

PLEASE NOTE!
-
Do not use any sharp or abrasive cleaning agents or cleaning pads to clean the device. These may damage the surfaces.
-
Make sure that the device is not connected to the mains power and has cooled down.
- If necessary, remove the contents and the shelf (3) from the device.
- Wipe down the device and the shelf with a damp cloth. If necessary, use a little mild detergent to remove more intense soiling.
- Thoroughly dry the device and the shelf before the device is put back into use.
- Check the connecting cables (1, 2) regularly for any damage.
- Store the device and all accessories in a dry, clean, frost-free place that is protected from direct sunlight and cannot be accessed by children or animals.
Troubleshooting
If the device does not work properly, first check whether you are able to rectify the problem yourself. If the problem cannot be solved with the steps that are listed, contact the customer service department.

Do not attempt to repair an electrical device yourself!
| Problem Possible cause Solution | ||
| The device does not work. | The plug of the connecting cable is not inserted correctly in the corresponding con-necting socket of the device. | Correct the fi t of the plug. |
| The mains plug or car adapt-er is not inserted correctly in the plug socket or cigarette lighter. | Correct the fi t of the mains plug or car adapter. | |
| The plug socket or cigarette lighter is defective. | Try another plug socket or another cigarette lighter. | |
| There is no mains voltage. | Check the fuse of the mains connection or the car battery. | |
| The On / Off switch (14) is in the OFF position. | Move the On / Off switch, depending on which mode you want to the HOT or COLD position. | |
| The fuse in the fuse box is triggered. | Too many devices connected to the same circuit. | Reduce the number of devices in the circuit. |
| The device is cooling or heating insuffi cientsly. | The door has been opened too often. | Opening the door too frequently should be avoided to ensure that the cold or warm air remains inside the device. |
| The device does not cool suffi cientsly. | The ambient temperature is too high. | If the ambient temperature is too high, this can impair the cooling of the device. The ideal ambient temperature is 20 - 25°C. |
Technical Data
Article number: 04834 (vanilla), 04837 (mint)
Model: LY-0204A-AC/DC
Voltage supply
from plug socket: 220 - 240V 50Hz
from cigarette lighter: 12 V DC
Output
from plug socket: cooling: 45 W; keeping-warm: 40 W
from cigarette lighter: cooling: 40 W; keeping-warm: 32 W
Protection class: II
ID instruction manual: Z 04834_04837 M DS V1 1218

Disposal

Dispose of the packaging material in an environmentally friendly manner so that it can be recycled.
This device is governed by the European Directive 2012/19/EU on waste electrical and electronic equipment (WEEE). Do not dispose of this device as normal domestic waste, but rather in an environmentally friendly manner via an officially approved waste disposal company.
All rights reserved.
Contenu
Chere cliente, cher client,