PXD3434141 - Monitor ProXtend - Free user manual and instructions
Find the device manual for free PXD3434141 ProXtend in PDF.

| Product type | Monitor |
| Brand | ProXtend |
| Model | PXD3434141 |
| Power supply | Mains (AC power cord) |
| Connectivity | HDMI, DisplayPort, audio jack |
| Main functions | OSD menu, FreeSync, DCR, ECO modes (Standard, Photo, Movie, Game, FPS, RTS), low blue light, response time, aspect ratio adjustment (widescreen/4:3/1:1/Auto), volume adjustment, mute, reset, game time option, aiming options |
| Control | Multidirectional joystick (OK + up/down/left/right directions) |
| LED indicator | Blue (operation), blue flashing (no signal), off (power off) |
| Mounting | Stand provided, assembly with M6 screw |
| Safety | Do not open the casing, refer to qualified service personnel, do not use non-recommended parts, disconnect before cleaning, do not block ventilation openings, minimum distance of 5 cm from walls and objects |
| Cleaning | Damp cloth, LCD screen detergent, avoid liquid or aerosol cleaners |
| Storage temperature | -2°C to 55°C |
| FreeSync compatibility | Requires compatible hardware and up-to-date graphics drivers |
| OSD settings | Language, horizontal/vertical position, transparency, display duration |
| Image settings | Brightness, contrast, DCR (on/off), ECO modes |
| Color settings | Warm, Cool, User (RGB adjustment) |
| Input sources | Auto, DP, HDMI 1, HDMI 2, HDMI 3 |
| Warranty | Contact the reseller for customer service or technical support |
Frequently Asked Questions - PXD3434141 ProXtend
User questions about PXD3434141 ProXtend
0 question about this device. Answer the ones you know or ask your own.
Ask a new question about this device
Download the instructions for your Monitor in PDF format for free! Find your manual PXD3434141 - ProXtend and take your electronic device back in hand. On this page are published all the documents necessary for the use of your device. PXD3434141 by ProXtend.
USER MANUAL PXD3434141 ProXtend
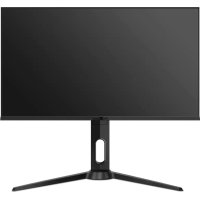
Ultrawide Curved WQHD Monitor
X2K34AC
User Manual
natural_image
Curved black monitor displaying a vibrant ocean wave against a dark mountain backdrop (no text or symbols visible)1 MONITOR (WITH STAND)
1 POWER CORD EU + UK
1 STAND BASE + SCREW
1 DISPLAYPORT CABLE
1 HDMI CABLE
1 USER MANUAL
If any of these items are missing, please contact with your dealer for technical support and customer service.
Monitor size: 34" | Resolution: 3440 x 1440 / 21 : 9
Refresh rate: 144 Hz | Response time: 1 ms
Colors: 16.7 Millions | Max Brightness: 350 cd / m²
1 x HDMI + 2 x DisplayPort
Height & tilt adjustable stand
INPUT VOLTAGE
POWER CONSUMPTION
100-240V\~, 50/60Hz, 1.1A
Please consult label on back of monitor.
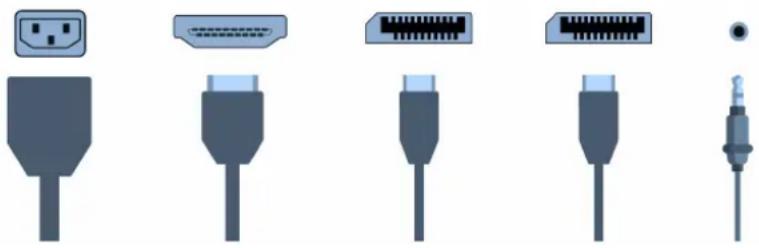
CONNECTIONPACKING LIST
Connect the power cord for your monitor to the AC IN port on the back of the monitor. Plug the power cord for the monitor into a nearby outlet. Use a connection appropriate for your computer. Using the HDMI or DP connector on the video card. Connect the signal cable to the HDMI or DP port of your computer.
POWER HDMI DPDP AUDIO
natural_image
Illustration of various types of connected cables, including plug, connector, and cable (no text or symbols)STAND ASSEMBLY
- Carefully remove the monitor, stand connector and stand base from the box.
- Attach the stand base to the stand connector using the M6 screw provided.
- Insert the connection block into the back cabinet and push down until firmly connected
- Lift monitor up straight and remove the bottom foam. Stand the monitor up on the installed base.
WARNING: The panel of the monitor is fragile. Keep the foam underneath the monitor screen while assembling the stand.
English
KEYS FUNCTION
KEY FUNCTION
OK KEY

DIRECTION KEYS

- Press and hold the OK key for 6 seconds to turn ON and OFF.
- When the display is turned on, click OK for one second for the main menu.
- Use DIRECTION KEY to select the items to be adjusted up and down in the main menu.
• After selecting the items, click OK to adjust. Click OK again to save and return to the upper menu.
Press OK to touch up, down, left and right to control the focus moving up, down, left and right. In the progress bar, the left and right keys are to reduce and increase functions respectively.

natural_image
Circular icon with a central power button and four directional arrows pointing outward (no text or symbols)SHORTCUT BUTTONS
- Move the OK lever to the right to display the INPUT SIGNAL SELECTION MENU.
- Move the OK lever to the left to display the SCREEN MODE MENU.
- Move the OK lever up to display the GAME TIME option.
- Select the desired time by pressing the OK lever. To exit move the OK lever up.
- Move the OK lever down to display the SIGHT options.
- Select the desired option by pressing the OK lever. To exit, move OK lever down.
POWER INDICATOR LIGHT
INDICATOR
No light
Blue light
Blue light flash
MODE
Power off
Normal work state
No signal input
English
ON SCREEN DISPLAY [OSD]
• The OSD MENU of the monitor provides various adjustments for the monitor such as color, brightness, contrast and more.
- When you press the ⏻ button, the OSD screen will appear. Select each of the functions with the < > ∧ √ buttons. √
- Use the ⏻ button again to enter each of the functions. If you're in the function already, use the ⏻ button to select the option you want to adjust.
- Use the < > × √ buttons to adjust option values. Exit by pressing the < button.
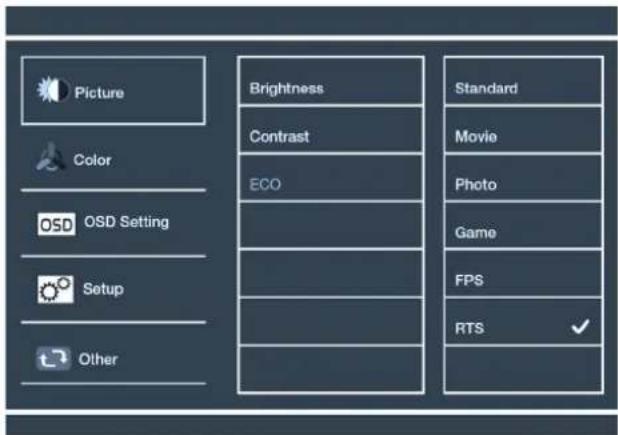
PICTURE ADJUSTMENT
- Adjust BRIGHTNESS and CONTRAST.
- DCR (Dynamic Contrast Ratio): Press MENU for the main menu, select DCR and press up or down to select ON or OFF. Press MENU to open or close DCR function.
ECO: Choose between different modes depending on your needs and preferences.
Standard - This display mode is suitable for most activities.
Photo - This display is for photo use mode.
Movie - This display mode is for playing movies.
Game - This display is for game use mode.
FPS - This display mode is for playing first person shooter games.
RTS - This display mode is for playing real time strategy games.
English
COLOUR ADJUSTMENT
Adjust the amounts of red, green, and blue present in the image. WARM MODE will give more red, COOL MODE will give more blue and USER MODE will allow you to make your own adjustments to the colours.
OSD SETTINGS
• LANGUAGE: Choose your language.
- OSD H-POSITION: Change the horizontal position of the On Screen Display Menu. Use the up and down buttons to change the position left to right.
- OSD V-POSITION: Change the horizontal position of the On Screen Display Menu. Use the up and down buttons to move the display up and down.
- OSD TRANSPARENCY: Adjust OSD menu transparency on the screen.
- OSD TIME OUT: Adjust OSD menu display time on the screen.
FREESYNC
- To use this feature, ensure your hardware has FreeSync capability and the graphics drivers are fully up to date.
- After connecting, you may receive a prompt to enable the feature on your computer. If not, you may need to enable the function in your graphics card menu.
- See your graphics card manufacturer's documentation on how to turn on and/or enable FreeSync.
SETUP
INPUT SOURCE: Select the input source where your pc or console is connected (Auto source, DP, HDMI 1, HDMI 2, HDMI 3).
MUTE: Enable or disable the volume of source connected to the monitor.
VOLUME: Adjust the volume of the source connected to the monitor.
RESET: This selection will reset the monitor to factory setting.
OTHER
ASPECT RATIO
Wide Screen / 4:3 / 1:1 / Auto
LOW BLUE LIGHT
Off / Low / Middle / High / MaxHigh
RESPONSE TIME
On / Off
FREESYNC
On / Off
English
IMPORTANT SAFETY INSTRUCTIONS
- Before using this device, please read all the instructions in this manual carefully.
- Please keep the manual for future reference.
- Unplug this device from the wall outlet before cleaning. Do not use liquid cleaners or aerosol cleaners. Use a damp or wet cloth to clean. Please use LCD screen detergent for cleaning if it is still dirty.
- Do not use parts not recommended by the manufacturer, otherwise it may cause a hazard.
- When unplugging the power cord of the monitor or adapter, please hold the plug with your hand, do not pull the cord directly.
- Do not place any object on the power cord. Do not trample it either.
- Do not use the device near water sources, example: bathtub, basin, kitchen sink, or washing machine. Do not place the device on a wet floor, or near a swimming pool etc. Do not touch the screen with your fingers or other hard objects.
- Slots and openings on housing and its back or bottom are provided for ventilation. To ensure reliable operation of the components and to protect them from overheating, these openings must not be blocked or covered placing the device on a bed, sofa, rug, or other similar surface. The device should never be placed near or over a radiator or heater and should not be placed in a built-in installation unless proper ventilation is provided.
- Make sure that the device is at least 5 cm distance from the wall or other objects around when it is in use.
- The power supply must respond to that stated on the rating plate. If you have any query about the power supply, please refer to the dealer or local power supply provider.
- As a safeguard measure, the monitor or adapter is equipped with a power cord with three-terminal plug, the third terminal is grounded. If the plug cannot be inserted into the outlet, please contact an electrical technician for replacing the original outlet while keeping the safeguard measure in effect.
- Ensure that the power socket and cord in use are able to take the sum of the electric current of all the products.
- Do not put the device at the place where user is subject to mal-function.
- Observe all the warnings and instructions described in the manual.
- Do not overload the power outlet or use any extension cord, otherwise it may cause fire or electric shock.
- Do not attempt to repair this device yourself since opening or removing covers may expose you to dangerous voltage or other hazards. Refer servicing to qualified service personnel.
• Unplug this monitor or AC/CD adapter from the wall outlet and refer servicing to qualified service personnel under the following conditions:
a. When the power cord or plug is damaged or worn.
b. If the device has been dropped or its housing has been damaged.
c. When the performance of the device deteriorates distinctly.
• The power cord is the main facility to turn on/off the device: unplug it if the device is not used for a long period of time.
- Store the device at a place of good ventilation; avoid strong sunlight, high temperature or humidity.
- Store the device at a place at -2D'C\~55"C room temperature. Otherwise, it may cause permanent damage.
English
CURVED WQHD MONITOR VERPACKUNGSINHALT
Monitor size: 34" | Resolution: 3440 x 1440 / 21 : 9
Refresh rate: 144 Hz | Response time: 1 ms
Colors: 16.7 Millions | Max Brightness: 350 cd / m²
1 x HDMI + 2 x DisplayPort
Height & tilt adjustable stand
EINGANGSSPANNUNG
STROMVERBRAUCH
100-240V\~, 50/60Hz, 1.1A
natural_image
Illustration of six different types of connected audio or connector cables, including plug, connector, and socket (no text or symbols present)MONTAGE DES STÄNDERS
natural_image
Circular icon with a central power button and four directional arrows pointing outward (no text or symbols)KURZBEFEHL-TASTE
Deutsch
FARBANPASSUNG
Monitor size: 34" | Resolution: 3440 x 1440 / 21 : 9
Refresh rate: 144 Hz | Response time: 1 ms
Colors: 16.7 Millions | Max Brightness: 350 cd / m²
1 x HDMI + 2 x DisplayPort
Height & tilt adjustable stand
TENSION D'ENTRÉE
CONSOMMATION ÉLECTRIQUE
100-240V\~, 50/60Hz, 1.1A
natural_image
Illustration of six different types of connected audio or cable connectors, including plug, connector, and socket (no text or symbols present)MONTAGE DU SUPPORT
natural_image
Circular icon with a central power button and four directional arrows pointing outward (no text or symbols)TOUCHE DE RACCOURCI
Français