GOsafe H20 - Safe Olymp - Free user manual and instructions
Find the device manual for free GOsafe H20 Olymp in PDF.
| Product type | Safe |
| Brand | Olymp |
| Model | GOsafe H20 |
| External dimensions | 200 x 430 x 370 mm |
| Internal dimensions | 170 x 427 x 320 mm |
| Weight | 10.5 kg |
| Power supply | 4 AA LR6 (Mignon) batteries |
| Locking type | 3-6 digit electronic code and emergency key |
| Number of emergency keys | 2 |
| Master code function | Yes, default code 000000 |
| Opening log | Up to 100 records with timestamp |
| Lockout after errors | After 3 incorrect codes, keypad locked for 5 minutes |
| Material | Steel |
| Wall thickness | 5 mm |
| Casing thickness | 1.5 mm |
| Package contents | Safe, 4 batteries, 2 emergency keys, 2 fixing screws, instruction manual |
| Cleaning | Soft dry cloth, no solvent |
| Disposal | Follow local regulations, separate recycling |
| Warranty | Return to store with original packaging and receipt |
| Manufacturer | GO Europe GmbH, Zum Kraftwerk 1, D-45527 Hattingen, Germany |
Frequently Asked Questions - GOsafe H20 Olymp
User questions about GOsafe H20 Olymp
0 question about this device. Answer the ones you know or ask your own.
Ask a new question about this device
Download the instructions for your Safe in PDF format for free! Find your manual GOsafe H20 - Olymp and take your electronic device back in hand. On this page are published all the documents necessary for the use of your device. GOsafe H20 by Olymp.
USER MANUAL GOsafe H20 Olymp
| hour minute second | |||||
| 0 0 0 0 | 0 0 | ||||
| hour minute second | |||||
| 1 6 0 1 | 3 0 | ||||
EN Operating instructions
The operating manual represents a component part of the device. It contains important information regarding safety, use and disposal. Familiarize yourself with all the operating and safety information before starting to use the device. Only use the device as described and for the purpose for which it is intended. Hand over all the documents with the device if it is transferred to third parties.
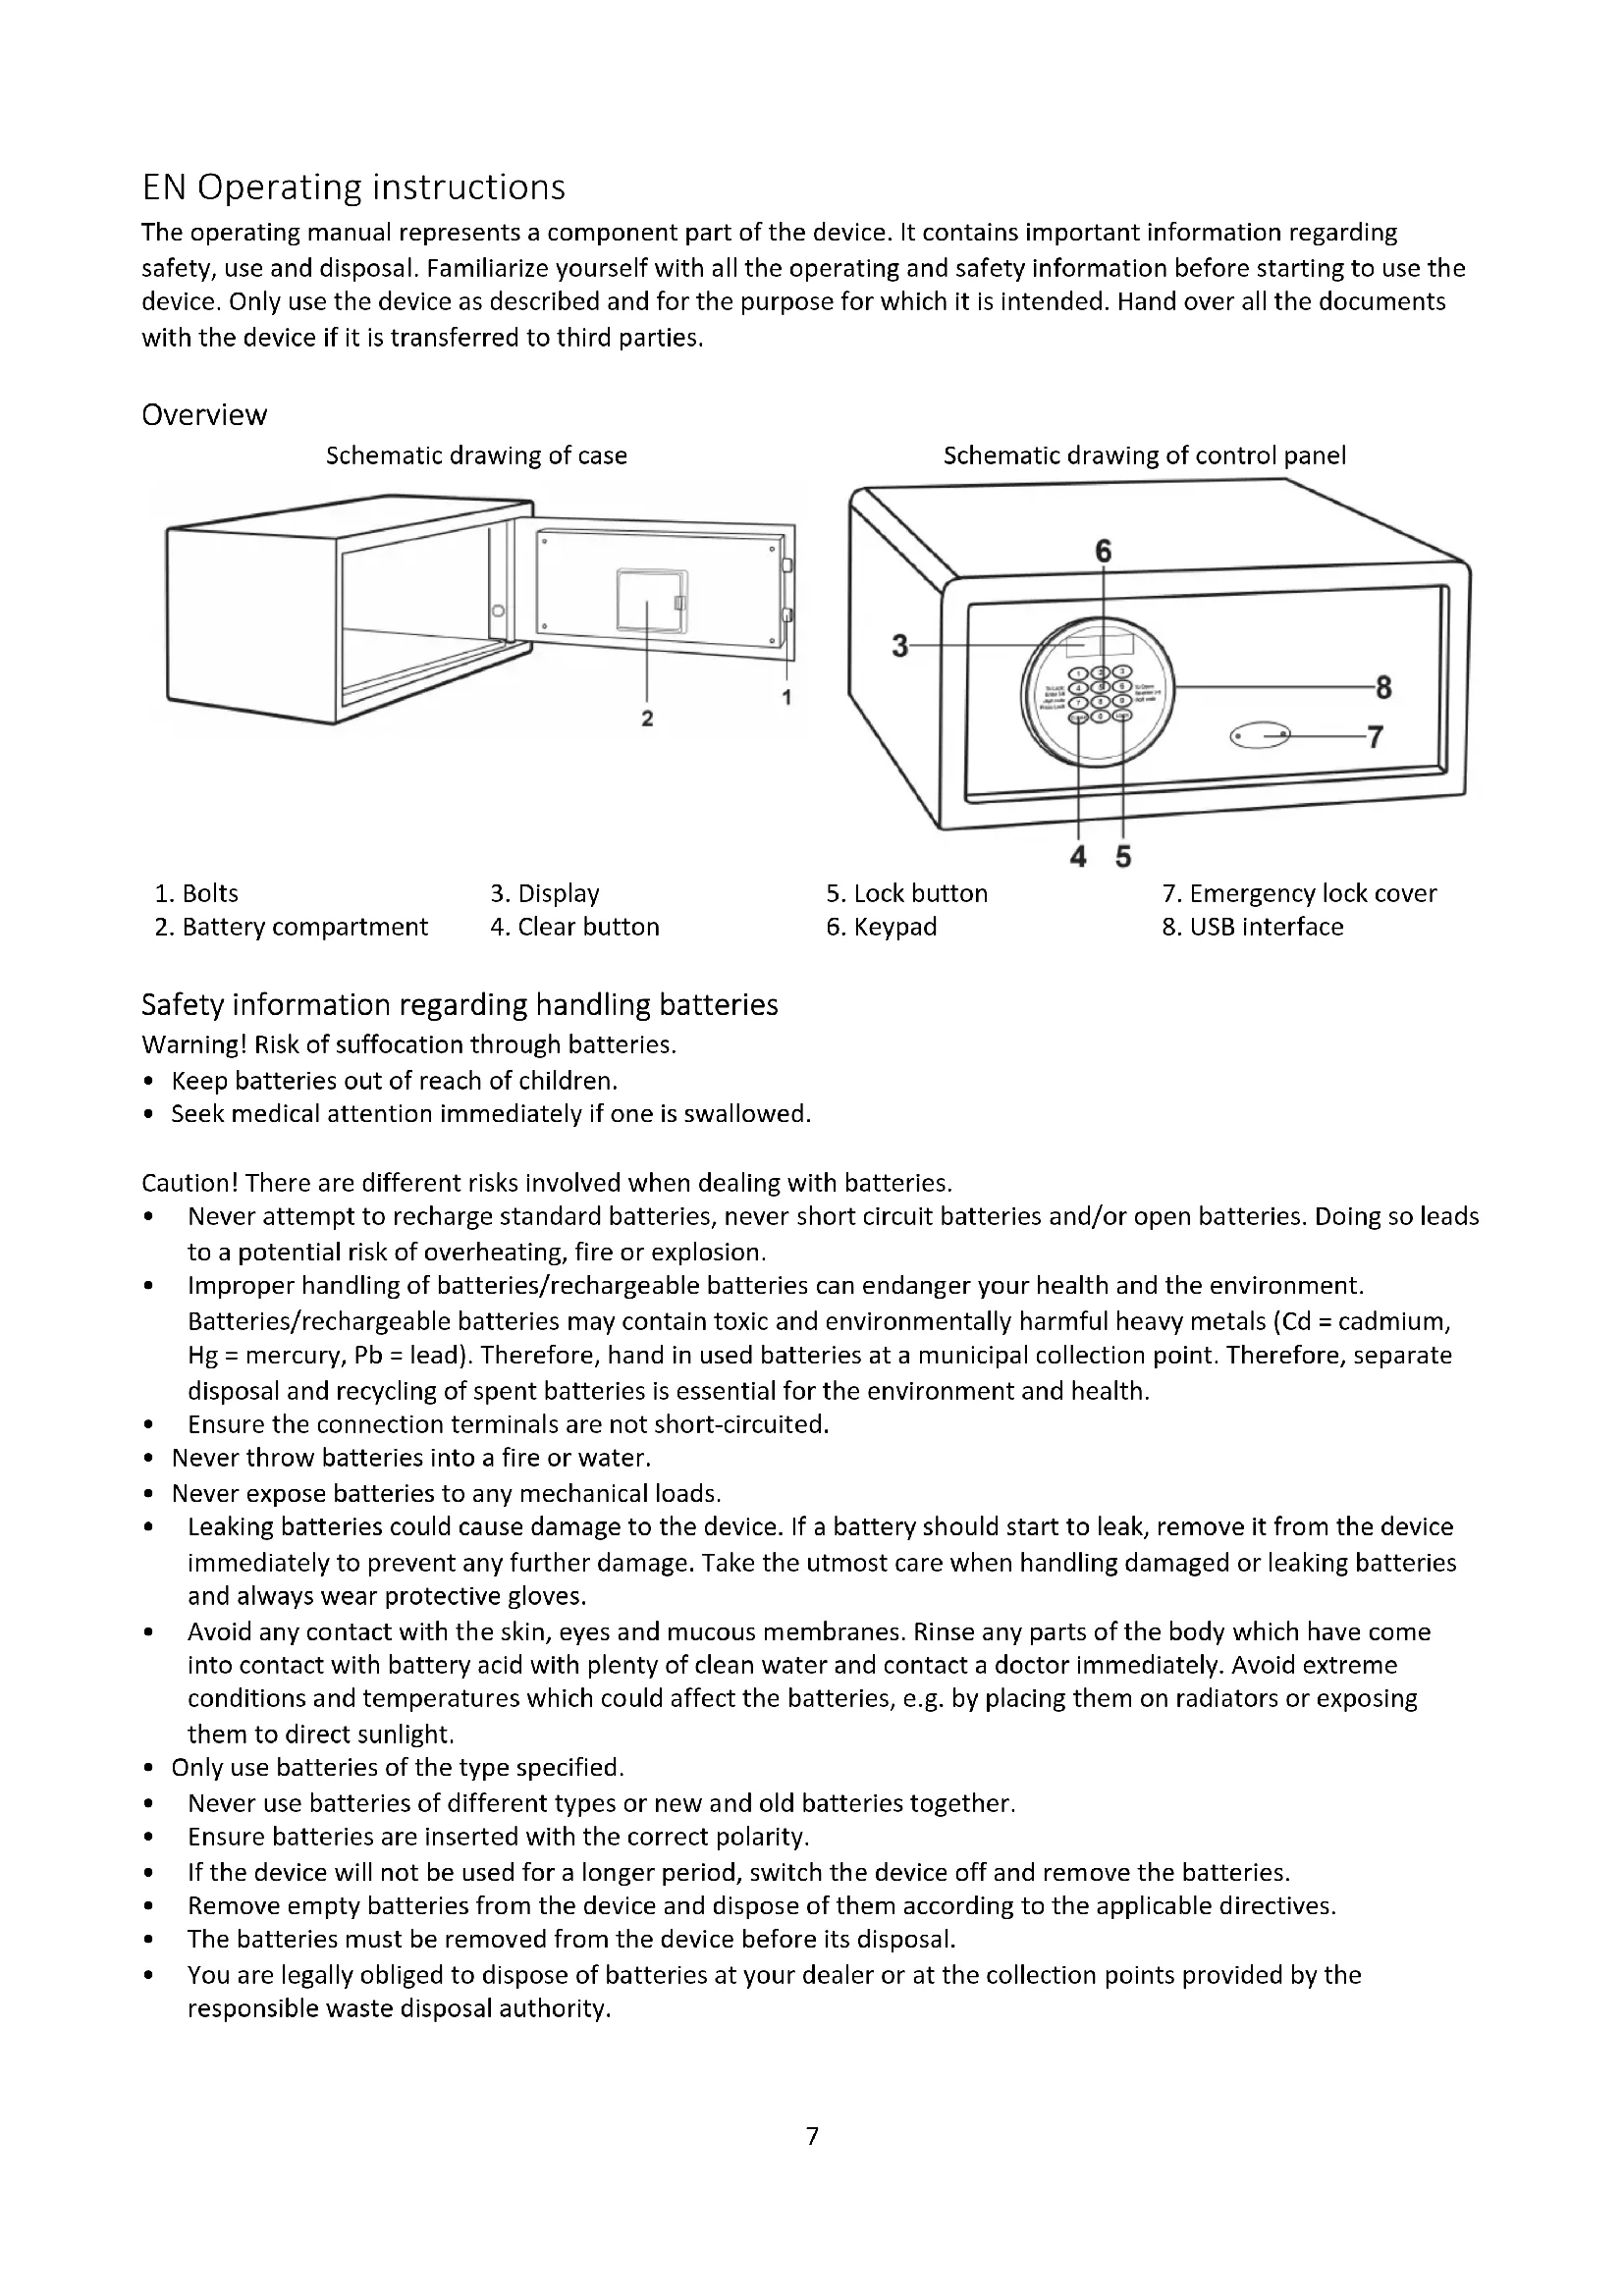
Overview

Schematic drawing of case
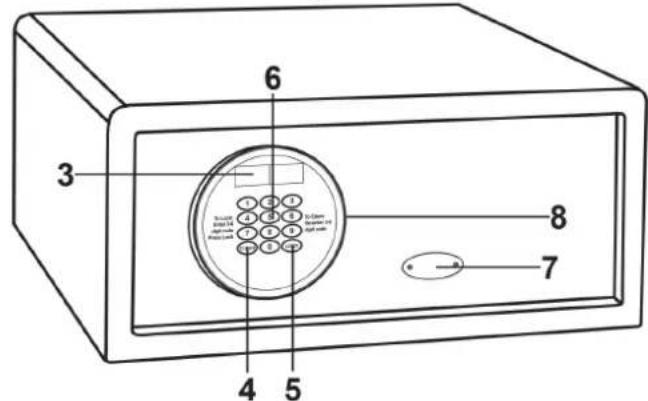
Schematic drawing of control panel
-
Bolts
-
Display
-
Lock button
-
Emergency lock cover
-
Battery compartment
-
Clear button
6.Keypad
- USB interface
Safety information regarding handling batteries
Warning! Risk of suffocation through batteries.
- Keep batteries out of reach of children.
- Seek medical attention immediately if one is swallowed.
Caution! There are different risks involved when dealing with batteries.
- Never attempt to recharge standard batteries, never short circuit batteries and/or open batteries. Doing so leads to a potential risk of overheating, fire or explosion.
- Improper handling of batteries/rechargeable batteries can endanger your health and the environment. Batteries/rechargeable batteries may contain toxic and environmentally harmful heavy metals (Cd = cadmium, Hg = mercury, Pb = lead). Therefore, hand in used batteries at a municipal collection point. Therefore, separate disposal and recycling of spent batteries is essential for the environment and health.
- Ensure the connection terminals are not short-circuited.
- Never throw batteries into a fire or water.
- Never expose batteries to any mechanical loads.
- Leaking batteries could cause damage to the device. If a battery should start to leak, remove it from the device immediately to prevent any further damage. Take the utmost care when handling damaged or leaking batteries and always wear protective gloves.
- Avoid any contact with the skin, eyes and mucous membranes. Rinse any parts of the body which have come into contact with battery acid with plenty of clean water and contact a doctor immediately. Avoid extreme conditions and temperatures which could affect the batteries, e.g. by placing them on radiators or exposing them to direct sunlight.
- Only use batteries of the type specified.
- Never use batteries of different types or new and old batteries together.
- Ensure batteries are inserted with the correct polarity.
If the device will not be used for a longer period, switch the device off and remove the batteries. - Remove empty batteries from the device and dispose of them according to the applicable directives.
- The batteries must be removed from the device before its disposal.
- You are legally obliged to dispose of batteries at your dealer or at the collection points provided by the responsible waste disposal authority.
Package Contents
Check the package contents of the safe before you actually use the safe. If anything is missing or damaged, contact our Service Department.
- 1x Safe
1x Emergency power supply
4x AA LR6 batteries
2x Emergency key
-
1x Shelf
-
4x Fixing screws
-
1x Instruction manual
Setup
Open the safe for the first time / Open the safe with the emergency key:
When opening the safe for the first time, it must be opened with the emergency key.
- Remove the cover of the emergency key (logo plate).
- Insert the emergency key.
- Turn it to open the door.
ATTENTION: Please do not leave your emergency keys in your safe.
Inserting the batteries
- Open the flap.
- Remove the battery cover.
- Insert 4xAA LR6 batteries into the battery compartment.
Low battery level
If the red light flashes after entering the correct code, it means that the battery voltage is too low and you need to insert new batteries.
ATTENTION: Replace 4 fresh alkaline batteries by arranging them as indicated by the "+" and "-" signs.
Removing the batteries
Follow the steps below to remove the batteries.
Remove the battery compartment cover.
Caution! Danger of short circuit.
- Remove batteries only with a non-conductive object, e.g. a wooden or plastic spatula.
Remove the batteries.
Replace the battery compartment cover.
Close door with personal code
- Lock the door.
- Enter any 3- to 6-digit code and press the "LOCK" button.
- The safe is locked as soon as the display shows "CLOSED".
Open door with user code
- Enter the previous 3 to 6 digit code.
- OPENED" appears on the display.
- This means that the safe is opened.
ATTENTION: Incorrect code entry 4 times activates the self-locking function. (3-6 digit code only)
The keypad is locked for 5 minutes!
Open door with hidden user code
- Press "Clear" once before entering the password.
- As you enter the code, it disappears from the display.
Opening the door with master code
- Press "LOCK" twice.
SUPER" appears on the display. - Enter the 6-digit master code.
- The safe is opened.
ATTENTION: The preset master code is "000001"!
Setting the master code
- Hold the door open and press "CLEAR" twice.
The display shows "PROG". - Enter "842627" and press "LOCK".
The display shows "OLD". - Enter the previous master code and press "LOCK".
NEW" appears on the display. - Enter the new 6-digit master code and press "LOCK" to confirm.
GOOD" appears on the display.
The new master code has been successfully changed.
ATTENTION: the preset master code is "000000"!
Setting the date and time
- Leave the door open.
Press "CLEAR" twice. - Enter "055261" and press "LOCK".
The date appears on the display. - The programme for setting the clock starts.
The data is first shown on the display:
| year month date | ||||
| 0 0 0 0 | 0 0 | |||
Example: Press 150730 means 30 July 2015
| year month date | ||||
| 1 5 0 7 | 3 0 |
Then press "LOCK" to confirm.
The display will now show the data:
| hour minute second | |||||
| 0 0 0 0 | 0 0 | ||||
Example: Press 160130 means 16(hour):01(minute):30(second)
| hour minute second | |||||
| 1 6 0 1 | 3 0 | ||||
Then press "LOCK" to confirm.
"Good" appears on the display.
Reading the closing and opening log
- This program can be used to query 100 data records.
- Leave the door open.
- Press "CLEAR" twice.
- Enter "162550" and "LOCK".
- The display will show "RECORD."
The program for retrieving records when closing and opening begins.
The records are displayed in two screens.
The function keys look as follows:
- Press "2" to return to the previous record.
- Press "8" to jump to the next record.
- Press "4" to show the previous content on the display.
- Press "6" to show the following contents on the display.
- Press "5" to go to the last record.
- Press "CLEAR" to exit this program.
For example:
Safe opened with master code on July 30, 2015 at 16:01:30.
The display shows the following message:
| year month date | ||||
| 1 5 0 7 3 0 |
Press "6" to display the following content.
| hour minute - Open way | |||||
| 1 6 0 1 | - 2 | ||||
- "1": Opening the lock with the user code.
- "2": Opening the lock with the master code.
- "3": Opening the lock with the CEU.
- "4": Opening the lock with the emergency key.
- Press "CLEAR" to exit this program.
CEU
Hand Device (CEU) for open the door, Set the code or Download the last 100 times opening records.
Alarm - Incorrect code
Incorrect code entry 3 times activates the self-locking function. (3-6 digit code only)
The keypad is locked for 5 minutes!
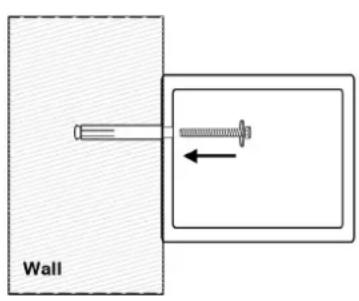
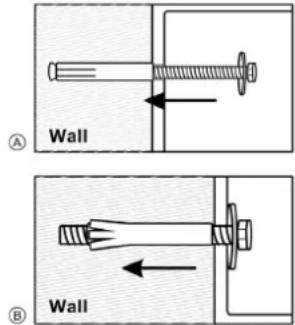
Mounting method
Mount the safe in a place that is not easy to move.
- Drill the holes for the expansion screws (or clamping screws) in the right place.
- Turn the expansion screws anticlockwise to loosen them.
- Use the expansion screws (or the clamping screws) to fix the cabinet to the wall.
- Make sure the enclosure is fixed in the right place, then tighten all the screws.
CAUTION: Use the expansion screws if there is a concrete wall. Use the clamping screws if there is a wooden wall.
Technical data
| Name | GOsafe H20 | GOsafe H25 | GOsafe H195 |
| Dimensions (H × W × D) | Outside: 200x430x370 mm / Inside: 170x427x320 mm | Outside: 250x350x250 mm / Inside: 230x347x200 mm | Outside: 195x508x370 mm / Inside: 165x505x320 mm |
| Weight | 10,5 kg | 8,5 kg | 13,5 kg |
| Lock variant | Code, emergency key | Code, emergency key | Code, emergency key |
| Wall thickness | 5 mm | 5 mm | 5 mm |
| Body thickness | 1,5 mm | 1,5 mm | 1,5 mm |
| Batteries | 4 × AA LR6 (Mignon) | 4 × AA LR6 (Mignon) | 4 × AA LR6 (Mignon) |
Warranty
Dear customer,
We are delighted that you have chosen this equipment.
In the case of a defect, please return the device together with the receipt and original packing material to the point of sale.
Cleaning
Clean the surface of the housing with a soft, dry, lint-free cloth. Do not use any solvents or cleaning agents.
Disposal
| OER GRÜNE PUNKY | Packaging materials must be disposed of according to local regulations. |
| The device and packaging materials can be recycled; sort them for disposal to simplify waste management. The Triman logo is only relevant for France. | |
| The packaging is made of environmentally friendly materials that you can dispose of at local recycling points. Advice on the options with which to dispose of your old device can be obtained from your municipal or local administration offices. | |
| The adjacent symbol indicates laws dictate that electrical and electronic apparatus no longer required must be disposed of separate from domestic waste. Dispos of your device at a collection point provided by your local public waste authority. Packaging materials must be disposed of according to local regulations. | |
| Defective or empty batteries must be recycled in accordance with Directive 2006/66/EC and its amendments. Return batteries and the device via the collection points provided. | |
| a b | Observe the identification on the packaging materials during the waste sorting process; they are identified by abbreviations (b) and numbers (a) which have the following significance: 1-7: plastic/20-22: paper and cardboard/80-98: composite materials. |
| lo Riciclo! d c a b Segui le regole del two comaune | The device and the packaging material can be recycled, so sort them prior to disposal for better waste management. Contact your local authorities for information on the various options available to ensure correct disposal. Observe the following identifications of the packaging materials: (a) numbers, (b) abbreviations and (c) materials which have the following significance: 1-7: plastics / 20-22: paper and cardboard / 80-98: composite materials and (d) type of packaging. The logo is only applicable to Italy. |
| i | Find out about the possibilities of taking back old appliances and used batteries free of charge from your dealer. |
Conformity

The CE Mark on the device confirms conformity.
The Declaration of Conformity can be read online at www.go-europe.com or
http://productip.com/?f=1670dd
The full EU Declaration of Conformity is available online at the following website or by scanning the QR code:
Manufacturer
GO Europe GmbH
Zum Kraftwerk 1
D-45527 Hattingen
Germany
FR Mode d'emploi
| hour minute second | |||||
| 0 0 0 0 | 0 0 | ||||
| hour minute second | |||||
| 1 6 0 1 | 3 0 | ||||
Aphipeote ticmuatapiies.
EnavatoonotheotetoKaUmuAtnc hKnCn paatapwv.
| hour minute second | |||||
| 0 0 0 0 | 0 0 | ||||
| hour minute second | |||||
| 1 6 0 1 | 3 0 | ||||
| hour minute second | |||||
| 0 0 0 0 | 0 0 | ||||
Primer: Pritisnite 160130 znači 16(sati):01(minuta):30(sekundi)
| hour minute second | |||||
| 1 6 0 1 | 3 0 | ||||
Zatim za potvrdu pritisnite "LOCK".
Na displeju se prikazuje "GOOD".
Citanje protokola zatvaranja i otvaranja
- Pomocu ovog protokola moze se izvršiti upit 100 zapisa podataka.
- Ostavite otvorena vrata.
- Pritisnite dva puta "CLEAR".
- Unesite "162550" i "LOCK".
- Na displeju se prikazuje "RECORD".
- Pocinje program za upit zapisa prilikom zatvaranja i otvaranja.