08612 - Mincer Gourmetmaxx - Free user manual and instructions
Find the device manual for free 08612 Gourmetmaxx in PDF.

| Product type | Multifunction electric grinder |
| Brand | Gourmetmaxx |
| Model | 08612 |
| Model number | AMG31B-100 |
| Power supply | 220-240 V ~ 50 Hz |
| Rated power / max | 500 W rated / 1000 W max |
| Protection class | II |
| Dimensions (approx.) | 30 x 20 x 30 cm |
| Weight (approx.) | 3 kg |
| Main functions | Grinding meat and fish, making sausages and kebbeh, cutting/grating vegetables, making shortbread cookies |
| Included accessories | Auger, blade head, 3 perforated discs (fine, medium, coarse), sausage nozzle, kebbeh attachment, coarse grater, fine grater, slicer, vegetable attachment, shortbread cookie adapter, 2 pushers, reservoir bowl |
| Max continuous operating time | 10 minutes, then cooling |
| Overload protection | Yes, automatic shutdown |
| Reverse function (Reverse) | Yes, to unblock food |
| Maintenance and cleaning | Hand wash, not dishwasher. Clean with hot water and mild detergent |
| Safety | Unlock button, sharp blades, do not immerse in water, use pusher |
| Intended use | Household only, do not grind bones, frozen or fibrous foods |
| Housing material | Plastic and stainless steel (blades) |
| Cable length (approx.) | 1 m |
| Customer service | DS Produkte GmbH, +49 38851 314650 |
Frequently Asked Questions - 08612 Gourmetmaxx
User questions about 08612 Gourmetmaxx
0 question about this device. Answer the ones you know or ask your own.
Ask a new question about this device
Download the instructions for your Mincer in PDF format for free! Find your manual 08612 - Gourmetmaxx and take your electronic device back in hand. On this page are published all the documents necessary for the use of your device. 08612 by Gourmetmaxx.
USER MANUAL 08612 Gourmetmaxx
natural_image
Black-and-white photo of a stainless steel meat processing machine with food being added to a bowl (no text or symbols visible)08612
DE
Gebrauchsanleitung
ab Seite 3
EN
Instruction manual
starting on page 14
FR
Mode d'emploi
text_image
Exploded diagram of a kitchen appliance with numbered parts for identificationnatural_image
Line drawing of a hand using a tool to lift a cylindrical device (no text or symbols)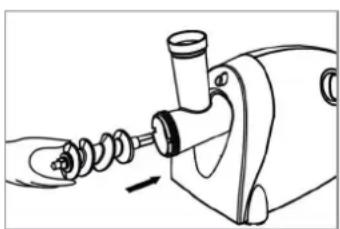
natural_image
Line drawing of a hand using a sewing machine to adjust or install a mechanical component (no text or symbols present)natural_image
Line drawing of a mechanical device with exploded view showing internal components (no text or symbols)natural_image
Technical line drawing of a mechanical device with a knob and handle, showing a close-up view of the knob (no text or symbols present)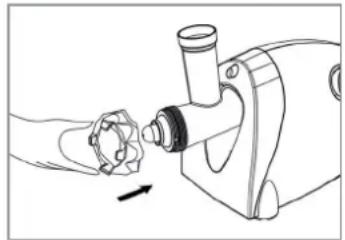
natural_image
Line drawing of a hand operating a mechanical device with a tool (no text or symbols)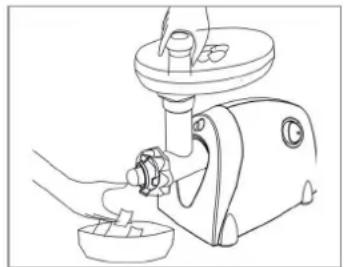
natural_image
Line drawing of a hand using a manual electric shaver to clean food items (no text or symbols)natural_image
Line drawing of a hand holding a cylindrical object next to a mechanical device (no text or symbols)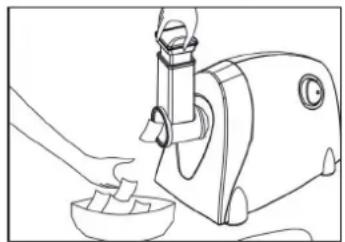
natural_image
Line drawing of a hand pouring liquid into a small bowl using a manual pump (no text or symbols)Safety Instructions 15
Scope of delivery 17
Device overview 18
Before first use 18
Use 19
Cleaning and Storage 23
Troubleshooting 24
Technical data 24
Disposal 24
Explanation of the Symbols

Danger symbols: These symbols indicate risks of injury (e.g. from electricity or fire).
Read through the associated safety instructions carefully and follow them.


Protection class II
Suitable for food use.

Read instruction manual before use!

Supplementary information
Explanation of the Signal Words
DANGER
Warns of serious injuries and danger to life.
WARNING
Warns of possible serious injuries and danger to life.
CAUTION
Warns of slight to moderate injuries.
NOTICE
Warns of damage to property.
Dear Customer,
We are delighted that you have chosen this mincer.
Before using the device for the first time, please read the instruction manual through carefully and keep them for future reference. If the device is given to someone else, this instruction manual should also be handed over with it. It forms an integral part of the device.
The manufacturer and importer do not accept any liability if the information in this instruction manual is not complied with.
If you have any questions about the device and about spare parts/accessories, contact the customer service department via our website:
• This device is suitable for:
-
chopping up meat and fish
–making small sausages and meatballs
-cutting, grating and rasping vegetables
-making spritz biscuits -
Not suitable for breaking up bones!
• Not suitable for mincing fibrous foods (e.g. ginger or asparagus)!
• Not suitable for frozen food! - The device is for personal use only and is not intended for commercial applications.
- The device should only be used as described in this instruction manual. Any other use is deemed to be improper.
- The following are excluded from the warranty: all defects caused by improper handling, damage or unauthorised attempts at repair. This also applies to normal wear and tear.
Safety Instructions
This device may be used by people with reduced physical, sensory or mental abilities or a lack of experience and/or knowledge if they are supervised or have received instruction on how to use the device safely and have understood the dangers resulting from this.
- The device may not be used by children. Children and animals must be kept away from the device and the mains cable!
■ The device is not a toy!
- The device is not designed to be operated with an external timer or a separate remote control system.
■ Never immerse the device or the connection in water or other liquids and ensure that they cannot fall into water or become wet.
- The device must always be disconnected from the mains power when it is left unattended and before assembling, disassembling or cleaning the device.
If the device or the connection of the device is damaged, it must be replaced by the manufacturer or customer service department or a similarly qualified person (e.g. specialist workshop) in order to avoid any hazards.

DANGER – Danger of Electric Shock
■ Use and store only in closed rooms.
- Do not use the device in rooms with high humidity.
- Should the device fall into water, switch off the power supply immediately. Do not attempt to pull the device out of the water while it is still connected to the mains power!
- Never touch the device or the connection with wet hands when these components are connected to the mains power.

WARNING – Danger of Injury
Risk of suffocation! Keep children and animals away from the packaging material.
Risk of strangulation! Make sure that the mains cable is always kept out of the reach of small children and animals.
Risk of injuries caused by rotating parts of the device! Keep clothing, jewellery, hair, hands and other body parts away from the device so that nothing can get caught in rotating device parts.
Risk of cut injuries! The blades of the inserts are sharp. Always switch off the device before inserting or removing the inserts.
Risk of cut injuries! Only ever use the plungers which is also supplied to push food into the feed chute. Never reach into the feed chute while the device is in operation.
Risk of tripping! Make sure that the connected mains cable does not present a trip hazard. The mains cable must not hang down from the surface on which the device is placed in order to prevent the device from being pulled down.
- Do not move the device during operation. Ensure sufficient stability.

WARNING – Danger of Fire
- Do not use the device in rooms containing easily ignitable substances or poisonous and explosive fumes.
- Do not connect the device along with other consumers (with a high wattage) to a multiple socket in order to prevent overloading and a possible short circuit (fire).
- Only use suitable extension cables whose technical data is the same as that of the device.
- Do not use the device in the vicinity of highly flammable materials (curtains, textiles, etc.).
- Do not cover the device during operation in order to prevent it from catching fire.
NOTICE – Risk of Damage to Material and Property
■ Always place the device on a dry, even and firm surface.
■ Make sure that the mains cable is not squashed, bent or laid over sharp edges and does not come into contact with hot surfaces. Do not wrap the mains cable around the device (danger of the cable breaking).
■ Only connect the device to a plug socket with safety contacts that is properly installed and matches the technical data of the device. The plug socket must also be
17 EN
readily accessible after connection so that the connection to the mains can quickly be isolated.
■ Remove the mains plug from the plug socket if a fault occurs during operation or before a thunderstorm.
- When you pull it out of the plug socket, always pull on the mains plug and never the mains cable!
■ Never pull or carry the device by connection.
- Protect the device from heat, naked flames, extreme temperatures, persistent moisture, wet conditions and collisions.
■ Use only original spare parts from the manufacturer in order to guarantee that there is no interference that may prevent the device from working and to avoid damage.
- Do not place or lay any heavy objects on the device or the connection.
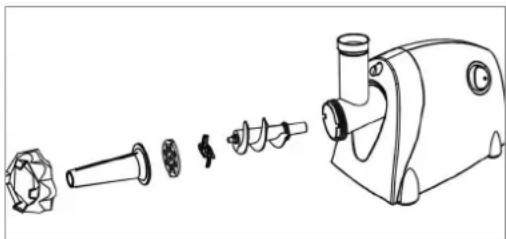
Scope of delivery
- Plunger for the vegetable cutting adapter
- Vegetable cutting adapter
- Plunger for the mincer adapter
- Supply bowl
- Motor unit
- Mincer adapter
- Conveyor spiral
- Blade head
- Sausage nozzle
• Perforated disc (coarse)
• Fixing nut for mincer adapter
• Perforated disc (medium)
• Perforated disc (fi ne) - Kebbe insert
- Coarse grater
- Slicer
- Fine grater
- Fixing nut for vegetable cutting adapter
- Spritz biscuits attachment with baking form bar
- Instruction manual
Unpack all parts and check the items supplied for completeness and any transport damage. If you find any damage to the components, do not use them (!), but contact our customer service department.
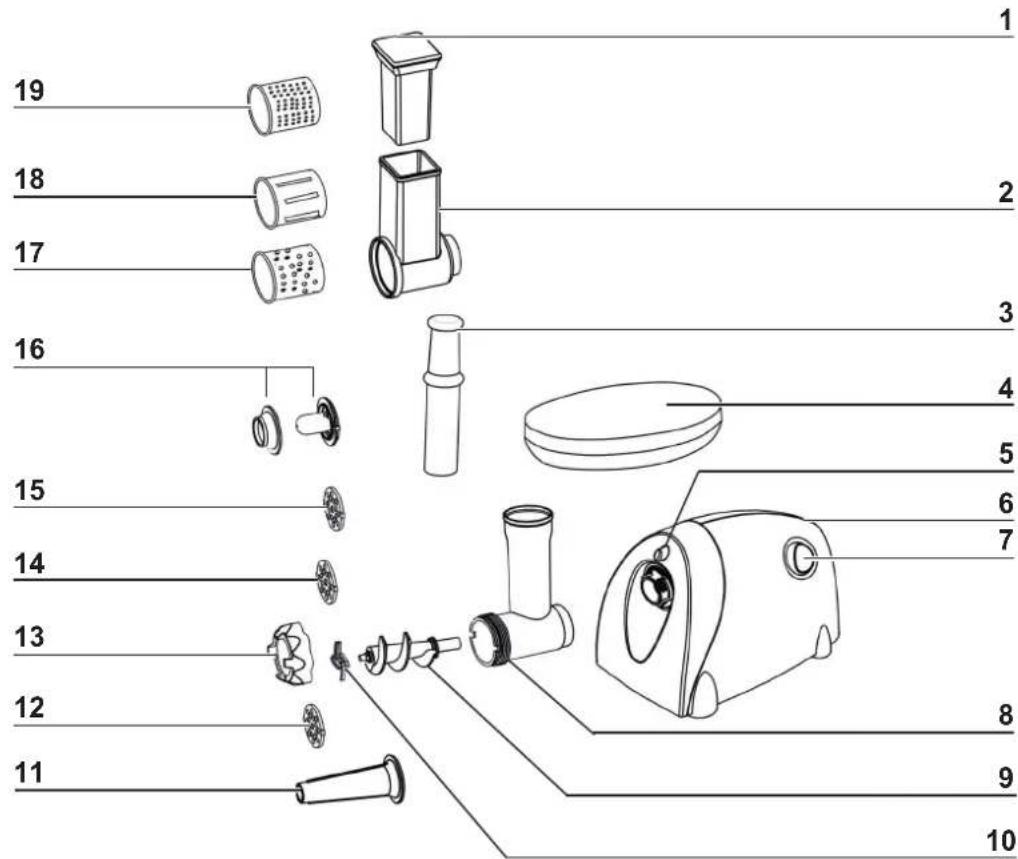
Device overview
text_image
Exploded diagram of a kitchen appliance with numbered parts for identification1 Plunger for the vegetable cutting adapter
2 Vegetable cutting adapter
3 Plunger for the mincer adapter
4 Supply bowl
5 Release button for the adapters
6 Motor unit
7 I/0/R – button for activating and deactivating the device and for activating reverse mode
8 Mincer adapter
9 Conveyor spiral
10 Blade head
11 Sausage nozzle
12 Perforated disc (coarse)
13 Fixing nut
14 Perforated disc (medium)
15 Perforated disc (fine)
16 Kebbe insert
17 Coarse grater
18 Slicer
19 Fine grater
Before fi rst use
- Remove any protective films and stickers that may be present from the device. Never remove the rating plate and any possible warnings!
- There may be some production residue stuck to the device. To prevent health risks, clean the device and all accessories with warm water and a mild cleaner thoroughly before first use (see chapter "Cleaning and storage").
Use

PLEASE NOTE!
The device should only be used if it has been completely and correctly assembled! Make sure that the mincing attachment is engaged correctly and all accessories are inserted correctly.
■ Never move the I / 0 / R button to the R (Reverse) position while the device is operating. Always move the button to the 0 (Off) position first and wait until the motor has come to a complete standstill before the button is moved to the R (Reverse) position.
- Do not attempt to force food down the feed chute; this may damage the device!
- Pull the mains plug from the plug socket before swapping inserts to prevent the device from being switched on accidentally!
The device is not suitable for constant operation. Operate it for no more than 10 minutes without a pause and then let it cool down for a few minutes.
- Do not operate the device for a lengthy period without food.
The device is equipped with overload protection; the device switches off if it is overloaded. In this case, pull the mains plug out of the plug socket and allow the device to cool down for approx. 10 minutes. It is then ready to be used again.

- For the best results, we recommend that before processing food you cut it up roughly and remove bones and tendons from meat.
- If food is blocking the device, move the I/0/R button to the R (Reverse) position for a few seconds so that the food causing the blockage can be dislodged. Then switch off the device and pull the mains plug from the plug socket before any food residues which are stuck are removed.
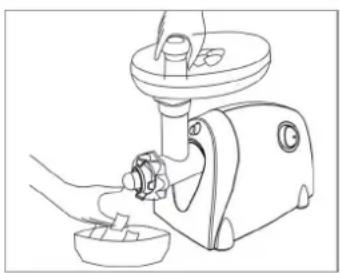
Use for Chopping Up Meat and Fish
natural_image
Line drawing of a hand using a tool to press or install a mechanical device (no text or symbols present)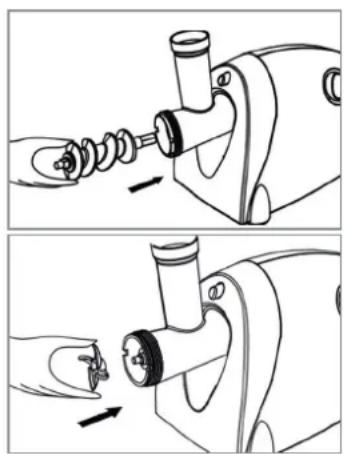
natural_image
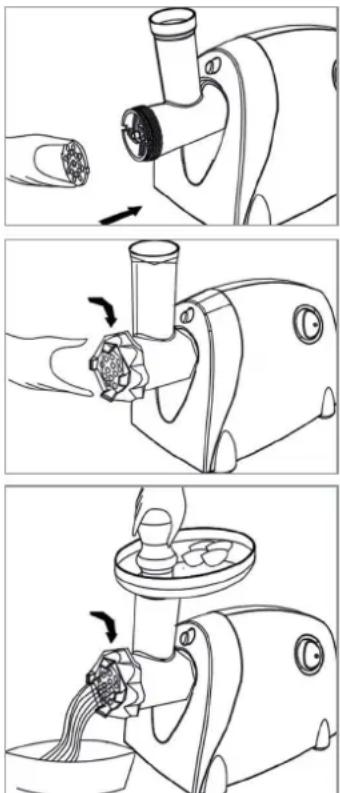
Two-step line drawing of a sewing machine tool, showing the process from pinning to cutting (no text or symbols present)- Place the motor unit (6) on an even, stable surface.
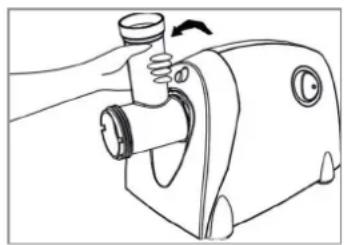
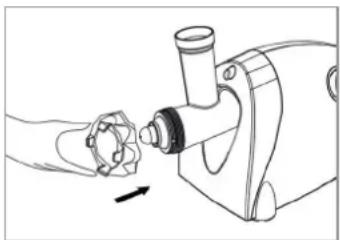
- Insert the mincing attachment (8) into the mount of the motor unit:
-press the release button (5),
—place the mincing attachment on the motor unit so that the feed chute tilts to the right (i.e. towards the I/0/R button (7)),
—let go of the release button again and
-twist the mincing attachment to the left until it is vertical and engages.
-
Insert the screw conveyor into the mincing attachment and the motor unit.
-
Place the cutter head (10) onto the screw conveyor (9). Make sure that the edges of the cutter head point outwards, towards you.
natural_image
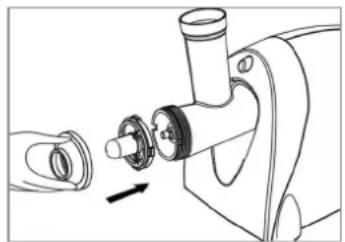
Three-step line drawing of a food robotic arm, showing step-by-step processing from feeding to blending (no text or symbols)- Place one of the perforated discs (fine, medium, coarse) in front of the cutter head. Make sure that the grooves of the perforated disc fit correctly in the recesses on the mincing attachment.
- Screw the locking nut (13) onto the mincing attachment. Do not overtighten!
- Place the storage bowl (4) onto the feed chute of the min-cing attachment.
- Place a bowl beneath the mincing attachment to capture the chopped-up food.
- To switch on the device, move the I/0/R button to the I (On) position.
-
Place the food in the feed chute and push it through bit by bit using the plunger (3).
-
To switch the device off again, move the I / 0 / R button to the 0 (Off) position.
- Remove the mains plug from the plug socket after use.
- Clean the device and the used accessories after each use (see „Cleaning and Storage“).
Use for Making Sausages
natural_image
Line drawing of a manual kitchen tool with exploded view and assembled parts (no text or symbols)- Place the motor unit (6) on an even, stable surface.
-
Insert the mincing attachment (8), the screw conveyor (9), the cutter head (10) and one perforated disc into the device in the manner described in "Use for Chopping Up Meat and Fish".
-
Place the sausage spout (11) onto the perforated disc and fix it in place with the locking nut (13). Do not overtighten!
- Place the storage bowl (4) onto the feed chute of the mincing attachment.
- Select a sausage casing (e.g. artificial or natural gut) and stretch it over the sausage spout.
- To switch on the device, move the I/0/R button (7) to the I (On) position.
- Place the food in the feed chute and push it through bit by bit using the plunger (3).
- Allow the filled sausage casing to run off the sausage spout. Make sure that the sausage casing is not overfilled.
-
To switch the device off again, move the I/0/R button to the 0 (Off) position.
-
Finally twist the sausage casing to shape little individual sausages.
- Remove the mains plug from the plug socket after use.
- Clean the device and the used accessories after each use (see „Cleaning and Storage“).
Use for Making Kebbe Meatballs
Kebbe meatballs are a traditional dish from the Middle East: It features fried croquettes made from lamb and bulgur wheat with a mince filling. Below you will find a sample recipe for how to make kebbe:
Prepare the pastry
Ingredients:
500 g of lamb or low-fat mutton, cut into strips
500 g of bulgur wheat, washed and drained
1 small onion, finely chopped
Preparation:
Important! Always process the bulgur wheat immediately after draining. If it dries out, the mincer could be overwhelmed and damaged as a result.
- Assemble the device in the manner described in "Use for Chopping Up Meat and Fish".
- Pour meat and bulgur alternately into the feed chute and twist through the mincer.
- Mix together meat and bulgur again thoroughly in a bowl.
- Twist the meat/bulgur mixture through the mincer another two times.
- Add the onion to the mixture and mix all the ingredients together again.
Prepare the filling
Ingredients:
400 g of lamb, cut into strips
1 tbsp. of oil
2 medium-sized onions, finely chopped
1 tbsp. of fl our
Salt and pepper
Preparation:
- Assemble the device in the manner described in "Use for Chopping Up Meat and Fish".
- Twist the meat through the fi ne perforated disc.
- Fry the onion until golden-brown.
- Add the lamb to the onion and brown it.
- Add the rest of the ingredients and simmer for around 2 minutes.
- Pour off excess fat and allow it to cool down.
Prepare kebbe
natural_image
Technical line drawing of a mechanical device with a valve and adjustment knob (no text or symbols)- Place the motor unit (6) on an even, stable surface.
- Insert the mincing attachment (8) and the screw conveyor (9) into the device in the manner described in "Use for Chopping Up Meat and Fish".
- Place the two-part kebbe attachment (16) onto the screw conveyor.
natural_image
Line drawing of a hand operating a mechanical device with a valve and handle (no text or symbols)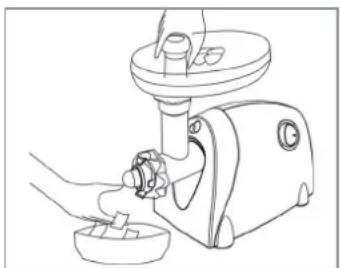
natural_image
Line drawing of a hand using a hairdryer machine to generate food (no text or symbols)-
Fix the kebbe attachment in place with the locking nut (13). Do not overtighten!
-
Place the storage bowl (4) onto the feed chute of the min-cing attachment.
- To switch on the device, move the I / 0 / R button (7) to the I (On) position.
-
Place the prepared meat/bulgur mixture for the pouches into the feed chute and use the plunger (3) to push it through bit by bit.
-
To switch the device off again, move the I/0/R button to the 0 (Off) position.
- Remove the mains plug from the plug socket after use.
- Divide the hollow strand into pieces of around 8 cm in length.
- Press down the strand pieces on one side to seal them. Pour some of the prepared and cooled filling into the pouch and then seal the other side of the pouch as well.
- Fry the filled pouches in hot oil until they are golden brown.
- Clean the device and the used accessories after each use (see „Cleaning and Storage“).
Use for cutting vegetables
- Place the motor unit (6) on an even, stable surface.
- Place the vegetable slicer adapter (2) in the receptacle on the motor base as well as described for the mincing attachment (8) in "Use for Chopping Up Meat and Fish".
natural_image
Line drawing of a hand holding a cylindrical object next to a mechanical device (no text or symbols)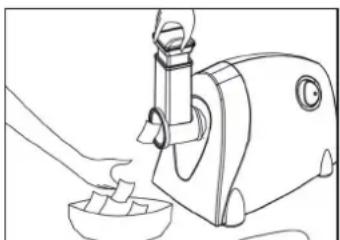
natural_image
Line drawing of a hand using a vacuum cleaner to clean food items (no text or symbols)-
Insert a vegetable cutting attachment (grater or slicer).
-
Place a bowl under the vegetable cutting adapter to collect the minced food.
- To switch on the device, move the I / 0 / R button (7) to the I (On) position.
-
Place the food in the feed chute and push it through bit by bit using the plunger (1).
-
To switch the device off again, move the I / 0 / R button to the 0 (Off) position.
- Remove the mains plug from the plug socket after use.
- Clean the device and the used accessories after each use (see „Cleaning and Storage“).
Use for preparing spritz biscuits
- Prepare the spritz biscuit dough according to your recipe.
- Place the motor unit (6) on an even, stable surface.
- Insert the mincing attachment (8) and the screw conveyor (9) into the device in the manner described in "Use for Chopping Up Meat and Fish".
- Place the spritz biscuits attachment onto the screw conveyor and fix it with the locking nut (13). Do not overtighten!
- Insert the baking form bar into the spritz biscuit attachment up to the required form. Take care that you push the bar into the spritz biscuit attachment with the handle to the front.
- To switch on the device, move the I / 0 / R button (7) to the I (On) position.
- Add the spritz biscuit dough in the fill chute. Use the plunger (3) to gradually push the dough through the fill chute.
- To switch the device off again, move the I/0/R button to the 0 (Off) position.
- Remove the mains plug from the plug socket after use.
- Divide the dough strand into equal sized parts and bake the spritz biscuits according to recipe until done.
- Clean the device and the used accessories after each use (see „Cleaning and Storage“).
Cleaning and Storage

PLEASE NOTE!
■ Remove the mains plug from the plug socket before cleaning the device.
■ The device and accessories are not suitable for dishwasher use.
- Do not use any caustic or abrasive cleaning agents for cleaning. These can damage the surface.
-
If you have not already done so, switch off the device and pull the mains plug out of the plug socket.
-
Dismantle the device in the reverse order:
–remove the storage bowl (4),
-undo the locking nut (13),
–remove the used insert,
-if needed remove the cutter head,
-take out the screw conveyor,
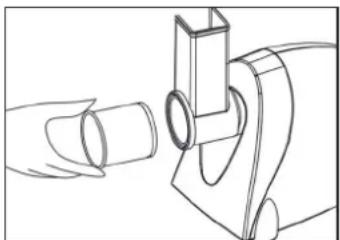
- remove the mincing attachment (8) or the vegetable slicer adapter (2) by pressing the release button (5) and turning the attachment to the right at the same time (towards the I / 0 / R button (7)).
-
Remove any possible food residues and clean all parts (apart from the motor unit (6)!) with warm water and mild detergent.
-
Then dry all parts thoroughly.
-
If necessary, wipe down the motor unit with a slightly damp cloth.
-
Store the device and all accessories in a clean, dry place which is not accessible to children and animals.
Troubleshooting
If the device does not work properly, check whether you are able to rectify the problem yourself. If the problem cannot be solved with the steps that are listed, contact the customer service department.

Do not attempt to repair an electrical device yourself!
| Problem Possible cause/solution | |
| The device is not working. | Is the mains plug inserted in the plug socket correctly?Is the plug socket defective? Try another plug socket.Check the fuse of the mains connection.Is the device activated? |
| The device automatically deactivates. | The device is overloaded. The device is equipped with overload protection; it switches off if it is overloaded. In this case, pull the mains plug out of the plug socket and allow the device to cool down for approx. 10 minutes. It is then ready to be used again. |
Technical data
Model number: AMG31B-100
Product number: 08612
Voltage supply: 220 – 240 V\~ 50 Hz
Output: nom. 500 W – max. 1000 W
Safety class: II
Manual ID: Z 08612 M DS V4 1118


Disposal

Dispose of the packaging material in an environmentally friendly manner so that it can be recycled.

This article is governed by the European Directive 2012/19/EU on waste electrical and electronic equipment (WEEE). Do not dispose of this device as normal domestic waste, but rather in an environmentally friendly manner via an officially approved waste disposal company.
Customer Service / Importer:
DS Produkte GmbH
Am Heisterbusch 1, 19258 Gallin, Germany
Tel.: +49 38851 314650 (Calls to German landlines are subject to charges. The cost varies depending on the service provider.)
All rights reserved.
Contenu
text_image
Exploded diagram of a kitchen appliance with numbered parts for identificationnatural_image
Line drawing of a hand using a tool to lift a cylindrical device (no text or symbols)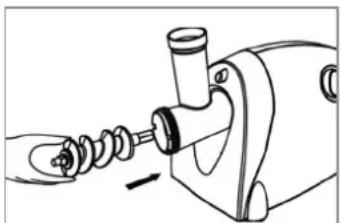
natural_image
Line drawing of a mechanical device with a tool inserted into a housing (no text or symbols)text_image
Step-by-step sequence of food cleaning and processing steps, showing hand turning, mixing, cutting, and blending with a bowl.natural_image
Technical line drawing of a mechanical device showing exploded view of components (no text or labels)natural_image
Technical line drawing of a mechanical device with a valve and adjustment knob (no text or symbols)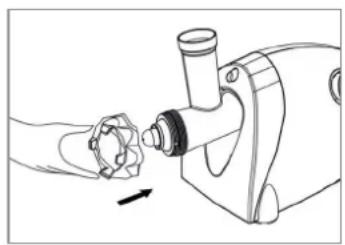
natural_image
Line drawing of a hand using a mechanical tool to interact with a small mechanical component (no text or symbols present)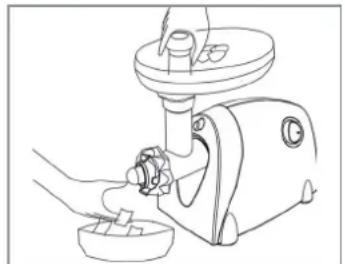
natural_image
Line drawing of a hand using a manual manual shaver machine to press or install a small container (no text or symbols present)natural_image
Line drawings of a hand using a microscope to interact with a small bowl (no text or symbols present)WAARSCHUWING – Brandgevaar
text_image
Exploded diagram of a kitchen appliance with numbered parts for identificationnatural_image
Line drawing of a hand using a manual pump device to lift a cylindrical component (no text or symbols)natural_image
Line drawing of a sewing machine needle insertion operation (no text or symbols)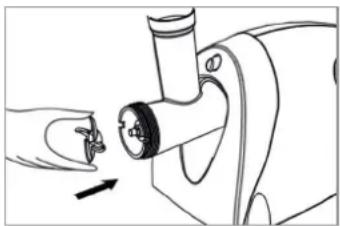
natural_image
Line drawing of a hand operating a sewing machine with a tool inserted (no text or symbols)
natural_image
Line drawing of a hairdryer with a cylindrical brush and a separate close-up of the tip (no text or symbols)
natural_image
Line drawing of a hand using a manual tool to press a small object (no text or symbols present)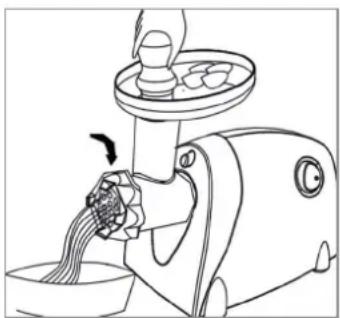
natural_image
Line drawing of a food processing machine with chopsticks lifting noodles (no text or symbols)natural_image
Technical line drawing of a mechanical device with exploded view showing internal components (no text or labels)natural_image
Technical line drawing of a mechanical device with a valve and adjustment knob (no text or symbols)natural_image
Line drawing of a hand operating a mechanical device with a tool (no text or symbols)