Karu 12 Gas Burner - Pizza oven OONI - Free user manual and instructions
Find the device manual for free Karu 12 Gas Burner OONI in PDF.
| Product Type | Outdoor Gas Pizza Oven |
| Brand | Ooni |
| Model | Karu 12 Gas Burner |
| Usage | Outdoor Only |
| Gas Type | Liquid Propane (LP) |
| Number of Burners | 1 |
| Gas Consumption | 17 500 BTU/h |
| Gas Pressure | 2.8 kPa (11 inch WC) |
| Injector Size | 0.85 mm |
| Ignition | Integrated Piezo Electric (Button) |
| Safety Device | Flame Supervision Device (FSD) |
| Pressure Regulator | Included, 11 iwc Output |
| Minimum Clearance (Sides) | 36 inches |
| Minimum Clearance (Front) | 36 inches |
| Maintenance | Inspect hose before each use; clean burner annually |
| Cleaning | After cooling, remove door and fuel tray |
| Repairability | Hose, injector, and regulator replaceable |
| Included Accessories | Gas burner, regulator, hose, match holder |
Frequently Asked Questions - Karu 12 Gas Burner OONI
User questions about Karu 12 Gas Burner OONI
0 question about this device. Answer the ones you know or ask your own.
Ask a new question about this device
Download the instructions for your Pizza oven in PDF format for free! Find your manual Karu 12 Gas Burner - OONI and take your electronic device back in hand. On this page are published all the documents necessary for the use of your device. Karu 12 Gas Burner by OONI.
USER MANUAL Karu 12 Gas Burner OONI
natural_image
Technical line drawing of a mechanical device with no visible text or symbols
bar
| Category | Value | |---|---| | Category 1 | 100 | | Category 2 | 100 | | Category 3 | 100 | | Category 4 | 100 | | Category 5 | 100 | | Category 6 | 100 | | Category 7 | 100 | | Category 8 | 100 | | Category 9 | 100 | | Category 10 | 100 | | Category 11 | 100 | | Category 12 | 100 | | Category 13 | 100 | | Category 14 | 100 | | Category 15 | 100 | | Category 16 | 100 | | Category 17 | 100 | | Category 18 | 100 | | Category 19 | 100 | | Category 20 | 100 | | Category 21 | 100 | | Category 22 | 100 | | Category 23 | 100 | | Category 24 | 100 | | Category 25 | 100 | | Category 26 | 100 | | Category 27 | 100 | | Category 28 | 100 | | Category 29 | 100 | | Category 30 | 100 | | Category 31 | 100 | | Category 32 | 100 | | Category 33 | 100 | | Category 34 | 100 | | Category 35 | 100 | | Category 36 | 100 | | Category 37 | 100 | | Category 38 | 100 | | Category 39 | 100 | | Category 40 | 100 | | Category 41 | 100 | | Category 42 | 100 | | Category 43 | 100 | | Category 44 | 100 | | Category 45 | 100 | | Category 46 | 100 | | Category 47 | 100 | | Category 48 | 100 | | Category 49 | 100 | | Category 50 | 100 | | Category 51 | 100 | | Category 52 | 100 | | Category 53 | 100 | | Category 54 | 100 | | Category 55 | 100 | | Category 56 | 100 | | Category 57 | 100 | | Category 58 | 100 | | Category 59 | 100 | | Category 60 | 100 | | Category 61 | 100 | | Category 62 | 100 | | Category 63 | 100 | | Category 64 | 100 | | Category 65 | 100 | | Category 66 | 100 | | Category 67 | 100 | | Category 68 | 100 | | Category 69 | 100 | | Category 70 | 100 | | Category 71 | 100 | | Category 72 | 100 | | Category 73 | 100 | | Category 74 | 100 | | Category 75 | 100 | | Category 76 | 100 | | Category 77 | 100 | | Category 78 | 100 | | Category 79 | 100 | | Category 80 | 100 | | Category 81 | 100 | | Category 82 | 100 | | Category 83 | 100 | | Category 84 | 100 | | Category 85 | 100 | | Category 86 | 100 | | Category 87 | 100 | | Category 88 | 100 | | Category 89 | 100 | | Category 90 | 100 | | Category 91 | 100 | | Category 92 | 100 | | Category 93 | 100 | | Category 94 | 100 | | Category 95 | 100 | | Category 96 | 100 | | Category 97 | 100 | | Category 98 | 100 | | Category 99 | 100 | | Total (Total) |Gas Burner
for Ooni Karu 12
Contents
EN 2
ES 15
FR....28
EN

WARNING
To reduce the risk of fire, burn hazard or other injury, read this safety manual carefully and completely before using this appliance.

WARNING
Before cleaning, make sure the gas supply and control knob is in the OFF position and that the burner and oven has cooled.

DANGER
Never operate this appliance unattended. If a fire should occur, keep away from the appliance and immediately call your fire department. Do not attempt to extinguish an oil or a grease fire with water.

DANGER
If you smell gas:
- Shut off gas to the appliance
• Extinguish any open flame - If odor continues, keep away from the appliance and immediately call your gas supplier or your fire department.
Failure to follow these instructions could result in fire, explosion or burn hazard which could cause property damage, personal injury or death.

WARNING
FOR OUTDOOR USE ONLY.

WARNING
a. Keep the fuel supply hose away from any heated surface(s).
b. The use of alcohol, prescription or non-prescription drugs may impair the consumer's ability to properly assemble or safely operate the appliance.
c. Keep children and pets away from the appliance at all times.
d. Do not move the appliance when in use.
e. This appliance is not intended for and should never be used as a heater.

WARNING
Spiders and insects can nest inside the burner of the appliance and disrupt gas flow. Inspect the burner at least once a year.

WARNING
When using a match to light the appliance, make sure to use the included matchstick holder.

WARNING
Do not store this appliance indoors unless the gas cylinder is disconnected.

WARNING
Do not store gas cylinder in a building, garage or any other enclosed area and keep out of reach of children at all times.

WARNING
This appliance is not intended to be installed in or on recreational vehicles and/or boats.

WARNING
Check all gas supply fittings for leaks before each use. Do not use the appliance until all connections have been checked and do not leak.

WARNING
Do not smoke while leak testing. Never leak test with an open flame.

WARNING
When lighting, keep your face and hands as far away from the appliance as possible.

WARNING
Minimum clearance from sides of unit to combustible construction is 610mm (24 inches).
Minimum clearance from back of unit to combustible construction is 915mm (36 inches).

WARNING
This instruction manual contains important information necessary for the proper assembly and safe use of the appliance. Read and follow all warnings and instructions before assembling and using the appliance. Follow all warnings and instructions when using the appliance. Keep this manual for future reference.

WARNING
This manual states that an oven, fryer or broiler shall not be used on or under any apartment or condominium balcony or deck.

WARNING
This appliance is not intended to be installed in or on a boat. This appliance is not intended to be installed in or on a recreational vehicle.

WARNING
Keep the fuel supply hose away from any heated surface(s).

WARNING
This manual includes an instruction to clean and inspect the hose before each use of the appliance. If there is evidence of abrasion, wear, cuts, or leaks, the hose must be replaced prior to the appliance being put into operation. The replacement hose assembly shall be that specified by the manufacturer.

WARNING
This appliance shall be used only outdoors, and shall not be used in a building, garage, or any other enclosed area.

WARNING
This manual includes a list of required parts necessary for the safe operation of the appliance, directions for proper assembly and for assembly of installed parts and accessories supplied with the appliance, and proper procedures for gas leak testing.

WARNING
The appliance should not be located or used under overhead unprotected combustible construction materials or surfaces. For a grill, fryer or broiler, the minimum clearance shall be at least 10ft (3m) from any structure or combustible material.

WARNING
Make sure the legs on Ooni Karu 12 are fully extended before use.

WARNING
To prevent shock, Do not to touch the electrode tip when igniting the burner.

WARNING
Ensure the chimney vent are fully open during use.

WARNING
Do not adjust the chimney vent during use.

WARNING
Keep away from hot exhaust gases coming from the chimney.

WARNING
Please ensure there is a distance of at least 3.5" / 90mm between the edges of any of the oven legs and the edge of the table surface.

- Do not store spare liquid propane gas cylinder under or near this appliance.
- Never fill the cylinder beyond 80 percent capacity.
- Liquid propane cylinder must be fitted with an OVERFILL PROTECTION DEVICE (OPD).
- If the information above is not followed exactly, a fire resulting in death or serious injury may occur.
- This manual states that the installation must conform with local codes or, in the absence of local codes, with the National Fuel Gas Code, ANSI Z223.1/NFPA 54, Storage and Handling of Liquefied Petroleum Gases, ANSI/NFPA 58; or Natural Gas and Propane Installation Code, CSA B149.1; Propane Storage and Handling, CSA B149.2
text_image
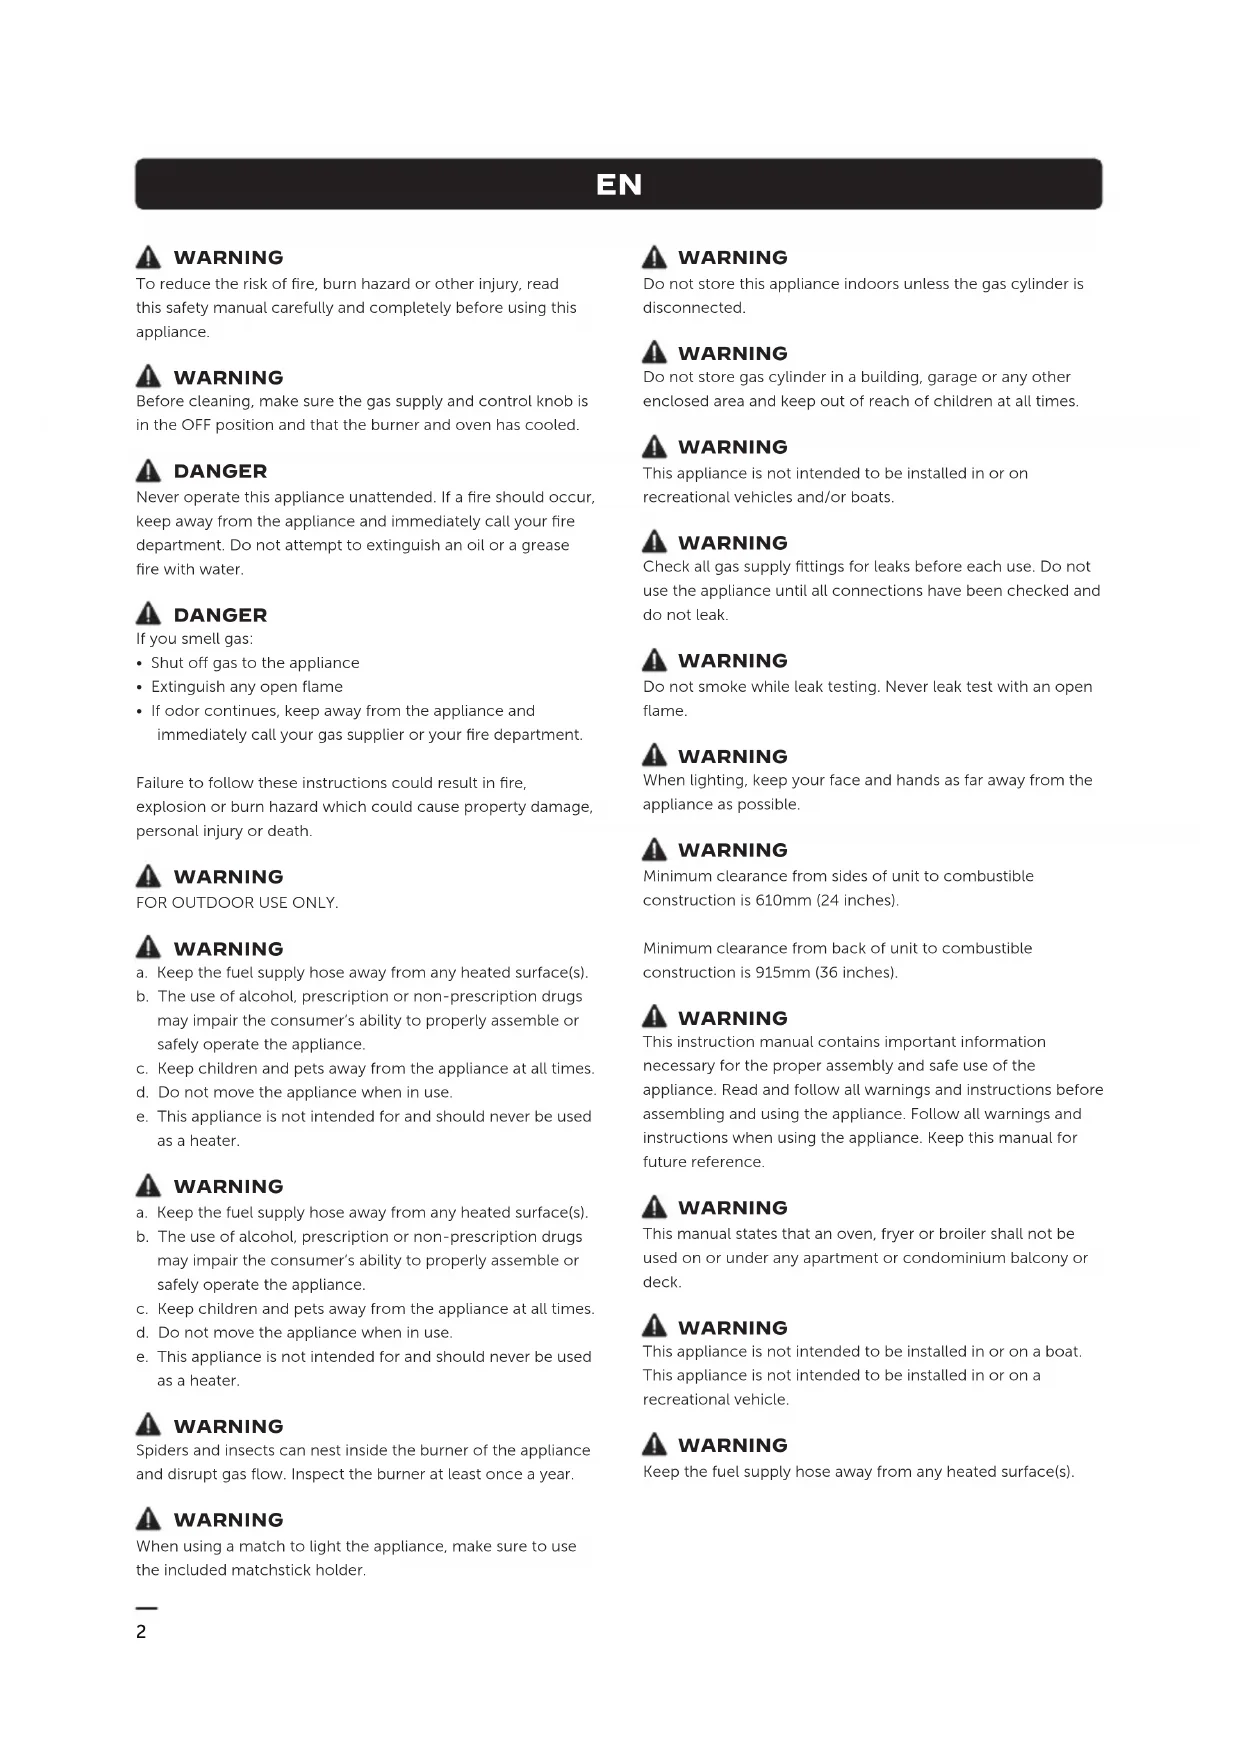
Prohibition sign with pictogram of a person using a bench and crossed-out stairs, indicating no use or absence of work.
Stand to side when relighting - never look directly into the oven or at the flame.

Gas regulator supplied may not be suitable for use in your territory or region, please refer to your local regulations for more information.
Step 1
Install hose pipe (if required)
Regulators and hose connections will vary depending on your region.
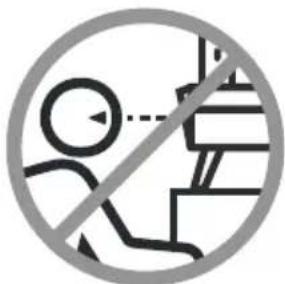
If your Ooni Gas Burner for Ooni Karu 12 has a threaded female hose end follow Step 1a.
If your Ooni Gas Burner for Ooni Karu 12 has a threaded barb and regular hose with a hose clip follow Step 1b then 1c.
If your Ooni Gas Burner for Ooni Karu 12 has a regular hose with a hose clip follow Step 1c.
If your Ooni Gas Burner for Ooni Karu 12 has the hose preinstalled continue to Step 2.
Step 1a
Tighten with suitable wrenches
natural_image
Diagram showing a cable connector inserted into a device with a circular arrow indicating direction (no text or symbols present)
natural_image
Mechanical assembly diagram showing a bolted joint with dashed arrows indicating motion (no text or symbols)
Tighten counter-clockwise in EU.
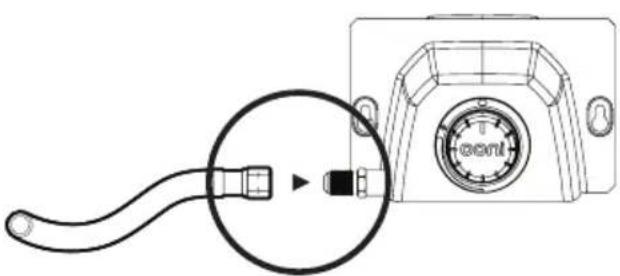
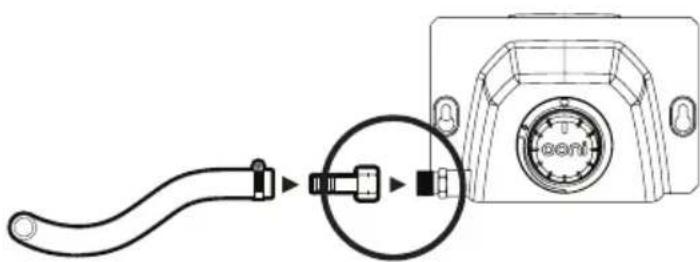
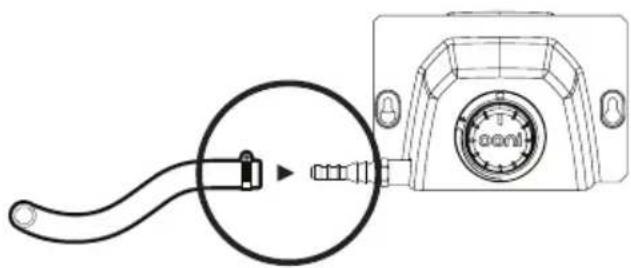
Step 1b
Tighten with suitable wrenches then follow Step 1c.
text_image
Diagram showing a cable connector connected to a device with a circular connector, labeled 'ECM' in the background.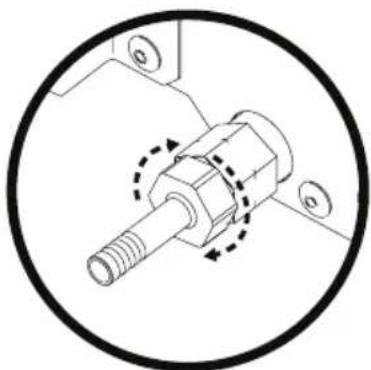
natural_image
Mechanical component diagram showing a threaded shaft and mounting bracket, enclosed in a circular outline (no text or symbols)
Tighten counter-clockwise in EU.
Step 1c
Tighten with suitable screwdriver.
natural_image
Diagram showing a cable connector inserted into a device housing (no text or symbols present)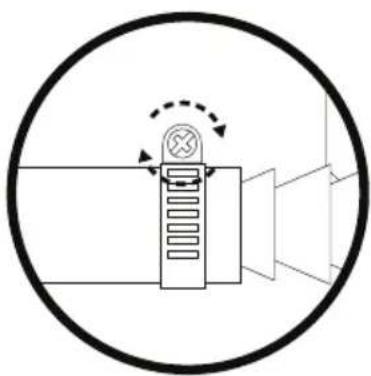
natural_image
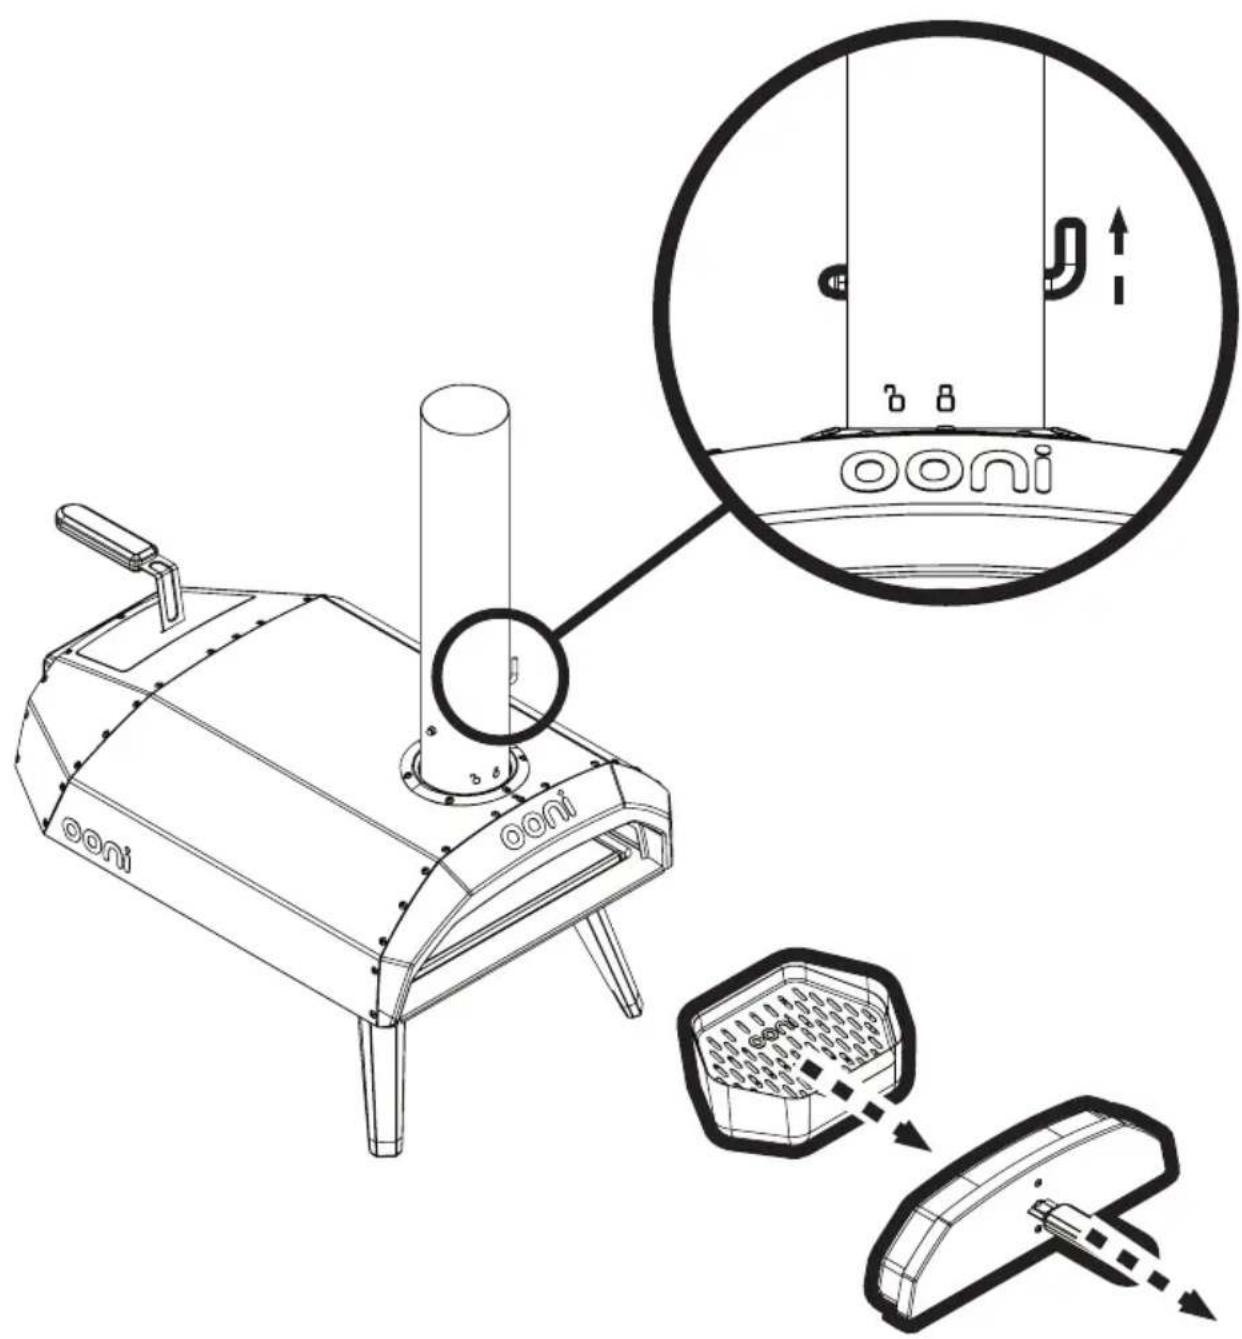
Pure mechanical diagram showing a lever mechanism inside a circular frame (no text or symbols)Step 2
Remove the door and fuel tray and ensure the chimney vent is open
text_image
ooni ooniStep 3
Remove draft defender plate
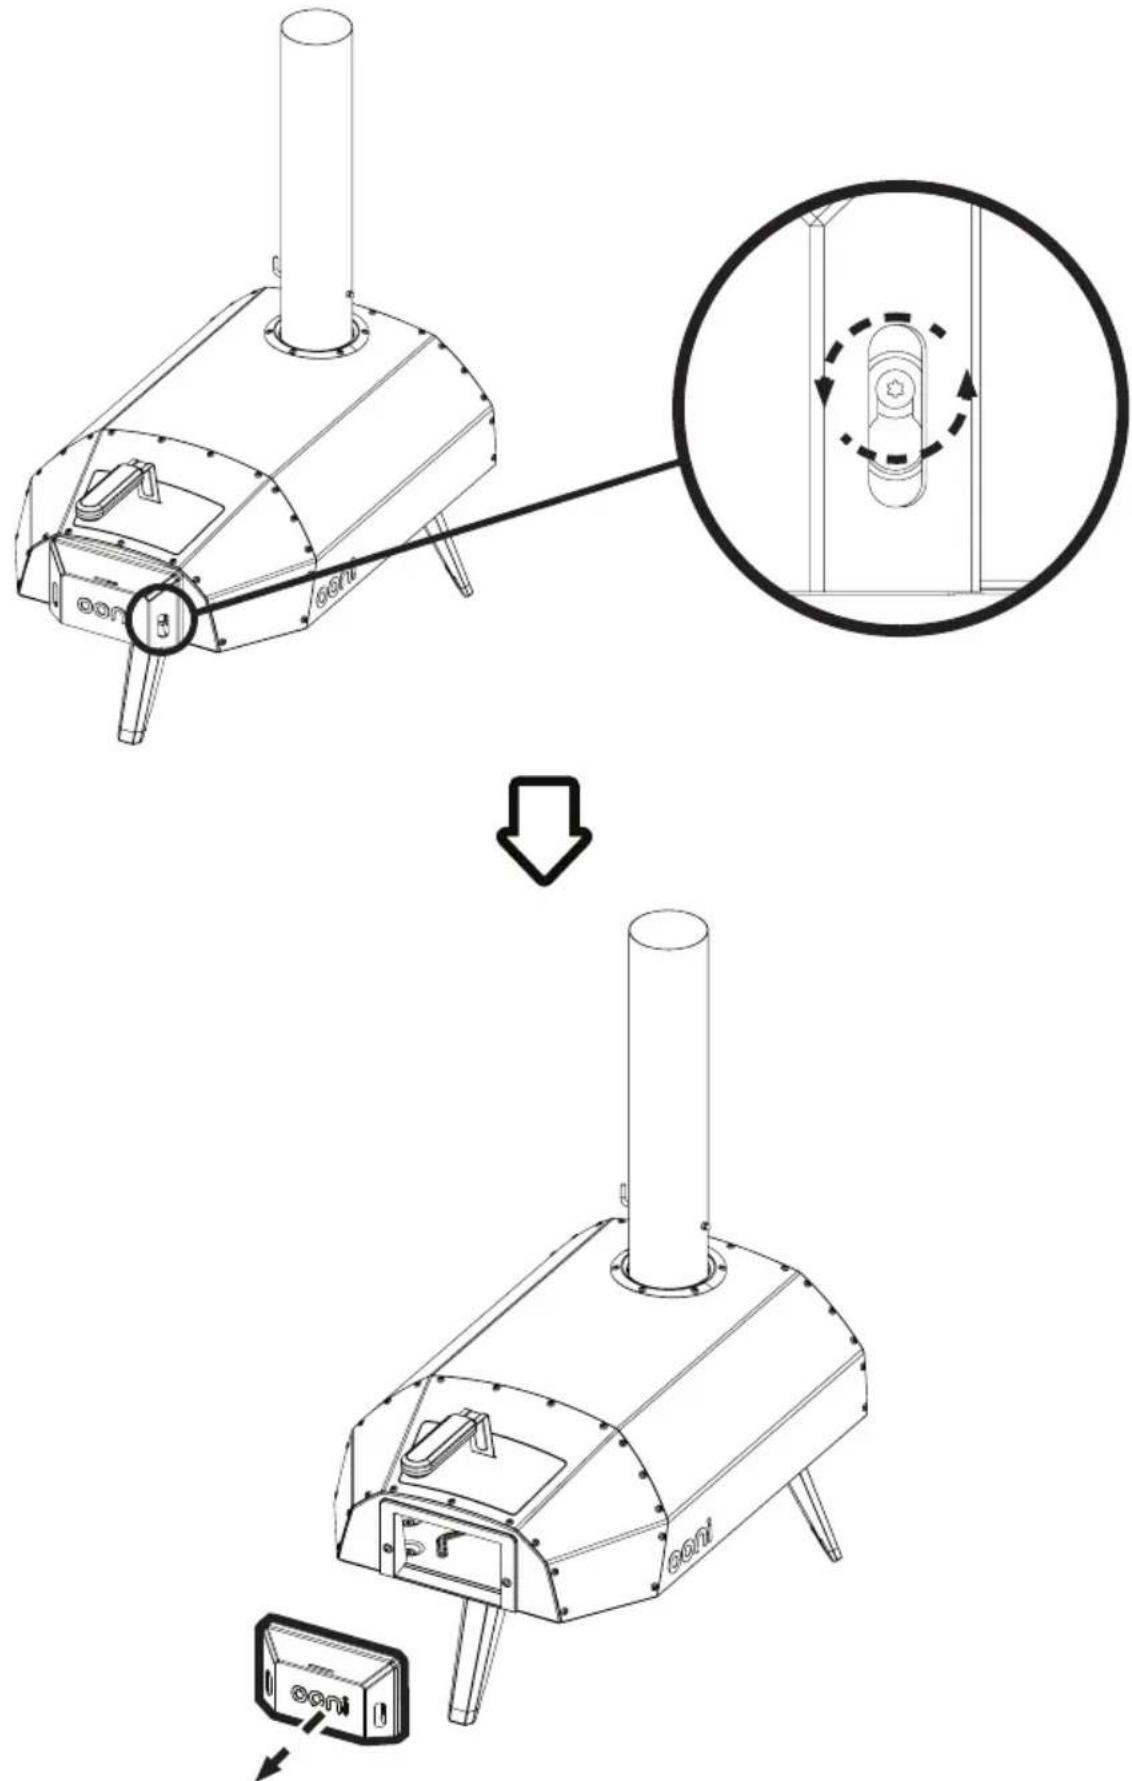
text_image
Technical diagram showing a device's internal structure before and after assembly, with magnified detail highlighting the component's rotation.Step 4
Add Ooni Gas Burner for Ooni Karu 12
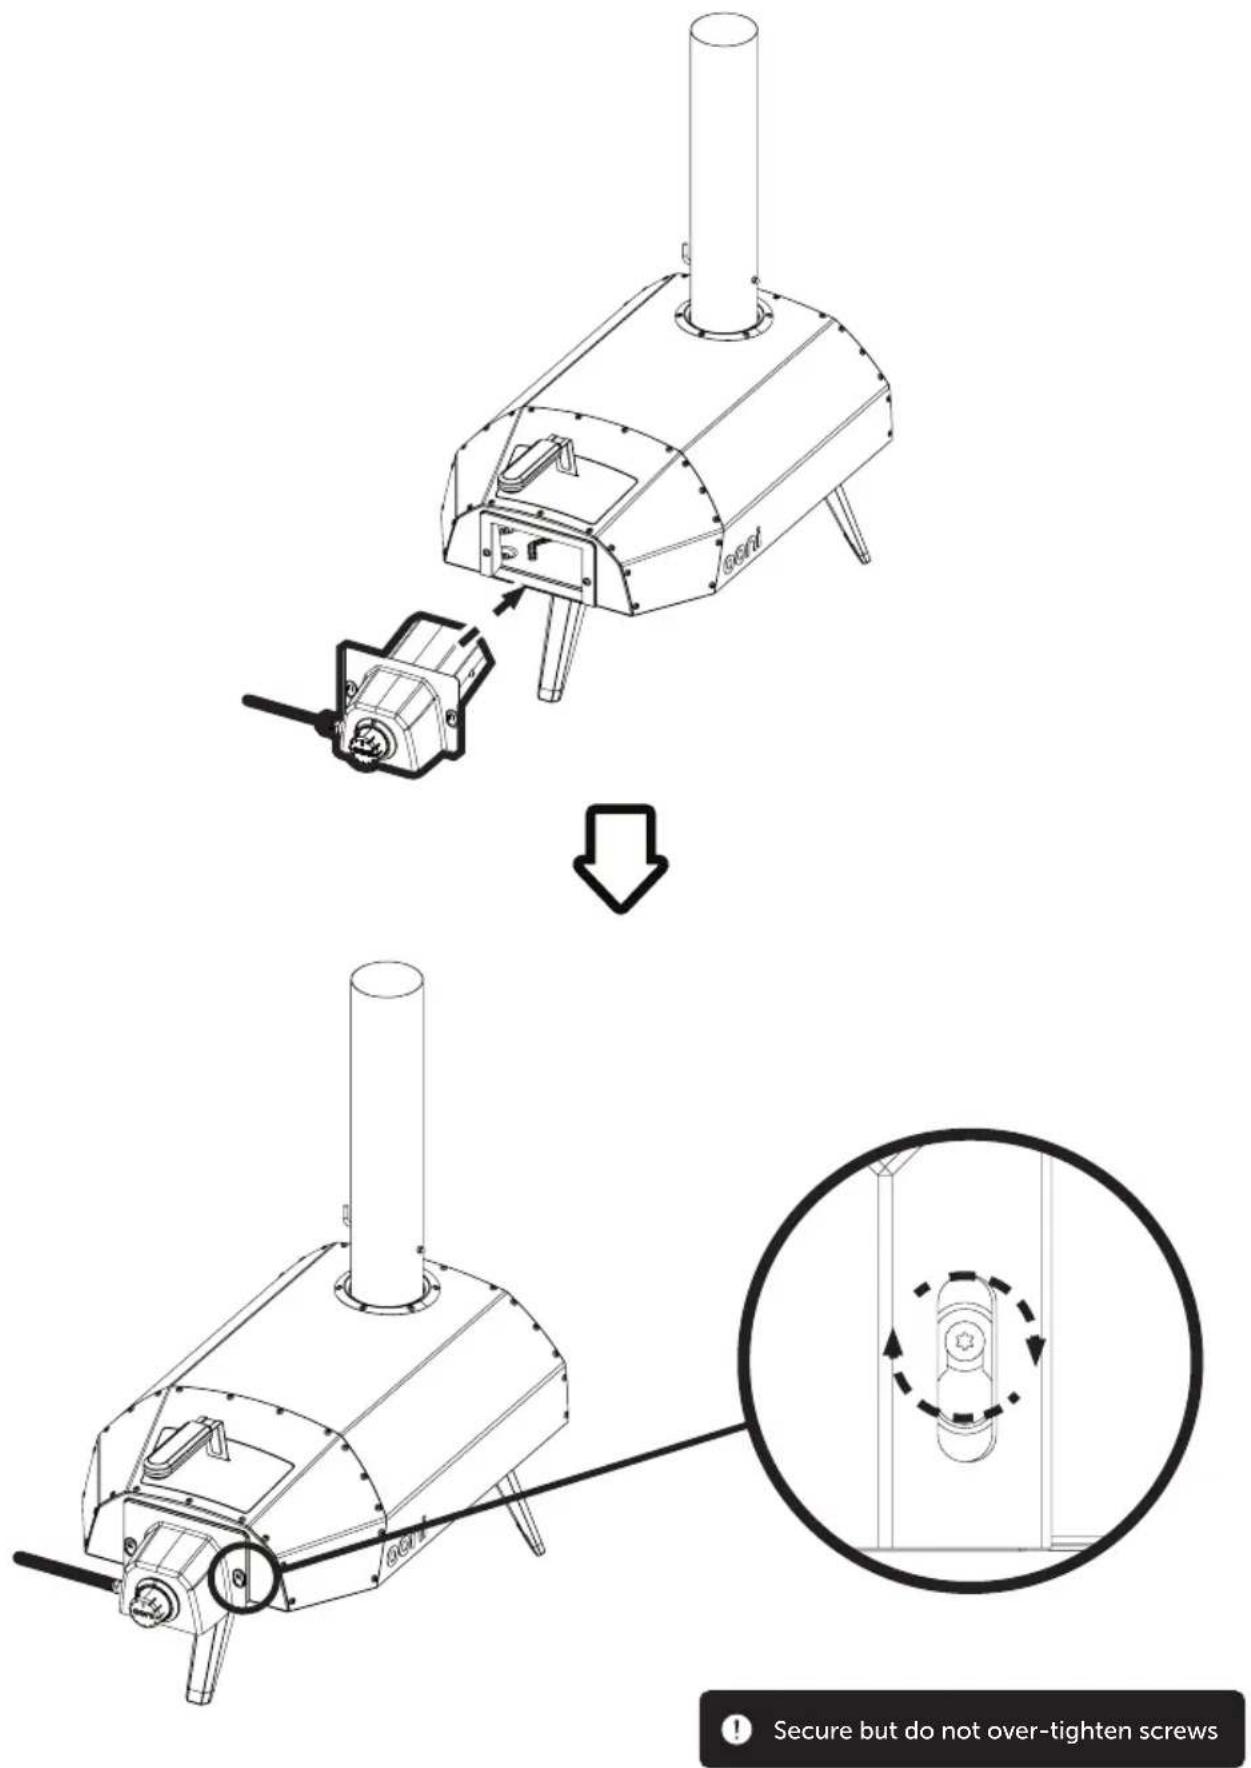
Step 6
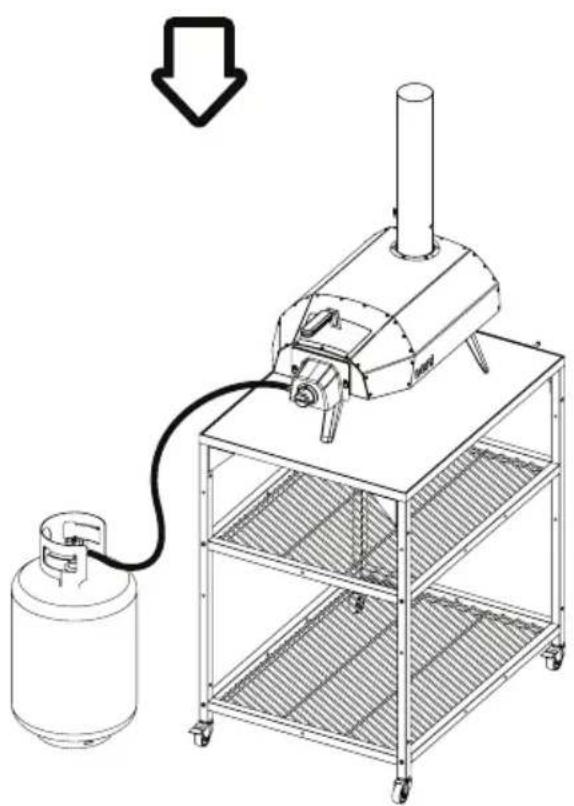
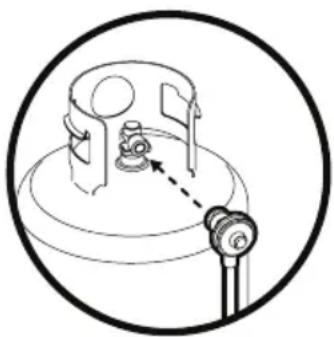
Connect to gas canister
Regulators will vary depending on region.

WARNING
- Please always keep the gas bottle in upright position.
- The size for 20 lbs LP gas cylinder is 12.2 inches in diameter and 17.9 inches tall
- If the appliance is not in use, the gas must be turned off at the supply cylinder.
- The cylinder used must include a collar to protect the cylinder valve.
- The minimum distance for the appliance and the 20lb gas tank is 40 inches apart.
natural_image
Diagram of a mechanical assembly with a central component and a base, enclosed in a circle (no text or symbols)QCC1 gas regulator
This gas fitting is clockwise. Make sure that the tank is completely switched off and screw the regulator as far as possible into the gas tank valve.
Connecting the liquid propane gas cylinder
- The cylinder valve should be in OFF position.
- Make sure the burner valve is in OFF position.
- Inspect the valve connections, port and regulator assembly. Remove debris and inspect the hose for damage.
- When connecting the regulator assembly to the valve, use your hand to tighten the nut clockwise until it stops. Use of a wrench could damage the quick coupling nut and result in a hazardous situation.
- Open the cylinder valve fully by turning the valve counter-clockwise.
- Before lighting the oven, use a soap and water solution to check all connections for leaks.
- If a leak is found, turn the cylinder valve OFF, and do not use the oven until local liquid propane dealer can make repairs.
Disconnecting the liquid propane gas cylinder
- Turn the oven burner valve OFF and make sure the oven is cool.
- Turn the liquid propane cylinder valve OFF by turning clockwise until it stops.
- Detach the regulator assembly from the cylinder valve by turning the quick coupling nut counter-clockwise.
- Place dust cap for cylinder valve outlet whenever the cylinder is not in use.
Leak testing
General
Although the gas connections of the appliance are leak tested prior packing and shipment, a complete test must be performed at the installation site.
Before each use, check all the gas connections for leak testing using the procedure listed below. If the smell of gas is detected at any time, you should immediately stop using and check the entire system for leaks.
Before testing
Make sure all packing material has been removed from the appliance.
Make a solution of one part liquid detergent and one part water. You will need a spray bottle, brush or rag to apply the solution to the fittings.
To test
- Turn the burner valve OFF.
- Turn the liquid propane cylinder valve on counter-clockwise to open the valve.
- Apply the soap solution to all gas fittings. Soap bubbles would appear where a leak is present.
- If a leak is present, immediately turn the gas supply OFF and tighten leaky fittings.
- Turn the gas back ON and recheck.
- Should the gas continue to leak from any of the fittings, turn the gas supply OFF and contact customer service.
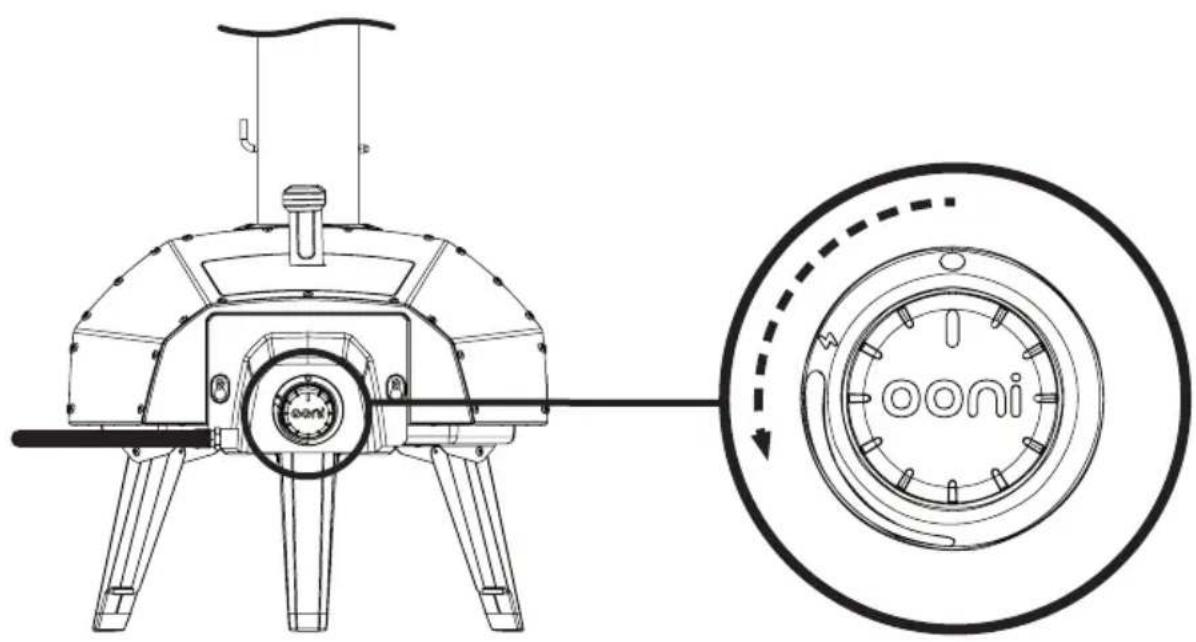
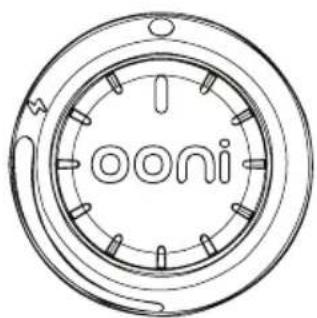
Step 6 Ignition
- Turn on the gas at the gas canister.
- Push in and turn the button counter-clockwise until it clicks. Do not turn too quickly. From press to click should take about 3 seconds
- Hold in button for 5 seconds, then release.
natural_image
Technical line drawing of a robotic device with a circular inset showing the rotor and wheel (no text or symbols)Maximum power Minimum powerOff
text_image
ooni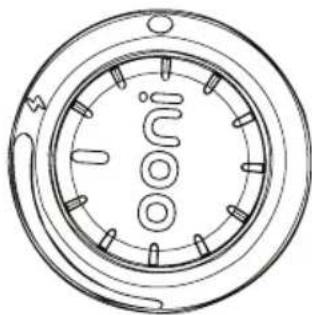
natural_image
Technical line drawing of a circular mechanical component with internal slots and mounting holes (no text or symbols)
text_image
!Uoo
Stand clear of the oven when igniting - ensure nobody is within 1 metres (3ft) of the front of the oven. Maintain arms length from the oven when igniting, and do not lean over the oven when igniting.
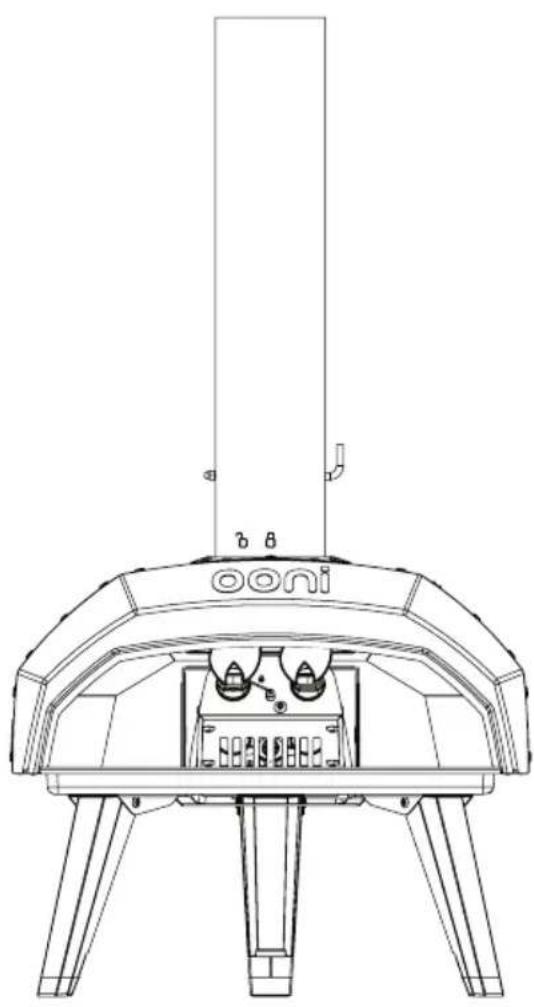
Step 7
Verify that the gas burner has on
- If not, turn off the gas and go back to Step 6.
- If the burner still does not ignite go to Step 8
natural_image
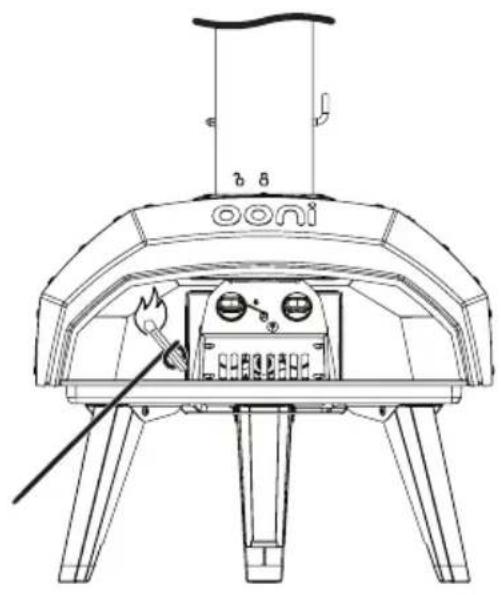
Technical line drawing of a mechanical device with no visible text or symbolsStep 8
Ignition - using a match
If the burner still does not ignite; turn the gas on and light using a match and the supplied match holder through the front of the oven. Hold it in front of the burners. Press and turn the knob as described in Step 6.
text_image
ooni b b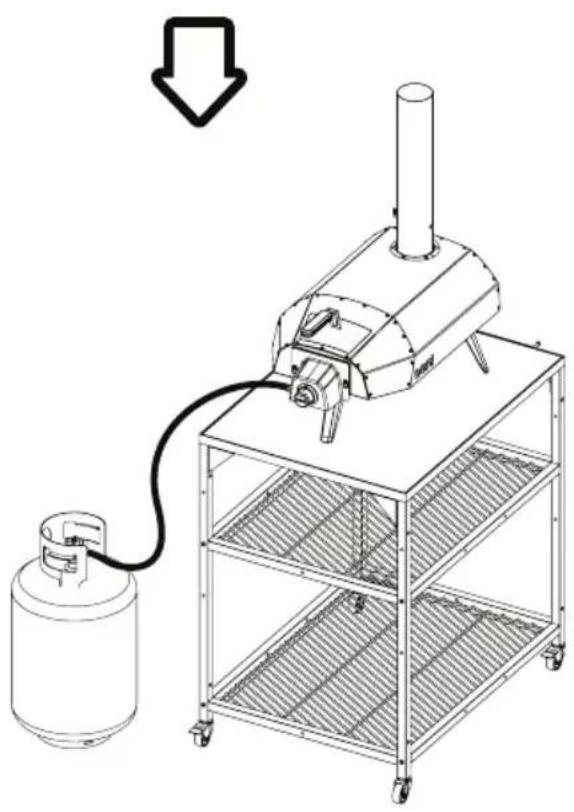
natural_image
Technical line drawing of a gas stove with a cylindrical tank and downward arrow indicating process (no text or symbols)Always route the gas hose away from the oven. The hose must not touch the oven body
If the flames go out turn off the gas and wait 5 minutes before reigniting
Troubleshooting
| Problem Possible cause Prevention / Solution | ||
| My oven isn't getting hot enough 1. Empty gas bottle2. Cracking or leaking on the hose3. Regulator improperly fixed4. Operation in extreme conditions | 1. Check the gas bottle is full, even a bottle with little gas inside may affect the gas burner performance2. Ensure there is no cracking or leaking on the hose3. Ensure the regulator is properly fixed to the gas bottle and the hose is firmly attached to the gas burner tightened using appropriate sized wrenches as outlined in the instruction manual4. Your gas burner and oven should not be used in extreme conditions (eg high wind) | |
| My gas burner will not ignite 1. Improper set-up2. Empty gas bottle3. Cracking or leaking from the hose4. Improper lighting technique.5. Regulator improperly fixed6. Improper alignment of the sparker | 1. Ensure the chimney cap is removed and the ceiling vents and chimney vent are open. The door should be open.2. Check the gas bottle is full, even a bottle with little gas inside may affect the gas burner performance3. Ensure there is no cracking or leaking on the hose4. Turning the dial too quickly may prevent the gas burner from lighting.5. Ensure the regulator is properly fixed to the gas bottle and the hose is firmly attached to the gas burner tightened using appropriate sized wrenches as outlined in the instruction manual6. Reposition the sparker tip so it is 2-3 mm away from the front of the burner cap. | |
| My flame is too yellow / too blue Variation in the environment, the food you cook, ambient temperature and condition of your Ooni oven may effect the colour of your flame | The colour of your flame will not affect the taste or quality of your food. | |
| My FSD is not functioning correctly There may be soot build up on my FSD probe | Ensure the gas burner and gas supply is switched off, wait for the burner to cool down, gently clean the probe and burner holes with damp cloth, leave the burner to fully dry before re-lighting. | |
| Gas burner for Ooni will not maintain it's flame | 1. Lack of oxygen2. Oven placed on an uneven surface | 1. Open the chimney vent of your Ooni Pro to encourage better airflow through the oven2. If your Ooni is on a slant when set up, the oxygen will not flow as well. Try to set up on a flat surface. |
| I can hear a 'roaring sound' coming from the Gas burner and my flames are very weak | Flame is burning within the ventures Switch off the gas supply and the gas burner immediately, wait 5 minutes and relight the gas burner. | |
Product technical information
Model number
Ooni Karu 12
Product Label
| Gas Type Number of Burners | Injector Size Main Burner | Total Gas Consumption BTU | Gas Pressure KPa | |
| Propane 1 0.85mm 17500 2.8 |

WARNING:
Do not spray aerosols in the vicinity of this appliance while it is in operation.
Do not use or store flammable materials in or near this appliance.
Do not place articles on or against this appliance. Do not modify this appliance
ES

ADVERTENCIA
natural_image
Prohibition sign showing a person crossed out of a building with a diagonal line (no text or symbols)
natural_image
Diagram of a device with a cable and connector, no text or symbols present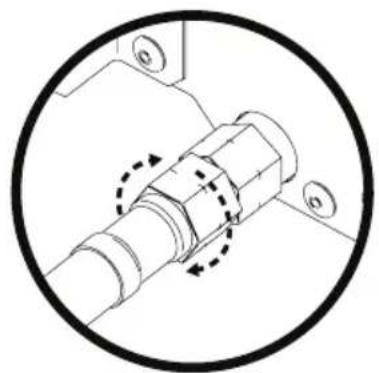
natural_image
Mechanical assembly diagram showing a bolted joint with dashed arrows indicating motion (no text or symbols)text_image
Diagram showing a cable connector connected to a device with a magnified view of the component labeled 'cont'.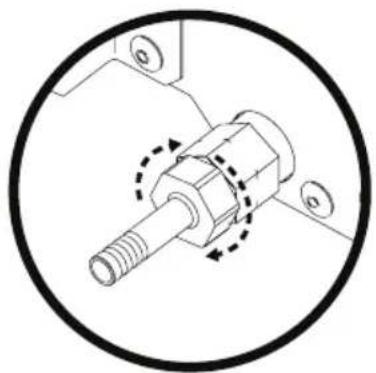
natural_image
Mechanical assembly diagram showing a bolted joint with mounting holes and a dashed circular motion arrow (no text or labels)natural_image
Diagram showing a cable connector inserted into a device with a circular connector (no text or symbols present)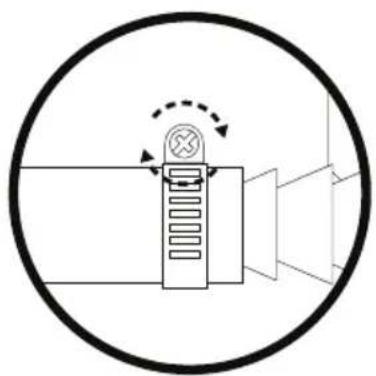
natural_image
Pure mechanical diagram showing a lever mechanism inside a circular frame (no text or symbols)Paso 2
text_image
Technical diagram showing a device's internal structure before and after assembly, with magnified detail highlighting the component.natural_image
Diagram of a mechanical device with a lever and base, enclosed in a circle (no text or symbols)natural_image
Technical line drawing of a robotic device with a circular inset showing the rotor and wheel (no text or symbols)natural_image
Technical line drawing of a circular mechanical component with internal slots and mounting holes (no text or symbols)
text_image
!Uoonatural_image
Technical line drawing of a four-legged robotic device with no visible text or symbolsPaso 8
natural_image
Line drawing of a portable oven with a fire extinguisher and control panel (no text or symbols)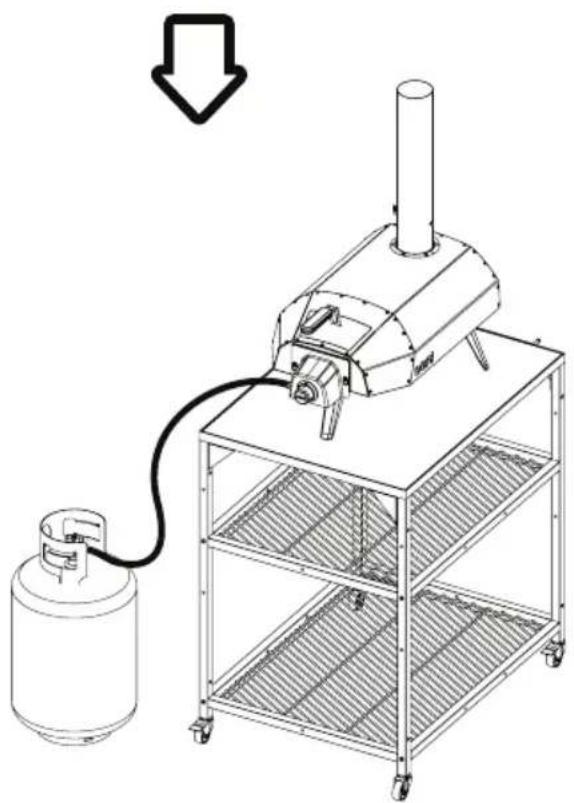
natural_image
Line drawing of a gas stove with a cylindrical tank and downward arrow indicating process (no text or symbols)text_image
Prohibition sign with pictogram of a person falling, crossed out by a diagonal line, indicating no movement or restriction.
natural_image
Diagram of a connected cable and a device with a circular connector (no text or symbols)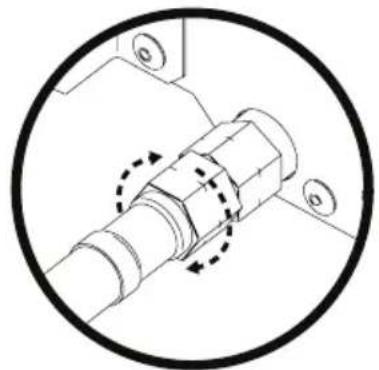
natural_image
Mechanical assembly diagram showing a bolted joint with dashed arrows indicating motion (no text or symbols)natural_image
Diagram showing a cable connector inserted into a device with a magnified view of the internal components (no text or symbols present)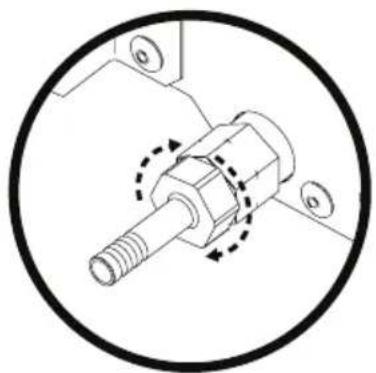
natural_image
Mechanical component diagram showing a bolt and nut assembly inside a circular housing (no text or symbols)natural_image
Technical line drawing showing a cable connector inserted into a device with a magnified view of the internal component (no text or symbols)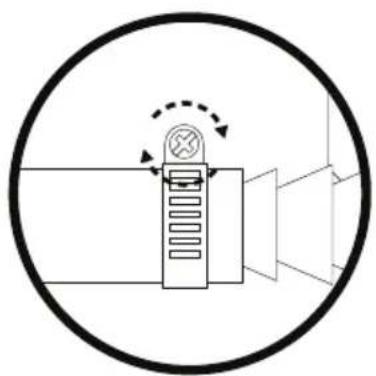
natural_image
Diagram of a device with a circular frame and directional arrow, no text or symbols presentÉtape 2
text_image
Technical diagram showing a device's internal structure before and after assembly, with magnified detail highlighting the component's rotation.Étape 4
natural_image
Diagram of a mechanical device with a lever and base, enclosed in a circular frame (no text or symbols)natural_image
Technical line drawing of a robotic device with a circular inset showing the rotor and wheel (no text or symbols)natural_image
Technical line drawing of a circular mechanical component with internal slots and mounting holes (no text or symbols)
text_image
!Uoonatural_image
Technical line drawing of a four-legged robotic device with no visible text or symbolsÉtape 8
natural_image
Line drawing of a portable oven with ooni branding and a fire extinguisher inside (no text or symbols)