A Modo Mio Jolie & Milk - Coffee machine Lavazza - Free user manual and instructions
Find the device manual for free A Modo Mio Jolie & Milk Lavazza in PDF.
User questions about A Modo Mio Jolie & Milk Lavazza
0 question about this device. Answer the ones you know or ask your own.
Ask a new question about this device
Download the instructions for your Coffee machine in PDF format for free! Find your manual A Modo Mio Jolie & Milk - Lavazza and take your electronic device back in hand. On this page are published all the documents necessary for the use of your device. A Modo Mio Jolie & Milk by Lavazza.
USER MANUAL A Modo Mio Jolie & Milk Lavazza
Dear Customer thank you for purchasing the Lavazza A MODO MIO espresso coffee machine and for choosing our company.
Before operating the machine, we recommend you carefully read the operating instructions that explain how to use, clean and maintain it in perfect working order. We hope you enjoy brewing authentic Italian coffee, thanks to Lavazza!
Felicitations!
A. 1 mCnAaz onC3d 3corrCnAC:
66C7, G53: 6,56 (52210-564: 3625EE/697,85-8765643: 9: 6.062733: -8:65.; G; 58:6:6437 098:6.06
( :9956568: 335A6L568: -907:-6.; : 627330947-.. : 3:656'; : ,560-.0258569; ,56853G1: 8856.; ,56
( 52210-5A

;H,89166.
46, avo3d/ al mCnAaz onC:3
N7-6; 953: 6,56( 52210-564: 3625EE/69: 60,625 76. '5,0( : -85)07- : 6/6. OE: 88797A6
S: 60,625 76. '5,0( : -85)07- : 6/6. 5-: GG0587F6: 9976. : : 6: 99: 3: 6979808; 0876. 5,627983; 8873: 6
76. 5,69; 769: 3 0)076. 06599098: -)568: 2-02567627( ; -' ; : 6. 56; -564: 397-5627-6' ; 5,OE0256
90( 0,53: F60-6( 7. 76. 5643: : -03: 67G-063092107 A6N7-6E536459953: 60,625 76. '5,0( : -85)07- : 6
4: 365-G7,06: 69; 6940G7,06 0 OF69743567GG: 8806( 7,87625., 06: 64378: GG: 3,76. 5,, '7,07A6
N7-6473853: 67680353: 6,56( 52210-564: 3625EE/68:-.. .7,564: 360,625 7A6
N7-6: 983533: 6,56940-568035-. .7,564: 360,625 7C6-7-6872253,5627-6,. .6( 5-06D5G-58:A6
E 0853: 621: 60,625 76. '5,0( : -85)07- : 625. 56,OD: 35( : -8: 6. 5685 7,0676925EE5,OA6
2 Cr colo3d 3folgoraz onC:
N7-6(:88:3:6(5065627-858876.:.,'52';56,:64538069788768:-907-:6:/762733:-8:A6 H; :9876544453: 221076-7-6. : : 6:99:3:60C(:397A
332 roACz onC3bamb n 3al3d 3BoAAo3dCgl 383ann :
T: - : 3: 606D5 ( D0- 069788769; 4: 3 0907 - : F64: 36: 0853: 621: 66G07210- 7627- 6, '54453: 22107A66
I6D5 ( D0- 06- 7- 69063: - . 7- 7627- 876. : ,64: 3027,7627- - : 99765G,06: ,8837. 7 ( : 9802A6
N7- 6,592053: 65,56,73764738585606 ( 58: 305,06; 80,0) )58064: 360 ( D5,53: 6,56 ( 52210- 5A
32Cr colo3d 3uBA on :3
N7-66872253:66,:66453806625,::66(G3;4476647385662549;,5F66:82A)669;D08766.74766,';976 :,'54453:22107&6D;35-8:66,':37G5)07:-66.::,566D:5-.56643:9853:6588:-)07:-:665.6 ::-8;5,069210))06.06,0';0.7625.,7A6

2ulz a:3
P30(56.064; .03: 6,56(52210-5F6/60- .094: -95D0.; 6927., G53: 6,56940-56. 5,,5643: 956.06 2733: -8: 6.; .6594: 8853: 621: 6,56(52210-5690635EE3.: .0A6N7-60( (:3G: 3: 6,56(52210-56 --:, '52'; 5E69: : 35( :-8: 6 0: 858762: 3253: 6. '0-8: 3: -03: 65, '0-8: 3-76. :, 56(52210-5A6 S79808; 03: 6, '52'; 56:-, 69: 3D587076. 7476|6G073-06. 060-; 80,))7A6 P: 36: .0853: 6. .06. 5--: GG053: 6, '54453: 221076-7-6; 80,))53: .8: 3G: -8065,25,0-064: 36,56 4; .0)05F6D: -916; -645--76(73D0.76: 6; -6. : 8: 3G: -8: 6. : ,02587A

CuBtodiaedella3macchina:3
*[]L:6253588:3098021:6:60,627-8:-;876.:.,5627-E:07:-647997-76 5353:60-6D59:65,6( :325876.0630E:30(:-87
64 on3B 3aBBumono3rCBponBab 1 AasPcr3CvCnAual 3 dann 3 n3caBo3d :3
-3 mp Cgo3CraAo3Csnon3conformCsgl 3Bcop 3prCv BA ;3
-3r paraz on 3non3CBCcu ACsprCBBo3cCnAr 3d/aBB BACnza3 auAor zzaA ;3
-3manom BB onC3dCl3cav03d/ al mCnAaz onC;3
3manom BB onC3d 3qualB aB 3componCnAC3dClla3 macch na;3
-3 mp Cgo3d 3pCzz 3d 3r camb o3CaccCBBor 3non3 or g nal ;3
3mancaAa3dCcalc ficaz onC;3
-3BAoccagg o3 n3local 3a3d 3BoAAo3d 34^ ,3
3u1 zzo3 n3local 3con3ACmpCraAura3 nfCr orC3a310°, 3 o3BupCr orC3a340°;3
3uA1zzo3nlocal 3con3um d Aa3rClaa vaBupCr or C3al395%;3
3uA1zzo3d3capBulCnon3compaAb1.3
Hn3quCBA 3caB 3v CnC3a3dCcadCr3la3garanz a.3
.EEH. ^14:53^ .,H4.3
62 oB z onarC3a3macch na3Bu3una3BupCr f Csp ana3CBAb b IC,3lonAano3da3acqua3CfONA 3d 3calorC.33Hdann 3cauBaA 3alla3macch na3cauBa3dC1la3mancaAa3oBBcrvanza3d 3 quCBAC nd caz on 3nonBono3copCr A 3da3garanz a46
LJH:9885884HJ;89J:K93NJ2;X114N9NO4H8:4X;90/9J.H4N:-9.9H8M88MNO4I-4H9HJ,
1 66S7..53:6:630(;7:3:60,6274:32107f6.747.021e6:983533:6 0,69:3D587076.,'52';54
6 266R092052';53:60,69:3D587076430(56.06;80,0))53,7%
366R0:(403:60,69:3D587076.:,'52';56E0-765,6,0:,76MAX60-.0-2587F6;95-.7697,85-87652';56E3:92564785D0.;6-7-6G5958546R0(7-853:60,69:3D587076:630210;:3:627-60,6274:32107A
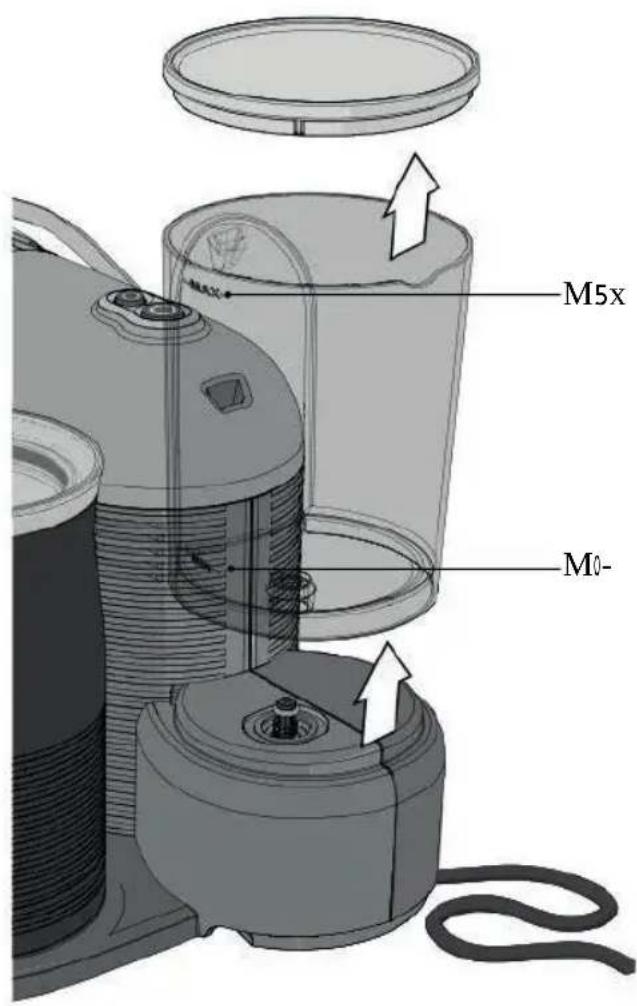
cqua35calda3C3alAr 31 qu d 3poBBbono3dannCgg arC3 I BCRbaAo o3C3la3macch na.34 on3mCAACrC3 n3funz onC3 la5macch naBCnza3acqua:3accCrAarB 3chC3vC3nC3B a3a3 Buff c Cnza3all/ nACrno3dCl3BCraAo o.
66, clo3d 3r Bc acquo3
1 R0;7:3:60,69:3D58707652';5F63092052';53,76:6,5 53,7652-2;3585(-8:6:630:(403,7627-652';56E3:92564785D0:-6-7-6G59856E0-765,6,0::,76MAXA6
6 R07-853:60,69:3D5870769;.,56(52210-5A
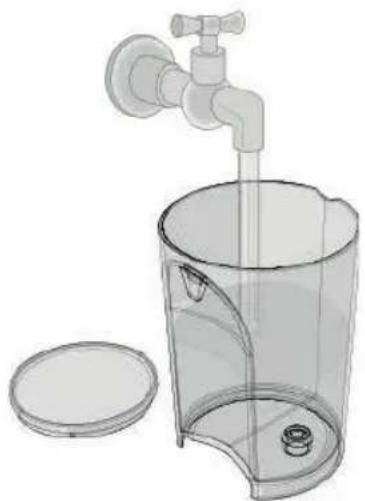
26P790)07-53:6; -627-8:-0873:65.:G; 5876978876,37G5873:46
P3:(:3:6:-64;95-8:66:6:37G53:6,0-8:37627-8:-;876.:6 9:3D58707466
46R0(;7:3:660,6627-8:-0873:F69;7853,76:66304790)07-53,76 978876,:37G5873:A6
56R0:(403:6:-75(-8:60,69:3D587076.0652';56:65 053:6;-69:27-.76202,76.063092052';7A
6R0(;7:3:60,69:3D58707652’;5F63092052’;53,76:6,5 53,7652-2;3585(:-8:6:630:(403,7627-652’;56E3:92564785D0,:6-7-6G595856E0-765,6,0::,76MAXA
7R0(7-853:60,69:3D5870769;.,56(52210-546
86P;03:6,56(52210-5627-6;-645--76(73D0.7F60-;(0.087466T:3(0-58566,5664;0)05F660,664372:99766.066.:25,20E025)07:-66/627(4,:87A66L56(52210-56/6437-8565.,97A

28OH6H.3,.228,,H4.:591

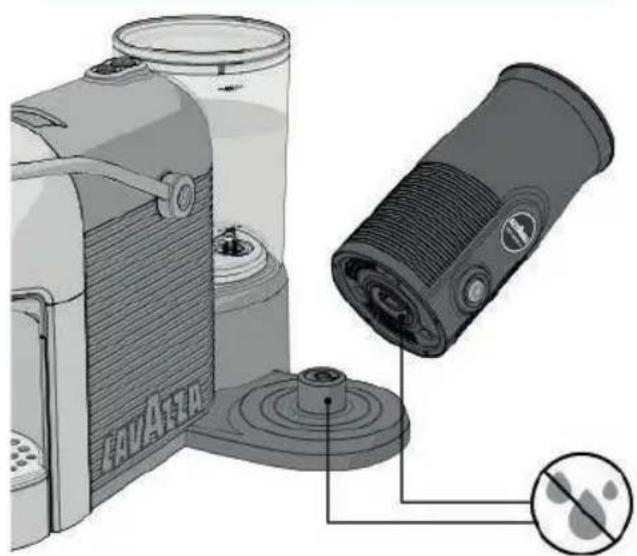
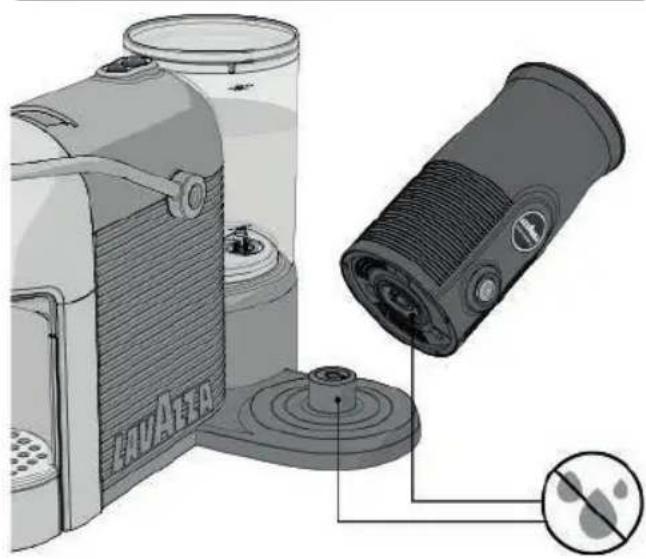
6) B nBCr rC3 BCmprC3 la3 Bp na3 dalla3 prCBa3 d3 cor-rnAC3pr ma3d 33procCdCr3alla3pul z a35dCl3cap-pucc naAorC35C3dC 33Bu0 33accCBBor .32 Cr35 Cv AarC313r Bch osd 3BcoBBC3ClCAar ch,non3pul rC3o3 mmCrgCrC3nCll/acqua3 lcavo3d 3al mCnAaz onC3C3la3baBC3dCll/ap- parCcch o.
-661,62544:220-5873:F60,E3;.,0-76:60,6274:321076. : 7-76:99:3:6,55806.74767G-66202,76.06:80)7A6
66P:360,6,5 5GG076.06 530627(47:-8069:G;03:6;60983)07-06
0-.0258:6-:,5685D,:5697887k

66H3cappucc naAorC3C1a3baBC3non3poBBbono3CBBCrClavaA 3 n3lavaBAov gl C.
-66N7-6;80.0)53:697,);07-06.8:3G:-8065D3590:67697,-80A

- BB curarB 3chC3la3baBC3dCl3cappucc naAorC3b a3BCm-prC3aBc uAAa.

N5M04H.11K;K3N:J1 54E9:9K'98J0/988;K3;K04-9:0/J4B-:J1 ;K3N K;E::K4UHK;E::.84E11K9,
| × | × | √ | √ | √ | |
| √ | √ | √ | √ | √ | |
| × | × | × | √ | √ |
| P37D.;(5630927-835876C5;9:647990D0,06S7.;)07:-6 | ||
| L56(52210-56-7-6906522;-:AS40:6694;-8:6.74765:3643;( ;876064;95-806.06522;-907;-/985.-Dy/37G5)07:-/6 | >RRM52210-56-7-627;G58565,563:8:6;::883025A>RRM56(52210-56/627;G58565643;9:6( ;804;6765.6;-56205D8856-7-6E;-)07-5-8:A>RRM6A,0(-85)07-6-7-643;9:-8: | >RRM66C7;G53:6,56(52210-565,563:8:6;::883025A>RRM66C7;G53:6,56(52210-56.03:885(-8:65,563:8:6;::883025A>RRM6V:30E253;6,5643;9:-)56.02733:-8:627;G5-76;65,8376.0947908 76;::88302765,5,0(-85)07:-/A>RRM6S:6,6437D;:(564:39098:607,G:3905,6S:30)076C0:-80&L5)5A |
| L56(52210-560;40;G56;7,8768;(4764:36925,5390A | >RRM6S87225GG076(52210-560-65(D0:-8:68374476E3::766(-9825-80-5/G535G);A>RRM6L56(52210-56156(7,87625,253;RMR6D:25,20E0253;6,56(52210-5A>RRM6S:6,6437D;:(564:39098:607,G:3905,6S:30)076C0:-80&L5)5A | |
| M52210-563;(7379546)>RRM6P05-76.065447GG076-7-6985D0;A>RRM6C5 76;::8830276(5,64790)07-587A>RRM6V:30E253;60,62733;88764790)07-5(-876;::62576::,56D59:6;::,56(52210-5A>RRM6I-9:303:62733:885(-8:6;6453806(7D0,0A>RRM5-25652';56;-,69;3D58707A>RRM6C549;56-7-643;9:-8:A>RRM6S:6,6437D;:(564:39098:607,G:3905,6S:30)076C0:-80&L5)5A | ||
| L56(52210-56-7-6:37G546)>RRM6G;59876;::88302766064;95-806-7-6E;-)07-5-7A>RRM5-25652';56;-,69;3D58707A>RRM6S:3D587076-7-60-9:308762733:885(-8:A>RRM6M5-258760--:927A | >RRM6P3:(3:60,64;95-8:6;30E253;60,6E;-)07-5(-876;::,5694056(522:956,5(4:GG05-8:6.0627,73:6D05-27)6;5'5(-876;::,56(52210-5A>RRM5DD72253;627-652';56E3:92564785D0;6-7-6G59585A>RRM6I-9:303:62733:885(-8:60,69:3D58707A>RRM6R4:8:3:6,564372;;356.06505(-876(52210-5A>RRM6S:6,6437D;:(564:39098:607,G:3905,6S:30)076C0:-80&L5)5A | |
| P37D,: (5630927-835876C5; 9:647990D,06S7,); )07:-6 | ||
| L56(52210-564:3. : 652'; 56.5,,564538:64798:3073:A) | »R»R»S:3D587076-7-60-9:308762733:885(:-8:A»R»R»S:3D587076.5--:GG0587A | »R»R»S-9:303:62733:885(:-8:60,69:3D58707A»R»R»V:30E0253:6,5643:9:-)56.064:3.08:-6:69:3D5870768:-.7,769:4535876.5.,56(52210-5A»R»R»S:6,6437D,:(564:39098:607,G:3905,S:30)076C,0:-8&L5)5A |
| L56(52210-564:3. : 652'; 56.5,,564538:6E37-85,:A) | »R»R»C599:88762549;..6:958:6-7-60-9:308762733:885(:-8:A»R»R»C599:88762549;..6:958:640:-7A»R»R»C549;560-25983585A»R»R»C549;56-7-60.7:-5A | »R»R»S-9:303:62733:885(:-8:60,62599:88762549;..A»R»R»S:7853:6:64;03:60,62599:88762549;..6:60,62599:887635227G,06G722:A»R»R»A):53:65DD59953:6,56:56253025(-8762549;..A6I-625962006-7-6E799:69;EE020:-8:F6927;..G53:6,56(52210-56.5,,563:8:6:..8830256:60-8:3:-03:6(5:-5;..5,-8:64:3692530253:6,562549;..56.5,627:-.7887A»R»R»U80,0))53:62549;..6L55))567627(4580D0,A»R»R»S:6,6437D,:(564:39098:607,G:3905,S:30)076C,0:-8&L5)5A |
| L56::56253025(-876-7-635GG0;-G:6,564790)07:-6.06:37G5)07:-67630210:-6:-.22:990 56E73)56.06210;9;35A | »R»R»C599:88762549;..6:958:640:-7A»R»R»C549;560-9:308560-6(7.76:33587A | »R»R»V:7853:60,62599:88762549;..6:958:A»R»R»R04:8:3:6,569:‘;:-)5F6;..560-64790)07:-6.06304797F6;4790)07:-6.06:37G5)07:-6(69-7-6/69;EE020:-8:60-8:3:-03:(5:-5;(-8:64:3692530253:6,562549;..56.5,627:-.7887627-6,56(52210-56927;..G5856.5,563:8:6:-.883025A |
| S40::R»522:9:6,5(4:GG05-806.0627,73:637997A | »R»R»M52210-56G:598546»R»R07:G:3905,6S:30)076C,0:-806L5)5A | |
| S40::R»522:9:6,5(4:GG05-806.7206.0627,73:6D05-27A | »R»R»C599:88762549;..6:958:640:-7A | »R»R»V:7853:60,62599:88762549;..6:958:643:(3:3;6:-64;95-8:6.06522:-907:-/37G5)07:-.64:363:9:8853:6,56(52210-5A |
| I,625EE/69G73G568374476:-.72:(-8:6-7-6:0:-.6:37G5876:-625EE/623:(797A | »R»R»C549;56-7-60.7:-5A»R»R»C549;56G1a6;9585A | »R»R»U80,0))53:62549;..6L55))567627(4580D0,A»R»R»R0473853:6,56;56:-,564790)07:-6.063047976;..60-9:303:-562549;..56:-.75A»R»R»S:6,6437D,:(564:39098:607,G:3905,S:30)076C,0:-8&L5)5A |
| P37D::(5630927-835876C5;9:647990D0,06S7.;)07:-6 | ||
| I,625EE/6/6E3::.7%»®R6E37G5)07::656G722:F62032;08760.35;.02760-859587A»®R6L56(52210-56156(7,87625,253):R6D:25,20E0253:6,56(52210-5A>>®RS:6,6437D::(564:39098:607,G:3905,S:30)076,C: -86L5)5A | >>®R6EEE:88;53:60,6202,76.06;55GG76(52210-5A>>®R6D:25,20E0253:6,56(52210-5A>>®RS:6,6437D::(564:39098:607,G:3905,S:30)076,C: -86L5)5A | |
| L56';5-808a6.0625EE/6:37G5856/60-9;EE020:-8:676:22:990 5A | >>®R6E335856437G35(5)07:-6.;..790A | >>®R6EEE:88;53:6;-56437G35(5)07:-6.79:625EE/A>>®RS:6,6437D::(564:39098:607,G:3905,S:30)076,C: -86L5)5A |
| I,625EE/6-7-6 0:-6:37G5876:.6:92:65473:6.5,65-760-9:30(:-8762549;.:A | >>®R6L56.;56253025(:-876-7-6/698586473858560-64790)07:-6.06:37G5)07:-A | >>®R6P73853:6,56;56253025(:-8760-64790)07:-6.06:37G5)07:-A>>®RS:6,6437D::(564:39098:607,G:3905,S:30)076,C: -86L5)5A |
| I,625EE/6E;730:92:656G722:%»®R6C549;56.0E:88795A>>®R6P7(456-7-62733:885(:-8:E;-)07-5-8:A>>®R6E37G5873:/2032:08760.35;02760-859587A>>®R6L56(52210-56156(7,87625,253):R6D:25,20E0253:6,56(52210-5A>>®RS:6,6437D::(564:39098:607,G:3905,S:30)076.C: -86L5)5A | >>®R6S79808;03:6,562549;5627-6;-56:-7.5A>>®R6V:30E0253:6,563;(737908a65-7(5,56.;,56(52210-5A>>®R6E9;G:03:6202,76.06,55GG076:37G5873:625EE/8(.06MANUTENZIONE&E,PULIZIA)A>>®R6D:25,20E0253:6,56(52210-5A>>®RS:6,6437D::(564:39098:607,G:3905,S:30)076.C: -86L5)5A | |
| U-76.;06.;:6859806-7-6E;)-07-56.;60,63;580 76LED6309;85694:-87A | >>®R6B,72276(:225-027A | >>®R6P37 53:656.095;(-853;6,56(52210-56:9835:-.76,56940-56.06;(-85);07:-64:361069;27-.06:63:09:303,5A6A22:-.3:6,56(52210-56;6:30E0253:60,62733:8876E;-)07-5(-876.06:-835(D06085980A>>®R6S:60,6437D:,:(564:39098:60/627(-;':647990D0;627-853.6;56253025:6,5678685987C0-6';:9876259760,685987E;)-07-5-8:6-7-653a640b60,6.795GG0765;87(580276(56953a656.79;60,D:356:6953a6,';8:-8:656.20;3:6' ;5.-.760-8:337(4:3:6,56.79:A>>®RS:6,6437D::(564:39098:607,G:3905,S:30)076.C: -86L5)5A |

;5086H54H3.H3295(01*H32HU3,5*84H3
| P37D,: (5630927-835876C5; 9:647990D0,06S7,);)07:-6 | ||
| I,62544; 220-5873:6-7-6906522:--:66S4056694:-856.74765:3643:(;8760,64;,95-8:6( ;,80E;-)07:-A | >RRR6A4453:221076-7-627,,G58765,563:8:6;;883025A>RRR6L'54453:221076/627,,G58765643:9:6( ;,804.;6765.6;-56205D5885>RRR6M5-25-)562733:-8:60-643:954>RRR6C544;220-5873:60-9:308760-6(7.76:33587A>RRR6G;598762032;0876;;883027A | >RRR66A9902;35390621:60,62576.065,0(-85)07:-690562733:-8:A>RRR66C7,,G53:6,'54453:221076.03:885(-8:65,5643:956.062733:-8:A66>RRR6V:30E0253:6,5643:9:-)56.062733:-8:627,,G5:-76;65,8376.094790076;;88302765,5(-85)07:-A>RRR6V:30E0253:6.065:3:60-9:308762733:885(-8:60,62544;220-5873:69;,56D59:6:621:6-7-6206905-76273406:9835:-68356D59:6:62544;220-5873:621:60(4:-0925-760,62733:8876E;-)07-5(-87A>RRR66R07,G:39065,6S:30)076C,0:-806L55)5A |
| I,62544;220-5873:6-7-6(7-8560,688:A | >RRR6F3;0-76-7-643:9:-8:-6:-,62544;220-5873:676-7-6599:(D,587/0-9:308762733:-8:A>RRR6P;95-8:6(-,80E;-)07:-65)07-58760-6(7.76:33587A>RRR6C544;220-5873:6G;5987A | >RRR6A9902;35390621:60,6E3;0-76905643:9:-8:F6599:(D,5876:0-9:308762733:885(-8:6:-,62544;220-5873:A>RRR6V:30E0253:6.06-7-643:(3:6;:-67,8:60,64;,95-8:6(-,80E;-)07:-A>RRR66R07,G:39065,6S:30)076C,0:-806L55)5A |
| S253956',5,08à6.,,56921C;(560,588:A | >RRR6F3;0-76-7-643:9:-8:-6:-,62544;220-5873:676-7-6599:(D,587/0-9:308762733:-8:A>RRR6C544;220-5873:676E3;0-76947321A>RRR6H;5-808à6.;,6,588:6-7-62733:885A>RRRL588:6-7-60.7:-7A>RRR6T:(476.06588:9568374476,-G768356E0:-643:4535)07:-6:627-9;(5)07:-A | >RRR6A9902;35390621:60,6E3;0-76905643:9:-8:F6599:(D,5876:0-9:308762733:885(-8:6:-,62544;220-5873:A>RRR6A9902;35390621:60,62544;220-5873:6:60,6E3;0-76905-764;000A>RRR6A9902;35390621:6,56';5-808à6.06,588:60-9:3085690562733:885F63094:885:-760,0:-,060:-02580A>RRR6P:36788:-3:6:-569210:(5625;567880(5;690627-90G,054;80,0))(53:6,588:60-8:376(4598730))(587676UHT)6E3:-76.56E3:76(4-8°C);0:-3:6:-569210;(56E3:-56780(5;690627-90G,056;80,0))(53:6,588:6923:(5876E3:-76.56E3:76(4-8°C))A>RRR6V:3953:6,5643:4535)07:-6788:-;856:-,5685))560(-0.0585(-8:6.74760,68:3(0:-6;:-,5643:4535)07:-6:627-9;(53,569;D087A |
| P37D,:(5630927-835876C5;9:647990D0,06S7.;)07:-6 | ||
| S415R6522:956,5(4:GG05-8:6.0627,73:637997A) | R6A4453:2210769;330925.,587A6R6G;598762032:0876.;883027A | R6A88:-:3:6';5,21:6(0;-876:630437 53:A.R6V:3E0253:621:60,6,588:6;80,0))5876-7-69056G0a698587630925.,R6S:7853:60,6,588:6.5,63:2040:-8:F63092052';53:6978876,52';56E3:..56:6304:8:3:60,6202,7A.R6R6R0 7,G:39065,6S:30)076C,0:-806L55))5A |
| F:730;920856.;6,588:6.5,62544;20-5873:A | R6H;5-808a6.;,6,588:6:22:99056R6R094:8853:606,0:-,060.-.0258064:36,568047,7G056.0643:4535)07:-A | R6R6R094:8853:606,0:-,060.-.0258064:36,568047,7G056.0643:4535)07:-A |
| I,6,588:6-7-6/698587630925.;587F6/630(59876E3.;..7A | R6P;95-8:6(;,80E;-)07:-65)07-58760-6(7.76:33587A)R6C544;220-5873:6G;5987A | R6R6V:30E0253:6.06-7-68:-3:643:(;8764:36|69:27-..060,64;95-8:6(;,80E;-)07:-A |
| L588:6837447625.;7676D3;20587A6 | R6H;5-808a6.;,6,588:6-7-62733:885A | R6A9902:353906.06-7-65:36;95876; -56';5-808a6.06,588:60-E:3073:65,6,0:-,76MINA |
| R6C544;220-5873:6G;5987A | R6R6R0 7,G:39065,6S:30)076C,0:-806L55))5A | |
| I,62544;220-5873:6/63; (73797A6) | R6C7(47:-806-7-60-985,,58062733:885(-8:60,6E3,-0-7A) | R6A9902:353906.065:360-9:308762733:885(:-8:60,6E3,-0-7A |
| R6P;9:-)56.06273406:9835:-0A | R6R6A9902:35390621:60,6274:32107690562733:885(:-8:60-9:3087A | |
| R6P;9:-)56.06273406:9835:-0A | R6R6A9902:35390621:6,654453:22107690564790)07-58769;6:-405-76985D0;A | |
| R6P;9:-)56.06273406:9835:-0A | R6R6A9902:35390621:65, '0-8:3-76.:62544;20-5873:6-7-6206905-76273406:9835:-.068356D59:6:62544;220-5873:621:60(4:-0925-760,62733:8876E:-)07-5(-87A | |
| M5-2585643:4535)07:-6D:5-.56E3:.5A | R6P;95-8:6(;,80E;-)07:-65)07-58760-6(7.76:33587A)R6C544;220-5873:6G;5987A | R6A9902:353906.0643:(3:6:68:-3:643:(;8764:36|69:27-..060,6E3,-0-7A |
| R6R6R0 7,G:39065,6S:30)076C,0:-806L55))5A | ||
;5086H54H3.H3295(01\*H32HU3,5\*84H
| P37D::(5630927-835876C5;9:647990D0,06S7,);07:-6 | ||
| L5643:4535)07:-6906E:3(569;D0876.7476,'5 07A | »R|R6C544;220-5873:6837447625,7A»R|R6U80,);7627-6,588:625,7A»R|R6C544;220-5873:6G;5987A | »R|R6S2052';53:60,62544;220-5873:627-652';56E3:..56:6:3953 06,588:6E3:..7A»R|R6N7-630;80,);53:627-6,588:6G;630925,..587A(U80,));53:6,588:6E3:..7A»R|R66R0 7,G:39065,6S:30)076C,0:-806L5)5A |
46 The machine rear features two outl: 89681 58625-6D; 6; 9: .6 for the power cord. You should us : 681 : 6(79869; 085D); 6 outlet for your needs.
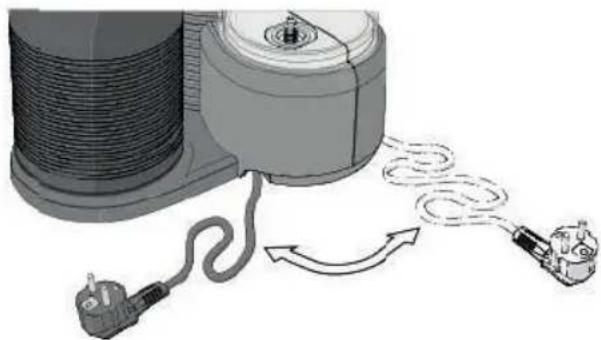
565F08681:69;44,y64.;G60-87681:647w:367;8.:8A
66P3:9967-:67E6681:669w0821-7-/9;44,y6D:887-9687659w08216 81:6(52210-:67-A6
76T1:627EE::6(5210:-6985389681:61:580-G62y2;6T1:69w0821-7-/9;44,y6D;887-96w0,6985386D,0-Bc-G687656,G186w108:A
1ND5:JH1/8/9/9;BJHNO 0K9B45HO;HN244k/8/93:JHKn-:9..JH1X 4H94C8/9.WJ8O/'4HC.5--K25884H.T/93:JHKwXN29N :9K;.93H.C89/8/9K9H3K4C8/9/N;BJH1No0K,
86T1:6(5210:-6w0,6D:63:5.yE736;9:6w1:-681:69w0821-7/-6 9;44,y6D;887-96,G186;468765698:5.yw108:6,G186w108:6,G184
966A866E03986647w:3-7-F669;44,y665866,:59866OA566,083:9667E66w58:36 w0817;862549;.,64,520-G65627-850:-36;..:3681:627EE:-6 947;8A
:.4)-(F3G84,:H54
1KT49H.5:98/9H9:1 K04H.9:E;8J4H8/9H1;0/JH9H;5841;8' J0;X N.;..9.K848/9H.8;H3'2 N 439H;C89:HJ589.N4CH48N 29JH1N5.93NT/9H;0/JH9N0;H29N.9848/8N.8;H3'2 N 439N 1;H5;X BACJ...B4C8/9ANJ H589."ABJ 9B2 N99-JH1K248/N258 84H.N.-9.9334wHC4:N;B8N. ..8K3N.904H3..NT/J.N 439NU.H' 3J0;893N2 W/9W.J8O/JH1K4CO4D8/9N25884H.NT/9M ;0/JH9N 0;HN29H:9;08JE;893N-9.JH1N/9N25884H.K:1;JH,
9:4-3: 13* HOD3G95: 193
66B94:98/9M--K;H09JL.5.93AC4:H8/9NCL:8N8JI 98H4:IN:C89K 9x89H393K-9:143.4CH H4H'5.98J8H./45K3X298/4:451/K 089;H93H..39.0:293WHA8/9M.908J4H.4* .H4:14.4,13 .4)3,01.4H4-"
66: h B3appl ancC3scan3only3bC3opCraAc3w Ah3or g nal3 accCBBor CB3 prov dCd3 by3 AhC3 manufacAurCr.3 4 o3 1 - ab 1 Ay3w ll3bC3aBBumC3forany3damagC3cauBC3by3 m BuBC3of3AhC3m lk3froAhCr3or3non-compl ancC3w Ah3 AhC3 nBAruc onB3conAa nCd3 n3Ah B3manual.
66T1:6E398680( :6y7; 6; 9:681:6(0,B6E3781:3F63: (7:65,6253. D753.65-.64,598026452B5G0-G6I-9:38681:6(0,B6E3781:367-6 81:647w:36D59:F6(5B:69;3:68764790807-60862733:28,y#6
WW/9HNUH.9:8JH1N8/9NJJKKRC:48/9:N4HN8/9H-4W9:H2;9SN8/9N ;--KJHO9JWJNN.45H3H;NX4H1N;045.8JONJ1H;

66: h B3applanc3haB3only3bCCn3dCB gnC3Ao3hCa3and3 froAh3m lk.3) 03noA3puA3any3oAhCr3AypCB3of3l qu d3or3 Bol d3BubBAancCB3 n3AhC3conAa nCr,3oAhCr3Ahan3AhoBC3 nd caACd3by3oavazza.3) 03noA3lCavC3AhC3m lk3froAhCr3 unguardCdwhCn3opCraA ng.3) 03noA3lCavC3AhC3m lk3 froAhCrunaACndCdwhCn3 n3uBC.
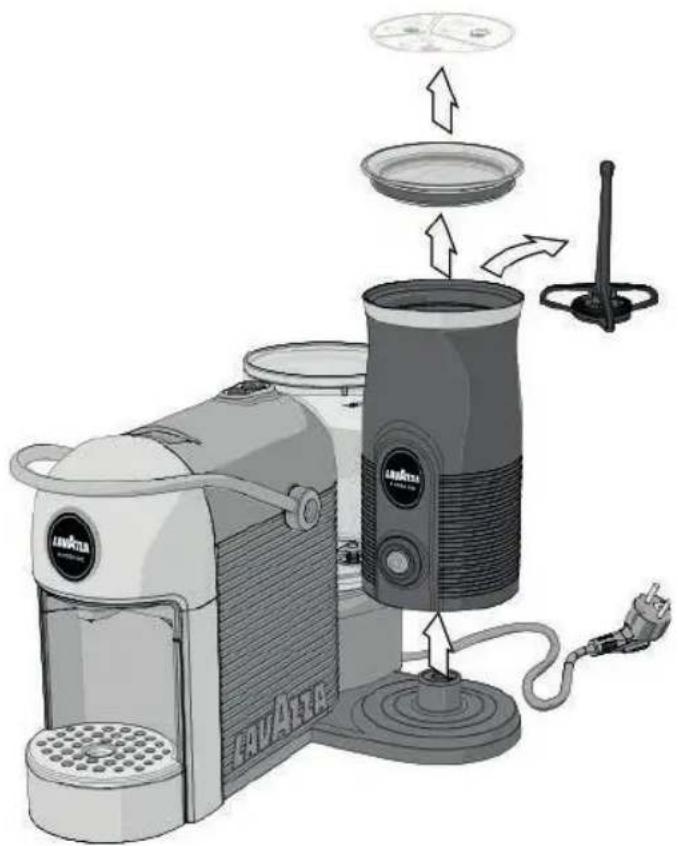
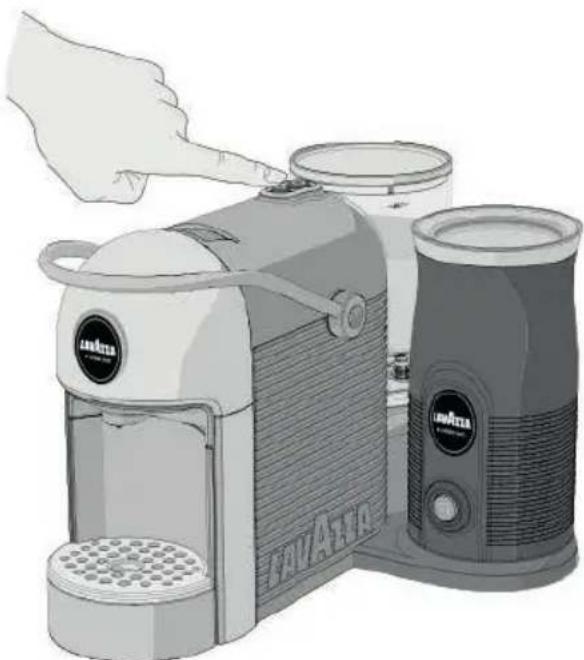
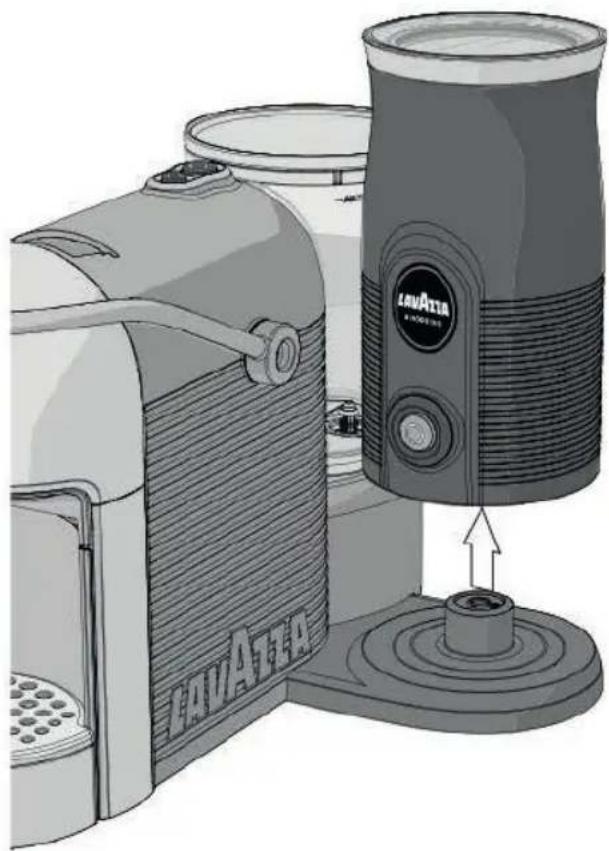
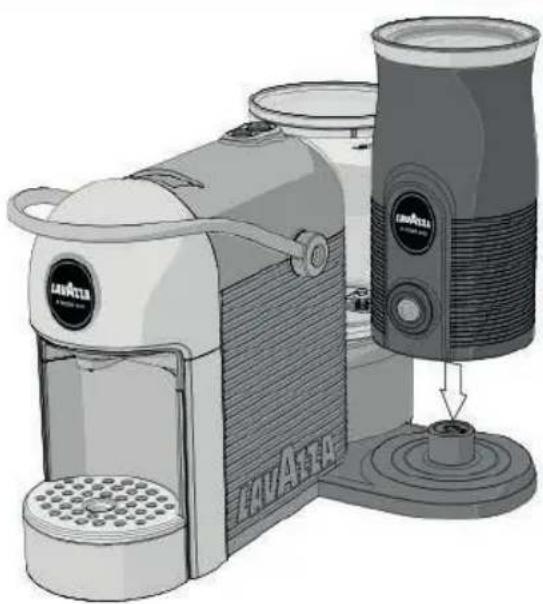
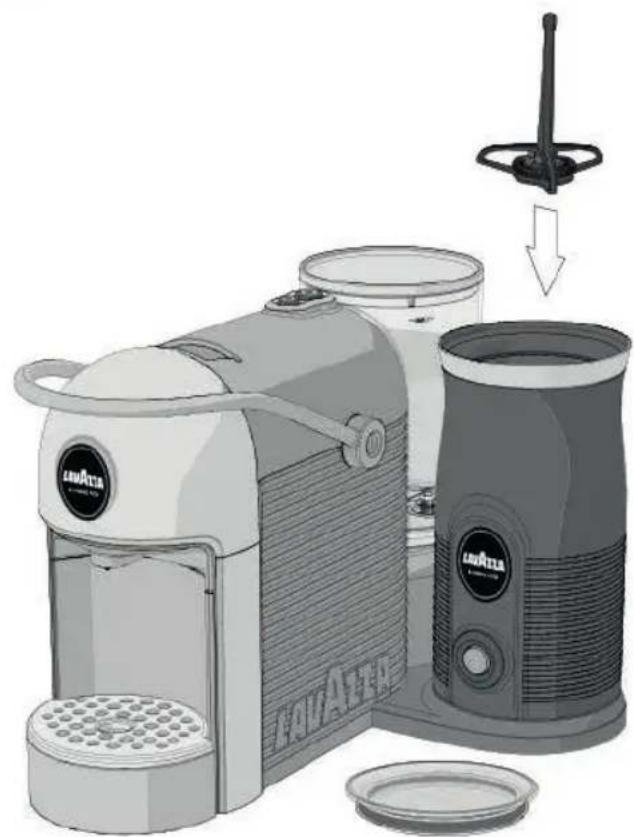
Before using the appliance carry out a preliminary cleaning cycle.
1 66R:(7:681:627:3665-.6E0,.6681:6(0,B6E3781:36w0816E3:91F6 -7--5:358:.6.30-B0-G6w58:36;4687681:6*HoD3.:,6(53B6 (1206(
2 66P;8681:627:367-681:6(0,B6E3781:3A
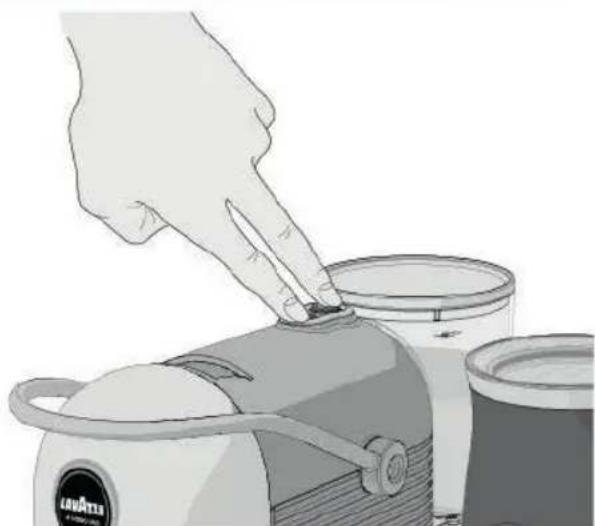
P3:9981:6( ;,8E; -2807-4D; 887-687698538681:62.; 5-0-G62y2;
46T1:6544,05-2:697:-.9656.7:D:6527:9802690G-5,68760.-0-258:681:6:-.67E681:62.:5-0-G62y2:46
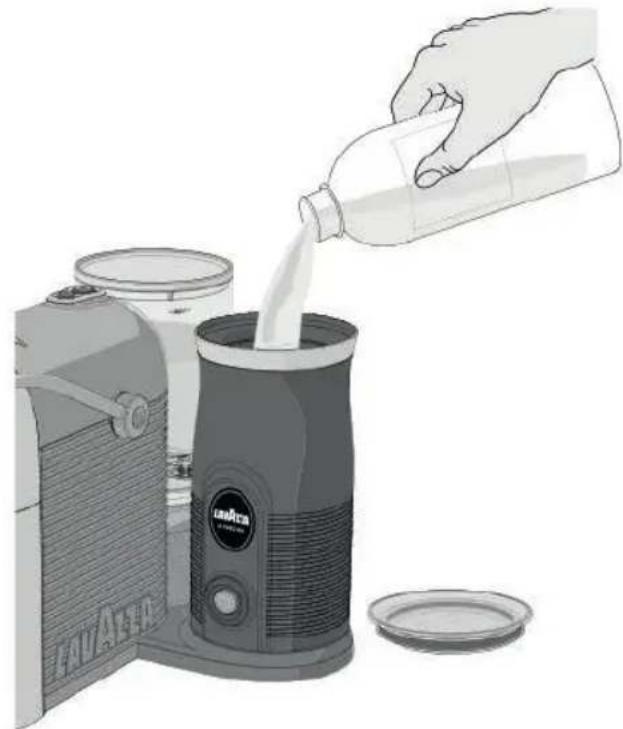
56R:(7:681:66(0,B6E3781:36E37(681:6D59:F6:(48y60865-.6 2,:5-65,681:627(47:--89%

2912. 9H4-3: 13,5GG11
1;291;;53) 10HE19F
iM: k9.5:9/8; 8/9.wJ80/'4H.C-25884H.KJ1/8.N5-84N;K89;3KW/J89NJ/8,
34 CvCr3puA3fingCrB3or3objCcAB3 n3AhC3capBulC-holdCr.3 5 nly30avazza33sNODOMolC3capBulCB3 muBA3bC3 nAroducCd3 n3AhC3capBulC-holdCr.
6 33; nglC-doBC3capBulCB3arC3prCparCd3Ao3d BpCnBC3onC3 coffCC/producA.35 5 34 5: 3uBC33AhC3capBulCB3morC3 Ahan3onC.3hNBCrA ng3Awo3or3morC3capBulCB3can3cauBC3 AhCmach nC3Ao3malfuncA on.3
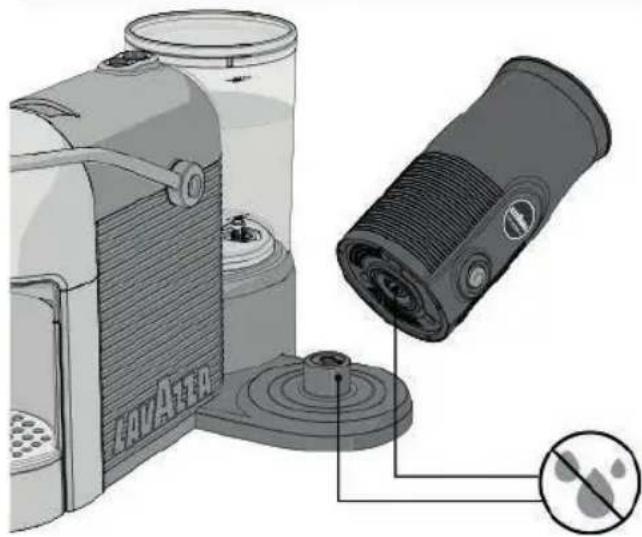
16 P,52:681:62;46:-:3681:627EE::6.094:-9:36E736562,599026 943:997
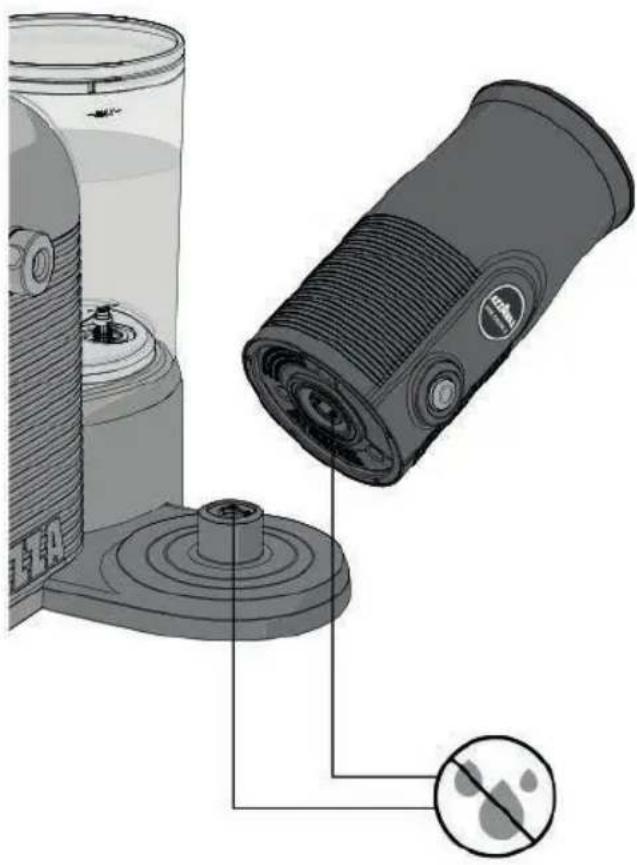
6akC3BurC3AhC3m 1k3froAhCr3baBC3 B3alwayB3dry.

W9M:9041/9H3K8;845N/45K3N8;K9N8/9N;29M4CO8/9M04E9:M 29C4:945kW;./NUBILHA;3J/w;./9;
| × | × | √ | √ | √ | |
| √ | √ | √ | √ | √ | |
| × | × | × | √ | √ |
| P37D: (6:-27; -8:3; .6P7990D: 625; 9:96S7; .807- | ||
| M5210:- 6.7: 96-7868; 3-67-A P7w: 36,0G1 896353: 67EE65E8: 36 15 0-G643: 99: .681: 69w0821-7-/6 9; 44,y6D; 887-9A6 | \( \gg \)R@6M5210:- 6096-78627--: 28: .687 81: 647 w: 3697; 32:A \( \gg \)R@6T1: 6( 5210:- 609627--: 286876 47 w: 36983046-786w73B0-GA \( \gg \)R@6P7w: 369; 44,y6-78643: 9:- 8A | \( \gg \)R@6C7--: 28: .681: 6( 5210:- 687681: 647 w: 3697; 32:A \( \gg \)R@6C7--: 28: .681: 6( 5210:- 6.03: 28,y687681: 647 w: 3697; 32:A \( \gg \)R@6C7--: 2865-781: 36: . 02: 687621: 2B681: 647 w: 369; 44,yA \( \gg \)R@6IE681: 6437D.: ( 63: ( 50-64: .59: 627-85286L5 5))56 C; 987( : 36S: 3 02:A |
| T1: 6( 5210:- 63: ' ; 33: 9656,7867E6 8G: 68761: 586; 4A | \( \gg \)R@6M5210:- 698735G: 6586,7w6 8:( 4: 358; 3: 966 ( : AG&62:: ,53/G535G: )A \( \gg \)R@6T1: 6( 5210:- 61596,0( : 925,: 6 D; 0.. :- 4A | \( \gg \)R@6S873: 681: 627EE: : 6( 5210:- 60-6564374: 36: - 037:- ( : -86 5-. 63: - 6269; 44,0: 96w0817; 862549; .9A \( \gg \)R@6D: 925: .681: 6( 5210:- A \( \gg \)R@6IE681: 6437D.: ( 63: ( 50-64: .59: 627-85286L5 5))56 C; 987( : 36S: 3 02:A |
| T1: 6( 5210:- 6096: 3y6-709y46»R@6M5210:- 6-7860967-65E,5865.- . 6 985D: .69; 3E52:A \( \gg \)R@6P7w: 369; 44,y625D: .60-2733: 28,y8@6C1: 2B681: 62733: 2864790807-67E681: 625D: .60-87681: 6D59: 67E681: 6( 5210:- A \( \gg \)R@6M7 5D: .6453896-786E088: .6 4374: 3,yA \( \gg \)R@N76w58: 360-681: 685-BA \( \gg \)R@C549: .6-78643: 9:- 8A | \( \gg \)R@6C1: 2B681: 69; 3E52:A \( \gg \)R@6C1: 2B681: 62733: 2864790807-67E681: 625D: .60-87681: 6D59: 67E681: 6( 5210:- A \( \gg \)R@6F08681: 6( 7 5D: .64538964374: 3,yA \( \gg \)R@T746: 4681: 685-B6w0816E3: 916. 30-B0-G6w58: 3A \( \gg \)R@I-9: 386L5 5))562549; .673627( 4580D: .A \( \gg \)R@6IE681: 6437D.: ( 63: ( 50-64: .59: 627-85286L5 5))56 C; 987( : 36S: 3 02:A | |
| N769: 44,y46»R@6E:: 283025,6E50; | 3: 86D: 887-96-786 w73B0-GA \( \gg \)R@N76w58: 360-681: 685-BA \( \gg \)R@6T5-B6-7860-9:38: .62733: 28,yA \( \gg \)R@6P7w: 3-7-6E50:: .A | \( \gg \)R@6P3: 9967:- 67E681: 6D: 887-965:- .621: 2B681: 674: 35807-67E6 81: 640,786,0G186(ON6w0816w108: 6D,0-B0-G6,0G18)65:- .681: 6 (5210:- 647 w: 3-7-A \( \gg \)R@T746: 4681: 685-B6w0816E3: 916. 30-B0-G6w58: 3A \( \gg \)R@6I-9: 38681: 685-B62733: 28,yA \( \gg \)R@R: 4: 58881: 627EE: : 6( 5210:- 647 w: 3-7-64372: .3:A \( \gg \)R@6IE681: 6437D.: ( 63: ( 50-64: .59: 627-85286L5 5))56 C: 987( : 36S: 3 02:A |
| P37D.; (6:-27; -8:3; .6P7990D); 625; 9:96S7.; 807- | ||
| W58:36.; 5B9658681; 63: 53690.; 67E681:627EE; : 6(5210;-A) | »R»R»T5-B6-7860-9:38; .62733:28,yA»R»R»T5-B6.5(5G; .A) | »R»R»I-9:38681:685-B62733:28,yA»R»R»C1:2B6E736.; 5B960-681:685-B6B; : 40-G60869:45358:6E37(681:6(5210;-A»R»R»IE681:6437D.; (63:(50-64;59:627-85286L5))56C; 987( :36S:302:A) |
| W58:36.; 5B9658681; 6E37-8690.; 67E681:627EE; : 6(5210;-A) | »R»R»S4:-862549;.; 6.35w:36-7860-9:38; .62733:28,yA»R»R»S4:-862549;.; 6.35w:36E0;.; .A»R»R»C549;.; 698; 2BA»R»R»C549;.; 6-78627(4580D; .A | »R»R»I-9:38681:694:-862549;.; 6.35w:362733:28,yA»R»R»E(48y681:694:-862549;.; 6.35w:365- .681:6.3046835yA»R»R»L.E865- .6,7w:3681:62549;.; 6,75.0-G6; : 3461E681096096-786;-7; G1F6.0927-: 28681:6(5210:-6E37(647w:36(50-965- .674:358:6(5-;5.,y68763: (7:681:62549;.; 6E37(681:6; .28A»R»R»U9:6L5))562549;.; 9673627(4580D; .9A»R»R»IE681:6437D.; (63:(50-64;59:627-85286L5))56C; 987( :36S:302:A) |
| T1:6,75.0-G6; : 36.7:96-7863:521681:69; 44.y64790807-67363;0; 03:965-6;x2:990:62,790-G6: EE738A | »R»R»S4:-862549;.; 6.35w:36E0;.; .A»R»R»C549;.; 6E088: .60-2733:28,yA | »R»R»E(48y681:694:-862549;.; 6.35w:3A»R»R»R:4:58681:69; ' ; -2:F6; : 360-681:67EE64790807-F6; : 360-681:6D3: w0-G64790807-C6E681096096-786;-7; G1F674:358:6(5-;5.,y68763: (7:681:62549;.; 6E37(681:6; .286W81681:6(5210:-6.0927-:28; .6E37(647w:36(50-9A) |
| R: .6E,5910-G6,0G189@46>>R»R»M5 | 210:-6D37B:-A»R»RC7-85286L5) | 56C; 987( :36S:302:A) |
| P0,786,0G1896ON@46w0816w108; 6,G1865- .6D,0-BG-E598A | »R»R»S4:-862549;.; 6.35w:36E0;.; .A»R»R»E(48y681:694:-862549;.; 6.35w:365- .643:9967:-67E681:647w:36/79;44,y6D; 887-968763:9:8681:6(5210:-A | »R»R»E(48y681:694:-862549;.; 6.35w:365- .643:9967:-67E681:647w:36/79;44,y6D; 887-968763:9:8681:6(5210:-A |
| T1:627EE: : 6E,7w967; 868776E59865- .6-7623; 5(y0E37816E73(967-681:69;3E52:A | »R»R»C549;.; 6-78627(4580D; .A»R»R»C549;.; 65,3:5.y6; 9; .A | »R»R»66U9:6L5)562549;.; 9673627(4580D; .9A»R»R»B30-G681:6; : 36D52B68763:9864790807-65- .6,75.656:-w2549; .A»R»R»IE681:6437D.; (63:(50-64;59:627-85286L5))56C; 987( :36S:302:A) |
| P37D,: (6:-27; -8:3; .6P7990D: 625; 9:96S7.; 807- | |
| T1:627EE:609627, A6»®®6C7EE: 647; 3967; 860-6.3749f8w58:362132;0862,7GG.: A>>®®6T1:6(5210:-61596,0(:925;6D;0..-;4A | >>®®6R:-681:6(5210:-6w5910-G62y2.;A>>®®6D:925;6(5210:-A>>®®6IE681:6437D;:(63:(50-64;59:627-85286L5))56C;987(:36S:302:A |
| D094:-9:627EE:60960-9; EE020:-86736:x2:990:A | >>®®6I-2733:286.79:6437G35(0-G6>>®®6P37G35(681:627EE:6.79:64374:3,yA>>®®6IE681:6437D;:(63:(50-64;59:627-85286L5))56C;987(:36S:302:A |
| C7EE:6-7869;440; .65-.698:5(627(0-G67;867E681:62549;:.627(4538(-8A | >>®®6T1:6,75.0-G6;:36w596-7869:87681:6D3:w0-G64790807-A>>®®6IE681:6437D;:(63:(50-64;59:627-85286L5))56C;987(:36S:302:A |
| C7EE:647;3967;860-6.3749%>®®6F5; .8y62549;..A>>®®6P; (46w73B0-G60(4374:3,yA>>®®6S47;8/w58:362132;0862,7GG;..A>>®®6T1:6(5210:-61596,0(:925;6D;0..-;4A | >>®®6R:4,52:681:62549;..A>>®®6C1:2B6E7365D-73(5,6-709:67E681:6(5210:-A>>®®6C;5-681:627EE:6.094:-90-G6948;86(9::6MAINTENANCE6AND6CLEANING)A>>®®6D:925;681:6(5210:-A>>®®6IE681:6437D;:(63:(50-64;59:627-85286L5))56C;987(:36S:302:A |
| O:-67E681:68w76D;887-96096-786w73B0-G65-.681:63;:.5-86LED60967EEA | >>®®M:215-025,6D,72B0-G>>®®3y687647w:3681:6(5210:-67EE6Dy6.0927--:280-G681:647w:364;G6E7361069:27-9681:-63:27--:2860846P7w:3681:6(5210:-67-65-621:2B681:62733:28674:35807-67E6D7816D:887-9A>>®®6IE681:6437D;:(64:390989F681:6(5210:-625-627-80;-:6876D:6;9:-6w081681:6781:36D:887-C60-681996259:F681:6D:887-6w73B0-G63;G;53,y6w0,-6-76,7-G:3615:681:65;87(58026.790-G6D;86w0,-6D:6E3:6.790-G65-..681:6;9:36w0,-6. :20. :6w1:-6987440-G681:6.79:A>>®®6IE681:6437D;:(63:(50-64;59:627-85286L5))56C;987(:36S:302:A |
| P37D,: (6:-27; -8:3; .6P7990D) | 625; 9:96S7.; 807- | |
| T1: 6(0,B6E3781:36.7:96-7869w082167-A6P7 w: 36,0G1867EE6○65E8: 36150-G643:99: .681:6( ;.80E: -2807-6D; 887-A) | >>R@6A44,05-2:6-78627--:28: .68781:6::283028y6G50.A>>R@6T1:6::02:609627--:28: .6876( ;.804, .67; 8: .89673647 w: 36D534>>R@6N762; 33: -8658681:62; 33: -867; 8: .84>>R@6M0,B6E3781:360-9:38: .60-2733:28,yA>>R@6E.: 283025,62032; 086E50.; 3:A | >>R@6M5B: 69; 3: 681: 647 w: 36273. 60964374: 3,y64.; GG: .60-87681:62; 33: -867; 8: .84>>R@6C7--: 28681:6: .02:6.03: 28,y687681:62; 33: -867; 8: .846>>R@6C7--: 2865-781:36: .02:687621:2B681:647 w: 369; 44,yA6>>R@6M5B: 69; 3: 687615: 60-9:38: .681:6(0,B6E3781:362733:28,y67-681:6D59:65- .68158681:3:653:6-76E73:0G-6D7: .0%D: 8w: -681:6D59:65- .681:6(0,B6E3781:368158643: -864374:3674:35807-A>>R@6C7-85286L5 5))5'96C; 987( :36S:302:A |
| T1: 6(0,B6E3781:36.7:96-786E3781681:6(0,BA) | >>R@6W109B6-78643:9:-860-681:6(0,B6E3781:36736-786599:(D,../0-9:38: .62733:28,yA>>R@6M: .80E: -2807-6D; 887-643:99:0-2733:28,yA>>R@6M0,B6E3781:36.5(5G: .A>>R@6C7-85286L5 5))5'96C; 987( :36S:302:A | |
| P7736'; 5,08y6(0,B6E378146>>R@6W109B6-78643:9:-860-681:6(0,B6E3781:36736-786599:(D,../0-9:38: .62733:28,yA>>R@6M0,B6E3781:36736w109B6.038yA>>R@6I-2733:286'; 5-808y67E6(0,BA>>R@U-9;085D: .6(0,BA>>R@6T1:6876w5868776,7-G6D:8w:-.67E643:4535807-65- .685B0-G67E681:69:..28: .6D: .35G:A | >>R@6M5B: 69; 3: 681: 6w109B609643: 9:-86599:(D,..65- .60-9:38: .62733:28,y60-681:6(0,B6E3781:3A>>R@6M5B: 69; 3: 681:6(0,B6E3781:365- .681:6w109B653:62; 5-A>>R@6M5B: 69; 3: 68158681:62733:286'; 5-808y67E6(0,B61596:D:-6;9:.F63:94:280-G681:6: ..96917w-A>>R@6F7367480(5,6w53(6(0,B6E75(Fw: 63:27( :..6;90-G6; -9B0( ( ...6(0,B6(4598: .30): .6736UHT)F63:E30G:358: .6(4-8°C);90-G6B0( ( ...6(0,B6(4598: .30): .6736UHT)F63:E30G:358: .6(4-8°C);80: -.67E681:643:4535807-67D850:-.60-681:62; 46.03:28,y65E8:3681:6: ..67E681:643:4535807-65- .6.30-B60860( ( ...058: .yA | |
| P37D,: ( 6: -27; -8: 3: .6P7990D,: 625; 9: 96S7,.; 807- | ||
| R: .6E,5910-G6,G18@6»R@6A44,05-2:67 :31:58: .46 | >>R@6E::283025,62032; 086E50,.; 3:A | >>R@6W508656E: w6(0:8:965: .683y65G50-A |
| >>R@6M5B: 69; 3:681:6(0,B6y7; 653:6; 90-G61596-786D: -61:58: .6y:84 | ||
| >>R@6E(48y6(0,B6E37(627-850: .3630-9:6; - .3627..6w58:365- .63: 4:58681:62y2,);A | ||
| M0,B6::5B0-G6E37(681:6(0,B6E3781:3A) | >>R@6Ex2:990:6(0,B65(7: -846>>R@6OD9:3:681:6;:.960: .0258: .6E73681:68y4:67E643:4535807-A | |
| T1:6(0,B61596-786D: -61:58: .F60863:(50:-.627,);A | >>R@6M; .80E: -2807-6D; 887-643:99:0-2733:28,yA | >>R@6M5B: 69; 3:6y7; 615:6-786;9: .65-65(7: -867E6(0,B6D: .7w681: .6MIN6,:.A |
| >>R@6M0,B6E3781:36.5(5G: .A | >>R@6C7-85286L5)5'96C; 987( :36S:302:A | |
| T7761786736D; 3-86(0,B46>>R@6I-2733:286'; 5-808y67E6(0,B46> | >>R@6M5B: 69; 3:6y7; 615:6-786;9: .65-65(7: -867E6(0,B6D: .7w681: .6MIN6,:.A | >>R@6M5B: 69; 3:6y7; 615:6-786;9: .65-65(7: -867E6(0,B6D: .7w681: .6MIN6,:.A |
| T1:6(0,B6E3781:36096-709y46>>R@6C7(47:-8960-985,:.60-2733:28,yA | >>R@6M5B: 69; 3:687615:60-9:38: .681:6w109B62733:28,yA | >>R@6M5B: 69; 3:68158681:6,0.60964374:3,y6E088: .60-8764,52:A |
| >>R@6P3:9:-2:67E673:0G-6D7.0:9A | >>R@6M5B: 69; 3:6-76E73:0G-6D7. y609643:9: -860-90: .681:6(0,B6E3781:3A | |
| >>R@6M5B: 69; 3:681:3:653:6-76E73:0G-6D7.0:96D:8w: -681:6D59:65:-.681:6(0,B6E3781:368158643: -864374:3674:35807-A | ||
| C7..6D: :35G: 643: 4535807-6E50..A | >>R@6M; .80E: -2807-6D; 887-674:358:0-2733:28,yA | >>R@6M5B: 69; 3:687643:9965:-.617; .643:99: .681:6(.80E: -2807-6D; 887-6E736169:27:-.9A |
| >>R@6M0,B6E3781:36.5(5G: .A | >>R@6C7-85286L5)5'96C; 987( :36S:302:A | |
Contact Lavazza Customer Service for any problem or failure not included in the above list.
| P37D,: (6:-27; -8:3: .6P7990D) | 625; 9:96S7.; 807- | |
| P3: 4535807-6987 49691738,y65E8: 36 985380-GA | >>R@6T7761786(0,B6E3781:3A >>R@6W53(6(0,B6;9:..A >>R@6M0,B6E3781:36.5(5G:..A | >>R@6R0-9:681:6G,5996w081627..6w58:365-.647;3627..6(0,BA >>R@6D76-7863:9:6w0816(0,B65,3:5.y61:58:.A6U9:627..6(0,BA >>R@6C7-85286L55))5'96C;987(:36S:302:A |
:1,4H. .03;21,HGH,.:H54;
-66N7(0-5,6V7,85G:6-6P7w:36R580-G6-6P7w:36S;44,y8666
S:6,5D:67-681:6544,05-2:
-6M:59;3:(:-898666H:0G1866666W.81666666D:481
W58:3685-B860F66L6(2042867))6-6R:(75D,:68y4:6
H7:90-G6(58:305,926T1:3(74,598026
-6C5D.; 6L: -G81260F86(6|14960-)
-6T1:3(76E;9:9
33) CBA naA on3d/uBagC:3
C:8654453:0,6:986. : 980- é6à6ê83: 6; 80,09é6. 5-96,: 96544,025807-96( é-5G/3: 96: 8690( 0,503: 9F6 8:.,:96' ;:&6
!66.5-96:96)7--:969:3 5-86. :62;090:-F63é9:3 é:965;64:397--: ,F6.5-96.:96D;3:5;x6:86.5-96.'5;83:96(0,0::x6437E:9907--: ,9C6
!6.5-96:96;90:-906
!6680,095807-64536,:962,0:-896.:961O8:9F6(78:9F6:865;83:96:-.370896a6253528/3:63e90.:-80:6
!6.5-96:9640/2:96.:68y4:6D:.65-.6D3:5BE598A
L'; 80,095807-60(43743:6. : 6,'54453:0,64: ; 8625; 9:36. : 965220. : -89A6
I,6:9860-8:3.086.'544738:36.:96(7.0E025807-968:21-0';:946
L'54453:0,64:;86e83:6;80,09e64536.:96:-E5-896a64538036.:6865-967;64536.:964:397--:96
5:26.:962545208é9641y90';:9F69:-9730;.,:967;6(-85,:963e.;08:967;6:-273:64536
:964:397--:960- :x4é30(-8é:967;6- :64799e.5-864596.;9627--50995-2:96-é2:99503:9
a627- . 0807- 6' ; ' : ,: 96970: - 869; 3 : 0,é: 967; 6' ; ' : ,: 9650: - 863: C; 6. : 9627- 90G- : 963: ,580 : 96
a6,’; 80,095807-6. : 6,’54453: 0,6:-687; 8: 69é2; 308é6: 865; x6309’; : 96’; ’0,627(47386
L:96:-E5-896:-6.70:-864596j7; :365:26,’54453:0,A6L:9674é35807-96.:6:-887y5G:6:86.:6
(50-8: -5-2: 6. : 6, '54453: 0,6. ; 63: 997386. : 6, '; 80,0958: ; 36:-6. 70:-864596e83: 6: xé2; 8é: 964536
:96:-E5-89695-969;3 :0,,5-2:A
1mplacCmCnA:
P,52:36,56( 5210- : 6. 5- 96; -6:- . 370869u3F67 u6:: ,: 6- : 6309' ; : 64596. : 69: 63: - : 39: 367; 6. : 6
D. 99: 36; : , ; , ; - A 6 ~N: 6459627 - 9: 3: 36, 56 (5210-:6a6;-:68:(4e358;3:60-Eé30;3:6a65°C
2536,: 6G: ,647; 335086,': -. 7( ( 5G: 3A6N: 64596; 80,09: 36,56( 5210- : 6:-64,: 0-6503A6
N:64596479:36,56(5210- : 69; 36. : 969; 3E52: 9683/96215; . : 96: 8/7; 6a6437x0(08e6. : 6E,5( : 96
,0D3: 9A6L7396. : 6, ; 80,095807 - F6,56( 5210- : 6a625Ee6- : 6. 708645969: 6837; : 36. 5- 96; - : 653( 703: A
A. 1 mCnAaA on:
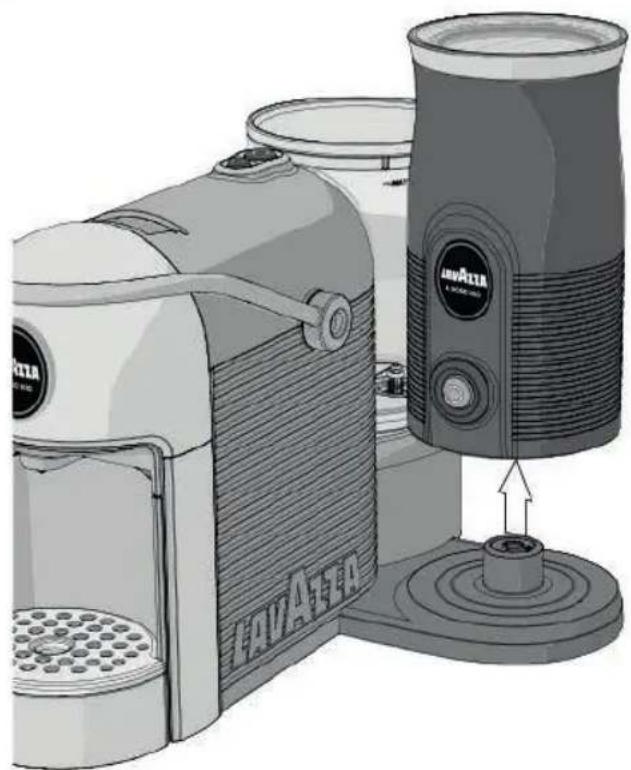
B35-21:36,56(5210:-6a625Ee6;-0';::(-86a6;:-64309:69:28;3654437430e:6:863;0e:6a6,56
8:33:A6
L568: -907-6. 70862733: 947-.3: 6a62: :, 60-.0'; é: 69; 36,564,5'; : 88: 6. : 6,56(5210-:A

;É,89H:É
A6, ablC3d/ al mCnAaA on:3
N: 64596; 80,09: 36,56 (5210- : 6906.; 62aD.; 6. '5,0 ( : -85807-6: 986. eE: 28; ; : xA6
S06.; 62aD.; 6. '5,0 ( : -85807-6: 986: .. 7 ( (5GeF60,6. 7086e83; 63: (4,52e64536.; 6E5D3025-86
7; 6453697-69: 3 02: 6. '5990985-2: 68: 21-0' ; F65E0-6. 'e 08: 3687; 86309'; : A6
N: 64596E503: 64599: 36; . 62aD.; 6. '5,0 ( : -85807-64536; . 96270-9F69; 36. : 965-G; . 96 OE967; 6
5; -. 99; 96. '7Dj: 89683/96215; . 9A6N: 645964738: 367; 6803: 36,56 (5210- : 6:-6,568:-5-864536
, . 62aD.; A6N: 64596: x83503: 6,56E021: 6:-6,568035-864536; . 62aD.; C6:- . 64596,5687; 21: 365: 26
, . 96 (50-96(7;0,,e: 9A6E 08:36'; : 6; . 62aD.; 6. '5,0 ( : -85807-6:- . 64:- . : . . . . . . . . . . . . . . . . . . . . . . . . . . . . . . . . . . . . . . . . . . . . . . . . . . . . . . . . . . . . .
6) angCr3d/élCcArocuA on:
L:9645380:9697;(09:96a68:-907-6é,:2830';:6-:6.70:-864596:-83:36:-627-852865:26 .:6,':5;A6C:8654453:0,6-:6.70864596e83:60( (:3GeA
32 roACcA on3dCB3CnfanAB3Cn-dCBBouB3dC383anB:
L: 96: -E5-896.70: -86é83: 69; 3: 0, é9647; 36E503: 6: -69738: 6'; '0,96:- 6j7; : -8645965:26,'54453: 0,A6L: 96: -E5-896:- 69: 63: .. : -86459627( 48: 6.; 6.5-G: 36,Oé65; x654453: 0,96é,: 2837( é-5G: 39A6N: 64596,5099: 36à6,: ; 364738é: 6,: 96( 58é30: ,96; 80,09é9647; 36: ( D5,: 36,56( 5210:- A
3)angCr3dC3brulurCB:3
N:6459687;21:36,:9645380:96215;:.96(G37;4:64738:-2549;:.9F6:82A)60( (é.058:(-86 543/96,';80,095807-6. :6,'54453:06P:-.5-86,56.09830D;807-6. :6,56D70997-F643e8:36588:-807-6 a6.'é:-8;:.96j:896. :6,0';0. :6215;.
64 CAAoyagC:3
A 5-86. : 6- : 887y: 36,56( 5210- : F60,6: 9860- . 094: -95D., 6. : 6. éD35- 21: 36,56E021: 6. : 6,56
4309: 6. : 627; 35-86: 86588: .. 3: 6' ; 6,56( 5210- : 63: E370.099: A6 N: 645960( (:3G: 36,56)
( 5210- : 6. 5-96,': 5; !6I,6: 986983028: (: -860- 8: 3. 086. : 68: -8: 36. '7; 3036,56( 5210- : A6
R: ( 4,52: 36,': 5; 6. 5-96,': 63é9: 3 70365; 6D7; 86. : 6I 6j7; 396. '0- ; 80,095807-A6
P7; 36é 08: 36. ':..7' ( ( 5G: 36, '54453: 0,6,7396. ; 6- : 887y5G: F6- : 64596; 80,09: 36. : 6
. é8: 3G: -8965,25,0-96( 5096; -6210EE7-697; 4.: 60( D0Dé6. '; -6. é8: 3G: -86. é,0258A
ConBervationdGia machine:3
64 CpaB3uA 1 BCr3lC3mouBBCur3a3la A3BanB3avo r3 nArodu A3 Ic3fouCA.

6R:803:36.;627; :32.; 6. ; 6(7:99; :36a6,508

6I-9e3:36.;6E7;86a6,0-8e30;36.;6(7;99;36a6,508

$R: (: 883:6,:627; :32,:69; 36,:6(7;99: ;36a6,508a6
PREMIERCYCLE DE METTOYAGE1UBIIBATION
36B5099:36;6;0:36. :62153G: (: -86. :962549; :, 9647; 36E: 3- (:36;6,7G: (: -86a62549; :, 9A
4 66A44; y:36:86(50-8:-036:-E7-2e:64:-.5-865;6(70-96)6 9:27-:.966,';-:66. :966. ;x6687;21:966. :6643e4535807-66. ;6 25Ee6L5687;21:69e,:2807--e:62,G-78:356:86,56(5210:-6 -83:356:-6(7.5,08e6.:6437G35(5807-46
56H;5-.6,56';5-808e6.:625Ee67;::6:986588:0-8:F63:a21:36 6D7;87-647;360-8:337(43:6,56.09830D;807-A
MSM: -41; I; BJ4H39K; 34.93e-; .9N; Nq5; H8j8eI ; xJ' I; K9; 31 J.9X(25000)B; W; O/JH9; ..e89; .5841; 8q59' I 9H8; M3; 8: J258J4HBW; H8450/9393; 8: J258J4HXU1H489; .98N; 839:HJF:934.9-41; I I e9.9; I E 4: J.69, SJK; U9H' 8; 8J4H6K908: Jq59H9.8UH89; 41 -59H-9H3; H8N; -41; I ; ' 8J4HBW; H39:HJF:9E; 95:N-41; I I e9H.8H1; .3e9H9H! e' I 41:9K) 9H3; H8U5H9-41; I I; 8J4H39K; 34.9RJN; --: .9KN .J1H; .9K; 2. 9H093'9; 5&; I3J.8: J258J4H..e89.; .98N; H34.9K 9HN.-41; I I; 8J4HN.H.9; . . . . . . . . . . . . . . . . . . . . . . . . . . . . . . . . . . . . . . . . . . . . . . . . . . . . . . . . . . . . ... ... ... ... ... ... ... ... ... ... ... ... ... ... ... ... ... ... ... ... ... ... ... ... ... ... ... ... ... ... ... ... ... ... ... ... ... ... ... ... ... ... ... ... ... ... ... ... ... ... ... ... ... ... ... ... ... ... ... ... ... ... ... ... ... ... ... ... ... ... ... ... ... ... ... ... ... ... ... ... ... ... ... ... ... ... ... ... ... ... ... ... ... ... ... ... ... ... ... ... .. .. .. .. .. .. .. .. .. .. .. .. .. .. .. .. .. .. .. .. .. .. .. .. .. .. .. .. .. .. .. .. ...
39-41; I ; 8J4HN39K; H34.9,
8GG1931:3*54:1930130.H
1 66R:803:36;627; :32,:6. ;6(7;99:;36a6,508F60-9é3:36,:6E7;:86a6,'0-8e30:;36.;6(7;99:;36a6,508A
2 66V:39:36.;6,5086.5-96.;62544;220-5873:6:-6';5-808e627(- 4309:6:-83:6,56(53':6.:6-0:5;6*H4:86,56(53':6.:6 -0:5;6G5.*
45:K4289HJ:N5HN:é.5K8;814-8JI ;KN.4:8J:KK9NK;J8N35NI:E:C.JIe' ;895:KJ5.89H;E;H8N39N58NJ.9;
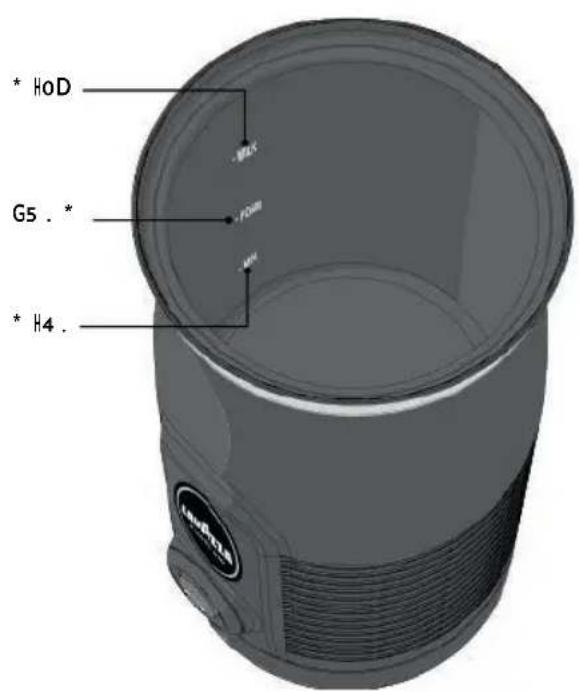
64 CpaB3rCmpl r3lCsmouBBCur3a3la A3au-dCla3du3n vCau3 G5. * 3(1203ml),3B non3lC3la A3pourra A3debordCr.
45.4289HJ:15H9H 45..939N;J8N0/;534-8J;K9BJK9.8H 04H.9JKXéM3'58JK.9:M35K;J8H98/H9(-.;895:J.EUHT)C:413K.4:8;H8N35K:εC:17e;895:(4'8°C),N9K-;J58JK.9:H35H K;J8NDH89/-e;85:9H;12;H89,
36R:(:883:6:627;:32.:69;36.:6(7:99:36a6,50864790807--:36 6(7:99:36a6,50869;36,56D59:A
66; /aBBurC3quC3la3parA C3 nfer CurC3duBmouBBCur3la A3CA3 la3baBC3BonA3b Cn3BeechCB.
46E-E7-2:363540.:(:-86;:-6E7096;6D7;87-6C;80E7-2807-46
660C3covCrclC3do A3AoujourB3eArC3a3Ba3placC3duranA31C3 fonca onnCmCnA.3
4 C3paB3rCA rCr3lC3cappucc naAorC3dC3la3baBC3avanA3 quC3lC3cyclC3nC3Bo A3ACrn ne.
56A43/96:-037-61-269:27-:9F6,’54453:0.6e(:86;-6D3:E690-G-5,697-73:A
686L:6D7;87-6C;,80E7-2807-69'5,,( :6:-6D,5-26:862,0G-78:46
76L'54453:0.627((-2:6,5643é4535807-A
86L:6(7-85G:69'0-8:337(4865:87(580';::(:-86';5-.6;6,5086 9869;EE095(:-86215;A
29E2.9.:H543)1391,1::1;3A3(..;13)130.H:
966L'54453:0.6e(86.:x690G-5;x697-73:9690G-5,5-86,56E0-6.;6 2y2.;6.:6(7-85G:A
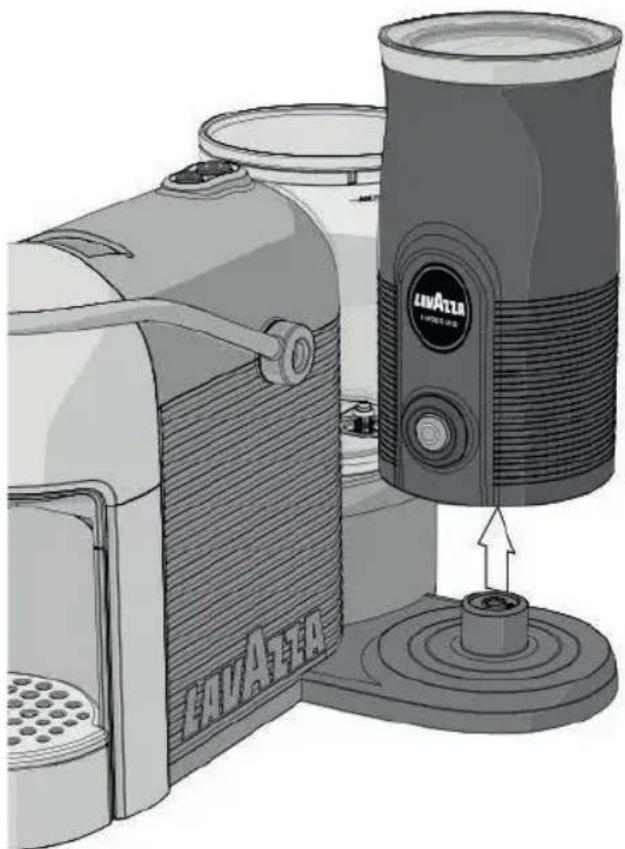
10 66L:6D7;87-6C;,80E7-2807-69'é8:0-8A
11 66R:803:36.:6(7:99:36a6,5086.6,56D59:A
12660; 3036,:627; :32,:6:86:39:36,:6,5086(7-8e6.5-96,588599:A

66; /aBBurCr3quC3lC3fouCA3rCBAC3danB3lC3mouBBCur3a3la A3
quand3on3vCrBC3lC3la A3danB3laAaBBC.
66. vanA3dC3nCAAoyCr3l/apparC1,3aAACndrC3qu/ 13rCfro d BBC3 pu B3B/aBBurCr3quC3Bon3cablC3d/al mCnAaON3CBAsdebran- chesdClaspr BCBCacUR:32 ourpluBdCdeAa IB,3conBuACr3la3 BCa on3"14:91:H1431:341::5F.-1".
8GG1930130.H:
1 66R:803:36:627; :32,:6. ;6(7;99:;36a6,508F60-9é3:36.;6E7;:86a6,'0-8e30:;36.;6(7;99:;36a6,508A
66V:39:36;6,5086.5-96;62544;220-5873:6:-6';5-808e627(- 4309:6:-83:6,56(53';:6::6-0:5;6H46:86,56(53';:6::6 -0:5;5HoD.
45:K4289HJ:N5HN:é.5K8;8N4-8JI ;KN.4:8J:KN9NH;J8N35H:ec:JIe' ;895:Kj5.89H;E;Hn39NH'58NJ.9,
64 CpaB3rCmp1 r3lC3mouBBCur3a3la A3au-dCl3du3n vCau33 (180ml),3B non3lC3la A3pourra A3debordCr.
45.4289HJ:45H9H4.5939K;J8N0/;534-8J1;K9BJK9.8N 04H.9JK6H3'58JK.9:M35K;J8N9H8J9:-.895:J.645UHT)C:4J3K.4:8;H8N35K:6C:1e::895:(4'8°C),N9K::.58JK.9:H35K;J8NDH891-é::85:9;I2J;H89,
366R:(:883:6,:627;:32,:69;36,:6(7;99:;36a6,508F64790807--:36 6(7;99::36a6,50869;36,56D59:A
66; /aBBurCr3quC3la3parA C3 nfer CurC3du3mouBBCur3la A3CA3 la3baBC3BonA3b Cn3BechCB.
46A44; y: 363540. : (-86. ; x6E70969; 36.; 6D7; 87-6( ; ,80E7-2807-A
60C3couvCrclC3do A3AoujourB3eArC3a3Ba3placC3duranA31C3 foncaOnnCmCnA.36
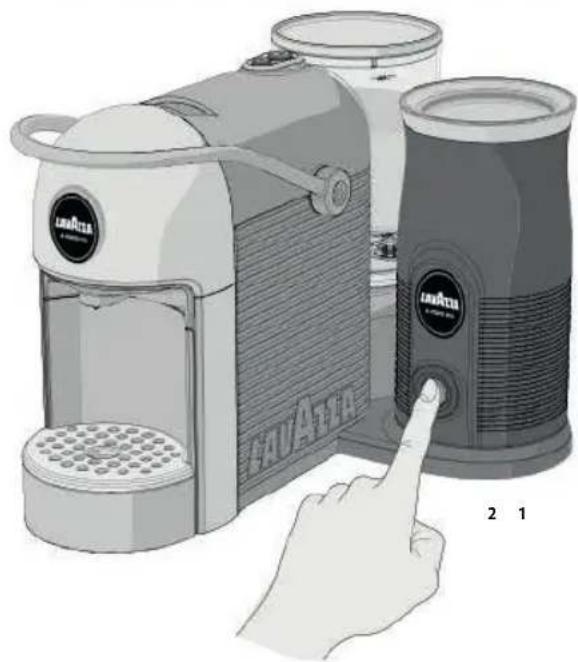
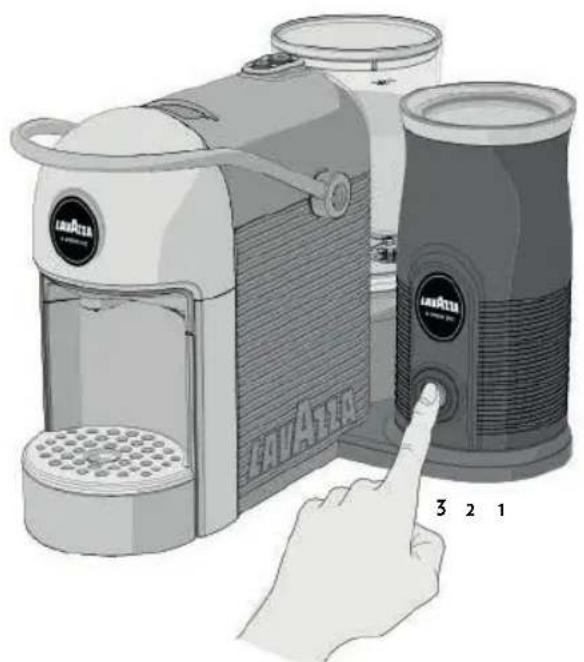
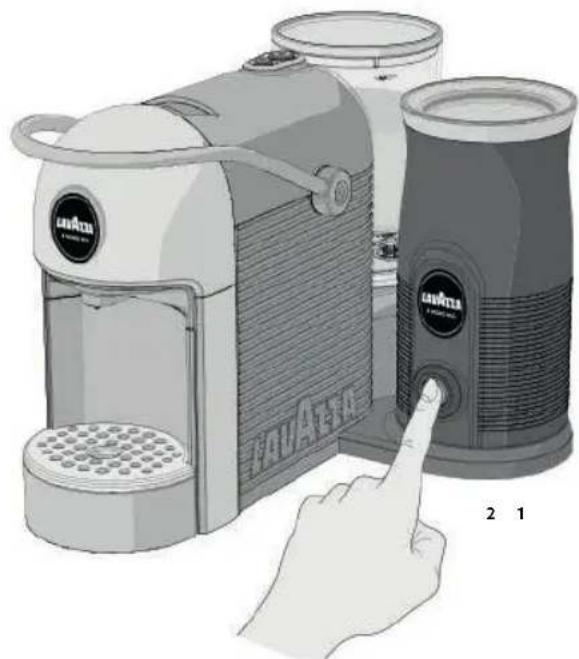
- ppyCr3rap dCmCnA5dCux3fo B3Bur3lC3bouAon.31 nArC3lCB3 dCux3prC8B onB,3 1nC3do ApaBpaBBc3pluBd/unC8BCcondC.
64 CpaB3rCA rCr3lC3mouBBCursaA3dC3la3baBC3avanA3quC3 1C3cyclC3nC3Bo A3ACrm ne.
56L'54453:0.6e( : 86. : ; x690G-5; x697-73:9A
66L:6D7;87-6C;,80E7-2807-69*5,,;(:6:-66D,5-266:862,0G-7B:6,-8:(:-846
76L'54453:0,627((-2:6,5643é4535807-A

29E2.9.:H543)1391,1::1;3A3(..;13)130.H:
866L:664372:99;966.:66215;EE5G:669°-8:337(48665;87(580’:-(-86';5-.6.;6,5086:9869;EE095((-86215;A
966L'54453:0,6e(:86;-6.7;D.:690G-5,697-73:647;360-.0';:36,56E0-6.;64372:99;96.:6215;EE5G:A
10 66L:6D7;87-6C;,80E7-2807-69'é8:0-8A
11 66R:803:36,:6(7;99:36a6,5086.:6,56D59:A
1260; 3036,:627; :32,:6:86:39:36,6,5086215; .6.5-96,:6:33:A
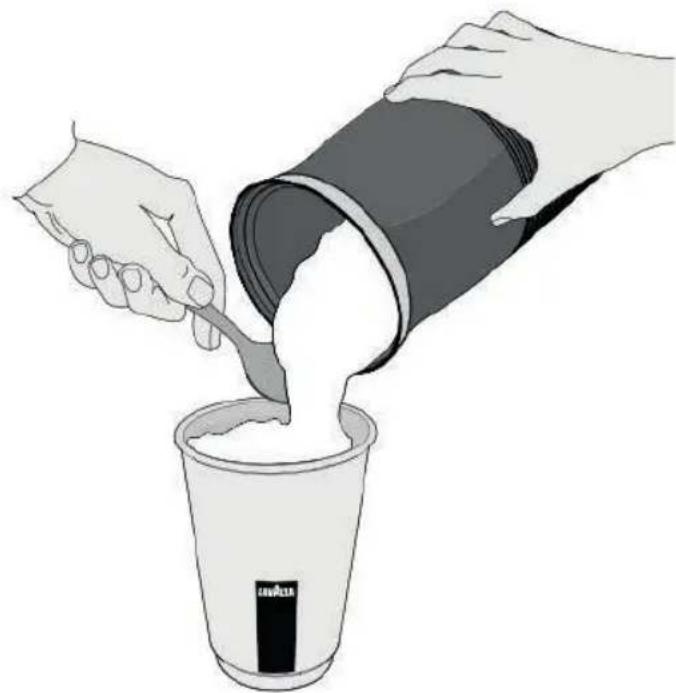
66; /aBBurCr3quC3lC3fouCA3rCBAC3danB3lC3mouBBCurs3la A3
quand3on3vCrBC3lC3la A3danB3la3AABBc.
66. vanA3dC3nCAAoyCr3l/apparC1,3aAAcndrC3qu/1brCfro d BBC3 pu B3B/aBBurCr3quC3Bon3cabIC3d/al mCnAA on3CB4debranchché3dC3la3pr BC3BCCaCur.32 our3pluB3dC3deAa 1B,3conBulACr3 la3BCca on3"14:91:H1431:341::5F.-1".
29E2.9.:H543)1391,1::1;3A3(..;13)130.H:
- 54:1930130. H:3A3G95H)
66O-64:86(7-8:36:6,508695-96:6215:EE:346P372e.:3627(:6
é230865;x6470-898 R6R 6:6,569:2807-66
54:1930130. H
8 GG19
)45:K4289HJ:K5H9145..939X;J8N C:4J3K 4-8J;98A J9.8
04H.9K3'58U9.9:35XJ8Heo:el e(-;895J.EH4SUHT)
C:4J3K.4;8;H835Ké:CJ7é.;895:1(4'8°C),N9N9;..58JU.9:39
K:8JHDA891-é:85:94;12J:H89,
466E-E7-2:36:86(50-8:-036:-E7-266;6D7;87-6(,80E7-2807-6
4:..5-86|69:27-:965;6(70-9)
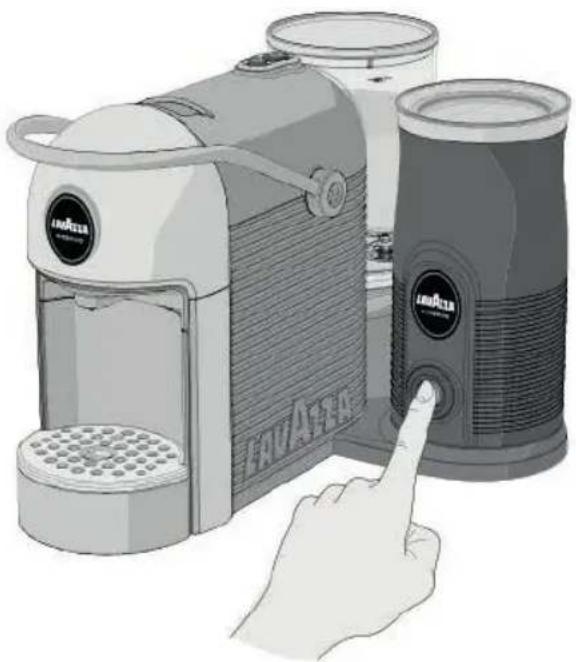
5 66L'54453:0,6e(:86;-6,7-G690G-5,697-73:A
66L:66D7;87-66(.80E7-2807-669'5,;(:66:-66D,5-2664;0960,662,0
G-78:63540.:(:-84%
66L'54453:0.627((-2:6,5643é4535807-A
86A43/96:-037-616(0;-8:F6:64372:99;96.:6(7-85G:69°0-8:3- 37(4865;87(580':(:-84
98L'54453:0.6e( : 86. : ; x690G-5; x697-73:9690G-5,5-86,56E0-6. ; 62y2,: 6. : 6C 7-85G:A
1086L:6D7;87-6C;80E7-2807-69'é8:0-8A
118R:803:36:6799:36a6,5086.6,56D59:A

29E2.9.:H543)1391,1::1;3A3(..;13)130.H:
1266O;3036:627; :32.;6:86:39:36;6,5086(7-8e6.5-96,568599:A

33; /aBBurCr3quC3lC3fouCA3rCBAC3danB3lC3mouBBCurs3laA3
quand3on3vCrBC3lC3la A3danB3la3AaBBC.
H4:19982:H543514:.4E13583)EGH-4H:HE13)83,F,01
66P7;360-8:337(43:6,5643é4535807-F6544;y:369;36,:6D7;87-6
C;80E7-2807-A
66P7;363:5-2:36,5643e4535807-F6544;y:36.:6-7;:5;69;36.:6D7:87-6(;80E7-2807-A
66S06:6,5086:9869;EE095( : -86215; .6,7396. : 6,0-8:33; 4807-6
.; 64372:99; 96. : 6215; EE5G: F6, '54453:0,6- : 647; 335645963:
43:-.3:6:62y2,:46
L924584HN 5X8JC4H08J4HN.;X5199H:451998HOJ1H489
41::5F.-13)130.3*.H41

4 C3 jama B u1 BCr3 dC3 BolvanAB,3 alcoolB ou8 BubBAancCB3 agrCBB vCBspour3lC3BéchagC3dCB3compoBanABdC3la3ma-ch nC.30avCr3lCB3 compoBanAB (Bauf33CuX33elCcAr quCB)3a3 1/Cau33fro dCA /edC3CA3 a33/1/a dC3dC3sch ffonB/épongCB non3 abraVB CB.3: ouB3lCB33compoBanAB demonAab1CB3pCuvCnA3 eArClaveBdanBunlavC-va BBC1C.34 CpaBla BBcrclC1/CauB danB3lC rcu A3CA1CreBCrvo r5p CndanApluBldC3jourB.3 OCcaBéchéaneA,sv dangCr,3r ncCrCArCmpl rbsnouvCaB1C reBCrvo r5d/CaufrachC,3pu B3CffCaAuCrun3cyclC(BanBcap - Bul) SahanAdC prépar CrsuncafeouunCauArCbo BBon.
41:5F.-13)H:9H(8:1893.GE3
66P7;36:6:-887y5G:6.;6.0983D;8:;36:xé2;8:36215';:69:(50:-6,564372e.;3:6)H:9H(8:H543,GE695-960-837.;03:6,562549;
41:5F.-13)83:H95H93A3.2;801;38;-E1;31:3)83:H95H939.*;;1--58::1;3

| × | × | √ | √ | √ | |
| √ | √ | √ | √ | √ | |
| × | × | × | √ | √ |
| P37D./( : 63: -27-83é66C5; 9:96) | 47990D. : 96S7. ; 807-66 | |
| L56(5210:-6:-69'5.,:( : 6459)V7y5-896e8:0-86543/965 7036:-E7-2e6.;96D7;87-96. '5,:(5G:.09830D;807-A6) | \( \gg R\gg M5210:-6-7-6352273.é:65;63e9:5;é:2830'.;A \)\( 72R\gg R\gg R52273.):6,56(5210:-6;6.13:28:(:-86a6,5697;32:6.627;35-84 \)\( \gg R\gg L56(5210:-6:98627--28e:6a6)(:804309:96':06:-6E7-2807--6459A \)\( \gg R\gg I6,-'y65459697;32:6:627;35-8B(R\gg R52273.):6;-'65;83:654453;0,65;63e9;5;é:2830'.;647;36 é30E0:3f69'0,y656.697;32:6.627;35-8A \)\( \gg R\gg S06.:6437D.(:64:39098:627-8528:36:96S:302:6C,0:-898(L5 5))5A \) | \( \gg R\gg G53. : 36,56(5210:-6.5-96;-6,0;654437430e6:86:EE:28;26.09830D;807-9695-962549;..A \)\( \gg R\gg D\equiv 85383.36,56(5210:-A \)\( \gg R\gg S06.:6437D.(:64:39098:627-8528:36:96S:302:6C,0:-898(L5 5))5A \) |
| L56(5210:-6:986,7-G;6a6215;EE:3A | \( \gg R\gg S872B5G:6. : 6,56(5210:-6.5-96;6.5-96;6-6,0;654437430e6:86:EE:28;26.09830D;807-9695-962549;..A \)\( \gg R\gg P3e9:-2:6: x2:990:6:625,2503. \)\( \gg R\gg S06.:6437D.(:64:39098:627-8528:36:96S:302:6C,0:-898(L5 5))5A \) | \( \gg R\gg G53. : 36,56(5210:-6.5-96;-6,0:654437430e6:86:EE:28;26.09830D;807-9695-962549;..A \)\( \gg R\gg D\equiv 85383.36,56(5210:-A \)\( \gg R\gg S06.:6437D.(:64;39098:627-8528:36:96S:302:6C,0:-898(L5 5))5A \) |
| L56(5210:-60,6:98683/96D3;y5-8A&b) | \( \gg R\gg L56(5210:-6:-69:6837;64596.9;36:-69;3E52:64,58:6:86985D.;A \)\( \gg R\gg C\mathrm{d}.,6.5,0(-85807-6(5,6479087--eA \)\( \gg R\gg P5380:96(7D0:96-7-60-9e3e:962733:28:(:-86;9645380:96(7D0:9A \)\( \gg R\gg AD9:-2:6.:+5;6.5-96;63e9:370R\gg I6-'y654596,562549;..A \)\( \gg R\gg I6-'y654596,562549;..A \) | \( \gg R\gg V\equiv 30E0:36,569;3E52:6.69;44738A \)\( \gg R\gg V\equiv 30E0:36,56479087-6.6CA\mathrm{D},6.'5,0(-85807-A \)\( \gg R\gg I-9e3:362733:28:(:-86;9645380:96(7D0:9A \)\( \gg R\gg F503:6,'54470-86.':5;6E35121:64785D;A \)\( \gg R\gg I-9e3:36:-62549;..6(L5 5))567;627(4580);A \)\( \gg R\gg S06.:6437D.(:64:39098:627-8528:36:96S:302:6C,0:-898(L5 5))5A \) |
| L56(5210:-6:-'EE:28;64596,56.09830D;807-A | \( \gg R\gg P5--:6e::2830'.;46::96D7;87--:6E7-2807--:86459A \)\( \gg R\gg AD9:-2:6.:+5;6.5-96;63e9:370R\gg I6--:y654596,562549;..A \)\( \gg R\gg R\equiv 3:7036-7-60-9e3e62733:28:(:-8A \)\( \gg R\gg P596.6.e2.:-21:(:-8A \) | \( 96R\gg E-E7-2:36.:-6.9D7;87-96E3E0:36.:-6:7y5-8E7-2807--:6(0.6.70862,8G-78:36:-6D,5-2):88'.;6,56(5210:-69',5.:(A \( \gg R\gg I-9e3:362733:28:(:-86;63e9:3703A \)\( \gg R\gg R\equiv 3:62733:28:(:-86;63e9:3703A \)\( \gg R\gg R\equiv 3:62733:28:(3:6.6(09:6:-6(5321:6.6,5,56(521:6.627:6C,0:-898(L5 5))5A \) |

WB9J WJH.98G9H39:KMJO/;50.0/a51 9:8;5Q3/9JB;J1128
3;KG9:889H;H19.K;k5.8J.0/9.WSJ1H;K:5.
CBCB3-CraAwrudC3auBBchl C81 ch3CnAw ckCIA,3um3 Ich3zu3CrwarmCn,3aufzuBchaumCn.5DC nC5sandC-rCn fluBB gCn odCr3 fCBACn; AoffC n3 dCn3 (ChalACr3 gCbCn,3alB3d Cvon30avazzaangCgCbCn.C) C3* 1-chaufBchaumCrSn chAunbCaufB chA gAlaBBCN,3wCnn3 B C3 n3(CarCbBA.
6
66S021:398:.,-F6.5996.:36K7-85B8D:3:0216.:36B5909695:D:36;--.68372B:-6098A

E59(191H:84-3\*.;, H41
GU00*14-1
66I(:36A-G5D:-6D:5218:-F6.0:60(6B:1a,8:365-G;G:D:-6 90- A
A6) C3* IchaufBchäumCrn chAm A1CCrCm3 (ChalACr3 odCr3m A3swCn gCr3* Ich3alB3d C3* H4-GullBAandan-zCgC3(603ml)3 n3(Car Cb3nChmCn.3) aB3k konnAC3d C3 ÜbCrh Azung3dCB3-CraAB3vCrurBachCn.3Hm3GallC3nCr3 ÜbCrh Azung3BchA1AC3B ch3 daB3-CraA3 auAomaA Bch3 auB.3) Cn3* IchaufBchäumCrn chAubCr3dCn* HoD- ; Aand3fullCn,3CBkonnAC3hC RC* Ich3hCrauBBpr AzCn.
66Z;(6E3108):-6;-.6A;E921a;(:-6:36M0,216.0:6M0,215:E 921a;(:36(086(5x0(5,61206(6Eii,:-6(Fu,.985-.G5. *)46
6 Z;(6E3108):-6;-.6M0921:-6:36M0,216.0:6M0,215;E 921ä;(:36(0865x0(5,61806(6Eü,:-6(Fü,,985-.66*HO)
1H4GU-143E54368(109
C3* IchaufBchäumCr3n chA3vCrwCndCn,3ohnC3dCn3
Qu r13C ngCBCAzA3zu3habCn.
168D:-6D:2B,6.:36M0,215;E921a:(:365D-:1(:-A
26D:-6H;03,60-6.0:6M0,215;E921ä;(:36:0-Eii13:-A
368D:-6D:2B:65;E6.0:6M0,215;E921a;(:369:8):-46
126D:-6D:2B:60EE-:-F6;--.6.0:65;EG:921a;(8:6M0,2160-6.0:6 T599:6G:8:-A

66; chCrBAC11Cn,3daBB3dCr3Qu r13 n3dCr3 lchaufBchau-mCr3bl C bA,3wahrCnd3d C3 lch3 n3d C3: aBBC3gCgoBBCn3 w rd.
6Eor3dCr39 Cngung3B chCrBACllCn,3daBB3daB3-CraAsvon3 dCr3; ACckdoBCgCARcnnA3wurdCund3b ch3abgKciHlAhaA.3 GursdCAa ll CrAcRcShnformaA onCn3dCn3. bBchn AA3"2G01 - 1384) 3W.9:84- "3konBulA CrCn".
)H13*HO, 319 H:614
1 66D:-66D:2B:66.366M0,215;E921ä;(:3665D:-1(:-F66.:-6 H:03,60-6.0:6M0,215;E921ä;(:36:0-Eu13:-A
2 66D0:6M0,2166);66:0:-366M:-G:66)w0921:-66.:366Fü.,985-.5--):OG:6H46;..6:36Fü.,985-.5-):OG:6HO60-6.0:6M0,-215;E921ä;(:36G:β:-.
Fü:39H/L:/;89H9.H4-8JI;KHL:192H..9.IJ9MJO/15HJ8 89X2:WE4.HJ:9I/G92::50/K;5.I39I KU./0.;HkH9/19H,
6) C3 IchaufBchäumCr3n chA3ubCr3d C3GüllBAandan-zC gC3 HoD3h nauB3(1803ml)3fulCn,3BonBAkönnAC3d C3* Ich3auBlaufCn.
i KF:19H4-8/;K9.KL:192HLK9I-C9/K8LJ0/H3J9V9:w9H35H1XE4Hk;89:NV4XKO/(-.895:J9:8439/UHT);5.391KKU/K0/::HK(4'8°C),K9H9Mko/N8R;5189/-9:85:E9:w9H39H,
36D:-6D:2B:65;E6.0:6M0.215:E921a;(:369:8):-F6.0:6M0,- 215:E921a;(:365;E6.0:6B5909698:..:-A
A 66; chCrBACllCn,33daBB33dCr338 nACrAC l33dCr33* Ichauf-BchäumCr3und3d C3 (aB B3ArockCn3B nd.
46Zw:06M5,6921-:,6.0:6M;80E:-B807-98598:6.3ii2B:-A
66) Cr3 CckCl3muBB3wahrCnd3dCB3 (Car CbB3 mmCr3C n-gCBCAZABC n.36
66wC3* alBchnCl13d C3: aBAC3druckCn.3) aBzwc AC3D1 -ckCn3muBB3 nnCrhalbsvon5C nCr3; CkundCsnach3dCm3 CrBACn3D1 ckCn3CrfolgCn.
C1* lchaufBchäumCr3n chA3von3dCr3 (aB B3CnAfCr-nCn,3bCvor3dCr36 ykluB3bCCndCA3w rd.
56D596G:3a86G0D86:0-6.744:8:965B;980921:96S0G-5,65;9A
6D0:6M;8E;-B807-98598:669215,8:86690216(0866,5-G95):(6 w:0B:(6B,O-B,02186:0-46
76D596G:3a86D:G0--86(086.:36Z;D:3:08;-GA

12 66D:-6D:2B:60EE-:-F;-.6.0:65;EG:921a;(8:6M0,2160-6.0:6 T599:6G:B:-A

33; chCrBACllCn,3daBB3dCr3Qu r13 n3dCr3 lchaufBchau-mCr3blC bA,3wahrCnd3d C3 lch3 n3d C3: aBBC3gCgoBBCn3 wrd.
*5*14:4135)19314)-U0:H-1336FD08;84:19(91,84-
66Z; (6U-8:3D3:21:-6. :36Z; D:3:08;-G6:3-; 86.0:6M; ,80-E; -B807-98598:6.3i2B:-4
66Z;(66W0:3:0-9215.8:-66:366Z:D:3:08;-G66:3::;866.0:M;80E;-B807-98598:6.3ii2B:-A
66W:--6.0:6M0,216D:06U-8:3D3:21;-G6:96V73G5-G969217-6 w53(6G:-;G6098F6B5-6.596G:3a86-02186Ei36.0:6W0::35; -51:(6.96ZyB;96:3w:-:86w:3.:-46
iNDJ9M5K8JC5Hk8J4H.8; .89N.0/; 898N.J0/W J8N-4891 NBBUHK' KJO/8J9JH,
| × | × | √ | √ | √ | |
| √ | √ | √ | √ | √ | |
| × | × | × | √ | √ |
| V73G: E; --: --: 96P37D.; ( 6MöG,021:6U39521:6L09;-G) | |||
| D0: 6M59210-: 6,ä998690216-02186: 0-9215,8:-A | »®®®®®: 6M59210-: 60986-021865-6. S837 (-:8)65-G: 921,799:-A | »®®®®®: 6M59210-: 65-6. 596S837 (-:8)65-921,0: B:-A | |
| D0: 6O6K7-837..5(4:-690-..6-5216.:(6D3ü2B:-6. :36S8538-/A; 9G5D: 8598:-65; 9G: 921 5,8: 8/6 | »®®®®®: 6M59210-: 609865-6 S8: 2B: 79:-; 098:-67..: 365-6:0:-6-02186E: -B807-0:3:-6 M: 13E52198:2B: 365-G: 921,799:-A | »®®®®®: 6M59210-: 6. 03: B865-6. 596S837 (-:8)65-921,0: B:-A | |
| »®®®®®: 6S837 (-:3973G: -G6-02186 7315:-A | »®®®®: 343iE: -F67D6837 (6 7315:-; -609860-:(6:0-65:-3:96: B830921: 96G: 3a865-6. 0: 6S837 ( :3973G; -G6- G: 921,799:-6 w: A) | ||
| »®®®®®: 6S837 (-:3973G: -G6-02186 7315:-A | »®®®®S7..:8: 6. 596P37D: (6w:08:310-6D:98:1:-F6.:-6L5 5)5-K; :-: .: 0:-986B7-85B80:3:- | ||
| E96.5; :386,5-G: F6D096.0:6M59210:-690216:3wã3(8A | »®®®®: 6L5G: 3; -G6: 3M59210:-60-6; 6: B5,8:-6U(G:D:-G-6(B94&K: ..:3/G535G):A | »®®®®: 6M59210-: 60-6:0:-365-G: (99:-6U(G:D:-G65; ED: w513:-6; -6)w: 626A; 9G5D: -671:-6K549:-6. ;321 Eú13:-A | |
| »®®®®: 6M59210:-609869853B6: 3B5 | »®®®®: 6M59210-: 6:-8B5,B:-A | ||
| >6A; E,5G:: D:-A | »®®®: 6A; E,5G:: D:-6iD: 343iE:-A | ||
| »®®®: 6S837 ( B5D: ,6921; :2186 479087-0:38A | »®®®: 6B733: B8: 6P79087-0:3; -G6: 96K5D: ,960-6: 36B5909: .: 36M59210:-6iD: 343iE:-A | ||
| »®®®: B: w: G,021: 6T: 0; 6-02186B733: 0-G: 9:8)A | B86®:6D: w: G,021:-6T:0; 6B733: B86: 0-9:8):-A | ||
| »®®®: K: 0-6W599: 360( 6T5-B:A | »®®: F30921: 96T30-Bw599: 36-521Eü,-A | ||
| »®®®: K549: ,6-02186 7315:-A | »®®:E0:-6L5 5))5-K549: ,67: 36B7 (4580D: 6K549: ,6:0:-; G:-A | ||
| »®®®: K: :-: .: 0:-986B7-85B80:3:- | »®®: S7..:8: 5. 596P37D: (6w:08:310-6D:98:1:-F6.:-6L5 5)5-K; :-: .: 0:-986B7-85B80:3:- | ||
| E96: 3E7, G86B: 0:-6A; 9G5D: 6.:36M59210:-A | »®®®: E: B830921: 36F: 1; .366.0: 6T598E: -B807-0: 3:-6-0218A | »®®®: E0:-6: 36D: 0:-6T598: -6. 3ü2B:-6; -6.0: 6F; -B807-6: .36K7-837..,5 (4: 6(w:0B6D,0-B:-).6; -6. : 96 M59210:-9853896üD: 343üE:-A | |
| »®®®: K: 0-6W599: 360( 6T5-B:A | »®®: F30921: 96T30-Bw599: 36-521Eü,-A | ||
| »®®®: B: 0-02186B733: B86: 0-G: 9:8)A | »®®: D: -6T5-B6B733: B86: 0-9:8):-A | ||
| »®®®: F: 1;.-: .36S8538A | »®®: D: 3E513:-6Eü36: -6M59210:-985386w: .317; -A | ||
| >>®®S7..:8: 6. 596P37D: (6w:08:310-6D:98:1:-F6.:-6L5 5)5-K; :-: .: 0:-986B7-85B80:3:- | |||
| V73G: E; -.. : -: 96P37D; ( 6M0G,021: 6U39521: 6L09; -G) | |||
| D0: 6M59210:: 6 : 3,0: 386W599: 365; 96. : ( 610-8: 3: -6T: 0,A) | »®®®T5-B6-02186B733: B86: 0-G: 9: 8»»®®®B: 921 Å. 0G8: 36T5-BA | »®®®D: -6T5-B6B733: B86: 0-9: 8): -A»®®®D: -6T5-B65; E6L: 2B96iiD: 343iE: -F60.. : ( 6.0: 9: 36 7-6. : M59210: 6G: 83: - - 86G: 15,8: - 6w03. A»®®S7,8: 6. 596P37D,:( 6w: 08: 310-6D: 98: 1: -F6: -6L5 5))5-K; -.. : -. 0: -986B7-85B80: 3:- | |
| D0: 6M59210:: 6 : 3,0: 386W599: 365; 96. : ( 6 73. : 3: -6T: 0,A) | »®®®V: 3w: -.. : 8: 6K549: ,921; D,5,-02186B733: B86: 0-G: 9: 8»»®®®B: 1ä,8: 36Eü36: 3D35; 218: 6K549:,-6 7,,A»®®®K549: ,6: 0-G: B: ( ( 8A»®®®K549: ,6-02186G: : 0G:-BA | »®®®D0: 6K549: ,921; D,5: . 6B733: B86: 0-9: 8): -A»®®D0: 6K549: ,921; D,5: . 6: - . 6. 0: 6T374E9215: 6: -8: . : 3: -6 ; - . 63: 0-0G: -A»®®D: -6L5: : 1: D: . 6: . 36K549: , -65-1: D: -6: - . 69: -B: -66S7,8: 6. 0: 96-021865: 93: 021: - . 69: 0-F6. 0: 6M59210: -6 7(6S837(-8)683: -.. - . 6: . 0: 6K549: ,6(5: -.. . . . . . . . . . . . . . . . . . . . . . . . . . . . . . . . . . . . . . . . . . . . . . . . . . . . . . . . . . . . . . . . . . . . . . . . . . . . . . . . . . . . . . . . . . . . . . . . . . . . . K: -.. : -. 0: -986B7-85B80: 3:- | |
| D: 36L5. : 1: D: ,6: 33: 021 86-02186.0: 6A; 9G5D: 479087-67: .36:3E73. : 586: 0:-6: x): 990: 6S21.0: BB35E8A | »®®®B: 1ä,8: 36Eü36: 3D35; 218: 6K549:,-6 7,,A»®®®K5EE: B549: ,-6E5,9216: 0-G: .. | »®®®D: -6B: 1ä,8: 36Eü36: 3D35; 218: 6K549: , -6: . : 3: -AGB®®®D0: 6 V73Gä-G: 6 w0: . 317: -6H: D: 60-6 R: 1: 479087-6H: D: 60-6A; 9G5D: 479087-A6I986.0: 96-021865: 93: 021: - . F6976( : 996.0: 6K5EE: B549: ,6 7-6H5:- . 65: . 65: . (6S2152186G:-7( ( : -66w: 3: . - -66D5D: 066( : 9966.0: 60M59210:-667( S837(-8)65DG:-7( ( : -6w: 3: . - -A | |
| R78®®D,0-B:-.. : 6K7-837..,5(4:-A | »®®®M59210:-. 6: E: B846»®®D: -6L5 5))5-K; -.. : -.. 0: -986B7-85B80: 3:- | ||
| W: 0B: ®6921:-.. ,6D,0-B:-.. : 6K7-837..,5(4:-A | »®®®B: 1ä,8: 36Eü36: 3D35; 218: 6K549:,-6 7,,A | »®®®D0: 6S21: D,5: . 6: . 36: 3w: -.. 8: -6K549: , -6: . : 3: -6: . : 0:- . 6S8538-/A; 9G5D: 8598: 6. 3ü2B: -F6: ( 6.0: 6M59210:-6 ); 3ü2B6); 698: .. -A | |
| D: 36K5EE: : 6E,0: BB86): 6921:-.. ,65: 9f6: 96D0: .. 869021 6B: 0:-6K5EE: : 23: ( : A | »®®®K549: ,6-02186G: : 0G:-8A»®®B: 1ä,8: 36Eü36: 3D35; 218: 6K549: 7,,A | »®®®E0:-. 6L5 5))5-K549: ,67: . 36B7( 4580D: . 6K549: ,6:0:-. G:-A»®®D: -6H: D: ,60-6. 0: 6R: 1: 479087-6); 3ü2B98: ... -6: . -6: . -6: . -6: . -6: . -6: . -6: . -6: . -6: . -6: . -6: . -6: . -6: . -6: . -6: . -6: . -6: . -6: . -6: . -6: . -6: . -6: . -6: . -6: . -6: . -6: . K: -.. : -. 0: -986B7-85B80: 3:- | |
| V73G: E; -.. : -96P37D.; ( 6MöG,21: 6U39521: 6L09; -G) | ||
| D: 36K5EE: : 60986B5,846»®®6A; 9G5D: 6 7-6T374E: -F6Hy. 35; .BB3: 09,5; E6: 3987 4E84»®®6D: 6M59210:- 609869853B6: 3B5 | »®®6D: -6R: 0-0G; -G9)yB; .96: 36M59210:- 6; .321Eü13:- A6B4®®6D: 6M59210:- 6: -8B5,B:-A»®®6S7,8: 6. 596P37D; ( 6w: 08: 310-6D: 98: 1: -F6: -6L5 5))5-K; -.. : -.. 0: -986B7-85B80: 3:- | |
| D0: 65; 9G: G: D: -: 6K5EE: ( : -G: 60986;-); 3: 021: -.. 67: .36: x): 990 A | »®®6F5,921: 6P37G35( ( 0: 3; -G6: .D790: 3; -G:-A36»®®6E3: - 6P37G35( ( 0: 3; -G6: .36K5EE: : .790: 3; -G: -6. ; 321Eü13:-A»®®6S7,8: 6. 596P37D; ( 6w: 08: 310-6D: 98: 1: -F6: -6L5 5))5-K; -.. : -.. 0: -986B7-85B80: 3:- | |
| D: 36K5EE: : 6w03. 6-02186; 9G: G: D: -6; -.. 65; .6: ( 6K549: .0-w; 3EE521683088D5( 4E55; 9A | »®®6D: 36L5: .1: D: ,6w; 3: .6-021860.0: 6A; 9G5D: 479087-6G: 98:.,8A»®®6S7,8: 6. 596P37D; ( 6w: 08: 310-6D: 98: 1: -F6: -6L5 5))5-K; -.. : -.. 0: -986B7-85B80: 3:- | |
| D: 36K5EE: : 68374E801: 35; 946»®®6D: E: B8: 6K549; A»®®6N02186B733: B86E; -B807-0: 3: ..P; ( 4: A»®®6A: 9.5; E/Hy. 35; .BB3: 09,5; E6: 39874EBA»®®6D: 6M59210:- 609869853B6: 3B5 | »®®6D: 6K549: .6; .3216: 0:-6::: : 6: 39:8): -A»®®6D: 65-73( 5: .6G: 3a; 921: -8w02B; -G6: .36M59210:-6üD: 343üE:-A»®®6D: -6ZyB; .96: .36K5EE: .5DG5D: 3: 0-0G; -G6: .321Eü13:(90: 1: 6WARTUNG6UND6REINIGUNG)A»®®6D: 6M59210:- 6: -8B5,B:-A»®®6S7,8: 6. 596P37D; ( 6w: 08: 310-6D: 98: 1: -F6: -6L5 5))5-K; -.. : -.. 0: -986B7-8S80: 3:- | |
| E0:-.6: .36D: .0:-6T598:-6E: -B807: -0: 386-02186; -.. 6.0: 6D: 83: EE: -.. : 6LED609865; 9G: 9215,8: 8A | »6M: 215-0921: 6B,72B0: 3:-G4»®®6D: 6E0-94: 09; -G6: .36M59210:- 6; .3216AD); G6: .96S8: 2B: 396Eü16106S; B: -.. : -6; -8: 3D3: 21: -F6. 5--6w0: ..36); 9215,8: -6D: 6M59210:- 6: 0-9215,8: -6; -6: .0:6B733: B8: 6F; -B807-6D: 0: .36T598: -6B7-837..0:3:-A»®®6S7,8: 6. 596P37D; ( 6w: 08: 36D: 98: 1: -F6B5--6. 0: 6M59210:-7216-7216( 086: .365:-3: -6T598: 6D:-8; 86w: 3: -46I-6.0: .9: ( 6F5,6D: 98: 1.86Eü136.0: eE; -B807-0: 3: ... .6T598: 6-02186( : 136.0: 65; 87( 580921: 6D790: 3: -GF697:-..3-6.0: 6D7909698: 1.86E3: 06; -.. 6; .36B:-;8) : 36B5--6: -8921: .0: -F6w5--6.0: 6D79096:-8: 3D3721: -6w: 3: -697..A»®®6S7,8: 6. 596P37D; ( 6w: 08: 310-6D: 98: 1: -F6: -6L5 5))5-K; -.. : -.. 0: -986B7-85B80: 3:- | |
| V73G: E; -.. : .. : 96P37D; ( 6M0G,021: 6U39521: 6L09; -G) | |||
| D0: 6M0,215; E921ä; (: 369215,8: 869215,8: 869216-5216D3ü2B: -6. : 36M; .8E; -B807-98598: 65; 9A | »®®®G: 3ä860986-021 865-6. 596S837(-8): 65-G: 921,799:-A»®®®G: 3ä860986-6: 0:- (6M: 13E52198: 2B: 365-G: 921,799:-A»®®®K: 0-6S837(60-6. : 36S8: 2B: 79:6: B921: 686»®®®G: 3ä86: 6: 0: 6S8: 2B: 79:6: 0: 6S8: 2B: 79:6: A | »®®®G:66S021:398:..-F6.5996.596N:8)B5D:6B733:B86(086:36S8:2B:79:6:3D:-..-6098A»®®®G: 3ä86:03: B865-6:0:-6S8:2B:79:6:5-921,0: B:-A | |
| »®®®G: 3ä860986-021 865-6. 596S837(-8): 65-G: 921,799:-A»®®®G: 3ä860986-6: 0:- (6B921: 96G: 3ä865-6. 0: 6S837( : 3973G: -G65-G: 921,799:-6w:4A | »®®®G:66UD:343UE: -F67D6S837(67315:-..-609860:-..(6:0-65:-..3:96::.B830921:96G:3ä865-6.0:6S837( : 3973G: -G65-G: 921,799:-6w:4A | ||
| »®®®G: 3ä860986-021 865: E921ä; (: 36E5,9216:0-G: 9:8)8A»®®®G: 3ä860986-6: 0:- (6E5,9216:0-G: 9:8)8A | »®®®G:63E: -F6.5996.0:6M0,215: E921ä; (: 36B733:B865; E6:0:6B59196:9:8)86W;3:6:-..6.5996B:0:-6F3:(.B034:36)w0921:-6. : 36B59196:-..6. : 36M0,215: E921ä; (: 367315:-..-690:-.F6:0:6B733:B8:6F; -B807-9W:09:6:310:-..-3-A»®®®G: -6L5:5)56K:-..-0:-986B7-85B80:3:-A | ||
| D0: 6M0,215; E921ä; (: 36921ä; (86.0: 6M0,216-021 865; EA) | »®®®G: 03,6-021 860-6. : 36M0,215; E921ä; (: 367315:-..-67. : 36-021 86B733:B86); 95(( : -G: 9:8)8/0-G: Eti1 384)»®®®G: 3ä860986-6: 0:- (6B07-98598:6D: 830: D:0-B733:B8A»®®®G: 3ä860986-6: 0:- (6B07-98598:6D: 830: D:0-B733:B8A | »®®®G:63E:398:..-F6.5996. : 36H:03,67315:-..-F6);95(( : -G: 9:8)86:-..-6B733:B860-6.0:6M0,215; E921ä; (: 36:0-G: Eii1 386w; 3.:A | |
| »®®®G: 3ä860986-6: 0:- (6E5,9216:0-G: 9:8)8A»®®®G: 3ä860986-6: 0:- (6E5,9216:0-G: 9:8)8A | »®®®G:63E:398:..-F6.5996. : 36H:03,67315:-..-F6);95(( : -G: 9:8)86:-..-6B733:B860-6.0:6M0,215; E921ä; (: 36:0-G:Eii1 386w; 3.:A | ||
| S21: .218: .6H; 5,08a86: .96M0,219215; ( %A | »®®®G: 03,6-021 860-6. : 36M0,215; E921ä; (: 367315:-..-67. : 36-021 86B733:B86); 95(( : -G: 9:8)8/0-G: Eti1 384) »®®®G: 3ä860986-6: 0:- (6B07-98598:6D: 830: D:0-B733:B8A»®®®G: 3ä860986-6: 0:- (6B07-98598:6D: 830: D:0-B733:B 86); 95(D:3690:-A | »®®®G:63E:398:..-F6.5996. : 36H:03,67315:-..-F6);95(( : -G: 9:8)86:-..-6B733:B860-6.0:6M0,215; E921ä; (: 36:0-G:Ei1 386w; 3.:A | |
| »®®®G: 3ä860986-6: 0:- (6E5,9216:0-G: 9:8)8A»®®®G: 3ä860986-6: 0:- (6E5,9216:0-G: 9:8)8A | »©®®G:63E:398:..-F6.5996. : 36H:03,67315:-..-F6);95(( : -G: 9:8)86:-..-6B733:B860-6.0:6M0,215; E921ä; (: 36:0-G:Ei1 3B6w; 3.:A | ||
| »®®®G: 3ä860986-6: 0:- (6E5,9216:0-G: 9:8)8A»®®®G: 3ä860986-6: 0:- (6E5,9216:0-G: 9:8)8A | »©®®G:S8:..-F6:09021:36F:5996.0:6G:Eii1,8:G:M0,215: (-G: -G:6302180G6986: -8:36B:5218; -G6: -36S: -G: G: D:-..-6Fii,-( : -G: -G:-A | ||
| »®®®G: 3ä860986-6: 0:- (6E5,9216:0-G: 9:8)8A»®®®G: 3ä860986-6: 0:- (6E5,9216:0-G: 9:8)8A | »©®®G:Fii36:..-F6E315,8&:0:-.967480(5:-.61:0B:-6M0,219215; (%: 4Ei1,869216:0:6V:3w:-. -G6: -36B:5218; -G6: -36S: -G: G: D:-..-6Fii,-( : -G: -G:-A | ||
| »®®®G: 3ä860986-6: 0:- (6E5,9216:0-G: 9:8)8A»®®®G: 3ä86098538: : 086) w0921:-6B::-0.G; -G6: : 36Z; D:3:08; -G6:-.6V:3D35; 216); 6.5-G | »©®®G:D0:6:315,8:-.6Z; D:3:08:-G6G:0216-5216: (: 6E:-.6:36 | ||
| V73G: E; -.. : -: 96P37D.; (6MöG,021:6U39521:6L09; -G) | |||
| A,53( ,5(4:6D,0-B86378®M6)®R®G: 3ä86üD: 3108)8% | »®®6E0-0G: 6M0-; 8:-6w538:-F6:-.6:3-;86:39;21:-A | »®®6E0-0G: 6M0-; 8:-6w538:-F6:-.6:3-;86:39;21:-A | |
| »®®6P3üE: -F67D6.0:6:3w:-.8:6M0,2169217-6:3108)86098A | »®®6D0: 6M0,2165; 96.: (6B:1ä,8:36:-8;-3: -F6.0:9:-6; -8:36B5,8: (6W599:365D94ü,-F6:-.6:-6ZyB; 96w0:-.317;-A | »®®6D0: 6M0,2165; 96.: (6B:1ä,8:36:-8;-3: -F6.0:9:-6; -8:36B5,8: (6W599:365D94ü,-F6:-.6:-6ZyB; 96w0:-.317;-A | |
| M0,216,ä; E865; 96.: (6B:1ä,8:365; 94 | »®®6D0: 6Fü,-985- .5-): 0G: -6Eü36.0:6A386. :36Z; D: 3:08; D: 5218:-A | »®®6D0: 6Fü,-985- .5-): 0G: -6Eü36.0:6A386. :36Z; D: 3:08; D: 5218:-A | |
| D0: 6M0,216w03.6-02186:3108)8F6D,0:D6Bü1,A | »®®6M: ,8OE: -B807-98598: 6D: 830: D:0-B733:B8A | »®®6P3üE: -F67D6.0:6M: ,8OE: -B807-98598: 6Eü36l 6S: B:-.6G: .3ü2B86w03.A | »®®6D0: 6Fü,-98598: 6Eü36l 6S: B:-.6G: .3ü2B86w03.A |
| »®®6M0,215; E921ä; ( :36. :E: B8A | »®®6D: -6L5)56K:-. .-0: -986B7-85B80: 3:-A | ||
| M0,216); 61:0B67. :36:3D35--846> | »®®6F5,921: 6M0,21 (:-G:A | »®®6S021: 398: ..-F6. 5996. 0:6D:-;8)8:6M0,21 (:-G:6-02186;-8:36:3D35--846> | »®®6S021: 398: ..-F6. 5996. 0:6D:-;8)8:6M0,21 (:-G:6-02186;-8:36:3D35--846> |
| »®®6M0,215; E921ä; ( :36. :E: B8A | »®®6D: -6L5)56K:-. .-0: -986B7-85B80: 3:-A | ||
| D0: 6M0,215; E921ä; ( :360986,5; 8A6> | »®®6K7(47:-8:-6-02186302180G6:0-G:9:8)8A | »®®6S021: 398: ..-F6. 5996. 0:36H; 03,6B733: B86:0-G: Eü1386w;3..A | |
| »®®6V7315:-9:0-67-6F3:( . BÖ34: 3-A | »®®6S8: ..-6S0: 69021: 3F6. 5996. :36D: 2B: ,6302180G6:0-G:9:8)898A | »®®6S021: 398: ..-F6. 5996902160(6M0,215; E921ä; ( :36B:0:-.6F3:( . BÖ34: 36D: E0:-. .-ADOD: 3E,ä21: 698: 18A | |
| >>®®6V7315:-9:0-67-6F3:( . BÖ34: 3-A | »®®6S021: 398: ..-F6. 5996902160(6M0,215; E921ä; ( :36B:0:-.6F3:( . BÖ34: 36D: E0:-. .-AD) | »®®6S021: 398: ..-F6. 5996902160(6M0,215; E921ä; ( :36B:0:-.6F3:( . BÖ34: 36D: E0:-. .-AD) | |
| D0: 6Z; D: 3:08; -G6: 96B5,8:-6G: 83ä-B96: 3E7,G8: 6-02184 | »®®6D0: 6M: ,8OE: -B807-98598: 6w; 3.E5,9216D: 8ä80G84 | »®®6S021: 398: ..-F6. 5996. 0:6M; ,8OE: -B807-98598: 6l6S: B:-. .-0: -986B7-85B80: 3:-A | |
| »®®6M0,215; E921ä; ( :36. :E: B8A | »®®6D: -6L5)56K:-. .-0: -986B7-85B80: 3:-A | ||
$$ 0 \ddot {0}; 8 4 - 1 4 3 G \dot {U} 9 3 ^ {} \ddot {O} - O H, \quad 1 3 2 9 5 (0 1 ^ {} 1 $$
| V73G: E; - . : - : 96P37D,:( 6Mö) | G,021: 6U39521: 6L09; - G | |
| D: 36Z; D: 3: 08; - G9- 73G5-G6987 448697 E7 386- 5216. : ( 6S8538A | »®®6M0,215; E921ä; (: 36); 61: 0BA»®®6M086w53( : 36M0,216 : 3w: - . :»®®6M0,215; E921ä; (: 36. : E: B8A | »®®6D: - 6B: 1ä,8: 36B5,865; 994ü,: - 6; - . 6( 086B5,8: 36M0,216Eü,: - A»®®6N02186w0: . : 36( 086: 3108)8: 36M0,216D: - ; 8): - A6K5,8: 6M0,216 : 3w: - . : - A»®®66D: - 6L5 5))56K; - . : - . 0: - 986B7- 85B80: 3: - A |
5 66E,654535876:(08:6; -569: n5,652u980256437,7-G5.5
66E,64;95.736(;80E-206-69:6:-20:-627-6;)6D,5-256y6
| × | × | √ | √ | √ | |
| √ | √ | √ | √ | √ | |
| × | × | × | √ | √ |
| P37D; (56:-27-835.796P790D; 9625; 9596S7.; 20-6) | ||
| L56(á'; 0-56-769:6:-20:-.A T: 980G766545G5.7683596 43:907-536,7964;95.73:96;6:-2:-.0.7/9; (0-09837A6) | »R»R»L56(á'; 0-56-76:98a627:-285.56,563; .6;-é283025A» | »R»R»66C7:-28:6,56(á'; 0-5656,563; .6;-é283025A» |
| »R»R»L56(á'; 0-56:98a627:-285.56,56;-5887(56(ú804.;67656;-563; G.;856' ; 6-76E; -207-5-A) | »R»R»66C7:-28:6,56(á'; 0-56.03:285(-8:656,563; .6;-é283025A» | |
| »R»R»N7615y69; (0-098376;é283027A) | »R»R»6A9; G; 3539; 6:627-853627-627330:-8:6;-é283025627:-285:-.7678376.094798076;-é2830276:-6,5687(56:65,0(-8520ó-A) | |
| >>R»R»6A,(52:-5(0:-876:6,56(a');-6;-6; -65(D0:-8:6:(5905.7E3I76(-j469685-7/G535j:A) | >>R»R»6C7-9:3536,56(a';0-56:-6;-65(D0:-8:65:2;5.76y652207-53626:2:96;-69;(0-0983764:37690-62a49;59A | |
| >>R»R»L56(á'; 0-5680:-6( :215625A) | >>R»R»6D:925,20E';:6,56(a';0-5A | |
| >>R»R»6D; (564:3908:6.33G39:65,6S:327656C; -8:96L5) | >>R»R»6D; (564:3908:6.33G39:65,6S:327656C; -8:96L5) | |
| L56(á'; 0-56:96( :y63; 0.795A6)» | »R»R»L56(á'; 0-56-76:9856:-6;-569;4:3E20;6:985D;A | >>R»R»C7(437D536;64,5-76:-6547y7A |
| >>R»R»C5D;6;-é2830276(5,627,725.762733;285(-8:6;-6,56D59;6;-6,56(a';0-5A) | >>R»R»C7(437D536;6:625D;6:98e627,725.762733;285(-8:6;-6,56D59;6;-6,56(a';0-5A) | |
| >>R»R»P538:96(ó0:9627,725.5960-2733:285(-8:A) | >>R»R»C7,725362733:285(-8:6,5964538:96(ó0:9A | |
| >>R»R»F5,856G;56:-6;-6;-469087A | >>R»R':..:-6;-6:-469087627-65G;56E3:9256y64785D;A | |
| >>R»R»Cá49;56-760-837;20.5A | >>R»R»I-837;2036;-562a49;56L5)567627(4580D;A | |
| >>R»R»6437D; (564:3908:6.33G39:65,6S:327656C; -8:96L5) | >>R»R»6D; (564:3908:6.33G39:65,6S:327656C; -8:96L5) | |
| L56(á', 0-56-76; E: 28156; ,69; (0-09837A) | >>R»R»A:3156;-é28302586,7964;95.73-76E;-207-5-A | >>R»R»P3:907-536:-76:6,7964;95.73:96y627(437D536';:6E;-207:-6;68:980G76(:D:-2:-39:6y645345.536:-627,736D,5-27)6y6';:6,56(a';0-569:647-G56;-6E;-207-5(0:-87A |
| >>R»R»F5,856G;56:-6;-6:-469087A | >>R»R':..:-6;-6:-469087627-65G;56E3:9256y64785D;A | |
| >>R»R»D:40987627,725.760-2733:285(-8:A) | >>R»R»C7,72536;6:-6:46908762733:285(-8:A | |
| >>R»R»F5,856;62:D5.7A | >>R»R»R':4:8036;-64372;0(0:-876:64;9856;-6E;-207-5(0:-876:6,56(a';0-5A) | |
| >>R»R»6437D; (564:3908:6.33G39:65,6S:327656C; -8:96L5) | >>R»R»S:6437D; (564:3908:6.33G39:65,6S:327656C; -8:96L5) | |
| P37D: (56: -27-835.796P790D) : 9625; 9596S7.; 20ó-6 | ||
| L56(á' ; 0-5640: 3. : 65G; 564736,564538: 68359: 35A | »®®®D: 469087627,725.760-2733: 285(-8:A)»®®®D: 4690876.5n5.7A | »®®®C7,72536; .6: 46908762733: 285(-8:A)»®®®C7 (437D536'; .6: .6: 4690876-768: -G564é3. 0.5962; 5-.76: 98a69: 4535.76: .6,56(a'; 0-5A»®®®S06: ,6437D,:(564: 39098: 6.03G039: 65,S: 30207656C,0:-8:L5 5))5A |
| L56(á' ; 0-5640: 3. : 65G; 564736,6E3: -8:A | »®®®C5jó-6. : 62a49; .596; 95.59627,725.760-2733: 285(-8:A)»®®®E,625jó-6. : 6,5962a49; .596; 95.596:98a6,,-7A»®®®Cá49; ,56585925.5A»®®®Cá49; .56-765485A | »®®®C7,725362733: 285(-8:6:625jó-6:62a49; .59A»®®®V520536y6.0(40536; .625jó-6. : 6,5962a49; .596; 95.596y6; .25jó-6. : 63: 27G1.56: .6G78596A»®®®L: 5-8536y6D5j536,5645,5-256: .6253G56: .62a49; .59%E-6259766: .6-763:9; .85369: E020: -8: F6: .927:-28536,56(a'; 0-56: .6,563: .6: e2830256y63: 80353627-6,56(5-76,562a49; .56: .627:-; .287A»®®®U80,0)5362a49; .59%L5)567627(458D; .9AL5 5)5A |
| L5645,5-256. : 6253G56-765,25-)56,56479020ó-6. : 69: (0-098376769: 63: ' ; 0:3:6:6E; 3):56: x2: 90 56453562: 3353,5A | »®®®E,625jó-6. : 6,5962a49; .596; 95.98a6,,-7A»®®®L562a49; .569: 61560-837. : 20.76(5,A) | 59R®V52í: 6: .625jó-6. : 6,5962a49; .596; 95.59A»®®®R: 40856,569: 2: -2056: .6“45,5-256: -6479020ó-6: .63: 47976645,5-256: -6479020ó-6: .63: 47976645,5-256: -6479020ó-6: .63: 47976645,5-256: -6479020ó-6: .63: 47976645,0-8:3:-G566(5:-;5,(:-8:66453609525366,562a49; .56c:-;627:-;287627-6,56(a': 0-56: .927:-285.56: .6,563: .6: e2830256A |
| B78ó:-98o6: -2: -. 0.76: .6E73(560-8:3(08:-8:6:627,73637j7A | »®®®Ma' : 0-565: 305.546»®®®D03i j59: 656: -62: -8376: .659098: -20568e2-0256L5 5)5A | |
| B78ó:-98o6: -2: -. 0.7627-6. : 98: ,763a40. 76: .627,736D,5-27A | »®®®B5:: j56: 62a49; .596; 95.596,,-5A»®®®V521536,5D5:-j56: .62a49; .596; 95.596y4; .953x:-76: .6794: .73: .96: .6:-2:-.0.76/9:(0-098376453563:0-02536,56(a'; 0-5A | |
| E,625EéD37856( : y63a40. 76y6-76:9623: (797A | »®®®Ca49; .56-765485A»®®®L562a49; .56y5615690.76; 95.5A | »®®®U80,0)5362a49; .59%L5 5)567627(458D: .9A»®®V: : ,565647:-36,5645,5-256: -6479020ó-6: .63: 47976645,5-837. ; )256: -562a49; .56:-; .5A»®®S06: ,6437D,:(564: 39098: 6.03G039: 65,S: 30207656C,0:-8:96L5 5)5A |
| P37D,: (56:-27-835.796P790D: 9625; 9596S7.; 20-6 | ||
| E,625Eé6: 98áéE3í7A6»®R6S: (0-09837656G7859F62032; 087610.3á; .02767D983; 0.7A»®R6L56(á' ; 0-5680: -6 ( ; 215625), | »®R6EE: 28; 536; .6202,76.; 6,5 5.76; .6,56(á' ; 0-5A»®R6D: 925,20E0'; : 6,56(á' ; 0-5A»®R6S06: .6437D.; ( 564: 39098; 6.030G039; 65,6S: 3 0207656C,0: -8 L5 5))5A | 96 |
| L5625-80.5.6: .625Eé69; (0-09835.56: 960-9; E020: -8: 676x2: 90 5A | »®R6P37G35(520ó-60-2733: 2856. : 6,596. 7909A | 96 |
| N7695.: 625Eé6. : .69; 380.73F64: 37695.: 6 54736. : 6,5635: ; 35645356,560-9: 320ó-6. : 62á49; .59A | »®R6L5645,5-256. : 6253G56-769: 61564; : 9876: -64790206-6. : 643: 453520ó-A | 96 |
| E,625Eé695.: 656G7859%»®R6Cá49; ,56.: E: 28; 795A»®R6L56D7(D56-76E: -207-562733: 285(-8:A»®R6B7'; 0,56. : 69; (0-09837/2032; 0876R6L0(40:6,69; 380.736. : 625Eé6(27-9; 8:6,6545385.76MANTENIMIENTO6Y6LIMPIEZA)A»®R6L56(á' : 0-5680: -6 ( ; 215625), | »®R6S: 9808; 036,562á49; .564736; -56: ; 54»®R6C7(437D536906,56(a' : 0-56; (08:63; 0.7965-6(5,79)MANTENIMIENTO6Y6LIMPIEZA)A»®R6D: 925,20E0'; : 6,56(a' : 0-5A»®R6S06: .6437D.; ( 564: 39098; 6.030G039; 65,6S: 3 0207656C,0: -8 L5 5))5A | 96 |
| U-76. : 6,796. 796D787: : 96-76E: -207-56y6: .6LED62733: 947: .0: -8: 65453: 2: 6545G5. 7A | »B,7'; : 76( : 2á-027 | 96 |
| »®R6D: 9: -21; E536,56(á' : 0-56.; 35-8: 61069; G: .. 796y67, : 3656: -21; E536E-2: ... : 36,56(á' : 0-56y627 (437D536); : 6,796. 796D787: : 96E: -207: ... -62733: 285 (-8:A»®R6S06: .6437D.; ( 564: 39098; F647. 3áb. : 687. 796(7. 79F69; G: 03680,0.5-76,56(á' : 0-5627-6; .678376D780-6a: -6: 98:625976: .6D780-6"; : 6E: -207-56-768: ... 3á6,56. 79E025206-65; 87 (á8025F6906-76"; : 69: 3á627-6. 79096,0D3: 6v69: 3á6; .6;9; 53076"; 0: -6. : 20.03á62; á: ... 760-8: 33; (4036,56.7909A»®R6S06: .6437D.; ( 564: 39098; 6.030G039; 65,6S: 3 0207656C,0: -8 L5 5))5A | 96 | |
91;508,HO43)1305;3295(01*.;3*A;3,5*841;
| P37D.; (56:-27-835.796P790D: 9625; 9596S7.; 206-6 | ||
| E,6:94; (5.736.;6:21;6-769:6:-20:-.6D:94;é96.6:615D:3643:907-5.76;64;95.736( .80E;-206-6;68:980G764:3(5:-2:6545G5.7A | »R»R»6A4535876-7627:-285.7656,563: ,é283025A»R»R»6E,654535876:98á627:-285.765687(596(ú,804.;967656;-6)54580,,5A»R»R»6N76::G5627330:-8:656,5687(5A»R»R»6E94; (5.736.;6:21:627,725.0-2733:285(-8:A)»R»R»6F5,,76:-6:62032;0876;é283027A | »R»R»66A9: G; 3539: 6:6'; : 6:625D; 6:65,0( :-8520ó-6:98é627:-285.762733:285( :-8:656,5687(56:627330:-8:A»R»R»6C7:-28536;6:21:698é627,725.2733:285( :-8:6:-6,56D59:6y6'; : 6-7615y562; : 34796x835n796:-83,6,56D59:6y6;6:94;(5.736'; : 60(40.5-6;,6E:-207-5(0:-8762733:287A»R»R»66D030G039:65,6S:302076:6A8:-206-65,6C:0:-8:6L5)5A |
| E,6:94; (5.736.;6:-21:6-76(7-856,56.;21:A) | »R»R»6B580.736-760-985,5.76:-6:6:94;(5.736.;6:21:676-76:-95( D,5.7/27,725.762733:285(-8:6:-6,6:94;(5.736.;6:21:A)»R»R»6B78ó-6:(.80E:-287-65674:3539:0-2733:285(-8:A)»R»R»6E94;(5.736.;6:-8:60)-206-A | »R»R»6A9: G; 3539: 6:6'; : 6:6,D580.736:98é6:-95( D,5.76y627,725.762733:285( :-8:6:-6,6:94;(5.736.;6:21:A)»R»R»6A9: G; 3539: 6:6-7643:907-536.796:2:96,-95.736( .80E:-206-A5R»R»6D030G039:65,6S:302076:6A8:-206-65,6C:0:-8:6L5)5A |
| E92595625-80.5.6:-6:94;(56:-6,56:-21:A) | »R»R»6B580.736-760-985,5.76:-6:6:94;(5.736.;6:21:676-76:-95( D,5.7/27,725.762733:285(-8:6:-6,6:94;(5.7.36.;6:21:A)»R»R»6E94;(5.736.;6:-21:676D580.9:2079A»R»R»6C5-80.5.6:-6:21:60-2733:285A»R»R»6A9: G; 3539: 6:6'; : 6:6,5625-80.5.6:-6:21:69:562733:285F3:94:85:-76,796:-0:-960:-0:25.79A»R»R»6P5356,7G3536; -56ó480( 56:94;(5625;0:-8:69:6527-9:j56;80);536.:21:6:-8:356(4598;30)5.5676UHT)6:-356(4-8°C)6P5356,7G3536;-56ó480( 56:94;(56E15F0:6527-9;j56;80);536.:21:6:-9-585.56:-6:56:-356(4-8°C)A»R»R»6T0:(476:-6:94:356;( y6,53G76:-83:6,-60-5.6:-6,5643:453520ó-6y6:-627-9;(7A | »R»R»6A9: G; 3539: 6:6'; : 6:6,D580.736:98é6:-95( D,5.76y627,725.762733:285( :-8:6:-6,6:94;(5.736.;6:21:A)»R»R≫6E94;(5.736.;6:-8:6:-6,6:94;(5.736.;6:21:A)»R»R»6A9: G; 3539: 6:6'; : 6:6,D580.736:98é6:-95( D,5.76y627,725.762733:285( :-8:6:-6,6:94;(5.736.;6:21:A)»R»R»45356,7G3536; -56ó480( 56:94;(56E15F0:6527-9;j56;80);536.:21:6:-9-585.56:-6:56:-356(4-8°C)A»R»R»6V: 38:360:- ( : .0585( :-8:6,5643:453520ó-67D8:-0.56:-6,5685)56y627-9;( 03,56.:-60-( : .0587A |
| P37D::(56:-27-835.796P790D::9625;9596S7.;20-6 | ||
| B78ó-®6:2:-.0.76.:6E73(560-8:3(08:-8:6.::627,73637j7A) | »®®6A453587697D3:25:-85.7%»®®6F5,,76:-6,62032;0876,:6283027A | »®®6E94:35365,G:-796(0:-;8796y6 7, :36560-8:-853A»®®6A9:G;3539:6.6' ;6,56.;21:6;80,0)5.6-7615y5690.7625:-85.5A»®®6V520536,56:21:6.:-63:2040:-8:F6:-j;5G53627-65G;56E3156y63:4:8036,6202,7A»®®6D030G039:65,6S:302076. :6A8:-206-65,6C,0:-8:6L5)5A |
| L56::21:69:6.::335(56.::,63:2040:-8:A) | »®®6Ex2:90 5625-80.5.6:6:21:A»®®6R:94:8536,796-0:-960:-.025.79645356:680476. :643:453520-Å | |
| L56::21:6-769:615625:-85.7F6:964:3(5:-2066E317A) | »®®6B786-6(;-80E:-2807-65674:3539x®®6C7-837,536.:-76(5-8:-3643:907-5.76. ;35-8:60-2733:285(-8:A)»®®6E94:(5.7356.6:21:6.5n5.5x®®6D030G039:65,6S:302076. :6A8:-206-65,6C,0:-8:6L5)5A | |
| L:21:6.:(5905.7625,0:-8:676;:(5.5A) | »®®6C5-80.5.6.:-6:21:60-2733:285»®®6A9:G;3539:6.6' ;6,5625-80.5.6.:-21:6-769:560-E:307365,6-0:-6MINA»®®6E94:(5.7356.6:21:6.5n5.5x®®6D030G039:65,6S:302076. :6A8:-206-65,6C,0:-8:6L5)5A | |
| E,6:94;(5.736.:-6:21:6152:63:0.7A | »®®6C7(47:-8:960-985,5.796.:-6(7.760-2733:287A)»®®6A9:G;3539:6.:-615D:3627,725.762733:285(-8:6,-6D580.73A»®®6A9:G;3539:6.:-6' ;6,5685456:98é627,725.562733:285(-8:A)»®®6A9:G;3539:6.:-6' ;6,654535876:98á64790207-5.7697D3:6;-569;4:3E020:6,-5-56y6:985D:-A | |
| »®®6P3:9:-2056.:-62;34796:x835n79x®®6C7-837,536' ;6:-8376.:-63:2040:-8:6.:-6,56;21:6-7615y562;34796:X835n796:-83;56D59:6y6:6:94;(5.736.:-6;21:6' ;60(40.5-6,-6E:-207-5(0:-8762733:287A) | ||
| L56D:D0.56E3156-769:615643:4535.7A | »®®6P;95.736(-,80E:-20-652207-5.76.:-6(7.76:336:-7A»®®6C7-837,536.:-6(5-8:-3643:907-5.76. ;35-8:6169:G:-.796;64;95.736(-,80E:-20-6-A»®®6D030G039:65,6S:302076. :6A8:-206-65,6C,0:-8:6L5)5A | |
91;508,HO43)1305;3295(01\*.;3\*A;3,5\*841;
| P37D,: (56:-27-835.796P790D) | 9625; 9596S7,; 20ó-6 | |||
| L5643: 453520ó-69: 6.: 80: -: 6 0- (: . 0585 (: -8: 6. : 94; é96. : 6 15D: 3627 (:-)5. 7A | »R»E94; (5.736. : 6.; 21: 6. : (5905 25,0: -8:A »R»U80,0)53627-6,; 21: 625,0: -8:A »R»E94; (5.7356. : 6.; 21: 6. 5ñ5. | »R»E-j; 5G536, : 6 597627-65G; 56E3156y627,72536, : 21: 6E3156; -6 9; 60-8: 3073A »R»N76 7, : 3656; 80,0)53627-6,; 21: 6y5625,:-85. 546U80,0)536 , 21: 6E315A »R»E94; (5.7356. : 6.; 21: 6. 5ñ5. | »R»Ej: j; 5G536, : 6 597627-65G; 56E3156y627,72536, : 21: 6E3156; -6 9; 60-8: 3073A »R»N76 7, : 3656; 80,0)536227-6,; 21: 6y5625,:-85. 546U80,0)536 , 21: 6E315A »R»E94; (5.7356. : 6.; 21: 6. 5ñ5. | »R»Ej: j; 5G536, : 6597627-65G; 56E3156y627,72536, : 21: 6E3156; -6 9; 60-8: 3073A »R»Ej: j; 5G536, : 6597627-65G; 56E3156y627,72536, : 21: 6E3156; -6 9; 60-8: 3073A »R»Ej: j; 5G536, : 659627-65G; 56E3156y627,72536, : 21: 6E3156; -6 9; 60-8: 3073A »R»Ej: j; 5G536, : 659627-65G; 56E3156y627, -8: 6L5 5)5A |
:6a627(43::-9a76.7964:30G7960:-3:-8:96a6(:9(5A6
A962305- C596-; -256. : : ( 6D30- 253627( 656( 'a' ; 0- 5A66A6,0( 4: )56: 656( 5-; 8: -ca7656
LOG:656(a';0-564535625Eé697(-8:6:(687(5.596.:67,85G:(65.:';5.596:6:,045-
.596:658:335(-876;e83027A6
A68:-9a76. : : 62733: 947- . : 36a60-. 025. 56- 564,5256. 56( a' ; 0- 5A

;1-89.4'.
46, abo3dC3corrCnAC:3
Nā76; 953656( á' ; 0-56. : 625Eé69: 67625D76. : 62733: -8: 680 : 36. : E: 087A6
S: 67625D76. : 62733: -8: 6: 980 : 36. 5-0E025. 7F6. : 69: 369; D9808; 1. 764: ,76E5D3025-8: 67; 64: ,769: ; 69: 3 0c76. : 6599098e-20568e2-025F656E0( 6. : 6: 08536'; 5, ' ; 3630927A6
Nā76E5c56459953676E076. : 65,0( : -85ca764736a-G; ,79F6: ( 625-8796 0 796: 697D3: 67Dj: 28796( ; 0876'; : -8: 9A6Nā7627,7'; : 67; 64; x: 656( a'; 0-564535625Ee69: G; 35-. .7-564: ,76E07A6
Nā76: x8350365687( 5. 564; x5-. .7-564: ,76E07C6-ä768725-,5627( 6596 ( a796( 7,15. 59A6
E 08: 6'; : 676E076. : 65,0( : -85ca7625056,0 3: ( : -8: 6. : 6( : 95967; 64358: ,0359A6
62 Cr go3dC3ClCcArocuBBao:
Na76E5c56: -83536: (627-85287627(656aG; 565964538: 969; D(:80.596a6 7,85G: (6:,é283025A6 E98: 65453: ,176- a76. : 69: 360(: 397A
432 roACgCr3aB3cr ancaB3com3mCnoB3dC383anoB3dC3 dadC:
M5-8:365962305-C59697D6G0,a-205645356:08536';:6D30-';:(627(6765453,17A6
A962305- c596- a769: 6. a7627-856. 764: 30G765997205. 765796: :, 2837. 7( é980279A6
Na76. : 0x5365765,25-2: 6. 5962305- c596796( 58: 305096; 80,0)5. 79645356: ( D5,53656 ( a' ; 0-5A
32 Cr go3dC3quC maduraB:3
Nā76872536- 5964538:96'; : -8:96(G3; 47647385-2á49; ,59F6:82A)60(:.0585(: -8:654ó96
56;80,0)5ca76.765453:17A6
D;35-8:656951.56.56D:D0.5F68:3658:-ca7656::-8;509695,402796.:6,1';0.76';:-8:A6
0 mpCza:3
A-8:96. :6,0(453656(a'; 0-5F6é60-. 094: -9á :,6. :9,0G53656E02156. 5687 (5. 56. :62733: -8:6 :6:94:3536'; :656(a'; 0-56533: E: c5Nä76C :3G; ,153656(a'; 0-56: (6aG; 5!6
E630G73795( : -8: 64370D0. 768: -8536: E: 28; 536' ; 5,' : 360-8: 3 : -ca76-760-8: 30736. 56 (á' ; 0-5A6S; D9808; 03656aG; 56-76: 4ó9087654ó96l 6. 0596. : 60-; 80,0)5ca7A6
P5356: 08536. : 6. 5-0E02536765453; 176- a76; 80,0)536. : 8: 3G: - 8: 965,25,0- 7964535656,0(4:)5F6 (596; 80,0): 6; (645-76(52076: 6; (6. : 8: 3G: - 8: 6. : ,025. 7A
Arrumaçaoiaiaquna:3
Quando a maquina6- 76E736; 80,0)5. 56.; 35-8:6; (64:317.76.:68: (476437,7-G5.7F6)
retirar a ficha da to(5.56:6533; (53656(a'; 0-56-; (6.; G5369:276:6- a7652:991 :,656)
criangas. Proteger a(á'; 0-56.764O6:6.569; j0.5.:A6
69 CparaçoCB/\* anuACncao:
E(625976. : 65 5305F6. : E: 087967; 69; 94: 0856. : 6. : E: 08796. : 47096. : 6; (56' ; . . .5F63: 803536 . . . . . . . . . . . . . . . . . . . . . . . . . . . . . . . . . . . . . . . . . . . . . . . . . . . . . . . . . . . . . . . . . . . . . . . . . . . . . . . . . . . . . . . . . . . . . . 27 (6. : E: 087A6A4: -596796C: -83796. : 6A99098e-2056Te2-0256A; 8730)5. 79647. : (6 :E: 28; 5360-8:3 : -cO: 96:63:4535cO: 9A6C5976727335 (60-8:3 : -cO: 96' ; : 6- a76:98: j5 (6 : (627-E73(0.5. : 627(6596-73(596.769:2873F6. : 2,0-5-9:6' ; 5,' ; : 363:947-95D0,0. 5. : 6 4736: : -8; 5096. 5-79A6
669 CBCrvaAor o3dC3aguaa:
D:08536-763:9:3 580307654:-596aG;56E3056478a:,F6- a76G59:0E025.5A6Na76403656(a';0-56 :(6E;-207-5(:-8769:6- a76:x098036aG;569:E020:-8:6-763:9:3 580307A6
a03dC3 nAroducao3dC3capBula:3
N76 a76. : 60-837.; ca76. : 62a49; .56. : ( 69: 360-837. ; )0. 596: x2; .90 5( : -8: 62a49; ,5966 L5 5)) 56A MODOMIO67; 627( 4581 : 09c6- a760-837. ; )56796. : . 7967; 6' ; 5', : 367; 8376 7Dj: 287A6A962a49; .596. : ( 69: 36; 80,0)5. 59697( : -8: 6; ( 56 : )A6
61 I m naçao3da3maqu na3Cm3fim3dCv da:3
INFORMACAO6PARA6OS6USUARIOS&67691(D7,76.56,0x:0356D5335.560.;9835.76-765453;1767;6-569;5627-E:2ca760-.0256';:676437.;876-76E0(6.5643043056 0.56u80,6.;:69:3627.;85.769:4535.5(-8:6.7967;83796,0x79A6O6;9;a3076.;:3af647385-87F6:-83:G536765453;176';:621:G7;6-769.;:6E0(6.60.5657960.ó::7962:-83796.;627.;856.0E:3:-205.56.796,0x796;é28302796;6.;:283o-0279A6U(5654374305.5627.;8569:-4535.5645356760-120769;D9:';:-8:6.76';045(:-876:(6.9;97645356563:202,5G:(F657683585(:-876:656;0(0-5ca765(D0:-85,(:-8:627(458i,:627-830D;06:(6:0853679647991;096:E:08796;-G580 796-76(:0765(D0:-8:6-5695u.;:6:E5 73:2:6563;80,0)5ca76:/563:202,5G:(6.796(58:305096. :62;j76e627(47987676';045(:-87A6A6;0(0-5ca765D;90 56.76437.;8764;,76;9;a307627(4738565654,025ca76. 59695-cO:965.(0-0983580-59643:0985964;,56-73(580 56OG:-8:A

*[A96253528:319802596:67627-8:u.76.5627-E:2ca7647.:(6530536:(6D59:6576:(325.76:63:E:3e-205
64 ao3aBBum moB3qualquCr3rCBponBab l dadC3por3 CvCnAua B3danoB3cauBadoB3por:3 3u1 zao3 ncorrCcAaou3no3conformC3com3oB3f nB3 prCv BAoB;3 3rCparaO CB3nao3CfCcAuadaB3cm3cCnArO B3dC3aBB B - Aenc aauAor zadoB3 3dCACr orao3do3cabo3dC3corrCnAC;3 3dCACr orao3dC3qualquCr3componCnAC3da3maqu na;3 3u1 zao3dC3pCaB3BobrCBBClCnACB3cAcCBBor oB3 nao0r g na B;3 3falAa3dC3dBcalc f cao;3 3armazCnamCnAo3Cm3loca B3com3ACmpCraAura3 nfCr ora34°, ;3 3u1 zao5Cm3loca B3com3ACmpCraAura3 nfCr ora3 10°, 3ouBupCr ora340°, ;3 3u1 zao5Cm3loca B3com3hum dadC3rClA vaBupCr ora395%;; 3u1 zao3dCcapBulaBnao3compaAivC B.3 4 CBACBcaBoB,laGaranA asPcrDc3aval dadC.3
66, olocar3a maqu na3Bobr CumaBup Crfc Cplana,hor zonAal CCBAvCI,3afaBAadaDagua.34 ao1 guCamaqu na3nal - mCnAacao3Cler ca.3) CBI gar3a corrCNAC5Clecar caBC3Cx BA r.3 5 BidanoBcauBadoBnaMaqu na3d Cv doao3n0cumper - mCnAo3dCBAA3 nd caoCBnao3CBAOcoBcrAoBpClaGaranA a46
i LJI JH98434KAI ; 89;J; K39M91 2; 191 9N04H8:4K; Nq59K .9j; I -: 9.9H89.8434.K4.04I -4H9H89.,
1 68L:5-8536:63:8035365685(456:F6.:4709F6:x835036763:9:35-863076.:6aG;5
266E-xaG; : 6763:9:3 58030765-8:96. : 6; 80,0)5-,746
36E-21:36763:9:35803076.:6aG;5658e6576-1:6MAX60-.025-7F6;95-.7654:-596aG;56E3056478a:,F69:(6Ga96M7-8536-75(-8:6763:9:35803076:6E:2153627(658545

33agua33quCnAC33ouAroB33liqu doB33podCm33dan f car 03rCBCrvaAor o3Ca3maqu na.34 ao3colocar3maqu -na3Cm3func onamCnAo3BCm3agua:3cCrA f quC-BC3quC Cx BAa3Cm3Buf c enc a3no3 nACrno3do3rCBCrvaAor o.
PT
87.596596:(D5,5G:-96:6454,a76:64,a98025/6I-837.;)5676
D02762544; 220-5.736-56D59:6,é83025F643:98:658:-ca76';:6
9: j564790207-5.762733:85(:-8:A6
WA4JH8:435GJ:4N210410:-500JH;34:N;12.;9N4N;-;9N/4
918951 4H14RJ;N0u.8104
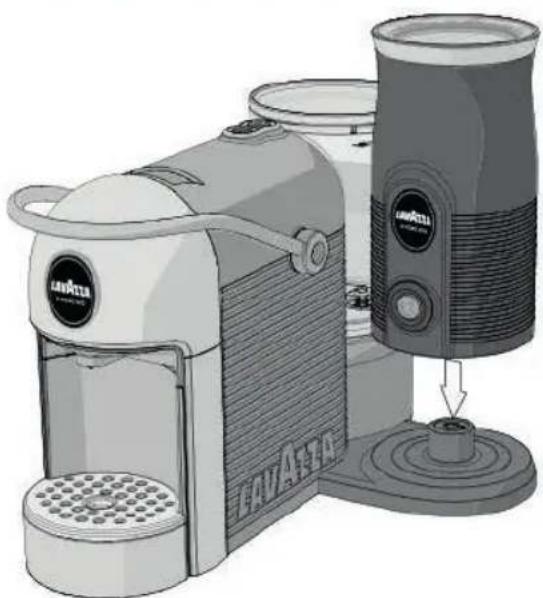
61 BAC3aparClho3fo 3CBAudado3un camCnAC3para3aquCcRc3fazCr3crCmC3dC3IC AC.34 ao3 nAroduza3ouAroB3A -poB3dC3BubBAanc aB3liqu daB3ou3Bol daB3no3rCp CnAC,3fora3daquClaB3 nd cadaB3pCla3oavazza.34 ao3dxC3a3maqu na3dC3cappucc no3dBacompanhadaqundo3amCBma3CBAa3Cm3funcao.
6
66C:380E°: -9:6°: 656a3:56:627-85876.56D59:6:98:156,0(456
:69:25
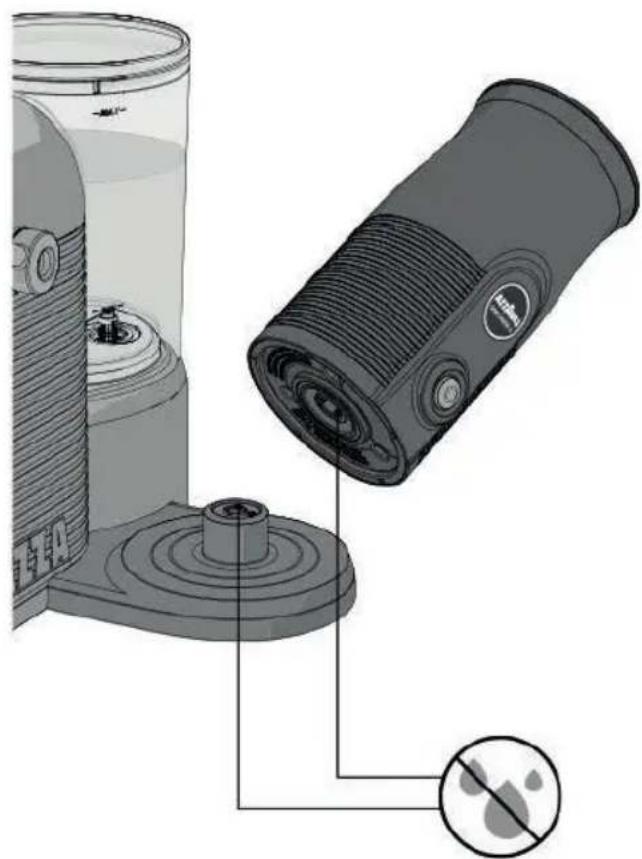
Q8.4:H).13)1314,H*14:5
66R:94:08:69:(43:6796-1:0960-.025.796-760-8:3-76.763:20-40:-8:

64 ao3coloquC3a3maqu na3dC3cappucc no3cm3funcao3 com3o3rCc p CnAC3vaz 05ou3com3uma3quanA dadC3dC3 IC AC3 nfCr or3ao3nivCl3 14 3(603ml).3HBAo3podCr a3cau Baro3CxocBBo3dC3aquCc mCnAo3do3aparClho.31 m3caBo3 dC3xCxcCBBo3dC3aquCc mCnAo,3o3aparClho3BC3dCB1 gara3 auAomaA camCnAC.34 ao3CnchCr3o3rCc p CnAC3alem3do3 nivCl3 HoD,3podCr am3vCr f car-BC3borr foB3dC3I AC3 quCnAC.
66P53565';:2:36:6(7-853676,:08:F6:-215676D02762544;220-5 73627(6:(6(ax0(76::61206,6(-i::,6::G5.*)46
66PS3565':2:36:65(5,G5(53676:08:F6:-215676D02762544;2 20-5.73627(6;(ax0(76:61806,6(-1:6:6*HoD)
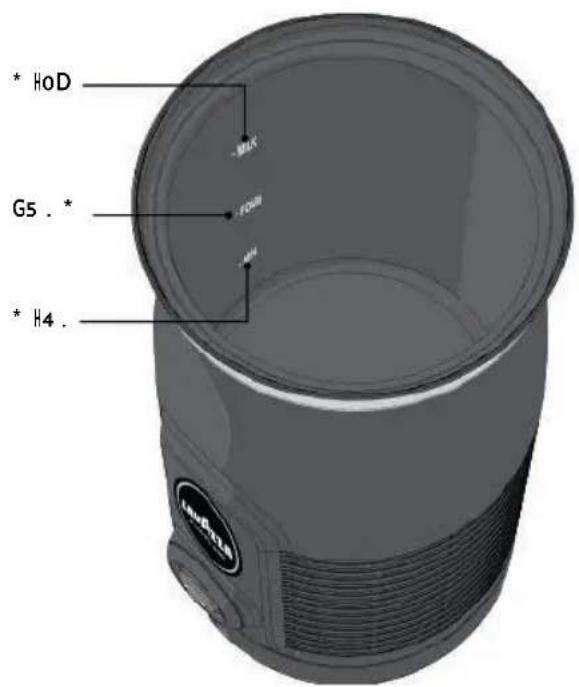
H4:95)8' 53)13.,1;O9H5;

4 aosu1 zC0sb co3cappucc nadorsBCmpr mC roshavCr nAroduz do3o3baACdor.

6R:(7:365685(456.76D02762544;220-5.73

651-837.;)5676D58: .736-760-8: 30736. 76D02762544; 220-5.734
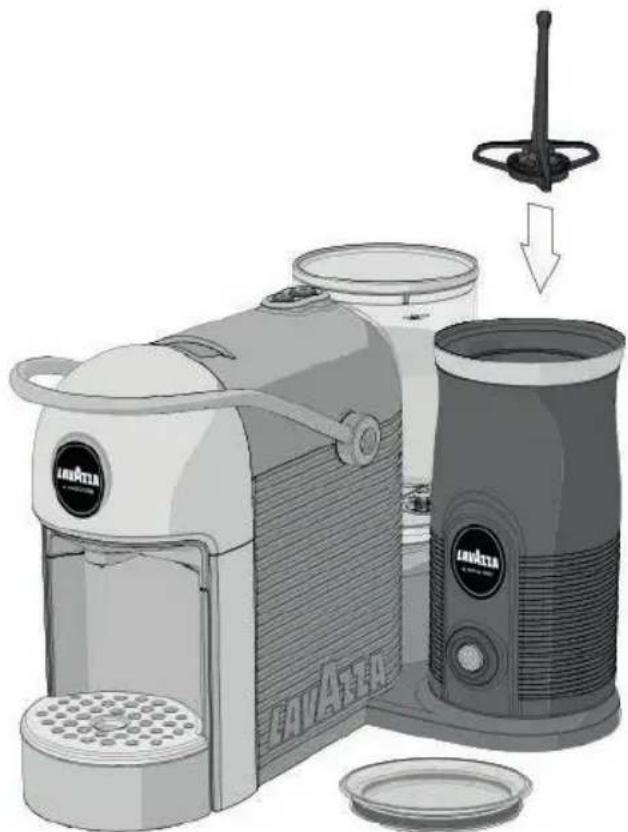

6P790207-:65685(456-76D02762544;220-5.73
CICBODESHMPEZA:PRHMEHRABUTIDIACAO
| × | × | √ | √ | √ | |
| √ | √ | √ | √ | √ | |
| × | × | × | √ | √ |
| P37D; (56C5; 95647991; .6R: 97; .çã76 | ||
| A6(á' ; 0-56-ã76,0G5A L); 96690-5.0)5.73596 545G5.596. : 47096. : 615. : 36 43: 9907-5.76796D780: 96. : 6 ,0G53/E73- : 20( : -8746 | »®®Má' ; 0-56-ã76,0G5.56à63: . . . 6 : ,é283025A >®®M6A6( 'á' ; 0-56: 98á6,0G5.5627( 6 87(5.596(ú,04,5967; 6: x8:-90: 96 ' ; 6-ã76E; -207-5( 62733: 85(: -8:A »®®M6A,0( : -85ca76-ã7643: 9: -8:A | »®®LIG53656( 'á' ; 0-56à63: . . . ,é283025A >®®M6LG; 656( 'á' ; 0-56.03: 85( : -8: 6-563: . . . ,é83025A >®®M6V: 3E0' ; 65643: 9: -c56. : 62733: -8: 6: ,é830256,0G5- . . . 767; 8376 .09479080 76: ,é830276-562733: -8: 6: ,é830256. : 65.0( : -85ca7A >®RS: 67437D; ( 564: 3998: 627-9; 8: 676: 3 0c76: 6C0-8: 9%L5 )5A |
| A6(á' ; 0-56. : ( 7356( ; 0876 8: ( 476565' ; : 2: 3A | »®®M5E98725G: ( 6.56( 'á' ; 0-56: ( 6 5(Da: -8: 6( : 0876E30766 (4736: x&5. : G5/G535G: ( )A»®®M6A( 'á' ; 0-568: ( 6( : 087625,2a3074R®®M6D: 925,20E253656( 'á' ; 0-5A >®RS: 67437D; ( 564: 3998: 627-9; 8: 676: 3 0c76: 6C0-8: 9%L5 )5A | |
| Ma' ; 0-563; 0.795%»®®P5,5-76. : 6547076-ã76: 98á : ,A >®®F076: ,é830276( 5,64790207-5.7 A >®®M6P538: 96( 'ó: 096-ã760-837. ; )0.2733: 85( : -8:A >®®F5,856áG; 56-763: 9: 3 586307A >®®Ca49; ,56-ã7643: 9: -8:A | »®®M6V: 3E0' ; 6764,5-76. : 654707A >®®M6V: 3E0' ; 6762733: 876479207-5( : -876.76E076-56D59: 6.56 ( 'á' ; 0-5A 59R®M6I-837. ; )0362733: 85( : -8: 65964538: 96( 'ó: 09A >®®A8: 9853627( 6áG; 56E3056478a : ,A >®®I-837. ; )036;( 562á49; ,56L5 )567; 627( 458í : ,A >®RS: 67437D; ( 564: 3998: 627-9; 8: 676: 3 0c76: 6C0-8: 9%L5 )5A | |
| A6(á' ; 0-56-ã763: 5,0)5676 E73- : 20( : -87A | »®®M6A 53056: ,é830256796D780: 96-ã76R®M6P3: 9907-536:( 6.796D780: 96: 3E0' : 676E; -207-5( : .56.; )690-5,0)5.7356(52: 9560-8: 3( 08:-8: 6: .62736D35-25)6 : 656580 5ca76.56( 'á' ; 0-5A >®®A8: 9853627( 6áG; 56E3056478a : ,A >®®M6I-837. ; )0362733: 85( : -8: 6763: 9: 3 58ó307A >®®R: 4: 8036764372: .0( : -876. : 6580 5ca76.56( 'á' ; 0-5A >®RS: 67437D; ( 564: 3998: 627-9; 8: 676: 3 0c76: 6C0-8: 9%L5 )5A | |
| P37D.; (56C5; 95647991; .8R: 97.; cã76 | ||
| A6(á' ; 0-564; 3. : 6aG; 56. 564538: 68359: 035A | »®®®®R: 9: 3 5803076-ã760-837.; )0.2733: 85(-: -8:A»®®®R: 9: 3 5803076. 5-ø025. 7A | 76»®®®R: 837.; )0362733: 85(-: -8: 6763: 9: 3 580307A»®®®V: 30E'; : 65643: 9: -C56. : 64: 3. 596-763: 9: 3 58030769: G; 35-.7-769: 4535. 76. 56(a'; 0-5A»®®®S: 676437D.; (564: 39098: 627-9; .8: 676S: 3 0c76. : 6C,0:-B:96L5)5A |
| A6(á' ; 0-564; 3. : 6aG; 56. 564538: 6E37-85,A | »®®®®G5: 856. : 62á49; .596: 80.0)5.596»®®®I-837.; )0362733: 85(-: -8: 656G5: 856. : 62á49; .594-ã760-837.; )0.562733: 85(-: -8:A»®®®G5: 856. : 62á49; .596: 80.0)5: 6:60(4: 656G5: 856. : 62á49; .596: 656G5: 856. : 62a49; .594-8:0G; : 656(a'; 0-56. 563: . 6:é830256: 60-8:06(.5;-5,(-: -8:645356: 92533: G536562á49; .56. 7627-.; .87A»®®®Gá49; .56. : 680476-ã765. .); 5.7A»®®®Gá49; .56. : 680476-ã765. .); 5.7A»®®®Gá49; .56. : 680476-ã765. .); 5.7A»®®®Gá49; .56. : 680476-ã765. .);5.7A»®®®Gá49; .56. : 680476-ã765. .); 5.7A»®®®Gá49; .56. : 680476-ã765. .); 5.7A»®®®Gá49; .56. : 680476-ã765. ; 5.7A»®®®Gá49; .56. : 680476-ã765. ; 5.7A»®®®Gá49; .56. : 680476-ã765. ; 5.7A»®®®Gá49; .56. : 680476-ã765. ;5.7A»®®®Gá49; .56. : 680476-ã765. ; 5.7A»®®®Gá49; .56. : 680476-ã765. ; 5.7A»®®®Gá49; .56. : 680476-ã765. ; 6.076: 6C,0:-B:96L5)5A | |
| A65.5 5-256. : 62533: G5(-: -876-ã765,25-c56564790cã76.; 6E73:-20(-: -8767; 63;-; : 36;(56:x2:990 56E73c56.; 6E: 215(-: -87A | »®®®®G5: 856453562á49; .596; 95.596»®®®E9 5)053656G5: 856. : 62á49; .596; 95.596»®®®R: 4: 8036 56 9: '; e-20586 56 5 5-256-56 4790cã76. : 63:47; 97F65,5-256-564790cã76. : 6951.56. : 625Eé69: 6-ã7E7369; E20:-8:Fe52207-á,-56(5:-;5,(-: -8:6453563:80353652á49; .56. 5627-.; .85627(-;0.56. : 0-56. 56. 563: . 6:é283025A | >>®®®®Gá49; .596: 80.0)567; 627(458i:094L5)5A |
| L.; )9@690-5.0)5.7359@52: 95960-8:3(08:-8:96. : 62736: 3(-:15A | »®®®®Ma'; 0-565 5305.546»®®®C7-9; .8:676S: 3 0c76. : 6C,0:-8:96L5)5A | |
| L.; )9@690-5.0)5.7359@52: 95960-8:3(08:-8:96.;7):96. : 62736D35-25A | »®®®G5: 856453562á49; .596; 95.596»®®®E9 5)0: 656G5: 856. : 62á49; .596: 80.0)5.596: 643: 9907-536; D78a76. : 6,G53/E73:-20(-: -876453563:0-2053656(a'; 0-5A | |
| O625E6950627(6.: (5905.563540.;)F6-ã769506; (625Ee623:(797A | »®®®Gá49; .56. : 680476-ã765. ; '; 5.7A»®®®E9 5)0: 62á49; .596L5)5)567; 627(458i:094»®®®V7,85365627,72536565,5-256-564790cã76. : 63:47; 976:60-9:3036; (562á49; .56-7.5A»®®S: 676437D.; (564: 39098: 627-9; .8: 676S: 3 0c76. : 6C,0:-B:96L5)5A | |
| P37D:: (56C5; 95647991::,6R:97::,ca76 | ||
| O625E6: 98a6E307/6»®®6F73::20( | :-876:(6G78596232;087610.3á;,0276:-8;40.7A»®®6A6(a';0-568:(6:(087625,2a37w®®6D:925,20E0253656(a';0-5A) | »®®6R:5,0):676202,76.:6,55G:(6.56(a';0-5A)»®®6S:676437D::(564:39098:627-9;8:676S:30c76. :6C,0:-8:96 |
| A6':5-80.5. :6. :625E6E73::20.7660-9;E02:-8:67;6:x2:990 5A | »®®6E335.56437G35(5cã76.596.79:9A | »®®6R:5,0):6:(56437G35(5cã76. :6.79:6.7625E6)»®®6S:676437D::(564:39098:627-9;8:676S:30c76. :6C,0:-8:96 |
| O625E6-a769506:69506 54736.7627(45380(-876453560-9:3cã76.5962a49;,59A | »®®6A65,55-256. :62533:G5(:-876. :62a49;,596-a76:98a6-564790cã76. :695i.56. :625E6A | »®®6C7,72536565,55-256. :62533:G5(:-876. :62a49;,596-564790cã76. :695i.56. :625E6A»®®6S:676437D::(564:39098:627-9;8:676S:30c76. :6C,0:-8:96 |
| O625E69506:(6G78596»®®6Cá49; | .56.:E:08;795A»®®6B7(D56-a76E;-207-562733:85(-8:A»®®6F73::2:73/232;087610.3á;,027»®®6Ex:2;85367620,76. :6,55G:(6.76D0276. :695i.56. :625E6(-8:40.7A»®®6A6(a';0-568:(6:(087625,2a37w®®6D:925,20E0253656(a';0-5A)»®®6S:676437D::(564:39098:627-9;8:676S:30c76. :6C,0:-8:96 | |
| U(56.596.;5968:2,596-ã76E:-207-56:6763;580 76LED63:9;856545G5.7A6 | »B,7'; :076(:2a-027A | »®®P37 53656. :9,0G536565,0(:-85cã76.56(a';0-56:x8350. :765687(5.56. :65,0(:-85cã7647361069:G:..796:63:0-837. ;)0-56-7 5(:-8:4L0G; :656(a';0-56:6:30E'; :6762733:876E;-207-5(-876. :65(D5965968:2,59A»®®6S:676437D::(564:39098:Féé6. :6' ;5', ' :36(5:-035647991:627-80:-53656;80,0)53656(a';0-5627(6567;83568:2,56:-98:625976588:2,56'; :6E:-207-56-â7615:3a6(50965.795G:(65:87)(á80256(59f69:3a6. :6.79:6.0:3:69:3a676;9;á307656. :20.036'; 5.-.760-8:337(4:3656.79:A»®®6S:676437D::(564:39098:627-9;8:676S:30c76. :6C,0:-8:96 |
-66T: -9376-7 (0-5,6! 6P78e-2056-7 (0-5,6! 6A,0 (: -85ζa7666
V:36:80; :85627,725.56-56(a’;0-5
-6D0(-90:9466A,8;356 C7(430(-876 P37E;-.0.5.:
M58:305,68:3(74,a98:276
The manufacturer reserves the right to make changes without prior notice.