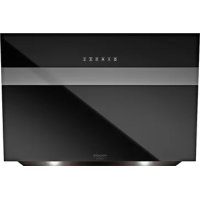
HHVS 8.7F LT K - Range hood HOTPOINT - Free user manual and instructions
Find the device manual for free HHVS 8.7F LT K HOTPOINT in PDF.



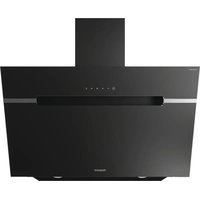
| Product type | Kitchen hood |
| Brand | Hotpoint |
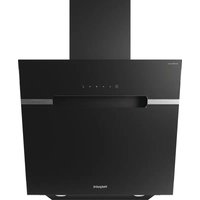
| Model | HHVS 8.7F LT K |
| Height (cm) | 104 - 147 |
| Width (cm) | 79,8 |
| Depth (cm) | 32,3 |
| Exhaust duct diameter (cm) | 15 |
| Installation type | Wall-mounted (extraction or recirculation) |
| Operating mode | Extraction (external venting) or recirculation (recycling) with optional charcoal filter kit |
| Number of speeds | 4 (quiet, medium, high, intensive) |
| Control type | Touch panel |
| Lighting | LED (replacement by after-sales service) |
| Grease filter | Metal, washable (by hand or dishwasher) – monthly cleaning |
| Charcoal filter | Replace every 4 months (not washable) |
| Filter saturation indicator | Yes (for grease and charcoal filters) |
| Automatic stop timer | Yes (10, 15, 20 min depending on speed) |
| High temperature detection function | Yes (automatic activation of medium speed) |
| Minimum distance to cooking surface | Electric: 45 cm – Gas or mix: 50 cm |
| Power supply | See rating plate (230 V ~ 50 Hz typical) |
| Total power consumption | See rating plate (estimated 200 W) |
| LED lighting power | See rating plate (estimated 3 W) |
| Approximate weight (kg) | 15 |
| Noise level | Varies by speed (see manual) |
| Repairability | LED lamps and power cable replaceable by after-sales service |
Frequently Asked Questions - HHVS 8.7F LT K HOTPOINT
User questions about HHVS 8.7F LT K HOTPOINT
0 question about this device. Answer the ones you know or ask your own.
Ask a new question about this device
Download the instructions for your Range hood in PDF format for free! Find your manual HHVS 8.7F LT K - HOTPOINT and take your electronic device back in hand. On this page are published all the documents necessary for the use of your device. HHVS 8.7F LT K by HOTPOINT.
USER MANUAL HHVS 8.7F LT K HOTPOINT
NEMOZE by umyvany alebo regenerovany.
Koralaku szenfilter
Use the correct length for the screws which are identified in the Installation Guide.
Haxatb eue pa3 nToro TTO6by Bb6paBCKOPcTB (MOUHOCTb) HHTEHCBHORO BCacBbAHM(LED L3 Mraet).
PnmueyHne: Ckopoctb (MOUHOCTb) INHTECMHBORCaCbIBAHNDAITTCa H npOtRKeHHnp6H3NTeHbHO 5 MmHT, nocne yeroABTOMaTHueCKn 6ydt BbIpaHa BbICOKa CKopoCTb (MOUHOCTb)BCaBcBAHnA.
T4. Khonka aBtOMaTHuecKOrO BbIKIIOUeHnna (TaIMep) n HnDnKaTop NaCbIeHnHaNbTpApAknBnPoBaHnHO ryr:
ABTomatNueCKoe BBIKJIOueHne:
Haxatb 3ty KhoNky dIpy TOrO yTo6bl yCTaHOBHTb ABTOMaTHueCKOE BIKJIOUHeHNE CKOPcTN (MOUHOCTn) AKTINBOHO BCACbIBAHN:
CKopoocb(MoHOCb)6ecyMHOBCaBHaHn:10MHHT
CKOPOCTb (MOUHOCTb) CpeHrero BCaCbBAHmR: 20 MmHT
CKoPoCTb (MOUHOCrB) BBICOKOr BCaCbIBAHn: 15 minuti
HdkaTop HacbIeHnA KtBpuBaHOro yrr
Korda Mmraet npoBecTu 06cnykBaHne HnIbtpa aKTbnpoBaHHoro
yrr,ecn yctaHOBHe;noCne Yero HaxaTb Ha nnTeIbHoe Bpem KhoNky T6TO6blOCTAHOBHTMBMRHHe.
T5.KhOnKa BbIbopa ckOpocTN (MoUHocTN) "6ecwymHO" BCacbIBaHHn HNDikatop HacbIeHHnXHPoBOrO pNtpa
PnmeaHne: Kda MnaeT npoBcTH OcbcyKbAHne XnPOBOrO 0nIbTa; nocne Yero HaxaTb Ha dNITeIbHOe BpEM RaONKy T6 To6bI OCTaHOBTb MInAHe.
T6. Khonka BKI/BblkIOcBueHne
T3+T4+T5 MuraOuNe: ABToMaTHueCKa paObaTa B npCycTcBn BBICOKo TMnepaTybpI (CMOTpeb OTHOCAUncnaparpaΦ)
BknIOueHne HnIkaTopa HacbIeHn Iyra
3TOT INHIMKATOP, KAK npabNIO, OTKNIOyeh. YTO6bl BKNIOHTb erO HxKHo CnIaTb, KAK yKa3aHO HIXe:
PnBbKIOHHeHH BbITKHe HAKaTb N depXaTb HAKaTbIMNa HINTeIbHO BpEMr ONDOBpeMeHHO T4N T5: ChaHaMa MInrae T5, noTOM TaKKe T4 yka3BaJI pNoBdEHHoe BKIOHeHMe.
OTKIOUeHNE LED HacbIeHne fIbtpa AKTHBnPOBaHHO rYrA: NOBTOPTb OIepauHQ,ONICAHHy Bblie,CHaJIa MIRaKoT T5 N T4,NOTOM TOJbKO T5 yka3bIbaNPOBeDEHoe OTKIOUeHne.
AbTomatuecka paobota B npncytcbnn BbICOKo TEMpepatypbl
BbTtKKa OCHaEHe CEPoPOM, YO m3MepeR TEMnepaTyP. KorJa OHa cTaHOBHTc CmUkOM BbICOKo, CEcoP AP botAMTuHecCKN BKNIOuAeT CKOPoCTb (MOUHOCTb) cpdHrO BCaCBiBAHIN. BtTtKKa OTKnIOHTbc KAK TOnbKO TemnepaTy pM3MePemAR CEhCOPOM 3HaHTIeJIbHo CHImITbcR.
TEXHNUECKOE OBCJNYKBAHNE
OuInCTka
ДЯЧИСКИ NGCJIБЛБУТЕ TOLьКО CSEИАЛБУTO PRANKY,CMOHEHNY HeIITPANBLHIM XUJKIM MOIOUМС PcEDCTBOM. HE ICSNOL3YUME HNKAKNE INCHPTyme DnI OUMCTMKe HE pIpMHeHrTe cpeDcTBa,copeRpaunie abpa3HbHBe MATEpMaIbIb. He IPNPMeHrTe CINPT!
Pahenb nepumetpaBHoro BCacbBaHn
HCTNb BACsbAkoUyO, HApKHyO NaHEB c ToE JAcTcOTOn ITO IN KJIOPOOB 0nIbTp, MCNb3y CaIeTeKy C He CNbHO KOHeTpPOBaHHM MOIOuIM cpeCDToB. Hi KOrJa HE cNcNo3oBaTB a6pa3BNHBe BeueCTBA.
06cnyxmbHHe xipoBbIX ΦnIbTpOB
YdepKnBaETacntuBjXnpa,NCxOJauneoTnnTbI.
Фньссгсгсгсгсгсгсгсгсгсгсгсгсгсгсгсгсгсgннннннннннннннннннннннннннннннннннннннннннннннннннннннннннннннннннннннннннннннннннннннн <|im_start|>assistant Фпьрссгсгсгсгсгсгсgн Ньшчы Ньшчы Ньшчы Ньшчы Ньшчы Ньшчы Ньшчы Ньшчы Ньшчы Ньшчы Ньшчы Ньшчы Ньшчы Ньшчы Ньшчы Ньшчы Ньшчы Ньshчы Ньshчы Ньshчы Ньshчы Ньshчы Ньshчы Ньshчы Ньshчы Ньshчы Ньshчы Ньshчы Ньshчы Ньshчы Ньshчы Ньshчы Ньshчы Ньshчы Hb Hb Hb Hb Hb Hb Hb Hb Hb Hb Hb Hb Hb Hb Hb Hb Hb Hb Hb Hb Hb Hb Hb Hb Hb Hb Hb Hb Hb Hb Hb Hb Hb Hb
PnMbTBe NocdyMOeCHNO MaHINHe MOKeT NMeTb MecTo HeKOTOpoe oBecueHBaHHe MnIbTa3aepKKn Kpa, Ho erO MnIbTypuOaJXapakTePcNTkA OCTaETC a6CONHTHO HeM3MHNoo.
Ia ChTnA FInbTpA 3aepKKn Xnpa NotaHnTe K c6e NpnyKeHHyO pykky OtuennHeNr FInbTpA.
06cnyxmbaHne yroIbHoro qnIbTp
Ydannr HnnpHbIe 3aaxn KxHN.
HacbIeHne yroIbHO rPnOcXoNDT NO nCTeHmN 60nee HIN MeHee dIITbHOr eepnoa 3KcPiyatauun, npedoppeJeMaero TNOm KxHN I nepOIOHOCBTO OUcTKn FInbTPOB 3AepkKn Jnpa. B IIObOM cTyHae, 3aMeHHe TKeapTpIX NO kPain He Mepe Yepe3 KaJdbie 4 MecHa (INN KORda CmTeMa HINDAKAn HAcbIeHne FInbTPOB, ecnn OHn IMeETCB BAuei MOeJIY, yka3bIaEBaT Na daHHyo Heo6xOmoMocTB).
YrOJIbHbI ΦIJIbTp HE noDJIeXnT MoIke IIN pereHepaUIM.
KpyTbIy yrObnHbIy qnIbTp
PokpbIb pfNtbpamn o6e cToPOhbl nra 3aueXneHnnaHTbIX peWetOK
potopaDburatena, nocne yero BpaataBnIbTp no yacobon Ctpelke.
IINCHTNA-BPAAATb npOTNBACOBONCTpeKN
3aMeHa JAmn
OTKnIOUHTe npBOp OT 3JNEKTPocetN.
BHHMaHHe InpexKe Yem npKacatbca K Naamam y6eHntecb B Tom, TTo OHN octbln.
3aMeHnTb NOBpeKdEHHyNoAMNOnyHa HOByo TAKOrO Je TnA, KaYkza3aHO Ha 3TNKe, ININ PdOM C NaMnOcKo HA BbITJKe.
BbTgKkO6OpDyOBaHcBSeHHeM Ha CBeToMDox LED.
CBeToIONoBbI ObecneuBAHOT ONTMaNbHoE OCBeUHeHnIX CpOK cnyk6b1 B 10
pa3 npeBbIaeaT cpoK pa6ObTl TpaHnHOHHbIX lamnoeK, H No3BOJIaIOT
3KOHOMITb 90% 3NeKTpO3HeprMn
YTO6bI npno6pctn HOBBI CBETOaMD, 6oPaTNCB CnyKBy TeXHueckO NOIDepKKn.
YTNJIN3AUIN
Dahno n3eJnne npomapKIpObaHO B COOTBcTcBm C Ebponecko DnpekTbBOI 2012/19/EC no ytniHaunn 3JeKtpueckoro n 3JeKtpoHOrO o6OpyobAHn (WEEE).
ObcneHn npabnHyy ytnn3aunno daHoro n3denn, Bbl noomokete npedTbpaTntb NOeHnIaIbHbIe HERATNBHe IocNeCTBnI DnKpyKaoue CpeBn 1DIOPOBBY cHOBeka.

CMMON HA CAMOM H3dennn HIN CONPOBNTeHbHO DOKyMHTaUN YK33BaET,TO pN pYNTHIN3AAMDANHORI 3nHnEHNHE3B 06paatcbKa Kc C 06bHbIMN 6bTOBbIMN OTXoAMn BmecTo 3tORO,ero cNeyET cDaBAtb COOTBCTByIOUyHK NTPEMKN 3NEKTPueckoro N 3NEKTPoHHORO 06OpOBOAHIN JIIOACNEyIOUeY TYN3Aauu.
CdaHa HcNOM DIOJIKHApOIN3BOIMTBcB C COOTBECTBm C MeCTHBIM npabnAmn No yTIN3aun OTXoOB.
3a 60nee noDpO6Hoi HnOpMaueMe O npabunax o6paueHn C takmmN3dennm, IN x yTnIIN3aun IN nepepa6OTKn 6bpaauTecb B MeCThble opraHbBnactn, B cnykby no yTnIN3aunn OTXoDb nIN B mRaAHn, B KOTopom BBy npno6pen DaHHoe n3dene.
YcTpoCTBO pa3pa6oTaHO,NCbIHaHO u3rTOBnEHO B COOTBETCTBN C
-Be30nachochtb:EN/IEC60335-1;EN/IEC60335-2-31,EN/IEC62233.
- 3KcnIpyaTaMQHbIe XapakTepeNtKN: EN/IEC 61591; ISO 5167-1; ISO 5167-3; ISO 5168; EN/IEC 60704-1; EN/IEC 60704-2-13; EN/IEC 60704-3; ISO 3741; EN 50564; IEC 62301.
EMC:EN 55014-1; CISPR 14-1; EN 55014-2; CISPR 14-2; EN/IEC 61000-3-2; EN/IEC 61000-3-3. Претхенядгп правиьоги Испоботаьи в саллары
Снжени BO3DEДСТВИHA OKРУЖAOUуОчу.БКЛЧИТЕ BБТХКНОПАК
HA MHHIMANHBOCKOCTN, KORDA HauHnAteTe ROTOBIT, N OCTaBtE erO
PabotaB T ByeHTHE HeCKOBKx MNHT NOcTe TOR, KAK ZAOHNTe ROTOBITb.
YBeHNuBAte COKOCTe TOnkBO CByuYe BoKoTOKNeOLOKHTB Odima n npa,
n npi6beraTe K INCHONZOBAHNO NBUJIeHbIX CKOPCETo TOnkBO B
3KCTpeMaIbHbIX CNTyaJmX. 3aMeHЯTe YronbHbI ΦINbTp(b), KORDA 3TO
Heo6xOdmo, DnI NOdEPxAHN XopoWey 3ФФeKTHBHOCTN yMeHbUeHnA
3anaxOB. OChuaIe XkpOBHbIe ΦINbTp(b), KORDA 3TO Heo6xOdmo, DnI
NoDepxAHN XopoWey 3ФФeKTHBHOCTN XkpOBoro ΦINbTpA. NcONb3yIe
MAKcIMaNbHbI DaMaTe PnCTeMBo BO3dYXOBOD, Yka3aHbI B DAHOM
pyKOBOdCTBe, DnI ONTNIM3aUIN 3ФФeKTHBHOCTN MHHIM3aUIN yPOBHR
UyMa.
AHOMAJINB PABOTE
Ecniyto-To He pa6oTaET DoJIKhbIM o6pa3OM, NpeI TeM KaK o6paTHTbCBA
Cnyx6y no Texnueckomy 6cnyxmbaHIO, BbINONHTe cneDyHoume npoctbie npOBepK:
Ecnn BbTgKaHaepa6oTaE:
PpOBepntb.
TTO 6bI He 6bIJa npepBaHa NoDaYa TOKa.
-TO6bI6bIaBbIpaHaCKoPocTb.
EcnBbTnKa nnoxopaboTaet:
PPOBepuTb:
TOBb6paHnHaCKOpOCTbBnIaTeJIaDcTaOHTaNJaTBAbIpa6oTaHHoroKONHecTBaDbIMaNapa.
- YTO KUYXHIOCTATOCHIOPOBETPEHA DnTOTO, YTO6bI BbITRAKKA MOrJa BBINOHHTb 3abOp BO3dyxa.
YTOYRONBHmFmBTPHeOTpa6oTaH(BbITAAKBApeXIMEC peuPKyIaMEn BO3dyxa).
EcIN BbITAAKKa BbIKHOnHnAcB XOe HOpMaIbHO pa6ToB!
PpOBepntb.
TTO He npepBaHa noDaHa TOKa.
-TO He cpa6oTaJ ODHONIOHCByBiknoaOuAnnapat.
B cnyuae Bo3MOxHbix aHomamn B paOte, nepe Tem KAK o6paTntbcra B cnky6y TeHHueCKoRO 06cIyKmbaHn OTKIOHHT ot AEKTPonHnAannapat MNHMym Ha 5 ckyHd, bblHmair BNkN y NOTOM nOeDHNb Eero CHObA. EcIn aHomamn B paOte npOJNaet cyueCTBOBaTb o6paTntcbra C ny6y TexoClyKBAHn.
TEXHNUECKNE DAHHbIE
Before any cleaning or maintenance operation, disconnect hood from the mains by removing the plug or disconnecting the mains electrical supply.
Always wear work gloves for all installation and maintenance operations.
This appliance can be used by children aged from 8 years and above and persons with reduced physical, sensory or mental capabilities or lack of experience and knowledge if they have been given supervision or instruction concerning use of the appliance in a safe way and understand the hazards involved.
Children shall not be allowed to tamper with the controls or play with the appliance.
Cleaning and user maintenance shall not be made by children without supervision.
The premises where the appliance is installed must be sufficiently ventilated, when the kitchen hood is used together with other gas combustion devices or other fuels.
The hood must be regularly cleaned on both the inside and outside (AT LEAST ONCE A MONTH).
This must be completed in accordance with the maintenance instructions provided. Failure to follow the instructions provided regarding the cleaning of the hood and filters will lead to the risk of fires.
Do not flambé under the range hood.
The use of exposed flames is detrimental to the filters and may cause a fire risk, and must therefore be avoided in all circumstances.
Any frying must be done with care in order to make sure that the oil does not overheat and ignite.
CAUTION: Accessible parts of the hood may become hot when used with cooking appliances.
For lamp replacement use only lamp type indicated in the Maintenance/Replacing lamps section of this manual.
WARNING! Do not connect the appliance to the mains until the installation is fully complete.
With regards to the technical and safety measures to be adopted for fume discharging it is important to closely follow the regulations provided by the local authorities.
The air must not be discharged into a flue that is used for exhausting fumes from appliance burning gas or other fuels.
Do not use or leave the hood without the lamp correctly mounted due to the possible risk of electric shocks.
Never use the hood without effectively mounted grids.
The hood must NEVER be used as a support surface unless specifically indicated.
Use only the fixing screws supplied with the product for installation or, if not supplied, purchase the correct screws type.
Use the correct length for the screws which are identified in the Installation Guide.
In case of doubt, consult an authorised service assistance centre or similar qualified person.
WARNING! Failure to install the screws or fixing device in accordance with these instructions may result in electrical hazards.
Do not use with a programmer, timer, separate remote control system or any other device that switches on automatically.
The hood can look different to that illustrated in the drawings in this booklet. The instructions for use, maintenance and installation, however, remain the same.
Closely follow the instructions set out in this manual. All responsibility, for any eventual inconveniences, damages or fires caused by not complying with the instructions in this manual, is declined. This appliance is intended to be used in household and similar application such as: - staff kitchen areas in shop, offices and other working environments; - farm houses; - by clients in hotels, motels and other residential type environments; - bed and breakfast type environments.
! It is important to conserve this booklet for consultation at any moment. In the case of sale, cession or move, make sure it is together with the product.
! Read the instructions carefully: there is important information about installation, use and safety.
! Do not carry out electrical or mechanical variations on the product or on the discharge conduits.
! Before proceeding with the installation of the appliance verify that there are no damaged all components. Otherwise contact your dealer and do not proceed with the installation.
The minimum distance between the supporting surface for the cooking equipment on the hob and the lowest part of the range hood must be not less than 45cm from electric cookers and 50cm from gas or mixed cookers.
If the instructions for installation for the gas hob specify a greater distance, this must be adhered to.
ELECTRICAL CONNECTION
The mains power supply must correspond to the rating indicated on the plate situated inside the hood. If provided with a plug connect the hood to a socket in compliance with current regulations and positioned in an accessible area, after installation. If it not fitted with a plug (direct mains connection) or if the plug is not located in an accessible area, after installation, apply a double pole switch in accordance with standards which assures the complete disconnection of the mains under conditions relating to over-current category III, in accordance with installation instructions.
Warning! Before re-connecting the hood circuit to the mains supply and checking the efficient function, always check that the mains cable is correctly assembled.
Replacing the power cable
The hood is provided with a special power cable; if the cable is damaged,
request a new one from Technical Service.
AIR VENT
(for the suction versions)
Connect the hood and discharge holes on the walls with a diameter equivalent to the air outlet (connection flange).
Using the tubes and discharge holes on walls with smaller dimensions will cause a diminution of the suction performance and a drastic increase in noise.
Any responsibility in the matter is therefore declined.
! Use a duct of the minimum indispensable length.
Use a duct with as few elbows as possible (maximum elbow angle: 90^
! Avoid drastic changes in the duct cross-section.
The company declines any responsibility whenever these regulations are not respected.
FILTERING OR DUCTING?
Your cooker hood is ready to be used in suction version.
To use the hood in filtering version the special ACCESSORY KIT must be installed.
Check on the first pages of this manual if the ACCESSORY KIT is furnished or must be bought separately.
Note: If furnished, in certain cases, the additional activated carbon filtering system may be installed on the hood.
Information about the conversion of the hood from suction version to filtering version is present in this manual.

Ducting version
In this case the fumes are conveyed outside of the building by means of a special pipe connected with the connection ring located on top of the hood.
Attention! The exhausting pipe is not supplied and must be purchased apart.
Diameter of the exhausting pipe must be equal to that of the connection ring. Attention! If the hood is supplied with active charcoal filter, then it must be removed.

Filter version
The aspirated air will be degreased and deodorised before being fed back into the room.
In order to use the hood in this version, you have to install a system of additional filtering based on activated charcoal.
CONTROLS
The hood is fitted with a control panel with aspiration speed selection control and a light switch to control cooking area lights.

T1

T2

T3

T4

T5

T6
To select hood functions, simply touch the controls:
T1. Button ON/OFF suction motor
T2. Button to select medium suction speed (power)
T3. Button to select high and intensive suction speed (power)
Press once to select high suction speed (power) (LED L3 on);
Press again to select intensive suction speed (power) (LED L3 flashing).
Note: The intensive suction (power) speed lasts for approximately 5 minutes, then the high suction speed (power) is set automatically.
T4. Automatic shutdown button (Timer) and saturation indicator for charcoal filter:
Automatic shutdown:
Press this button to set the automatic shutdown of the active suction speed (power):
Silent suction speed (power): 10 minutes
Medium suction speed (power): 20 minutes
High suction speed (power): 15 minutes
Saturation indicator charcoal filter
When flashing, perform maintenance of the charcoal filter, if installed, then keep the button T6 pressed for a long time to stop the flashing.
T5. Button to select 'silent' suction speed (power) and saturation indicator for grease filter
Note: when flashing, perform maintenance of the grease filter; then keep the button T6 pressed for a long time to stop the flashing.
T6. Button ON/OFF lighting
T3+T4+T5 flashing: automatic operation under high temperature conditions (see relevant paragraph)
Activation of the charcoal filter saturation indicator
This indicator is normally deactivated. To activate it, proceed as follows:
With the hood off, press and keep pressed simultaneously T4 and T5: T5 starts flashing first, then T4 as well, to indicate successful activation.
Deactivation of charcoal filter saturation LED: repeat the operation described above; T5 and T4 start flashing, then only T5 to indicate successful deactivation.
Automatic operation under high temperature conditions
The hood is equipped with a sensor which detects the temperature. When this becomes too high, the sensor automatically turns on the medium suction speed (power). The hood turns off as soon as the temperature detected by the sensor is lowered significantly.
MAINTENANCE
Cleaning
Clean using ONLY the cloth dampened with neutral liquid detergent. DO NOT CLEAN WITH TOOLS OR INSTRUMENTS. Do not use abrasive products. DO NOT USE ALCOHOL!
Perimeter aspiration panel
Clean the perimeter aspiration panel with the same frequency as the anti-fats filter, using a cloth and not too concentrated liquid detergent. Do not use abrasive substances.
Maintenance of the anti-grease filters Traps cooking grease particles.
This must be cleaned once a month (or when the filter saturation indication system - if envisaged on the model in possession - indicates this necessity) using non aggressive detergents, either by hand or in the dishwasher, which must be set to a low temperature and a short cycle.
When washed in a dishwasher, the grease filter may discolour slightly, but this does not affect its filtering capacity.
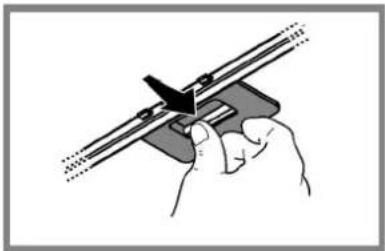
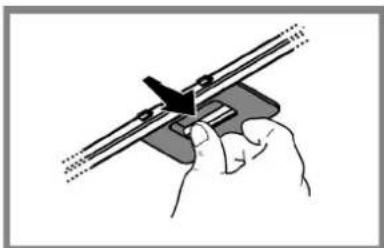
To remove the grease filter, pull the spring release handle.
Maintenance of the charcoal filter
It absorbs unpleasant odours caused by cooking.
The saturation of the charcoal filter occurs after more or less prolonged use, depending on the type of cooking and the regularity of cleaning of the grease filter.
In any case it is necessary to replace the cartridge at least every four months (or when the filter saturation indication system – if envisaged on the model in possession – indicates this necessity). The charcoal filter may NOT be washed or regenerated.
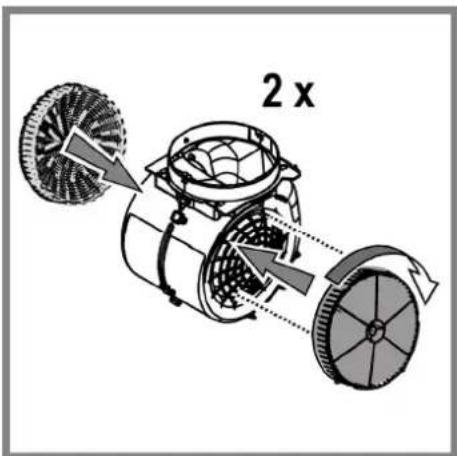
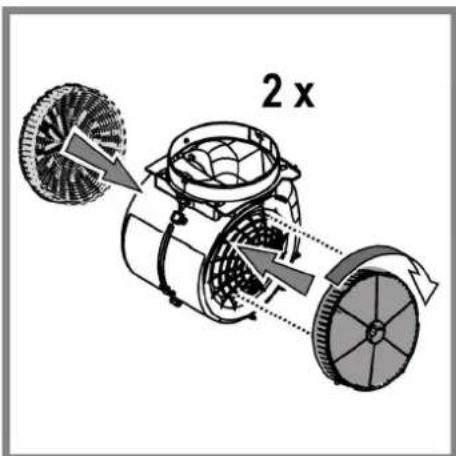
Circular carbon filter
Apply one on each side as cover to both the shield grids of the motor impeller, then turn clockwise.
For the disassembly, turn counter-clockwise.
Replacing lamps
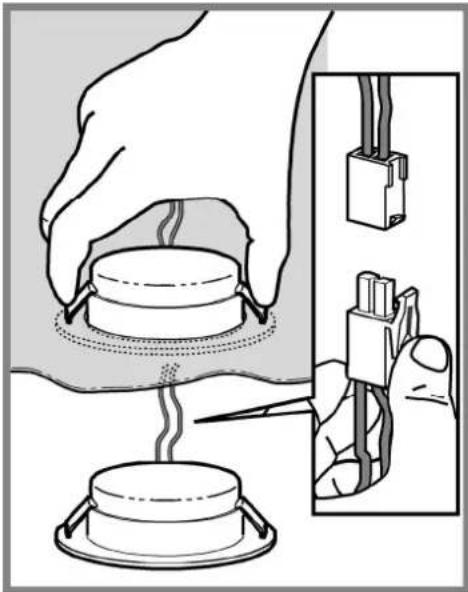
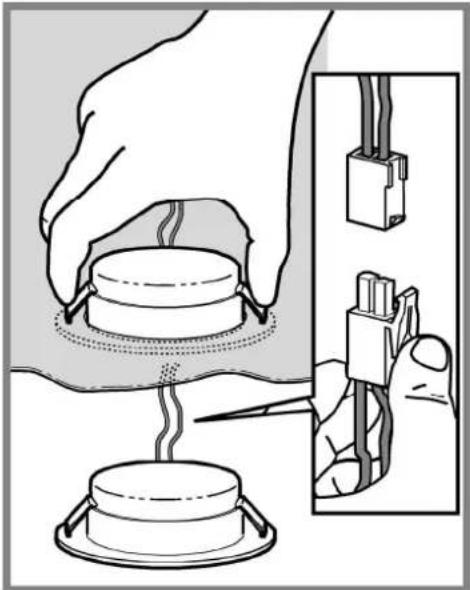
Disconnect the appliance from the electricity.
Warning! Prior to touching the light bulbs ensure they are cooled down.
Replace the old light bulb with the one of the same type as specified in the feature label or near the light lamp on the hood.
The hood is equipped with a lighting system based on LED technology.
The LEDs guarantee an optimum lighting, a duration up to 10 times as long as the traditional lamps and allow to save 90% electrical energy.
To purchase spare LEDs, contact the technical assistance service.
DISPOSAL
This appliance is marked according to the European directive 2012/19/EC on Waste Electrical and Electronic Equipment (WEEE). By ensuring this product is disposed of correctly, you will help prevent potential negative consequences for the environment and human health, which could otherwise be caused by inappropriate waste handling of this product.

The symbol on the product, or on the documents accompanying the product, indicates that this appliance may not be treated as household waste. Instead it should be taken to the appropriate collection point for the recycling of electrical and electronic equipment. Disposal must be carried out in accordance with local environmental regulations for waste disposal.
For further detailed information regarding the process, collection and recycling of this product, please contact the appropriate department of your local authorities or the local department for household waste or the shop where you purchased this product.
Appliance designed, tested and manufactured according to:
Safety: EN/IEC 60335-1; EN/IEC 60335-2-31, EN/IEC 62233.
Performance: EN/IEC 61591; ISO 5167-1; ISO 5167-3; ISO 5168; EN/IEC 60704-1; EN/IEC 60704-2-13; EN/IEC 60704-3; ISO 3741; EN 50564; IEC 62301.
- EMC: EN 55014-1; CISPR 14-1; EN 55014-2; CISPR 14-2; EN/IEC 61000-3-2; EN/IEC 61000-3-3. Suggestions for a correct use in order to reduce the environmental impact: Switch ON the hood at minimum speed when you start cooking and kept it running for few minutes after cooking is finished. Increase the speed only in case of large amount of smoke and vapour and use boost speed(s) only in extreme situations. Replace the charcoal filter(s) when necessary to maintain a good odour reduction efficiency. Clean the grease filter(s) when necessary to maintain a good grease filter efficiency. Use the maximum diameter of the ducting system indicated in this manual to optimize efficiency and minimize noise.
MALFUNCTIONS
If something appears not to be working properly, do the following simple checks before calling Technical Service:
If the hood is not working.
Check that:
- The power has not been disconnected.
- A speed has been selected.
- If the hood performs inefficiently: Check that:
- The motor speed selected is sufficient for the amount of smoke and vapours released.
- The kitchen is sufficiently ventilated to allow air intake.
- The charcoal filter is not worn (hood in filtering version).
If the hood has turned off during normal functioning: Check that:
- The power has not been disconnected.
- the omnipolar disconnection device has not tripped
If the hood fails to operate correctly, briefly disconnect it from the mains power supply for almost 5 sec. by pulling out the plug. Then plug it in again and try once more before contacting the Technical Assistance Service.
TECHNICAL DATA
| Model | Height (cm) | Width (cm) | depth (cm) | Ø of exhaust tube (cm) |
| HHVS87FLTK | 104-147 79,8 | 32,3 | 15-1 | 12,5-12 |
Please check the plate in order to verify the total absorption and the light absorption.
The hood is equipped with a lighting system based on LED technology. To purchase spare LEDs, contact the technical assistance service.


Components not provided with the product
VŠEOBECNÁ BEZPEČNOSTNI OPATRENI


- TEXHNUECKOE OBCJNYKBAHNE
- OuInCTka
- Pahenb nepumetpaBHoro BCacbBaHn
- 06cnyxmbHHe xipoBbIX ΦnIbTpOB
- YdepKnBaETacntuBjXnpa,NCxOJauneoTnnTbI.
- 06cnyxmbaHne yroIbHoro qnIbTp
- Ydannr HnnpHbIe 3aaxn KxHN.
- KpyTbIy yrObnHbIy qnIbTp
- 3aMeHa JAmn
- YTNJIN3AUIN
- AHOMAJINB PABOTE
- ELECTRICAL CONNECTION
- Replacing the power cable
- AIR VENT
- FILTERING OR DUCTING?
- Ducting version
- Filter version
- CONTROLS
- MAINTENANCE
- Cleaning
- Perimeter aspiration panel
- Maintenance of the anti-grease filters Traps cooking grease particles.
- Maintenance of the charcoal filter
- Circular carbon filter
- Replacing lamps
- DISPOSAL
- MALFUNCTIONS
- VŠEOBECNÁ BEZPEČNOSTNI OPATRENI
Brand : HOTPOINT
Model : HHVS 8.7F LT K
Category : Range hood