AirPool+ - Swimming Pool ASTRALPOOL - Free user manual and instructions
Find the device manual for free AirPool+ ASTRALPOOL in PDF.


| Product Type | LED Pool Projector |
| Brand | AstralPool |
| Model | LumiPlus Mini V3 (AirPool+) |
| Category | Pool Lighting |
| Power Supply | 12 V AC (or 24 V DMX with power supply 52142) |
| Electrical Class | III (very low safety voltage) |
| Protection Rating | IPX8 (immersion up to 2 m) |
| Nominal Immersion Depth | 2 m |
| Maximum Water Temperature | 40 °C |
| Minimum Viewing Distance | 20 cm (do not stare for more than one minute) |
| LED Risk Group | Group 2 |
| Housing Material | ABS |
| Seawater Resistance | Yes |
| Chemical Resistance | Chlorine ≤ 2 mg/l, Bromine ≤ 5 mg/l, pH 7.2-7.6 |
| Installation | Concrete pool, liner, polyester, spa |
| Mounting | By adapter and quarter-turn (90°) |
| Recommended Cable Length | Installation depth + 30 cm |
| Package Contents | Projector, 1"1/2 adapter, fixing key, warranty and installation brochures |
| Maintenance | Clean with non-abrasive products; avoid universal sealants |
| Safety | Use only with safety transformer; standards EN 60598-2-18, IEC 364-7-702 |
Frequently Asked Questions - AirPool+ ASTRALPOOL
User questions about AirPool+ ASTRALPOOL
0 question about this device. Answer the ones you know or ask your own.
Ask a new question about this device
Download the instructions for your Swimming Pool in PDF format for free! Find your manual AirPool+ - ASTRALPOOL and take your electronic device back in hand. On this page are published all the documents necessary for the use of your device. AirPool+ by ASTRALPOOL.
USER MANUAL AirPool+ ASTRALPOOL
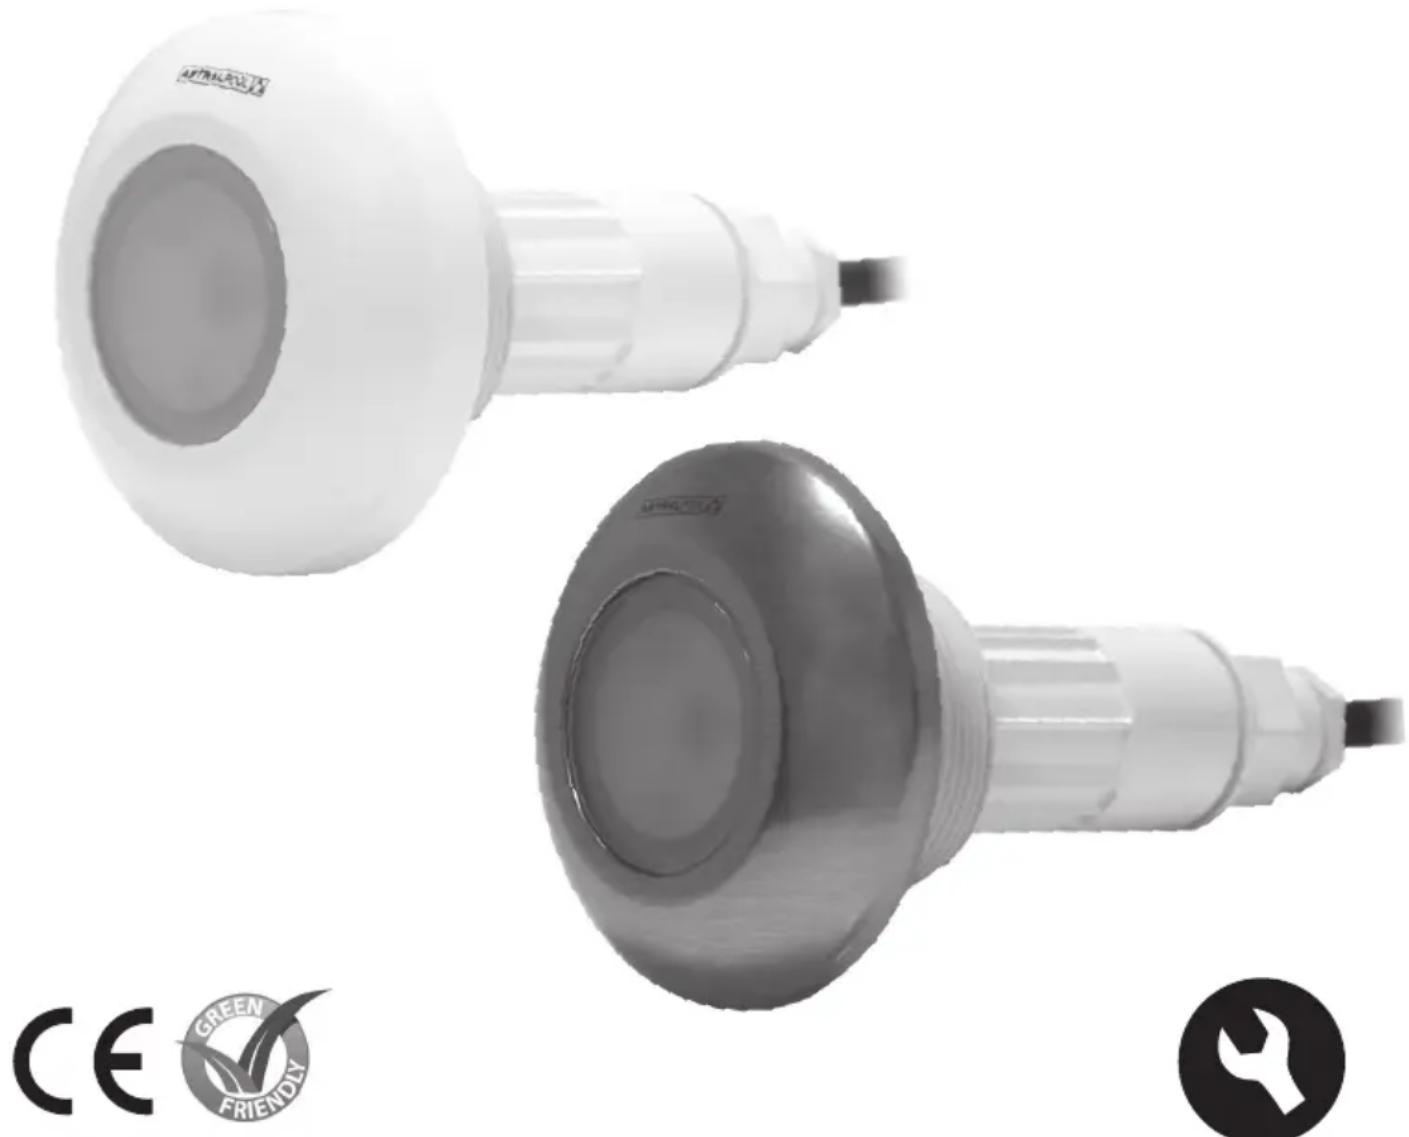
LUMIPLUS MINI V3 PROJECTOR PROJECTEUR LUMIPLUS MINI V3 PROYECTOR LUMIPLUS MINI V3 PROIETTORE LUMIPLUS MINI V3 STRAHLER LUMIPLUS MINI V3 PROJETOR LUMIPLUS MINI V3
natural_image
Two white handheld hair blower pens with circular head and neck, shown from different angles (no text or symbols on the devices themselves)INSTALLATION AND MAINTENANCE MANUAL MANUEL D'INSTALLATION ET D'ENTRETIEN MANUAL DE INSTALACIÓN Y MANTENIMIENTO MANUALE DI INSTALAZIONE E MANUTENZIONE EINBAU-UND BETRIEBSANLEITUNG MANUAL DE INSTRUÇÕES E MANUTENÇÃO



ENGLISH
IMPORTANT: The instruction manual you are holding includes essential information on the safety measures to be implemented for installation and start-up. Therefore, the installer as well as the user must read the instructions before beginning installation and start-up.
Keep this manual for future reference.
To achieve optimum performance of the LumiPlus Mini V3 Spotlight, follow the instructions provided below:
1. VERIFY THE CONTENTS OF THE PACKING:
The following accessories are included inside the box:
- Unit spotlight
- Warranty booklet
- 1" 1/2 adaptor
• Installation and maintenance manual - Manual for electrical connection
- Spanner for adaptor
2. GENERAL CHARACTERISTICS:
This spotlight has been designed to be used totally submerged in water. It is a Class III electric apparatus with very low safety voltage (12 V AC - 24 V DMX with power pack, code 52142).
The spotlight compiles with IPX8 degree of protection (resistance to penetration of dust, solid bodies and humidity) at a nominal immersion depth of 2 m.
This spotlight compiles with international safety standards for lights, especially the EN 60598-2-18 standard. LIGHTS PART 2: SPECIFIC REQUIREMENTS SECTION 18 LIGHTS FOR SWIMMING POOLS AND SIMILAR APPLICATIONS.
The manufacturer is not responsible in any circumstances for assembly, installation or start-up of any electric components which have been inserted or handled at locations other than its own premises.
3. INSTALLATION:
- To illuminate a pool properly, it is advisable:
To install a spotlight from the LumiPlus Mini V3 family for every 5m^2 of water surface. In particularly deep pools, it will be necessary to install a spotlight for every 10 m^3 of water.
Note: Strongly recommended for pools in light colors. In dark colored and stainless steel pools, we recommend increasing the proportion of spotlights per m2.
- In order to avoid glare, the spotlights should be fitted so that they face the opposite direction to the home or any other poolside building used as living quarters.
- Should lighting be used in competition or training pools, the spotlights should be fitted on the sides to avoid swimmers being dazzled by the light.
- It is recommended that a length of cable be left in the niche or wall conduit that is approximately the same depth as the spotlight fixture + 30 cm so that it can be pulled out up to the edge of the pool if it has to be handled (Fig. 1).
- The inside of the spotlight should not be handled under any circumstances, otherwise the warranty will no longer be valid.
- The spotlight is not watertight: if a LumiPlus Mini V3 is installed in ducts, conduits or bushings, a siphon must be fitted to avoid emptying the pool (see Fig. 1).
The spotlight should be fitted 400–700 mm below the surface of the water on one of the pool walls (Fig. 1). The way the spotlight is fitted will depend on whether bushing or piping is used.
- Should the cable have been replaced before installing the spotlight, check that the stuffing box is firmly tightened.
4. ASSEMBLY:
There are various ways of mounting a LumiPlus Mini V3:
Concrete pools
A) Directly on ∅63 PN-6/10 piping. (Fig. 2a)
Recess required: No/Accessories required: 62395/Siphon required: Yes
Procedure:
1 - A suitable O-ring seal must be selected to fit to the piping and to place it on the PN6 pipe adaptor: ∅53 x 3 O-ring seal
PN10 pipe: ∅53 x 2 O-ring seal
2 - Twist the adaptor into the piping.
3 - Insert the cable in the piping, ease the spotlight in and turn 90° clockwise (Fig. 5).
4 - Put the face plate into place with the logo facing the top of the fixture (Fig. 5).
B) On bushing with G1" 1/2 thread glued to ∅63 piping. (Fig. 2b1, 2b2)
Recess required: 35618 for ∅63 PN-06 piping/35412 for ∅63 PN-10 piping.
Accessories required: No/Siphon required: Yes
Procedure:
1 - Glue bushing in place that is suitable for the type of piping used.
2 - Screw in the adaptor included with the spotlight.
3 - Insert the cable in the piping, ease the spotlight in and turn 90^ clockwise (Fig. 5).
4 - Put the face plate into place with the logo facing the top of the fixture. (Fig. 5)
C) On flush wall conduits. (Fig. 2c)
Recess required: 15660/15661/Accessories required: 62395/Siphon required: Yes
Procedure:
1 - Place the ∅3.5 O-ring seal on the adaptor.
2- Twist the adaptor into the wall conduit.
3- Insert the cable in the adaptor, ease the spotlight in and turn 90 ° clockwise (Fig. 5).
4 - Put the face plate into place with the logo facing the top of the fixture.
D) On a flush wall conduit with G2" thread (Fig. 2d)
Recess required: 15658/15659
Accessories required: 62395/Siphon required: Yes
Procedure:
1 - Screw in the adaptor with a 2" thread into the wall conduit.
2- Insert the cable in the adaptor, ease the spotlight in and turn 90 ° clockwise (Fig. 5).
3 - Put the face plate into place with the logo facing the top of the fixture. (Fig. 5)
Recess required: 15661/Accessories required: No/Siphon required: No.
Procedure:
1- Glue the adaptor (included with the niche) in the niche.
2- Insert the cable in the niche's stuffing box assembly, then tighten the nut on the stuffing box assembly using the special spanner included with the niche.
3 - Ease the spotlight in and turn 90° clockwise (Fig. 5).
4 - Put the face plate into place with the logo facing the top of the fixture.
For more details about this installation, see the manual for the niche (code 53956).
Liner pools
A) In bushing no. 27084. (Fig. 3a)
Recess required: 27084/Accessories required: No/Siphon required: Yes
Using a diamond tile drill bit, drill a hole 60 mm in diameter into the wall.
Procedure:
1- Screw the adaptor into the bushing.
2 - Insert the cable in the piping, ease the spotlight in and turn 90° clockwise (Fig. 5).
3 - Put face plate into place with the logo facing the top of the fixture. (Fig. 5)
B) In wall conduits. (Fig. 3b)
Recess required: 15664 or 15665 + 06544/Accessories required: No/Siphon required: Yes
Procedure:
1- Screw the adaptor into the bushing.
2 - Insert the cable in the piping, ease the spotlight in and turn 90^ clockwise (Fig. 5).
3 - Put the face plate into place with the logo facing the top of the fixture (Fig. 5).
Recess required: 59983
Accessories required: No/Siphon required: No
Procedure:
1- Screw the adaptor into the niche.
2- Insert the cable in the niche's stuffing box assembly, then tighten the nut on the stuffing box assembly using the special spanner included with the niche.
3 - Ease the spotlight in and turn 90° clockwise (Fig. 5).
4 - Put the face plate into place with the logo facing the top of the fixture. 5).
For more details about this installation, see the manual for the niche (code 59983).
Polyester pools/spas
A) On bushings 38805 and 53862. (Fig. 3d)
The special products for LumiPlus Mini V3 spotlights fitted in concrete pools should be used (see list on the last page for product codes).
Recess required: 38805/53862
Accessories required: No/Siphon required: Yes
Using a diamond tile drill bit, drill a hole 60 mm in diameter into the wall.
Procedure:
1 - Screw the adaptor into the nozzle.
2 - Insert the cable in the piping, ease the spotlight in and turn 90^ clockwise (Fig. 5).
3 - Put face plate into place with the logo facing the top of the fixture (Fig. 5).
Spas and prefabricated pools (2" thread) (Fig. 4)
The special products for LumiPlus Mini V3 spotlights fitted in spas and prefabricated pools should be used (see list on the last page for product codes).
Recess required: No/Accessories required: No/Siphon required: No
Procedure:
This spotlight has been designed for installation in polyester spas, pools and tubs. A niche is not required to fit them.
1 - The spotlight should be placed approximately 400 mm below the spa's water line making sure it is not placed somewhere that could easily be covered by a person's body. It should preferably be placed on the wall where the spa's steps are found.
2 - Using a diamond tile drill bit, drill a hole 60 mm in diameter into the wall.
3 - Check that there is no dirt on the seals or on the areas where they will be in contact with the spotlight and the spa wall.
4 - Fit the friction ring and rubber seal into the spotlight's thread, and assemble the whole inside the spa.
5 - Put the seal and the friction ring into place at the back of the spa shell, and screw in the 2" GAS nut to the body of the spotlight.
The seals must be in contact with the spa's inside and outside wall.
Replacing the spotlight
Replacing the spotlight or if the electrical connection has to be handled:
- Remove the faceplate using a screwdriver as a lever (Fig. 6).
- Screw a quarter of a turn anticlockwise with the help of the wrench supplied, lift out the spotlight until it is no longer attached to the adaptor (steps in reverse order as shown in Fig. 5) and 5b) and place it on the edge of the pool.
- First loosen the stuffing box assembly and then the wire connector (Fig. 7). Check that the connectors are properly assembled before reconnecting by making sure that the cable is fully enclosed by the stuffing box assembly.
5. SAFETY AND MAINTENANCE WARNINGS:
- Before any handling ensure that there is NO voltage supplied to the spotlight.
- People in charge of assembly should be suitably qualified for this type of work.
- Avoid making contact with the electric voltage.
- Comply with the current standards regarding accident prevention.
- In this regard, the IEC 364-7-702 standards must be observed: WIRING IN BUILDINGS SPECIAL WIRING SWIMMING POOLS.
- Do not handle with wet feet.
- Do not clean using abrasive products that could damage the spotlight.
- The LEDs in this spotlight are classified as risk group 2.
- Under no circumstances should the luminaire be stared into for one minute or more at distances equal to or less than 20 cm. Doing so could damage eyesight.
6. ASSEMBLY AND FUNCTIONING WARNINGS:
• Maximum water temperature 40°C.
- It is not recommended the use of sealing putty in this product and, anyway, you should use only products specifically conceived to work with ABS, all those products of universal use remain excluded.
- The spotlight is designed TO OPERATE ONLY WITH A SAFETY TRANSFORMER.
- The manufacturer is not responsible in any circumstances for assembly, installation or start-up of any electric components which have been inserted or handled at locations other than its own premises.
- It is responsibility of the installer to ensure that no water gets inside the spotlight by means of the cables.
• This spotlight is seawater resistant.
- This spotlight is resistant to pool treatments described below, always that the concentration values do not exceed the following levels:
| TYPE OF TREATMENT CONCENTRATION IN WATER | |
| Salt chlorinators - | |
| Chlorine 2 mg/l | |
| Bromine 5 mg/l | |
Attention: Please note that the Ph of pool water always must be between 7.2 and 7.6.
FRANÇAIS
6. ASSEMBLY AND FUNCTIONING WARNINGS:
Piscine in poliestere / SPA
A) In bocchette 38805 e 53862 (Fig. 3d)
natural_image
Technical illustration of a mechanical assembly with exploded view and dimension label (Ø60), no readable text or symbols beyond labels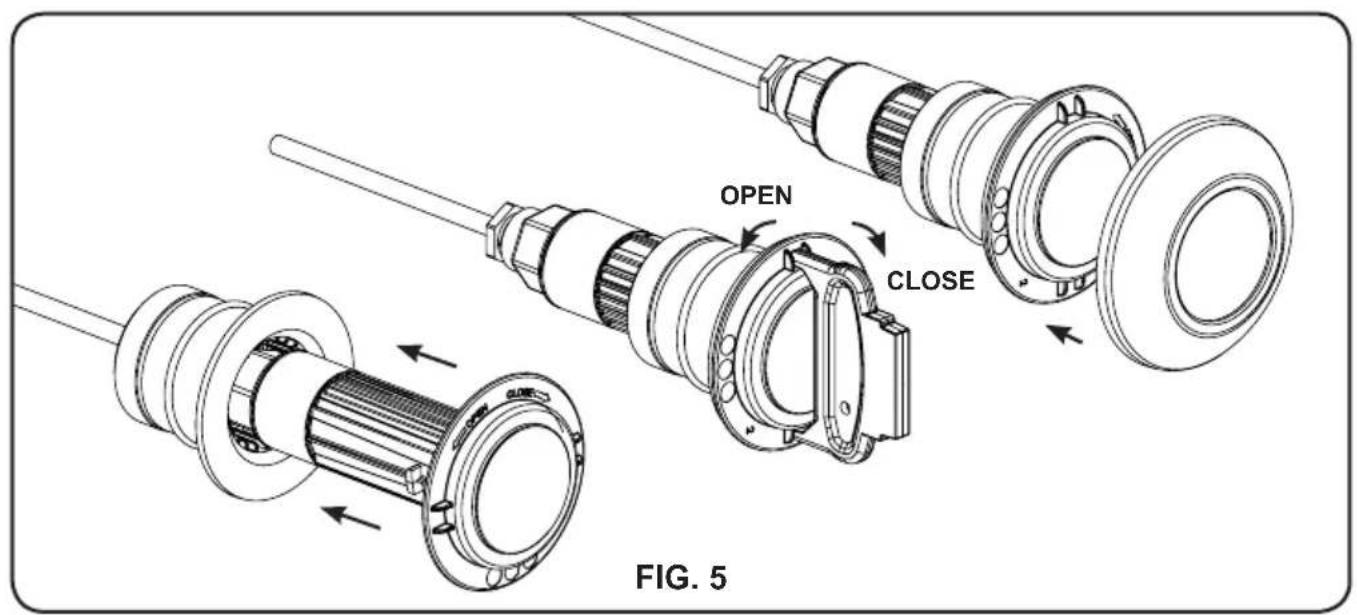

natural_image
Technical line drawing of a mechanical component inside a grid-patterned enclosure, labeled FIG. 6 (no text or symbols on the diagram itself)
natural_image
Technical illustration of two mechanical components with rotating shafts and housing, labeled 1 and 2 (no text or symbols on the diagrams)59971, 59972, 59975, 59976, 59979, 59980
69633, 69634, 69635, 69636, 69637, 69638 * 6
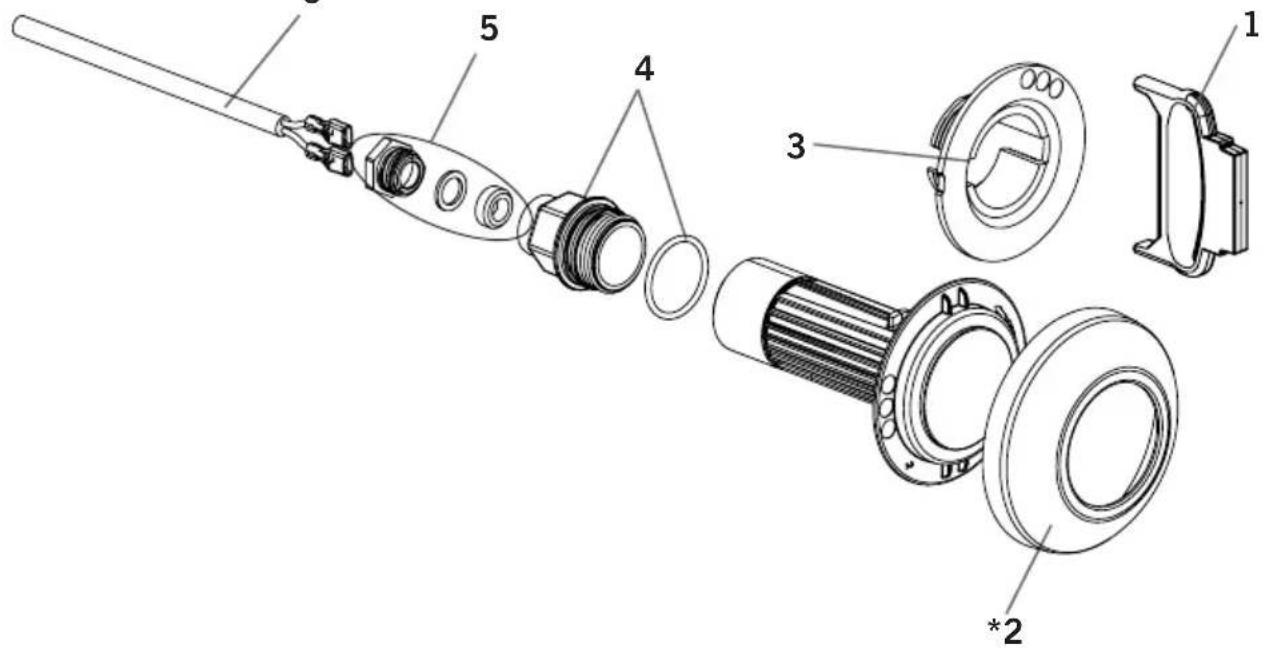
ENGLISH
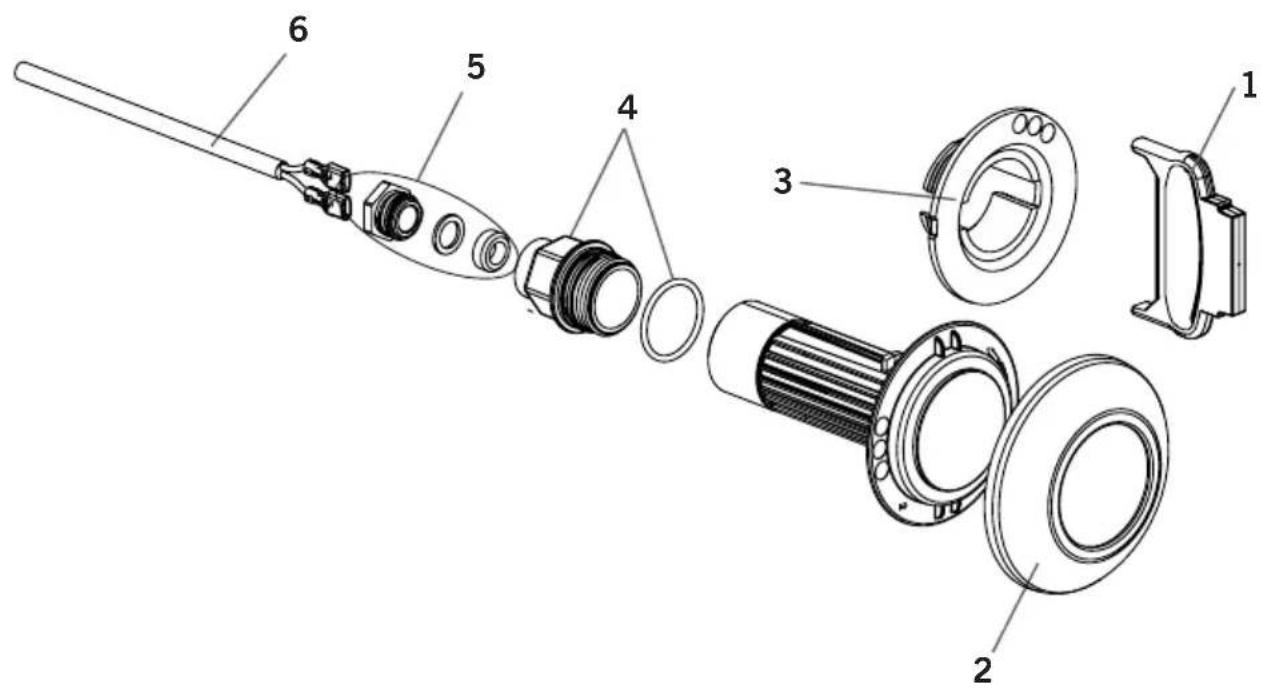
| Pos. | Code Description | |
| 1 | 4403010060 NOZZLE REMOVER | |
| 2 | 4403010061 LUMIPLUS MINI V3 P. FACEPLATE (CONCRETE POOLS) | |
| 2 | 4403010062 | LUMIPLUS MINI V3 P. FACEPLATE INOX EFFECT (CONCRETE POOLS) |
| *2 | 4403010071 LUMIPLUS MINI V3 P. FACEPLATE (LINER POOLS) | |
| *2 | 4403010072 | LUMIPLUS MINI V3 P. FACEPLATE INOX EFFECT (LINER POOLS) |
| Pos. | Code Description | |
| 3 | 4403010063 1 1/2" THREAD ADAPTOR | |
| 4 | 4403010064 WIRE CONNECTOR | |
| 5 | 4403010076 TR 12X2 STUFFING BOX ASSEMBLY COVER | |
| 6 | 4403010065 LUMIPLUS MINI CABLE | |
| 7 | 4403010066 SNAP-ON ADAPTOR |
FRANÇAIS
| Pos. | Code Description | |
| 1 | 4403010060 CLÉ | POUR EMBOUT |
| 2 | 4403010061 | COUVERCLE LUMIPLUS MINI V3 P. BÉTON |
| 2 | 4403010062 COUVERCLE LUMIPLUS MINI V3 P. BÉTON INOX EFFECT | |
| *2 | 4403010071 | COUVERCLE LUMIPLUS MINI V3 P. LINER |
| *2 | 4403010072 COUVERCLE LUMIPLUS MINI V3 P. LINER INOX EFFECT | |
| Pos. | Code | |
| 3 | 4403010063 | ADAPTATEUR VIS 1 1/2" |
| 4 | 4403010064 | CAPUCHON BRANCHEMENT |
| 5 | 4403010076 | ENSEMBLE BOUCHON PRESSE-ÉTOU-PES TR 12X2 |
| 6 | 4403010065 | CÂBLE LUMIPLUS MINI |
| 7 | 4403010066 | ADAPTATEUR ASSEMBLAGE Mini V3E |
ESPAÑOL
| Pos. | Code Description | |
| 1 | 4403010060 LLAVE BOQUILLA | |
| 2 | 4403010061 TAPETA LUMIPLUS MINI V3 P.HORMIGÓN | |
| 2 | 4403010062 TAPETA LUMIPLUS MINI V3 P.HORMIGÓN INOX EFFECT | |
| *2 | 4403010071 TAPETA LUMIPLUS MINI V3 P.LINER | |
| *2 | 4403010072 TAPETA LUMIPLUS MINI V3 P.LINER INOX EFFECT |
| Pos. | Code Description | |
| 3 | 4403010063 ADAPTADOR | ROSCA 1 1/2” |
| 4 | 4403010064 CAPUCHÓN | CONEXIÓN |
| 5 | 4403010076 CJTO. TAPON | PRENSAESTOPAS TR 12X2 |
| 6 | 4403010065 CABLE LUMIPLUS MINI | |
| 7 | 4403010066 ADAPTADOR | ACOPLE RÁPIDO |
ITALIANO
| Pos. | Codice Descrizione | |
| 1 | 4403010060 CHIAVE BOCCHETTA | |
| 2 | 4403010061 COPERCHIO LUMIPLUS MINI V3 P. CEMENTO | |
| 2 | 4403010062 COPERCHIO LUMIPLUS MINI V3 P. CEMENTO INOX EFFECT | |
| *2 | 4403010071 COPERCHIO LUMIPLUS MINI V3 P. LINER | |
| *2 | 4403010072 COPERCHIO LUMIPLUS MINI V3 P. LINER INOX EFFECT |
| Pos. | Codice Descrizione | |
| 3 | 4403010063 ADATTATORE | AVVITABILE 1 1/2” |
| 4 | 4403010064 CAPPUCCIO | COLLEGAMENTO |
| 5 | 4403010076 GRUPPO | TAPPO PREMISTOPPA TR12X2 |
| 6 | 4403010065 CAVO LUMI | PLUS MINI |
| 7 | 4403010066 ADATTATORE | ACCOPPIAMENTO Mini V30 |
DEUTSCH
| Pos. | Artikel Nr Beschreibung | |
| 1 | 4403010060 MAULSCHL | ÜSSEL |
| 2 | 4403010061 ABDECKUNG | LUMIPLUS MINI V3.FÜR BETON |
| 2 | 4403010062 ABDECKUNG | LUMIPLUS MINI V3.FÜR BETON INOX EFFECT |
| *2 | 4403010071 ABDECKUNG | LUMIPLUS MINI V3.FÜR LINER |
| *2 | 4403010072 ABDECKUNG | LUMIPLUS MINI V3.FÜR LINER INOX EFFECT |
| Pos. | Artikel Nr Beschreibung | |
| 3 | 440 | 3010063 SCHRAUBADAPTER 1 1/2" |
| 4 | 440 | 3010064 VERBINDUNGSKAPPE |
| 5 | 440 | 3010076 SATZ DECKEL STOPFBUCHSE12X2 |
| 6 | 440 | 3010065 KABEL LUMIPLUS MINI |
| 7 | 440 | 3010066 SCHNELLANSCHLUSS-ADAPTER |
PORTUGUÊS
| Pos. Código Descrição | |
| 1 4403010060 CHAVE BOQUILHA | |
| 2 4403010061 | TAMPA LUMIPLUS MINI V3 P. BETÃO |
| 2 4403010062 TAMPA LUMIPLUS MINI V3 P.BETÃO INOX EFFECT | |
| *2 4403010071 | TAMPA LUMIPLUS MINI V3 P. LINER |
| *2 4403010072 TAMPA LUMIPLUS MINI V3 P.LINER INOX EFFECT | |
| Pos. | Código Descrição | |
| 3 | 4403010063 ADAPTADOR | ROSCA 1 12 " |
| 4 | 4403010064 CONECTOR | TORÇÃO |
| 5 | 4403010076 CONJ. TAMPA | BUCIM TR 12X2 |
| 6 | 4403010065 CABO LUM | PLUS MINI |
| 7 | 4403010066 ADAPTADOR | ACOPLAGEM RÁPIDA |
59973, 59974, 59977, 59978, 59981, 59982
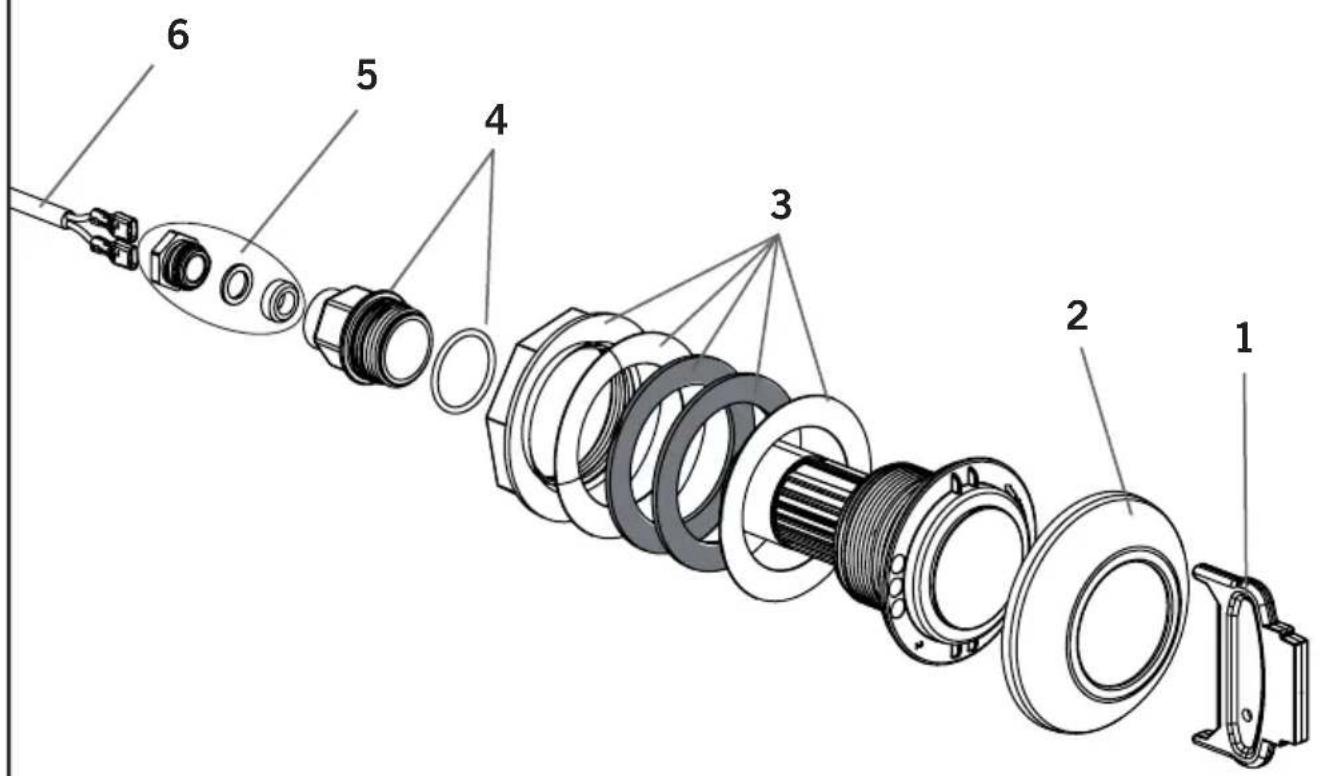
ENGLISH
| Pos. | Code Description | |
| 1 | 4403010060 NOZZLE REMOVER | |
| 2. | 4403010061 LUMIPLUS MINI V3 P. FACEPLA-TE (CONCRETE POOLS) | |
| 2. | 4403010062 | LUMIPLUS MINI V3 P. FACEPLATE(CONCRETE POOLS) INOX EFFECT |
| 3 | 4411030612 HOSE ADAPTOR | |
| Pos. | Code Description | |
| 4 44 | 03010064 WIRE CONNECTOR | |
| 5 44 | 03010076 TR 12X2 STUFFING BOXASSEMBLY COVER | |
| 6 44 | 03010065 LUMIPLUS MINI CABLE | |
FRANÇAIS
| Pos. | Code Description | |
| 1 | 4403010060 CLÉ POUR | EMBOUT |
| 2 | 4403010061 COUVERO | LE LUMIPLUS MINI V3P. BÉTON |
| 2 | 4403010062 COUVERO | LE LUMIPLUS MINI V3P. BÉTON INOX EFFECT |
| 3 | 4411030612 ADAPTATE | EUR TUYAU FLEXIBLE |
| Pos. | Code Description | |
| 4 | 4403010064 CAPUCHON BRANCHEMENT | |
| 5 | 4403010076 ENSEMBLE BOUCHON PRESSE-ÉTOUPES TR 12X2 | |
| 6 | 4403010065 CÂBLE LU MIPLUS MINI | |
ESPAÑOL
| Pos. | Code Description | |
| 1 | 4403010060 LLAVE BOQUILLA | |
| 2 | 4403010061 TAPETA LUMIPLUS MINI V3 | |
| 2 | 4403010062 TAPETA LUIMIPLUS MINI V3 P.HORMIGÓN INOX EFFECT | |
| 3 | 4411030612 ADAPTADOR MANGUERA |
| Pos. | Code Description | |
| 4 | 4403010064 CAPUCHÓN CONEXIÓN | |
| 5 | 4403010076 CJTO. TAPON PRENSAESTOPAS TR 12X2 | |
| 6 | 4403010065 CABLE LU MIPLUS MINI |
ITALIANO
| Pos. | Codice Descrizione | |
| 1 | 4403010060 CHIAVE BOCCHETTA | |
| 2 | 4403010061 COPERCHIO LUMIPLUS MINI V3P. CEMENTO | |
| 2 | 4403010062 COPERCHIO LUMIPLUS MINI V3P. CEMENTO INOX EFFECT | |
| 3 | 4411030612 ADATTATORE TUBO |
| Pos. | Codice | |
| 4 | 4403010064 CAPPUCCIO COLLEGAMENTO | |
| 5 | 4403010076 GRUPPO | TAPPO PREMISTOPPA TR12X2 |
| 6 | 4403010065 CAVO LUMIPLUS MINI | |
DEUTSCH
| Pos. | Artikel Nr Beschreibung | |
| 1 | 440 | 3010060 MAULSCHLÜSSEL |
| 2 | 440 | 3010061 ABDECKUNG LUMIPLUS MINIV3. FÜR BETON |
| 2 | 440 | 3010062 ABDECKUNG LUMIPLUS MINIV3. FÜR BETON INOX EFFECT |
| 3 | 441 | 1030612 SCHLAUCHADAPTER |
| Pos. | Artikel Nr Beschreibung | |
| 4 | 4403010064 VERBIND | UNGSKAPPE |
| 5 | 4403010076 SATZ DE | CKEL STOPFBUCHSE12X2 |
| 6 | 4403010065 KABEL LUMIPLUS MINI | |
PORTUGUÊS
| GB | PRODUCTS: | LUMIPLUS MINI V3 SPOTLIGHT |
| F | PRODUITS: | PROJECTEUR LUMIPLUS MINI V3 |
| E | PRODUCTOS: | PROYECTOR LUMIPLUS MINI V3 |
| I | PRODOTTI: | PROIETTORE LUMIPLUS MINI V3 |
| D | PRODUKTE: | STRAHLER LUMIPLUS MINI V3 |
| P | PRODUTOS: | PROJETOR LUMIPLUS MINI V3 |
DECLARATION CE OF CONFORMITY
The products listed above are in compliance with: Electromagnetic Compatibility Directive 2014/30/EEC.
Low Voltage Directive 2014/35/EEC.
European Standard EN 60598-1, EN 60598-2-18, and all its modifications.
DÉCLARATION CE DE CONFORMITÉ
Signature / Qualification:
Signature / Qualification:
Firma / Cargo:
Firma / Qualifica:



- ENGLISH
- VERIFY THE CONTENTS OF THE PACKING:
- GENERAL CHARACTERISTICS:
- INSTALLATION:
- ASSEMBLY:
- Concrete pools
- A) Directly on ∅63 PN-6/10 piping. (Fig. 2a)
- C) On flush wall conduits. (Fig. 2c)
- D) On a flush wall conduit with G2" thread (Fig. 2d)
- Liner pools
- A) In bushing no. 27084. (Fig. 3a)
- B) In wall conduits. (Fig. 3b)
- Polyester pools/spas
- A) On bushings 38805 and 53862. (Fig. 3d)
- Procedure:
- Spas and prefabricated pools (2" thread) (Fig. 4)
- Replacing the spotlight
- SAFETY AND MAINTENANCE WARNINGS:
- ASSEMBLY AND FUNCTIONING WARNINGS:
- FRANÇAIS
- Piscine in poliestere / SPA
- A) In bocchette 38805 e 53862 (Fig. 3d)
- DECLARATION CE OF CONFORMITY
- DÉCLARATION CE DE CONFORMITÉ
Brand : ASTRALPOOL
Model : AirPool+
Category : Swimming Pool