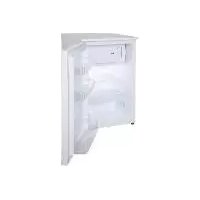
SKS 121 A1 - Refrigerator SILVERCREST - Free user manual and instructions
Find the device manual for free SKS 121 A1 SILVERCREST in PDF.


| Product type | Refrigerator with freezer compartment (4-star) |
| Brand and model | SilverCrest SKS 121 A1 |
| Dimensions (H × W × D) | 838 × 540 × 595 mm |
| Net weight | 27.5 kg |
| Total volume | 121 L (refrigerator 104 L, freezer 17 L) |
| Energy class | E |
| Annual energy consumption | 145 kWh/year |
| Power supply | 220‑240 V ~, 50 Hz, 0.51 A |
| Refrigerant | R‑600a (isobutane), 25 g |
| Insulating gas | Cyclopentane |
| Climate class | SN, T (10 °C to 43 °C) |
| Freezing capacity | 2.6 kg/24 h |
| Storage time during power failure | 6 hours |
| Noise | 40 dB(A) – class C |
| Refrigerator defrost | Automatic (A) |
| Freezer defrost | Manual (M) |
| Interior lighting | LED, class F |
| Door reversibility | Yes (possible) |
| Included accessories | 1 glass shelf, 1 vegetable drawer with cover, 1 ice cube tray, 1 egg rack, 2 spacers, quick start guide |
| Warranty conditions | 3 years (spare parts available during warranty period) |
Frequently Asked Questions - SKS 121 A1 SILVERCREST
User questions about SKS 121 A1 SILVERCREST
0 question about this device. Answer the ones you know or ask your own.
Ask a new question about this device
Download the instructions for your Refrigerator in PDF format for free! Find your manual SKS 121 A1 - SILVERCREST and take your electronic device back in hand. On this page are published all the documents necessary for the use of your device. SKS 121 A1 by SILVERCREST.
USER MANUAL SKS 121 A1 SILVERCREST
natural_image
White silver Silver Crest refrigerator with lid and front panel (no visible text or symbols on body)
KÜHLSCHRANK / REFRIGERATOR / REFRIGERATEUR SKS 121 A1
DE AT CH
KÜHLSCHRANK
Bedienungsanleitung
FR BE
RÉFRIGÉRATEUR
Mode d'emploi
CZ
CHLADNIČKA
Návod k obsluze
SK
CHLADNIČKA
Návod na obsluhu
DK
K∅LESKAB
Operating instructions
NL BE
KOELKAST
Gebruiksaanwijzing
PL
LODÓWKA
Instrukcja obstugi
ES
FRIGORÍFICO
Before reading, unfold the page containing the illustrations and familiarise yourself with all functions of the device.
FR BE
natural_image
Illustration of a hand holding a shelf with a wooden plank, no text or symbols present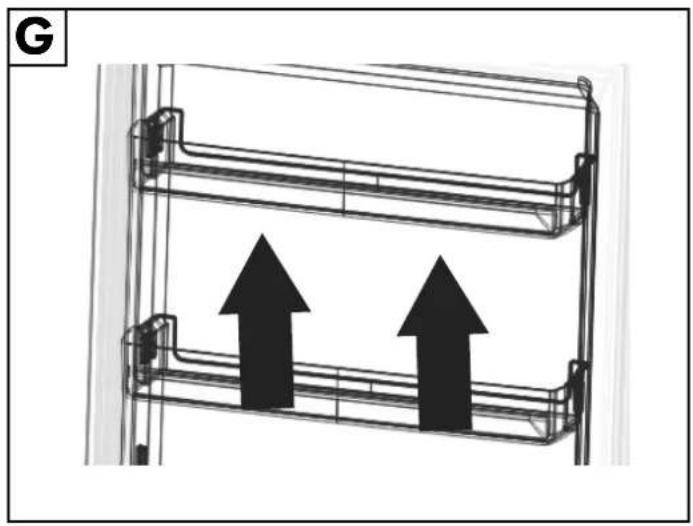
natural_image
Diagram of a multi-level metal structure with two upward-pointing arrows, no text or symbols present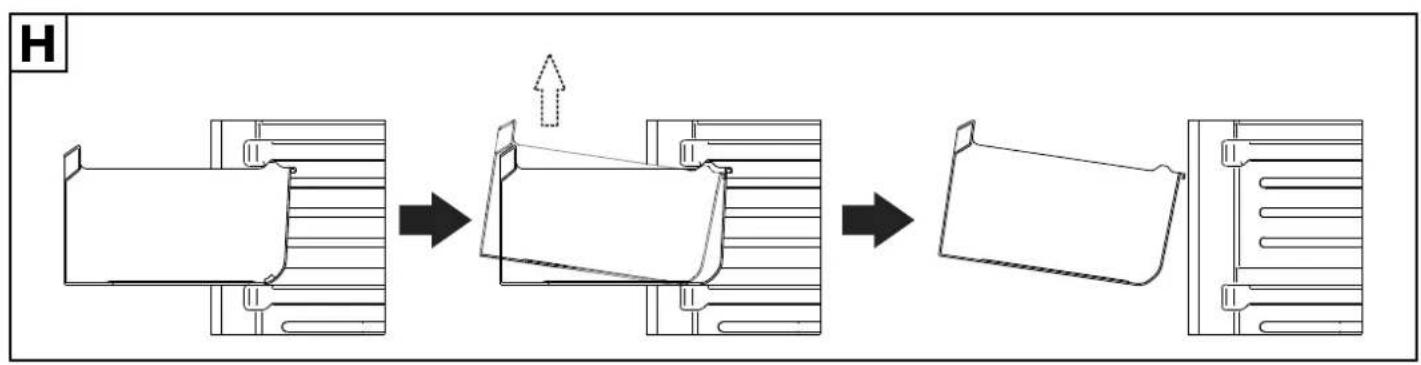
flowchart
graph LR
    A["Step 1: Initial assembled part"] --> B["Step 2: ↑↑"]
    B --> C["Step 3: Processed part with curved cutout"]
    C --> D["Step 4: Final assembled part with flanged end"]
natural_image
Line drawing of a hand cleaning a textured surface inside a 3D printer or enclosure (no text or symbols)Inhaltsverzeichnis
1. Einführung 7
natural_image
Technical line drawing of a structural frame with directional arrows indicating motion (no text or symbols)Abb. 1
natural_image
Technical line drawing of a mechanical assembly with a screwdriver inserted, showing no text or symbolsAbb. 2
natural_image
Diagram of a mechanical device with a red arrow indicating direction, no text or symbols presentAbb. 3
Abb. 4
natural_image
Technical line drawing of a mechanical assembly with no visible text or symbolsAbb. 5
natural_image
Pure technical line drawing of a rectangular frame with internal compartments and a vertical wall, no text or symbols presentAbb. 6
natural_image
Pure technical line drawing of a rectangular frame with internal components and a red dotted line indicating a dimension (no text or symbols)Abb. 7
SILVERCREST®
natural_image
Technical line drawing of a cabinet interior with internal components and directional arrows (no text or symbols)Abb. 8
natural_image
Diagram of a refrigerator interior showing door, seat, and shelf with red arrows indicating motion (no text or symbols)Abb. 9
Abb. 10
natural_image
Technical line drawing of a mechanical cabinet or enclosure with internal compartments and a red directional arrow indicating movement (no text or symbols)Abb. 11
SILVER CREST®
natural_image
Diagram showing two screwdriver positions with red arrows indicating rotation and movement (no text or symbols)Abb. 12
natural_image
Technical line drawing of a mechanical cabinet or rack system with internal compartments and a handle (no text or symbols)Abb. 13
natural_image
Diagram of a rectangular frame with light rays passing through it, showing directional arrows (no text or symbols)Abb. 14
SILVERCREST®
Abb. 15
natural_image
Two identical diagrams showing a screwdriver on a mobile phone, with red arrows indicating direction of movement (no text or symbols present)Abb. 16
natural_image
Technical line drawing of a mechanical housing or enclosure with internal compartments and directional arrows indicating motion (no text or symbols)Abb. 17
SILVER CREST®
natural_image
Technical line drawing of a mechanical device with a lever and force arrow (no text or symbols)Abb. 18
Abb. 19
natural_image
Line drawing of a single refrigerator with open doors and internal shelves (no text or symbols)Abb. 20

natural_image
Diagram of a mechanical or electrical component with directional arrows indicating motion, no readable text or symbols present.Abb. 21
1.1. Information about this user manual 37
1.2. Explanation of symbols....37
2. Proper use 39
3. Safety instructions 39
3.1. General safety instructions....40
3.2. Transport 40
3.3. Installation and electrical connection....41
3.4. Cleaning and maintenance....43
3.5. Faults 43
3.6. Disposal 43
4. Package contents 44
5. Description of components 44
6. Recommended food storage 45
7. Technical specifications....45
7.1. Product data sheet 45
8. EU declaration of conformity 47
9. Spare parts......47
10. Information on the appliance 47
10.1. Information regarding refrigerant R-600a....47
11. Before operation 47
11.1. Changing the door hinge 47
11.2. Fitting the spacers....53
11.3. Setting up the appliance ....53
11.4. Inserting/removing accessories 54
12. Operating the appliance 54
12.1. Setting the temperature....54
12.2. Climate control switch....55
13. Optimising energy consumption....55
13.1. Recommended temperature setting 55
14. Deep-freezing food....56
14.1. Using ice cube trays....56
14.2. Defrosting food....56
15. Storing food in the refrigerator compartment 57
16. Cleaning and defrosting 57
16.1. Cleaning the appliance....58
17. Replacing the interior light 59
18. Faults....59
19. Measures in case of power failure....59
20. Troubleshooting....59
21. Longer periods without use....60
22. Transport....60
23. Disposal....61
SILVER CREST®
- Legal notice 61
24.1. Information on trademarks....61 - MLAP GmbH Warranty 61
25.1. Conditions of warranty....62
25.2. Warranty period and legal claims for defects....62
25.3. Scope of warranty 62
25.4. Processing of warranty claims....62 - Service....62
26.1. Supplier/Producer/Importer....63 - Privacy statement....63
1. Introduction
1.1. Information about this user manual

Congratulations on purchasing your new appliance. You have chosen a high-quality product. The user manual is an integral part of this product. It contains important safety information and instructions for use and disposal. Before using the product, please familiarise yourself with all operating and safety instructions. Only use the product as described and for the specified applications. Keep this user manual in a safe place. If you give this product to someone else, ensure that you also hand over all the documents.
1.2. Explanation of symbols

DANGER!
Warning: risk of fatal injury!
▶ Follow the instructions to avoid situations that will lead to fatal or serious injuries.
DANGER!
Warning: risk of electric shock!
▶ Follow the instructions to avoid situations that will lead to fatal or serious injuries.

WARNING!
Warning: risk of possible fatal injury and/or serious irreversible injuries!
▶ Follow the instructions to avoid situations that may lead to fatal or serious injuries.
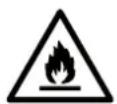
Warning: danger due to combustible and/or highly flammable substances!
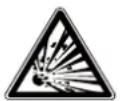
Warning: risk of explosive materials!

NOTICE!
Follow the instructions to avoid damaging the appliance!
▶ Follow the instructions to avoid situations that may damage the appliance.

Notes regarding assembly or operation

Follow the instructions in the user manual!

AC (alternating current)
■ Instruction to be followed to prevent hazards
- Bullet point/information on steps during operation
▶ Instruction to be carried out

Products that feature this symbol meet the requirements of the EU directives (see section entitled "EU declaration of conformity").
SILVER CREST®

Tested safety: Products that feature this symbol meet the requirements of the German Product Safety Act.

Packaging material label regarding waste separation
Label includes abbreviations (a) and numbers (b) with the following meaning: 1–7: plastics/20–22: paper and cardboard/80–98: composite materials.

Dispose of packaging in compliance with environmental regulations (see section "Disposal").

Dispose of packaging in compliance with environmental regulations (see section "Disposal").

The „Triman“ symbol tells the consumer that the product can be recycled, is covered by an extended system of manufacturer's responsibility and must be sorted by material type, in France.
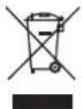
Dispose of the appliance in compliance with environmental regulations (see section "Disposal").
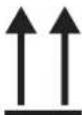
Indicates the correct upright position of the transport packaging.
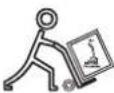
Tilt transport packaging before using hand truck!

DO NOT ROLL

Do not roll!

Keep away from rain!

Handle with care!
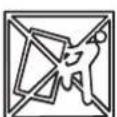
Do not clamp as indicated!
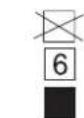
Stacking limit by number (here max. 6 transport packages)
Do not support using your knee!
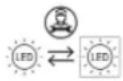
The replacement of the LED interior light is the responsibility of the manufacturer, its customer service or a similarly qualified person.
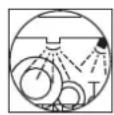
The accessory is dishwasher-safe.
2. Proper use
This appliance is intended to be used for cooling and freezing food. This appliance is designed for use in private households and similar household applications, such as:
-Staff kitchens in shops, offices and other workplaces
- In agriculture and by guests in hotels, motels and other types of accommodation
-Bed-and-breakfast establishments
-Catering establishments and wholesale use
The manufacturer accepts no liability for damages if the appliance is used for commercial purposes or for any purpose other than cooling and freezing food.
Please note that we shall not be liable in cases of improper use:
- Do not modify the appliance without our consent and do not use any auxiliary equipment that we have not approved or supplied.
- Only use replacement parts or accessories that we have supplied or approved.
- Comply with all the information in this user manual, especially the safety instructions. Any other use is considered improper and can cause personal injury or property damage.
3. Safety instructions
IMPORTANT SAFETY INSTRUCTIONS – READ CAREFULLY AND KEEP FOR FUTURE REFERENCE!
This appliance can be used by children over the age of 8 and by persons with reduced physical, sensory or mental abilities or by those with limited experience and/or knowledge, provided that they are supervised or have been instructed in how to use the appliance safely, and have understood the associated risks.
■ Children must not be allowed to play with the appliance.
■ Children between the ages of 3 and 8 are allowed to load and remove items from refrigerating appliances.
■ Cleaning and user maintenance must not be carried out by children unless they are supervised.

DANGER!
Risk of choking and suffocation!
There is a risk of choking and suffocation due to swallowing or inhaling small parts or plastic wrap.
- Keep all packaging materials used (bag, pieces of polystyrene etc.) out of reach of children.
■ Do not allow children to play with the packaging material.
- Keep children away from the appliance inner. If the door is closed, there is a risk of suffocation!
SILVER CREST®
3.1. General safety instructions

Warning! Risk of injury!
The appliance's refrigeration system contains R-600a refrigerant. If the refrigerant escapes, there is a risk of injuries.
■ WARNING! Do not damage the refrigerant circuit.
If the refrigeration system has nevertheless become damaged, ventilate the room. Avoid naked flames and ignition sources. Have the appliance repaired by a qualified technician before using it again.
If refrigerant comes into contact with the skin or eyes, this can lead to injuries. If necessary, rinse the eyes with clean water and consult a doctor.
■ WARNING! Do not operate electrical appliances inside the cooling chamber that do not conform to the design recommended by the manufacturer.
■ Do not use any other electrical appliances (such as ice machines) inside the refrigerating appliance unless they are approved for this purpose by the manufacturer.
■ Tampering with the refrigerant circuit is prohibited and invalidates the warranty.
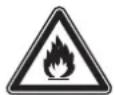
WARNING! Risk of fire!
There are flammable liquids in the coolant circuit and the compressor.
■ Note the "Fire hazard" warning signs on the back of the appliance or the compressor.
■ Avoid naked flames and ignition sources when using, maintaining and disposing of the appliance.
3.2. Transport

CAUTION! Risk of injury!
The appliance is heavy! There is a risk of injury from the strain of lifting the appliance.
- Seek the assistance of at least one other person in order to move the appliance. Do not transport the appliance alone.

NOTICE! Possible material damage!
Risk of damage to the appliance if transported incorrectly
■ Make sure that the packaging is not damaged.
- Carefully remove the packaging material and check the appliance for transport damage.
■ Never connect a damaged appliance. In the event of damage, contact the Service Centre.
■ Always transport the refrigerator in its packaging and with the transport lock.
■ Ensure that no part of the refrigerant circuit is damaged when transporting and installing the appliance.
■ Where possible, always transport the appliance upright. If tilted to an angle of more than 40^ during transport, wait 3 hours before connecting it to the mains and switching it on to enable the refrigerant circuit to return to normal after transport. - Do not place the appliance on its side or back, as this can cause oil from the compressor to enter and block the refrigerant circuit.
■ Do not expose the appliance to rain or spray water.
3.3. Installation and electrical connection
3.3.1. Location

NOTICE!
Possible material damage!
Risk of damage to the appliance due to improper handling
■ Install the refrigerating appliance in a dry and ventilated room. The room should be approx. 4 m^2 to ensure that sufficient air volume is available if the refrigeration system becomes damaged.
■ Take the space requirements into consideration when setting up the appliance (see "11.3. Setting up the appliance" on page 53).
■ The appliance is suitable for climate classes SN and T (see the type plate). The cooling performance of the appliance is guaranteed at ambient temperatures from 10°C to 43°C. If temperatures deviate from this range, the appliance performance may be reduced.
■ Do not use the appliance outdoors.
■ Do not expose the appliance to extreme conditions. Avoid:
—high humidity or wet conditions
—extremely high or low temperatures
–direct sunlight
-naked flames.

WARNING!
Risk of fire!
Insufficient air circulation can lead to heat accumulation.
■ WARNING! Make sure that the ventilation openings in the housing, around the appliance and in the installation niche are not blocked.
■ The appliance is not designed to be an integrated appliance.
■ To ensure adequate ventilation, a minimum clearance of 15 cm to the top, 7.5 cm to the sides and 7.5 cm to the back must be observed.
- Do not install near heat sources such as hobs, radiators, underfloor heating etc. If installation near a heat source cannot be avoided, use an appropriate insulation panel or maintain the following minimum clearances to the heat source:
—from electric ovens or similar: approx. 5 cm
—from oil, gas or coal-fired ovens: approx. 50 cm
- If installed next to another refrigerating appliance, a minimum distance of 2 cm from the side is required.
3.3.2. Before connection
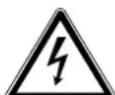
WARNING!
Risk of electric shock!
There is a risk of electric shock due to live parts.
■ After installing the appliance, check that the mains cable is not squashed or damaged.
■ Do not operate the appliance if it has been visibly damaged or the mains cable or plug is defective.
■ In the event of damage, contact the Service Centre.
SILVER CREST®
3.3.3. Mains connection
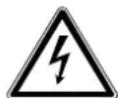
WARNING! Risk of electric shock!
There is a risk of electric shock due to live parts.
■ Only connect the appliance to a properly installed and easily accessible earthed mains socket that is close to where you are using the appliance. The local mains voltage must match the voltage stated in the technical specifications for the appliance.
■ The power socket must be easily accessible so that you can unplug the appliance from the mains quickly if necessary.
■ WARNING! Ensure the mains cable is out of harm's way and will not trip people up. Do not use an extension cable.
■ WARNING! Do not allow the mains cable to become trapped or damaged during installation.
■ WARNING! Do not connect portable multiple sockets or power supplies to the back of the appliance.
In order to disconnect the appliance completely from the electrical circuit, pull the mains plug out of the socket.
3.3.4. Use of the appliance
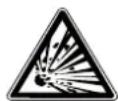
WARNING!
Risk of explosion!
Flammable gases and liquids can cause explosions if stored in the appliance.
■ Do not store any explosive materials, e.g. aerosol containers containing propellant gas, in the appliance.
■ Do not freeze any carbonated beverages. Expanding liquid can break the container.

WARNING! Risk of injury/risk to health!
Improper handling of the appliance can lead to injuries.
- Do not misuse the plinth, drawer compartments, doors etc. as a step or for support.
The appliance may not work properly (temperature increase) if the appliance is exposed to temperatures that fall below the specified intended temperature range for a prolonged period of time (below 10^ C).
In case of power failure or a switched off appliance, stored foodstuffs may spoil. There is a risk of food poisoning.
If there has been a power failure, check that the food which is stored in the appliance still looks and smells safe to eat.
■ Do not store medicines, laboratory specimens or other temperature-sensitive products that are subject to the Medical Devices Directive 2007/47/EC inside the refrigerator.
■ Ensure cleanliness and correct storage of food.
If the door is left open for a long time, this can cause the temperature inside the appliance zones to increase significantly.
■ Regularly clean surfaces that may come into contact with food and accessible drain systems.
■ Store raw meat and fish in appropriate containers in the appliance to ensure that they do not come into contact with or drip onto other food.
■ Store food on plates or in appropriate containers.
If the appliance is not going to be used for a longer period of time, pull the mains plug out of the mains socket, defrost and clean the appliance, leaving the door open to avoid unpleasant odours and to prevent mould from forming.
3.4. Cleaning and maintenance
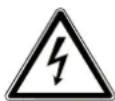
WARNING!
Risk of electric shock!
There is a risk of electric shock due to live parts.
■ Before starting any cleaning or maintenance work, pull the mains plug out of the socket (pull on the plug, not the mains cable). If the plug is not accessible, the corresponding fuse for the mains electricity supply to the house needs to be switched off.
■ Never touch the mains plug with wet or damp hands.
■ The replacement of the LED interior light is the responsibility of the manufacturer, its customer service or a similarly qualified person.

DANGER!
Risk of explosion and fire!
An accumulation of gas can lead to explosions.
■ Do not use any flammable liquids to clean the appliance or appliance parts.

NOTICE!
Possible material damage!
Damage to the appliance caused by improper handling
■ Do not operate any electrical appliances for cleaning inside the refrigerator. Both appliances may be damaged irreparably.
■ Do not use any abrasive or harsh cleaning agents on the inside, door or housing of the appliance as these could damage the surfaces.
■ Do not allow oil and grease to come into contact with the plastic parts and the door seal as the door seal can become porous and brittle.
- Do not use any other mechanical equipment or synthetic agents to accelerate the defrosting process, e.g. electric heaters, hot air blowers or hair-dryers or pointed or hard objects. The heat insulation and appliance interior are sensitive to scratches and heat and can melt.
3.5. Faults
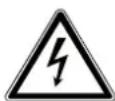
WARNING!
Risk of electric shock!
There is a risk of electric shock due to live parts.
■ Never try to open and/or repair an appliance component yourself.
If there is damage to the mains connection cable on this appliance, it must be replaced by the manufacturer, its customer service department, or another suitably qualified person. This is necessary to avoid hazards.
In the event of a fault, contact the Service Centre or another suitable professional repair workshop.
3.6. Disposal

DANGER!
Risk of choking and suffocation! Risk of injury!
To avoid risks to children, proceed as follows before disposing of the appliance:
■ Remove the doors and the seals or tape the door closed.
■ Leave the drawers/shelves in the appliance so that no-one, for example children, can climb into the appliance.
SILVER CREST®
4. Package contents

DANGER!
Risk of choking and suffocation!
There is a risk of choking and suffocation due to swallowing or inhaling small parts or plastic wrap.
- Keep the packaging material and small parts out of the reach of children.
Please check your purchase to ensure that all items are included and in perfect condition. If anything is missing or damaged, please contact us within 14 days of purchase.
The following items are supplied with your product:
• Refrigerator with freezer compartment, incl.
-1 glass shelf
-1 transparent vegetable drawer with glass cover
-1 ice cube tray
-1 egg tray
-2 spacers
-short manual
5. Description of components
See Fig. A
1) Appliance cover
2) Temperature control/interior lighting
3) Door compartments
4) Refrigerator door
5) Bottle compartment
6) Appliance feet
7) Egg tray
8) Ice cube tray
9) Vegetable drawer with cover
10) Drainage outlet for condensation
11) Glass shelf
12) Freezer compartment door handle
13) Freezer compartment
See Fig. B
14) Interior lighting
15) Climate control switch
16) Temperature control
See Fig. C
17) Spacer
6. Recommended food storage
▶ Store food in the correct fridge/freezer zone according to its type and sensitivity, see Fig. A. Refrigerator/freezer compartment recommended for:
A) * *** freezer compartment
Suitable for storing the following foods:
Seafood (fish, prawns, shellfish), freshwater fish and meat products (recommended for 3 months; the longer the storage time, the more likely it is that the taste and nutritional value will deteriorate in quality), suitable for frozen fresh foods. Store the food in suitable containers (see also "14. Deep-freezing food").
B) Recommended for cheese, baked goods
C) Recommended for sausage products, fish, meat and poultry
D) Recommended for fruit and vegetables
E) Recommended for eggs, butter
F) Recommended for jam, tins, glass containers
G) Recommended for milk, drinks
7. Technical specifications
Rated voltage: 220-240 V\~
Rated frequency: 50 Hz
Rated current: 0.51 A
Refrigerant: R-600α
Refrigerant quantity: 25 g
Insulation gas: Cyclopentane
Weight: Approx. 27.5 kg
Protection class I
Storage time in case of fault 6 hours
www.tuv.com ID 1111242458
7.1. Product data sheet
| Supplier's name or trademark: | SilverCrest® | ||
| Supplier's address: | MLAP GmbHMeitnerstr. 970563 StuttgartGERMANY | ||
| Model identifier: | SKS 121 A1 | ||
| Type of refrigerating appliance: | |||
| Low-noise appliance: | No | Design type: | Free-standing |
| Wine cooler: | No | Other refrigerating appli-ance: | Yes |
SILVERCREST®
| General product parameters: | ||||
| Parameter Value Parameter Value | ||||
| Overall dimensions (in mm) | Height 838 Total volume (in | dm3 or l) | 121 | |
| Width 540 | ||||
| Depth 595 | ||||
| EEI 100 Energy efficiency | class | E | ||
| Airborne noise emissions (in dB(A) re 1 pW) | 40 Airborne noise emission class | C | ||
| Annual energy consumption (in kWh/a)* | 145 Climate class: T, SN | |||
| Minimum ambient temperature (in °C) for which the refrigerating appliance is suitable | 10 Maximum ambient temperature (in °C) for which the refrigerating appliance is suitable | 43 | ||
| Winter mode Yes | ||||
* kWh/year energy consumption calculated on the basis of conformity testing results over 24 hours. The actual consumption will depend on the use and location of the appliance.
| Compartment parameters: | |||||
| Compartment type | Compartment parameters and values | ||||
| Compartment volume (in dm3 or l) | Recommended temperature settings for optimal food storage (in °C). | Freezing capacity (in kg/24h) | Defrost type A/M** | ||
| Compartment for fresh food | Yes | 104 | +4 | — | A |
| 4-star freezer compartment | Yes | 17.0 | -18 | 2.6 | M |
** Automatic defrost = A, manual defrost = M
| 4-star freezer compartment | |
| Fast freeze facility | Yes |
| Light source parameters: | |
| Type of light source | LED |
| Energy efficiency class | F |
| Minimum duration of the warranty offered by the manufacturer: | 36 months from date of purchase |
| Additional information: | Scan the QR code shown on the energy label to download the complete product data sheet. |
8. EU declaration of conformity


MLAP GmbH hereby declares that the product conforms to the following requirements of the European Union:
• EMC Directive 2014/30/EU
• Low Voltage Directive 2014/35/EU
• Ecodesign Directive 2009/125/EC
• RoHS Directive 2011/65/EU.
9. Spare parts
If you would like to order spare parts, please contact us using the contact form at www.mlap.info/contact.
10. Information on the appliance
- The appliance uses refrigerant R-600a (HCFC- and CFC-free) in the refrigerant circuit.
- The refrigerant circuit has been checked for leaks. This complies with the relevant safety regulations for electrical appliances.
• Energy efficiency class E
• Climate class SN, T
The different climate classes are explained in the following table.
| Climate class Meaning Ambient temperature | ||
| SN Appliances for subnormal climate +10°C to +32°C | ||
| N Appliances for normal climate +16°C to +32°C | ||
| ST | Appliances for subtropical climate | +16°C to +38°C |
| T | Appliances for tropical climate | +16°C to +43°C |
10.1. Information regarding refrigerant R-600a
R-600a and cyclopentane are used as 100% HCFC-free refrigerant and insulating materials in this appliance. This helps to protect the ozone layer and reduces the so-called greenhouse effect.
These appliances can be identified by the "Refrigerant R-600a" notice on the type plate.
Ensure that the refrigerant circuit is not damaged, as small quantities of R-600a can contribute to the greenhouse effect if released.
This applies both when transporting the appliance and throughout its service life. Also ensure that you dispose of this appliance correctly according to local regulations.
11. Before operation
Remove the packaging material and all protective film.
11.1. Changing the door hinge
To change the door hinge, you will need:
• Phillips screwdriver
- Slotted screwdriver
The mains plug has been unplugged.
Remove the vegetable drawer and the glass shelf as described under "11.4. Inserting/removing accessories" on page 54.
▶ Tilt the appliance backwards (maximum 40^ ) and place it carefully, e.g. on the edge of a chair, so that you can reach the fixing screws of the lower hinge.
SILVER CREST®
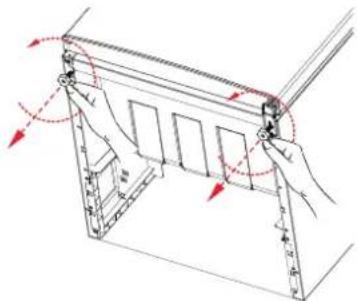
Remove the appliance feet by turning anti-clockwise (Fig. 1).
natural_image
Technical line drawing of a mechanical assembly with red motion arrows indicating movement (no text or symbols)Fig. 1
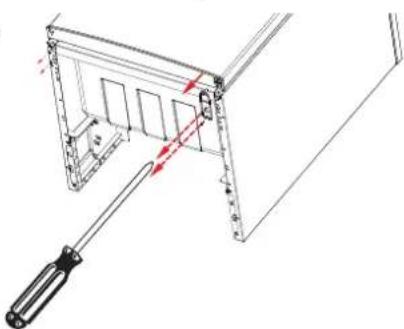
▶ Use a Phillips screwdriver to unscrew the two retaining screws on the lower hinge and remove the hinge from the refrigerator housing (Fig. 2).
Remove the two screws on the left-hand side of the housing and reposition the screws on the right-hand side of the housing.
natural_image
Technical line drawing of a mechanical assembly with a tool inserted, showing no text or symbolsFig. 2
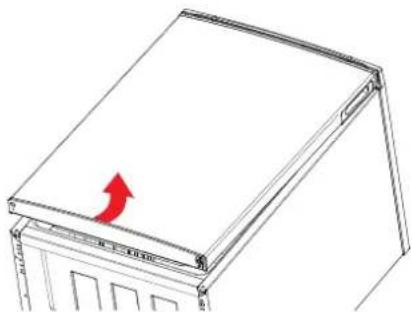
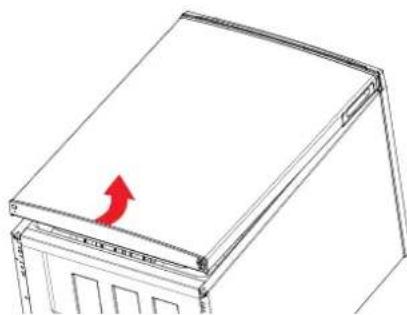
▶ Use both hands to lift the bottom of the refrigerator door slightly and take the refrigerator door off the upper hinge (Fig. 3).
▶ Lift off the refrigerator door and place to one side on a soft surface to avoid scratches and secure it against falling over.
natural_image
Diagram of a mechanical device with a red arrow indicating upward motion (no text or symbols)Fig. 3
Changing the freezer compartment door hinge
Due to the increased force needed when screwing in the screws, a second person is to hold the appliance in position.
▶ Use a Phillips screwdriver to remove the screws on the freezer compartment hinge (Fig. 4).

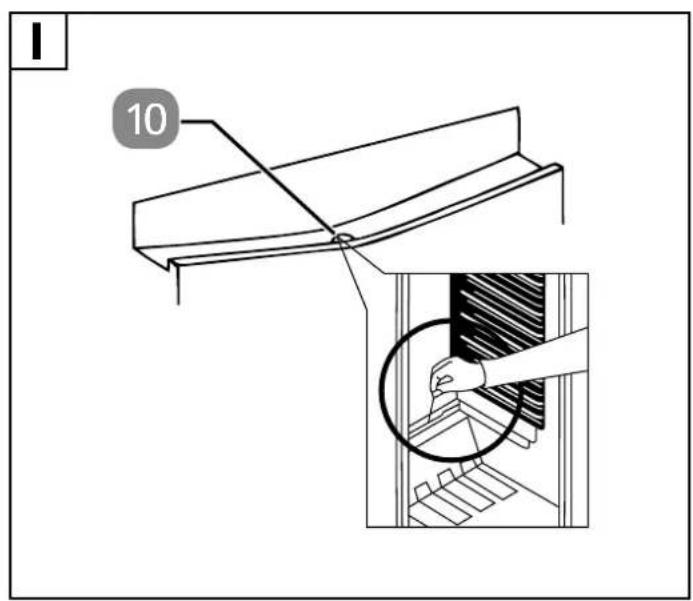
To prevent the screw from unintentionally falling through the drainage outlet for condensation (10), cover it with a cloth or something similar. Remove the cloth after assembly.
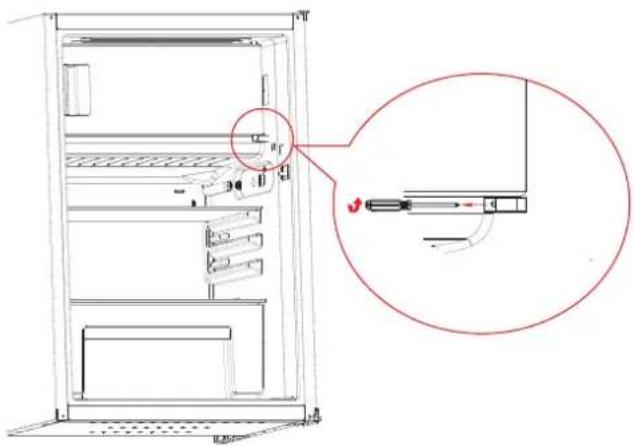
Fig. 4
SILVER CREST®
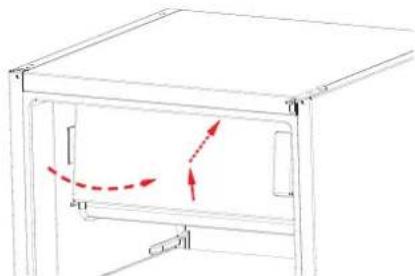
Remove the freezer compartment door by lifting the bottom up slightly and then pulling downwards (Fig. 5).
natural_image
Line drawing of a mechanical device with internal components and red motion arrows indicating movement (no text or symbols)Fig. 5
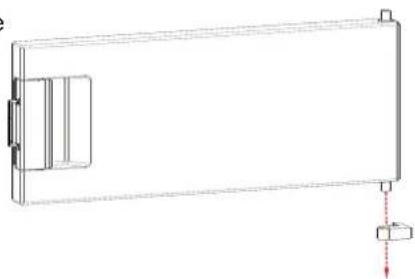
Remove the freezer compartment hinge from the underside of the door (Fig. 6).
natural_image
Pure technical line drawing of a rectangular frame with internal compartments and a vertical rod, no text or symbols presentFig. 6
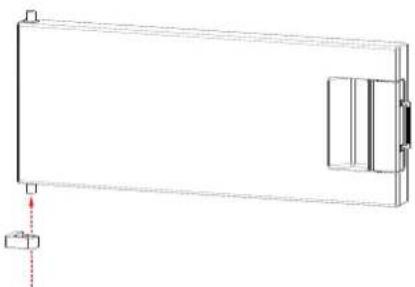
Now rotate the freezer compartment door by 180°. Place the freezer compartment hinge on the left-hand pins (Fig. 7).
natural_image
Pure technical line drawing of a rectangular enclosure or enclosure with mounting feet and internal components (no text or symbols)Fig. 7
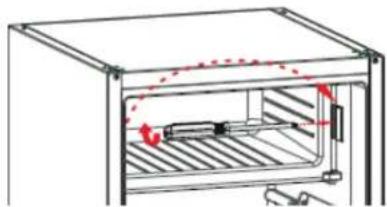
▶ Undo the screws on the freezer compartment door lock and remove the lock. (Fig. 8)
▶ Replace the lock on the other size, then screw down the lock.
natural_image
Technical diagram of a refrigerator interior showing internal components and airflow direction (no text or labels)Fig. 8
▶ Refit the freezer compartment door on the freezer compartment by sliding the freezer compartment door upwards at a slight angle from below (Fig. 9). Ensure that the pin on top of the door is seated in the recess on the appliance and that the seal is properly flush with the edge of the freezer compartment.

Fig. 9
SILVERCREST®
▶ Next, screw the freezer compartment hinge tight (Fig. 10). The opening direction of the freezer compartment door has now been changed.
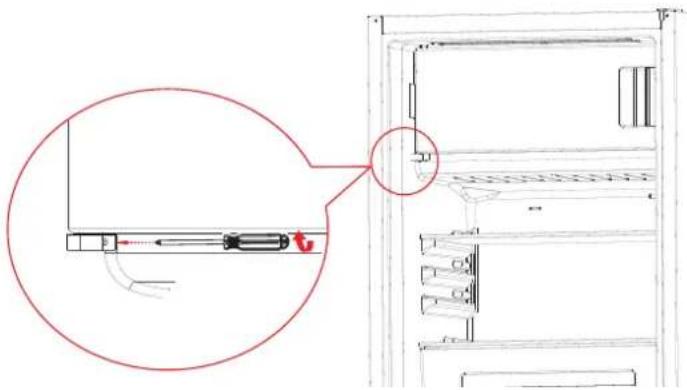
natural_image
Technical line drawing of a mechanical assembly with a magnified inset showing a component detail (no text or symbols)Fig. 10
▶ Use a Phillips screwdriver to unscrew the two retaining screws on the upper hinge of the refrigerator door and remove the hinge from the refrigerator housing (Fig. 11).
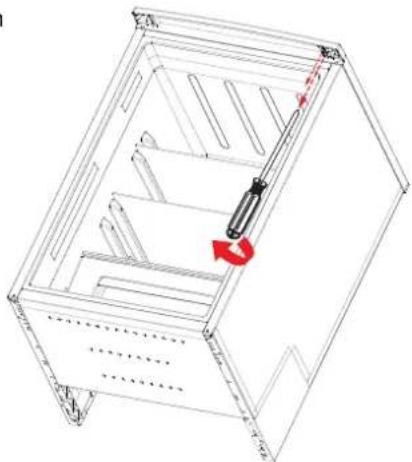
natural_image
Technical line drawing of a mechanical cabinet or enclosure with internal compartments and a red directional arrow indicating movement (no text or symbols present)Fig. 11
▶ Use a slotted screwdriver to remove the upper hinge pins (Fig. 12) and screw the pins back into the holes on the opposing side.
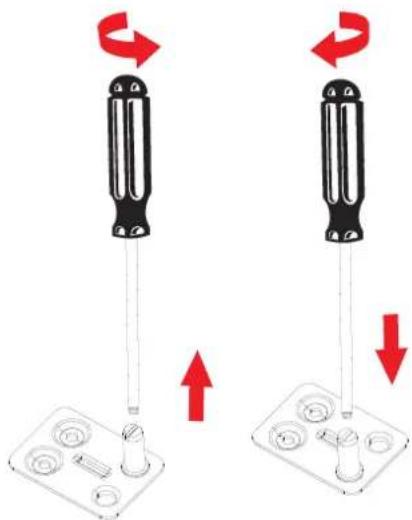
natural_image
Two screwdriver tools with red directional arrows indicating rotation or movement (no text or symbols)Fig. 12
SILVER CREST®
Screw the upper hinge to the left-hand side of the appliance using the two retaining screws (Fig. 13).
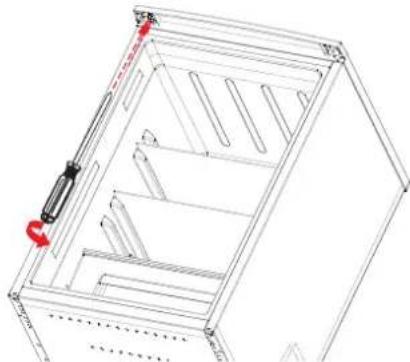
natural_image
Technical line drawing of a mechanical housing or enclosure with internal compartments and a handle (no text or symbols)Fig. 13
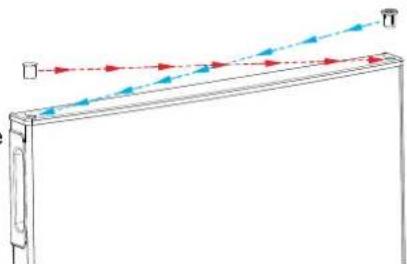
Remove the blind plug on the top left-hand side of the refrigerator door and the hinge bushing on the right-hand side using a small slotted screwdriver.
Insert the hinge bushing into the hole on the left-hand side. When doing so, pay attention to the guide nose.
▶ Insert the blind plug into the hole on the right-hand side (Fig. 14).

natural_image
Diagram of a rectangular frame with two vertical supports and directional arrows indicating light or motion (no text or symbols)Fig. 14
Loosen the retaining screw on the lower door stop limiter. Reposition the door stop limiter on the left-hand side as well and screw the door stop limiter tight with the retaining screw (Fig. 15).
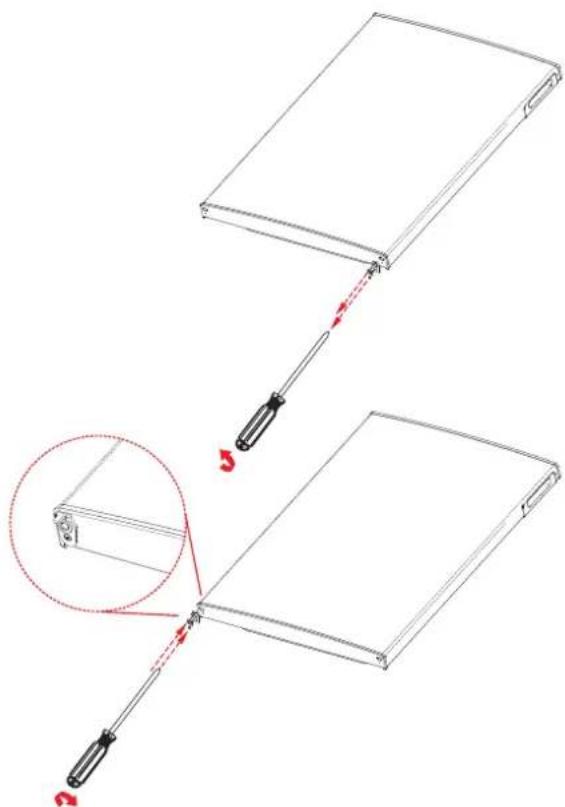
Fig. 15
SILVERCREST®
▶ Use a slotted screwdriver to remove the hinge pin on the lower hinge and screw the pins back into the hole on the opposite side (Fig. 16).
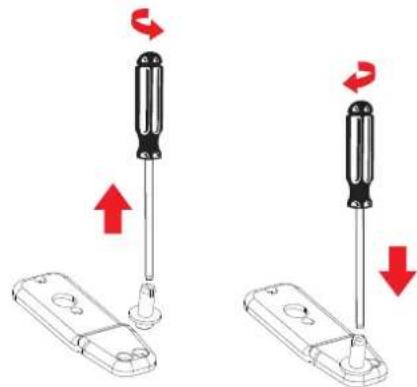
natural_image
Two identical diagrams showing a screwdriver on a device, with red arrows indicating direction of movement (no text or symbols present)Fig. 16
▶ Refit the refrigerator door on the refrigerator by sliding the refrigerator door upwards at a slight angle from below (Fig. 17). Ensure that the hinge pin of the upper hinge is seated in the hinge bushing on the top of the refrigerator door and that the seal is properly flush with the edge of the housing.
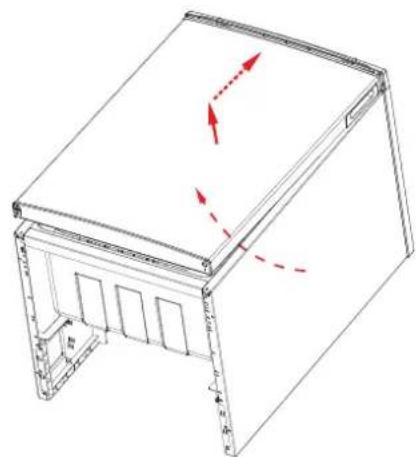
natural_image
Technical line drawing of a mechanical housing or enclosure with internal compartments and directional arrows indicating movement (no text or symbols)Fig. 17
▶ Use a Phillips screwdriver to secure the two retaining screws on the lower hinge (Fig. 18). Do not tighten the retaining screws completely yet so that you can still align the door. Tighten both retaining screws on the lower hinge only when it is possible to close the door evenly.
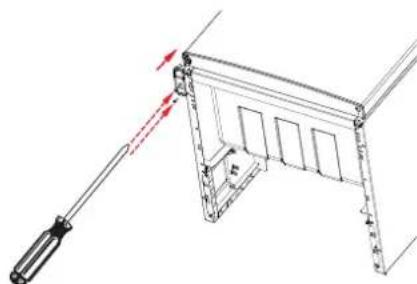
natural_image
Technical line drawing of a mechanical clamp or bracket assembly with a screwdriver, showing no text or symbols.Fig. 18
▶ Replace the appliance feet and screw the appliance feet clockwise slightly (Fig. 19).
▶ Stand the appliance upright again. Next, level the appliance by screwing the appliance feet in or out as required.
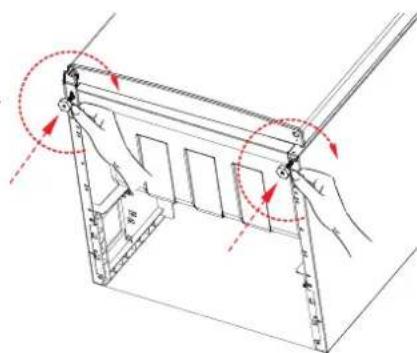
Fig. 19
SILVERCREST®
The opening direction of the refrigerator door has now been changed (Fig. 20).
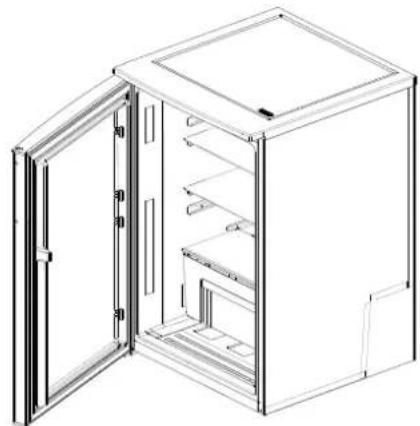
natural_image
Line drawing of a refrigerator with open doors and internal shelves (no text or symbols)Fig. 20

The door seal adapts to the new door hinge after a few hours.

If tilted to an angle of more than 40^ during transport, wait 3 hours before connecting it to the mains power supply and switching it on to enable the refrigerant circuit to settle after transport.
11.2. Fitting the spacers
natural_image
Diagram showing a vehicle with directional arrows indicating motion or movement, no readable text or symbols present.Fig. 21
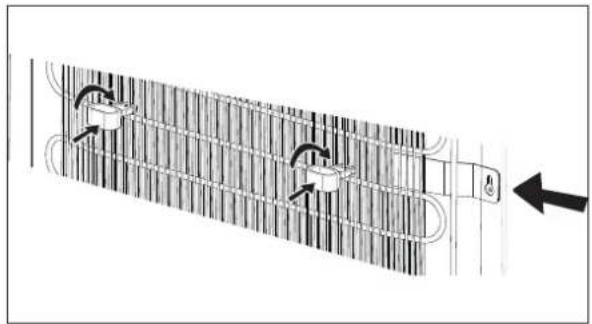
▶ Fit the two spacers (17) on the cooling ribs at the back of the appliance at the height of the upper fixing plate (see arrow on the right in Fig. 21).
Insert each spacer (17) in the vertical position up to the recess marked T between two cooling ribs and turn it 90° to the horizontal position as shown in Fig. 21. This prevents the condenser from coming into direct contact with the wall.
11.3. Setting up the appliance
Before switching on the appliance for the first time, clean all parts of the appliance (see section "16. Cleaning and defrosting" on page 57).
Dry the appliance thoroughly after cleaning and before switching it on for the first time.
Place the appliance in an appropriate location (see also section "3.3.1. Location" on page 41).
▶ Ensure that the appliance is level, compensate for any unevenness in the floor by screwing in the appliance feet (6).
▶ Level the fridge freezer with a spirit level.
To open the appliance door, the room dimensions indicated in Fig. D and Fig. E must be available.
SILVER CREST®
11.4. Inserting/removing accessories
11.4.1. Inserting/removing the vegetable drawer
▶ To remove the vegetable drawer (9), open the door fully.
▶ Pull out the vegetable drawer (9) with both hands and remove the vegetable drawer (9) from the refrigerator compartment at a slight angle (Fig. H).
▶ To insert the vegetable drawer (9), slide it into the refrigerator compartment at a slight angle.
11.4.2. Removing glass shelves
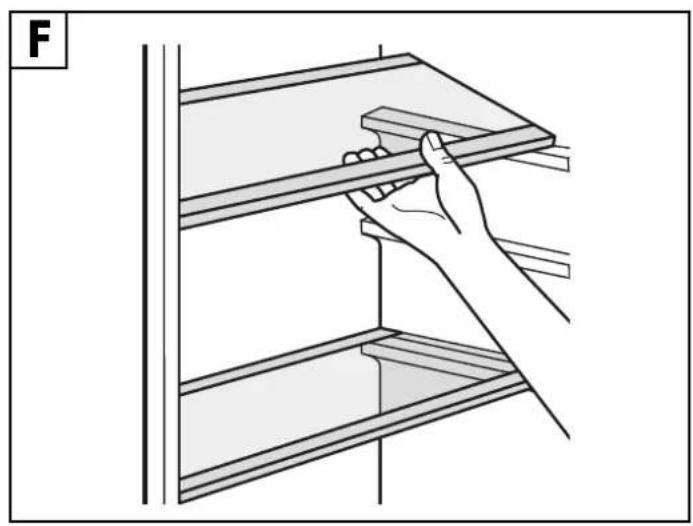
▶ Open the door fully to remove a glass shelf (11) (Fig. F).
▶ Lift the glass shelf (11) with both hands and pull the glass shelf (11) out of the refrigerator compartment.
11.4.3. Inserting glass shelves
Insert the glass shelf (11) from the front into the guide rails in the refrigerator wall.
11.4.4. Removing/inserting door compartments
▶ Lift the door compartment (3/5) (Fig. G) to remove it.
To fit a door compartment (3/5), slide the door compartment from top to bottom onto the door compartment guide until it is firmly in place.
11.4.5. Egg tray
▶ Place the egg tray (7) in the upper door compartment (3).
12. Operating the appliance
Connect the appliance to an earthed mains socket. The local mains voltage must match the voltage stated in the technical specifications for the appliance.
- Store food in the correct cooling zones according to its type and sensitivity (see "6. Recommended food storage" on page 45).
▶ Turn the temperature control (16) to position 1–5.
The appliance and interior lighting is switched on.

Audible noises such as cracking, humming or gurgling are caused by the expansion and shrinkage of the components as a result of the temperature changes or by the compressor working and do not indicate a malfunction.
12.1. Setting the temperature
Setting the temperature control (16) to one of the selected positions automatically adjusts the temperature in the refrigerator compartment.
The following temperature control settings (16) can be selected:
● Cooling is switched off
1 The maximum refrigerator temperature (the warmest)
2 to 4 Intermediate position
5 The lowest refrigerator compartment temperature (coldest)
Once the appliance has been switched on for the first time, it takes 24 hours for the appliance to cool down to a suitable temperature. Check the temperatures in the refrigerator/freezer compartment with a thermometer. The ideal temperature in the refrigerator compartment is 6^ . The ideal temperature in the freezer compartment is -18^ . Once this temperature is reached, you can load it with food.
To de-energise the appliance, set the temperature control (16) to ●. Unplug the mains plug. When switching off or unplugging the appliance, you must wait at least 5 minutes before switching it on again or plugging in the mains plug. Not doing this can damage the compressor.

The internal temperatures can be influenced by factors such as the installation location, ambient temperature and the number of times the door is opened. Take these factors into account when setting the temperature.

The maximum level of cooling on the temperature control (16) should only be set for short periods in the event of high external temperatures or when filling the refrigerator with food that must be cooled quickly. Once the required interior temperature has been reached, the thermostat should be turned down, otherwise temperatures inside the appliance fall below 0^ C and can damage the chilled goods.
12.2. Climate control switch
In the event of low room temperatures below or equal to 15^ C, it can become too warm inside the freezer compartment, since the cooling unit responds less often as a result of the low room temperature.
Frozen goods can defrost. To prevent the freezer compartment temperature from rising in case of low external temperatures, the appliance is fitted with a climate control switch (15).
Ambient temperatures of below 15°C
▶ Check the temperatures in the freezer compartment with a thermometer.
If the temperature inside the freezer compartment exceeds -18^ in case of an ambient temperature below 15^ and an intermediate setting of 3-4, set the climate control switch (15) in the refrigerator compartment to 1.
The cooling unit will respond more frequently. This guarantees the required temperature of approx. -18°C.
Ambient temperatures of above 15°C
As soon as the room temperature is warmer than 15^ C, set the climate control switch (15) to 0, otherwise the appliance will consume energy unnecessarily.
The appliance cooling works with normal performance again.
13. Optimising energy consumption
In order to achieve the best possible cooling performance with low energy consumption, observe the following:
▶ Do not position the appliance near a heat source (radiator or cooker etc.).
The location should be not too warm, dry, dust-free and well ventilated.
▶ Ensure that air can circulate freely around the refrigerating appliance.
The energy consumption will be lowest if the shelf (11) and vegetable drawer (9) are left inside the appliance when it is in use.
If the door is left open for a long time, this can cause the temperature inside the appliance zones to increase significantly. Only open the door briefly when loading and removing foodstuffs. Less cold can escape if the door is left open for only a short time and therefore the appliance requires less energy.
▶ Select the temperature setting according to how full the appliance is.
▶ Ensure that the door seals are undamaged and that the door closes properly.
If the appliance is left empty for an extended period of time, switch it off. Defrost and clean the appliance and allow it to dry. Leave the door open to prevent mould from forming in the appliance.
If a layer of ice has formed in the freezer compartment, defrost the appliance. A thick coating of ice will adversely affect the energy consumption.
13.1. Recommended temperature setting
| Ambient temperature Temperature setting | |
| Summer (28–38°C) Setting 3–5 | |
| Normal (22–28°C) Setting 3–4 | |
| Winter (10–22°C) Setting 2–3 | |
SILVERCREST®

Effects of storage on food
At the recommended setting, the optimal storage time of food in the refrigerator compartment is no longer than 3 days.
At the recommended setting, the optimal storage time of food in the freezer compartment is no more than 3 months.
Other settings can shorten the optimal storage time.
The optimal storage time varies depending on the food. Pay attention to the storage times recommended by the food manufacturers.
14. Deep-freezing food
Almost all types of food are suitable for freezing, except vegetables which are eaten raw, e.g. lettuce.
Only high-quality food is suitable to be frozen. Freeze food in portions for single use and do not refreeze any products that have defrosted.
▶ Food to be frozen must not come into contact with food that has already been frozen. It may be necessary to reduce the quantity of food to be frozen if you intend to freeze food each day.
▶ Do not exceed the storage times recommended by the food manufacturers.
Place the food in odourless, airtight, moisture-free, greaseproof and leach-resistant packaging.
—Polythene bags and aluminium foil are the most suitable materials.
—The food must be closely wrapped in airtight packaging.
-Do not use glass packaging as the glass may break.
To achieve maximum freezing capacity, set the climate control switch (15) to 1 and the temperature control to 3 24 hours before loading fresh food to be frozen. Retain this setting for a further 24 hours after loading the food. To save energy, then set the climate control switch (15) to 0 and move the temperature control back to the recommended temperature setting (see section "13.1. Recommended temperature setting" on page 55).
Take care not to overload the freezer compartment (13) as otherwise optimal performance cannot be guaranteed and energy consumption will increase.
- Signs of moisture or swelling of deep-freeze packaging indicates that the food has not been stored/transported correctly and may be spoiled. Check the condition of food before eating.
Fruit can be frozen in the freezer compartment (13) and ice cubes can be made.
14.1. Using ice cube trays
Clean the ice cube tray (8) thoroughly with water and a little washing-up liquid before using for the first time.
▶ Fill the ice cube tray (8) with drinking water.
Place the ice cube tray (8) upright in the freezer compartment (13).
As soon as the ice cubes are frozen, remove the ice cube tray (8) from the freezer compartment (13) and press the ice cubes out of the mould.
14.2. Defrosting food
Depending on the type and use, food can be defrosted in a refrigerator, in a container filled with lukewarm water, in a microwave, at room temperature or in the oven. Fruit and vegetables which are going to be cooked do not need to be defrosted.
Once defrosted, food is preferably to be eaten on the same day or stored in the freezer compartment/refrigerator until the next day at the latest. Food must not be refrozen, even if it has not fully defrosted.
15. Storing food in the refrigerator compartment

NOTICE!
Possible material damage!
Possible risk of damage to the door seal
■ Sensitive surfaces: Do not allow oil and grease to come into contact with the plastic parts and the door seal as the surface can become porous and brittle.
To avoid food from becoming contaminated, please observe the following instructions:
▶ If the door is left open for a long time, this can cause the temperature inside the appliance zones to increase significantly.
▶ Regularly clean surfaces that may come into contact with food and accessible drain systems.
▶ Store raw meat and fish in appropriate containers in the appliance to ensure that they do not come into contact with or drip onto other food.
▶ Store food on plates or in appropriate containers.
▶ Distribute the food evenly throughout the appliance. Please note that food must not touch the rear wall of the cooling chamber, as this could cause frost and condensation to form.
▶ Allow hot foods to cool down before placing them into the appliance to avoid increasing the energy consumption.
▶ Ensure that foods that take on other smells easily, such as butter, milk and quark, are well packaged. i.e. in tightly sealed containers.
▶ Store food in the correct cooling zone according to its type and sensitivity.
▶ Storing vegetables with a high water content causes condensation to form on the vegetable containers. This does not impair the proper function of the refrigerator compartment.
Dry vegetables thoroughly before placing them in the refrigerator compartment. The storage time is reduced for vegetables with a high water content (e.g. leaf vegetables, cucumbers).
16. Cleaning and defrosting
▶ Regularly clean surfaces that come into contact with food and the drainage system.
WARNING!
Risk of electric shock!
There is a risk of electric shock from electrified parts.
■ Before starting any cleaning work, you must set the temperature control (16) to ● and pull the mains plug out of the socket (pull on the plug, not the cable). If the plug is not accessible, the corresponding fuse for the mains electricity supply to the house needs to be switched off.
■ Do not touch the mains plug with wet or damp hands.
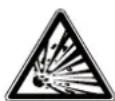
DANGER!
RISK OF EXPLOSION AND FIRE!
An accumulation of gas can lead to explosions.
■ Do not use any flammable liquids to clean the appliance or appliance parts.
■ Do not use de-icer sprays. They may produce explosive gases.
SILVER CREST®

WARNING!
Risk to health!
Improperly handling foods can lead to food poisoning.
Cooling is no longer sufficient if you switch off the appliance or in case of power failure. Frozen food can thaw or defrost completely.
A rise in temperature of the frozen food during manual defrosting, maintenance or cleaning can shorten the storage life of the frozen products.
■ Remove the frozen food from the appliance, wrap in several layers of newspaper and store in a sufficiently cool room or refrigerator.
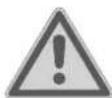
WARNING!
Risk of injury!
Risk of burns resulting from the low temperatures.
- Do not touch the freezer compartment's frozen inner walls or frozen foodstuffs with your hands. Use a dry cloth, for example, to hold the frozen products.

NOTICE!
Possible material damage!
Damage to the appliance due to improper handling of the sensitive surfaces of the appliance
■ Sensitive surfaces: Do not allow oil and grease to come into contact with the plastic parts and the door seal as the door seal can become porous and brittle.
■ Never use acidic, abrasive or granular, acetic-acid-, soda- or solvent-based cleaning agents. These may damage the surfaces of your appliance.
■ Do not use any other mechanical equipment or synthetic agents to accelerate the defrosting process, e.g. electric heaters, hot air blowers or hair-dryers or pointed or hard objects. The heat insulation and appliance interior are sensitive to scratches and heat and can melt.
■ Do not operate any electrical appliances inside the refrigerator. Both appliances may be damaged irreparably.
16.1. Cleaning the appliance
▶ Turn the temperature control (16) to position ●. The appliance switches off.
▶ Unplug the mains plug.
Remove the vegetable drawer, door compartments and shelf from the refrigerator.
▶ After approx. 30 minutes any frost on the interior rear wall can be easily removed using a plastic or wooden spatula.
▶ Clean the drainage channel, e.g. with a cotton bud or a cleaning spike (see also Fig. I).
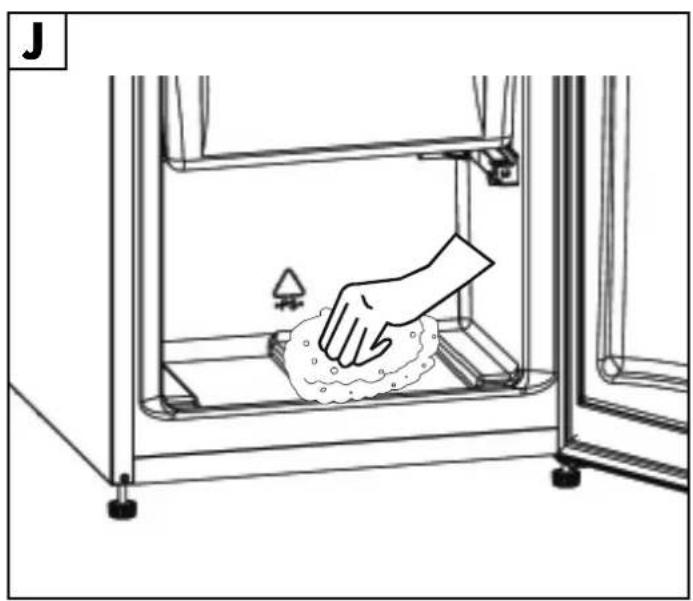
Wipe the refrigerator compartment with water and a mild detergent (e.g. washing-up liquid) and leave to dry completely (see also Fig. J).

To prevent mould, vinegar (cleaning vinegar, household vinegar or vinegar essence) can be added to the water for cleaning. Cleaning agents containing sand, soda and acid are not suitable.
Carefully rinse all fittings with water and a little washing-up liquid and leave to dry (vegetable drawer (9), glass shelf (11), egg tray (7), ice cube tray (8)). The components are dishwasher safe.
▶ Clean the appliance surfaces, except the door seal, with a mild cleaning agent.
▶ Clean the door seal with clean water, wipe it off and allow to dry.
▶ Plug the mains plug back into the socket.
As soon as the freezer compartment has reached a temperature of -18^ , you can put the food back into the appliance.
17. Replacing the interior light

CAUTION! Risk of injury/damage to the appliance!
The replacement of the LED interior light is the responsibility of the manufacturer, its customer service or a similarly qualified person.
■ If the interior light does not work, contact customer service.
18. Faults
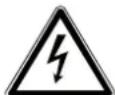
WARNING! Risk of electric shock!
There is a risk of electric shock due to live parts.
■ Never try to open and/or repair an appliance component yourself.
In the event of a fault, contact the Service Centre or another suitable professional repair workshop.
19. Measures in case of power failure
Food must not be refrozen, even if it has not fully defrosted.
In case of a power failure, check the condition of food before eating (see also "3.3.4. Use of the appliance").
20. Troubleshooting
Faults may occur during operation. Please use the following table to check whether you can resolve the problem yourself. All other repairs are prohibited and invalidate the warranty. Therefore, in the event of a fault, contact our Service Centre or another suitable professional repair workshop.
| Fault Cause Solution | ||
| The appliance is not working. | Power supply interrupted ▶ Check whether the mains plug is plugged in. ▶ Check whether the mains socket is live by plugging in another electrical appliance (e.g. a bedside lamp). Have the mains socket repaired, if necessary. ▶ Check that the mains cable is not damaged. Contact customer services if necessary. | |
| The interior light is not working. | LED interior lighting is defective ▶ | Contact customer services |
| Fault Cause Solution | ||
| The temperature is not low enough. | The door does not seal properly or is opened too often. | ▸ Arrange food so that it does not prevent the door from closing properly.▸ Open the door for less time. |
| The ambient temperature is less than 10°C/higher than +43°C. | ▸ The appliance is designed to work in a temperature range from +10°C to +43°C. | |
| Air circulation behind the appliance is impeded. | ▸ Move the appliance away from the wall. | |
| The appliance has been set up in a location exposed to direct sunlight or next to a heat source. | ▸ Place the appliance in a different position. | |
| Water collects on the bottom of the refrigerator compartment. | Food is touching the rear wall of the refrigerator compartment. | ▸ Move food and containers away from the rear wall. |
| The appliance makes too much noise. | The appliance has not been set up properly. | ▸ Level the appliance by screwing the appliance feet (6) in or out. |
21. Longer periods without use
If the appliance is not going to be used for a longer period of time, proceed as follows to safely store and protect the appliance.
▶ Turn the temperature control (16) to position ●. The appliance switches off.
▶ Pull the mains plug out of the mains socket.
▶ Clear out the appliance.
▶ Wipe out the inside of the freezer and refrigerator compartments and allow to dry.
▶ Carefully clean and dry all fittings.
Leave the door open to avoid unpleasant odours and to prevent mould from forming.
22. Transport

CAUTION! Risk of injury!
There is a risk of injury from the strain of lifting the heavy weight of the appliance.
- Seek the assistance of at least one other person in order to move the appliance. Do not transport the appliance alone.
▶ Turn the temperature control (16) to position ●. The appliance switches off.
▶ Pull the mains plug out of the mains socket.
Remove all food, shelves and glass shelves from the refrigerator compartment.
▶ Fully screw in the adjustable feet.
▶ Tape the door shut.
▶ To avoid damage during transport, we recommend that you use the original packaging.
23. Disposal

DANGER!
Risk of choking and suffocation! Risk of injury!
To avoid risks to children, proceed as follows before disposing of the appliance:
■ Remove the doors and the seals or tape the door closed.
■ Leave the vegetable drawer/shelves in the appliance so that no-one, for example children, can climb into the appliance.

Packaging
Your appliance has been packaged to protect it from damage in transit. Packaging materials are raw materials and can therefore be reused or recycled.
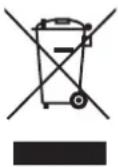
Appliance
Do not dispose of old appliances in normal household waste.
In accordance with Directive 2012/19/EU, these appliances must be disposed of correctly at the end of their service life.
This involves separating the materials in the appliances for the purpose of recycling and minimising the environmental impact.
Take old appliances to a collection point for electrical scrap or a recycling centre.
Contact your local waste disposal company or your local authority for more information on this subject.
During disposal, please note that the appliance/insulation contains cyclopentane (a flammable expanded gas for insulation).
The appliance/insulation must be disposed of correctly.
24. Legal notice
Copyright © 2021
All rights reserved.
This user manual is protected by copyright.
Mechanical, electronic and any other forms of reproduction are prohibited without the written permission of the manufacturer.
Copyright is owned by the company:
MLAP GmbH
Meitnerstr. 9
70563 Stuttgart
GERMANY
24.1. Information on trademarks
SilverCrest® is a registered trademark of Lidl Stiftung & Co. KG, 74167 Neckarsulm, Germany.
All other names and products are trademarks or registered trademarks of their respective owners.
25. MLAP GmbH Warranty
Dear customer,
The warranty on this product is 3 years from the date of purchase. In the event of defects in this product, you have legal rights against the product vendor. These legal rights are in no way limited by the warranty described below.
SILVER CREST®
25.1. Conditions of warranty
The warranty period begins on the date of purchase. Please take care to keep the original purchase receipt. This document will serve as a proof of purchase.
If, within three years of the date of purchase of this product, any defect in material or manufacture should become evident, the product will – as we choose – be repaired free of charge or replaced. This warranty is subject to presentation, within the three-year term, of the defective product and the proof of purchase (receipt) and a brief, written description of what constitutes the defect and when it became evident.
If the defect is covered by our warranty, you will receive back the repaired product or a new replacement.
Repair or exchange of the product does not lead to a renewed warranty period.
25.2. Warranty period and legal claims for defects
The warranty period is not prolonged by the above fulfilment. This also applies for replaced and repaired parts. Any damage or defects present at the time of purchase must be notified immediately after unpacking. Repairs that are carried out after the expiration of the warranty period are subject to a charge.
25.3. Scope of warranty
The product is manufactured in accordance with strict quality guidelines and thoroughly tested before dispatch.
The warranty applies for defects in materials or manufacture. This warranty does not extend to product parts that are subject to normal wear and can therefore be regarded as wearing parts or to damage to fragile parts, e.g. switches, batteries or parts made of glass.
This warranty is void if the product has been damaged or not properly used or serviced. For proper use of the product, exact compliance with all instructions listed in the user manual is required. It is essential to avoid procedures and use for purposes against which the user manual advises or warns.
The product is intended for private use only and not for industrial/commercial use. Improper handling and usage not in accordance with the intended purpose, use of force and any interventions that are not carried out by our authorised service centre will render the warranty null and void.
25.4. Processing of warranty claims
For speedy processing of your request, please observe the following instructions:
- For all enquiries, please keep the receipt and the article number IAN 394963_2104 to hand as proof of purchase.
- The article number is to be found on the type plate, an engraving, on the title page of your instructions (bottom left) or on an adhesive label on the rear or underside.
- If functional or other defects occur, first contact the service department named below by telephone or via our contact form.
26. Service
You can download this user manual and many other manuals, product videos and installation software from www.lidl-service.com.
Scan this QR code to be directed straight to the Lidl Service website (www.lidl-service.com) where you can open your user manual by entering the article number IAN 394963_2104.
IE Service Ireland
Hotline
① +353 1 6533859
Mon - Fri: 09:00 - 17:00
Please use the contact form at www.mlap.info/contact
NI Service North Ireland
Hotline
① +44 28 95922074
Mon - Fri: 09:00 - 17:00
Please use the contact form at www.mlap.info/contact
IAN 394963_2104
26.1. Supplier/Producer/Importer
Please note that you cannot use the address below for returns. Please contact the Service Centre mentioned above.
MLAP GmbH
Meitnerstr. 9
70563 Stuttgart
GERMANY
27. Privacy statement
Dear Customer,
We wish to inform you that we, MLAP GmbH, Meitnerstr. 9, 70563 Stuttgart, Germany, process your personal data as a data controller.
For matters regarding data protection, we are supported by our company data protection officer who can be contacted at MLAP GmbH, Datenschutz, Meitnerstr. 9, 70563 Stuttgart, Germany, datenschutz@mlap.info. We process your data for the purpose of warranty processing and associated processes (e.g. repairs) and therefore rely on processing your data for the sales contract concluded with us.
Your data will be provided to repair service providers contracted by us for the purpose of warranty processing and associated processes (e.g. repairs). We generally store your personal data for a period of three years in order to fulfil your legal warranty rights.
You have the right to be informed of the personal data concerned as well as the right to rectification, deletion, restriction of processing, the right to object to processing and the right to data portability.
In case of access and cancellation rights, restrictions apply according to paragraphs 34 and 35 of the BDSG (Federal Data Protection Act) (Art. 23 GDPR). In addition, there is a right of appeal to a competent data protection supervisory authority (Article 77 GDPR in conjunction with paragraph 19 BDSG). For MLAP, this is the Landesbeauftragte für Datenschutz und Informationsfreiheit Baden-Württemberg, Postfach 10 29 32, 70025 Stuttgart, Germany, www.baden-wuerttemberg.datenschutz.de.
The processing of your data is necessary for warranty processing: it is not possible to process the warranty without the provision of the required data.
SILVER CREST®
SILVER CREST®
Sommaire
1. Introduction......67
natural_image
Technical line drawing of a structural frame with directional arrows indicating motion (no text or symbols)Fig. 1
natural_image
Technical line drawing of a mechanical assembly with a tool and dimension arrows (no text or symbols)Fig. 2
natural_image
Diagram of a mechanical device with a red arrow indicating direction, no text or symbols presentFig. 3
Fig. 4
natural_image
Technical line drawing of a mechanical assembly with no visible text or symbolsFig. 5
natural_image
Pure technical line drawing of a rectangular frame with internal compartments and a vertical wall, no text or symbols presentFig. 6
natural_image
Pure technical line drawing of a rectangular frame with internal components and a red dotted line indicating a dimension (no text or symbols)Fig. 7
SILVER CREST®
natural_image
Technical line drawing of a cabinet interior with internal components and directional arrows (no text or symbols)Fig. 8
natural_image
Diagram of a refrigerator interior showing door, seat, and door frame with red arrows indicating motion (no text or symbols)Fig. 9
Fig. 10
natural_image
Technical line drawing of a mechanical cabinet or enclosure with internal compartments and a red directional arrow indicating motion (no text or symbols)Fig. 11
SILVER CREST®
natural_image
Two screwdriver tools with red directional arrows indicating rotation or movement (no text or symbols)Fig. 12
natural_image
Technical line drawing of a mechanical cabinet or rack system with internal compartments and a handle (no text or symbols)Fig. 13
natural_image
Diagram of a rectangular frame with two vertical supports and directional arrows indicating light or motion (no text or symbols)Fig. 14
SILVERCREST®
Fig. 15
natural_image
Two identical diagrams showing a screwdriver on a mobile phone, with red arrows indicating direction of movement (no text or symbols present)Fig. 16
natural_image
Technical line drawing of a mechanical housing or enclosure with internal compartments and directional arrows indicating movement (no text or symbols)Fig. 17
SILVER CREST®
natural_image
Technical line drawing of a mechanical device with a lever and force arrow (no text or symbols)Fig. 18
Fig. 19
natural_image
Line drawing of a single refrigerator with open doors and internal shelves (no text or symbols)Fig. 20

natural_image
Diagram of a mechanical or electrical component with curved arrows indicating motion, no visible text or symbolsFig. 21
Afb. 1
SILVERCREST®
natural_image
Technical line drawing of a mechanical assembly with a tool inserted, showing no text or symbolsAfb. 2
natural_image
Diagram of a mechanical component with a red arrow indicating direction, no text or symbols presentAfb. 3
Afb. 4
natural_image
Technical line drawing of a mechanical assembly with no visible text or symbolsAfb. 5
SILVER CREST®
natural_image
Pure technical line drawing of a rectangular enclosure with internal compartments and a hanging component (no text or symbols)Afb. 6
natural_image
Pure technical line drawing of a rectangular frame with internal compartments and a small inset view (no text or symbols)Afb. 7
natural_image
Technical diagram of an oven with internal structure and directional arrows indicating motion (no text or symbols)Afb. 8
natural_image
Technical line drawing of a refrigerator interior showing door, shelf, and door frame (no text or symbols)Afb. 9
natural_image
Technical line drawing of a mechanical assembly with a magnified inset showing a component detail (no text or symbols)Afb. 10
SILVER CREST®
natural_image
Technical line drawing of a mechanical cabinet or enclosure with internal compartments and a screwdriver inserted (no text or symbols)Afb. 11
natural_image
Two screwdriver tools with red directional arrows indicating rotation or movement (no text or symbols)Afb. 12
natural_image
Technical line drawing of a mechanical enclosure or storage unit with internal compartments and a handle (no text or symbols)Afb. 13
natural_image
Diagram of light rays reflecting off a rectangular frame with two lenses (no text or symbols)Afb. 14
SILVERCREST®
Afb. 15
natural_image
Two identical diagrams showing a screwdriver on a mobile phone case, with red arrows indicating direction of movement (no text or symbols present)Afb. 16
natural_image
Technical line drawing of a mechanical housing or enclosure with internal compartments and directional arrows indicating motion (no text or symbols)Afb. 17
SILVER CREST®
natural_image
Technical line drawing of a mechanical device with a screwdriver and directional arrow (no text or symbols)Afb. 18
Afb. 19
natural_image
Line drawing of a single refrigerator with open doors and internal shelves (no text or symbols)Afb. 20

natural_image
Diagram of a mechanical or electrical component with curved arrows indicating motion, no visible text or symbolsAfb. 21
natural_image
Technical line drawing of a structural frame with directional arrows indicating motion (no text or symbols)Obr. 1
natural_image
Technical line drawing of a mechanical assembly with a screwdriver inserted, showing no text or symbolsObr. 2
natural_image
Diagram of a mechanical device with a red arrow indicating direction, no text or symbols presentObr. 3
Obr. 4
natural_image
Technical line drawing of a mechanical assembly with no visible text or symbolsObr. 5
natural_image
Pure technical line drawing of a rectangular frame with internal compartments and a vertical wall, no text or symbols presentObr. 6
natural_image
Pure technical line drawing of a rectangular frame with internal components and a red dotted line indicating a dimension (no text or symbols)Obr. 7
SILVER CREST®
natural_image
Technical line drawing of a cabinet interior with internal components and directional arrows (no text or symbols)Obr. 8
Obr. 9
Obr. 10
natural_image
Technical line drawing of a mechanical cabinet or enclosure with internal compartments and a red directional arrow indicating motion (no text or symbols)Obr. 11
SILVER CREST®
natural_image
Diagram showing two screwdriver positions with red arrows indicating rotation and movement (no text or symbols)Obr. 12
natural_image
Technical line drawing of a mechanical cabinet or rack system with internal compartments and a handle (no text or symbols)Obr. 13
natural_image
Diagram of a beam with directional arrows indicating light or motion, no text or symbols presentObr. 14
SILVERCREST®
Obr. 15
natural_image
Two identical diagrams showing a screwdriver on a mobile phone, with red arrows indicating direction of movement (no text or symbols present)Obr. 16
natural_image
Technical line drawing of a mechanical housing or enclosure with internal compartments and directional arrows indicating movement (no text or symbols)Obr. 17
SILVER CREST®
natural_image
Technical line drawing of a mechanical device with a lever and force arrow (no text or symbols)Obr. 18
Obr. 19
natural_image
Line drawing of an open refrigerator with doors open (no text or symbols)Obr. 20

natural_image
Diagram of a mechanical or electrical component with directional arrows indicating motion, no readable text or symbols present.Obr. 21
Rys. 1
natural_image
Technical line drawing of a mechanical assembly with a screwdriver inserted, showing no text or symbolsRys. 2
natural_image
Diagram of a mechanical device with a red arrow indicating direction, no text or symbols presentRys. 3
natural_image
Line drawing of a refrigerator interior with a magnified inset showing internal components (no text or symbols)Rys. 4
SILVER CREST®
natural_image
Line drawing of a mechanical cabinet with red dashed arrows indicating motion or force direction (no text or symbols)Rys. 5
natural_image
Pure technical line drawing of a rectangular frame with internal components and a vertical arrow indicating direction (no text or symbols)Rys. 6
natural_image
Pure technical line drawing of a rectangular frame with internal components and a red dotted line indicating a dimension (no text or symbols)Rys. 7
natural_image
Technical line drawing of an oven with internal structure and ventilation duct (no text or symbols)Rys. 8
Rys. 9
SILVER CREST®
natural_image
Technical line drawing of a mechanical assembly with a magnified inset showing a component detail (no text or symbols)Rys. 10
natural_image
Technical line drawing of a mechanical cabinet or rack with internal compartments and a red directional arrow indicating movement (no text or symbols present)Rys. 11
natural_image
Two screwdriver tools with red directional arrows indicating rotation or movement (no text or symbols)Rys. 12
SILVERCREST®
natural_image
Technical line drawing of a multi-level storage cabinet or rack unit (no text or symbols)Rys. 13
natural_image
Diagram of a rectangular frame with two vertical supports and directional arrows indicating light or motion (no text or symbols)Rys. 14
Rys. 15
SILVER CREST®
natural_image
Two identical diagrams showing a screwdriver being inserted into a device, with red arrows indicating direction of movement (no text or symbols present)Rys. 16
natural_image
Technical line drawing of a mechanical housing or enclosure with internal compartments and directional arrows indicating motion (no text or symbols)Rys. 17
natural_image
Technical line drawing of a mechanical clamp or bracket with a screwdriver, showing no text or symbolsRys. 18
Rys. 19
SILVER CREST®
natural_image
Line drawing of a single refrigerator with open doors and internal shelves (no text or symbols)Rys. 20

natural_image
Diagram showing a barcode pattern with directional arrows and a small arrow pointing to a specific area (no text or symbols present)Rys. 21
natural_image
Technical line drawing of a mechanical assembly with red motion arrows indicating movement (no text or symbols)Obr. 1
natural_image
Technical line drawing of a mechanical assembly with a screwdriver inserted, showing no text or symbolsObr. 2
natural_image
Diagram of a mechanical device with a red arrow indicating direction, no text or symbols presentObr. 3
Obr. 4
natural_image
Technical line drawing of a mechanical assembly with no visible text or symbolsObr. 5
natural_image
Pure technical line drawing of a rectangular frame with internal compartments and a vertical rod, no text or symbols presentObr. 6
natural_image
Pure technical line drawing of a rectangular enclosure with internal components and mounting points (no text or symbols)Obr. 7
SILVERCREST®
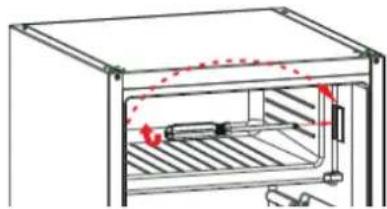
▶ Uvol'nite skrutku zámku dverí mraziaceho priečinka a odstráňte zámok. (Obr. 8)
Znovu vložte zámok na druhú stranu a pevne ho zoskrutkujte.
natural_image
Technical line drawing of a cabinet interior with internal components and directional arrows (no text or symbols)Obr. 8
natural_image
Diagram of a refrigerator interior showing door, seat, and door frame with red arrows indicating motion (no text or symbols)Obr. 9
Obr. 10
natural_image
Technical line drawing of a mechanical cabinet or enclosure with internal compartments and a red directional arrow indicating motion (no text or symbols)Obr. 11
SILVER CREST®
natural_image
Diagram showing two screwdriver positions with red arrows indicating rotation and movement (no text or symbols)Obr. 12
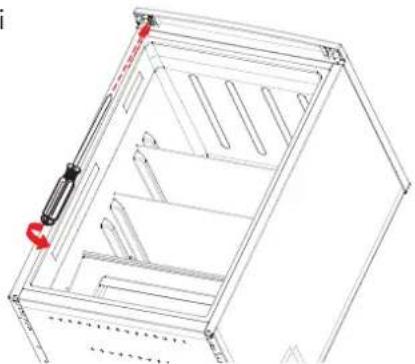
Znovu pevne naskrutkujte horný záves s obidvomi pridržiavacími skrutkami na l'avú stranu zariadenia (obr. 13).
natural_image
Technical line drawing of a mechanical cabinet or rack system with internal compartments and a handle (no text or symbols)Obr. 13
Pomocou malého plochého skrutkovača odoberte záslepku na l'avej hornej strane chladiaceho priestoru a puzdro závesu na pravej strane.
▶ Nasad'te puzdro závesu do otvoru na l'avej strane. Pritom dbajte na vodiaci výstupok.
▶ Nasadte záslepku do otvoru na pravej strane (obr. 14).
natural_image
Diagram of a rectangular frame with two arrows indicating light or direction, no text or symbols presentObr. 14
SILVERCREST®
Obr. 15
natural_image
Two identical diagrams showing a screwdriver on a mobile phone, with red arrows indicating direction of movement (no text or symbols present)Obr. 16
natural_image
Technical line drawing of a mechanical housing or enclosure with internal compartments and directional arrows indicating motion (no text or symbols)Obr. 17
SILVER CREST®
natural_image
Technical line drawing of a mechanical device with a lever and force arrow (no text or symbols)Obr. 18
Obr. 19
natural_image
Line drawing of an open refrigerator with doors open (no text or symbols)Obr. 20

natural_image
Diagram of a mechanical or electrical component with directional arrows indicating motion, no readable text or symbols present.Obr. 21
natural_image
Technical line drawing of a structural frame with directional arrows indicating motion (no text or symbols)Fig. 1
natural_image
Technical line drawing of a mechanical assembly with a tool and dimension arrows (no text or symbols)Fig. 2
natural_image
Diagram of a mechanical component with a red arrow indicating upward motion (no text or symbols)Fig. 3
Fig. 4
natural_image
Technical line drawing of a mechanical assembly with no visible text or symbolsFig. 5
natural_image
Pure technical line drawing of a rectangular frame with internal compartments and a vertical wall, no text or symbols presentFig. 6
natural_image
Pure technical line drawing of a rectangular frame with internal components and a red dotted line indicating a dimension (no text or symbols)Fig. 7
SILVERCREST®
natural_image
Technical line drawing of a cabinet interior with internal components and directional arrows (no text or symbols)Fig. 8
Fig. 9
Fig. 10
natural_image
Technical line drawing of a mechanical cabinet or enclosure with internal compartments and a red directional arrow indicating movement (no text or symbols)Fig. 11
SILVER CREST®
natural_image
Two screwdriver tools with red directional arrows indicating rotation or movement (no text or symbols)Fig. 12
natural_image
Technical line drawing of a mechanical cabinet or rack system with internal compartments and a handle (no text or symbols)Fig. 13
natural_image
Diagram of light rays reflecting off a rectangular panel with a wall-mounted sensor (no text or symbols)Fig. 14
SILVERCREST®
Fig. 15
natural_image
Two identical diagrams showing a screwdriver on a mobile phone, with red arrows indicating direction of movement (no text or symbols present)Fig. 16
natural_image
Technical line drawing of a mechanical housing or enclosure with internal compartments and directional arrows indicating movement (no text or symbols)Fig. 17
SILVER CREST®
natural_image
Technical line drawing of a mechanical device with a lever and force arrow (no text or symbols)Fig. 18
Fig. 19
natural_image
Line drawing of an open refrigerator with doors open (no text or symbols)Fig. 20

natural_image
Diagram of a mechanical or electrical component with directional arrows indicating motion, no readable text or symbols present.Fig. 21
natural_image
Technical line drawing of a mechanical assembly with red motion arrows indicating movement (no text or symbols)Fig. 1
SILVER CREST®
natural_image
Technical line drawing of a mechanical assembly with a lever and guide tool (no text or symbols)Fig. 2
natural_image
Diagram of a mechanical device with a red arrow indicating direction, no text or symbols presentFig. 3
Fig. 4
natural_image
Line drawing of a mechanical cabinet with red dashed arrows indicating motion or movement (no text or symbols)Fig. 5
SILVER CREST®
natural_image
Pure technical line drawing of a rectangular frame with internal components and a red dashed arrow indicating direction (no text or symbols)Fig. 6
natural_image
Pure technical line drawing of a rectangular frame with internal components and a small inset view (no text or symbols)Fig. 7
natural_image
Diagram of a refrigerator interior showing internal components and airflow direction (no text or labels)Fig. 8
Fig. 9
natural_image
Technical line drawing of a mechanical assembly with a magnified inset showing a component detail (no text or symbols)Fig. 10
SILVERCREST®
natural_image
Technical line drawing of a mechanical cabinet or storage unit with internal compartments and a screwdriver inserted (no text or symbols)Fig. 11
natural_image
Two screwdrivers with red directional arrows indicating rotation and movement (no text or symbols)Fig. 12
natural_image
Technical line drawing of a multi-level storage cabinet or rack unit (no text or symbols)Fig. 13
natural_image
Diagram of a rectangular frame with two arrows indicating light or direction, no text or symbols presentFig. 14
SILVER CREST®
Fig. 15
natural_image
Two diagrams showing screwdriver tool positioning on a device, with red arrows indicating movement (no text or symbols)Fig. 16
natural_image
Technical line drawing of a mechanical housing or enclosure with internal compartments and directional arrows indicating motion (no text or symbols)Fig. 17
SILVER CREST®
natural_image
Technical line drawing of a mechanical device with a lever and force arrow (no text or symbols)Fig. 18
Fig. 19
natural_image
Line drawing of an open refrigerator with doors open (no text or symbols)Fig. 20



- KÜHLSCHRANK / REFRIGERATOR / REFRIGERATEUR SKS 121 A1
- FR BE
- Inhaltsverzeichnis
- Einführung 7
- SILVERCREST®
- SILVER CREST®
- Proper use 39
- Safety instructions 39
- Package contents 44
- Description of components 44
- Recommended food storage 45
- Technical specifications....45
- EU declaration of conformity 47
- Spare parts......47
- Information on the appliance 47
- Before operation 47
- Operating the appliance 54
- Optimising energy consumption....55
- Deep-freezing food....56
- Storing food in the refrigerator compartment 57
- Cleaning and defrosting 57
- Replacing the interior light 59
- Faults....59
- Measures in case of power failure....59
- Troubleshooting....59
- Longer periods without use....60
- Transport....60
- Disposal....61
- Introduction
- Information about this user manual
- Explanation of symbols
- DANGER!
- WARNING!
- NOTICE!
- Packaging material label regarding waste separation
- Proper use
- Safety instructions
- Risk of choking and suffocation!
- General safety instructions
- Warning! Risk of injury!
- WARNING! Risk of fire!
- Transport
- CAUTION! Risk of injury!
- NOTICE! Possible material damage!
- Installation and electrical connection
- Location
- Possible material damage!
- Risk of fire!
- Before connection
- Risk of electric shock!
- Mains connection
- WARNING! Risk of electric shock!
- Use of the appliance
- WARNING! Risk of injury/risk to health!
- Cleaning and maintenance
- Risk of explosion and fire!
- Faults
- Disposal
- Risk of choking and suffocation! Risk of injury!
- Package contents
- Description of components
- See Fig. A
- See Fig. B
- See Fig. C
- Recommended food storage
- Technical specifications
- Product data sheet
- EU declaration of conformity
- Spare parts
- Information on the appliance
- Information regarding refrigerant R-600a
- Before operation
- Changing the door hinge
- Changing the freezer compartment door hinge
- Fitting the spacers
- Setting up the appliance
- Inserting/removing accessories
- Inserting/removing the vegetable drawer
- Removing glass shelves
- Inserting glass shelves
- Removing/inserting door compartments
- Egg tray
- Operating the appliance
- Setting the temperature
- Climate control switch
- Ambient temperatures of below 15°C
- Ambient temperatures of above 15°C
- Optimising energy consumption
- Recommended temperature setting
- Effects of storage on food
- Deep-freezing food
- Using ice cube trays
- Defrosting food
- Storing food in the refrigerator compartment
- Cleaning and defrosting
- Risk to health!
- Risk of injury!
- Cleaning the appliance
- Replacing the interior light
- CAUTION! Risk of injury/damage to the appliance!
- Faults
- Measures in case of power failure
- Troubleshooting
- Longer periods without use
- Transport
- Disposal
- Packaging
- Appliance
- Legal notice
- Information on trademarks
- MLAP GmbH Warranty
- Conditions of warranty
- Warranty period and legal claims for defects
- Scope of warranty
- Processing of warranty claims
- Service
- IE Service Ireland
- NI Service North Ireland
- Supplier/Producer/Importer
- Privacy statement
- Sommaire
- Introduction......67
Brand : SILVERCREST
Model : SKS 121 A1
Category : Refrigerator