Xenio CX002RGBW - Lighting HARVIA - Free user manual and instructions
Find the device manual for free Xenio CX002RGBW HARVIA in PDF.
| Brand | Harvia |
| Model | Xenio CX002RGBW |
| Product type | RGBW colored light control |
| Dimensions (W x H x D) | 85 × 110 × 24 mm |
| Weight | Approximately 150 g (estimated) |
| Supply voltage | 12-24 V DC |
| Power consumption | < 0.5 W |
| Connection | 4-pole with power and communication cables (5 m cable included) |
| Number of controllable groups | 4 independent RGBW groups |
| Main functions | Brightness adjustment (7 levels), color selection (touch ring), color change speed, variable white (7 levels), preset modes |
| Protection | Splash protected (estimated IPx4) |
| Ambient temperature | Up to 100 °C in sauna, 170 °C in infrared (installation) |
| Max installation height (sauna) | 100 cm |
| Max installation height (infrared) | 170 cm |
| Maintenance | Clean with a damp cloth; do not immerse in water |
| Safety | Install away from the stove, do not mount above a heat source, reserved for a qualified electrician |
| Spare part | Xenio RGBW control (ref. WX695) |
| Delivery contents | Xenio RGBW control, 5 m connection cable, mounting instructions |
Frequently Asked Questions - Xenio CX002RGBW HARVIA
User questions about Xenio CX002RGBW HARVIA
0 question about this device. Answer the ones you know or ask your own.
Ask a new question about this device
Download the instructions for your Lighting in PDF format for free! Find your manual Xenio CX002RGBW - HARVIA and take your electronic device back in hand. On this page are published all the documents necessary for the use of your device. Xenio CX002RGBW by HARVIA.
USER MANUAL Xenio CX002RGBW HARVIA
Xenio RGBW CX002RGBW
Fl Ohjauspaneelin asennus- ja kayttiohje
SV Installations- och bruksanvisning for kontroll av fargat ljus
EN Instructions for Installation and Use of Color light control panel
DE Montage- und Gebrauchsanleitung der Farblichtsteuerung
FR Instructions d'installation et d'utilisation de la commande de lumière colorée
RU Hnctpykzna no yctaHOBke n 3KcnpyaTaun dIy npabneHn IBeTHbIM CBEtom

Aipcec
OOO«XapBn Pyc>
191015 Poccu ronon
CaHT-Netep6vpr
ylnuaIbnepnA,IOM54JITepaB.
OPPH115784720
TeneoH:+78123258294
E-mail: spb@accountor.ru
https://mediabank.harvia.com.
1. About this instruction manual
Read these installation and operating instructions carefully and keep them close to the infrared control unit. This ensures that you can refer to information on safety and operation at any time.

These installation and operating instructions can also be at https://mediabank.harvia.com.
2. Important information for your safety
The Xenio RGBW colour light control has been manufactured according to the applicable safety regulations. However, hazards may arise during use. Therefore adhere to the following safety information and the specific warning notices in the individual chapters.
2.1. Intended use
The Xenio RGBW colour light control is used to control LED RGBW spots and RGBW tubes using DMX CC / CV drivers.
Any use exceeding this scope is considered improper use. Improper use can result in serious injury or damage to the product.
2.2. Safety information for the installer
- It may only be fitted and installed when the power has been disconnected.
- Installation may only be performed by a qualified electrician or similarly qualified person.
- For your own safety, consult your supplier in the event of problems that are not explained in sufficient detail in the installation instructions.
3. Product description
3.1. Scope of delivery
Xenio RGBW colour light control
- 5 m connection cable
Assembly instructions
3.2. Optional accessories
- DMX CC driver (DMX-CC)
- DMX CV driver (DMX-CV)
LED tubes RGBW (LED-TB-xx) - LED spots RGBW (LED-SP-RGBW-xx)
- Power supply units (LED-PWS-xx / LED-150)
3.3. Product features
The Xenio RGBW colour light control has the following functions:
- Four independently operable colour light groups that can be adjusted in terms of brightness, colour and speed of colour changer
Colour selection via colour ring - White for all light groups - dimmable in 7 steps
4. Installation and connection
The Xenio RGBW light controller is splash-protected and has a low operating voltage. The light controller can be mounted inside the cabin if the following points are observed:
- Install the device as far away from the sauna heater, infrared lamps or other heat sources as possible.
- Do NOT install the device on or right next to the sauna heater or other heat source.
- The maximum installation height in a sauna cabin is 100cm . Surface mounting is not recommended.
-
The maximum installation height in an infrared cabin is 170~cm .
-
No insulating material (such as mineral wool) may be located behind the device.
-
Observe the ambient conditions (see 8. Technical data on page 7)
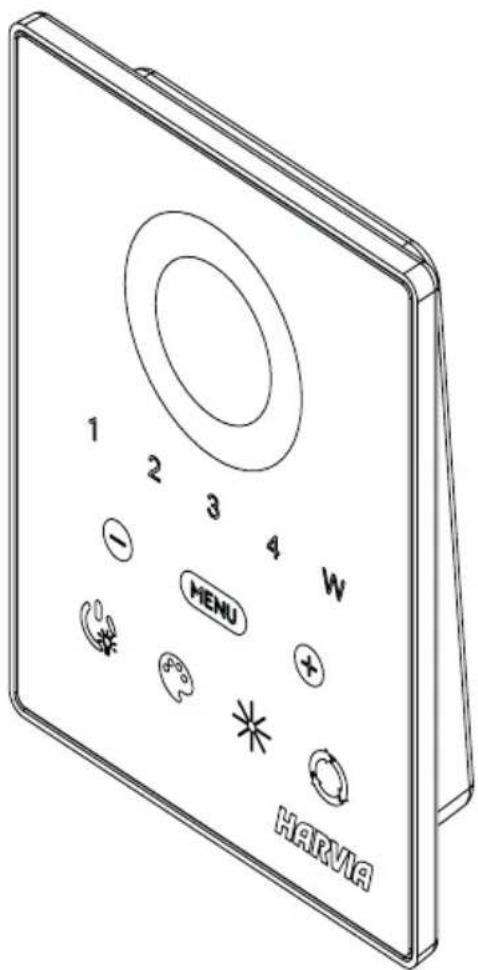
4.1. Installation
The Xenio RGBW light control can be surface-mounted (A) and flush-mounted (B), see Fig. 1.
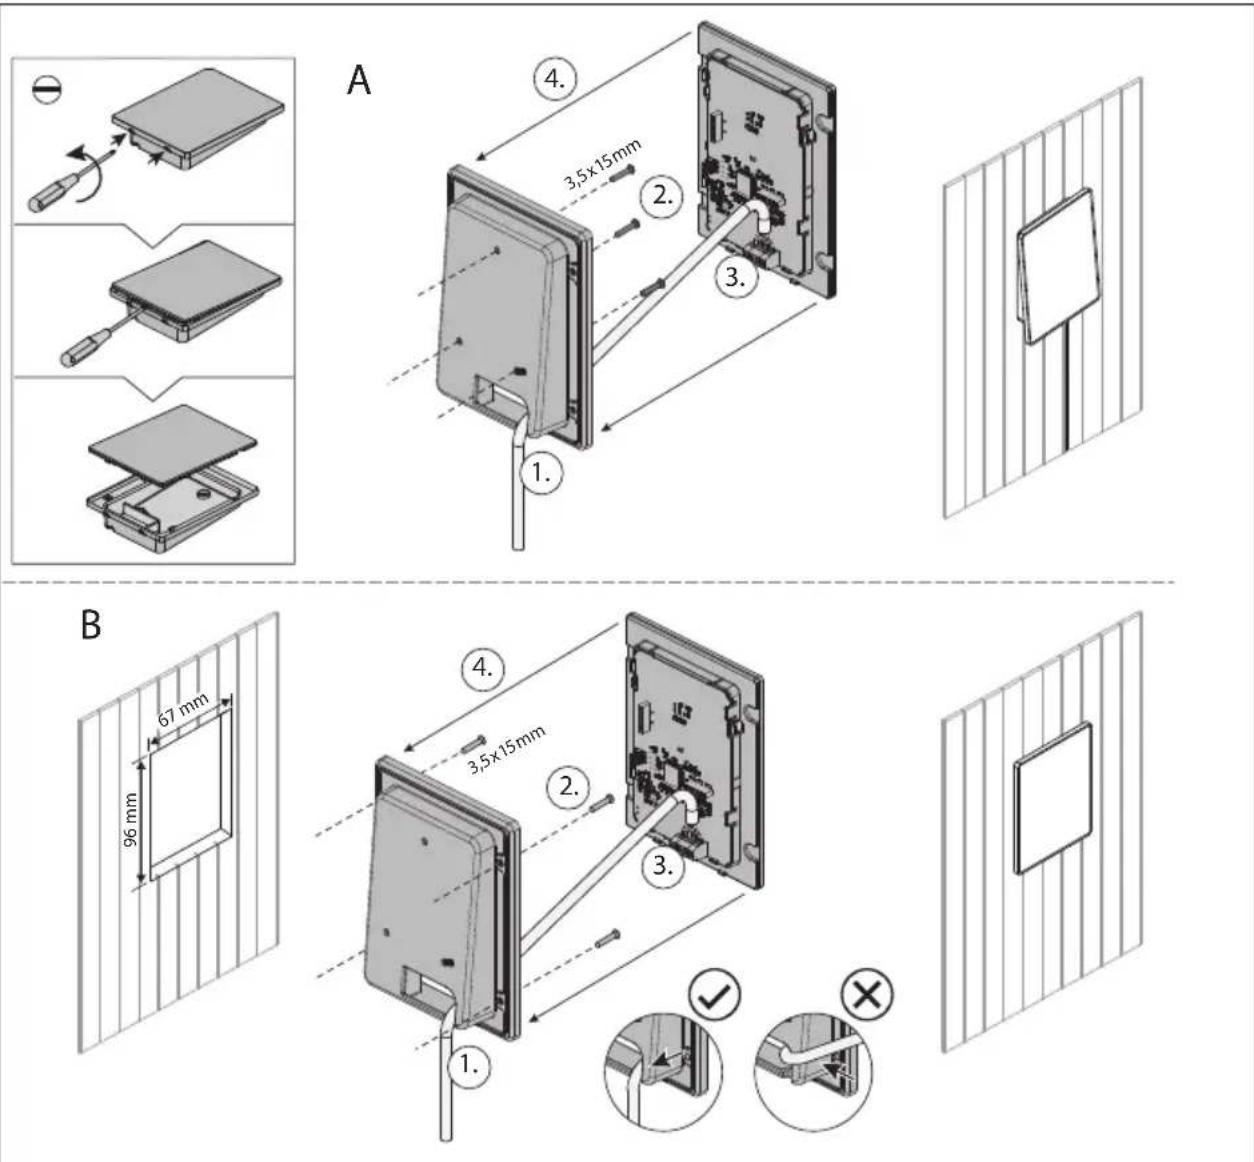
Fig. 2: Connecting the device (rear)
Fig. 1: Mounting the Xenio RGBW light control
4.2. Connecting the device
Note Fig. 2.
- Connect the 4-pin cable to the terminals as follows.
| GND | DMX- | DMX+ | +24V |
1: GND
2:DMX-
3:DMX+
4:DC12-24V
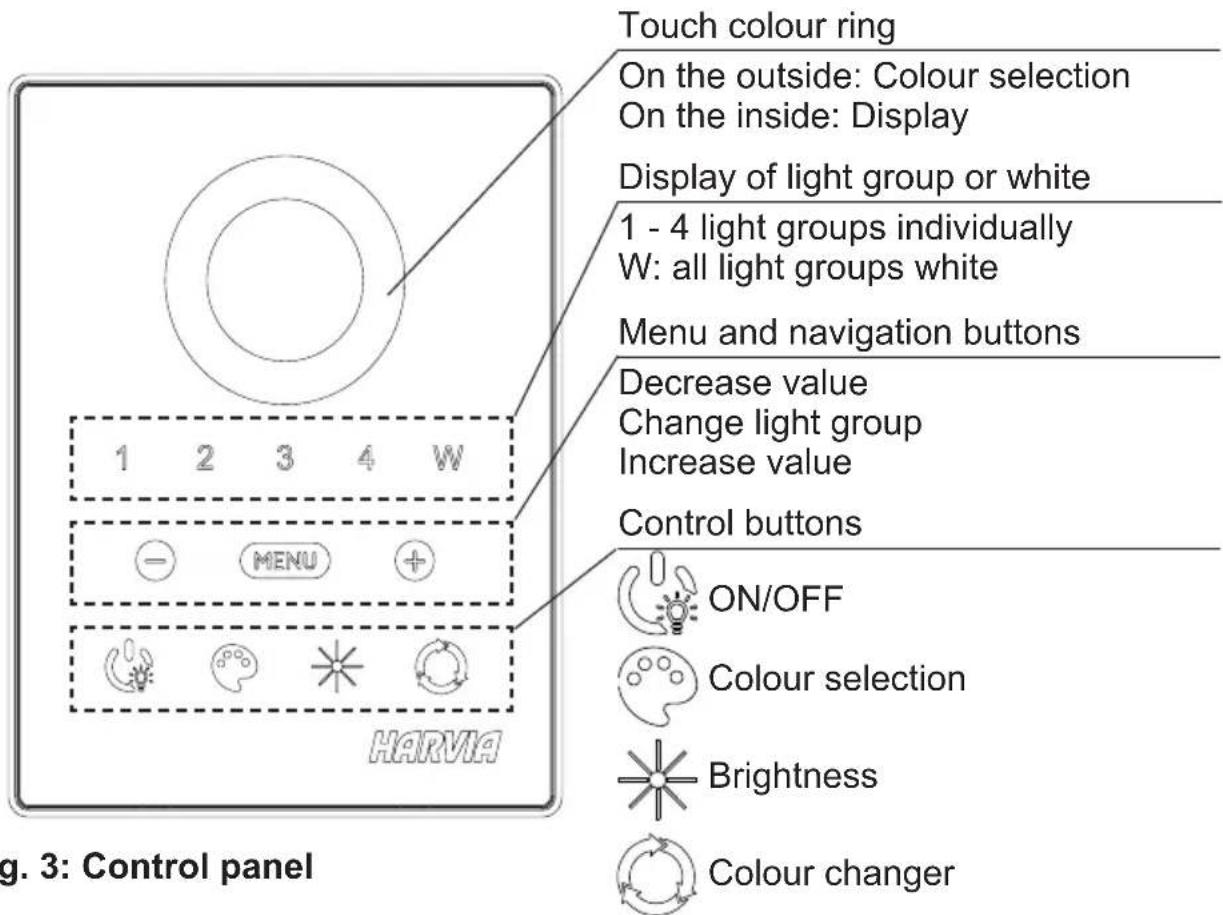
5. Operation
5.1. Control panel
5.2. Switching on white light
Press the ON/OFF button for 3 sec. (long press)
All light groups light up white (100% intensity)
The brightness can be dimmed with - / + (7 levels)
5.3. Switching on the colour light:
Press the ON/OFF button BRIEFLY
The last settings are activated, or the first time the unit is switched on, all light groups light up yellow (100% intensity)
Inside of the colour ring flashes red (=operation indicator)
5.4. Switching off the light
- Press the ON/OFF button BRIEFLY.
5.5. Making colour light settings
Press the Menu button to open the settings menu
Light group 1 flashes
Make settings while the display is flashing (approx.10 seconds)
MEUN
Press the colour selection button and select:
- Use + or - to select red, yellow, green, cyan, blue, purple, white (=factory setting colours) or

- Use the touch colour ring (colours of the factory setting are reprogrammed, these colours are used for the colour changer)
Display on the inside of the colour ring
Press the brightness button and select:
- Use + or - to select the intensity (40%, 50%, 60%.... 100%)
Display of the intensity on the inside of the colour ring
Press the colour changer button and select:
- Use + or - to select the speed (2, 4, 6, 8, 10, 20, 30 seconds)
Fast / slow flashing display of the selected light group
Press the Menu button to change the light group


5.6. Further settings
Deactivating an individual light group because no LED is connected:
- Press the Menu button until the desired light group flashes.
- Press the ON/OFF button, to switch off the light group.
This light group is no longer displayed in operating mode
Resetting to factory settings:
- In operating mode, press the colour selection and brightness buttons simultaneously (although they are not illuminated) for approx. 3 seconds (long press).
The light control switches off
6. Cleaning and maintenance
6.1. Cleaning
ATTENTION!
Damage to the unit
The lighting control unit is splashproof, but direct contact with water could still damage it.
- NEVER immerse the device in water.
- Do not pour water over the device.
Wipe the housing with a damp cloth.
6.2. Maintenance
The colour light control does not require any maintenance.
7. Disposal
- Dispose of packaging materials in accordance with the applicable waste disposal regulations.
- Used devices contain reusable materials as well as hazardous substances. Therefore, do not dispose of your used device with household waste, but do so in accordance with the locally applicable regulations.
8. Technical data
Lighting control unit
Connection: 4-pin with power supply and communication lines
Supply voltage: 12-24 VDC
Output: <0.5 W
Dimensions (W× H× D) .. 85× 110× 24mm
DMX master
| 1 | CH1 | R | 17 | CH1 | R (16 bit) | 33 | CH3 | R (16 bit) | 49 | CH1 | H | 61 | CH1 | H |
| 2 | G | 18 | 34 | 50 | V | 62 | S | |||||||
| 3 | B | 19 | G | 35 | G | 51 | S | 63 | V | |||||
| 4 | W | 20 | 36 | 52 | CH2 | H | 64 | CH2 | H | |||||
| 5 | CH2 | R | 21 | B | 37 | B | 53 | V | 65 | S | ||||
| 6 | G | 22 | 38 | 54 | S | 66 | V | |||||||
| 7 | B | 23 | W | 39 | W | 55 | CH3 | H | 67 | CH3 | H | |||
| 8 | W | 24 | 40 | 56 | V | 68 | S | |||||||
| 9 | CH3 | R | 25 | CH2 | R (16 bit) | 41 | CH4 | R (16 bit) | 57 | S | 69 | V | ||
| 10 | G | 26 | 42 | 58 | CH4 | H | 70 | CH4 | H | |||||
| 11 | B | 27 | G | 43 | G | 59 | V | 71 | S | |||||
| 12 | W | 28 | 44 | 60 | S | 72 | V | |||||||
| 13 | CH4 | R | 29 | B | 45 | B | ||||||||
| 14 | G | 30 | 46 | |||||||||||
| 15 | B | 31 | W | 47 | W | |||||||||
| 16 | W 32 | 48 | ||||||||||||
Spare parts
Xenio RGBW controller: WX695
Connection cable, 5 m: WX696
Cable de raccordement de 5 m: WX696
1. Информаць К настая заMuу ДOKум enty
BHNMaTeIbHNo IpoUHTaTb IHCTpyKcIIO NO MOHTaKy U KcNPyatau. XpaHNTb HAcToaMn DOKyMeHr PAnOM C yCTpOJCTBOM INΦpaKpaCHOrO ynpabJeHnA, TAK KaK OH CoDEPxHr INΦOpMaciu, Heo6XODmMyIO dJa 6e3OnaCHOkCnPyatauN yCTpOJCTBa.

BheuHHee KoiIbO: BbIbOp ZBeTa
BHyTpeneHHee KOJbUo: oTo6paKeHne
OTo6paXeHne rpynnbI NOcBETK nI npexnma 6eIoro cBeTa
C 1 no 4 rpynny noDCBETKn no OTdJIbHOCTN
W: BCE rpynnbI NOcBETK C 6eJIbIM
KhoNKe MeHIO N HABnraCIN
YMeHbUHTb 3HaueHHe
IpeeknoueHne rpynnbI NOcBETKnyBeInueHne 3NaueHn
KhoNkynpaBneHnA
BKJ./BbIKJ.
Bb6op UBeTa
Rpkoctb
I3meHHeUcBeta
C NOMOUI KHOIOK+INN- INHTEHCNBHOCTb (40%,50%,60%....100%)
Omo6paxehue uHmeHCu8Hocmu Ha 8hympeHHem ueMo8OM KOnbue
Haxmnte KhoNky CMeHbI UBeTa n:
- BBi6epnte cKOpocTb C NOMOuBIO KHOJOK + HJN - (2, 4, 6, 8, 10, 20, 30 cekyHd)
Bbicmpoe/MedneHHoe MuaHue bibpaHou apynnbI noocemku
Haxmnte KhoNky MeHIO, YTO6bI CMeHNTb rpynny NOcBETKn
3APPEUCAETCnorpuykaTb yctpoiCTBO BBOy.
He haIINBaTb Ha yCTpoiCtBO BODy.
PpOTepeTb KOpnyc BJaXHOJ TkaHbIO.
6.2. TexHnueckoe obcnyxnbAHne
UcTpoIcTBo ynpaBHeHnI cBeTHbIM OCBeIeHNEm He Tpe6yET TexHnueckoro 06CnyKbAHnI.
7.Утейнзацья
- YTNIN3NPOBaTb ynaKOBOHbIe MaTePnAJIbI B COOTBETCTBnC DeiCTByIOUcIMN CTaHdApTaMn NO YTNIN3aCmN.
- YcTpoIcTBa coIepKaat MaTePnaIbI, KOToPbIe MOryt 6bITb NcNoIb3OBAHbI NOBTOpHO, a TAKKe BpeIHbIe BeIeCTBa. IOnrTomy 3anpeUaETcra YtINn3InPOBaTb YcTpoIcTBo BMeCTe C 6bITOBbIM MyCOPOM. YtINn3InPOBaTb NCKJIIOHTeJIbHO B COOTBETCTBUN C DeIeCTByIOUIMNnpaBNJAmN YtINn3aUHN.
8. TexHnueckne xapaKTepeNCTnKN
ynpaenHe oceenueHuem
IoknueHne: 4-koHTaKTHoe c JINHmN nTaHn i o6MeHa daHHbIMN
HapjkeHne nHTaHn: 12-24 B noct. Toka
MoUHocTb: <0,5BT
Pa3mepbI (UxBxΓ): 85x110x24cm
DMX-Master
| 1 | CH1 | R | 17 | CH1 | R (16 bit) | 33 | CH3 | R (16 bit) | 49 | CH1 | H | 61 | CH1 | H |
| 2 | G | 18 | 34 | 50 | V | 62 | S | |||||||
| 3 | B | 19 | G | 35 | G | 51 | S | 63 | V | |||||
| 4 | W | 20 | 36 | 52 | CH2 | H | 64 | CH2 | H | |||||
| 5 | CH2 | R | 21 | B | 37 | B | 53 | V | 65 | S | ||||
| 6 | G | 22 | 38 | 54 | S | 66 | V | |||||||
| 7 | B | 23 | W | 39 | W | 55 | CH3 | H | 67 | CH3 | H | |||
| 8 | W | 24 | 40 | 56 | V | 68 | S | |||||||
| 9 | CH3 | R | 25 | CH2 | R (16 bit) | 41 | CH4 | R (16 bit) | 57 | S | 69 | V | ||
| 10 | G | 26 | 42 | 58 | CH4 | H | 70 | CH4 | H | |||||
| 11 | B | 27 | G | 43 | G | 59 | V | 71 | S | |||||
| 12 | W | 28 | 44 | 60 | S | 72 | V | |||||||
| 13 | CH4 | R | 29 | B | 45 | B | ||||||||
| 14 | G | 30 | 46 | |||||||||||
| 15 | B | 31 | W | 47 | W | |||||||||
| 16 | W | 32 | 48 | |||||||||||
3anachbte demaru
YcTpoIcTBo ynpaBneHnXenio RGBW:WX695
Ka6eJb noKJIouHeHn 5 M:
WX696
RU
Global:
www.harvia.fi
Tel. +358 207 464 000
HARVIA
www.sentiotaes.com
Tel. +43 7672 22 900-50
Central
Europe