
HSR5918DIMP - Fridge HAIER - Free user manual and instructions
Find the device manual for free HSR5918DIMP HAIER in PDF.
| Product Type | Refrigerator-Freezer |
| Brand | Haier |
| Model | HSR5918DIMP |
| Dimensions (H x W x D) | 1775 x 905 x 726 mm |
| Total Volume | 601 L |
| Fridge Volume | 391 L |
| Freezer Volume | 210 L |
| Energy Class | E |
| Annual Consumption | 334 kWh/year |
| Freezing Capacity | 12 kg/24h |
| Power Failure Autonomy | 5 h |
| Refrigerant | R600a (isobutane) |
| Power Supply | 220-240 V ~ 50 Hz |
| Rated Current | 1.8 A |
| Climate Class | SN, N, ST, T (10 °C to 43 °C) |
| Freezer Star Rating | 4 stars |
| Defrost System | Automatic (No Frost) |
| Water and Ice Dispenser | Yes (filtered water, cubed or crushed ice) |
| Ice Maker | Built-in, capacity 0.9 kg/24h |
| Water Filter | Yes, replace every 6 months |
| Special Functions | Auto Set, Holiday, Super-Cool, Super-Freeze, panel lock, Wi-Fi |
| Lighting | LED (class G, professional replacement) |
| Required Water Pressure | 0.15 - 0.6 MPa |
| Maintenance | Clean every 4 weeks, automatic defrost |
| Available Spare Parts | Thermostats, sensors, printed circuits, lamps: 7 years; handles, hinges, bins: 7 years; door gaskets: 10 years |
| Warranty (EU) | 2 years |
Frequently Asked Questions - HSR5918DIMP HAIER
User questions about HSR5918DIMP HAIER
0 question about this device. Answer the ones you know or ask your own.
Ask a new question about this device
Download the instructions for your Fridge in PDF format for free! Find your manual HSR5918DIMP - HAIER and take your electronic device back in hand. On this page are published all the documents necessary for the use of your device. HSR5918DIMP by HAIER.
USER MANUAL HSR5918DIMP HAIER
- Please read this manual carefully before using refrigerator.
- Retain it for future reference.

WARNING: Risk of fire/flammable material
EN
The symbol indicates there is a risk of fire since flammable materials are used. Take care to avoid causing a fire by igniting flammable material.
Safety information....5
Intended use ....10
Product description....11
Control panel....12
Use....13
Equipment 26
Care and cleaning....28
Troubleshooting....31
Installation....35
Technical data....41
Customer service 43
Thank you for purchasing a Haier Product.
Please read these instructions carefully before using this appliance. The instructions contain important information which will help you get the best out of the appliance and ensure safe and proper installation, use and maintenance.
Keep this manual in a convenient place so you can always refer to it for the safe and proper use of the appliance.
If you sell the appliance, give it away, or leave it behind when you move house, make sure you also pass this manual so that the new owner can become familiar with the appliance and safety warnings.
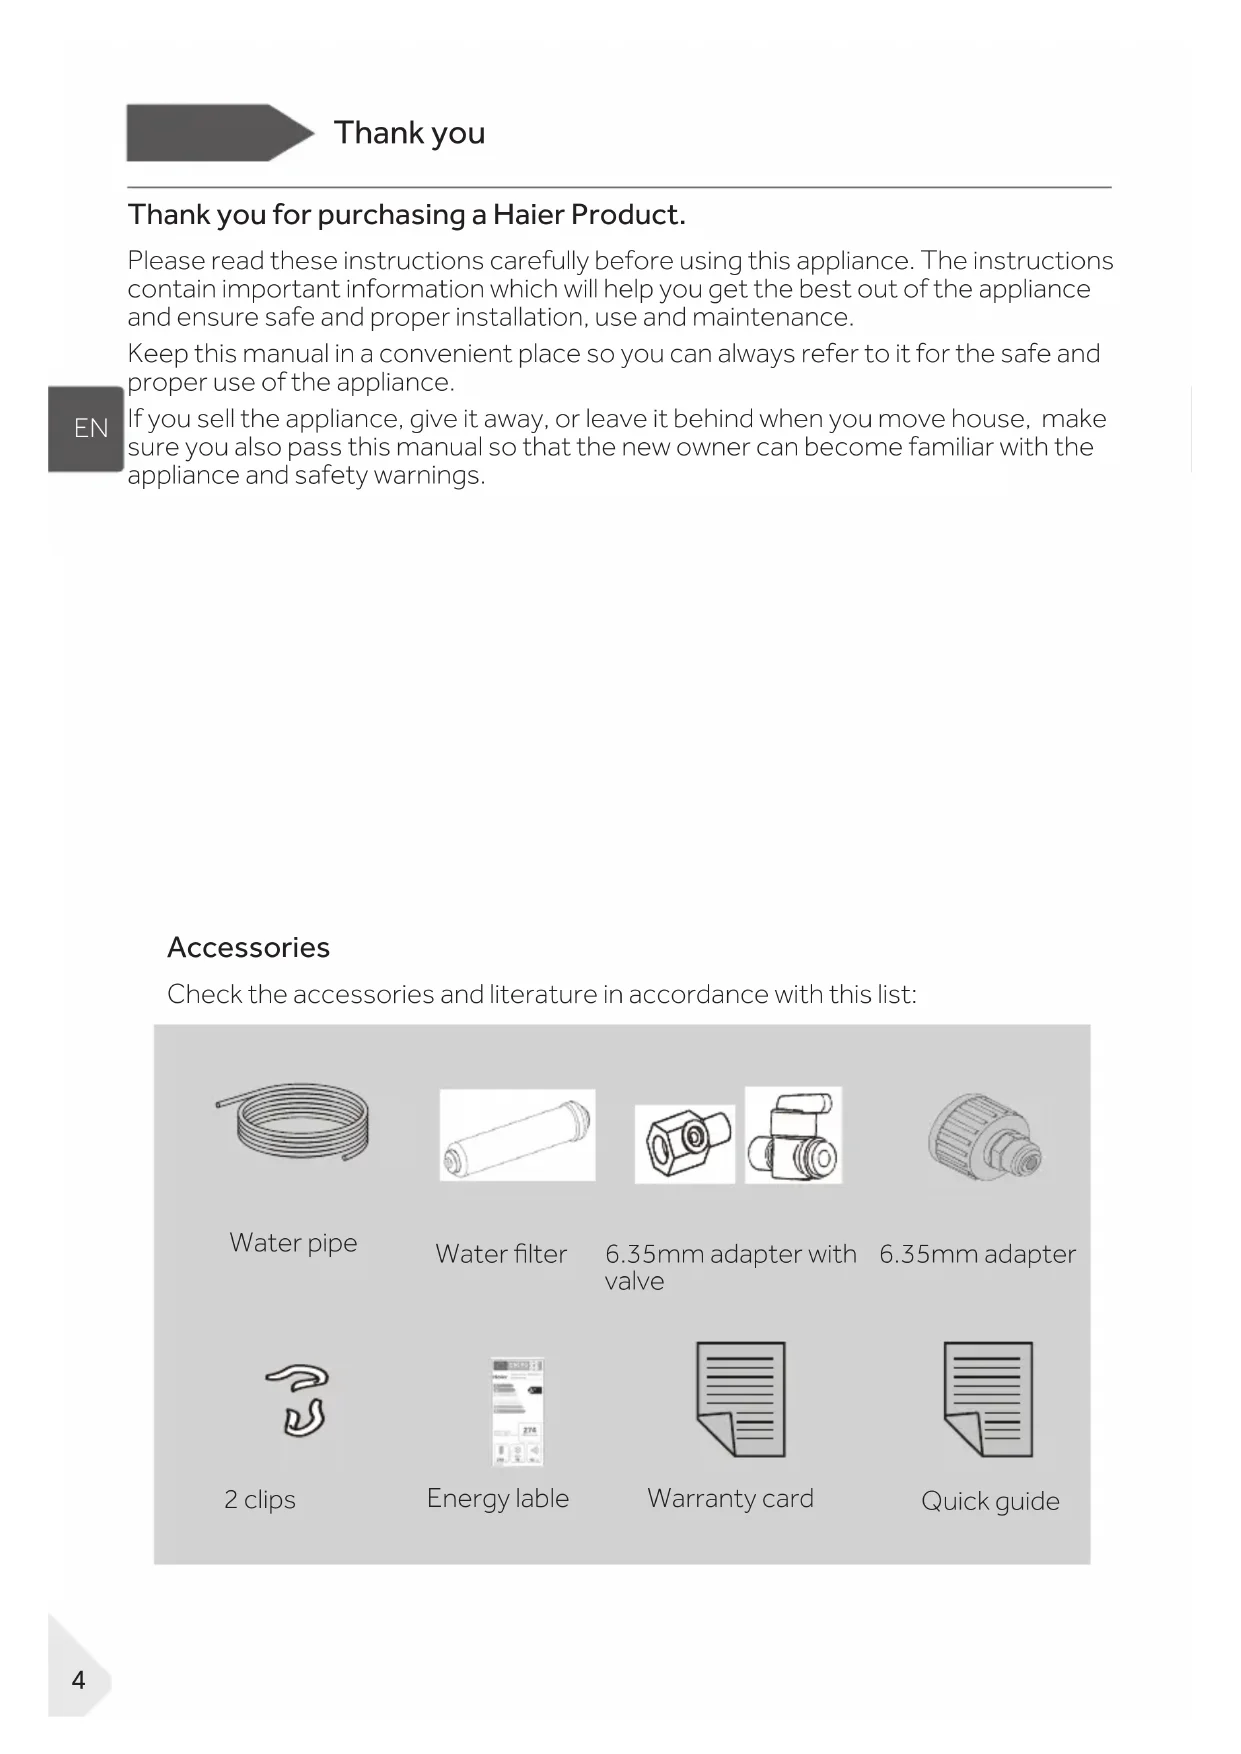
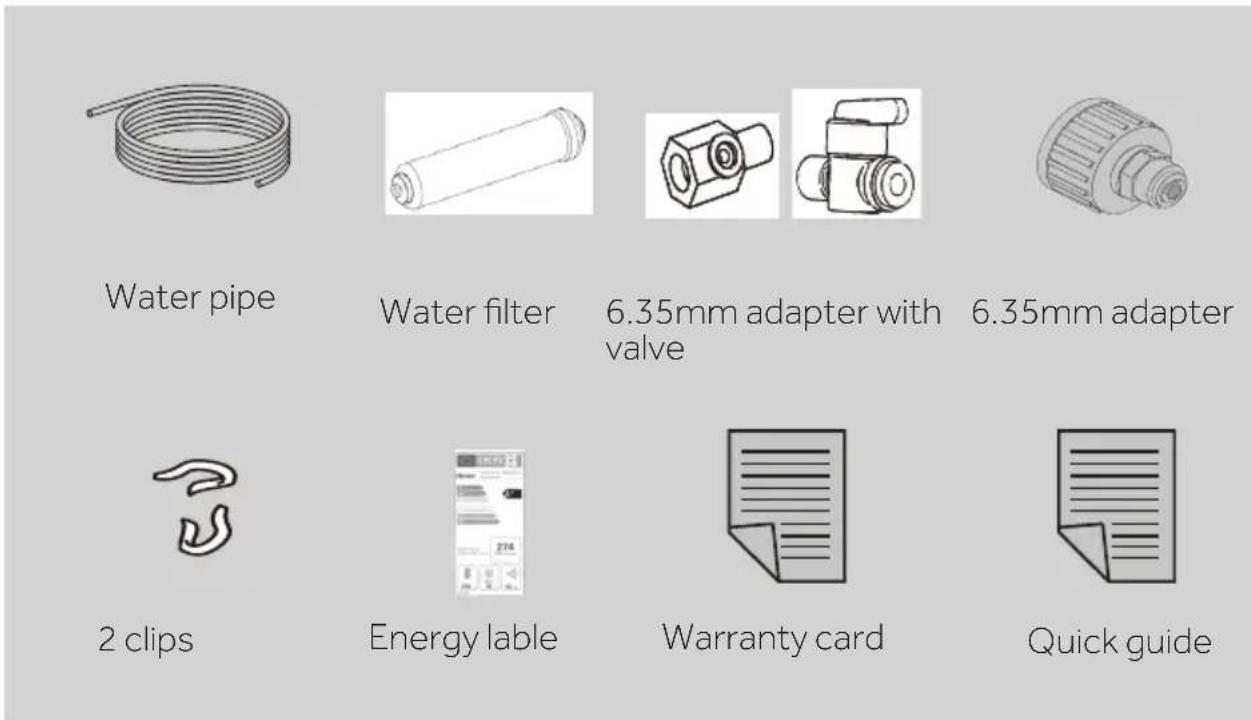
Accessories
Check the accessories and literature in accordance with this list:

WARNING – Important Safety information

NOTICE-General information and tips

Environmental information

Disposal
Help protect the environment and human health. Put the packaging in applicable containers to recycle it. Help to recycle waste of electrical and electronic appliances. Do not dispose appliances marked with this symbol with the household waste. Return the product to your local recycling facility or contact your municipal office.

RNING!
Risk of injury or suffocation!
Refrigerants and gases must be disposed of professionally. Ensure that the tubing of the refrigerant circuit is not damaged before being properly disposed of. Disconnect the appliance from the mains supply. Cut off the mains cable and dispose of it. Remove the trays and drawers as well as the door catch and seals, to prevent children and pets to get closed in the appliance.
Before switching on the appliance for the first time read the following safety hints!:
WARNING!
Before first use
▶Make sure there is no transport damage.
Remove all packaging and keep out of children's reach.
▶ Wait at least two hours before installing the appliance in order to ensure the refrigerant circuit is fully efficient.
▶ Handle the appliance always with at least two persons because it is heavy.
Installation
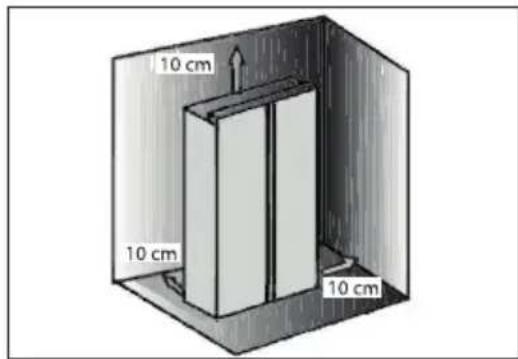
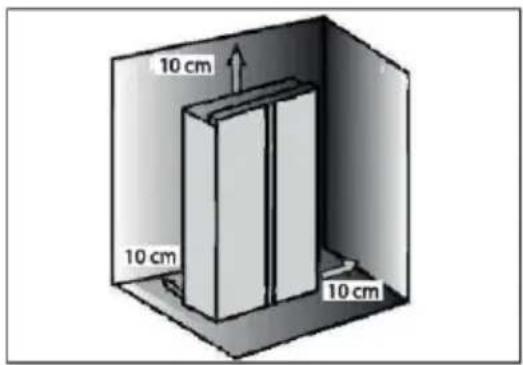
The appliance should be placed in a well-ventilated place. Ensure a space of at least 10 cm above and around the appliance.
▶ Never place the appliance in a damp area or location where it might be splashed with water. Clean and dry water splashes and stains with a soft clean cloth.
▶ Do not install the appliance in direct sunlight or in the near of heat sources(e.g. stoves, heaters).
▶ Install and level the appliance in an area suitable for its size and use.
- Keep ventilation openings in the appliance or in the in-built structure clear of obstruction.
▶ Make sure that the electrical information on the rating plate agrees with the power supply. If it does not, contact an electrician.
The appliance is operated by a 220-240 VAC/50 Hz power supply. Abnormal voltage fluctuation may cause the appliance to fail to start, or damage to the temperature control or compressor, or there may be an abnormal noise when operating. In such case, an automatic regulator shall be mounted.
▶Do not use multi-plug adapters and extension cables.
- Do not locate multiple portable socket-outlets or portable power supplies at the rear of the appliance.
▶ Ensure that the power cable is not trapped by the refrigerator. Do not step on the power cable.
WARNING!
▶ Use a separate earthed socket for the power supply which is easy accessible. The appliance must be earthed.
Only for UK: The appliance's power cable is fitted with 3-cord (grounding) plug that fits a standard 3-cord (grounded) socket. Never cut off or dismount the third pin (grounding). After the appliance is installed, the plug should be accessible.
▶Do not damage the refrigerant circuit.
Daily use
This appliance can be used by children aged from 8 years and above and persons with reduced physical, sensory or mental capabilities or lack of experience and knowledge if they have been given supervision or instruction concerning use of the appliance in a safe way and understand the hazards involved.
Children aged from 3 to 8 years are allowed to load and unload, but not allowed to clean or install the refrigerating appliances.
- Keep away children under 3 years of age from the appliance unless they are constantly supervised.
▶Children shall not play with the appliance.
If coal gas or other inflammable gas is leaking in the vicinity of the appliance, turn off the valve of the leaking gas, open the doors and windows and do not unplug a plug in the power cable of the refrigerator or any other appliance.
▶ Notice that the appliance is set for operation at a specific ambient range between 10 and 43°C. The appliance may not work properly if it is left for a long period at a temperature above or below the indicated range.
- Do not place unstable articles (heavy objects, containers filled with water) on top of the refrigerator, to ovoid personal injury caused by falling or electric shock caused by contact with water.
▶ Do not pull on the door shelves. The door may be pulled slant, the bottle rack, may be pulled away, or the appliance may topple.
▶ Open and close the doors only with the handles. The gap between the doors and between the doors and the cabinet is very narrow. Do not extend your hands in these areas to avoid pinching your fingers. Open or close the refrigerator doors only when there are no children standing within the range of door movement.
WARNING!
- Do not store or use inflammable, explosive or corrosive materials in the appliance or in the vicinity.
- Do not store medicines, bacteria or chemical agents in the appliance. This appliance is a household appliance. It is not recommended to store materials that require strict temperatures.
▶ Never store liquids in bottles or cans (besides high percentage spirits) especially carbonated beverages in the freezer, as these will burst during freezing.
▶ Check the condition of food if a warming in the freezer has taken place.
▶ Do not set unnecessarily low temperature in the refrigerator compartment. Minus temperatures may occur at high settings. Attention: Bottles can burst
▶ Do not touch frozen goods with wet hands (wear gloves). Especially do not eat ice lollies immediately after removal from the freezer compartment. There is the risk to freeze or the formation of frost blisters. FIRST aid: keep immediately under running cold water. Do not pull away!
▶ Do not touch the inside surface of the freezer storage compartment when in operation, especially with wet hands, as your hands may freeze onto the surface.
▶ Unplug the appliance in the event of a power interruption or before cleaning. Allow at least 7 minutes before restarting the appliance, as frequent starting may damage the compressor.
▶ Do not use electrical devices inside the food storage compartments of the appliance, unless they are of the type recommended by the manufacturer. Maintenance / cleaning
▶ Make sure children are supervised if they carry out cleaning and maintenance.
▶ Disconnect the appliance from the electrical supply before undertaking any routine maintenance. Allow at least 5 minutes before restarting the appliance, as frequent starting may damage the compressor.
WARNING!
▶Hold the plug, not the cable, when unplugging the appliance.
▶ Do not clean the appliance with hard brushes, wire brushes, detergent powder, petrol, amyl acetate, acetone and similar organic solutions, acid or alkaline solutions. Please clean with special refrigerator detergent to avoid damage.
▶ Do not scrape off frost and ice with sharp objects. Do not use sprays, electric heaters like heater, hair dryer, steam cleaners or other sources of heat in order to avoid damage to the plastic parts.
▶ Do not use mechanical devices or other means to accelerate the defrosting process, other than those recommended by the manufacturer.
If the supply cord is damaged, it must be replaced by the manufacturer, its service agent or similarly qualified persons in order to avoid a hazard.
Do not try to repair, disassemble or modify the appliance by yourself. In case of repair please contact our customer service.
Eliminate the dust on the back of the unit at least once in the year to avoid hazard by fire, as well as increased energy consumption.
▶Do not spray or flush the appliance during cleaning.
▶Do not use water spray or steam to clean the appliance.
▶ Do not clean the cold glass shelves with hot water. Sudden temperature change may cause the glass to break.
Refrigerant gas information
WARNING!
The appliance contains the flammable refrigerant ISOBUTANE (R600a). Make sure the refrigerant circuit is not damaged during transportation or installation. Leaking refrigerant may cause eye injuries or ignite. If a damage has occurred, keep away open fire sources, thoroughly ventilate the room, do not plug or unplug the power cords of the appliance or any other appliance. Inform the customer service.
In case of eyes get into contact with the refrigerant, rinse immediately it under running water and call immediately the eye specialist.
Intended use
This appliance is intended for cooling and freezing food. It has been designed exclusively for use in household and similar applications such as staff kitchen areas in shops, offices and other working environments; farm houses and by clients in hotels, motels and other residential type environments as well as in bed-and-breakfast and catering business. It is not intended for commercial or industrial use.
EN
Changes or modifications to the device are not allowed. Unintended use may cause hazards and loss of warranty claims.
Standards and directives

This product meets the requirements of all applicable EC directives with the corresponding harmonised standards and UK standards, which provide for CE and UKCA marking.

Notice
Due to technical changes and different models, some of the illustrations in this manual may differ from your model.
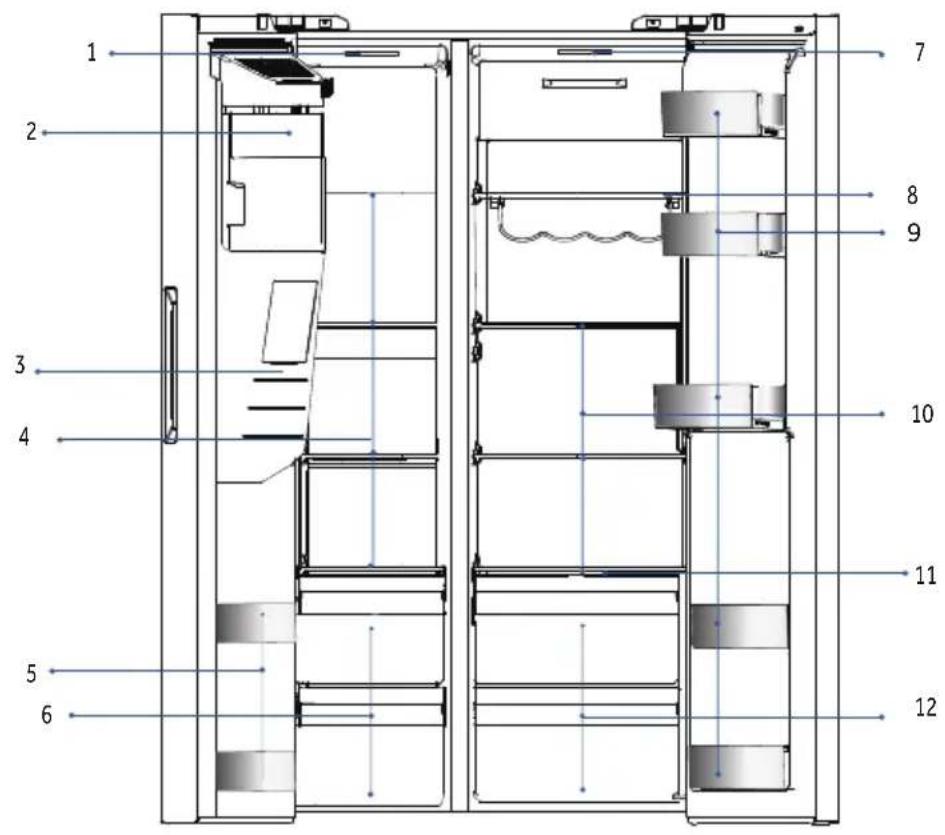
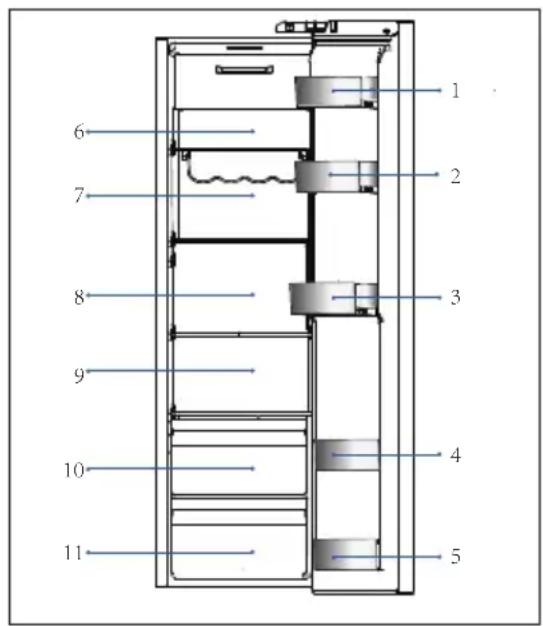
A: Freezer compartment
1 Ceiling lamp
2 Ice maker with ice container
3 Water and ice dispenser
4 Glass shelves
5 Bottle holder
6 Drawers
B: Refrigerator compartment
7 Ceiling lamp
8 Wine rack
9 Bottle holder
10 Glass shelves
11 Wet zone cover plate
12 Drawers
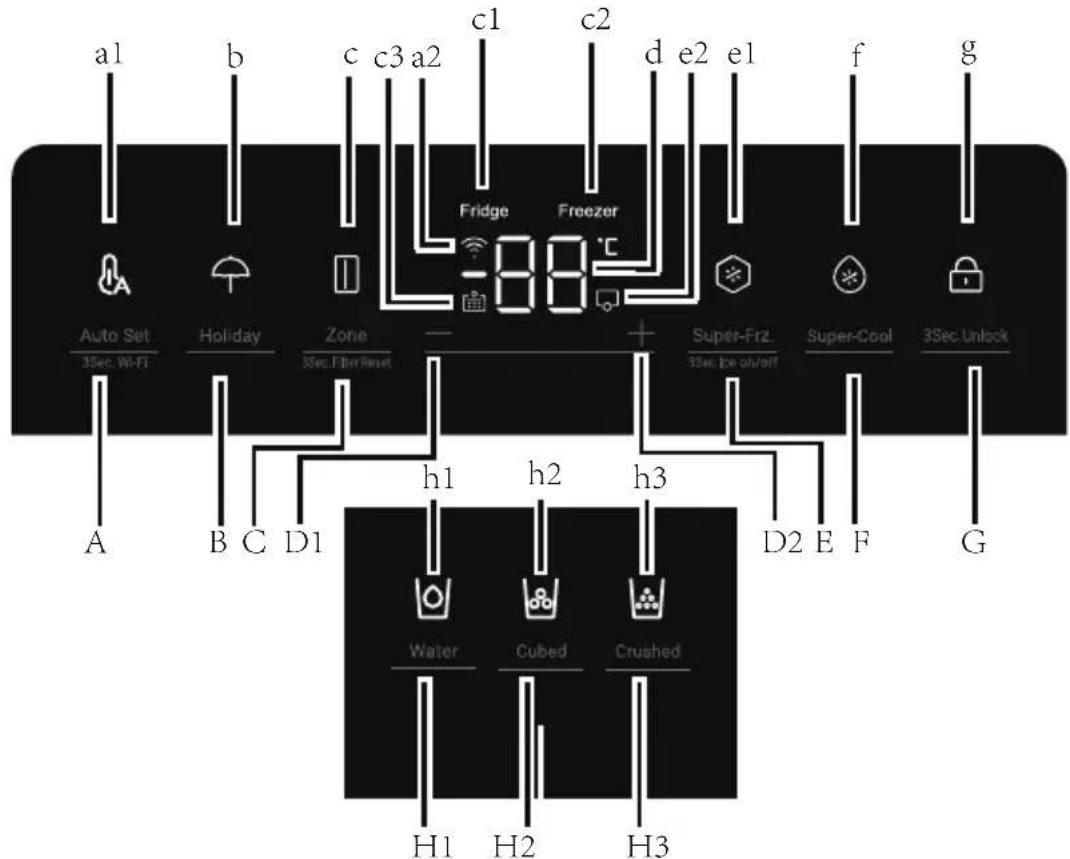
Control panel

flowchart
graph TD
    A["Auto Set 3Sec. Wi-Fi"] --> B["A"]
    B --> C["B"]
    C --> D["C"]
    D --> E["D1"]
    E --> F["h1"]
    F --> G["H2"]
    G --> H["H3"]
    H --> I["H1"]
    I --> J["H2"]
    J --> K["H3"]
    K --> L["H1"]
    M["Fridge"] --> N["Freezer"]
    O["Super-Frz. 3Sec. be on/off"] --> P["D2"]
    Q["Super-Cool"] --> R["E"]
    S["3Sec. Unlock"] --> T["F"]
    U["c1"] --> V["c2"]
    W["c3"] --> X["c1"]
    Y["c4"] --> Z["c2"]
    AA["d"] --> AB["d"]
    AC["e2"] --> AD["e2"]
    AE["e1"] --> AF["e1"]
    AG["f"] --> AH["f"]
    AI["g"] --> AJ["g"]
Keys:
A Auto Set function /3Sec.Wi-Fi
B Holiday function
C Zone selection/3Sec.Filter Reset
D1 Temperature adjustment button "-"
D2 Temperature adjustment button "+"
E Super-Freeze function/3Sec.Ice on/off
F Super-Cool function
G Panel lock selector
H1 Water intake function selector
H2 Cubed ice function selector
H3 Crushed ice function selector
Indicators:
a1 Auto Set mode
a2 Wi-Fi function
b Holiday mode
c Zone indicator
c1 Fridge indicator
c2 Freezer indicator
c3 Filter reset function
d Temperature display
h3 Crushed ice function
Before first use
Remove all packaging materials, keep them out of children's reach and dispose them in an environmentally friendly manner.
▶ Clean the inside and outside of the appliance with water and a mild detergent before putting any food in it.
▶ After the appliance has been levelled and cleaned, wait for at least 2-5 hours before connecting it to the power supply. See Section INSTALLATION.
▶ Precool the compartments at high settings before loading with food. The function Power- Freeze helps to cool down the compartments quickly.
The refrigerator temperature and freezer temperature are automatically set to 5°C and -18°C respectively. These are the recommended settings. If desired, you can change these temperatures manually. Please see ADJUST THE TEMPERATURE.
Sensor keys
The buttons on the control panel are sensor keys, which already respond when lightly touched with the finger.
Switch on /of the appliance
The appliance is in operation as soon as it is connected to the power supply.
The temperatures displayed will show the setting temperatures in the compartment.
Maybe the panel lock is active.

Notice
When the appliance is switched on after disconnection from the main power supply, it may take up to 12 hours for the correct temperatures to be reached.
Empty the appliance before switching off. To switch off the appliance, pull the power cord out off the power socket.

NOTICE
When the refrigerator is first powered on, the indicator illuminates. The fridge temperature and freezer temperature are automatically set to 5^ C and -18^ C respectively.
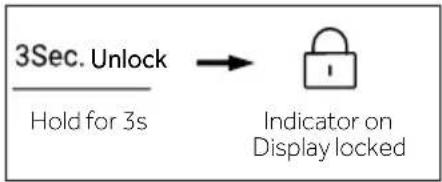
Lock/unlock panel
- Automatic lock: When the fridge door, freezer door are closed and there is no key operation within 30 seconds, the display screen will be automatically extinguished and locked

flowchart
graph LR
    A["3Sec. Unlock"] --> B["Hold for 3s"]
    B --> C["Indicator on Display locked"]
- Manual lock: When the display screen is unlocked, press the button "G" (Panel lock selector) and hold for 3 seconds, the buzzer rings once, the indicator "g" (Panel lock) illuminates, and the display is locked.

flowchart
graph LR
    A["Open door or any button\nDisplay lights up"] --> B["3Sec. Unlock\nHold for 3s"]
    B --> C["Indicator off\nDisplay unlocked"]
Adjust the temperature
The indoor temperatures are influenced by the following factors:
▶Ambient temperature
▶ Frequency of door opening
▶Amount of stored foods
▶Installation of the appliance
Adjust the temperature for fridge
- When the display screen is unlocked, press the button "C" (Zone selector). The buzzer rings once, the indicator "c1" (Fridge indicator) flashes, and then here comes the temperature setting mode of the fridge.
- Press the button "D1" (Temperature adjustment button "-" every time, the buzzer rings once, the set temperature of the fridge will be reduced by 1. The fridge temperature will display in the sequence of "9°C >8°C >7°C >6°C>5°C>4°C>3°C>2°C>1°C".
Adjust the temperature for fridge
- Press the button "D2" (Temperature adjustment button "+" every time, the buzzer rings once, the set temperature of the fridge will be increased by 1. The fridge temperature will display in the sequence of "1 °C > 2°C > 3°C > 4°C > 5°C > 6°C > 7°C > 8°C > 9°C".
EN

Notice
After setting the temperature, if there is no operation within 5 seconds, the system will be automatically determined and save the set temperature.
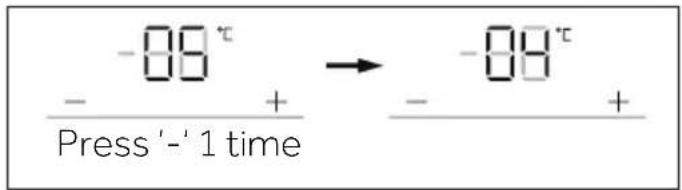
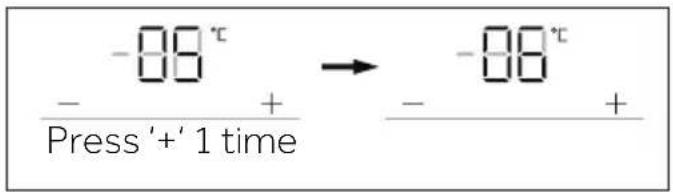
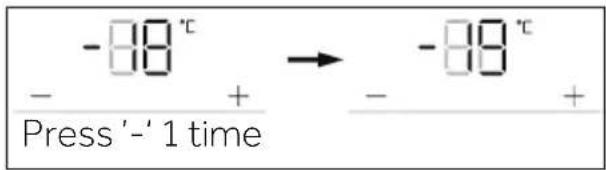
Adjust the temperature for freezer
- When the display screen is unlocked, press the button "C" (Zone selector). The buzzer rings once, the indicator "c2" (Freezer indicator) flashes, and then here comes the temperature setting mode of the freezer.
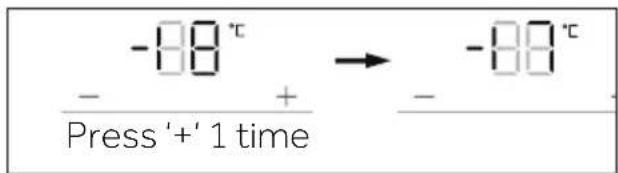
- Press the button "D1" (Temperature adjustment button "-" every time, the buzzer rings once, the set temperature of the freezer will be reduced by 1. The freezer temperature will display in the sequence of "-14°C >-15°C>-16°C >-17°C>-18°C >-19°C>-20°C>-21°C>-22°C>-23°C>-24°C".
- Press the button "D2" (Temperature adjustment button "+") every time, the buzzer rings once, the set temperature of the freezer will be increased by 1. The freezer temperature will display in the sequence of "-24°C >-23°C>-22°C>-21°C>-20°C>-19°C>-18°C>-17°C>-16°C>-15°C>-14°C.

Notice
After setting the temperature, if there is no operation within 5 seconds, the system will be automatically determined and save the set temperature.

Auto Set mode
-
When the display screen is unlocked, press the button "A" (Auto Set mode selector), the buzzer rings once, the indicator "a1" (Auto Set mode) illuminates, and then the Auto Set function will be turned on.
-
When the indicator "a1" (Auto Set mode) illuminates, press the button "A" (Auto Set mode selector), the buzzer rings once, the indicator "a1" (Auto Set mode) goes off, and then the Auto Set function will be turned off.

flowchart
graph LR
    A["Press 1 time"] --> B["Indicator on Auto Set on"]
    B --> C["Press 1 time"]
    C --> D["Indicator off Auto Set off"]

Notice
In Auto Set mode, the fridge or freeze temperature cannot be adjusted. If either button "D1" (Temperature adjustment button "-" or button "D2" (Temperature adjustment button "+" is pressed to adjust the temperature of fridge or freezer, the indicator "a1" (Auto Set indicator) will flash with a prompt sound to indicate that this operation cannot be carried out.
In Auto Set mode, due to different control methods, if the "Super-Cool", "Super-Freeze" or "Holiday" function is set, the indicator "a1" (Auto Set mode) goes off, and then the Auto Set function will automatically exit.
Holiday mode
Holiday mode is designed for not using the fridge for a long time. When the Holiday mode is turned on, the freezer is under normal control, and the temperature of fridge is automatically set to be 17^ C. The actual temperature is not higher than 17^ C, which prevents peculiar smell caused by overtemperature, and helps reduce energy consumption at the same time.
-
When the display screen is unlocked, press the button "B" (Holiday mode selector), the buzzer rings once, the indicator "b" (Holiday mode) illuminates, and then the Holiday function will be turned on.
-
When the indicator "b" (Holiday mode) illuminates, press the button "B" (Holiday mode selector), the buzzer rings once, the indicator "b" (Holiday mode) goes off, and then the Holiday function will be turned off.
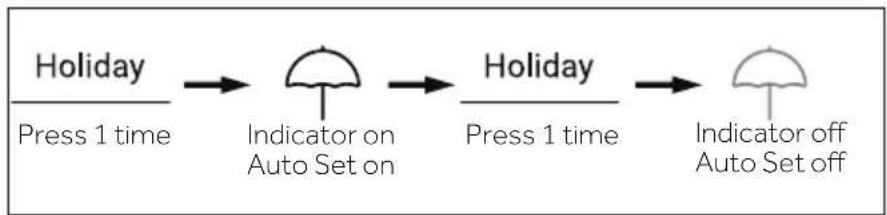
flowchart
graph LR
    A["Press 1 time\nHoliday"] --> B["Indicator on Auto Set on"]
    B --> C["Press 1 time\nHoliday"]
    C --> D["Indicator off Auto Set off"]

Notice
Under Holiday state, the fridge temperature cannot be adjusted. If either button "D1" (Temperature adjustment button "-" or button "D2" (Temperature adjustment button "+") is pressed to adjust the temperature of fridge, the indicator "b" (Holiday indicator) will flash with a prompt sound to indicate that this operation cannot be carried out.
Before using the Holiday function, please empty the fridge to prevent food goes bad in it. When the Holiday function is turned on, either "Auto Set" function or "Super-Cool" function cannot be turned on at the same time.
Super-Cool function
- When the display screen is unlocked, press the button "F" (Super-Cool selector), the buzzer rings once, the indicator "f" (Super-Cool function) illuminates, and then the Super-Cool function will be turned on.
- When the indicator "f" (Super-Cool function) illuminates, press the button "F" (Super-Cool selector), the buzzer rings once, the indicator "f" (Super-Cool function) goes off, and then the Super-Cool function will be turned off.
- After the Super-Cool function is turned on, the refrigerator will automatically turn off the function when it reaches the set condition. If you want to exit manually, you can press the button "F" (Super-Cool selector) to turn it off.

flowchart
graph LR
    A["Indicator off"] --> B["Super-Cool\nPress 1 time"]
    B --> C["Indicator on"]
    C --> D["Super-Cool\nPress 1 time"]
    D --> E["Indicator off"]

Notice
Under Super-cool state, the fridge temperature cannot be adjusted. If either button "D1" (Temperature adjustment button "-" or button "D2" (Temperature adjustment button "+" is pressed to adjust the temperature of fridge, the indicator "f" (Super-Cool indicator) will flash with a prompt sound to indicate that this operation cannot be carried out.
In the state of Super-cool function, the Auto-set function or Holiday function cannot be turned on at the same time due to different control modes. When you choose one function that conflicts with another function, the original function will automatically exit.

Super-Freeze function (Super-Frz)
- When the display screen is unlocked, press the button "E" (Super-Frz. selector), the buzzer rings once, the indicator "e1" (Super-Freeze function) illuminates, and then the Super-Freeze function will be turned on.
- When the indicator "e1" (Super-Freeze function) illuminates, press the button "E" (Super-Frz. selector), the buzzer rings once, the indicator "e1" (Super-Freeze function) goes off, and then the Super-Freeze function will be turned off.
- After the Super-Freeze function is turned on, the refrigerator will automatically turn off the function when it reaches the set condition. If you want to exit manually, you can press the button "E" (Super-Frz. selector) to turn it off.

flowchart
graph LR
    A["Indicator off"] --> B["Super-Frz. Press 1 time"]
    B --> C["Indicator on"]
    C --> D["Super-Frz. Press 1 time"]
    D --> E["Indicator off"]

Notice
Under Super-Freeze state, the freezer temperature cannot be adjusted. If either button "D1" (Temperature adjustment button "-" or button "D2" (Temperature adjustment button "+") is pressed to adjust the temperature of freezer, the indicator "e1" (Super-Frz. indicator) will flash with a prompt sound to indicate that this operation cannot be carried out.
In the state of Super-Freeze function, the Auto-set function cannot be turned on at the same time due to different control modes. When you choose one function that conflicts with another function, the original function will automatically exit.
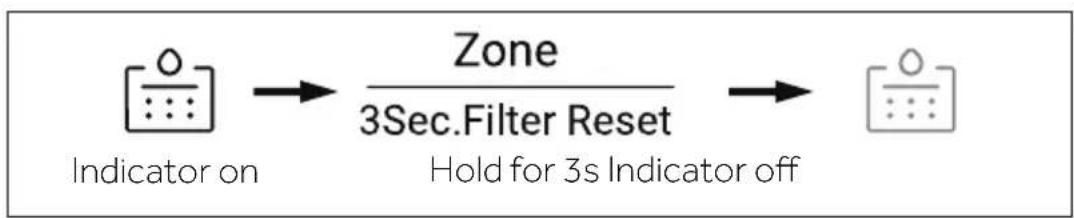
Filter function
When the refrigerator operates for six months, the reminder indicator "c3" (Filter Reset function) will light up to remind users to replace with a new filter. When filter is replaced, hold the button "C" (Filter Reset function selector) for 3 seconds to cancel the reminder, the timing will reset with buzzer ringing.
flowchart
graph LR
    A["Indicator on"] --> B["Zone\n3Sec.Filter Reset"]
    B --> C["Hold for 3s Indicator off"]

Notice
The normal service life of filter is six months. It is recommended to replace the filter every six months.
Ice maker mode
-
Under unlocked state, press the button "E" (Ice maker mode selector) and hold for 3 seconds, the buzzer rings once, the indicator "e2" (Ice maker mode) illuminates, and then the ice maker mode will be turned on.
-
When the indicator "e2" (Ice maker mode) illuminates, press the button "E" (Ice maker mode selector) and hold for 3 seconds, the buzzer rings once, the indicator "e2" (Ice maker mode) goes off, and then the ice maker mode will be turned off.

flowchart
graph LR
    A["Super-Frz.<br>3Sec.Ice on/off"] --> B["Indicator on<br>Ice making function on"]
    B --> C["Super-Frz.<br>3Sec.Ice on/off"]
    C --> D["Indicator off<br>Ice making function off"]
    style A fill:#f9f,stroke:#333
    style B fill:#ccf,stroke:#333
    style C fill:#cfc,stroke:#333
    style D fill:#fcc,stroke:#333
EN

Notice
When the application is powered on, the ice maker is off by default. When you don, t need ice cubes for a long period of time, please turn off the Ice Maker function, empty the container and insert the cleaned container. The Icemaker can only be configured with manufacturer or purchased from its service agent.
Water intake function
Under any state (locked or unlocked), press the button "H1" (Water intake function selector), the buzzer rings once, the indicator "h1" (Water intake function) illuminates, and then the water intake function will be turned on.

flowchart
graph LR
    A["Water\nPress 1 time"] --> B["Indicator on\nWater intake function on"]

Notice
- When the indicator "h1" (Water intake function) illuminates, the indicator "h2" (Cubed ice function) and the indicator "h3" (Crushed ice function) go off. After the dispenser paddle is pressed, water will flow out of the intake port.
- When the water intake time reaches 150s, the refrigerator will beep and keep water until the time reaches 180s, the water will be cut off and the water valve will enter the 200s protection time, and then water intake can be carried out again.
- When the cumulative water intake time reaches 5min within 10min, the water valve enters the 10min protection time, and then water intake can be carried out again.
Cubed ice function
Under any state (locked or unlocked), press the button "H2" (Cubed ice function selector), the buzzer rings once, the indicator "h2" (Cubed ice function) illuminates, and then the Cubed ice function will be turned on.
EN
Cubed
Press 1 time


Indicator on
Cubed ice function on

Notice
- When the indicator "h2" (Cubed ice function) illuminates, the indicator "h1" (Water intake function) and the indicator "h3" (Crushed ice function) go off. After the micro-switch of distributor is pressed, cubed ice will flow out of the intake port.
- When the ice maker is firstly connected to electricity to operate, the Cubed ice function is turned off by default.
- Press the micro-switch of dispenser, the light of it turns on with the cover of it open. Then, the motor of crushing ice starts to rotate anticlockwise to push ice cubes. Loosen the micro-switch of dispenser, the motor of crushing ice stops, the cover of dispenser will close and the light will go off after 5 seconds.
- Under the state of Cubed ice, when Cubed ice time is longer than 50 seconds, there will be buzzer starting to alert (knocking) to notice users to shut it down. When the time reaches 1 minute, it is forced to stop Cubed ice, and it is effective when the switch is pressed next time.
- During Cubed ice, if the fridge door is opened, the motor that delivering ice will stop, with the cover of dispenser closed, light of dispenser off, and Cubed ice will be stopped.
- It is forbidden to get ice with the fridge door open.
Crushed ice function
Under any state (locked or unlocked), press the button "H3" (Crushed ice function selector), the buzzer rings once, the indicator "h3" (Crushed ice function) illuminates, and then the Crushed ice function will be turned on.
Crushed
Press 1 time


Indicator on Crushed ice function on

Notice
When the indicator "h3" (Crushed ice function) illuminates, the indicator "h1" (Water intake function) and the indicator "h2" (Cubed ice function) go off. After the micro-switch of distributor is pressed, crushed ice will flow out of the intake port.
Press the micro-switch of dispenser, the light of it turns on with the cover of it open. Then, the motor of crushing ice starts to rotate clockwise to push ice cubes. Loosen the micro-switch of dispenser, the motor of crushing ice stops, the cover of dispenser will close and the light will go off after 5 seconds.
Under the state of Crushed ice, when Crushed ice time is longer than 50 seconds, there will be buzzer starting to alert (knocking) to notice users to shut it down. When the time reaches 1 minute, it is forced to stop Crushed ice, and it is effective when the switch is pressed next time.
During Crushed ice, if the fridge door is opened, the motor that delivering ice will stop, with the cover of dispenser closed, light of dispenser off, and Crushed ice will be stopped.
It is forbidden to crush ice with the fridge door open.
Door opening alarm
If any door is kept open too long or the door is not closed well, the refrigerator will raise beep alarm at set intervals to remind you to close the door in time.
Power off memory
The instantaneous working state of power off is remembered. After power on again, it still works according to the setting before power off.
Using the ice and water dispenser
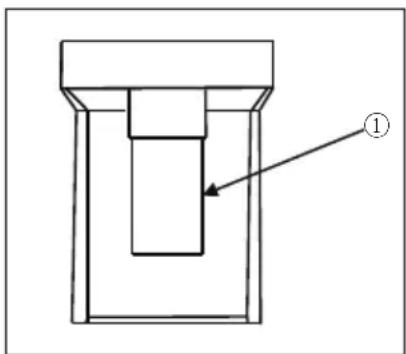
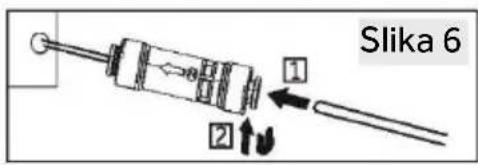
Press the dispenser selection button repeatedly until the light above the indicator that you want illuminates.
Press the dispenser paddle (1) with a glass or other container to dispense cubed ice, water or crushed ice.
TIPS ON STORING FRESH FOOD
Storing into the fridge compartment
- Keep your fridge temperature below 5^ C.
- Hot food must be cooled to room temperature before storing in the appliance.
- Foods stored in the fridge should be washed and dried before storing.
-
Food to be stored should be properly sealed to avoid odour or taste alterations.
-
Do not store excessive quantities of food. Leave spaces between foods to allow cold air flowing around them, for a better and more homogeneous cooling
-
Foods eaten daily should be stored at the front of the shelf.
-
Leave a gap between foods and the inner walls, allowing air flow. Especially don't store foods against the rear wall: foods could freeze against rear wall. Avoid direct contact of food (especially oily or acidic food) with the inner liner, as oil / acid can erode the inner liner. Clean away oily / acid dirt whenever it is found.
-
Defreeze frozen food in the fridge storage compartment. This way, you can use the frozen food to decrease the temperature in the compartment and save energy.
-
The ageing process of fruit and vegetables such as courgettes, melons, papaya, ba - nana, pineapple, etc. can be accelerated in the fridge. Therefore, it is not advisable to store them in the fridge. However, the ripening of strongly green fruits can be promoted for a certain period. Onions, garlic, ginger and other root vegetables should also be stored at room temperature.
-
Unpleasant odours inside the fridge are a sign that something has spilled and cleaning is required. See CARE AND CLEANING.
-
Different kinds of food should be placed in different areas according to their properties:
1-Butter, cheese etc.
2-Eggs, canned food, spices etc.
3/4/5-Drinks and bottled foods.
6-Pickled foods, canned food, etc
7/8-Meat products, fish, raw food
9 -Cans, dairy products etc.
10-Fruits, vegetables, lettuce, etc
11-Cooked meat, sausages, etc.
TIPS ON STORING FRESH FOOD
Storage into the freezer compartment
- Keep the freezer temperature at -18^ .
- 12 hours before freezing additional items switch on the Super - Freeze function; for small quantities of food 4-6 hours are sufficient.
-
Hot food must be cooled to room temperature before storing in the freezer compartment.
-
Food cut into small portions will freeze faster and is easier to defrost and cook. The recommended weight for each portion is less than 2.5 kg.
-
It is better to pack food before putting it into the freezer. The outside of the packaging must be dry to avoid bags sticking together. Packaging materials should be odour - free, airtight, non - poisonous and nontoxic.
-
In order to avoid expiration of storage periods, please note the freezing date, time limit and name of the food on the packaging according to the storage periods of different foods.
-
WARNING!: Acid, alkali and salt etc. could erode the internal surface of the freezer. Do not place the food having these substances (e.g. sea fish) directly on the internal surface. Salt water in the freezer should be cleaned up immediately.
-
Do not exceed the food storage times recommended by the manufacturers. Only take the required amount of food out of the freezer.
-
Different kinds of food should be placed in different areas according to their properties:
1-Less weighty items, such as ice cream, vegetables, bread etc.
2-Large / heavier portions of food, such as meat joints for roasting
3-Pizza etc.

NOTICE : STORAGE
- Please keep a distance of more than 10 mm between the food and the sensor to ensure the cooling effect.
- Please leave the lowest drawer in the appliance when it is working in order to ensure the cooling effect.
- Food items that include ice (like ice cream etc.) should be stored inside the freezer compartment instead of in the bottle holders. The temperature changes the bottle holders are exposed to, caused by opening and closing the door, may thaw the food.
- Consume defrosted food quickly. Defrosted food cannot be re - frozen unless it is firstly cooked, otherwise it may become inedible.
- Do not load excessive quantities of fresh food in the freezer compartment. Refer to the freezing capacity of the freezer - See TECHNICAL DATA or data at the type plate.
- Food can be stored in the freezer at a temperature of at least -18°C for 2 to 12 months, depending on its properties (e.g., meat:3-12 months, vegetables:6-12 months)
- When freezing fresh food, avoid bringing it in contact with already frozen food. Risk of thawing!
- Defreeze frozen food in the fridge. This way, you can use the frozen food to decrease the temperature in the compartment and save energy.
When storing commercially frozen foods, please follow these guidelines:
- Always follow manufacturers' guidelines for the length of time you should store food for. Do not exceed these guidelines!
- Try to keep the length of time between purchase and storage as short as possible to preserve food quality.
- Buy frozen foods, which have been stored at a temperature of -18°C or below.
- Avoid buying food which has ice or frost on the packaging - This indicates that the products might have been partially defrosted and refrozen at some point - temperature rises affect the quality of food.

Energy saving tips
▶Make sure the appliance is properly ventilated (see INSTALLATION).
Do not install the appliance in direct sunlight or in the near of heat sources (e.g. stoves, heaters).
Avoid unnecessarily low temperature in the appliance. The energy consumption increases the lower the temperature in the appliance is set.
▶ Functions like POWER-FREEZE consume more energy.
▶ Allow warm food to cool down before placing it in the appliance.
▶Open the appliance door as little and as briefly as possible.
▶ Do not overfill the appliance to avoid obstructing the air flow.
▶ Avoid air within the food packaging.
▶ Keep door seals clean so that the door always closes correctly.
▶ Defreeze frozen food in the fridge storage compartment.
The most energy-saving configuration requires the appliance keep drawers, food box and shelves on factory-fresh condition, and food should be places as far as possible without blocking the air outlet of the duct.

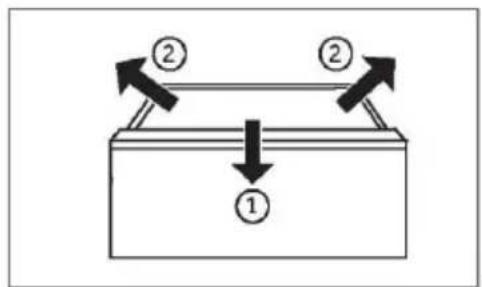
Adjustable shelves
- The height of the shelves can be adjusted to fit your storage needs.
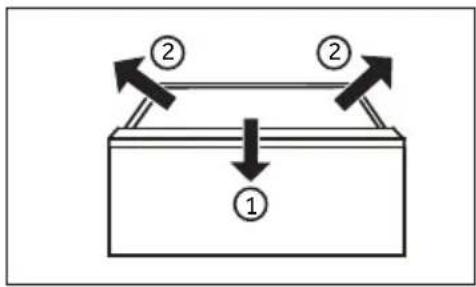
- To relocate a shelf, remove it first by uplifting its hind edge ① and pulling it out ②.
- To reinstall it, put it on the lugs on both sides and push it to the most rearward position until the rear of the shelf is fixed inside the slots in the sides
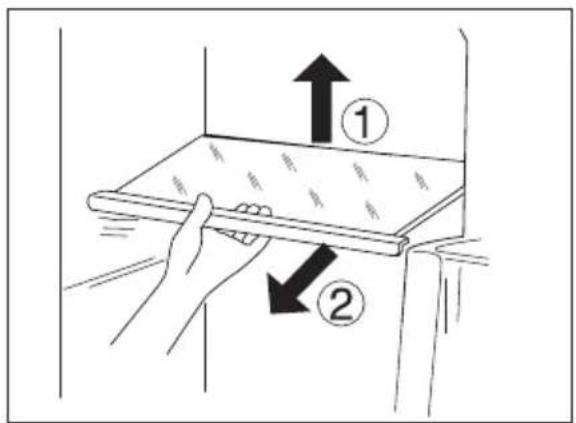

NOTICE
Ensure that all ends of a shelf are level.
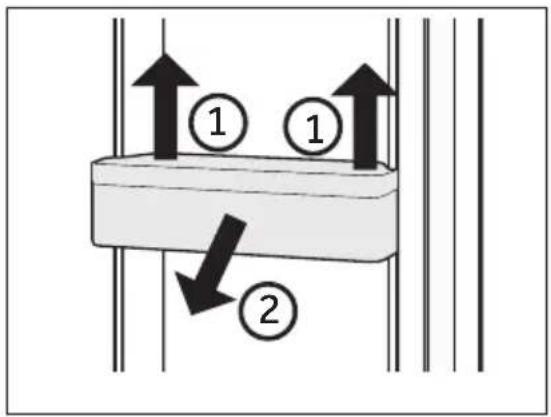
Removable door racks/bottle holder
- The door racks/bottle holder can be removed for cleaning:
- Place hands on each side of the racks/bottle holder, lift it upwards ① and pull it out ②.
- In order to insert the door racks/bottle holder, the above steps are carried out in reverse order.
Removable drawer
To remove the drawer out, pull out to the maximum extent ①, lift and remove ②.
In order to insert the drawer, the above steps are carried out in reverse order.
Ice container
Stopping the production of ice
If no ice or water is needed over a long period of time, the valve between the water supply and the appliance can be turned off.
The ice box should be cleaned, dried and put back into the appliance to prevent the emergence of odours.
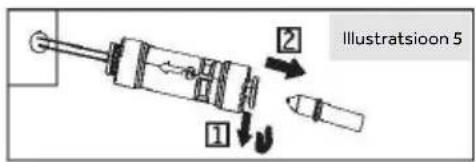
Removing the ice container
- Grip both side hangles.
- Lift the container up.
- Pull the container out.
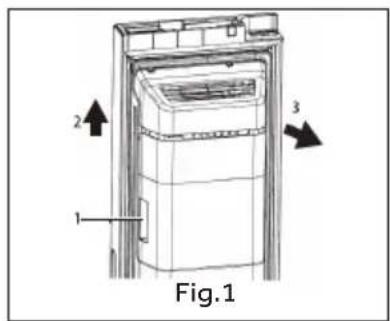
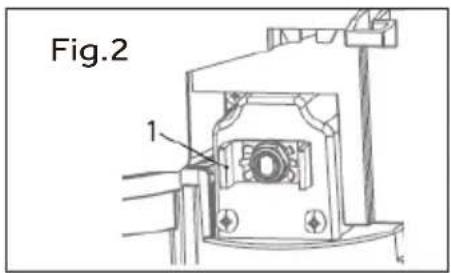
Reinstalling the ice container
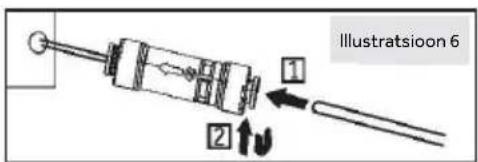
To reinstall the ice container, the U-shaped bracket behind the ice container(1 in Fig.2) must be aligned with the corresponding metal structure. Follow the steps from Fig.1 in the reverse order.

NOTICE
Moisture can condense and freeze the ice box in place.
WARNING!
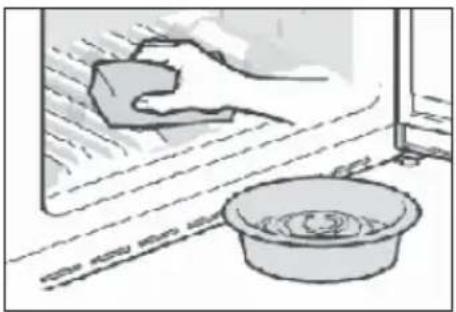
Disconnect the appliance from the power supply before cleaning.
Cleaning
Clean the appliance when only little or no food is stored.
The appliance should be cleaned every four weeks for good maintenance and to prevent bad stored food odors.
EN
WARNING!
Do not clean the appliance with hard brushes, wire brushes, detergent powder, petrol, amyl acetate, acetone and similar organic solutions, acid or alkaline solutions. Please clean with special refrigerator detergent to avoid damage.
▶Do not spray or flush the appliance during cleaning.
▶Do not use water spray or steam to clean the appliance.
Do not clean the cold glass shelves with hot water. Sudden temperature change may cause the glass to break.
Do not touch the inside surface of the freezer storage compartment, especially with wet hands, as your hands may freeze onto the surface.
▶In case of heating check the condition of frozen goods.
natural_image
Illustration of a hand cleaning a window with a soap block and a basin (no text or symbols)▶Always keep the door gasket clean.
▶ Clean the inside and housing of the appliance with a sponge dampened in warm water and neutral detergent.
-
Please scrub the interior and exterior of the refrigerator, including door sealing, door rack, glass shelves, boxes and so on, with a soft towel or sponge dipped in warm water (you may add neutral detergent into the warm water).
-
If there is liquid spilled, remove all the contaminated parts, directly rinse with the flow water, dry and place it back into the fridge.
- If there is spilled cream (such as the cream, melting ice cream), please remove all the contaminated parts, put into the warm water with about 40^ C for some time, then rinse with the flow water, dry and place it back into the fridge.
- In case some small part or component gets stuck inside of the fridge (between shelves or drawers), use small soft brush to release it. If you could not reach the part, please contact Haier service
▶Rinse and dry with soft cloth.
▶ Do not clean any of the parts of the appliance in a dishwasher.
▶ Allow at least 5 minutes before restarting the appliance as frequent starting may damage the compressor.
Defrosting
The defrosting of the refrigerator and the freezer compartment are done automatically; no manual operation is needed.
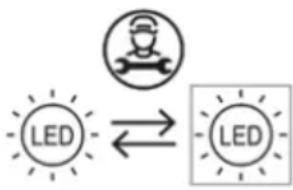
Replacing the LED-lamps
WARNING!
Do not replace the LED lamp yourself, it must only be replaced by either the manufacturer or the authorised service agent.
The lamps adopts LED as its light source, featuring low energy consumption and long service life. If there is any abnormality, please contact the customer service. See CUSTOMER SERVICE.
flowchart
graph LR
    A["LED"] <--> B["LED"]
Replaceable (LED only) light source by a professional.
This product contains a light source of energy efficiency class G.
Compartment Voltage Energy efficiency class Model
Refrigerator 12V G HSW59F18EIPT
Freezer 12V G
HSW59F18EIMM
Cleaning the ice container
Clean the ice container periodically with warm water, especially if ice cubes get older and stale. Dry the container well before putting it back into the appliance in order to prevent ice cubes from sticking to the walls.
Non-use for a longer period
If the appliance is not used for an extended period of time, and you will not use the Holiday-function for the refrigerator:
▶Take out the food.
▶Unplug the power cord.
▶Clean the appliance as described above.
- Keep the doors open to prevent the creation of bad odours inside.

NOTICE
Turn the appliance off only if strictly necessary.
Moving the appliance
- Remove all food and unplug the appliance.
- Secure shelves and other moveable parts in the fridge and the freezer with adhesive tape.
- Do not tilt the refrigerator more than 45^ to avoid damaging the refrigerating system.
WARNING!
▶ Do not lift the appliance by its handles.
▶Never place the appliance horizontally on the ground.
Replacing the filter
The water filter has to be changed approximately every 6 months, when the indicator "c3" (Filter Reset function) lights up.
The filter set can be ordered via the CUSTOMER SERVICE.
WARNING!
Before replacing the filter deactivate the appliance and disconnect the mains plug from the mains socket.
▶Turn off water supply.
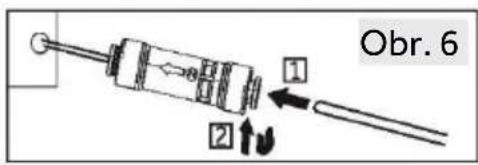
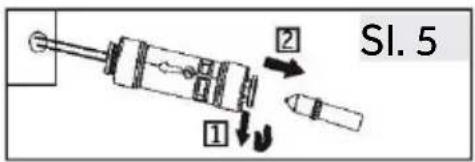
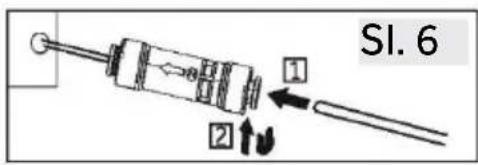
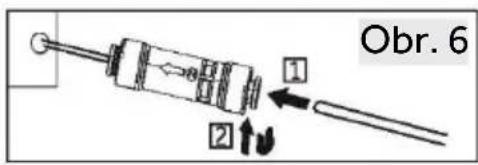
- Remove (1) the locking cip (C) on both sides of the filter (A) and disconnect both pipes (2)
- Install the new filter in correct position; the dart shows the direction of water flow. Repeat step 1 in reverse order.
- Put the plug into the socket and open the water tab to flush the hoses.
- Reset the "Change Filter" indicator: hold the button "C" (Filter Reset function selector) for 3 seconds, indicator "c3" turns off.
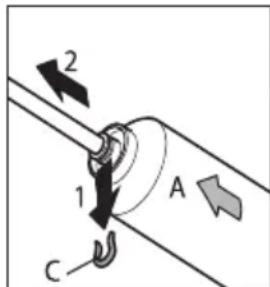

WARNING!
▶Ensure always that the connection is firm, dry and leak free!
▶Take care the hose never to be crushed, kinked, or twisted.
Many occurring problems could be solved by yourself without specific expertise. In case of a problem please check all shown possibilities and follow below instructions before you contact an after sales service. See CUSTOMER SERVICE.
WARNING!
Before maintenance, deactivate the appliance and disconnect the mains plug from the mains socket.
Electrical equipment should be serviced only by qualified electrical experts, because improper repairs can cause considerable consequential damages.
▶ A damaged supply should only be replaced by the manufacturer, its service agent or similarly qualified persons in order to avoid a hazard.
Problem Possible Cause Possible Solution
| The compressor does not work. | Mains plug is not connected in the mains socket.The appliance is in the defrost-ing cycle | Connect the mains plug.This is normal for an automatic defrosting |
| The appliance runs frequently or runs for a too long period of time. | The indoor or outdoor temperature is too high.The appliance has been off power for a period of time.A door of the appliance is not tightly closed.The door has been opened too frequently or for too long.The temperature setting for the freezer compartment is too low.The door gasket is dirty, worn, cracked or mismatched.The required air circulation is not guaranteed. | In this case, it is normal for the appliance to run longer.Normally, it takes 8 to 12 hours for the appliance to cool down completely.Close the door/drawer and ensure the appliance is located on a level ground and there is no food or container jarring the door.Do not open the door/drawer too frequently.Set the temperature higher until a satisfactory refrigerator temperature is obtained. It takes 24 hours for the refrigerator temperature to become stable.Clean the door/drawer gasket or replace them by the customer service.Ensure adequate ventilation. |
| The inside of the refrigerator is dirty and/or smells. | The inside of the refrigerator needs cleaning.Food of strong odour is stored in the refrigerator. | Clean the inside of the refrigerator.Wrap the food thoroughly.. |
| The appliance makes abnormal sounds. | The appliance is not located on level ground.The appliance touches some object around it. | Adjust the feet to level the appliance.Remove objects around the appliance. |
| Problem Possible Cause | Possible Solution | |
| It is not cold enough inside the appliance. | The temperature is set too high.Too warm goods has been stored.Too much food has been stored at one time.The goods are too close to each other.A door/drawer of the appliance is not tightly closed.The door/drawer has been opened too frequently or for too long. | Reset the temperature.Always cool down goods before storing them.Always store small quantities of food.Leave a gap between several foods allowing air flowing.Close the door/drawer.Do not open the door/drawer too frequently. |
| It is too cold inside the appliance. | The temperature is set too low.The Super-Frz/Super-Coolfunction is activated or is running too long. | Reset the temperature.Switch off the Super-Frz/Super-Cool function |
| Moisture formation on the inside of the refrigerator compartment. | The climate is too warm and toodamp.A door/drawer of the appliance is not tightly closed.The door/drawer has been opened too frequently or for too long.Food containers or liquids are left open. | Increase the temperature.Close the door/drawer.Do not open the door/drawer too frequently.Let hot foods cool to room temperature and cover foods and liquids. |
| Moisture accumulates on the refrigerators outside surface or between the doors/door and drawer. | The climate is too warm and too damp.The door is not closed tightly.The cold air in the appliance and the warm air outside it condensates. | This is normal in damp climate and will change when the humidity decreases.Ensure that he door/drawer is tightly shut. |
| Strong ice and frost in the freezer compartment. | The goods were not adequately packaged.A door/drawer of the appliance is not tightly closed.The door/drawer has been opened too frequently or for too long.The door/drawer gasket is dirty, worn, cracked or mismatched.Something on the inside prevents the door/drawer to close properly. | Always pack the goods well.Close the door/drawer.Do not open the door/drawer too frequently.Clean the door/drawer gasket or replace them by new ones.Reposition the shelves, door racks, or internal containers to allow the door/drawer to close. |
| The sides of the cabinet and door strip get warm. | • - • This is normal. | |
| The appliance makes abnormal sounds. | • The appliance is not located on level ground.• The appliance touches some object around it. | • Adjust the feet to level the appliance.• Remove objects around the appliance. |
| A slight sound is to be heard similar to that of flowing water. | • - • This is normal. | |
| You will hear an alarm beep. | • The fridge storage compartment door is open. | • Close the door. |
| You will hear a faint hum. | • The anti-condensation system is working | • This prevents condensation and is normal |
| The interior lighting or cooling system does not work. | • Mains plug is not connected in the mains socket.• The power supply is not intact.• The LED-lamp is out of order. | • Connect the mains plug.• Check the electrical supply to the room. Call the local electricity company!• Please call the service for changing the lamp. |
| Water leaking or dripping from the water dispenser spout. | • The water tank is not installed correctly• The water dispenser spout is not screwed tight to the tank.• The white silicon O ring is missing from the water spout. | • Refit the water tank into the fridge door, ensure it is pushed fully into the door.• The water spout is screwed in firmly to the water tank.• Check the water spout has a white silicon O ring at the tank end before fitting the water spout to the water tank. |
To contact the technical assistance, visit our website: https://corporate.haier-europe.com/en/
Under the section "website", choose the brand of your product and your country. You will be redirected to the specific website where you can find the telephone number and form to contact the technical assistance.
EN
Power interruption
In the event of a power cut, food should remain safely cold for about 5 hours. Follow these tips during a prolonged power interruption, especially in summer:
▶Open the door/drawer as few times as possible.
▶ Do not put additional food into the appliance during a power interruption.
If prior notice of a power interruption is given and the interruption duration is longer than 5 hours, make some ice and put it in a container in the top of the refrigerator compartment.
An inspection of the goods is required immediately after the interruption.
As temperature in the refrigerator will rise during a power interruption or other failure, the storage period and edible quality of food will be reduced. Any food that defrosts should be either consumed, or cooked and refrozen (where suitable) soon afterwards in order to prevent health risks.
NOTICE: Memory function during power interruption
After restoration of power the appliance continues with the settings that were set before the power failure.
Unpacking

RNING!
The appliance is heavy. Always handle with at least two persons.
- Keep all packaging materials out of children's reach and dispose them in an environmentally friendly manner.
▶Take the appliance out of the packaging.
▶Remove all packaging materials.
EN
Environmental conditions
The room temperature should always be between 10^ C and 43^ C, since it can influence the temperature inside the appliance and its energy consumption. Do not install the appliance near other heat-emitting appliances (ovens, refrigerators) without isolation.
- Extended temperate (SN): this refrigerating appliance is intended to be used at ambient temperatures ranging from 10°C to 32°C;
- Temperate (N): this refrigerating appliance is intended to be used at ambient temperatures ranging from 16°C to 32°C;
- Subtropical (ST): this refrigerating appliance is intended to be used at ambient temperatures ranging from 16°C to 38°C;
- Tropical (T): this refrigerating appliance is intended to be used at ambient temperatures ranging from 16°C to 43°C;
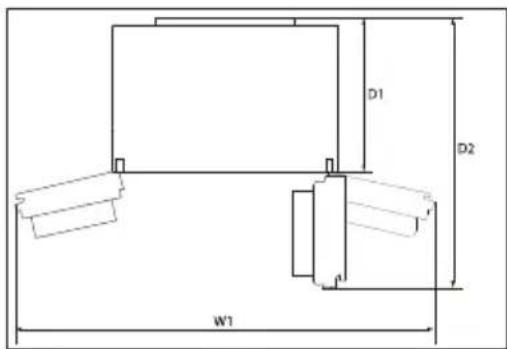
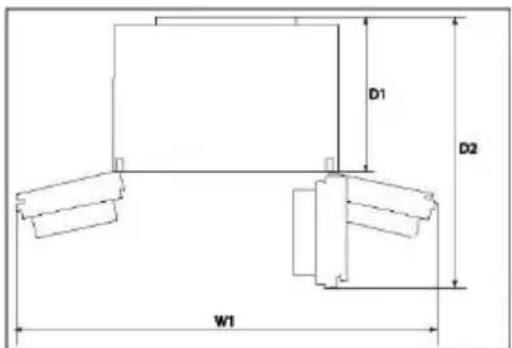
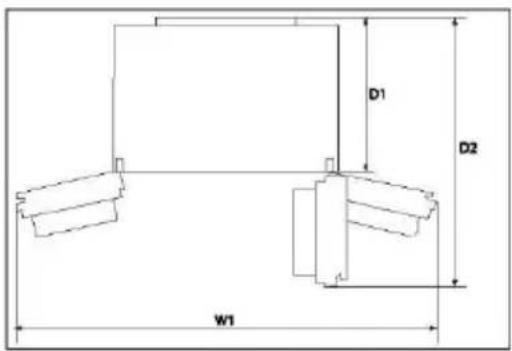
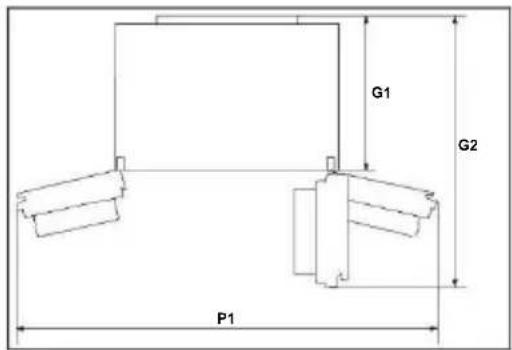
Space requirement
Required space when door is opened:
$$ W 1 = 1 5 7. 8 \mathrm{cm} $$
$$ D 1 = 6 2. 9 \mathrm{cm} $$
$$ D 2 = 1 1 7. 3 \mathrm{cm} $$
Ventilaton cross-section
To achieve sufficient ventilation of the appliance for safety reasons, the information of the required ventilation cross sections must be observed.

TICE
For a free standing appliance: this refrigerating appliance is not intended to be used as a built-in appliance.
Fresh water connection

RNING!
It is recommended to have the appliance installed by a qualified technician.
▶ Make sure that the mains plug is disconnected from the mains socket.
▶Make sure the water supply is blocked.
▶ A shut - off valve which must be easy accessible after installation must be installed between the hose and the domestic water connection in order to be able to interrupt the water supply if necessary.
▶Only connect to cold water supply.
▶Use only the supplied hose set for the connection.
▶ Only connect to drinking water supply. The water filter only filters impurities in the water and makes ice clean and hygienic. It cannot sterilize or destroy germs or other harmful substances.
▶ Too high water pressure in the hose can damage the appliance. Install a pressure reducer when the water pressure in the hose exceeds 0.6 MPa.
▶Before connection, check whether the water is clean and clear.

NOTICE: Water connection
▶Pressure of the cold water has to be 0.15-0.6 MPa.
The maximum permitted length of water hose is 8 meter. Longer hoses will affect the ice cubes and cold water content.
▶ Ambient temperature has to be 0^ C minimum.
▶Keep the water hose away from heat sources.
Follow the installation instructions below:
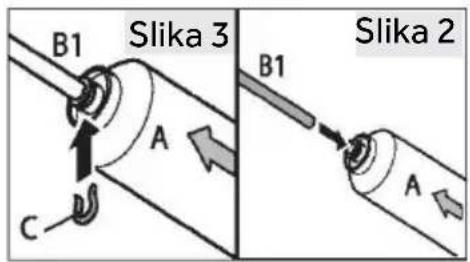
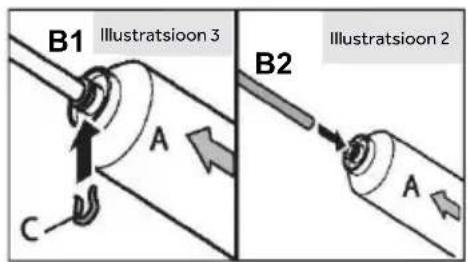
- Cut the pipe into two pieces with the required length to connect the filter (A) with the appliance (B1) and the water tap (B2)(Fig.1). Make sure to get a square cut by using a sharp knife.
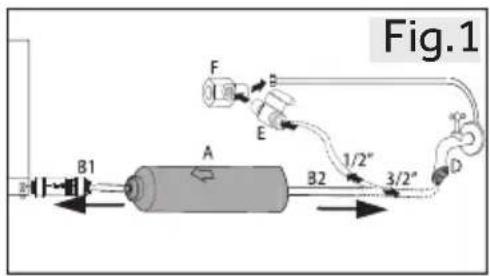
-
Insert pipe (B1) approx .12 mm deep into the mounting fixture of the water fiter ( A )( Fig .2). Take care to install the fiter in the correct direction . The dart shows the direction of water flow .
-
Secure the pipe with a locking clip (C) according to Fig .3.

- Repeat step 2 and 3 with the pipe (B2) on the other side of the filter.
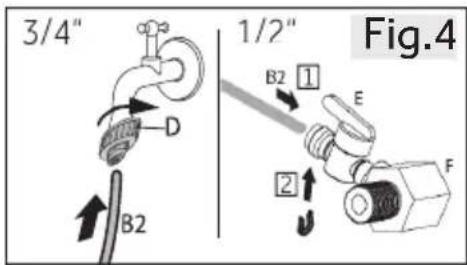
- Connect the end of pipe (B2) to one of the adapters "D" or "E and F" which suits to the water main (Fig .4).
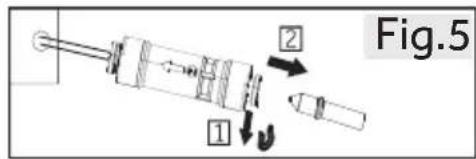
- Remove the plug in the valve at the back of appliance( Fig .5).
- Connect the end of B1 to the valve at the back of the appliance( Fig .6).
- Open the water tab to check if the system is leak free and flush the pipe.

WARNING!
▶Ensure that the connections are always firm, dry and leak free.
▶Make sure the hose is never crushed, kinked, or twisted.
Aligning the appliance
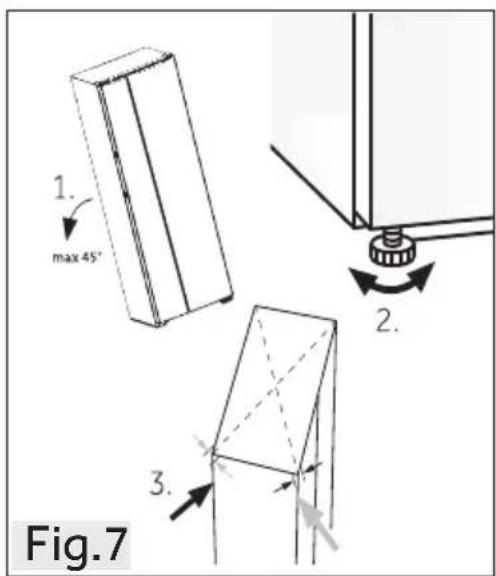
The appliance should be placed on a flat and solid surface.
- Tit the appliance slightly backwards (Fig .7).
- Set the feet to the desired level. Make sure the distance to the wall on the hinge sides is at least 10 cm.
- The stability can be checked by alternately bumping on the diagonals. The slightly swaying should be the same in both directions. Otherwise the frame can warp; possible leaking door seals are the result. A low tendency to the rear facilitates the closing of the doors.
Fine tuning of the doors
If the doors are still not in one level after leveling the doors by the feet, this mismatch can be remedied by turning the hinge lifting shaft at the right bottom corner of refrigerating door with a spanner( Fig .8)
EN
Clockwise turn lifting shaft with spanner to lower door height (Fig.9).
Antic lock wise turn lifting shaft with spanner to lift door height (Fig.10).
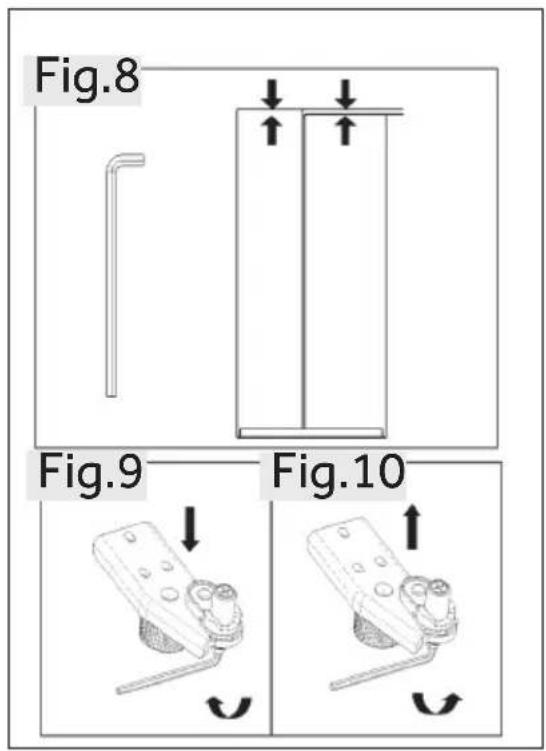
RNING!
Do not adjust the hinge lifting shaft excessively to a height which might cause the shaft to leave its original locked position .( Adjustable height range :3 mm )
Waiting time
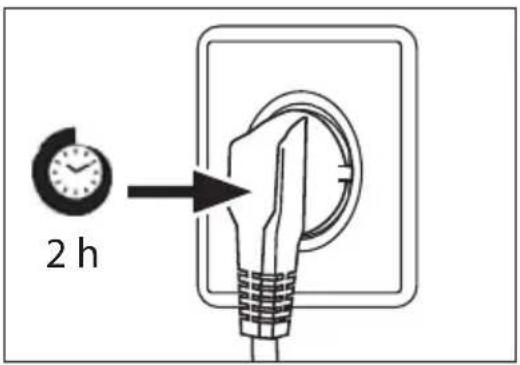
To the maintenance-free lubrication oil is located in the capsule of the compressor. This oil can get through the closed pipe system during slanting transport. Before connecting the appliance to the power supply you have to wait at least 2 hours so that the oil runs back into the capsule.
Electrical connection
Before each connection check if:
▶ power supply, socket and fusing are appropriate to the rating plate.
▶the power socket is earthed and no multi-plug or extension.
▶the power plug and socket are strictly according.
Connect the plug to a properly installed household socket.
WARNING!
To avoid risks a damaged power cord must be replaced by the customer service (see warranty card).
Removing and installing the doors
In the event that you need to remove the appliance doors, please follow the door removal and installation instructions below.
WARNING!
Before any operation, deactivate the appliance and disconnect the mains plug from the mains socket.
▶Block the water supply.
The appliance is heavy. Always handle with at least two persons.
▶ Do not tilt the appliance more than 45 or place it horizontally on the ground.
The door may fall over and hurt people, or get damaged during these steps, please pay more attention when rermoving and instaling doors.
-
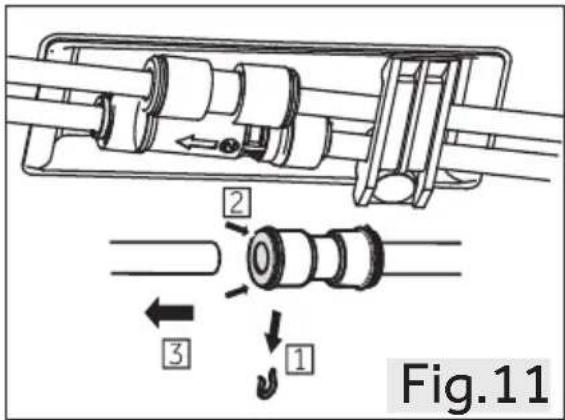
Release the left side of two water couplers on the front left corner at the bottom of appliance: press and hold in the collar as shown and remove the water pipe. (Fig. 11).
-
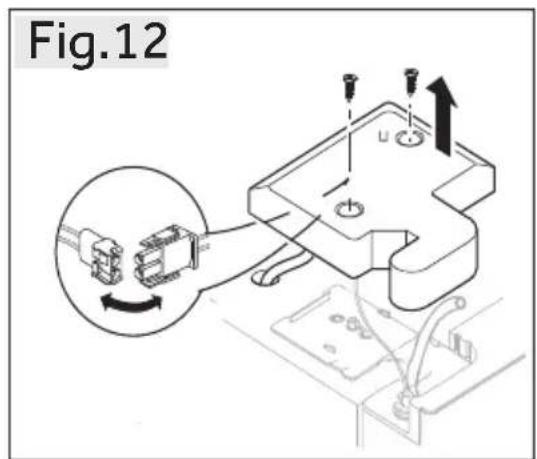
Undo the hinge cover screw and remove the cover (Fig .12). When removing the freezer door, disconnect all wires except for the grounding wire.

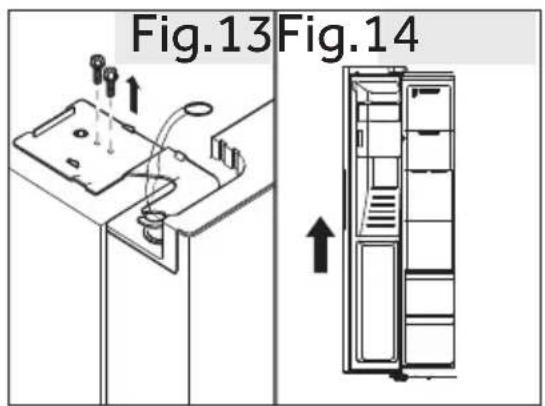
- Undo the screws holding the upper hinge in position and then remove the hinge(Fig.13).
- Lift the door to remove it (Fig.14). When removing the freezer door, lift it high enough to pull out the water connection from the bottom of the appliance.
- Refit the door by reversing the removal steps. Ensure that the grounding cable will be fixed by the screw.
- Refit the water connection.

NOTICE: Fridge door
The pictures show the removing of the freezer compartment door. For the fridge door please use the corresponding parts on the other side.
Product fiche according to regulation EU No. 2019/2016
| Brand Haier | |
| Model name / identifier | HSW59F18EIMMHSW59F18EIPT |
| Category of the model | Refrigerator-freezer |
| Energy efficiency class | E |
| Annual energy consumption(kWh/year) (1) | 334 |
| Total volume(L) | 601 |
| Volume refrigerator(L) | 391 |
| Volume freezer(L) 210 | |
| Star rating | *** |
| Temperature of other compartments>14°C | Non applicable |
| Frost-free system | Yes |
| Freezing capacity(kg/24h) | 12 |
| Climate rating (2) | SN-N-ST-T |
| Noise emission class and airborne acoustical noise emissions(db(A) re 1pW) | C(36) |
| Temperature rise time (h) | 5 |
| Ice making capacity | 0.9 kg/24h |
| Type of appliance | freestanding |
Explanations:
- Yes, featured
(1) Based on the results of the standards conformance test over 24 hours. The actual consumption depends on the use and the location of the appliance.
(2) Climate rating SN: This appliance is intended for use in an ambient temperature of between +10°C and +32°C
EN
Climate rating N: This appliance is intended for use in an ambient temperature of between +16°C and +32°C
Climate rating ST: This appliance is intended for use in an ambient temperature of between +16°C and +38°C
Climate rating T: This appliance is intended for use in an ambient temperature of between +16°C and +43°C
Additional technical data
| Voltage / Frequency 220-240V ~/ | 50Hz |
| Input current (A) | 1.8 |
| Defrosting input power (W) | 220 |
| Main fuse (A) | 15 |
| Coolant R600a | |
| Water pressure in MPa | 0.15-0.6 |
| Dimensions (H/W/D in mm) | 1775 / 905 / 726 |
We recommend our Haier Customer Service and the use of original spare parts. If you have a problem with your appliance, please first check section TROUBLE-SHOOTING.
If you cannot find a solution there, please contact
▶your local dealer or
▶ our European Call Service-Center (see listed phone numbers below) or
▶ the Service & Support area at www.haier.com where you can activate the service
▶claim and also find FAQs.
To contact our Service, ensure that you have the following data available. The information can be found on the rating plate.
Model ____
Serial No. ____
Also check the Warranty Card supplied with the product in case of warranty.
| European Call Service-Center | ||
| Country* | Phone number Costs | |
| Haier Italy (IT) | 199 100 912 | |
| Haier Spain (ES) 902 509 123 | ||
| Haier Germany (DE) 0180 5 39 39 | 99 | • 14 Ct/Min Landline• max 42 Ct/Min Mobile |
| Haier Austria (AT) 0820 001 205 | • 14,53 Ct/Min Landline• max 20 Ct/Min all others | |
| Haier United Kingdom (UK) | 0333 003 8122 | |
| Haier France (FR) | 0980 406 409 | |
* For other countries please refer to www.haier.com
Haier Europe Trading S.r.l
Branch UK
Westgate House, Westgate, Ealing
London, W5 1YY
EN
*Duration of the guarantee of the refrigerating appliance:
Minimum guarantee is: 2 years for EU Countries, 3 years for Turkey, 1 year for UK, 1 year for Russia, 3 years for Sweden, 2 years for Serbia, 5 years for Norway, 1 year for Morocco, 6 months for Algeria, Tunisia no legal warranty required.
*The period of spare parts for the repair of the appliance:
Thermostats, temperature sensors, printed circuit boards and light sources are available for a minimum period of seven years after placing the last unit of the model on the market.
Door handles, door hinges, trays and baskets for a minimum period of seven years and door gaskets for a minimum period of 10 year, after placing the last unit of the model on the market.
*For further information about the product, please consult https://eprel.ec.europe.eu/ or scan the QR on the energy label supplied with the appliance.
natural_image
Technical line drawing of a mechanical component with a labeled arrow (no text or symbols present)TIPY PRO UKLÁDÁNÍ ČERSTVÝCH POTRAVIN
1-Máslo, sýr atd.


POZNÁMKA
Vyjímatelná zásuvka
Nádoba na led
CS
natural_image
Illustration of a hand cleaning a window with a soap block and a basin (no text or symbols)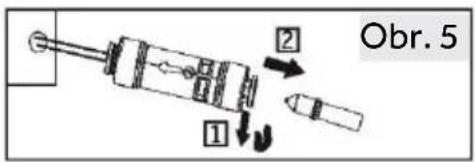

VAROVÁNÍ!

VAROVÁNÍ!
CS

Westgate House, Westgate, Ealing
London, W5 1YY
CS
natural_image
Technical line drawing of a mechanical component with a labeled arrow (no text or symbols present)TIPS TIL OPBEVARING AF FERSKVARER
TIPS TIL OPBEVARING AF FERSKVARER
Opbevaring i fryseren
DA

BEMÆRK: OPBEVARING

BEMÆRK
Aftagelig skuffe
Isbeholder
natural_image
Illustration of a hand cleaning a window with a soap block and a basin (no text or symbols)Westgate House, Westgate, Ealing
London, W5 1YY
DA
natural_image
Technical line drawing of a mechanical component with no visible text or symbols
HINWEIS: LAGERUNG

HINWEIS
Eisbehälter
natural_image
Illustration of a hand cleaning a window with a soap block and a basin (no text or symbols)Westgate House, Westgate, Ealing
London, W5 1YY
DE
natural_image
Technical line drawing of a mechanical component with a labeled arrow (no text or symbols present)

ΕΙΔΟΠΟΪΗΣΗ
Αφαιρούμενο συρτάρι
Δοχείο πάγου
natural_image
Illustration of a hand cleaning a window with a soap block and a basin (no text or symbols)Westgate House, Westgate, Ealing
Λονδίνο, W5 1YY
EL
natural_image
Two technical line drawings of mechanical connectors, one with a hexagonal nut and the other with a cylindrical housing (no text or symbols)natural_image
Pure technical line drawing of a mechanical component without any text, numbers, or symbolsCONSEJOS PARA ALMACENAR ALIMENTOS FRESCOS

AVISO
Cajón extraíble
Depósito de hielo
ES
natural_image
Illustration of a hand cleaning a window with a soap block and a basin (no text or symbols)Westgate House, Westgate, Ealing
Londres, W5 1YY
ES
natural_image
Technical line drawing of a mechanical component with a labeled arrow (no text or symbols present)VINKKEJÄ TUOREIDEN ELINTARVIKKEIDEN SÄILYTYKSEEN

HUOMAUTUS
Jääsäiliö
natural_image
Illustration of a hand cleaning a window with a soap block and a basin (no text or symbols)Westgate House, Westgate, Ealing
London, W5 1YY
FI
E Fonction Super-Freeze/3Sec.Ice on/off
h3 Fonction Crushed ice
Fonction Crushed ice
natural_image
Technical line drawing of a mechanical component with a labeled arrow (no text or symbols present)CONSEILS POUR CONSERVER DES ALIMENTS FRAIS
FR

REMARQUE :
Tiroir amovible
Bac à glaçons
FR
natural_image
Illustration of a hand cleaning a kitchen with a soap block and a basin (no text or symbols)Westgate House, Westgate, Ealing
Londres, W5 1YY
FR
natural_image
Technical line drawing of a mechanical component with a labeled arrow (no text or symbols present)SAVJETI ZA ČUVANJE SVJEŽE HRANE
1-Maslac, sir itd.
2-Jaja, konzervirana hrana, začini itd.
3/4/5 - pića i hrana u bocama.
6 - ukiseljena hrana, konzervirana hrana, itd.
7/8 - mesni proizvodi, riba, sirova hrana
9 - limenke, mliječni proizvodi itd.
10-Voće, povrće, zelena salata itd.
11-Kuhano meso, kobasice itd.
SAVJETI ZA ČUVANJE SVJEŽE HRANE

OBAVIJEST: SKLADIŠTENJE

OBAVIJEST
Uklonjiva ladica
Prilikom uklanjanja ladice, izvucite je do samog kraja ①, podignite i izvadite②.
Prilikom ponovnog postavljanja ladice provedite opisane korake obrnutim redoslijedom.
Posuda za led
Zaustavljanje proizvodnje leda
natural_image
Illustration of a hand cleaning a window with a soap block and a basin (no text or symbols)▶ Brtva vrata uvijek mora biti čista.
▶ Očistite unutrašnjost i kućište uređaja spužvom navlaženom toplom vodom i neutralnim deter-džentom.
$$ W 1 = 1 5 7, 8 \mathrm{cm} $$
$$ D 1 = 6 2, 9 \mathrm{cm} $$
$$ D 2 = 1 1 7, 3 \mathrm{cm} $$


UPOZORENJE!
Westgate House, Westgate, Ealing
London, W5 1YY
HR
natural_image
Technical line drawing of a mechanical component with a labeled arrow (no text or symbols present)
MEGJEGYZÉS
Eltávolítható fiók
natural_image
Illustration of a hand cleaning a window with a soap block and a basin (no text or symbols)Westgate House, Westgate, Ealing
London, W5 1YY
HU
natural_image
Technical line drawing of a mechanical component with a labeled arrow (no text or symbols present)IT

AVVISO
Cassetto rimovibile
natural_image
Illustration of a hand cleaning a window with a soap block and a basin (no text or symbols)Westgate House, Westgate, Ealing
London, W5 1YY
IT
Toetsen:
natural_image
Technical line drawing of a mechanical component with a labeled arrow (no text or symbols present)TIPS VOOR HET BEWAREN VAN VERS VOEDSEL

LET OP
Verwijderbare lade
IJsreservoir
natural_image
Illustration of a hand cleaning a window with a soap block and a basin (no text or symbols)$$ W 1 = 1 5 7, 8 \mathrm{cm} $$
$$ D 1 = 6 2, 9 \mathrm{cm} $$
$$ D 2 = 1 1 7. 3 \mathrm{cm} $$
Westgate House, Westgate, Ealing
E Super-Freeze-funksjon/3Sec.Ice on/off
natural_image
Technical line drawing of a mechanical component with a labeled arrow (no text or symbols present)TIPS OM OPPBEVARING AV FERSK MAT

LEGGE MERKE TIL: OPPBEVARING

OBS
Sørg for at alle ender av en hylle er i vater.
Avtakbar skuff
Isbeholder
natural_image
Illustration of a hand cleaning a window with a soap block and a basin (no text or symbols)Westgate House, Westgate, Ealing
London, W5 1YY
NO
natural_image
Technical line drawing of a mechanical component with a labeled arrow (no text or symbols present)WSKAZÓWKI DOTYCZĄCE PRZECHOWYWANIA ŚWIEŻEJ ŻYWNOŚCI

UWAGA: PRZECHOWYWANIE

UWAGA
Wyjmowana szuflada
Pojemnik na lód
natural_image
Illustration of a hand cleaning a window with a soap block and a basin (no text or symbols)flowchart
graph LR
    A["LED Light"] <--> B["Robot Icon"]
    B --> C["LED Light"]
$$ W 1 = 1 5 7, 8 \mathrm{cm} $$
$$ D 1 = 6 2. 9 \mathrm{cm} $$
$$ D 2 = 1 1 7, 3 \mathrm{cm} $$
Westgate House, Westgate, Ealing
Londyn, W5 1YY
PL
Função Super-Freeze (Super-Frz)
natural_image
Technical line drawing of a mechanical component with a labeled arrow (no text or symbols present)DICAS PARA ARMAZENAR ALIMENTOS FRESCOS


AVISO
Gaveta amovível
Recipiente de gelo
natural_image
Illustration of a hand cleaning a window with a soap block and a basin (no text or symbols)Substituir as lâmpadas LED

AVISO!
flowchart
graph LR
    A["LED Light"] <--> B["Robot Icon"]
    B --> C["LED Light"]
Westgate House, Westgate, Ealing
London, W5 1YY
PT
A: Compartment congelator
G Selector blocare panoul
natural_image
Pure technical line drawing of a mechanical component with no text or symbolsSFATURI LEGATE DE DEPOZITAREA ALIMENTELOR PROASPETE
SFATURI LEGATE DE DEPOZITAREA ALIMENTELOR PROASPETE

OBSERVATIE: DEPOZITARE

OBSERVATIE
Sertar demontabil
Recipient de gheata
Oprirea productiei de cuburi de gheata
natural_image
Illustration of a hand cleaning a window with a soap block and a basin (no text or symbols)Westgate House, Westgate, Ealing
Londra, W5 1YY
RO
B: Chladiaci priestor
7 Stropné svietidlo
8 Stojan na víno
9 Držiak na fl'aše
10 Sklenené police
natural_image
Technical line drawing of a mechanical component with a labeled arrow (no text or symbols present)TIPY NA SKLADOVANIE ČERSTVÝCH POTRAVÍN
Uchovávanie v chladničke
SK

POZNÁMKA
Vyberatel'ná zásuvka
Ak chcete zásuvku vybrat, vytiahnite ju do maximálnej polohy ①, nadvihnite ju a vyberte ②.
Kontajner na l'ad
SK
natural_image
Illustration of a hand cleaning a window with a soap block and a basin (no text or symbols)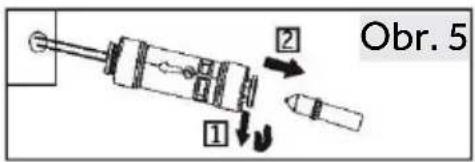

VAROVANIE!

VAROVANIE!
SK

POZNÁMKA: Dvere chladničky
Westgate House, Westgate, Ealing
London, W5 1YY
SK
natural_image
Technical line drawing of a mechanical component with a labeled arrow (no text or symbols present)NASVETI ZA SHRANJEVANJE SVEŽIH ŽIVIL
Shranjevanje v hladilnik

OBVESTILO: SHRANJEVANJE

OBVESTILO
Prepričajte se, da so vsi konci police poravnani.
Odstranljive police za vrata/nosilec za steklenice
Odstranljiv predal
Posoda za led
natural_image
Illustration of a hand cleaning a window with a soap block and a basin (no text or symbols)▶ Tesnilo na vratih naj bo vedno čisto.
▶ Očistite notranjost in ohišje aparata z gobo, navlaženo v topli vodi in nevtralnem čistilu.
-
Vstavite cev (B1) pribl. 12 mm globoko v pritrdilno napravo vodnega filtra (A) (sl. 2). Pazite, da filter namestite v pravo smer. Puščica prikazuje smer pretoka vode.
-
Cev pritrdite z zaporno sponko (C) v skladu s sl. 3.


OPOZORILO!
Westgate House, Westgate, Ealing
London, W5 1YY
SL
*Trajanje garancije hladilnega aparata:
natural_image
Technical line drawing of a mechanical component with a labeled arrow (no text or symbols present)TIPS OM FÖRVARING AV FÄRSK MAT

UPPMÄRKSAMMA: FÖRVARING

UPPMÄRKSAMMA
Avtagbar låda
Isbehållare
natural_image
Illustration of a hand cleaning a window with a soap block and a basin (no text or symbols)Westgate House, Westgate, Ealing
London, W5 1YY
SV
المؤشرات:
المفاتيح:
Auto Set ∫ a1
Super-Cool ∪ ∪ ∪ ∪ ∪ ∪ ∪ ∪ ∪ ∪ ∪ ∪ ∪ ∪ ∪ ∪ ∪ ∪ ∪ ∪ ∪ ∪ ∪ ∪ ∪ ∪ ∪ ∪ ∪ ∪ ∪ ∪ ∪ ∪ ∪ ∪ ∪ ∪ ∪ ∪ ∪ ∪ ∪ ∪ ∪ ∪ ∪ ∪ ∪ ∪ ∸ ∸ ∸ ∸ ∸ ∸ ∸ ∸ ∸ ∸ ∸ ∸ ∸ ∸ ∸ ∸ ∸ ∸ ∸ ∸ ∸ ∸ ∸ ∸ ∸ ∸ ∸ ∸ ∸ ∸ ∸ ∸ ∸ ∸ ∸ ∸ ∸ ∸ ∸ ∸ ∸ ∸ ∸ ∸ ∸
- عندما تكون شاشة العرض غير مقالة، اض菀 على الزر "A" (م crowded وضع) Auto Set (Auto Set)a1 (widع) واحدة، وبيضى العfoundر "a1" (widع) (Auto Set) (widع) (widع) (Auto Set) (widع) (widع) (widع) (widع) (widع) (widع) (widع) (widع) (widع) (widع) (widع) (widع) (widع) (widع) (widع) (widع) (widع) (widع) (widع) (widع) (widع) (widع) (widع) (widع) (widع) (widog)

flowchart
graph LR
    A["Auto Set"] --> B["Automotive"]
    B --> C["Auto Set"]
    C --> D["Automotive"]
    style A fill:#f9f,stroke:#333
    style B fill:#ccf,stroke:#333
    style C fill:#cfc,stroke:#333
    style D fill:#fcc,stroke:#333
AR

natural_image
Technical line drawing of a mechanical component with a labeled arrow (no text or symbols present)AR
درج قابل للإزالة
natural_image
Illustration of a hand cleaning a window with a cloth and a basin nearby (no text or symbols)$$ \sim 1 5 7. 8 = W 1 $$
$$ \sim 6 2. 9 = D 1 $$
$$ \omega 1 1 7. 3 = D 2 $$
تهوية المقطع العرضي
Westgate House, Westgate, Ealing
London, W5 1YY
AR
Nupud:
natural_image
Technical line drawing of a mechanical component with a labeled arrow (no text or symbols present)NÕUANDED VÄRSKE TOIDU SÄILITAMISEKS
NÕUANDED VÄRSKE TOIDU SÄILITAMISEKS
ET

Märkus. TOIDUAINETE SÄILITAMINE

Märkus.
Eemaldatav sahtel
Jäämahuti
natural_image
Illustration of a hand cleaning a window with a soap block and a basin (no text or symbols)https://corporate.haier-europe.com/en/.
HOIATUS!
Klavišai:
natural_image
Technical line drawing of a mechanical component with a labeled arrow (no text or symbols present)PATARIMAI, KAIP LAIKYTI ŠVIEŽIUS MAISTO PRODUKTUS
LT

PASTABA. LAIKYMAS

PASTABA
Išimamas stalčius
Ledo talpykla
Ledo gamybos sustabdymas
natural_image
Illustration of a hand cleaning a window with a soap block and a basin (no text or symbols)$$ W 1 = 1 5 7, 8 \mathrm{cm} $$
$$ D 1 = 6 2, 9 \mathrm{cm} $$
$$ D 2 = 1 1 7, 3 \mathrm{cm} $$
Westgate House, Westgate, Ealing
London, W5 1YY
LT
natural_image
Technical line drawing of a mechanical component with a labeled arrow (no text or symbols present)IETEIKUMI SVAIGAS PĀRTIKAS GLABĀŠANAI
IETEIKUMI SVAIGAS PĀRTIKAS GLABĀŠANAI

PAZINOJUMS
Iznemama atviktne
Lai iznemtu atvilktni, maksimāli izvelciet to ①, paceliet un iznemiet ②.