Leifheit Linomatic 500 Plus - Tumble drier

Linomatic 500 Plus - Tumble drier Leifheit - Free user manual and instructions

Find the device manual for free Linomatic 500 Plus Leifheit in PDF.

📄 52 pages English EN 💬 AI Question
Notice Leifheit Linomatic 500 Plus - page 8

Download the instructions for your Tumble drier in PDF format for free! Find your manual Linomatic 500 Plus - Leifheit and take your electronic device back in hand. On this page are published all the documents necessary for the use of your device. Linomatic 500 Plus by Leifheit.

USER MANUAL Linomatic 500 Plus Leifheit

Instructions for use

1. Choose a sunny spot unobstructed by trees, bushes, fences, etc. The arms must be able

to rotate freely. The space to allow is detailed on the packing.

2. Dig a hole as shown.

3. Mix about 20 litres (2 buckets) of concrete with some water to make it slightly moist –

5 parts sand to 1 part cement. Set the mounting socket into the hole and ll the hole with the concrete.

4. Make sure the mounting socket is centred and straight. Test this by inserting the

clothes dryer and checking that it is vertical with a spirit level.

5. The mounting socket should protrude enough to let you shut the cover.

6. Leave the concrete for a couple of days to set.

To open: Open the dryer only by pulling up the tug line at an angle. After initial resistance, the dryer will open easily until the lines are taut.

To open: Open the dryer only by pulling up the tug line at an angle. After initial resistance, the dryer will open easily until the lines are taut.

To close: a Unlock the notch handle. b Move the collar downwards.

Instructions for use

1. Choose a sunny spot unobstructed by trees, bushes, fences, etc. The arms must be able

to rotate freely. The space to allow is detailed on the packing.

2. Dig a hole as shown.

3. Mix about 20 litres (2 buckets) of concrete with some water to make it slightly moist –

5 parts sand to 1 part cement. Set the mounting socket into the hole and ll the hole with the concrete.

4. Make sure the mounting socket is centred and straight. Test this by inserting the

clothes dryer and checking that it is vertical with a spirit level.

5. The mounting socket should protrude enough to let you shut the cover.

6. Leave the concrete for a couple of days to set.

Find a sunny spot where your rotary outdoor dryer can rotate without obstruction. Do not position the dryer under trees. Use the Leifheit base socket that comes with the dryer.

Close the dryer after each use to ensure that the lines are pro- tected and remain clean. Rotate the dryer in the base socket when hanging out washing to save time and eort. Spread washing evenly around the dryer – especially when the wind is stronger.

During winter, make sure that the rotary outdoor dryer is stored in a dry place. Transport or store the dryer in an upright or horizontal position. Do not turn it upside down. Close the lid of the base socket when you remove the dryer.

Clean the base pole occasionally with a damp cloth and a little household cleaner. You can also use small quantities of conventional fully-synthetic care sprays on a cloth to rub the base pole clean. When the dryer is open, you can spray a small quantity of care spray on the line retraction holes on the support arms. Regularly remove earth, sand and water from the base socket.

Instructions for use

1. Choose a sunny spot unobstructed by trees, bushes, fences, etc. The arms must be able

to rotate freely. The space to allow is detailed on the packing.

2. Dig a hole as shown.

3. Mix about 20 litres (2 buckets) of concrete with some water to make it slightly moist –

5 parts sand to 1 part cement. Set the mounting socket into the hole and ll the hole with the concrete.

4. Make sure the mounting socket is centred and straight. Test this by inserting the

clothes dryer and checking that it is vertical with a spirit level.

5. The mounting socket should protrude enough to let you shut the cover.

6. Leave the concrete for a couple of days to set.

Opening: Pull the handle and open the rotary washing line.

Instructions for use

1. Choose a sunny spot unobstructed by trees, bushes, fences, etc. The arms must be able

to rotate freely. The space to allow is detailed on the packing.

2. Dig a hole as shown.

3. Mix about 20 litres (2 buckets) of concrete with some water to make it slightly moist –

5 parts sand to 1 part cement. Set the mounting socket into the hole and ll the hole with the concrete.

4. Make sure the mounting socket is centred and straight. Test this by inserting the

clothes dryer and checking that it is vertical with a spirit level.

5. The mounting socket should protrude enough to let you shut the cover.

6. Leave the concrete for a couple of days to set.

Find a sunny spot where your rotary outdoor dryer can rotate without obstruction. Do not position the dryer under trees. Use the Leifheit base socket that comes with the dryer.

Close the dryer after each use to ensure that the lines are pro- tected and remain clean. Rotate the dryer in the base socket when hanging out washing to save time and eort. Spread washing evenly around the dryer – especially when the wind is stronger.

During winter, make sure that the rotary outdoor dryer is stored in a dry place. Transport or store the dryer in an upright or horizontal position. Do not turn it upside down. Close the lid of the base socket when you remove the dryer.

Closing: Before closing return the lever to its original position. To close, press on the red button (1) and push the arm upwards in the direction of the arrow (2).

Working height: Adjust the rotary washing line to the desired height prior to rst use. In order to do this, open the arms slightly and push the upper button. Then click to the desired working height.

Tigh- tening the line: Fold the red lever over by 180° until it clicks into place.

To open: Open the dryer only by pulling up the tug line at an angle. After initial resistance, the dryer will open easily until the lines are taut.

To open: Open the dryer only by pulling up the tug line at an angle. After initial resistance, the dryer will open easily until the lines are taut.

To close: a Unlock the notch handle. b Move the collar downwards.

Instructions for use

1. Choose a sunny spot unobstructed by trees, bushes, fences, etc. The arms must be able

to rotate freely. The space to allow is detailed on the packing.

2. Dig a hole as shown.

3. Mix about 20 litres (2 buckets) of concrete with some water to make it slightly moist –

5 parts sand to 1 part cement. Set the mounting socket into the hole and ll the hole with the concrete.

4. Make sure the mounting socket is centred and straight. Test this by inserting the

clothes dryer and checking that it is vertical with a spirit level.

5. The mounting socket should protrude enough to let you shut the cover.

6. Leave the concrete for a couple of days to set.

Find a sunny spot where your rotary outdoor dryer can rotate without obstruction. Do not position the dryer under trees. Use the Leifheit base socket that comes with the dryer.

Close the dryer after each use to ensure that the lines are pro- tected and remain clean. Rotate the dryer in the base socket when hanging out washing to save time and eort. Spread washing evenly around the dryer – especially when the wind is stronger.

During winter, make sure that the rotary outdoor dryer is stored in a dry place. Transport or store the dryer in an upright or horizontal position. Do not turn it upside down. Close the lid of the base socket when you remove the dryer.

Clean the base pole occasionally with a damp cloth and a little household cleaner. You can also use small quantities of conventional fully-synthetic care sprays on a cloth to rub the base pole clean. When the dryer is open, you can spray a small quantity of care spray on the line retraction holes on the support arms. Regularly remove earth, sand and water from the base socket.

Instructions for use

1. Choose a sunny spot unobstructed by trees, bushes, fences, etc. The arms must be able

to rotate freely. The space to allow is detailed on the packing.

2. Dig a hole as shown.

3. Mix about 20 litres (2 buckets) of concrete with some water to make it slightly moist –

5 parts sand to 1 part cement. Set the mounting socket into the hole and ll the hole with the concrete.

4. Make sure the mounting socket is centred and straight. Test this by inserting the

clothes dryer and checking that it is vertical with a spirit level.

5. The mounting socket should protrude enough to let you shut the cover.

6. Leave the concrete for a couple of days to set.

Working heigt: Adjust the rotary washing line to the desired height prior to rst use. In order to do this, open the arms slightly and push the upper button. Then click to the desired working height.

[1] Find a sunny spot and bear in mind any surrounding trees, shrubs and fences, etc. so the rotary dryer can rotate freely. The space requirements are provided on the packaging. [2] Dig a hole according to the diagram. Mix approx. 20 litres (2 buckets) of concrete with some water (earth- moist) in a ratio of 5 parts sand to 1 part cement and ll up the hole. Hold the ground socket upright. Test the rotary dryer with a spirit level. Only use the original Leifheit ground socket provided by the manufacturer. The socket should protrude slightly out of the ground so that the cover can be closed. Let the concrete set for a few days. [3] Check whether the rotary dryer is correctly positioned in the ground socket. When setting up the rotary dryer, the bottom of the three holes in the slot of the central pole must be covered by the upper edge of the ground socket. Or the central pole must be sunk at least 21.5 cm into the ground socket. *BA_Linomatic_Plus.indd 8 14.10.22 15:11D Opening: The rotary dryer should be checked for damage prior to each use and must only be used if a awless condition can be assumed. For your own safety before opening, please make sure there is stable footing and that no items or obstacles are behind your back. Pull the handle and open the rotary washing line.

Tightening the line: Fold the red lever over by 180° until it clicks into place.

Closing: Before closing return the lever to its original position. [1] To close, press on the red button and [2] Push the arm upwards in the direction of the arrow.

Store your rotary dryer in a dry place during winter. Carry the rotary dryer vertically or horizontally; do not place it upside down. Close the cover of the ground socket when removing the rotary dryer.

Clean the central pole from time to time with a damp cloth and a small amount of household cleaner. You can also apply small amounts of a standard fully synthetic care spray onto a cloth and wipe the central pole with it. When the rotary dryer is open, care spray can be applied to the line retraction opening of the rotary arms. Regularly clean the ground spike to remove soil, sand and water. Safety instructions: The Linomatic rotary dryer by Leifheit is only intended for out- door household use and must only be used according to the infor- mation provided in these instructions. Improper use is forbidden. *BA_Linomatic_Plus.indd 9 14.10.22 15:11
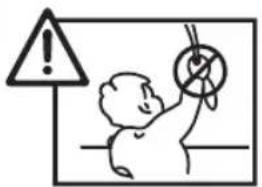
Particular caution should be shown as children are at risk of being strangled by the lines. To avoid strangulation and the lines becoming tangled, only adults should use the rotary dryer. There is a risk of the lines becoming wrapped around a child’s neck. Do not tie the lines together. Ensure that the lines do not twist together and form any loops. Check the rotary dryer and the tensioning cord for damage before each use. A damaged rotary dryer should no longer be used. If a line becomes jammed between the plastic covers: Carefully push the line back into the „U“ shaped channel. Never remove the plastic cover! If a line has wrapped around the central pole, a rotary arm or the cover: Lift the rotary dryer slightly and put the line back. If the lines have become wet: Let the lines dry when the rotary dryer is open. Bedienungs-, Pege- und Sicherheitshinweise / Operating, care and safety instructions. / Instructions d’utilisation, instructions d‘entretien et consignes de sécurité / Bedienings-, verzorgings- en veiligheidsaanwijzingen / Istruzioni per l‘uso e il mantenimento e avvertenze di sicurezza / Instrucci- ones de uso, mantenimiento y seguridad / Pokyny pro obsluhu, ošetřování a bezpečnost / Pokyny na obsluhu, ošetrovanie a bezpečnostné pokyny / Wskazówki dotyczące obsługi, konserwacji i bezpieczeństwa / Bruks-, skötsel- och säkerhetsanvisningar / Bet- jenings-, pleje- og sikkerhedsanvisninger / Naudojimo, priežiūros ir saugos nurodyma / Kasutus- hooldus- ja ohutusjuhised

BA LinoProtect 400-LangDIN.indd 19 31.01.17 13:53 The rotary dryer is not approved for use in strong wind (from wind force 6) and/or thunder storms. Guarantee certicate: 3 years guarantee Leifheit grants a 3-year guarantee on this product. Should a manufacturing fault appear within this time, it will be repaired free of charge. It is essential that you use the original Leifheit ground socket provided! If necessary, this ground socket is also available in stores as a replacement part, along with a protective cover and other accessories for your rotary dryer. More information can be found at www.leifheit.co.uk Exempt from guarantee is:

1. normal wear and tear or other naturally caused wear

2. Damage caused by improper use or handling

Manual assistant
Powered by ChatGPT
Waiting for your message
Product information

Brand : Leifheit

Model : Linomatic 500 Plus

Category : Tumble drier