TCB 60 - Battery charger GYS - Free user manual and instructions
Find the device manual for free TCB 60 GYS in PDF.


User questions about TCB 60 GYS
0 question about this device. Answer the ones you know or ask your own.
Ask a new question about this device
Download the instructions for your Battery charger in PDF format for free! Find your manual TCB 60 - GYS and take your electronic device back in hand. On this page are published all the documents necessary for the use of your device. TCB 60 by GYS.
USER MANUAL TCB 60 GYS
FR 2-8/46-48
EN 9-14/46-48
DE 15-21/46-48
ES 22-27 / 46-48
RU 28-33 / 46-48
NL 34-39/46-48
IT 40-45/46-48
TCB 60 / 90 / 120
ANALYSES, CAUSES, REMÉDES
Anomalies Causes Remèdes
This manual includes guidelines on the operation of your device and the precautions to follow for your own safety. Ensure it is read carefully before first use and keep it handy for future reference. These instructions should be read and understood before anyone operates the product. Any modifications or maintenance that are not specified in the manual should not be undertaken. The manufacturer is not liable for any injury or damage due to non-compliance with the instruction manual. In case of problems or uncertainties, please consult a qualified person that is able to handle the device correctly. This device should only be used for charging within the limits indicated on the device and in the manual. The safety instructions must be followed. In case of improper or unsafe use, the manufacturer cannot be held responsible.

Device suitable for indoor use only. Do not expose to rain or excessive moisture.
This device may be used by children from age 8 and by persons with reduced physical, sensory or mental capabilities or lack of experience and knowledge, provided that they are under supervision or have been told how to use the device safely and are aware of the potential risks. Children must not use the device as a plaything. Cleaning and servicing tasks may not be carried out by children unless they are supervised.
Do not use for charging non-rechargeable batteries.
Do not operate the device with a damaged power supply cord or a damaged mains plug.
Do not use the device if the charging cable appears to be damaged or assembled incorrectly in order to avoid any risk of short circuiting the battery.
Never charge a frozen or damaged battery. Do not cover the device
Do not place the device near a fire or subject it to heat or to longterm temperatures exceeding 50^ C
Do not obstruct the cooling vents. Refer to the installation section before operating the machine.
The automatic mode of operation and usage restrictions are explained below in these operating instructions.
Risk of explosion, and fire!
A battery being charged can emit explosive gas.
During the charge, the battery must be placed in a well ventilated area.
- Avoid flames and sparks. Do not smoke.
- Protect the electrical contacts of the battery against short-circuiting.
Acid projection hazard!






- Wear safety goggles and protective gloves
If your eyes or skin come into contact with battery acid, rinse the affected part of the body with plenty of water and seek immediate medical assistance.
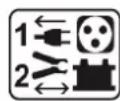
Connection / disconnection:
- Disconnect the power supply before connecting/disconnecting the device to/ from the battery.
- The terminal of the battery that is not connected to the car frame must be connected first. The other connection must be made on the car frame, far from the battery and the fuel line. The battery charger must be connected to the power supply network.
- After the charging process, disconnect the battery charger from the power supply network and remove the connector from the car frame and then the connector from the battery, in this order.

Connection:
Class II device.
- This machine is fuse-protected.

Maintenance:
- If the power supply cable is damaged, it must only be replaced by a cable specified or supplied by the manufacturer or its after-sales service.
- Service should be performed by a qualified person.
- Warning! Always remove the power plug from the wall socket before carrying out any work on the device.
-
If the internal fuse is blown, it must be replaced by the manufacturer, its after-sales service or an equally qualified person.
-
Regularly take off the cover and remove dust with an air gun. Take the opportunity to have a qualified person check the electrical connections with an insulated tool.
- Under no circumstances should solvents or other aggressive cleaning agents be used.
- Clean the device's surfaces with a soft, dry cloth.
Réglementation :
C E
EAC
UK CA
The device complies with European Directive. The certificate of compliance is available on our website.
EAC conformity mark (Eurasian Economic Commission)
- Equipment in compliance with British requirements. The British Declaration of Conformity is available on our website (see home page).
Equipment in conformity with Moroccan standards. The declaration C_ (CMIM) of conformity is available on our website (see cover page).
Mise au rebut :
- This product should be disposed of at an appropriate recycling facility. Do not dispose of in domestic waste.
- Product whose manufacturer is involved in the packaging's recycling process by contributing to a global system of sorting, collecting and recycling of household packaging waste.
Recyclable product that falls within waste sorting recommendations (according to Decree n° 2014-1577).
GENERAL DESCRIPTION
The chargers TCB 60, TCB 90 and TCB 120 are designed to charge lead acid batteries with liquid or gel electrolyte, nominal voltage from 12V, and with capacity according to the following table:
| Minimum Maximum | ||
| TCB 60 10 Ah | 60 Ah | |
| TCB 90 15 Ah | 90 Ah | |
| TCB 120 30 Ah | 120 Ah | |
OPERATING MODE WITH TESTER FUNCTION
When it is not connected to the mains supply, this charger is a battery tester. It lets you know the state of the battery. The integrated voltmeter informs you by three LEDs:
red: < 12.3V :battery to be charged
orange : between 12.3 and 12.6V : middle charge
green: >12.6V :charged
CONNECTION IN CHARGER FUNCTION
Preliminary precautions
- For indoor use, with good ventilation.
- Remove the battery caps if there is, and check the level of liquid. If it is not correct, filled up with distilled water. Clean well the battery terminals.
- Check if the battery capacity and voltage are compatible with your charger.
Connection and disconnection
-
Connect the clamps (+ red, - black) to + and - battery terminals, making sure you get a good electric contact, respecting the following order.
-
Connect first the battery terminal not connected to the chassis of the vehicle.
-
Then connect the other connection to the chassis remote from the battery and any fuel line (to limit the risk of ignition of petrol vapor at the appearance of an electric arc can result from accidental disconnection in charge of the clamp).
-
Select the charge speed with the front switch
-
At last, plug in your charger to 230V50 / 60Hz mains supply.
After charging, disconnected the battery charger from supply mains. Then remove the chassis connection and the battery connection, in this order.
Current selection
Depending on the capacity of the battery of the vehicle, select the current position:
| Position Minimum Maximum | |||
| TCB 60 | 2 A | 10 Ah | 30 Ah |
| 4 A | 20 Ah | 60 Ah | |
| TCB 90 | 2 A | 15 Ah | 30 Ah |
| 5,5 A | 30 Ah | 90 Ah | |
| TCB 120 | 3,5 A | 20 Ah | 60 Ah |
| 7 A | 35 Ah | 120 Ah | |
Charge process
- The green light «POWER» above the fuse indicates AC power connection.
- The orange light indicates that the charge is in progress.
- The green LED lights when the charge is finished.
If the green LED is not lighting after quite a long time, check the front fuse after switching off your product. If it still does not work, please check the battery by a professional.
This product can charge automatically one battery with its rated loading current, and then continue with a moderate speed to finish the loading 100% . With that function « floating », you can leave the battery connected to your product unlimitedly without any risk. - The charger detects a battery with a voltage above 4V .
PROTECTIONS
Your product has been developed with a maximum of protections.
The clamps of the battery charger are isolated, and there is no voltage on the clamp as long as the battery is not connected.
- The polarity reversal will not cause danger. In case of polarity error a buzzer sounds.
- Your charger is protected against over current that can occur with faulty batteries or false use of the product by the front fuse.
Thermal protection: the transformer of the product is protected by a thermal switch (cooling: about 1/4 h).
SULPHATED BATTERIES - START
If your battery is sulfated, the green LED of your charger will light very quickly, as if the battery was charged. Change your battery.
- Do not leave your charger plugged on your car when you start it. It can break the fuse.
Do not use your charger like an auxiliary power supply. It is forbidden to pull up current from the battery when the battery is connected to the charger.
TROUBLESHOOTING
| Symptoms Causes Remedies | ||
| The mains indicator does not switch on even after plugging the machine to the mains | No mains voltage Check that the power cord is plugged to a 230V 50/60Hz socket. Check the power supply network. | |
| None of the indicators that indicate the state of charge are switching on | No mains voltage Check that the power cord is plugged to a 230V 50/60Hz socket. Check the power supply network. | |
| Clamps in short circuit or polarity reversal. | Remove the clamps. Check that the fuses have not melted and that the circuit breaker is not tripped | |
| The charger is properly connected but it does not charge the battery | Blown fuse Replace the fuse by a new one. | |
| Bad clamp connections. Clean the terminals and the clamps. Check the state of the cables and clamps. | ||
| Wrong charge settings Check that the selected voltage matches the battery voltage. | ||
| Following intensive use, your device has entered thermal protection mode. | Wait 1/4h so the device can cool down. | |
| The fuse blows every time it is replaced | Polarity reversal Connect the + clamp to the battery's (+) and the + clamp to the battery's (-). | |
| Starting the vehicle Do not perform any starts when the charger is connected. | ||
| Wrong charge settings Check that the selected voltage matches the battery voltage. | ||
| Current overconsumption on the battery | Do not draw any of the battery's current during the charge | |
| After charging for a whole day, the end of charge indicator does not switch on. | The battery is damaged Change the battery. | |
WARRANTY
The warranty covers faulty workmanship for 2 years from the date of purchase (parts and labour).
The warranty does not cover:
- Transit damage.
- Normal wear of parts (eg.: cables, clamps, etc...).
- Damages due to misuse (power supply error, dropping of equipment, disassembling).
- Environment related failures (pollution, rust, dust).
In case of failure, return the unit to your distributor together with:
- The proof of purchase (receipt etc ...)
- A description of the fault reported
He nokpbBaIe annapaT.
He yctaHaBnBaTb aannapat pIOM C nCTOuHnKOM TeIa I He IOdBepraTb BbICOKM TempepaTypam (Bblwe 50^ ) B TeueHn dIITeIbHOro nepnoDa.
He nepekepbiaTe BeHTnlaIcNOHbIe OTBepCTn.
Pepei nCpOJIb30BaHnem O3HaKOMbTEcB C pa3dEJOM
«yCTaHOBka» INHCTpyKcNn.
ABTOMATNueckn pexim, a TaKKe OrpaHnueHnnpi erO nCNoIb3OBaHn, ONncaHbI daJIeB B 3ToHnHCTpyKcHn.






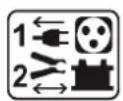
Pnck nOxkapa N B3pbBa!
HENCNPABHOCTN, INX PIPNUHbI N UCTPAHEHNE