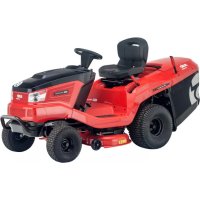
T22105.1 HDA V2 - Tractor SOLO - Free user manual and instructions
Find the device manual for free T22105.1 HDA V2 SOLO in PDF.



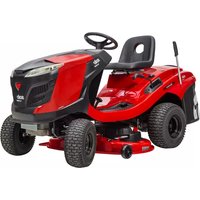
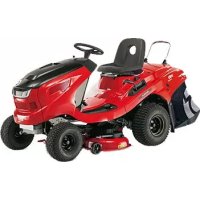
| Product type | Heat engine tractor |
| Brand | Solo |
| Model | T22105.1 HDA V2 |
| Engine type | AL-KO Pro 700 V2 |
| Displacement | 708 cc |
| Rated power | 13 kW at 2700 rpm |
| Engine oil capacity | 2 liters |
| Cooling | Air |
| Fuel | Unleaded gasoline with octane rating ≥ 90 |
| Spark plug electrode gap | 0.7 - 0.8 mm |
| Recommended spark plug | RN9YC (Champion) or equivalent |
| Intended use | Private, outdoor only |
| Safety symbols | Carbon monoxide, flammability, read manual |
| Oil change interval | Every 50 service hours or 1 year |
| Air filter check and cleaning interval | Every 25 hours |
| Spark plug check interval | Once a year |
| Air filter replacement interval | Every 100 hours |
| Engine and muffler cleaning | Regularly, remove flammable impurities |
| Transport | Empty tank, horizontal position |
| Storage | Ventilated area, out of reach of children, drain fuel if stationary > 2-3 months |
Frequently Asked Questions - T22105.1 HDA V2 SOLO
User questions about T22105.1 HDA V2 SOLO
0 question about this device. Answer the ones you know or ask your own.
Ask a new question about this device
Download the instructions for your Tractor in PDF format for free! Find your manual T22105.1 HDA V2 - SOLO and take your electronic device back in hand. On this page are published all the documents necessary for the use of your device. T22105.1 HDA V2 by SOLO.
USER MANUAL T22105.1 HDA V2 SOLO
natural_image
Technical line drawing of a mechanical engine or motor assembly (no text or symbols visible)| DE |
| GB |
| NL |
| FR |
| ES |
| IT |






Inhaltsverzeichnis
Deutsch 6
English....23
Nederlands 38
Français....55
Español 74
Italiano....93
01

www.al-ko.com/service-contacts
14 GARANTIE
1 About these operating instructions .... 24
1.1 Legends and signal words.... 24
2 Product description 24
2.1 Designated use 24
2.2 Symbols on the appliance 24
2.3 Product overview (01) 25
3 Safety instructions 25
3.1 Operator 25
3.2 Safety of persons, animals and property 26
3.3 Handling of petrol and oil.... 27
4 Start-up 28
4.1 Check the general state of the engine.... 28
4.2 Filling with fuel 28
4.2.1 Filling with engine oil (02) 28
4.2.2 Check the oil level (02) 29
4.2.3 Filling with petrol.... 29
5 Operating the engine 29
5.1 Stop the engine and switch off 30
6 Repair 31
7 Maintenance and care 31
7.1 Change the air filter (03).... 31
7.2 Changing the oil (06) 31
7.3 Clean engine and silencer (07) 32
7.4 Clean the air filter (08) 33
7.5 Maintaining the spark plug (09) 33
7.6 Carburettor settings.... 33
7.7 Maintenance schedule 34
8 Transport 34
9 Storage 35
10 Replacement parts.... 35
11 Technical data 35
12 Help in case of malfunction.... 36
13 After-Sales / Service 37
14 Guarantee.... 37
1 ABOUT THESE OPERATING INSTRUCTIONS
The German version is the original operating instructions. All additional language versions are translations of the original operating instructions.
It is essential to read through these operating instructions carefully before start-up. This is essential for safe working and trouble-free handling.
- Keep these operating instructions in a safe place at all times so that they can be consulted if you need any information about the product.
■ Only pass on the product to other persons together with these operating instructions.
■ Comply with the safety and warning information in these operating instructions.
1.1 Legends and signal words

DANGER!
Denotes an imminently dangerous situation which will result in fatal or serious injury if not avoided.

WARNING!
Denotes a potentially dangerous situation which can result in fatal or serious injury if not avoided.

CAUTION!
Denotes a potentially dangerous situation which can result in minor or moderate injury if not avoided.
IMPORTANT!
Denotes a situation which can result in material damage if not avoided.

NOTE
Special instructions for ease of understanding and handling.
2 PRODUCT DESCRIPTION
This documentation describes an internal combustion engine.
In addition, always comply with the operating instructions of the lawn tractor/garden equipment!
2.1 Designated use
This combustion engine has been designed for driving lawn tractors used for private applications. Due to its exhaust gases it must only be operated outdoors and not indoors. Any use not in accordance with this designated use shall be regarded as misuse.
This engine is intended solely for use in non-commercial applications. Any other use (as well as unauthorised conversions or add-ons) are regarded as contrary to the intended use and will result in exclusion of the warranty as well as loss of conformity (CE mark); the manufacturer will thus decline any responsibility for damage and/or injury suffered by the user or third parties.
2.2 Symbols on the appliance

Important!
Engines generate carbon monoxide, an odourless, colourless, toxic gas. If carbon monoxide is inhaled, it can cause nausea, loss of consciousness or death.
Start the engine and let it run in the open air.
Do not start the engine or let it run in closed rooms, even if doors or windows are open.

Read the operating instructions before starting operation!

Fuel and fuel vapours are extremely highly inflammable and explosive.
Starting the engine gives rise to sparks.
Sparks can ignite flammable gases in the vicinity.
Flammable objects such as leaves, grass, etc. can ignite.
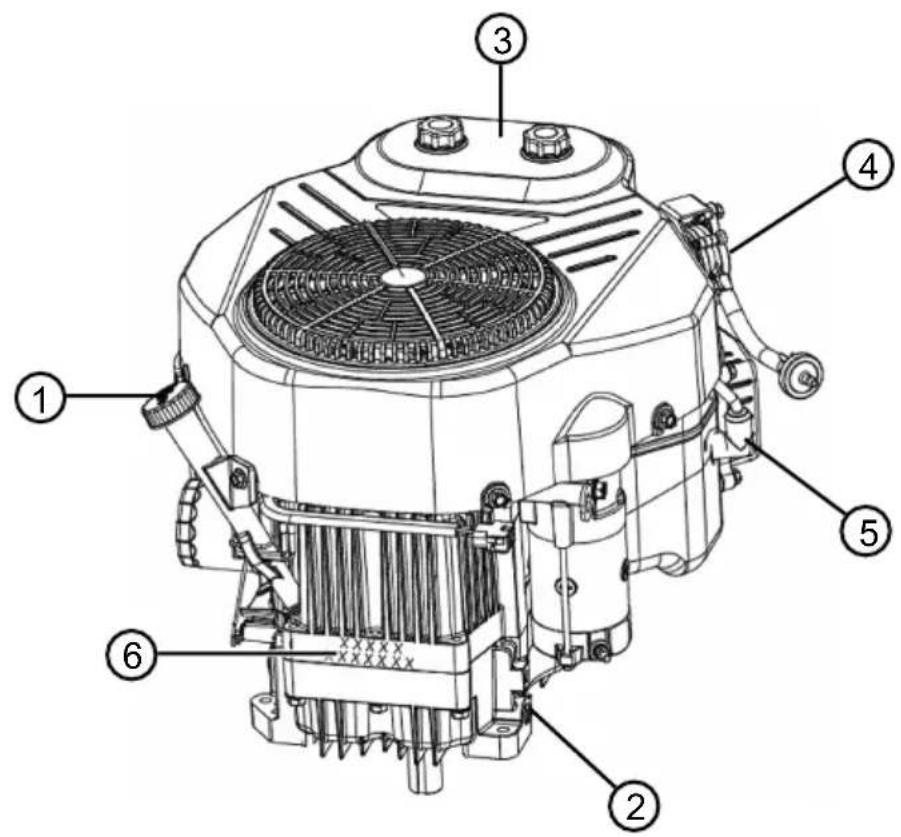
2.3 Product overview (01)
No. Component
| 1 Oil filler cover with dipstick |
| 2 Oil drain plug |
| 3 Air filter cover |
| 4 Fuel cock |
| 5 Spark plug connector |
| 6 Engine serial number |
3 SAFETY INSTRUCTIONS

DANGER!
Lack of knowledge of the safety instructions can pose a danger of extremely severe or even fatal injury.
Lack of knowledge of the safety instructions and operating instructions can lead to extremely serious and even fatal injury.
- Observe all safety instructions and instructions for use in these operating instructions as well the operating instructions which are referred to before you start using the appliance.
- Keep all supplied documents in a safe place for future reference.

DANGER! Risk of poisoning
The engine exhaust gases contain carbon monoxide that can kill a person within a few minutes.
■ Operate the engine only outdoors, never in a closed room.
■ Do not inhale the engine exhaust gases.
■ Switch off the engine if you feel nauseous, dizzy or weak when using this appliance. Immediately consult a doctor.
■ Only use the engine if it is in perfect technical condition.
■ Do not disable safety and protective devices.
■ Wear ear defenders.
- Carefully read and follow the directions in these operating instructions and the operating instructions for the lawn tractor in which the engine is installed. Learn how to stop the engine quickly.
■ Do not use starter sprays or similar.
3.1 Operator
■ Young people under 16 years of age and people who do not know the operating instruc-
tions are not allowed to use the engine. Observe any country-specific safety regulations concerning the minimum age of the user.
■ Do not operate the engine if you are under the influence of alcohol, drugs or medication.
3.2 Safety of persons, animals and property
■ Use the engine only as intended. Any non-intended use can lead to injury and property damage.
■ The user is responsible for accidents involving other people and their property.
- Keep third parties out of the danger area.
■ Only switch the engine on when there are no persons or animals in the working area.
- Maintain a safe distance to persons or animals, or switch the engine off if persons or animals approach.
■ Never direct the exhaust gas jet of the engine towards persons and animals or towards inflammable products and objects.
- Do not reach into the vacuum and vent grilles when the engine is running. Injuries can
occur due to rotating appli- ance parts.
■ Always switch the engine off when not in use, e.g. when changing the work area, during service and maintenance, and when filling with the petrol/oil mixture.
- Do not operate the engine in poorly ventilated working areas (e.g. a garage). The exhaust gases contain poisonous carbon monoxide as well as other harmful substances.
- Immediately switch the engine off if there is an accident in order to avoid further injuries and/or property damage.
■ Never operate the engine with worn or defective parts. Worn or defective parts can cause serious injuries.
■ Only use genuine spare parts and genuine accessories.
- Keep the engine out of the reach of children.
■ Do not allow children and adolescents to play with the engine.
3.3 Handling of petrol and oil

DANGER!
Risk of explosion and fire
An escaping petrol/air mixture can cause an explosive atmosphere. Deflagration, explosion and fire can lead to serious and even fatal injuries if fuel is not handled properly.
■ Do not smoke when dealing with petrol.
■ Only handle petrol out of doors and never in enclosed spaces.
It is essential to heed the code of conduct stated below.
■ Only transport and store petrol and oil in containers approved for that purpose. Ensure that children have no access to stored petrol and oil.
In order to avoid ground contamination (environmental protection) when filling, ensure that no petrol or oil enters the soil. Use a funnel for filling.
■ Never fill the appliance in enclosed spaces. Petrol vapours may gather at ground level, and thereby result in a defla- gration or even an explosion.
- Immediately wipe any spilled petrol off the appliance and the ground. Allow textiles used to wipe off petrol to dry in a well ventilated place before disposing of them. Otherwise, sudden self-ignition may occur.
If petrol has been spilled, petrol vapours occur. For this reason, do not start the engine at the same location and move it at least 3 m away.
- Avoid skin contact with mineral oil products. Do not inhale petrol vapours. When filling, always wear protective gloves. Change and clean protective clothing regularly.
■ Ensure that your clothing does not come into contact with petrol. If petrol has got onto your clothing, change it immediately.
■ Never fill the appliance while the engine is running or hot.
4 START-UP

NOTE
Before starting up:
■ Always perform a visual check. Do not operate the engine if the operating and/or fastening parts are loose, damaged, or worn.
- Be sure to add engine oil.
4.1 Check the general state of the engine
1. Check the engine for:
■ Signs of an oil or petrol leak on the exterior and underside of the engine.
■ Excessive dirt or foreign bodies
■ Indications of damage
■ Tightness of all nuts, bolts and screws
■ Tight fitting and presence of all screens and covers
■ Damage or contamination of the air filter
Fuel level
Engine oil level
- Eliminate any identified defects before starting up.
4.2 Filling with fuel

WARNING!
Danger of explosion and fire
Petrol and oil are highly flammable. Fire can lead to serious injuries.
■ Only refill petrol and oil in the open and never in the vicinity of naked flames or sources of heat.
-
Immediately renew the tank or tank cap if damaged.
■ Always close the tank lid firmly.
If petrol has leaked out:
Do not start the engine. -
Avoid start attempts.
■ Clean the lawn tractor and engine.
Spilled fuel can lead to damage to plastic parts: Immediately wipe off fuel. The warranty does not cover damage to plastic parts caused by fuel.
4.2.1 Filling with engine oil (02)
Oil recommendations
Engine oil is a decisive factor on the performance and lifetime of the engine.
■ Use a detergent engine oil which fulfils the requirements for API service classes SF and SG.
- Check the API service label on the oil container in order to ensure that it contains the letters SF or SG.
- Choose the SAE viscosity class according to the following table:
| Temperature range | SAE viscosity class |
| +5 – +35°C | SAE 30 (monograde summer oil) |
| -15 – +5°C | 5W-30 or 10W-30 (multi-grade oils) |
| -25 – +35°C | 5W-30 or 10W-30 (synthetic multi-grade oils) |
The use of multi-grade oils can result in a higher consumption at higher temperatures. Therefore check the oil level more frequently.
- Do not mix oils of different grades and with different properties.
IMPORTANT!
Danger of engine damage
Using SAE 30 oil (mono-grade summer oil) at temperatures lower than +5°C may cause engine damage due to insufficient lubrication.
■ Use only the prescribed engine oil.
Filling with oil

NOTE
The oil capacity for the AL-KO Pro 700 V2 engine is max. 2.0 l.

NOTE
Do not fill oil level above MAX. Too much oil will cause:
■ Smoke in the exhaust
■ Contamination of the spark plug or the air filter
If the engine oil level is too low:
- Fill engine oil into a suitable container.
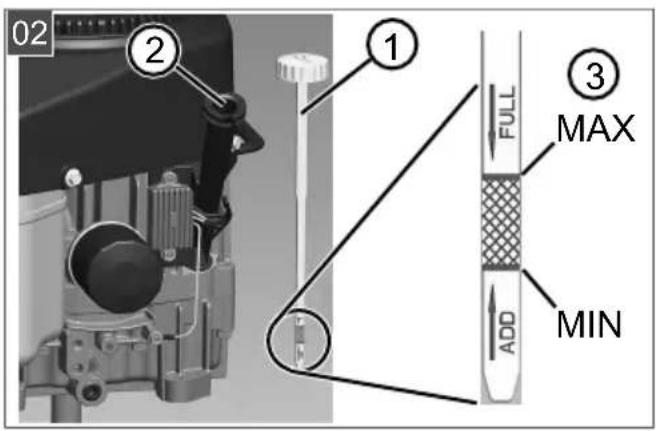
- Unscrew the oil dipstick (02/1) and remove from the oil filler opening (02/2).
- Add oil slowly and in small quantities into the oil filler opening. Use a funnel (not included with the engine).
- Regularly stop whilst filling the oil and check the oil level. The MAX mark (02/3) must not be exceeded (see chapter 4.2.2 "Check the oil level (02)", page 29).
- Insert oil dipstick and screw in tight.
- Remove any spilled oil.
4.2.2 Check the oil level (02)
IMPORTANT!
Danger of engine damage
A low oil level can cause engine damage.
-
Check the oil level at regular intervals.
■ If the level is low, top up with clean oil. -
Stop the engine and let it cool down. Note: The engine must be level.
- Remove any foreign bodies form the vicinity of the oil filler opening.
- Unscrew the oil dipstick (02/1) and wipe it clean.
-
Insert the dipstick up to the stop and then pull out again. Check that the level is between the MIN and MAX marks.
-
When the oil level is near or below the MIN mark: Fill with oil.
- Insert oil dipstick and screw in tight.
- Remove any spilled oil.
4.2.3 Filling with petrol
Recommendations regarding petrol
■ Use clean, fresh, lead-free petrol with a minimum octane rating of 90.
■ Buy fuel in quantities that can be used within 30 days (Storage).
- On no account should petrol containing methanol be used.
- Do not mix petrol with oil or other additives.
Filling with petrol

NOTE
For further information: Refer to the lawn tractor's operating instructions.
The engine exhaust gases contain carbon monoxide that can kill a person within a few minutes.
■ Operate the engine only outdoors, never in a closed room.
■ Do not inhale the engine exhaust gases.
■ Switch off the engine if you feel nauseous, dizzy or weak during use. Immediately consult a doctor.

WARNING! Risk of explosion
Petrol and oil are highly flammable.
■ Never use starter spay or similar.

WARNING! Danger of burns
Engines become very hot in operation!
■ Never touch parts of the engine, in particular the exhaust.
- Allow the exhaust, cylinder and cooling vanes to cool down before contact.

WARNING! Danger from rotating ap- pliance parts!
Reaching into rotating appliance parts will result in serious injuries!
■ Never reach into rotating parts.
■ Before starting to use the engine, refer to the operating instructions for the equipment.
■ Only start and allow the engine to run outdoors.
- Do not operate the engine in inclined positions with an angle of more than 15°.
■ Start the engine only in a horizontal position.
- Do not tilt the machine so far to the side that fuel runs out of the fuel tank cap.
- Check the oil level.
■ Tie up long hair and remove jewellery.
■ Do not wear loose clothing.
■ Wear sturdy, non-slip shoes.
- Do not change the basic setting of the engine or over-rev.
- Keep the safety distance when starting.
■ Switch off the engine and allow to cool down before removing the tank cap.
■ Switch off the engine and remove the spark plug cable before checking, cleaning or working on the machine or engine.
- Wait until the engine has cooled down sufficiently before touching the cylinder ribs and protective housing.
- Do not rotate the engine without a spark plug.
5.1 Stop the engine and switch off

NOTE
Observe the operating instructions on the lawn tractor!
When starting and stopping the engine, be sure to disengage all lawn tractor traction equipment, the drive to work tools (such as the power mower).
■ Only start the engine in the horizontal position.
- Cold start problems may occur if the outside temperature is low.
■ Warm start problems may occur if the outside temperature is low due to evaporation in the carburettor chamber or pump.
In either case the grade of oil must be adapted to the operating temperatures.
The maximum power of an internal combustion engine progressively decreases with the increase in altitude above sea level. Excessive engine load and heavy work must therefore be avoided with increasing altitude.
Controlling the engine speed
The lawn tractor engine speed is set using the throttle:

Increase speed.

Reduce speed.
Cold start and warm start
The choke must be engaged for a warm start and disengaged once the engine is warm. The choke does not need to be used for a warm start.

Switch the choke on and off.
6 REPAIR

WARNING!
Risk of injury during re-pair work
Improper repairs can lead to serious injuries and damage to the appliance.
■ Repair work may only be carried out by AL-KO service centres or authorised specialist workshops.
■ Only original spare parts from AL-KO are allowed.
7 MAINTENANCE AND CARE

WARNING!
Risk of injury
Inadvertent switching on of the engine can lead to serious injuries.
■ Before setting, maintenance and repair work, always switch off the engine and secure against being switched on again.
■ Regular maintenance is essential for safety and maintaining performance.
- Observe the maintenance schedule.
For use under more demanding conditions, more frequent maintenance is required.
-
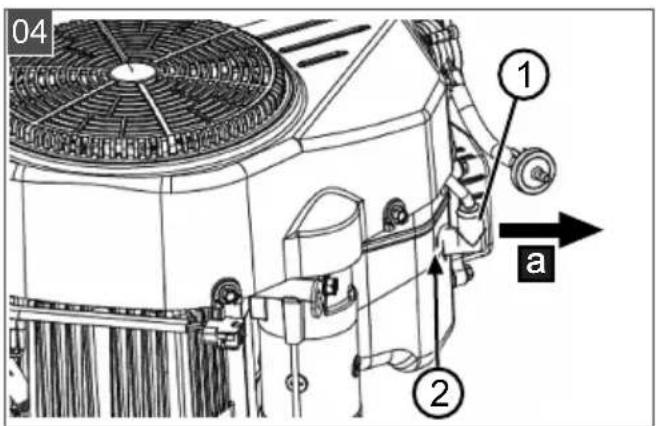
Before all maintenance and cleaning work: Remove (04/a) spark plug connector (04/1) from the spark plug (04/2).
-
Perform the maintenance and cleaning work described in this section according to the maintenance schedule.
-
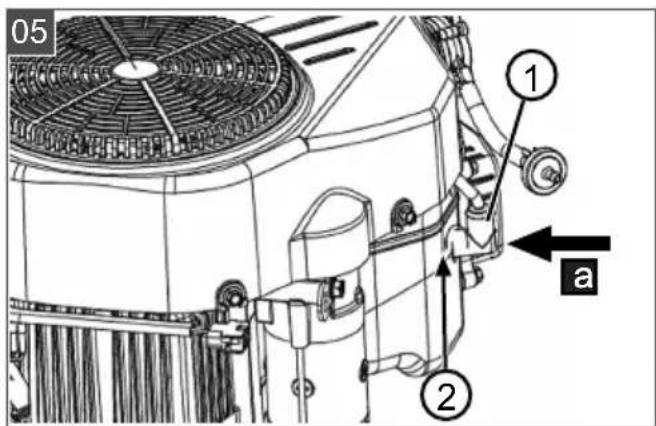
After maintenance and cleaning work: Reattach (05/a) the spark plug connector(05/1) to the spark plug (05/2).
7.1 Change the air filter (03)

NOTE
■ The filter element must be kept free of grass residue and dirt.
■ Only replace filter elements with original spare parts.
The engine must never be operated without a properly installed filter element.
Clean the air filter regularly. Renew air filters if damaged.
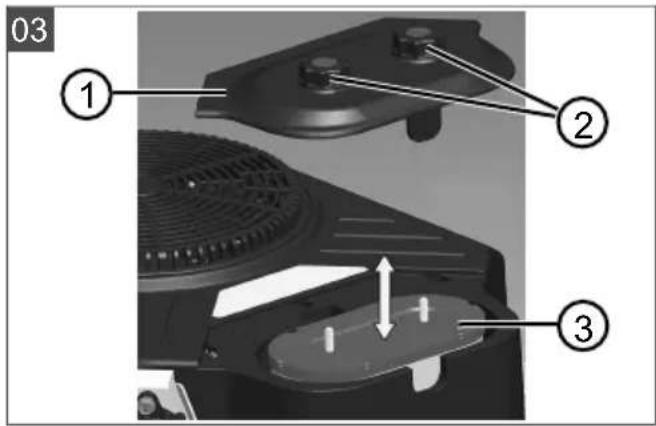
- Clean the area around the filter cover (03/1).
- Unscrew the two knobs (03/2) of the filter cover and remove the filter cover.
- Pull out filter element (03/3).
- Check the condition of the filter element. The filter element must be in perfect condition, clean and fully functional. Otherwise the filter element must be serviced or replaced.
- Insert the filter element and refit the filter cover.
7.2 Changing the oil (06)
Check the oil level regularly. Check the oil level every 5 operating hours or every day before starting the engine.

WARNING!
Danger of explosion and fire
Escaping fuel will create an explosive petrol/air mixture. Deflagration, explosion and fire can lead to serious and even fatal injuries if fuel is not handled properly.
■ Empty the fuel tank before draining the oil.

NOTE
Contact our customer service if you cannot carry out work yourself.

NOTE
The oil capacity for the AL-KO Pro 700 V2 engine is max. 2.0 l.

NOTE
-
Drain off the old oil when the engine is warm. Warm oil runs out quickly and fully.
■ Dispose of used oil in an eco-friendly manner! -
To empty the fuel tank: Allow the engine to run until it stops itself. Or drain the fuel.
- Remove the spark plug connector (04/1).
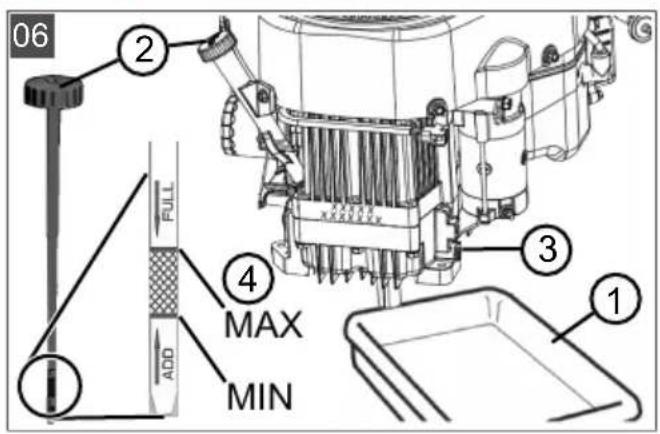
- Place the container (06/1) for the old oil.
- Unscrew the oil dipstick (06/2) and wipe it clean.
- Unscrew and remove the drain plug (06/3).
- Allow the oil to run out completely into a container.
- Replace the drain plug. Ensure that the gas- ket is correctly positioned. Tighten the drain plug firmly.
- Top up with clean oil through the dipstick opening (see chapter 4.2.1 "Filling with engine oil (02)", page 28). Use a funnel (not included with the engine).
- Insert the dipstick up to the stop and then pull out again. Check that the level has reached the MAX (06/4) mark.
- Insert oil dipstick and screw in tight.
- Remove any spilled oil.
7.3 Clean engine and silencer (07)

WARNING!
Risk of fire due to for- eign objects
Foreign objects on the engine can cause the lawn tractor to catch fire. A fire can result in serious or even fatal injuries.
■ Remove combustible debris (e.g. grass, leaves, grease) from the engine, especially from the exhaust and cylinder area.
- Check and clean the exhaust and cylinder area regularly.
IMPORTANT!
Danger from water
Penetrating water (ignition system, carburettor...) can lead to malfunctions.
■ Do not spray the engine with water.
- Allow the engine to cool before cleaning.
- Remove the contamination regularly from the engine with a cleaning cloth or brush.
-
Blow-off all waste and dirt residues from the silencer and its cover using compressed air.
-
Clean the cooling system:
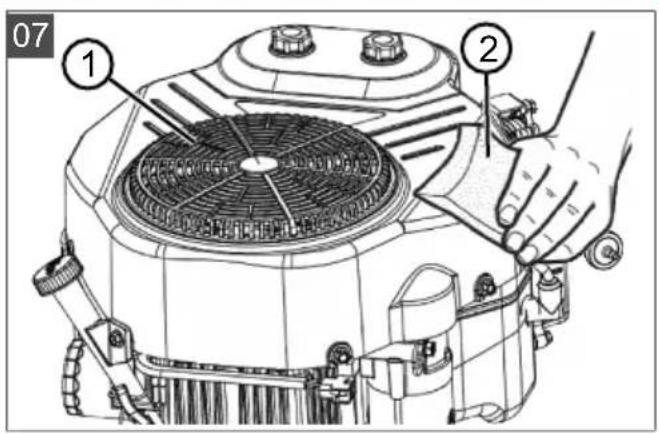
■ Remove obstructions from cooling air openings (07/1).
In order to prevent overheating, also clean the internal cooling vanes and surfaces.
- Wipe plastic parts with a damp sponge (07/2) and detergent.
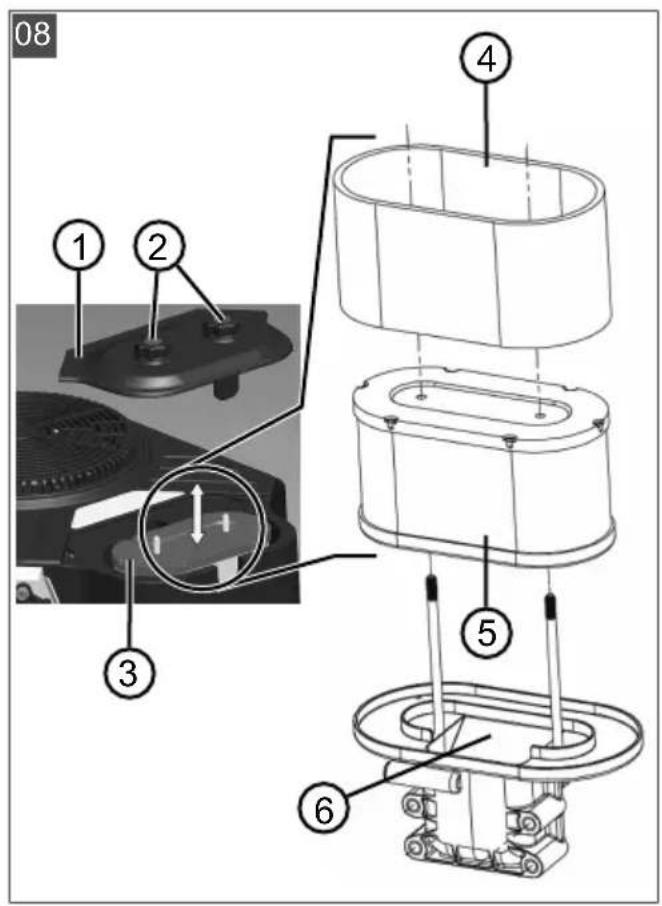
7.4 Clean the air filter (08)
- Clean the area around the filter cover.
- Unscrew the two knobs (08/2) on the filter cover (08/1).
- Remove filter cover.
- Remove filter element (08/3).
- Disconnect the foam pre-filter (08/4) from the cartridge (08/5).
-
Close intake port (08/6) of the engine with a cloth to prevent dirt getting into the engine.
-
Tap out the cartridge (08/5) on a solid surface and blow out from the inside to the outside with compressed air to remove dust and dirt. Important: Water, gasoline, detergents and similar must not be used to clean the cartridge.
-
Wash foam pre-filter (08/4) with water and detergent and allow to dry in fresh air. Important: The foam pre-filter must NOT be soaked in oil.
-
Clean the inside of the filter cover (08/1).
-
Remove the cloth from the intake port.
-
Pull the foam pre-filter over the cartridge.
-
Insert the filter element and refit the filter cover.
7.5 Maintaining the spark plug (09)
Prescribed spark plug type: see chapter 10 "Replacement parts", page 35.

WARNING! Risk of injury from elec- tric shock
Checking the ignition spark with the spark plug removed may result in serious injury from electric shock and fire.
■ Never check the ignition spark function with the spark plug removed. Use an ignition spark tester instead.
IMPORTANT!
Danger of engine damage
Operating the engine with the incorrect spark plug or without a spark plug will result in serious engine damage!
■ Always use the specified spark plug type.
■ Never try to start the engine without a spark plug.
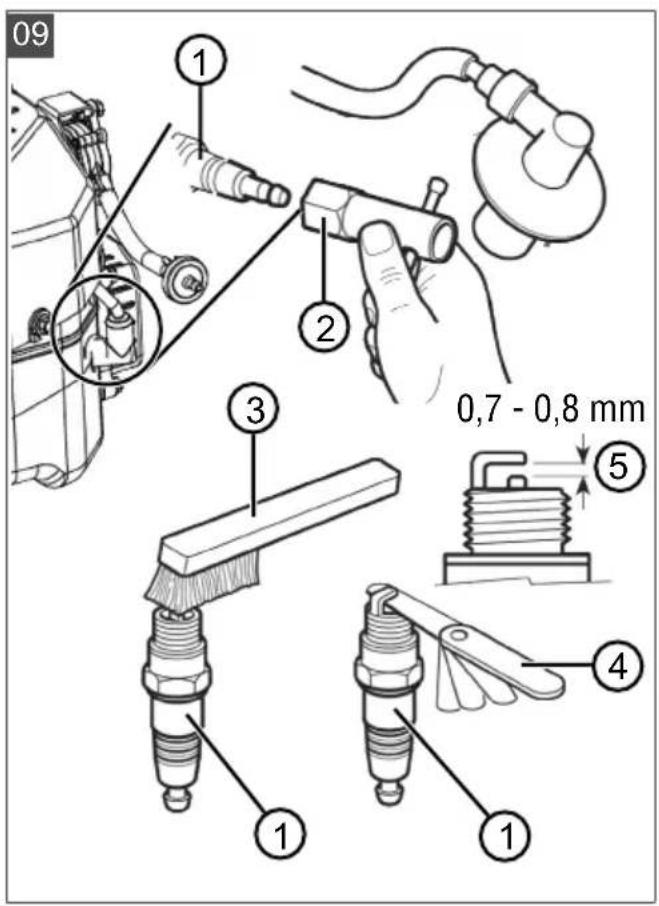
- Remove the spark plug (09/1) with a socket wrench (09/2).
- Clean the electrodes with a metal brush (09/3) and remove any carbon black deposits.
- Check the correct electrode distance (09/5) with a feeler gauge (09/4).
Note: The electrode clearance of the spark plug should be 0.7 mm – 0.8 mm.
- Reinsert the spark plug and tighten with a socket wrench.
7.6 Carburettor settings

NOTE
The carburettor must only be adjusted by an authorised service workshop.
7.7 Maintenance schedule
Comply with the intervals measured in hours or years, whichever occurs first.
| Activity After the | first 5 operating hours | Every 5 operating hours or daily prior to use | Every 25 operating hours | Every 50 operating hours or annually | Every year | Every 100 operating hours |
| Checking the engine oil level X | ||||||
| Changing the engine oil X X | * | X | ||||
| Check and clean air filter X | ** | |||||
| Change the air filter X | ||||||
| Checking the spark plug X | ||||||
| Exchange the spark plug X | ||||||
| Clean the area of the silencer and controls. | X | |||||
| Check the petrol filter *** | X | |||||
| Check the silencer and spark arrester | X |
OH Operating hours
*: When the engine is working at full load or in high temperatures.
**: Clean the air filter more frequently when the engine is operating in a dusty environment.
***: Performed by a specialist company

NOTE
It may be necessary to shorten the maintenance intervals compared to those stated in the table above in case of severe loading and at high temperatures.
8 TRANSPORT
■ Transport the engine only when the fuel tank is empty.
■ Always transport the engine horizontally, otherwise the following will occur:
■ Leaking fuel and oil
Generation of smoke
■ Starting difficulties
■ Soot on spark plug
9 STORAGE

NOTE
For further information: Refer to the lawn tractor's operating instructions.

WARNING!
Danger of explosion and fire
Escaping fuel will create an explosive petrol/air mixture. Deflagration, explosion and fire can lead to serious and even fatal injuries if fuel is not handled properly.
■ Never store the engine in front of naked flames or heat sources.
■ Never operate the engine in a flammable environment.
If the lawn tractor is idled for longer than 2 to 3 months, the fuel must be drained off to avoid deposits in the fuel system. With a shorter idle period, the fuel can be protected with a fuel stabiliser.

NOTE
For further information: Ask your customer service.
- Close the fuel cock.
- Drain the fuel from the carburettor.
-
Clean the engine (see chapter 7.3 "Clean engine and silencer (07)", page 32).
-
Storing the engine:
-
Allow the engine to cool down.
■ Store the engine in a well ventilated location, and not in the vicinity of naked flames or sources of heat. - Do not store the engine where electric motors or power tools are operated.
■ Store protected from moisture.
10 REPLACEMENT PARTS
Recommended spark plugs: RN9YC (Champion) or equivalent
Replacement parts can be obtained from the authorised dealer or our service team.
11 TECHNICAL DATA
| Engine type PRO 700 V2 | |
| Displacement 708 cm | 3 |
| Power 13 kW / 2700 rpm | |
| Engine oil fill volume 2 l | |
| Cooling system Air cooling | |
| Electrode clearance of the spark plug | 0.7 mm - 0.8 mm |
12 HELP IN CASE OF MALFUNCTION

CAUTION! Risk of injury
Sharp-edged and moving appliance parts can lead to injury.
■ Always wear protective gloves during maintenance, care and cleaning work.
| Malfunction Cause Remedy | ||
| Engine does not start. Lack of fuel Top up with fuel. | ||
| Poor quality, contaminated fuel, old fuel in tank | ||
| Incorrect starting procedure Execute the starting process correctly. | ||
| Spark plug not connected Check the spark plug connector, make sure that it is firmly seated on the spark plug. | ||
| ■ Spark plug wet ■ Dirty spark plug electrodes ■ Incorrect spark plug electrode gap | ||
| Air filter clogged Check and clean the air filter. | ||
| Unsuitable oil for the season Check the oil, replace if necessary. | ||
| Vapour bubbles forming within the carburettor due to high temperatures | ||
| Combustion problems Only have the check performed in a customer service workshop! | ||
| Ignition problems Only have the check performed in a customer service workshop! | ||
| Uneven function | ■ Dirty spark plug electrodes ■ Incorrect spark plug electrode gap | |
| Spark plug connector poorly fitted | ||
| Air filter clogged Check and clean the air filter. | ||
| Choke engaged Disengage the choke. | ||
| Combustion problems Only have the check performed in a customer service workshop! | ||
| Ignition problems Only have the check performed in a customer service workshop! | ||
| Loss of power during operation | Air filter clogged Check and clean the air filter. | |
| Combustion problems Only have the check performed in a customer service workshop! | ||

NOTE
If you encounter any malfunctions that are not listed in this table or that you cannot rectify yourself, please contact our customer service.
Please enter the engine serial number and date of purchase below. You will need this information when ordering replacement parts and when making technical or warranty inquiries.
Engine serial number:
| Engine serial number: | |
| Date of purchase: |
13 AFTER-SALES / SERVICE
In the event of questions of warranty, repair or spare parts, please contact your nearest AL-KO Service Centre.
These can be found on the Internet at:
www.al-ko.com/service-contacts
14 GUARANTEE
We will resolve any material or manufacturing faults on the appliance during the legal warranty period for claims relating to faults, in accordance with our choice either to repair or replace. The legal warranty period is determined by the legislation of the country in which the appliance was purchased.
Our warranty promise applies only if:
■ These operating instructions are heeded
■ The appliance is handled correctly
■ Original spare parts have been used
The warranty becomes void in the case of:
■ Unauthorised repair attempts
■ Unauthorised technical modifications
Non-intended use
The guarantee excludes:
■ Paint damage that can be attributed to normal wear and tear
■ Wear parts that are marked with a frame xxxxxx (x) on the spare parts card
The guarantee period commences with purchase by the first end user. The date on the proof of purchase is decisive. In the event of a guarantee claim, please take this guarantee declaration and the original proof of purchase, and contact your dealer or the nearest authorised customer service centre. This statement does not affect the purchaser's statutory claims for defects against the vendor.
VERTALING VAN DE ORIGINELE GEBRUIKERSHANDLEIDING
Inhoudsopgave
13 Klantenservice/service centre 54
14 Garantie 54
1 OVER DEZE GEBRUIKERSHANDLEIDING
2 PRODUCTOMSCHRIJVING
www.al-ko.com/service-contacts
14 GARANTIE
www.al-ko.com/service-contacts
14 GARANTIE
www.al-ko.com/service-contacts
14 GARANTÍA
www.al-ko.com/service-contacts
14 GARANZIA


- Inhaltsverzeichnis
- GARANTIE
- ABOUT THESE OPERATING INSTRUCTIONS
- Legends and signal words
- DANGER!
- WARNING!
- CAUTION!
- IMPORTANT!
- NOTE
- PRODUCT DESCRIPTION
- Designated use
- Symbols on the appliance
- Product overview (01)
- SAFETY INSTRUCTIONS
- DANGER! Risk of poisoning
- Operator
- Safety of persons, animals and property
- Handling of petrol and oil
- Risk of explosion and fire
- START-UP
- Check the general state of the engine
- Check the engine for:
- Filling with fuel
- Danger of explosion and fire
- Filling with engine oil (02)
- Oil recommendations
- Danger of engine damage
- Filling with oil
- Check the oil level (02)
- Filling with petrol
- Recommendations regarding petrol
- Filling with petrol
- WARNING! Risk of explosion
- WARNING! Danger of burns
- WARNING! Danger from rotating ap- pliance parts!
- Stop the engine and switch off
- Controlling the engine speed
- Cold start and warm start
- REPAIR
- Risk of injury during re-pair work
- MAINTENANCE AND CARE
- Risk of injury
- Change the air filter (03)
- Changing the oil (06)
- Clean engine and silencer (07)
- Risk of fire due to for- eign objects
- Danger from water
- Clean the air filter (08)
- Maintaining the spark plug (09)
- WARNING! Risk of injury from elec- tric shock
- Carburettor settings
- Maintenance schedule
- OH Operating hours
- TRANSPORT
- STORAGE
- REPLACEMENT PARTS
- TECHNICAL DATA
- HELP IN CASE OF MALFUNCTION
- CAUTION! Risk of injury
- AFTER-SALES / SERVICE
- GUARANTEE
- VERTALING VAN DE ORIGINELE GEBRUIKERSHANDLEIDING
- Inhoudsopgave
- OVER DEZE GEBRUIKERSHANDLEIDING
- PRODUCTOMSCHRIJVING
- GARANTÍA
- GARANZIA
Brand : SOLO
Model : T22105.1 HDA V2
Category : Tractor