
PLREC - Lighting GRE - Free user manual and instructions
Find the device manual for free PLREC GRE in PDF.
| Product type | Submersible LED pool light |
| Brand | GRE |
| Model | PLREC |
| Protection class | Class III (extra-low safety voltage) |
| Protection rating | IPX8 (immersion up to 2 m) |
| Supply voltage | 12 V~ AC (via safety transformer) |
| Rated power | Varies by model (e.g., 37 VA for PAR56 1.11) |
| Cable type | H07RNF 2-wire 1.5 mm² Cu |
| Number of colors | 12 fixed colors |
| Number of sequences | 8 dynamic sequences |
| Sequence speed | 8 adjustable levels |
| Control | Control Motion remote control (RF 868 MHz) or wired NC button |
| Remote control range | 5 m in open air |
| Remote control power supply | 2 AAA 1.5 V batteries |
| Installation method | On nozzle or pipe, screwed into 1" 1/2 adapter, logo facing up |
| Recommended installation depth | 400 - 700 mm below water surface |
| Maximum water temperature | 40 °C |
| Chemical resistance | Chlorine ≤ 2 mg/l, Bromine ≤ 5 mg/l, pH 7.2-7.6 |
| Maintenance | No maintenance required; contact customer service in case of malfunction |
| LED risk groups | Risk group 2 (do not stare at <20 cm) |
| Dimensions (estimate) | Approximately 20 cm diameter (not precisely specified) |
| Weight (estimate) | Approximately 1 kg (not precisely specified) |
| Warranty | Manufacturer's warranty, void if product opened |
| Standards | EN 60598-1, EN 60598-2-18, directives 2014/30/EU, 2014/35/EU, 2011/65/EU |
Frequently Asked Questions - PLREC GRE
User questions about PLREC GRE
0 question about this device. Answer the ones you know or ask your own.
Ask a new question about this device
Download the instructions for your Lighting in PDF format for free! Find your manual PLREC - GRE and take your electronic device back in hand. On this page are published all the documents necessary for the use of your device. PLREC by GRE.
USER MANUAL PLREC GRE
IMPORTANT: The instruction manual you are holding includes essential information on the safety measures to be implemented for installation and start-up. Therefore, the installer as well as the user must read the instructions before beginning installation and start-up.
Keep this manual for future reference.
To achieve optimum performance of the LED Rapid Projector, follow the instructions provided below:
1. VERIFY THE CONTENTS OF THE PACKING:
The following accessories are included inside the box:
- Unit projector - Warranty booklet - Nozzle
- 1" 1/2 adaptor - Installation and maintenance manual
-
Manual for electrical connection - Spanner for adaptor
-
Stuffing box hose
2. GENERAL CHARACTERISTICS:
This projector has been designed to be used totally submerged in water. It is a Class III electric apparatus with very low safety voltage (12V with alternating current).
The projector compiles with IPX8 degree of protection (resistance to penetration of dust, solid bodies and humidity) at a nominal immersion depth of 2m .
This projector compiles with international safety standards for lights, especially the EN 60598-2-18 standard. LIGHTS PART 2: SPECIFIC REQUIREMENTS SECTION 18 LIGHTS FOR SWIMMING POOLS AND SIMILAR APPLICATIONS.
The manufacturer is not responsible in any circumstances for assembly, installation or start-up of any electric components which have been inserted or handled at locations other than its own premises.
3. INSTALLATION:
- To correctly light a swimming pool we recommend you:
Install a projector in the range LED Rapid every 20m^2 of water surface.
Note: Recommendation valid for light coloured pools. In darker coloured pools or stainless steel pools we recommend oversizing the proportion of projectors per ^2
- In order to prevent glare, the projectors should be installed so that they face away from the residence or usual view of the swimming pool.
- In the event that lighting is used in training or competition pools, the projectors should be installed on the sides to prevent glare on the swimmers.
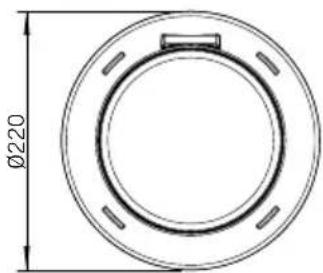
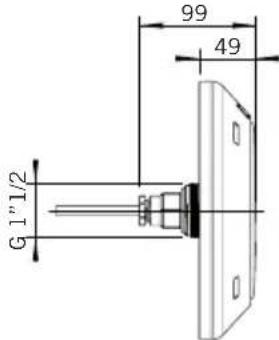
The spotlight should not be handled internally under any circumstances as this would lead to losing the guarantee. - The LED Rapid projector has been designed to be fitted to the bushing or piping; a siphon can be made or the stuffing box kit installed (Fig. 1).
- The projector should be fitted 400 - 700mm under the surface of the water on one of the pool walls (Fig. 1). The way the projector is fitted will depend on whether the bushing or piping is used.
- Sealing all sections with resin systems or safety connections that comply with the IP68 rating is recommended to ensure that both cables and cable sheaths are properly sealed. Failure to follow these steps may cause short- or long-term damage to the light and installation cables.
4. ASSEMBLY:
Procedure:
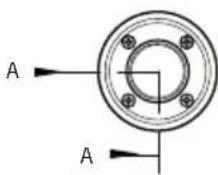
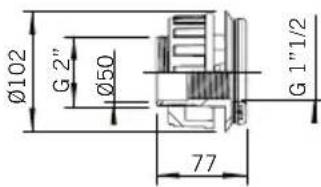
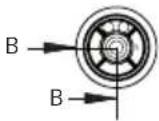
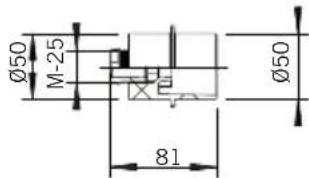
1 - Install the bushing as shown in Figure 2; A (siphon) / B (Kit 65286).
2-Screw the adaptor into the bushing (Fig. 3).
2 - Insert the cable in the bushing, ease the projector in and turn 90^ clockwise (Fig. 3).
3 - Ensure that the logo is uppermost (Fig. 4).
Replacing the projector
- Give a quarter of a turn anti-clockwise, remove the projector until it has come out of the adaptor (Fig. 5b) and place it on the edge of the pool.
2 - Loosen the stuffing box assembly and then the wire connector; it is very important to follow the steps as shown (Fig. 6).
3- Reconnect the projector.
5. MAINTENANCE:
This lamp does not require any type of maintenance work. If you notice that the lamp is not working properly, please contact our customer attention service.
THIS PRODUCT DOES NOT CONTAIN ANY ELEMENTS THAT CAN BE HANDLED, DISMANTLED OR REPLACED BY THE USER. IT IS FORBIDDEN TO ACCESS INSIDE THE PRODUCT, OTHERWISE THE GUARANTEE OF THE PRODUCT WILL BECOME INVALID.
6. SAFETY AND MAINTENANCE WARNINGS:
- Before any handling ensure that there is NO voltage supplied to the projector.
- People in charge of assembly should be suitably qualified for this type of work.
- Avoid making contact with the electric voltage.
- Comply with the current standards regarding accident prevention.
- In this regard, the IEC 364-7-702 standards must be observed: WIRING IN BUILDINGS SPECIAL WIRING SWIMMING POOLS.
- Do not handle with wet feet.
- Do not clean using abrasive products that could damage the projector.
- The LEDs in this projector are classified as risk group 2.
- Under no circumstances should the luminaire be stared into for one minute or more at distances equal to or less than 20~cm . Doing so could damage eyesight.
7. ASSEMBLY AND FUNCTIONING WARNINGS:
Maximum water temperature 40^
- It is not recommended the use of sealing putty in this product and, anyway, you should use only products specifically conceived to work with ABS, all those products of universal use remain excluded.
- The projector is designed TO OPERATE ONLY WITH A SAFETY TRANSFORMER.
- The manufacturer is not responsible in any circumstances for assembly, installation or start-up of any electric components which have been inserted or handled at locations other than its own premises.
- It is responsibility of the installer to ensure that no water gets inside the projector by means of the cables.
- This projector is seawater resistant.
- This projector is resistant to pool treatments described below, always that the concentration values do not exceed the following levels:
| TYPE OF TREATMENT CONCENTRATION IN WATER | |
| Chlorine 2 mg/l | |
| Bromine 5 mg/l | |
Attention : Please note that the Ph of pool water always must be between 7.2 and 7.6 .
8. ENVIRONMENTAL INFORMATION Processing of electrical and electronic equipment after their period of use (Only applicable in the E.U.)
In order to reduce the amount of waste of electric and electronic apparatus, to reduce the danger of components, to encourage the reuse of apparatus, to assess waste and to set up a suitable waste treatment system, with the aim of improving the efficiency of environmental protection, a set of rules has been established applicable to the manufacture of the product and other rules regarding the correct environmental treatment when these products become waste.
It is also intended to improve the environmental practices of all agents involved in electrical and electronic goods, including manufacturers, distributors, users and particularly those directly involved in the treatment of waste derived from these apparatus.
From 13th August 2005, there are two ways of disposing of this apparatus:
- if you purchase a new equivalent apparatus or which has the same functions as the one you wish to dispose of, you can hand it over, free of charge, to the distributor when making your purchase, or
- you can take it to local collection points.
We shall cover waste treatment costs.
The apparatus are labelled with a symbol of a "crossed-out waste container". This symbol means that the apparatus is subject to selected waste collection, different from general waste collection.
Our products are designed and manufactured with top-quality, environmental-friendly materials and components, which can be reused and recycled. In spite of this, several parts of this product are not biodegradable and therefore it should not be left in the environment. For the correct recycling of this product, please completely detach the electrical motor from the rest of the filtration equipment.
DECLARATION CE OF CONFORMITY
The products listed above are in compliance with: Electromagnetic Compatibility Directive 2014/30/UE. Low Voltage Directive 2014/35/UE.
European Standard EN 60598-1, EN 60598-2-18, and all its modifications.
Directive 2011/65/EU of the European Parliament and of the Council of 8 June 2011 on the restriction of the use of certain hazardous substances in electrical and electronic equipment.
DECLARATION CE DE CONFORMIDAD
Signature / Qualification:
Signature / Qualification:
Firma / Cargo:
Firma / Qualifica:
MANUFACTURAS GRE, S.A.
ARITZ BIDEA N°57, BELAKO INDUSTRIALDEA
48100 MUNGIA (BIZKAIA)·ESPANA
TEL. +34 946 74 11 16 - FAX. 34 946 74 17 08
http://www.gre.es
N^ REG.IND.:48-06762
We reserve the right to change all or part of the articles or contents of this document, without prior notice
Nos reservamos el derecho decaeir total o parcialmente lascharacteristicas de nuestros articulos o el contentido de this documento sin previo aviso
- Nous nous réservons le droit de modifier totalement ou en partie les caractéristiques de nos articles ou le contenu de ce document sans préavis
- Wir behalten uns das Recht vor, die technischen Daten unserer Antikel oder den Inhalt dieser Dokumente ohne vorherigen Hinweis ganz oder teilweise zu ändern
Ci riserviamo il diritto diambiare totalmente o parzialmente le caratteristiche tecniche dei nostri prodotti ed il contentuto di quello documento alla nessun preavviso
Wij behouden ons hetrecht voor geheel of gedeelijk de kenmerken van onsze artikelen of de inhoud van deze handleiding zonder voorafgaand bericht te wijzigen
-
Reservamo-nos o direito de alterar, total ou parcialmente, as caracteristicas dos)nossos artigos ou o conteudoeste documento sem aviso prévio
-
TECHNICAL CHARACTERISTICS
- CHARACTERISTICAS TECNICAS
CHARACTERISTIQUES TECHNIQUES
TECHNISCHE ANGABEN - DATI TECHNICI
TECHNISCHE KENMERKEN - CHARACTERISTICAS TECNICAS
MANUFACTURAS GRE, S.A.
IMPORTANT: The instruction manual you are holding includes essential information on the safety measures to be implemented for installation and start-up. Therefore, the installer as well as the user must read the instructions before beginning installation and start-up.
Keep this manual for future reference.
To achieve optimum performance of the LED Wireless Projector, follow the instructions provided below:
1. ELECTRICAL CONNECTION
The projectors are supplied with a 2-wire 1.5mm2 Cu H07RNF cable.
You should make sure that the voltage received by the lamp is never more than 12V AC by a safety transformer. The transformer must be sized to provide the VA for each LED projector that is connected. See power table, last page.
2. CONTROL MOTION:
Operating frequency: 868 MHz
Range in the open field: 5m
Batteries: 2 AAA-1.5 V batteries.
Control Motion has 6 buttons: COLOR, REFRESH, SEQUENCE, SPEED (- / + ) , ON/OFF
The main functions on the remote control are:
- COLOR: selects one of 12 standard colours available.
- REFRESH: recovers the colour/sequences
- SEQUENCE: selects one of the 8 sequences available.
- SPEED: selects one of the 8 speeds available.
- ON/OFF: switches the lamp/s or spotlight/s on and off.
ATTENTION
DO NOT PLACE HAND OVER TOP OF THE BUTTONS ON CONTROL MOTION

3. OPERATION:
Control Motion is able to control lamp/s or spotlight/s through the buttons or movement.
In order for a lamp to respond to Control Motion, it must be placed near the lamp/s or spotlight/s. If you have more than one lamp, place it in the middle of them to ensure optimum reception.
3.1 Remote control
- Switching spotlights on
By pressing the ON/OFF button for a few seconds, the spotlights will turn on.
- Selecting colours
The COLOR button enables you to select one of the 12 available colours. Each time the button is pressed, the colour changes; when the last colour is reached, pressing again goes back to the first colour. The colour selected is displayed in the Central Display.
| COLOUR N° COLOUR COLOUR N° | |
| 1 Red 7 Sky-blue | |
| 2 Green 8 Pale violet | |
| 3 Blue 9 Orange | |
| 4 Yellow 10 Pink | |
| 5 Cyan | |
| 6 Magenta | |
| 11 12 White | |
| Emerald green | |
| White | |
- Selecting sequences
The SEQUENCE button enables you to select one of the 8 available sequences. Each time the button is pressed, the sequence changes; when the last sequence is reached, pressing again goes back to the first sequence. All sequences work in cycles; when the last sequence is reached the cycle starts again.
The numbers of the sequences appear on the display numbered from 1 to 8.
| SEQUENCE | ORDER OF COLOURS | |||||||||||
| Estival | Red | Green | Blue | |||||||||
| Caroline | Cyan | Magenta | Yellow | |||||||||
| Iris | Green | Esmeral green | Cyan | Sky-blue | ||||||||
| Candy | Red | Orange | Green | Orange | ||||||||
| Tropical | Red Pink | Blue Pink | |||||||||
| Paradise | Red Orange Green Cyan | Blue Pink | |||||||||
| Abril | Pale violet | Magenta Cyan | Yellow White | Yellow Cyan | Magenta | ||||||
| Eleven | Red Green | Blue Yellow | cyan Magenta | Pale | violet | Sky-blue | Orange Pink | Esmerald green |
- Refresh button
In pools with more than one lamp, this button is used to synchronise them.
If one of the lamps fails to respond to the COLOR/SEQUENCE commands, press the REFRESH button on the lamp and the last command will be sent so that it synchronises with the others.
- Selecting the speed of sequences
The - / + buttons enable you to select one of the eight sequences, ordered from the slowest to the fastest speed.
- Switching spotlights off
The spotlgs are turned off by pressing the ON/OFF button. The status (colour/sequence) of the lamps is stored in the memory for the next time the system is switched on.
- Switching the remote control off
The remote control automatically switches off in less than 60 seconds.
The LED display lights on the remote control only light up for a few seconds.
3.2 Control motion mode (see page 23)
When the control motion mode is switched on, the colours and sequences can be changed.
Changing the colour (Fig. A)
- Hold the remote control firmly without touching any of the buttons.
- Flick your wrist downwards.
- The change in colour will be displayed on the Central Display.
Changing the sequence (Fig. B)
- Hold the remote control firmly without touching any of the buttons.
- Flick you wrist form side to side.
- The change in sequence will be displayed on the Central Display.
4. CONTROL MOTION MAINTENANCE:
If the Central Display lights up in red without switching off, this means the batteries are low. The battery case is on the back of the Control Motion unit; replace the old batteries with two new AAA 1.5 V ones.
5.WIRING:
Diagram of the wiring (see page 23)
In order to wire the system properly, a lamp, transformer and the Control Motion unit will be needed.
The transformer should be connected to a 230 V~ac power supply and the lamp (12 V~ac) to the auxiliary winding.
It must be sized to supply the corresponding VA to each LED lamp that is wired (see table on the back cover). For example, if you wish to control two 37VA PAR56 1.11 lamps they must be wired in parallel to the transformer to at least 74VA.
Alternatively, the system can be controlled using a simple NC push button, in which case there will be 14 function modes: seven set colours and seven different colour sequences. Each time the push button is pressed, the colour or sequence will change. By pressing for several seconds, the light becomes white.
6. TROUBLESHOOTING:
| Problems | Usual causes | Solutions |
| The lamp or spotlight is not working | The lamp or spotlight does not have a power supply | Connect the lamp or spotlight to the power supply through a 12 V~ac safety transformer. |
| The lamp projects a different colour to that shown on the Control Motion Central Display | The lamp/s or spotlight/s do not receive information | 1. Get close to the lamp or spotlight before sending a command |
| Two lamps project different colours | 2. Do not cover the antenna with your hand | |
| Using the control motion mode, the lamp or spotlight does not work | 3. Press the REFRESH button | |
| Control Motion is not responding | The Control Motion batteries are low Change the batteries | |
7. SAFETY WARNINGS:
People in charge of assembly should be suitably qualified for this type of work.
- Avoid making contact with the electric voltage.
- Comply with the current standards regarding accident prevention.
- In this regard, the IEC 364-7-702 standards must be observed: WIRING IN BUILDINGS SPECIAL WIRING SWIMMING POOLS
- All maintenance operations should be performed with the lamp disconnected from the Mains.
- Do not handle with wet feet.
8. ASSEMBLY AND FUNCTIONING WARNINGS:
- The projector and the lamp are designed TO OPERATE ONLY WITH A SAFETY TRANSFORMER.
- It is not recommended the use of sealing putty in this product and, anyway, you should use only products specifically conceived to work with ABS, all those products of universal use remain excluded.
- The manufacturer is not responsible in any circumstances for assembly, installation or start-up of any electric components which have been inserted or handled at locations other than its own premises.
- It is responsibility of the installer to ensure that no water gets inside the projector by means of the cables.
- The Global projector is seawater resistant.
- The projector and the lamp resistance the treatments of swimming pool described next as long as the values of concentration do not surpass the following values:
| TYPE OF TREATMENT CONCENTRATION IN WATER | |
| Chlorine 2 g/l | |
| Bromine 5 g/l | |
| Salt electrolysis (Na Cl) 6 g/l | |
Attention : Please note that the Ph of pool water always must be between 7.2 and 7.6 .
9. ENVIRONMENTAL INFORMATION Processing of electrical and electronic equipment after their period of use (Only applicable in the E.U.)
In order to reduce the amount of waste of electric and electronic apparatus, to reduce the danger of components, to encourage the reuse of apparatus, to assess waste and to set up a suitable waste treatment system, with the aim of improving the efficiency of environmental protection, a set of rules has been established applicable to the manufacture of the product and other rules regarding the correct environmental treatment when these products become waste.
It is also intended to improve the environmental practices of all agents involved in electrical and electronic goods, including manufacturers, distributors, users and particularly those directly involved in the treatment of waste derived from these apparatus.
From 13th August 2005, there are two ways of disposing of this apparatus:
- if you purchase a new equivalent apparatus or which has the same functions as the one you wish to dispose of, you can hand it over, free of charge, to the distributor when making your purchase, or
- you can take it to local collection points.
We shall cover waste treatment costs.
The apparatus are labelled with a symbol of a "crossed-out waste container". This symbol means that the apparatus is subject to selected waste collection, different from general waste collection.
Our products are designed and manufactured with top-quality, environmental-friendly materials and components, which can be reused and recycled. In spite of this, several parts of this product are not biodegradable and therefore it should not be left in the environment. For the correct recycling of this product, please completely detach the electrical motor from the rest of the filtration equipment.
6. PROBLEMES/SOLUTIONS:
7. VEILIGHEIDSWAARSCHUWINGEN:
MANUFACTURAS GRE, S.A.

- VERIFY THE CONTENTS OF THE PACKING:
- GENERAL CHARACTERISTICS:
- INSTALLATION:
- ASSEMBLY:
- Procedure:
- Replacing the projector
- MAINTENANCE:
- THIS PRODUCT DOES NOT CONTAIN ANY ELEMENTS THAT CAN BE HANDLED, DISMANTLED OR REPLACED BY THE USER. IT IS FORBIDDEN TO ACCESS INSIDE THE PRODUCT, OTHERWISE THE GUARANTEE OF THE PRODUCT WILL BECOME INVALID.
- SAFETY AND MAINTENANCE WARNINGS:
- ASSEMBLY AND FUNCTIONING WARNINGS:
- ENVIRONMENTAL INFORMATION Processing of electrical and electronic equipment after their period of use (Only applicable in the E.U.)
- DECLARATION CE OF CONFORMITY
- DECLARATION CE DE CONFORMIDAD
- ELECTRICAL CONNECTION
- CONTROL MOTION:
- ATTENTION
- DO NOT PLACE HAND OVER TOP OF THE BUTTONS ON CONTROL MOTION
- OPERATION:
- Remote control
- - Refresh button
- - Selecting the speed of sequences
- - Switching spotlights off
- - Switching the remote control off
- Control motion mode (see page 23)
- Changing the sequence (Fig. B)
- CONTROL MOTION MAINTENANCE:
- 5.WIRING:
- TROUBLESHOOTING:
- SAFETY WARNINGS:
- ASSEMBLY AND FUNCTIONING WARNINGS:
- ENVIRONMENTAL INFORMATION Processing of electrical and electronic equipment after their period of use (Only applicable in the E.U.)
- PROBLEMES/SOLUTIONS:
- VEILIGHEIDSWAARSCHUWINGEN:
Brand : GRE
Model : PLREC
Category : Lighting