
ElTex 1400 - Lawn mower Texas - Free user manual and instructions
Find the device manual for free ElTex 1400 Texas in PDF.

| Product type | Electric lawn mower |
| Brand | Texas |
| Model | ElTex 1400 |
| Power supply | 230 V - 50 Hz |
| Power | 1400 W |
| Cutting width | 38 cm |
| Maximum working depth | 21 cm |
| Rotation speed | ~280 rpm |
| Noise level | 93 dB(A) |
| Weight | 12 kg |
| Recommended lubricant | Multifak EP-0 grease |
| Safety | Safety button + activation lever (automatic stop) |
| Number of blades | 2 (inner and outer set) |
| Stabilizer wheel adjustment | Yes, by pin |
| Motor type | Electric motor |
| Maintenance | Clean after each use, lubricate regularly |
| Storage | Protect from rust, store in a dry place |
| Spare parts available | Blades, power cable |
Frequently Asked Questions - ElTex 1400 Texas
User questions about ElTex 1400 Texas
0 question about this device. Answer the ones you know or ask your own.
Ask a new question about this device
Download the instructions for your Lawn mower in PDF format for free! Find your manual ElTex 1400 - Texas and take your electronic device back in hand. On this page are published all the documents necessary for the use of your device. ElTex 1400 by Texas.
USER MANUAL ElTex 1400 Texas
1. Table of Contents
- Safety precautions 9
3.Identification 10 - Assembly 11
- Starting machine 12
6.Blade. 13 - Lubrication 13
8.Maintenance and storage 14 - Troubleshooting 14
- Specifications 14
CE declaration 41
Spare parts
Spare part drawings for the specific product can be found on our website www texas.dk
If you find the part numbers yourself, this will facilitate more rapid service.
For purchase of spare parts, please contact your dealer.
You will find a list of dealers on the Texas website.
2. Safety precautions

Read these user instructions carefully to familiarize yourself with all the safety precautions and operating functions before starting to work with the machine.

Not for use by children.

Do not use the machine if you are tired or ill, or have taken medicines or alcohol.

Always wear ear- and eye protection and heavy-duty footwear when using the machine. Avoid loose clothing.

Make sure you have a good footing when using the machine, to maintain control.

Keep any bystanders at least 10 meters from the place you start and will work with the machine.

Do not use in the vicinity of explosive liquids, gases or dust. The machine can cause sparks which can ignite dust etc.

Never start to use before the area has been cleared.

All repairs not described in this use manual can only be performed by a specially-trained personnel at an authorized service workshop. Always ensure machine is switched off when performing repairs.

Use original spare parts only.

The machine must only be loaned to persons who are familiar with its operation.

The user manual must always be provided with the machine.
Check with your local authorities for rules on disposal of mechanical implements. Electrical products must always be handed in to a local recycling centre for correct disposal.
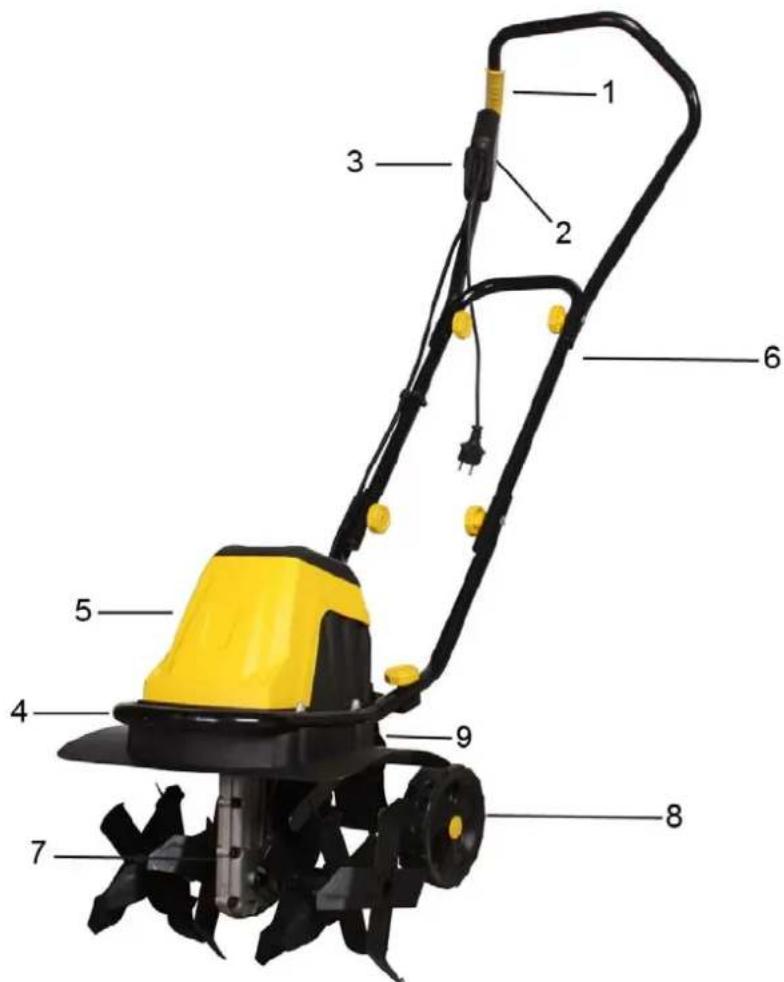
3. Identification

| 1. | Activation lever |
| 3. | Power cable 4. Carr |
| 5. | Motor |
| 7. | Grease filler cap 8. Stabilizer wheels |
| 9. | Stabilizer wheel adjustment |
| 2. | y button | Safet |
| ying handle | ||
| 6. | Cable | |
Mount subframe using the bolts supplied as shown.
Mount cable holder as shown.
Fix the start switch unit on the handle as shown.
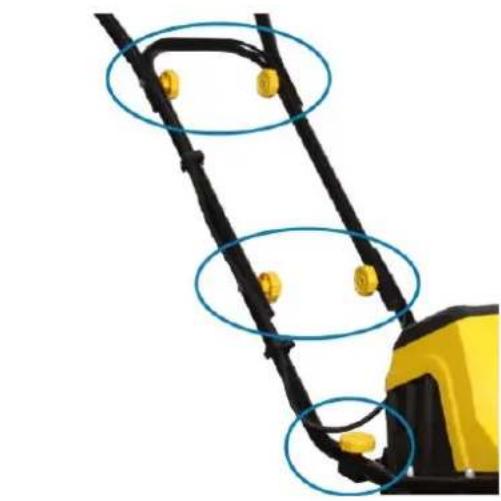
Mount handlebar using knobs and bolts as shown.
Fit cable holder on handlebar as shown.
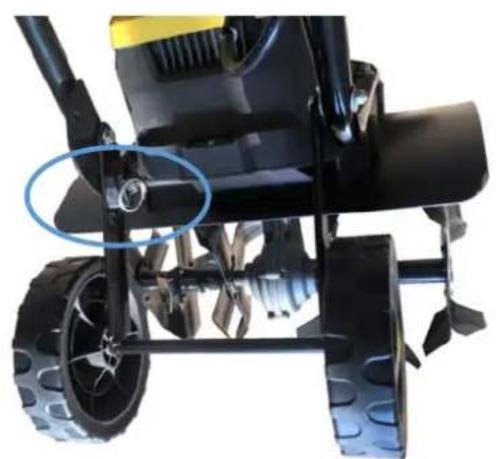
Fit support wheels. Wheels can be adjusted to the desired position by pulling the pin.

Connect to mains electricity and ensure cable is correctly secured in cable holder. (fig. 3)
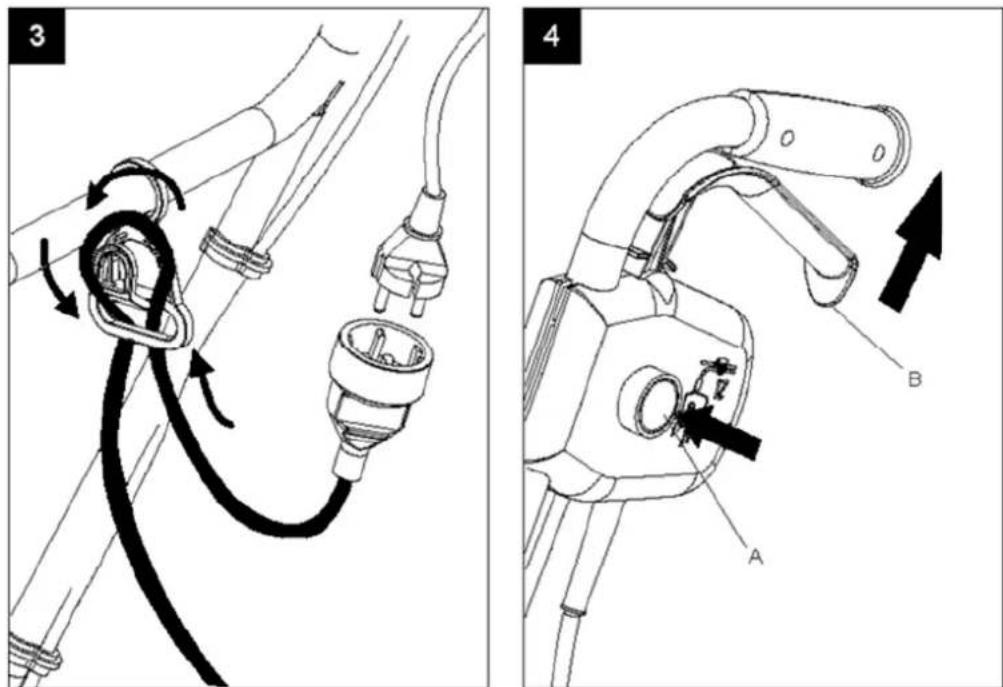
Start machine by pressing safety button A, then pull lever B up towards handlebar. When machine starts, release button A.
Stop machine by releasing lever B.
Tips
Do not start motor before machine is at area to be worked. Always hold machine securely in both hands. Check extension cable is behind you to avoid cutting it.
The blades will propel the machine forwards. Allow the blades to slowly sink into the soil. Remember to adjust the wheel yoke before use.
When cutting deeply, the most effective method is to allow the blades to propel the machine forwards for an arms length. Pull the machine back towards you. Allow it to run forwards again.
Blades must always operate at maximum speed. Avoid overloading. If the blades get buried, rock machine from side to side while holding it back, until it comes free.
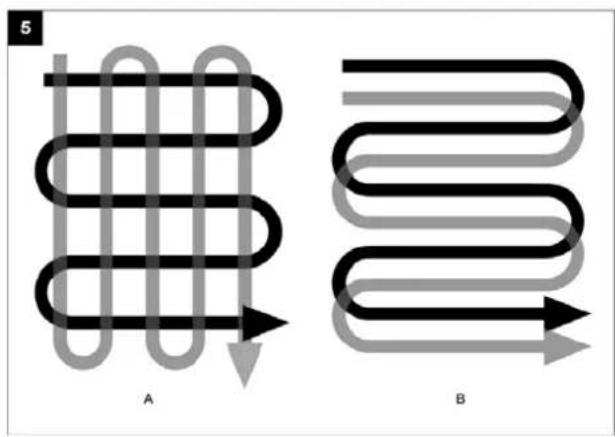
Use one of the patterns shown when preparing an area for sowing.
6. Blade
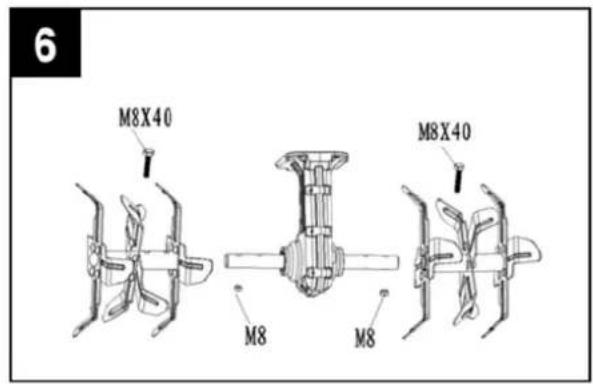
If the blades are worn or broken, they can be replaced. Failure to maintain the blades can cause poor results when cultivating, or overload the motor. Always wear gloves when working near the blades.
Blades can only be replaced as a set. When changing blades, remove the first split pin and the outer blade, followed by the inner split pin to remove the inner blade (fig. 6).
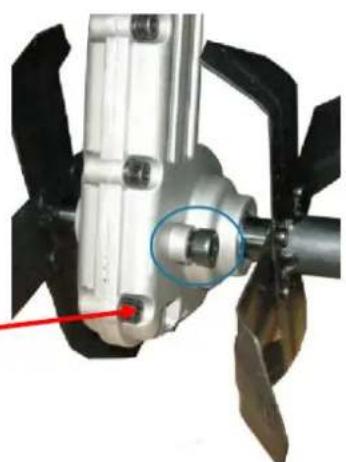
7. Lubrication
The gears are factory lubricated. Check level regularly.
Lie machine on its left side. Clean around the filler hole to avoid dirt getting into the machine when removing the screw.
Fill with Multifak EP-0 grease up to the bottom edge of the hole. Replace screw.
Item number : 90306500
8. Maintenance and storage
Clean all grass and soil from machine after each use.
If not to be used for an extended period, coat all metal parts in grease to avoid corrosion and rust.
Use original spare parts only
9. Troubleshooting
| Problem | Casue | Solution |
| Motor will not start: No power Check power supply and cables | ||
| Defective safety button Contact authorised workshop | ||
| Overheating cutout activated? | a. Cut shallower b. Remove any blockages c. Soil too hard. Change depth and run slowly backwards and forwards several times. Do not restart for 15 mins. | |
| Abnormal noise Blade stuck Switch off machine and allow to stop completely. Remove obstruction. | ||
| No lubrication Contact authorised dealer | ||
| Loose bolts, nuts or safety equipment. | Tighten. Contact authorised workshop if noise persists | |
| Abnormal vibrations Depth too great Replace or contact authorised workshop | ||
| Depth too great Use correct depth | ||
| Poor cutting action Depth too shallow Use correct depth | ||
| Worn blade Replace or contact authorised workshop | ||
10. Specifications
| Model El-Tex 1400 | |
| Power supply 230 Volt - 50 Hz | |
| Power consumption | 1400 Watt |
| Cutting width | 38 cm |
| Max. working depth | 21 cm |
| Noise level | 93 dB(A) |
| Grease | Multifak EP-0 / 90306500 |
| Weight | 12 kg |
| RPM | Approx. 280/min |
1. CodepkaHne
2.Мерьпразосторожности 15
3.Obo3NaueHne 16
4.C6opka. 17
5.BkJIoueHne MaunHbI 18
6.Φpe3a 19
7.Cma3ka 20
8.ObcnyxmbHne n xpaHHe 20
9.YctpaHHe HncnpaBHOtei 20
10. Texnueckne xapaKTepcntuKu 21
ДeКларачи O COOTBeTCTBm CtaHapTaM EC 41
3anyactn
Cnncok 3anpuacteI Jn KOHKpeTHORO n3dJIINMAoXHO HaHTn Ha caTe www.texas.dk. CamocToTbHbI NOnCK HOMePoB 3aPAcTei 3HaUTeJIbHO oBnErHt pa60Ty cepBnCHOrO ueHTpa.
He pa6oTaIe c MaunHoi, ecn Bbl yTomJeHbI, He3OpOBbl, npHIMaJIaN aIKOrOJIb nII neKapCTBa, 3aMeIJIouIe peakuHO.
При рабо-te с Maшино obязателно ИспOLTьугte спесиалыную paбочую obyв, срета 3auntb opraHOB 3peHnI n clyxa. He naDEBaIte CBO6OdHyIO ODEXJy.

IpeD BkIIOUeHnEM MaINHbI yBeIITecB H aIIuHn XopoWei onOpbl I cnOCo6HOCTn yDepKINBaTb paBHOBecne.

YdaJIte BcEx NocToPOHHNX IuC Ha pacCToRHe He MeHee 10 MetpoB OT MeCTa pa6OtBi C nCNoJIb3OBAHnEM MaUHHOI.

He 3Kcnpnyatnpynte MaunHy B6Jn3N B3pblBOONaCHbIX XnIDKOCTe, ra3OB n dp. BeueCTB. O6OpYIOBaHne MOKeT 6bITb NCTOuHNKOM NCKp, KOtOpbIe MOryt cTaTb npUHHoB BO3rOpAHn.

He haunhaite 3KcnpnyatauHIO, noka Teppntopn He ocbooxdeHa ot NOCTOPOHNX ppeDMeTOB.

Bce pa6oTbI peMOHTbIe pa6OtI, He ONHcHbIe B HAcToIeM pyKOBOCTBe DOJXHbI IpON3BOIDITbcra TOnbKO CneuHaNbHO oByeHHbIM NepCOHaIOM B ABTOPIN3OBaHHOM cepBnCHOM cHTpe. IpePe BblIOJIHeHem peMOHTa y6eIInTECb B TOM, YTO NITAHNE OTKIOUyeHO.

IcnoJb3yIte TOnbKO opnHnHaJIbHbIe 3aNaChbIe YaactN.

IpepaBaiTe MaunHy B apEny ToJbKO JnUaM, O3HaKOMJIeHHbIM C npabuamN ee 3KcPnyatauN.

Bcerda npedocTabIe pykoBOcTBO nOb3OBaTeJI BmecTe C MaunHOH.
IPOKOHcyIbTnpyntecb MecTHbIMN OpraHAMN BnaCTN OTHOCHTeJbHO npaBnI yTnIIN3aUIN MEXAHuecknx arperatOB. C celenbIO co6JIIODeHnA npaBnI yTnIIN3aUIN 3JIeKtpoO6OpyDobAHnA, OHO nOdJIeXNT o6ra3aTeJbHOcdaYe BCNEuHaNBhI cEHTp.
3.0603haueHne
Pocne KaKdoRo NcNoIb3ObaHn ydaJIaIe C MaunHbI rpaBy.
Ipeed dInTeBbIM XpaHeHnEM, IJI pPeDoTbpaUeHnA Koppo3n, NOKpoTe BCE MeTaIIuYeCKne DeTaTI CMa3KoJ.
IcnoJb3yTe TOnbKO opnHaJIbHbIe 3aNaChIe YacTn
9. YctpaHHeH HeuCnpaBHOCTeI
2006/42/EC - 2014/30/EU - 2000/14/EC amended by 2005/88/EC Annex VI
Materiellet er udfør i henhold til ffolgende standarder · Conforms with the following standards · Und die Anforderungen folgender Normen erfüllt · CootBeTCTByeT cIeNyUoUm cTaHdapTaM · Conformément aux normes suivantes · jest zgodna z nastepujacymi normami
EN ISO 3744:2010,ISO 11094:1991,EN 55014-1:2006+A1+A2,EN 55014-2:2015 EN 61000-3-2:2013,EN 61000-3-3:2014 EN 60335-1:2012+A11,EN 62233:2008,EN 709:1997+A4,AfPS GS 2014:01
LWA: 93 dB(A)
L_pA : 79 dB(A)
$$ a _ {h} = 1. 1 5 8 \mathrm {m} / \mathrm {s} ^ {2} \text {u n c e r t a i n t i e s} K = 1. 5 \mathrm {m} / \mathrm {s} ^ {2} $$
S/N: 1901770001 - 2112779999
Texas Andreas Petersen A/S Knullen 22 · DK-5260 Odense S
Responsible for documentation Johnny Lolk
03.10.2018

Johnny Lolk Managing Director
TEXAS
EQUIPMENT