BC358D - Brush cutter Texas - Free user manual and instructions
Find the device manual for free BC358D Texas in PDF.

User questions about BC358D Texas
0 question about this device. Answer the ones you know or ask your own.
Ask a new question about this device
Download the instructions for your Brush cutter in PDF format for free! Find your manual BC358D - Texas and take your electronic device back in hand. On this page are published all the documents necessary for the use of your device. BC358D by Texas.
USER MANUAL BC358D Texas
natural_image
Exterior view of a small manual pusher with metal frame and black handle (no text or symbols visible)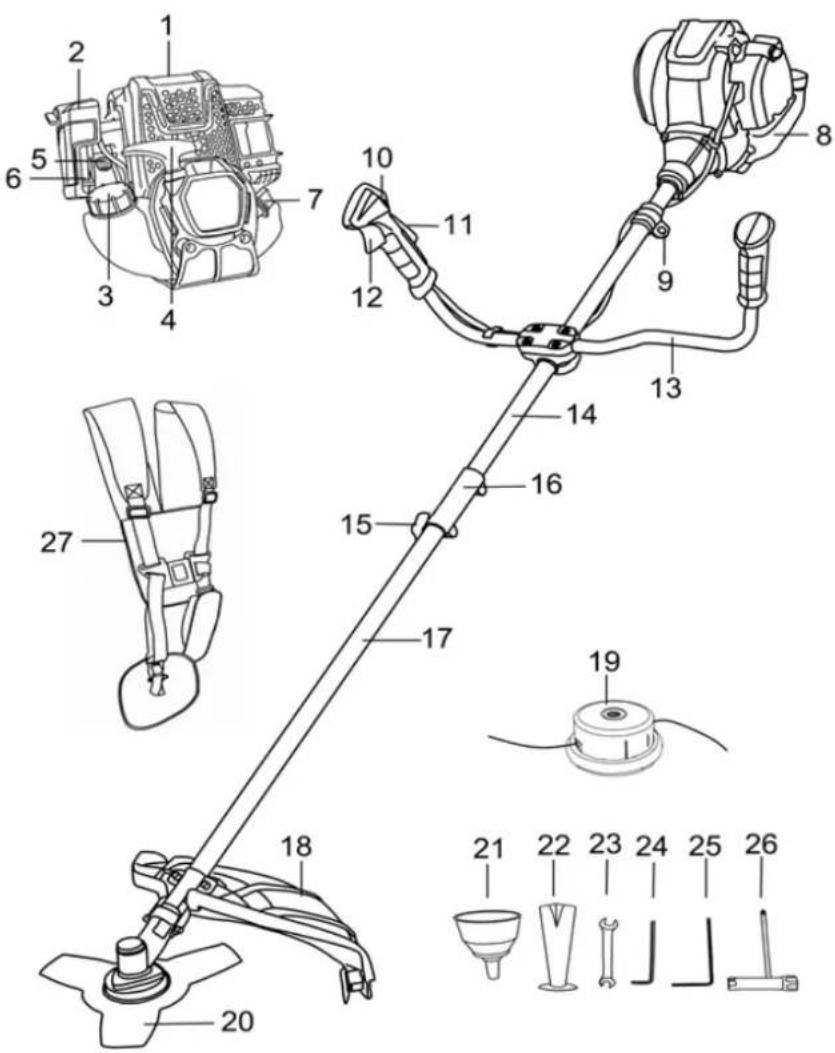 | Figur1 |
 | Figur2 |
  | Figur 3 |
  | |
 | Figur 4 |
 | Figur 5 |

natural_image
Mechanical component diagram showing a shaft and housing assembly with labeled parts (a and 1), no readable text or symbols beyond labels.Figur 6

text_image
a b c d e Max Speed 10000r/min V25000.7Figur 7

Figur 8

natural_image
Close-up of a mechanical power tool with black and gray components (no visible text or symbols)Figur 9
 | Figur10 | ||
 |  | Figur11 | |
 |  | ||
 |  | ||
| Max - Min | |||
 | Figur 12 |
 | Figur 13 |
a  | Figur 14 |
 | Figur 15 |
 | Figur16 |
 | Figur17 |
Advarselssymboler / Warning symbols / Warnzeichen / Symboles d'avertissement / Pittogrammi di Sicurezza
 | Advarse! Maskinen kan ved skødesløs og forkertbrug være et farligt redskab, som kan forårsage alvorlige skader. | Warning! This product can be dangerous and in some cases fatal if not handled correct. | Warnung! Wenn man unvorsichtig ist oder die Maschine falsch benutzt, kann dies sehr gefährlich sein und es können schwere Schäden verursacht werden. | Avvertimento! Questo prodotto può essere pericoloso e in alcuni casi fatale se non maneggiato correttamente . |
 | Læs betjeningsvejledningen grundigt før brug af maskinen. | Read the user manual before operating this machine. | Lesen Sie sich vor der Bedienung dieser Maschine das Benutzerhandbuch sorgfältig durch. | Leggere il manuale utente prima di utilizzare questa macchina. |
 | Benyt høreværn, sikkerheds-briller og sikkerhedshjelm. | Use ear protection, safety glasses and safety helmet. | Tragen Sie eine Gehörschutz, eine Schutzbrille und einen Schutzhelm. | Utilizzare protezioni per le orecchie, occhiali di sicurezza e casco di sicurezza. |
 | Brug sikkerhedshandsker. | Wear safety gloves. | Tragen Sie Schutzhandschuhe. | Indossare guanti di sicurezza. |
 | Brug sikkerhedsfodtøj. | Wear safety shoes/boots. | Tragen Sie Sicherheitsschuhe/- stiefel. | Indossare scarpe/stivali di sicurezza. |
 | Rotationsretning. | Rotation direction. | Drehrichtung. | direzione di rotazione. |
 | Risiko for flyvende objekter. Hold afstand til dyr og mennesker. | Risk for flying objects. Keep distance to animals and humans. | Gefahr durch fliegende Gegenstände. Halten Sie Abstand zu Tieren und Personen. | Rischio per oggetti volanti. Mantienere la corretta distanza di sicuezza da persone e animali. |
 | Brandbar væske i tanken | Flammable liquid in the fuel tank | Entzündbare Flüssigkeit im Tank | Liquido infiammabile nel serbatoio del carburante |
 | Hold afstand til personer og dyr. Minimum 15M (50FT) | Keep bystanders away. Minimum 15M (50FT) | Halten Sie Abstand von Menschen und Tieren. Minderst 15M (50FT) | Distanza di sicurezza minimo 15 M (50 FT) |
GB - Table of Contents "Original instructions"
Illustrations....2
- Identification of Symbols and Safety Instructions....20
- Identification of Parts ....22
- Fitting Screen and Handle ......23
- Switch from Trimmer to Brushcutter....23
- Switch from Brushcutter to Trimmer....24
- Replacing Cord 24
- Fuel....24
- Oil 25
- Start/Stop....25
- Operation....25
- Air Filter 26
- Spark Plug ....26
- Storage (Important)......26
- Troubleshooting....27
- Specifications....28
- Standard warranty terms and conditions....29
EC Declaration of conformity 69
Spare parts
Spare part drawings for the specific product can be found on our website www.texas.dk
If you find the part numbers yourself, this will facilitate more rapid service.
For purchase of spare parts, please contact your dealer.
You will find a list of dealers on the Texas website.
2. Identification of Symbols and Safety Instructions


Do not let children or untrained persons use this machine.
For use on grass and weed growth only, do not use for other purposes.
Never start or run the engine in a closed space. Inhalation of exhaust gas is dangerous.
Clear the work area before the tool is to be used. Remove all items such as rocks, broken glass, nails, steel wire, or string that could be thrown out by or tangled in the blade.
Always wear protective glasses and hearing protection.
Use sturdy, long pants, shoes, and gloves.
 | Keep bystanders, children and pets at least 50 feet away. |
 | Do not wear loose clothing or jewelry. |
 | Gather long hair, so that it cannot come in contact with machine. |
 | Do not use this machine if you are feeling tired, ill, or are under the influence of alcohol, drugs or medication. |
 | Do not work in poor lighting. |
 | Keep proper footing and balance. Do not over-reach. |
 | Keep trimmer head, blade and hot surfaces away from your body. Keep trimmer head/blade under waist height. |
 | Do not touch engine during or immediately after use (hot). |
 | Always stop engine and disconnect spark plug lead before making adjustments or repairs (with the exception of carburetor adjustments). |
 | Always use original spare parts only. Failure to do so can affect performance, cause personal injury and void the guarantee. |
 | Always check machine before use for loose bolts and nuts, fuel leaks etc. Replace all damaged parts. Replace trimmer head if cracked, chipped or damaged in any other way. |
 | Always check trimmer head is correctly fitted and tightened. Failure to do so can cause serious personal injury. |
 | Check that all screens and handle are correctly fitted and secure. |
 | The trimmer head will rotate when you adjust the carburetor. Wear protective glasses and follow all safety instructions. |
 | Allow engine to cool before storing. |
 | Empty fuel tank and secure trimmer to prevent movement when transporting in a vehicle. |
Figure 1.
| 1. Cylinder cover | 14. Drive tube |
| 2. Air filter cover | 15. Knob |
| 3. Fuel tank cap | 16. Adapter |
| 4. Starter handle | 17. Lower tube |
| 5. Primer | 18. Protection cover |
| 6. Choke lever | 19. Trimmer head |
| 7. Dip stick lever for oil | 20. Blade |
| 21. Funnel | |
| 8. Fuel tank | 22. measuring glass |
| 9. Suspension point | 23. 8~10mm spanner |
| 10. N/A | 24. 5mm Allen key |
| 11. Safety lever | 25. 4mm Allen key |
| 12. Throttle trigger | 26. Socket spanner |
| 13. “U”-Handle | 27. Harness |
Figure 2.
| 1. | Choke |
| 2. | Recoiling starter handle |
| 3. | Air filter |
| 4. | Primer |
| 5. | Fuel tank |
Figure 5.
| 1. | Start/Stop button |
| 2. | Safety button |
| 3. | Lock for gas handle |
| 4. | Throttle trigger |
Figure 6.
| 1. Allen wrench |
| a. Bushing with projection |
Figure 7.
| a. Bushing with projection |
| b. Blade |
| c. Washer |
| d. Cup |
| e. Nut |
Figure 14.
| a. Bushing with projection |
| b. Trimmer head |
Figure 16.
| 1. Allen wrench |
| a. Bushing with projection |
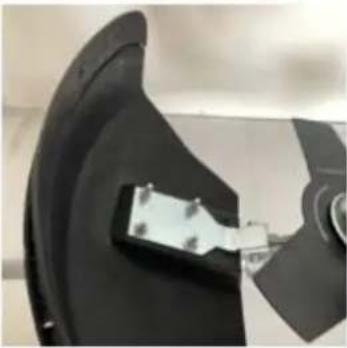
Fit screen using screws supplied. Check screen is secure.
See figure 3.
Fit handle and ensure machine is balanced. Also make sure the machine is comfortable to use for the user.
See figure 4.
5. Switch from Trimmer to Brushcutter
Removing trimmer head - figures 16, 17.
-
Insert the Allen key (1) provided into trimmer gear hole and bushing (a) to secure the shaft.
-
Unscrew twine head clockwise.
Note! Keep trimmer head parts together for later use.
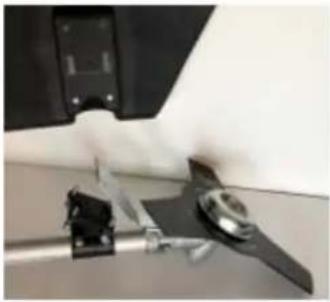
Fitting blade – figures 6, 7, 8
- Insert the Allen key (1) provided into trimmer gear hole and bushing (a) to secure the shaft.
- Mount the blade (b) on the bushing (a), making sure that the projection on the bushing fits in the blade's fitting hole.
- Fit the washer (c) and cup (d) against the blade, and finish by fitting nut (f). Make sure the washer is facing the proper direction (flat side against blade).
- Remove the allenwrench before use.
Always ensure blade is secure. If in doubt, contact your nearest dealer.
Using the blade
- Keep blade in dense grass or weeds when stopping engine until rotation has ceased.
- Always hold machine securely in both hands.
- Do not use if screen is incorrectly fitted and in poor condition.
- Always stop engine before removing any materials stuck in blade.
-
Never attempt to touch or stop blade while it is rotating.
-
A rotating blade can cause injury, as it will continue to rotate after the engine is stopped or gas regulator activated. Always maintain control over the machine until blade stops completely.
-
Always ensure blade is correctly fitted before use.
-
Always use a sharp blade. Replace damaged or worn blades.
-
Use original spare parts only.
-
Use blade only for weeds, grass and the like.
-
Kickback is a reaction that can occur when a rotating blade comes into contact with something it cannot cut. This can cause the blade to stop for a moment, causing the machine to recoil from the object it hit. This reaction can be so violent that control over the machine can be lost. Kickback can occur without warning if the blade gets stuck, loses speed or is impaired. This is more likely to occur in areas where it can be hard to see the material to be cut.
-
Always ensure strap is properly adjusted.
-
Maintain a firm grip on both handles while blade is in use. Keep blade away from body and under waist height.
Removing blade - figures 6, 7, 8.
- Insert the Allen wrench (1) provided into trimmer gear hole and bushing (a) to secure the shaft.
- Screw off the nut (f).
- Remove cup (d), washer (c) and blade (b).
Note! Keep blade parts together for later use.
Fitting trimmer head - figures 14, 15, 16, 17.
- Mount bushing (a)
- Place the provided allen wrench (1) in the hole in the gearhousing, make sure it goes through the hole in the bushing (a), so it is locked.
- Mount the trimmerhead (c) (turn counterclockwise), make sure it is tightenen proberly.
- Remove the allenwrench before use.
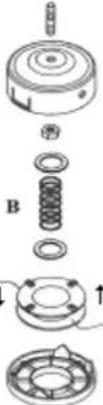
7. Replacing Cord
- Stop engine.
- Press each side of cord housing. Remove lid.
- Remove roll by pulling. Allow spring to remain on spool. Remove any cord residue. Take 3-4 m of cord (2.4 mm) and double it up.
- Insert both ends into the 2 holes on the roll. Wind cord onto roll in direction of arrow. Avoid twisting cord. When twine is fully on roll, cut and insert the two cut ends through the guide holes.
- Assemble cord housing in reverse order, starting with spring. Place cord in cord housing holes.
- Re-place cover. Check cover is secure.
Figure 10.
Always ensure trimmer head is secured tightly. NEVER OVERFILL THE REEL! If in doubt, contact your nearest dealer.
8. Fuel
- This product is equipped with a 4-stroke engine.
- Always use unleaded gasoline (minimum octane 95)
- Use a clean, approved gas can.
- Do NOT use a gasoline mixture that is more than 90 days old, as it can cause problems starting engine. Do not store the same gasoline in tank for more than 30 days.
- Always drain tank prior to long-term storage.
Allow engine to cool for at least 2 minutes before fuelling.
Remove filler cap slowly. Place on a clean surface.
Carefully pour fuel into tank, avoiding spillage. Replace and tighten filler cap immediately. Wipe up spilt fuel.
Always switch engine off before filling. Never pour fuel into a machine that is running or when engine is hot. Move machine at least 3 meters away from filling site before starting engine.
Filling gasoline – No smoking!
9. Oil
When oil is filled in/checked, the brush cutter must lie down flat on ground!
Check the oil level on the dipstick. Fill oil so oil level is exactly between the 2 marks on the dipstick. See Figure 11. We recommend to fill max. 80 ml. engine oil in.
Caution: Overfilling might damage the engine!
Always check the oil level before starting the motor. Change the oil once a year or every 10th hour of operation.
Use the correct oil for the specific time of year
| By 20°C Between | 10°-20°C Below 10° | |
| SAE30 | SAE30 | SAE10W-30 |
10. Start/Stop
Starting a cold engine.
Place trimmer on a solid, level surface.
Set choke (figure 2.1).
Activate safety switch (figure 5.2), and press throttle (figure 5.4).
Lock handle with lock mechanism (figure 5.3).
Press the primer 5-8 times (figure 2.4).
Pull starter cord until engine starts (figure 2.2).
Set choke to run position (figure 2.1) when engine is warm.
Starting a warm engine:
Set choke (figure 2.1).
Pull starter cord until engine starts (figure 2.2).
Stopping engine:
Release throttle (figure 5.4).
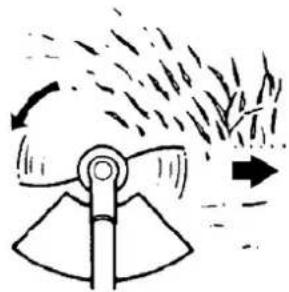
11. Operation.
Always cut high grass from the top and down. This will prevent grass from getting twisted around the drive shaft and trimmer head, which can cause overheating and damage. If grass or the like does get twisted around the drive shaft, STOP engine, detach spark plug lead and remove.
Trimmer
The cord is advanced by tapping the cord housing lightly on the ground while the motor is running at full speed.
Hold trimmer at an angle towards the area to be cut.
Figure 12 shows the best cutting zone. Always work from left to right.
Use cord to cut. Do not force cord housing into uncut grass. Wire and fences cause accelerated wear and can break cord. Stones and bricks, curbstones and wood cause very rapid cord wear. Work around trees and bushes. Bark and wooden ornaments, wood cladding and posts can be damaged by the cord.
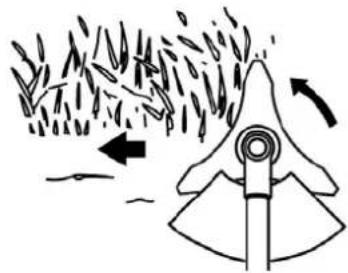
Brushcutter
Figure 13 shows the best cutting zone. Always work from right to left.
12. Air Filter
For correct performance and durability, keep air filter clean.
Remove air filter cover by unscrewing retaining screw.
Clean filter in warm soapy water and allow to dry completely. Soak filter in a little oil.
Squeeze any surplus oil out. If filter is very worn, replace.
Fit filter and cover. Check filter and cover are properly fitted.
Clean filter every 5 hours of operation, more frequently if working in dusty conditions.
13. Spark Plug
This machine is equipped with an spark plug which has a gap of 0.6 mm 0.7 mm. Replace annually for optimum performance.
14. Storage (Important)
IMPORTANT!
If the brush cutter is stored for more than 4 weeks, it is recommended to drain all fuel from the tank into an approved container. You can also let the engine run until the tank is completely empty and the engine stops. Push several times on the primer to get the last fuel out before machine is set for storage.
During storage over the vinter time, it is recommended also to empty the oil tank completely.
Always store the brush cutter in a horizontal position (place it on a surface)! Never re-use old gasoline and oil!
Clean the trimmer for grass and dirt and store it in frost-free conditions out of the reach of children. Observe all safety instructions concerning safe storage and handling of gasoline.
15. Troubleshooting
| PROBLEM POSSIBLE CAUSE SOLUTION | ||
| Engine will not start | 1. No spark. Check spark | plug. Remove spark plug,connect lead and place plug on cylinderblock. Pull starter cord. Check for spark.Repeat process with new spark plug if nospark appears. |
| 2. No fuel. Press fuel pump button. If problem recurs,contact dealer/repair shop. | ||
| 3. Engine flooded. Remove spark plug, turn trimmer over sothat spark plug hole points downwards.Set choke to "Run" and pull starter cord10 – 15 times. Clean spark plug. andscrew back on. Replace if necessary.Pull starter cord 3 times with choke set to"Run". If engine fails to start, set choke to"Choke" and perform normal startprocedure. If engine still fails to start,repeat procedure with a new spark plug. | ||
| 4. Starter cord requiresmore effort than whennew. | Contact dealer/repair shop. | |
| Engine starts, butwill not accelerate | Carburetor needsadjustment. | Contact repair shop. |
| Engine starts, butwill only run at fullthrottle with halfchoke. | Carburetor needsadjustment, repair orcleaning. | Contact repair shop. |
| Engine starts, runsand accelerates, butwill not run in idle. | Carburetor needsadjustment. | Contact repair shop. |
| Cord cannot beextended. | 1. Cord melted.2. Insufficient cord onspool.3. Cord worn down.4. Cord tangled withspool.5. Engine RPM too low. | Replace. Trimmer operating too close tostones and walls.Fit more cord.Advance cord while alternatively pressingand releasing cord housing.Remove cord from spool, roll on once more.Advance cord at full throttle. |
| Grass getting twistedaround drive shaftand cord housing. | 1. High grass being cutat ground level.2. Trimmer used at lowRPM. | Cut grass from top and down.Use trimmer at high RPM. |
| Cord spool hard toturn. | Threads dirty, damagedor full of grass. | Clean threads, lubricate with grease.Replace spool if necessary. |
| Engine will not reachfull speed andproduces a lot ofsmoke. | 1. Check fuel. Use new fuel. | |
| 2. Air filter dirty. Clean or3. Carburetor needsadjustment. | replace.Contact repair shop. | |
16. Specifications
| BC358D | |
| Gears | Automatic centrifugal clutch |
| Handlebar | V |
| Weight (kg) | 8,2 |
| Carburetor | Membrane ype |
| Engine (cc) | 35.8 |
| Start | Recoil |
| Fuel | Octane |
| Fuel tank capacity (L) | 0.65 |
| Oil SAE30 / SAE10W-30 - 80 ml | |
| Trimmer cord thickness (mm) | 2.4 mm |
| Length with blade (cm) | 190 |
| Spark plug Part no. 442441 | |
| Blade 3-tooth + 80-tooth | |
| Trimmer head Tapn' | go 2 cord |
Because of continued product development, Texas A/S reserves the right to improve the product without obligation, to improve already sold models.
The warranty period is 2 years for private end users in EU countries.
Products sold for commercial use, only have a warranty period of 1 year.
The warranty covers material and/or fabrication faults.
Restrictions and requirements
Normal wear and replacement of wearing parts are NOT covered by the warranty.
Wearing parts, which are NOT covered for more than 12 months:
- Blades
- Spools with nylon line (trimmerheads)
- Cables
- Switches
- Membranes/gaskets
- Spark plugs
• Engine liquids (oil, gasoline, grease) - Starter cords
- Filters
If you start the engine without adding correct fuel mix of gasoline and 2-stroke oil, it will be damaged and cannot be repaired and therefore not covered by the warranty.
The warranty does NOT cover damages/faults caused by:
- Lack of service and maintenance
• Structural changes - Exposure to unusual external conditions
- Damages to the bodywork, deck, handles, panels etc.
- If the machine has been improperly used or overloaded
- Wrong use of oil, gasoline, grease or other liquid types, which are not recommended in this user manual
- Bad or dirty gasoline, which results in contamination of the fuel system
- Use of unoriginal spare parts.
- Other conditions where Texas cannot be held responsible.
Whether a case is a warranty claim or not is determined in each case by an authorized service center.
Your receipt is your warranty note, why it should always be kept safe.
REMEMBER: The purchase of spare parts as well as any request for warranty repair, model number, year and serial number should always been informed. It can be found on the CE-label on the machine!
* We reserve the right to change the conditions and accept no liability for any misprints
23.8-10mm Skrue Schraubschlüssel
24.5mm Inbusschlüssel
25.4mm Inbusschlüssel
-
Zündkerzenschlüssel
-
Gurt
Abbildung 2.
Testa portafilo adatta – figure 14, 15, 16, 17.
Vibrations a_h=6.40 m/s^2 (left handle) / 5.23 m/s ^2 (right handle), K = 1.5 m/s ^2
EU V : e24*2016/1628*2017/656SHA1/P*0063*00
Serial numbers:
S/N 2301401001 - 2512409999
Texas Andreas Petersen A/S
Knullen 22 • DK-5260 Odense S 02.09.2022
Responsible for documentation
Johnny Lolk

text_image
Henry TahnJohnny Lolk
Managing Director