
Razor 4810TRM - Lawn mower Texas - Free user manual and instructions
Find the device manual for free Razor 4810TRM Texas in PDF.

| Product Type | Gasoline Lawn Mower |
| Brand | Texas |
| Model | Razor 4810TRM |
| Engine | TG470VT, 139 cc |
| Start Type | Recoil starter (broom handle) |
| Cutting Width | Not explicitly specified, approximately 46 cm (estimate) |
| Cutting Height Adjustment | 5 positions, from 25 mm to 75 mm |
| Self-propelled engine | Yes, rear wheel drive |
| Blade Brake | Yes, engine and blade stop in 3 seconds |
| Collection System | Not specified, but has a water injector for cleaning |
| Weight | 35 kg |
| Wheel Diameter | 8 inches (20.3 cm) |
| Oil Tank Capacity | 0.6 liter |
| Recommended Engine Oil Type | SAE-30 |
| Fuel Type | Unleaded gasoline 95 |
| Spark Plug Gap | 0.7 to 0.8 mm |
| Sound Pressure Level | 76.17 dB(A) (uncertainty 3 dB) |
| Guaranteed Sound Power Level | 95 dB(A) |
| Warranty | 2 years |
Frequently Asked Questions - Razor 4810TRM Texas
User questions about Razor 4810TRM Texas
0 question about this device. Answer the ones you know or ask your own.
Ask a new question about this device
Download the instructions for your Lawn mower in PDF format for free! Find your manual Razor 4810TRM - Texas and take your electronic device back in hand. On this page are published all the documents necessary for the use of your device. Razor 4810TRM by Texas.
USER MANUAL Razor 4810TRM Texas
DENKEN SIE DARAN, VOR
INBETRIEBNAHME MOTOROL (SAE-30)
AUFZUFULLENI
1

11
12
TEXAS
TEXAS A/S KNULLEN 22
DK-5260 ODENSE S. DENMARK
RAZOR 4810TR/M
Lawn mower
2.3 kW - 3000/min - 35 kg
Art.no.90061131
S/N:

C
WWW.TEXAS.DK
2018


Adverselssymboler / Warning symbols / Warnsymbole / Simboluri de avertizare


D
DK
Laas betjenings-vejoladingen
grundigt for maskinen
benytes
Benyt horevaarn og
sikkerhedsbriller.
Advarsel:
Please read the user manual carefully before operating the machine.
Always wear eye and ear
protection.
Warning:
Safety information about hazards that can result in personal injury
Warning:
Pay attention to thrown objects
Do not use on hills above 22^ Do not touch rotating parts
Remove the spark plug cap from the spark plug before service or repair
Stop the engine before cleaning of work area.
Keep distance to other people, children and animals
Warning:
The blade is sharp, do not touch the knife
Do not place hands or feet under cutting deck
Warning:
Always use correct tools and original spare parts
D
GB Original instructions
Safety. 10
Identification of the parts 11
Mounting 11
Cable Adjustment 11
Operation 12
Mulching 12
Water nozzle 12
Oil change 12
Air Filter. 12
Blade 12
Spark plug. 13
Storage and maintenance 13
Warranty terms and conditions. 13
Technical specifications 39
Troubleshooting 41
CE Certificate of conformity 48
Safety
Setup
4 Do not put hands or feet near or under rotating parts.
Read this manual carefully. Make sure that you are familiar with the different controls, settings and handles of the equipment.
4 Know how to stop the unit and ensure that you are familiar with emergency stop.
4 Never allow children or people unfamiliar with these instructions to use the machine. Note, that local regulations can restrict the age of the operator.
If you feel unwell, tired or have consumed alcohol or drugs, do not operate the machine.
Always inspect the machine before usage Ensure that no parts are worn or damaged.
Replace worn out or damaged elements and bolts in sets to preserve balance.
The operator of the machine is responsible for people's safety.
Never use the machine near children or animals.
The operator of the machine is held liable for any accidents or hazards to other people and their property.
Thoroughly inspect the area, where the equipment is to be used, if necessary remove any foreign objects.
4 Do not refuel gasoline indoors or while the engine is running.
Spilled gasoline is extremely flammable, never refuel while the engine is still hot.
1 Wipe off any spilled gasoline before starting the engine. Spilled gasoline on a hot engine may cause a fire or explosion!
4 Boots with non-slip soles with steel jacket is required. Avoid loose-fitting clothes.
Operation
After striking a foreign object, stop the engine immediately, remove the spark plug cap and inspect the machine thoroughly for damage. Repair the damage before continuing.
If the machine should start to vibrate abnormally, stop the engine and check immediately for the cause. Vibration is generally a warning of damage.
Always turn off the engine and ensure that all moving parts have come to a complete stop before making any repairs, adjustments, or inspections.
Exercise extreme caution when operating on slopes.
1 Never operate the machine at a fast pace.
Do not overload machine capacity by attempting to push at too fast a rate.
Do not carry passengers.
1 Never allow any bystanders in front of unit.
Only operate the machine at daylight or in fully illuminated areas.
Ensure a stable foothold and always keep a firm hold on the handles. Always walk, never run.
1 Do not operate the machine when barefoot or wearing sandals.
Exercise extreme caution when changing direction on slopes
1 Never attempt to make any adjustments, while the engine is running.
Use extreme caution when reversing or pulling the machine backwards
1 Never operate the engine indoor or in areas with low ventilation. The exhaustion from the engine contains carbon monoxide. Failure to observe could result in permanent injury or death.
Due to vibrations from the handle, long time use can result in white fingers. If fatigue is felt in arms, hands or fingers - or visible signs of white fingers is appearing, the work should be stopped immediately and a sufficient time of break should be taken for recovery. To avoid white fingers, each user should operate the machine for no more than 1.5 hours per day.
Gasoline safety
Use extreme care in handling gasoline.
Gasoline is extremely flammable and the fumes are explosive. Serious personal injury can occur, when gasoline is spilled on yourself or your clothes. Rinse your skin and change clothes immediately!
Use only an approved gasoline container. Do not use soft drink bottle or similar!
1 Extinguish all cigarettes, cigars, pipes and other sources of ignition.
1 Never refuel your machine indoors.
Let the engine cool down before refilling
1 Never fill the fuel tank to more than 2.5cm below filler in order to provide space for fuel to expansion.
After refueling, ensure that the cap tighten securely.
1 Never use the lock-function on the gasoline gun, when refueling.
Do not smoke while refueling.
1 Never refuel gasoline inside a building or where gasoline fumes may get in contact with an ignition source.
1 Keep gasoline and engine away from appliance, pilot lights, barbecues, electric appliances, power tools, etc.
Maintenance and storage
4 The engine shall be stopped when carrying out maintenance and cleaning operations, when changing tools and when being transported by means other than under its own power.
4 Check regularly that all bolts and nuts are tightened. Retighten if necessary.
The engine must be completely cooled before storing indoors or covered.
If the machine unused for a period of time, please refer to the instructions in this manual.
4 Maintain or replace safety and instruction labels, as necessary.
Only use original spare parts or accessories. If not original parts or accessories is used, the liability is no longer applied.
Miscellaneous
The motor is not pre-filled with oil.
Always before start check the engine oil level.
4 Factory-fitted control devices, such as the handle-mounted clutch cable, must not be removed or exposed.
Only drain the fuel tank outdoors. Gasoline is extremely flammable and the fumes are explosive.
Ensure that the machine is properly secured when transported on a flatbed etc.

Waste electrical products must not be disposed of with the household waste. This tool should be taken to your local recycling centre for safe treatment.
The lawnmower is manufactured according to the latest safety requirements. These include a blade brake that stops the motor and blade in 3 seconds when the blade brake. Every precaution is only effective when it is followed exactly. Use the following description when you mount your lawnmower.
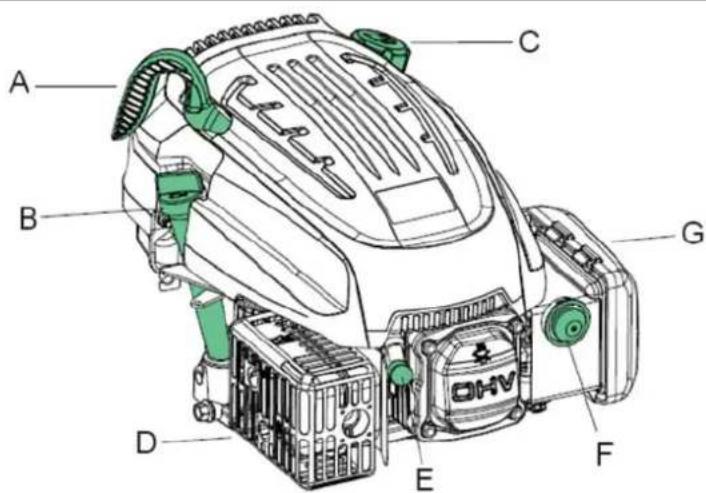
Identification of the parts
See Illustration 1
Notice: the illustrations may vary from your present model
A. Recoil starter (start cord)
B. Oil cap
C. Gasoline filling cap
D. Exhaust
E. Spark plug
F. Primer
G. Air filter
H. Handlebar for drive
I. Handlebar for engine brake
J. Wing nut
K. Water nozzle
L. Grass knife (only model 4810TR/M)
M. Lifting handle
N. Height adjustment
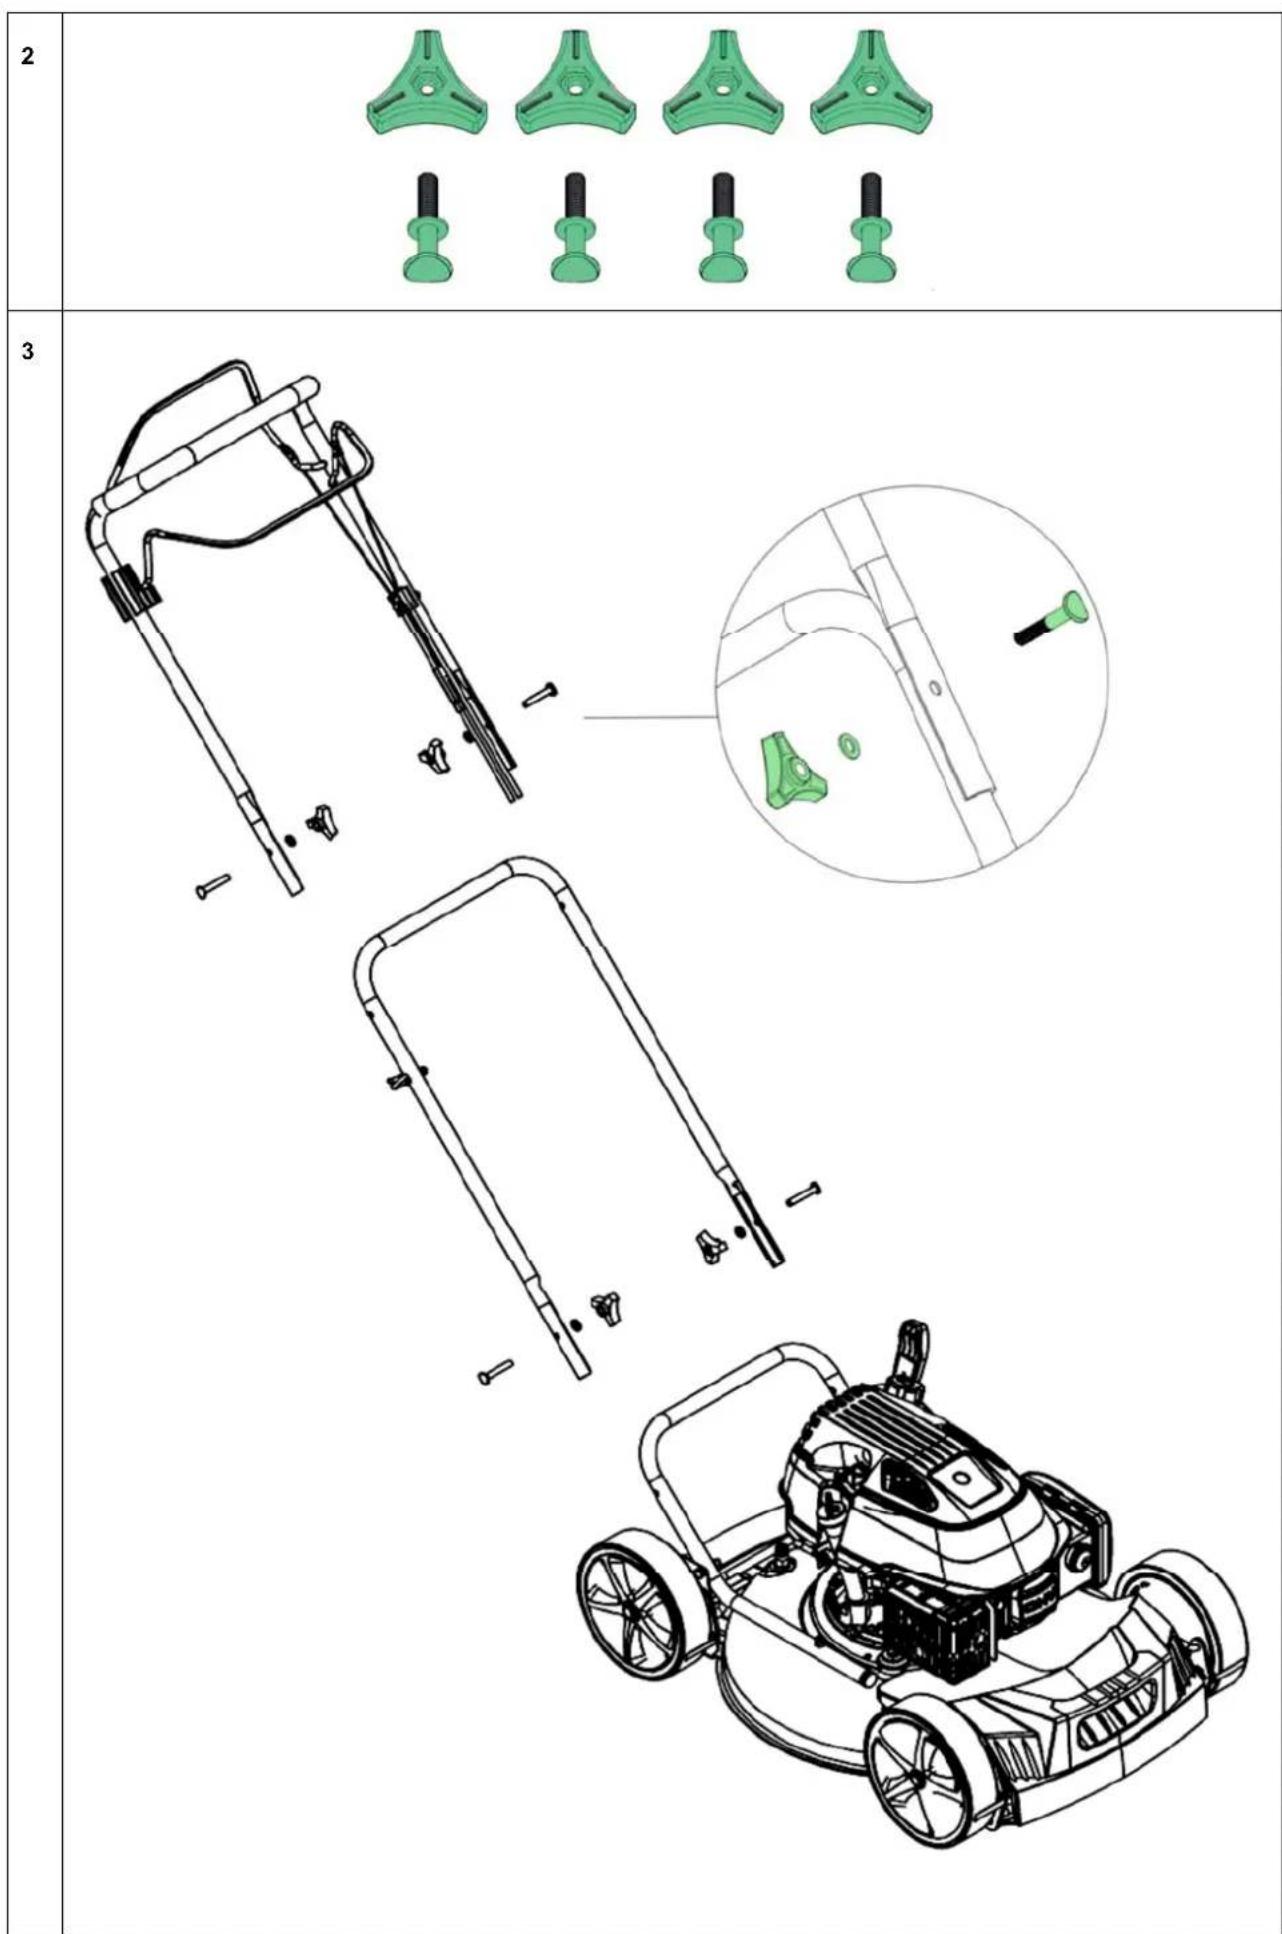
Mounting
Unpacking: Remove the mower from the box by pulling the machine out form the side. The box contains:
1 pcs mower
4 pcs wing nut set consisting of wing nuts, bolts and washers. (See illustration 2)
Warning: Ensure that cables are not pinched.
Assembly of handlebar: Illustration 3
- Attach the wing nut from the inside of the side bracket and into the lower handlebar.
- Attach the upper handlebar on the lower. Fasten with wing nut from the inside of the handlebar.
- Customize cable and secure with cable clamps
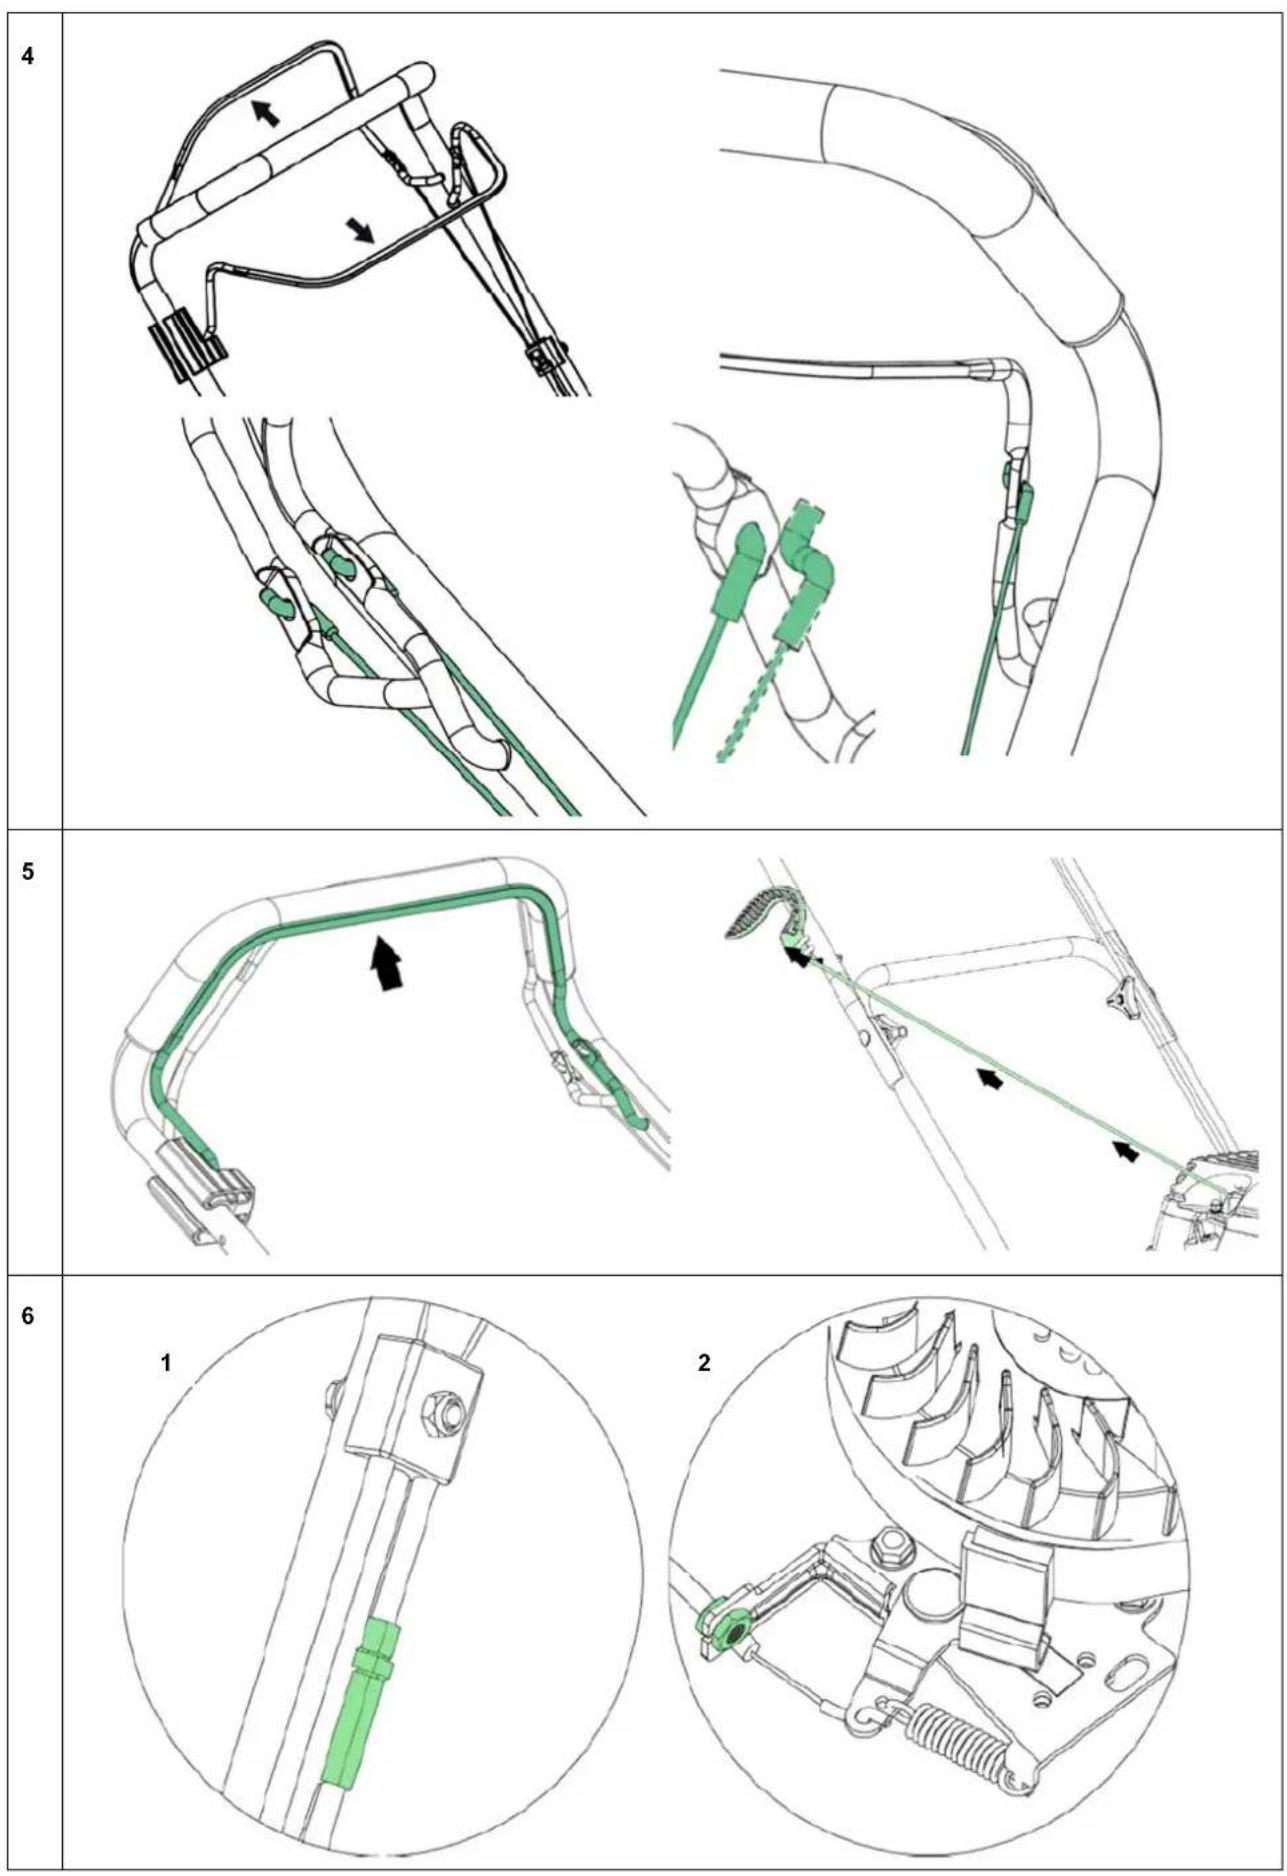
Mounting the engine brake cable: Illustration 4
- Gently push the top handlebar forward
- Insert the engine brake cable from the outside, into the hole in the bracket on handlebar and lock.
Mounting the drive cable: Illustration 4
- Gently push the lower handlebar downward
- Insert the drive cable from the inside, into the hole in the bracket on handlebar and lock.
Mounting the start cord: Illustration 5
- Pull the engine brake handlebar and hold in order to release the starter cord on the engine.
- Pull gently the starter cord from the engine (Engine brake handlebar MUST be hold)
- Attach the starter grip on the rack of handlebar.
- Release the engine brake handlebar and the starter grip.
Cable Adjustment
Before the machine is being used, the cable adjustment should always be checked.
The cables can be checked by activating the handles fully and check if the cable is tight. If not, it must be tightened. If the handle cannot easily be fully activated, the cable should be loosened.
After first season, it must be expected that the cables need to be adjusted for optimal activation, as cables can stretch when used.
The following cables may be necessary to readjust: Illustration 6
- Cable for drive
- Cable for engine brake
Adjusting the drive cable: Illustration 6-1
If you experience slack in the drive cable, this can be solved simply by tighten or loosen the bolt on the cable.
- Tighten turning clockwise - loosen the cable.
- Tighten turning anti clockwise - tighten the cable.
Adjusting the engine brake cable: Illustration 6-2
If you experience slack in engine brake cable, this can be solved simply by tighten or loosen the bolt on the engine block.
Operation
Always check and refill oil before the start! Read and apply the instructions given in the enclosed start guide!
The oil level should always be between min. and max on the dipstick. Fill with SAE-30 oil. There should be total 0.6 liter oil in the engine. Use only unleaded 95 octane fuel to the engine. Never overfill the tank.
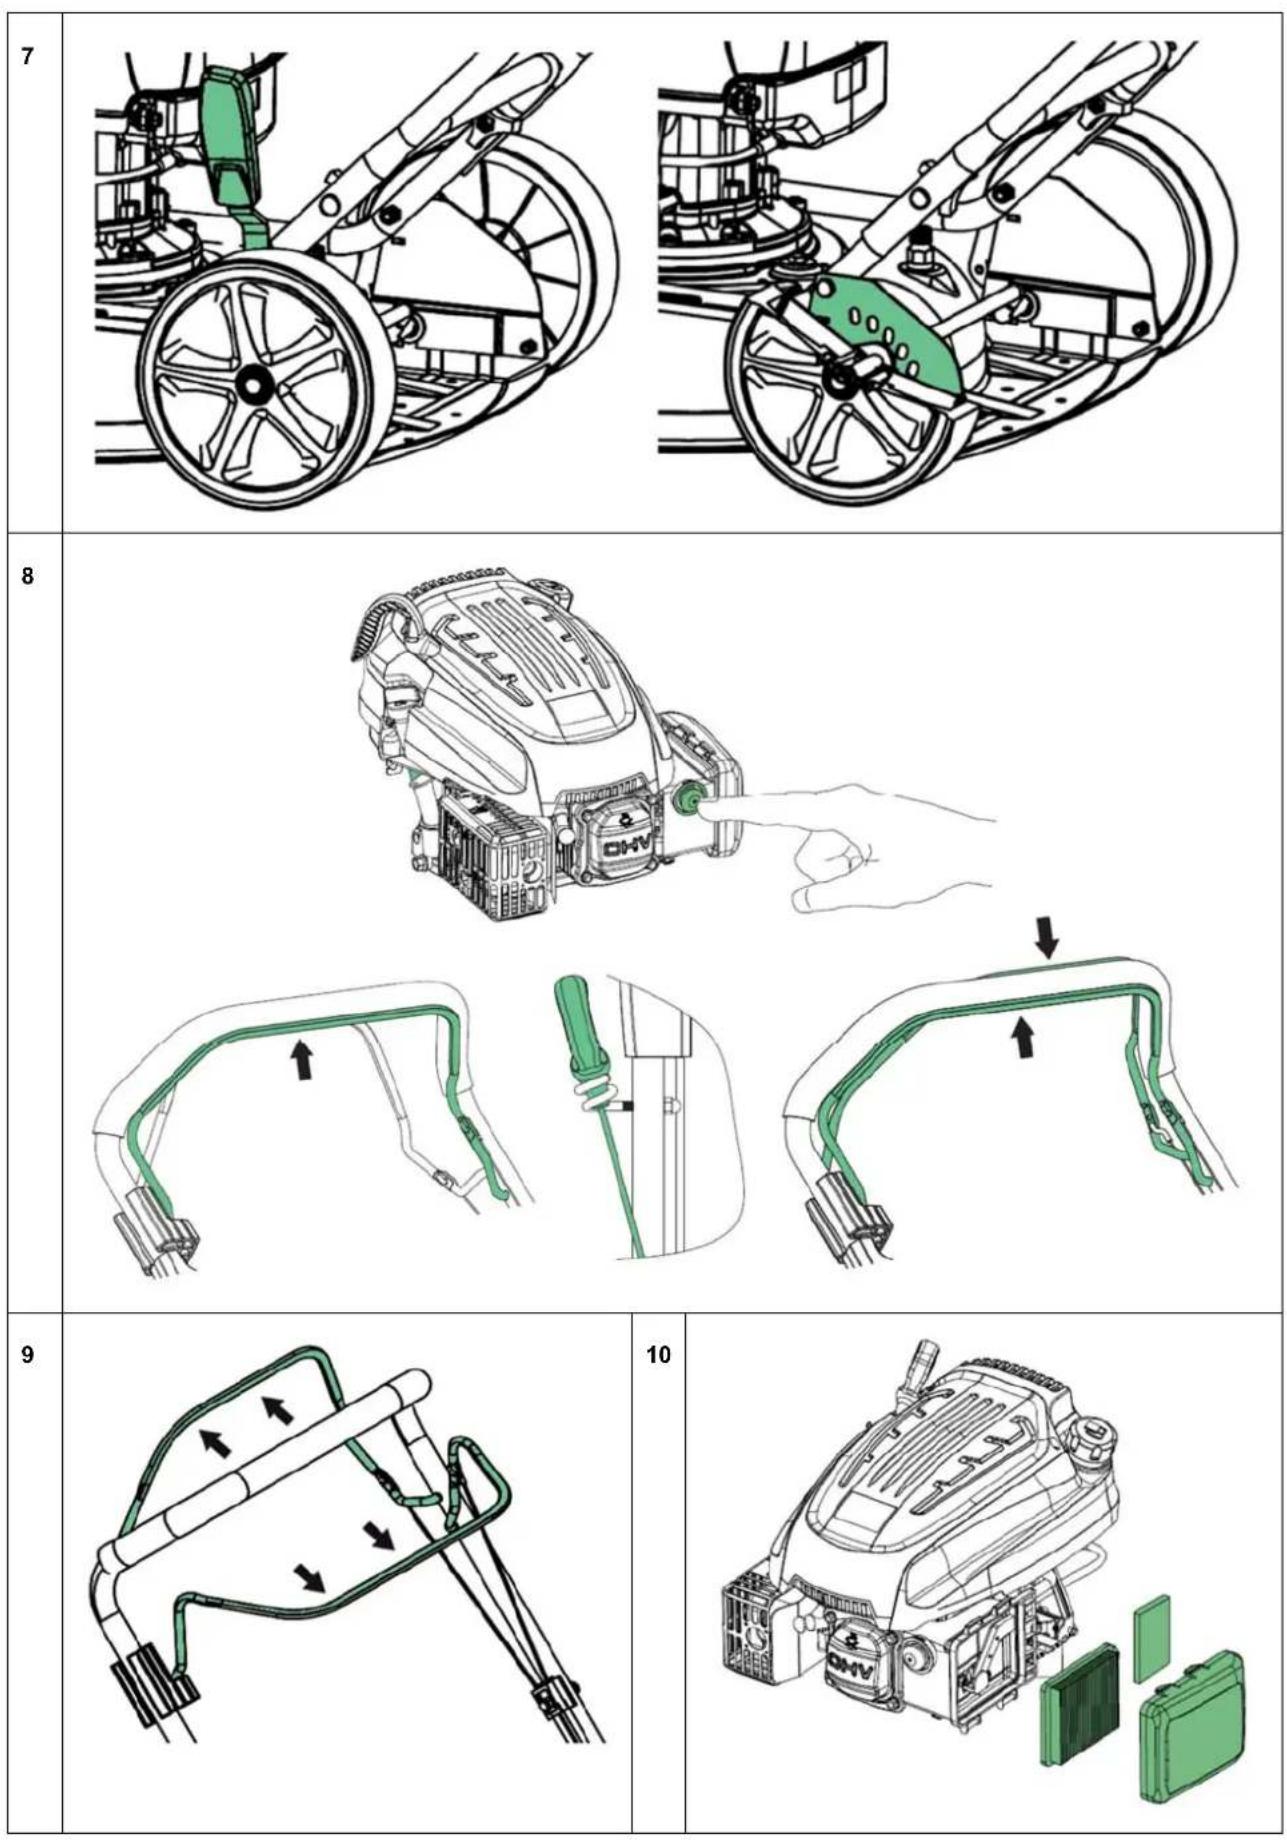
Cutting height adjustment: Illustration 7
The mower has 5 different heights. The cutting height ranges from 25mm to 75mm
Start: Never start the mower directly on long grass.
Recoil with primer: Illustration 8
- Push the primer several times, first time push 1-3 times, if necessary supplement with up to 3-5 times.
Note: It is not possible to drown engine - Hold the handlebar for the engine brake; this will release the engine brake.
- Pull the recoil starter gently until you feel resistance in the rope, then pull quickly and energetic. Do not at any time let go of the recoil starter but slide it gently into starting position.
- Hold the bar for self-propelled in order to start mowing
Warning: Do not use on hills above 22^
Note: As long as operating the mower, the bar forengine brake must be engaged.
Stop: Illustration 9
- Release the engine brake and self-propelled bar to turn off the mower and the engine
Note: The blades will still rotate at up to 3 seconds after stopping.
Mulching
To get the optimal result from mulching, it is necessary to cut the grass 1-2 times per week, depending on how fast the grass grows. The grass should be completely dry, or else it can clump and maximum 2 - 3cm of the length should be cut off every time.
Water nozzle
The left side of the mower deck is fitted with a water nozzle for washing the deck. (See Illustration 1-K)
- When using the water nozzle, the machine must be in the lowest height position and placed on the lawn. This ensures that the water remains under the deck during cleaning.
- Attach a hose to the nozzle.
- Turn on the water and start the engine.
- The rotations of the blades will ensure that the water will clean the underside of the deck.
Note: For best result clean the deck with the water nozzle function right after each mowing. If the grass dries out, this function will not work optimally.
Oil change
Oil should be changed for the first time after 5 hours, then at least 1 time per year.
You will need an oil extractor kit. Art. no. 40-11336
Oil and oil extractor kit is not included
Use an extractor kit and do as follows:
- Turn on the engine and let it run for 5 min or until the engine is hot. A hot engine liquefies the oil which makes it easier to drain.
- Suck the oil up through the oil filler hole using the syringe that came with the oil extractor kit. Use the hose to reach the sump.
- Transfer the used oil into a empty container.
- Fill the engine with SAE-30 oil.
- Check the oil level using the dipstick. (Min / Max)
Remember to dispose the used oil so that it does no harm to nature. Use your local recycling station.
Air Filter
The air filter should be inspected and cleaned regularly. If the filter has not been cleaned for a long time, the engine's power will drop.
See Illustration 10
- Clean around the air filter before removing the cap.
- Push the two flaps down and gently pull the cover
- Carefully remove the paper filter and inspect it. Brush it with a soft brush. If it is very dirty, replace it. Be careful that no dirt gets into the inlet.
- Wash the black foam element in the right side in warm water and soap.
- Press the water out of the foam element and let it dry. Put a few drops of SAE-30 oil on the filter to moisten it lightly. Carefully squeeze any surplus oil out of the foam element and reattach.
- Please note that all parts are assembled correctly and properly closed, as shown in the picture.
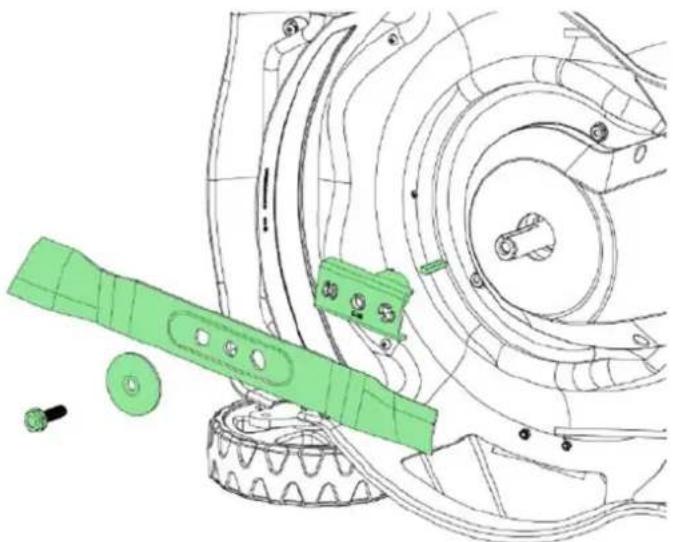
Blade
Inspection of the blade
- Tilt the mower with the front upwards.
- Inspect blade for damage, cracks or excessive rust or corrosion.
- Check that the blade bolt is tightened.
Note: A dull blade can be sharpened! But a blade that is worn, bent, cracked or otherwise damaged must be replaced.
Removing the blade: See illustration 11
If you remove the blade to sharpen or replace it, you must use a torque wrench and some heavy gloves to protect your hands.
- Loosen the blade bolt. Use a piece of wood to prevent the blade from turning around.
- Remove the bolt, washer, blade and blade holder in that order
- Sharpen or replace the blade.
- Insert the blade holder, blade, washer and bolt in that order.
- Tighten the blade bolt with 50Nm . Use a piece of wood to prevent the blade from turning around.
Warning: A blade must be sharpened so it is in 100% balance, otherwise it may cause vibrations that could damage the engine. Damage to engine due to faulty sharpening is not covered by warranty. We therefore recommend letting a service center sharpen the blade.
Spark plug
- Remove the spark plug.
- Brush off dirt from the spark plug.
- Use a spark plug wrench to loosen the spark plug.
- Check the insulation is intact.
- Clean the spark plug with a wire brush.
- Measure the electrode, taking care not to damage the electrode.
- The distance should be: 0.7 to 0.8mm
- If the spark plug is undamaged refit or replace. Art.no.40-11294
- Reattach the spark plug.
Storage and maintenance
Maintain your lawnmower: Check all bolts, screws, nuts and deck. Dismount the blade and the belt plastic cover for regular cleaning. Always make sure that the blade is sharp. It's a good idea to take your lawn mower to an annual service check with your authorized service dealer. See your nearest service center at www texas.dk.
Storage: After use the lawnmower kept in a dry and clean room. Clean the machine after every use. Grass and dirt must be removed from the underside of the deck. By tipping the mower (for cleaning) is recommended to tilt the front up (max. 45 degrees). If you tilt it sideways, the carburetor and air filter always face upwards, since oil may run out and destroy the engine. Be aware that removing the spark plug before the mower maintenance.
Winter storage: Empty the fuel tank and let the engine run until the gasoline in the carburetor is used up. Spark plug removed. Remove the spark plug and add a teaspoon of oil (engine oil) in the hole. Pull the starter to distribute oil. Mount the spark plug, but not the spark plug cap. Change oil as described in the section above. Spray silicone lubrication into the cables and move them.
Finally, clean the mower thoroughly. Dip a cloth in oil and luricate metal parts to prevent rust.
Warranty terms and conditions
The warranty period is 2 years for private end users in EU countries.
Products sold for commercial use, only have a warranty period of 1 year.
The warranty covers material and/or fabrication faults.
Restrictions and requirements
Normal wear and replacement of wearing parts are NOT covered by the warranty.
Wearing parts, which are NOT covered for more than 12 months:
Blades
Cables
Belts
Fuses
Switches
- Membranes/gaskets
Spark plugs
Engine liquids (oil, gasoline)
- Starter cords
- Filters
If you start the engine without adding oil, it will be damaged and cannot be repaired and therefore not covered by the warranty.
The warranty does NOT cover damages/faults caused by:
- Lack of service and maintenance
Structural changes - Exposure to unusual external conditions
- Damages to the bodywork, deck, handles, panels etc.
- If the machine has been improperly used or overloaded
- Wrong use of oil, gasoline or other liquid types, which are not recommended in this user manual
- Bad or dirty gasoline, which results in contamination of the fuel system
- Use of unoriginal spare parts.
- Other conditions where Texas cannot be held responsible.
Whether a case is a warranty claim or not is determined in each case by an authorized service center.
Your receipt is your warranty note, why it should always be kept safe.
REMEMBER: The purchase of spare parts as well as any request for warranty repair, art. number (e.g. 900665XX), year and serial number should always be informed. It can be found on the CE-label located on the back of the engine (see illustration 12).
- We reserve the right to change the conditions and accept no liability for any misprints
PeryJnpoBkA BbICOTbI NOKOCA: PcyHOK 7
Ta3OHOKOcNka HMeet 5 ypOBHeB BbICtBcTpyKKn. BbICota CtpnKKn BapbpnyeTcR O2 75 MM.
Nyck: HnKorda He 3ayncKaaTe ra3oHOKocNIky HnOncpeDCTBeHHo Ha HeKOuEHHO TpaBe.
3anyck c nomooubno npaimepa, pucyHok 8
-
Heckolbko pa3 haxmnte Ha KhoNky nycOBoro npaimepa: 1-3 haxatnДЯ nepBOrO pa3a n do 3-5 haxatn B clyae Heo6xOIMOCtI. PpmeuHHe: 3aJIntb DBrIrataTeNb HeBO3MOJHO.
-
YdepxkBaIte pykoTb InT TopMoXeHnIy DInrataTeI, 3TOOCBO6OHTTOPMO3a.
- Clerka notaHnTe shyp cTape, noka He noCyBCTByeTe conpOtnBneHne shhya, TOrda dePHnte ero 6bICTpo n3HeprnuHo. Hn npu KaKnx obcToarTeNbCTbAx He OTnyckaiTe shHypoBoi cTapTeP, MeIeHHo daIte Emy BepHyTbcB INCXoDHO neIOJKeHne.
- YdepKnBaIe pyKoTb IJIra camOXoHOrO peKIma, YTO6bI Haatb KoWeHHe.
IpeDynpexJeHHe HcNoB3OBaTb HaCKHOHa X BIIe 22°
PpmeaHHe: PyKoTb TOPMOKeHn DnIraTeJIa DOJIxHa 6bITb Haxata Ha npOTJKeHn Bcero BpeMeHn pa60tblra3OHOKOCINK.
OctaHOBka: PmcyHOK 9
- Otnyctnte pyuKy topmo3a DBuratela n pykoarb camoxoHoro pexima dna OTKnHoyehn Kocunkn N ee DBuratela.
PpmeaHHe: Hox npoDOnkaeT BpaauOTcA Do 3-x cekynd nocne octaHOBKn.
HacaKa Dnpa36pb3rNBaHH
B JEBOJ YACTN DEKn Ra3OHOKCINKn paCNOIOKeHa HacaIka IJIpa36pbI3rNBaHn,OCyIeCTBJIYUQaI npOMbIKy DEKn. (CM. pncyHOK 1-K)
Pn nCnONb3OBaHH Bnycka BOdy MaHINHa DOnKHa 6BtB yCTaHOBNeHa Ha MNHMaNbHyIO BbICOTy n pacNoJIOKeHa Ha rA3OHe. BnaOApra 3TOMy BOda OCTaHETcnoD HnIeM.
- PnKpeNITe K HacaKe WlaHr.
BknHouHTe BOy n 3anyCTte DnurTaTeNb.
BpaueHne HOka rapaHTnpyET BOHyIO OuNCTKU HxKHeu Yactn DeKe Nra3OHOKOcNKn.
PpmeaHHe: Hnnyuero pe3yIbTaT, nocKeKaJdOro NOKOCA OUnuAte Deky C NOMUbIONoD6HOro pa36pbIsrMaHn. He donyckaiTe BBcixAHn TpaBbl-e6 Byet TpydHO ydaNtB.
3aMeHa Macna
IepBbipa3Macno Heo6xOIMO CmEHITbYepe3 IBa yaca, 3aTeM -He pexe Ondoro pa3a B roJ.
Bam notpe6yETcHabOp nIaIz3aMeHbI MaCna. HOMep cTaTbN: 40-11336
MaNo Ha6Op dJa 3aMeHb MaNa He BKJIIOueHb B IocTabky
IcnoJIb3yIte Ha6op IJn 3aMeHbI MaCJa CneDyuOuIM o6pa30M:
- 3anyctnte DBIraTeNb KocNlKn N daIte Em npa6oTaTb MNHyT 5 nn Do HarpBa. HarpeTb I DBIraTeNb pa3KnKaet MacNo, oBnerqA erO cToK.
- Cnne Te Macno Yepe3 OTBepCTne MacnaHoro
ФиNbTpa, C NOMOuBcN CnpHcOBKn, NOCTaBnREMOB
BMecTe C KOMnEeKToM dIg 3aMeHb MaCJa.
NcNoJIb3yIte IJNaHr YTO6bl Do6paTbc DO Hn3a
MaCJraHOro KapTePa. - Перение оразботанhoe MacNo B nyctoI KOHTeINHep.
- 3aneTe B dBuratEnb Macno SAE-30.
- PpOBepbTe ypoBeHb MaCna MaCnHaHbIM UyIOM. (MnH./MaKc.)
IOMHHTe, YTO OTPa6oTaHHoe MaCNo HxKHO yTNIN3nPOBaTb, He npuynHra BpeD OkpykaioSei cpe. BocnoB3yTeCb ycnyramn MeCTHOrO ceHTpa nepepa6OTKn OTXoIOB.
06cnyXnBaHne Bo3dyuHoro nIbTp
Ioxaanyncta, npOBeprTte n uHCTnTe Bo3dyHbIn
fNtbpHa peryraHoi oChObE. Ecnu fNtbp He 6bln
OuHSeH B TeueHHe dNITeBHoro nepnoDa, 3TO MOKET
NOBnAHTb Ha paobTy dBnRaTeJn npNBecTu K erO
NoJOMKe.
cm.pncyHOK 10
- OuHCTnTe MeCTo BOKpyr BO3DyUHOrO FmIbTpappei CHaTHeM.
- AkkypaTHO CHIMNTE 6yMaXHbI ΦnIbTp IN npOBepbTe erO. OuCTnTe erO c nOMoUbIO MraKoI ueTKI. EcII nΦnIbTp oyeHb 3aRpa3HeH, 3aMeHnte erO.
- BbIMoTe npOIOHOBbI 3eMeHb TepNo MBbHOB BOe n npocuHTe erO.
4.CMOHTeΦnIbTpMacNoMSAE-30.AKKypaTHOBblabNTeN3NIuKmMacna.YCTaHOBNTeHaMeTO. - Y6eIITcB, YTO BCE DeTaJIY ycTaHOBJIeHbI npaBnIbHO n 3aKpOITe KpbIuKy, KaK NOKa3aHO Ha pncyHKe.
Hox
Поберка Нossa
- IonoKnte Kocnky nepedHue Bbepx.
- PpOBePbTe HOx Ha npEmdT NOBpeXdEnH, HAdIOMOB, Ype3MepHO pKxABuHbI IIN Kopp0HN.
PpOBepeTe 3aTgKky 60JTa HOXa.
PnmeaHne: 3atynBmnc HOK MOKHO 3aToHTb! Ondako CneDeYet 3ameHrTb CTapbIe, nORHyBwneCe, TpeChyBwne INK KAK-TO INHaue NOBpeXdeHHbIe HOKn.
CHRTHe HOXA: CM. pucyHOK 11
Ecnn Bbl CHImaeTe HOX, YTO6b HATOHTb NIN 3aMeHnTb ERO, BOCIOJIb3yITECb DnHAMOMETPNueCKIM KJIIOYOM I IIOOTHbIMN IEPaTKAMN DnAaNTbIpyK.
- Otnyctnte 6oJr HOxA. IcnoJIb3yIte DepeBraHHbI 6pycok, UTo6bl He dOnyctntb NobopoT HOxA.
- CHIMITE 60NT, 7a86y, ne3Bne n depkaTeNb HOXa NMeHHO B TAKoI NocJeDoBaTeNbHOCTN.
- HatoHTe NIN 3aMeHInTe HOK.
- BepHnTe He MeCTo DePkateJb HOxA, HOx, 7aM6y H 60Tt NMeHHO B TAKOI NocNeDobATEBHOCTN.
- 3aTaNHTe 6oNT HOxa. IcNoIb3ayTe DepeBraHHbIb 6pyocK, YTO6bI He dOnyCTnTB NobOpOT HOxa.
Octopoxho: HOK DOJIKKeH 6bITb HatoyeH Do 100%- ro 6baHaCA, INaue OH MOKeT Bb3BaTb ONaCHBe IJa DBnIaTeNa Bn6paun. NObpeXdEHHaDBrAteNc BCJeDCTBne PINOxo ININ HeBepHO 3aTOeHHOro Ne3BnHOxKa, rapaHTnHe NOJNeKaT. NoTOMy, JnA 3aToOKn Je3Bn, Mbl peKOMeHdyem BOCNOJIb3OBaTbCra YcNpyAMn cepBnCHOrO ueHTpa.
XpaHneHne n 06cnyKuBaHne
- CBeya 3axKurHn
- CHIMMTE CBEHNOK KOJNaOH.
- OuHCTIte MeCTo BOKpyr CBeU 3aXnRanHn IeTKoH.
- CBeuHbIM KJIIOHOM BblkpyTNTe CBeHy.
- IpoBepbTe ceJeIOCTHOCTb N3OJIaTOpa CBeuN.
- OuHCTHe CBeU KOpIeTkoJ
7.ИЗмерьтepacctOЯнe Мжdy элкtpoДamN. - PacToHHe MExdy 3NeKTpOaMn DOJIxHO 6bITb: 0,7-0,8 MM.
- Пи NOржденгс Всч -ЗамнITE e. HOMep ctaTbN: 40-11294
- YCTAHOBITE CBEHNOK KOJINaOK Ha MeCTO.
Texnueckoe 06nykBaHne
PeryIpaHNo 06cIyKbAaTe Ra3OHOKocNkky: IpoBepbTe 3atXkky BCero Kpenexa. PeryIpaH NoPobepaTe COCToHnE HOx HOx DOJKeH 6bITb BcERda OCTpbIM. PeKOMeHNyETcM HeTb HOx HpeKe Yem pa3 B Dba roJa. PeKOMeHNyETcO bpaaTaBCra B cepBnCHbI cHTp ODNH pa3 B rDnI npOBedeHnRA TexHnueCKOrO 06cIyKnBaHnR.
XpaHeHHe: XpaHHTe ra3OHOKOcNkY B cyXOM, YnCTOM NOMEueHN. OuHuaTe ra3OHOKoNkY nocJe kKaJDoRO MCNOJIb3OBaHnA, OuHuaTe BHyTpEHHIO NOBepxHOCTb DEKn OT TpaBbI rpr3n. IOnHMaIte nepeHIOU qAcTb RA3OHOKOcNkДЯ OUnCTKN BHyTpEHnE NOBepxHOCTn DEKn Ha yrOJ He 60onee 45 rpaYcoB. He HAKNoHnTe ra3OHOKOcNkY Habok, TAK KAK npN 3OM MacNo MoKet NONaTb B cInnHd, Kap6Opatop IN BO3dyHhBf PhINbTp IN NobpeDntb DBnraTeNb. PnpCTynar K TEXo6CnyKnbAHnIO y6eDNTecb, YTO CBEueHOr KOJNaQOK CHaT.
3MHee xpaHHe: OnyctoWnte ToNINBHy 6ak n 3aNyCTte DnIraTeNb, YTObblbipaBoTaTb OCTaTKI TOINBa n3 Kap6bOpatopa.CHMNTe CBeHoi KOJNaOH. BkpyTne CBeHy 3axnHaHn I 3aJeHTe He6OJIbWoE KOJNUcHcTBO (PpIMepHO cToIOByIO JoxKy) MOTOPHOrO MaCnA B OTBepCTne UINHHDpa. HeCKoJIbKO pa3 NotAHnte UHyp cTapTepa. YCTaHOBtne CBeHy 3axnHaHn Ha MeCTo, HO He HadeBaTe CBeHuON KOJNaOH.PomeHnTE MacNo TAK, KaK ONCaHO B COOTBETCTByIOUeM pa3DeNE.OChCTne Ra3OHOKOcnIKy. CMOHTe BeToCb He6oJIbWiIM KOnIueCTBOM Macna n CMAxkbTe Deky mMetaIINuYe cAcTHn dnn PpeDTBpaUeHnOBpa3OBaHNpy PXaBCHhI.
TapaTnA
- TapaANTna Ha Bauyra3oHokocnky coCTaBnETo OINH roD c DaTbI npOdaXn.
- FapaHTnpaCnpocTpaHareTcHa DepeKTHbIe. 1actn n 3aBODCKyO c6opky.
- FapaHTnHe paCnpocTpaHareTcHa noBpeXdeHn I NIOLOMKN, Bbl3BaHHbIe HENpaBUNbHbIM NCNOJb3OBAHNEM n O6CnyKuBAHNEM ra3OHOKOJIKN.
- TapaHTnHe paCnpocTpaHReTcHa YnCTKy TOJIINBHO CnCTeMbI,3aMeHy INN peRyInpOBky UHypa CTapTePa, npyKInbI CTapTePa, CBeCy 3axnraHn, HOx, depkateNb HOxa, pemeHb I TPOCbI.
- TapaHTnHe paCnpocTpaHareTc npn NcNoJIb3OBAHn HeOpuRHaJIbHbIX 3aNaChbIX qacteI.
OnpeeneHne cTaTyca noIOMKn B KOMnTeHcNToJIbKO aBTopu3ObaHHoro cepBnCHOro ceHTpa.
Ecnn Bbl 3anyckaete Dniratelb, He 3aIMB Macna, To Dniratelb 6ydt NobpekdeH 6e3 BO3MOXHOCTN BOCCTAHOBJIeHNA, INOTOMY rapaHTNI NOJNEKATb He 6ydt.
NOMHNTE:Длгпрбретенязачacтей,кakидя Любого Започа Ра rapанн_HOMу peMOHTу,Вam БудET HeobxOIMMo COOBuNTb HOMep MOdENI Серийнblу HOMeR.ИХ можно habTи Ha МарКИрОВе EC ra3oHOKOCUJIKN (Cm.pncyHOK12).
| Difficult to start | ||
| Problem | Cause | Solution |
| Generally difficult to start | Wrong starting procedure | Follow the starting instructions in the manual precisely. |
| The start cable is very tight (will not start) | The brake handle is not being activated The machine is placed in high grass | Activate the brake handle and pull the start cord. Move the machine away from the high grass and repeat the start procedure. Set the height adjustment in the highest position, so that the blade is lifted free of the grass. |
| The machine will not start when the start cord is pulled | The brake handle is not being activated The wires are not connected to battery The brake cable is incorrectly adjusted The machine is standing in high grass Engine is not primed before starting The choke is not in the correct position No more gasoline in fuel tank The gasoline is more than 3 months old | Activate the engine brake handle and press the electric start button. Check that the wires are connected from the battery to the motor and start button. Adjust the engine brake cable, following the instructions in the manual. Move the machine away from the high grass to start it. Tip the machine when starting. Set the height adjustment in the highest position, so that the blade can run freely. Push the primer 1-3 times before starting. Move the choke lever to a different position. Check and fill fuel tank with gasoline. Empty the fuel tank and carburetto r from old gasoline, and fill with new gasoline. |
| No ignition spark (cannot start) | The spark plug cap is loose The spark plug is damp or dirty Incorrect gap between the spark plug and the electrode The air filter is dirty or defective | Check that the cap is firmly attached to the spark plug. Check that there is no dirt on the spark plug, following the instructions in the manual. Check and adjust the spark plug gap, following the instructions in the manual. Aalternatively, replace the spark plug. Check the air filter for dirt and clean it, following the instructions in the manual. |
| The mower starts, but runs unevenly | ||
| Problem | Cause | Solution |
| The front wheels are not pulling, or only very little | The clutch cable is too tight/too loose The ratchets in the rear wheels are worn Rem has fallen off / is damaged | Adjust the clutch cable, following the instructions in the manual. Replace the ratchets. Inspect belt, replace if necessary |
| The engine runs irregularly and/or its performance becomes poor as you are working | The spark plug cap is loose The spark plug is dirty Incorrect gap between the spark plug and the electrode The air filter is dirty or defective Evaporation of fuel in the carburettor Loose throttle cable Dirt in the carburettor | Check that the cap is firmly attached to the spark plug. Check that the spark plug is clean and not damaged, following the instructions in the manual. Check and adjust the spark plug gap, following the instructions in the manual. Check the air filter for dirt and clean it, following the instructions in the manual. Wait a few minutes, and then try to start again. Tighten the throttle cable, following the instructions in the manual. Clean the carburetto r. |
| The engine will not stop | ||
| Problem | Cause | Solution |
| The machine does not stop after 5 seconds | The engine brake cable runs too tightly | Check and adjust the engine brake cable, following the instructions in the manual. |
If your problem is not described above, please contact an approved service centre or Texas A/S.
Fehlerbehebung
HnArHOCTNkA HEnCnpaBHOCTe
| Ту rudосту пpr 3ауucky | |||
| П robл exemplа | Прочина | Р漱ене | |
| Ошиме trуduсту пpr 3ауucky | •Неравлино Былоронь залуck | •В тунrostу сденице указаням руховodства по заclпуатамдгета залуucky. | |
| Пубковоу тroc Траю Кожелно Вьтгимьагсь (двогател boл Зунstуcaeць) | •Pyokotb Topmokogen He aktnibpoporta | •Актульные руховоту Сденице и поразнite руховоту Trрoc. | |
| •Машima Stont B blycokoi Trape | •Убerte машину ИЗ Вьсокоту Trры и поразнite Ротук. | ||
| •УстаньOTу руховоту Вьсокоту Вьсокоту Вьсокоту Вьсокоту Вьсокоту Вьсокоту Вьсокоту Вьсокоту Вьсокоту Вьсокоту Вьсокоту Вьсокоту Вьсокоту Вьсокоту Вьсокоту Вьсокоту Вьсокоту Ввспспспспспспспспспспспспспспспспспспспспспспспспспспспспспспспспспспспспспспспспспспспспспспспспспспс化 no leashne nad Trpavob. | |||
| Машина He zanuksaetcru prn HatajkeHIMYPSKOBORTO TPOCA IINHakatni Khoikni 3aektpurcheckoro nyaika (Иллстор "шелkaert" pri nonblte 3aektpurcheckoro nyaika) | •Pyokotb Topmokogen He aktnibpoporta | •Актульные руховоту Сденице и поразнite Ротук. | |
| •Пробда He ndceointeКи k Akymyntalotpy Tpoc Tropmokogen DBngatela He npabunlbo Topeyunipovba | •Проб耗费п дддддддддддддддддддддддддддддддддддддддддддддддддддддддддддддддддддддддддддддддддддддддддддддддддддддd | ||
| •Машина Stont B blycokoi Trape | •Убerte машина ИЗ Вьсокоту Trры,чтоб'tауctы. | ||
| •Hakmonite машина pri nonclny. | |||
| •Дыгател He boil zanpablen nepeod 3aayckom | •Ustahнып reynokotу Вьсокоту Вьсокоту Вьсокotу Вьсокotу Вьсокotу Вьсокotу Вьсокotу Вьсокotу Вьсокotу Вьсокotу Вьсокotу Вьсокotу Вьсокotу Вьсокotу Вьсокotу Вьсокotу Вьсокotу Вьсокotу Вьсокotу ВьСпспспспспспспспспспспспспспспспспспспспспспспспспспспспспспспспспспспспспспспспспспспспспспспспспспСБСБСБСБСБСБСБСБСБСБСБСБСБСБСБСБСБСБСБСБСБСБСБСБСБСБСБСБСБСБСБСБСБСБСБСБСБСБСБСБСБСБСБСБСБСБСБСБСБСБСSB | ||
| •HempablnHoe noonokhen He bokdyshn Topeyunipovba | •Посадузackoнн Мархиту Na lycoKoBorOу hacoc 1-3 paba. | ||
| 3aazlonkhi | •Посадузып bokdyshn BoLIOBHom BoIyDHom BoIyDHom BoIyDHom BoIyDHom BoIyDHom BoIyDHom BoIyDHom BoIyDHom BoIyDHom BoIyDHom BoIyDHom BoIyDHom BoIyDHom BoIyDHom BoIyDHom BoIyDHom BoIyDHom BoIyDHom BoIyDHom BoIyDHom BoIy DHom BoIyDHom BoIyDHom BoIyDHom BoIyDHom BoIyDHom BoIyDHom BoIyDHom BoIyDHom BoIyDHom BoIyDHom BoIyDHom BoIyDHom BoIyDHom BoIyDHom BoIyDHom BoIyDHom BoIyDHom BoIyDHom BoIyDHom BoIyOToBn | •Посадузын Mархиту Na lycoKoBorOу hacoc 1-3 paba. | |
| 3aokhunics6 Bezhen In B toplnbHOM 6bale | •Посадузын Mархиту Na lycoKoBorOу hacoc 1-3 paba. | ||
| 6bemHHIn y boIbIe 3 MeCzucB | •Посадузын Mархиту Na lycoKoBorOу hacoc 1-3 paba. | ||
| OTcytCTBYET 3aakirahanee (he bKIINUcAETC) | •Kolnayok CbevNe 3aakirahanee Paasatah | •Убente cteb,чт когнakpochno coeundienco CbevOn 3aakirahanee. | |
| •Cbeva 3aakirahanee OTebpeNa mIna Zanaykaha | •Udery mNCHpukuzmam pyrukOBODCTBa no 3KcnPukuzmam. | ||
| •HempablnHbI 3aazop Mekdy CbevOn 3aakirahanee n aektrpdoom | •Probertes n otpernynpuyte 3aazop CbevOn 3aakirahanee, cdey mNCHpukuzmam pyrukOBODCTBa no 3KcnPukuzmam. | ||
| •BoZdUnbHbI 3aizbT 3aapankah nInn Nobpexden | •Moxho taiokce 3amehntb CbevOn 3aakirahanee. | ||
| •BocdUnbHbI 3aizbT 3aapankah nInn Nobpexden | •Pobertes n otpernynpuyte 3aazop CbevOn 3aakirahanee, cdey mNCHpukuzmam pyrukOBODCTBa no 3KcnPukuzmam. | ||
| Газовоту He octahabnBuAetcra, Ho pa6otaet HerpaBvHOBHomepHo | |||
| П robл exemplа | Прочина | Р漱ене | |
| Косяа He bpaalototru nInn Bpalaototcr ouchel cnaabo | •Troc suclentelne Cnilskom Tygo/lerko Xodit | •Отравлиу trade Troc suclentelne, cdey mNCHtpukuzmam pyrukOBODCTBa no 3KcnPukuzmam. | |
| Xxapobniki 3adnix Konec 3nlouohby | 3amehnte xxpobniki. | ||
| Двогател habotet He hctabtse He hctabtse | •Kolnayok CbevNe 3aakirahanee Paasatah | •Udery mNCHpukuzmam pyrukOBODCTBa no 3KcnPukuzmam. | |
| •Cbeva 3aakirahanee 3aapankaiha | •Udery mNCHpukuzmam pyrukOBODCTBa no 3KcnPukuzmam. | ||
| •HempablnHbI 3aazop Mekdy CbevOn 3aakirahanee n aektrpdoom | •Pobertes n otpernynpuyte 3aazop CbevOn 3aakirahanee, cdey mNCHpukuzmam pyrukOBODCTBa no 3KcnPukuzmam. | ||
| •BoZdUnbHbI 3aizbT 3aapankaih nInn Nobpexden | •Pobertes n otpernynpuyte 3aazop CbevOn 3aakirahanee, cdey mNCHpukuzmam pyrukOBODCTBa no 3KcnPukuzmam. | ||
| •NcnapenHe tonlina B kapbipoatope | •Pobertes n otpernynpuyte 3aazop CbevOn 3aakirahanee, cdey mNCHpukuzmam pyrukOBODCTBa no 3KcnPukuzmam. | ||
| •Pacsaatan Troc dlroccen | •Pobertes n otpernynpuyte 3aazop CbevOn 3aakirahanee, cdey mNCHpukuzmam pyrukOBODCTBa no 3KcnPukuzmam. | ||
| •Bkapbipatop nnonana rpr3b | •Pobertes n otpernynpuyte 3aazop CbevOn 3aakirahanee, cdey mNCHpukuzmam pyrukOBODCTBa no 3KcnPukuzmam. | ||
| Двогател He octahabnBuAetcra | |||
| П robл exemplа | Прочина | Р漱ене | |
| Машина He octahabnBuAetcra chere 5 cekynd | •Troc topmokogen DBngatela Xodit cnilskom Tygo | •Pobertes n otpernynpuyte Troc dbngatela, cdey mNCHtpukuzmam pyrukOBODCTBa no 3KcnPukuzmam. | |
EcnBbHe HaunOnncaHne CBoe npo6nmbi Bblwe, 0paTntecb B ATOPn3OBAHbI cepBnCHbI ceHTp HIN B KOMNaHIO Texas A/S.
Problemen oplossen
2006/42/EC - 2004/108/EC
Overensstammelsesvurdering procedure i henhold til bilag I · Conformity assessment procedure according to Annex I · Konformitätsbewertungsverfahren nach Anhang I · Procedure d'évaluation de la conformité conformément à l'annexe I · Procedure oceny zgodnosci zgodnie z załacznikiem I · Procedure deevaluate a conformitàti in conformitate cu anexa I · Conformiteits assessment-procedure conform Annex I
2006/42/EC
Materiellet er udfort i overensstemmelse med følgende standarder · Conforms with the following standards · In Übereinstimmung mit den folgende Standards · Conformément aux normes suivantes · jest zgodna z nastepujacymi normami · Echipament se face in conformitate cu urmatoarele standarde · Conforms with the following standards
EN ISO 14982: 2009, EN ISO 5395-1: 2013, EN ISO 5395-2: 2013
Responsible for documentation
Johnny Lolk
TEXAS
EQUIPMENT