USER MANUAL Startium 480E GYS
CONDITIONS DE GARANTIE
This manual includes guidelines on the operation of your device and the precautions to follow for your own safety. Ensure it is read carefully before first use and keep it handy for future reference. These instructions should be read and understood before anyone operates the product. Any modifications or maintenance that are not specified in the manual should not be undertaken. The manufacturer is not liable for any injury or damage due to non-compliance with the instruction manual. In case of problems or uncertainties, please consult a qualified person that is able to handle the device correctly. This device should only be used for charging, start-up within the limits indicated on the device and in the manual. The safety instructions must be followed. In case of improper or unsafe use, the manufacturer cannot be held responsible

Device suitable for indoor use only. Do not expose to rain or excessive moisture.
This device may be used by children from age 8 and by persons with reduced physical, sensory or mental capabilities or lack of experience and knowledge, provided that they are under supervision or have been told how to use the device safely and are aware of the potential risks. Children must not use the device as a plaything. Cleaning and servicing tasks may not be carried out by children unless they are supervised.
Do not use for charging non-rechargeable batteries
Do not operate the device with a damaged power supply cord or a damaged mains plug.
Do not use the device if the charging cable appears to be damaged or assembled incorrectly in order to avoid any risk of short circuiting the battery.
Never charge a frozen or damaged battery.
Do not cover the device
Do not place the device near a fire or subject it to heat or to longterm temperatures exceeding 60^
Do not obstruct the cooling vents. Refer to the installation section before operating the machine.
The automatic mode of operation and usage restrictions are explained below in these operating instructions.


Risk of explosion and fire!
A battery being charged can emit explosive gas.
- During the charge, the battery must be placed in a well ventilated area.
- Avoid flames and sparks. Do not smoke.
- Protect the electrical contacts of the battery against short-circuiting.

Do not leave a charging battery unattended for a long time
Acid projection hazard!
- Wear safety goggles and protective gloves.
- If your eyes or skin come into contact with battery acid, rinse the affected part of the body with plenty of water and seek immediate medical assistance.
Connection / disconnection:
- Disconnect the power supply before connecting/disconnecting the device to/from the battery
- The terminal of the battery that is not connected to the car frame must be connected first. The other connection must be made on the car frame, far from the battery and the fuel line. The battery charger must be connected to the power supply network.
- After the charging process, disconnect the battery charger from the power supply network and remove the connector from the car frame and then the connector from the battery, in this order.
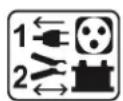
Connection:
- This device must be connected to an earthed power supply.
- This equipment is intended for industrial environments (class A) and not for residential sites where the electric current is supplied by the public low-voltage power supply network. There may be potential difficulties in ensuring electromagnetic compatibility on these sites, because of the conducted interferences, as well as radiated radioelectrical frequency.
- This product does not comply with IEC 61000-3-12 and is intended to be connected to private low voltage networks which are connected to public supply network only at the medium and high voltage level. If connected to a public low-voltage supply network, it is the responsibility of the installer or user of the equipment to ensure, by consulting the operator of the electrical distribution network, that the hardware can be connected.

Maintenance:
- If the power supply cable is damaged, it must be replaced by the manufacturer, its service agent or an equally qualified person.
Service should be performed by a qualified person.
- Warning! Always remove the power plug from the wall socket before carrying out any work on the device.
-
If the internal fuse is blown, it must be replaced by the manufacturer, its after-sales service or an equally qualified person.
-
Regularly take off the cover and remove dust with an air gun. Take the opportunity to have a qualified person check the electrical connections with an insulated tool.
- Under no circumstances should solvents or other aggressive cleaning agents be used.
- Clean the device's surfaces with a soft, dry cloth.

Regulations
- The device complies with European Directive.
The certificate of compliance is available on our website.
EAC conformity mark (Eurasian Economic Commission)
- Equipment in compliance with British requirements. The British Declaration of Conformity is available on our website (see home page).
- Equipment in conformity with Moroccan standards.
- The declaration C_ (CMIM) of conformity is available on our website (see cover page).
Disposal:
- This product should be disposed of at an appropriate recycling facility. Do not dispose of in domestic waste.
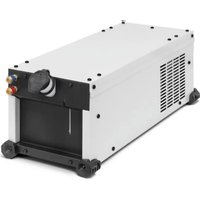
GENERAL DESCRIPTION
The STARTIUM range is designed to charge and start all common batteries including lead-acid, electrolyte or gel batteries, 12V et 24V.
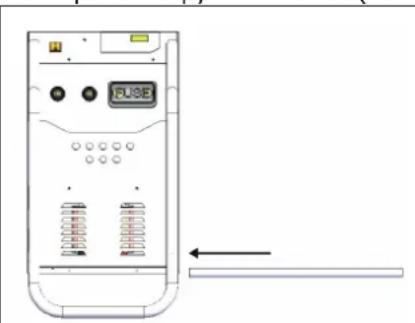
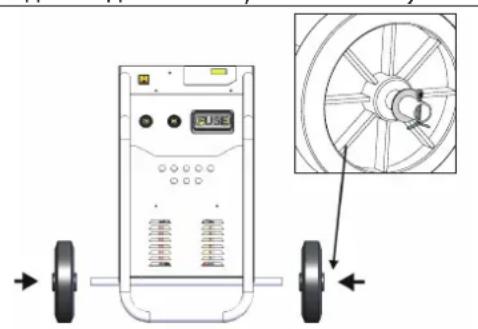
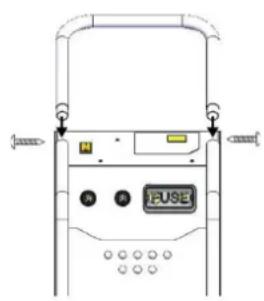
Assembling the handle and the wheels (only for 480E, 680E and 980E):

POWER SUPPLY
Check that the power supply and its protection (fuses) are compatible with the current required by the machine. The device must be positioned so that the socket is easily accessible. The machine must be connected to a socket WITH earth according to the following recommendations:
| STARTIUM 330E | STARTIUM 480E | STARTIUM 680E | STARTIUM 980E |
| Mains voltage | 230V - 1 ph | 230V - 1 ph | 230V - 1 ph | 230V - 1 ph |
| Protection | 16 A | 16 A | 16 A | 16 A* |
| Charging power | charge | 800 W | 1 700 W | 2 000 W | 2 000 W |
| Starting | 6 500 W | 9 000 W | 10 000 W | 12 000 W |
*In the event that starting a HGV proves difficult, use a 20A plug (optional).
The recommended cross-section for an extension is: 3 × 2,5mm^2
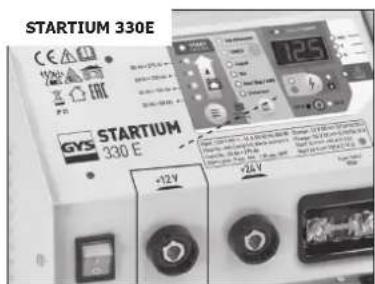
CONNECTION AND DISCONNECTION (cf p.5)
Before any connection
| ·Before any connection to a vehicle battery, make sure that the booster isn't connected to the mains and that the booster's switch is set to OFF.
·Locate the + and - battery terminals. (polarity reversal can damage the fuse).
·Keep the cables away from hot or sharp surfaces. Separate the 2 cables properly and avoid pinching them.
·Check that the battery capacity (Ampere hour Ah) and the voltage (Volt V)are compatible with your charger (see table above). | BATTERY CHARGER
/STARTER
155 Ah+675 Ah+
100 Ah+050 Ah+
60 Ah+230 Ah
75 Ah+80 Ah
START |
| STARTIUM 330E | STARTIUM 480E | STARTIUM 680E | STARTIUM 980E |
| Charging capacity | 12V 20 | - 375 Ah 20 - 600 Ah 20 | - 675 Ah 20 - 750 Ah | | |
| 24V 20 | - 300 Ah 20 - 450 Ah 20 | - 525 Ah 20 - 525 Ah | | |
Connection


-
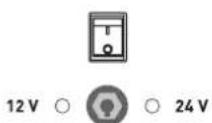
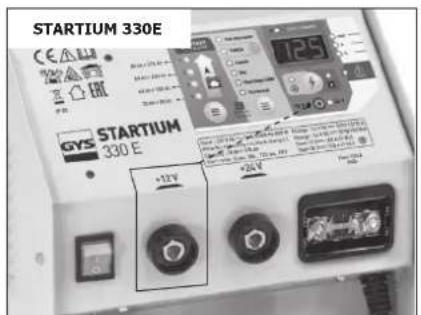
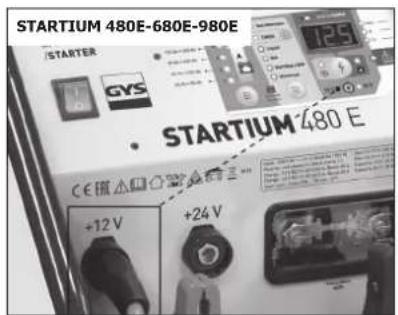
Plug the connector into the «12 V» or «24 V» position of the STARTIUM according to the battery to be charged or started.
-
Connect the clamps (several possible cases):
a. The negative terminal is plugged onto the car's chassis :
-
Connect the red clamp to the battery's positive terminal.
-
Connect the black clamp to the vehicle's chassis, make sure it is a safe distance from the battery and the fuel/exhaust pipe.
b. The positive terminal plugged onto the car chassis, in this event :
-
Connect the black clamp to the battery's negative terminal.
-
Connect the red clamp to the vehicle's chassis, make sure it is a safe distance from the battery and the fuel/exhaust pipe.
c. Battery disconnected from the vehicle :
Connect the red clamp to the battery's positive terminal and the black clamp to the battery's negative terminal.
-
Connect the device to the mains.
-
Press the ON / OFF button.
A LED, (8) or (10) switches on under the corresponding interface to confirm the selected voltage input. If the selected voltage does not match the battery voltage, the charge cannot start.

Once connected, the STARTIUM provides information on the battery's health status. The display (2) alternately indicates the actual voltage (4) and the percentage of charge (5).
| 12V 24V |
| 100% | >12,8 V >25,6 V | |
| ... | 11,8 V < tension < 12,8 V 23 | 6 V < tension < 25,6 V |
| 0% | < 11,8 V < 23,6 V | |
- Use the STARTIUM in charger, starter or alternator test mode.
Disconnection


- After use, carry out the exact reverse operation for the disconnection phase in order.
USE IN CHARGER MODE (cf p.5)
-
Connection (p.15).
-
Select the appropriate parameters: adapt the STARTIUM charge to the battery to be recharged.
a. Select the charge speed ( 13) with respect to the battery capacity (see table below).
| STARTIUM 330E STARTIUM 480E STARTIUM 680E STARTIUM 980E | |
| 12V 24V 1 | 2V 24V 12V 24V | 12V 24V | | | | | |
| Charge 1 | 20-75Ah(5A) | 20-75Ah(5A) | 20-75Ah(5A) | 20-75Ah(5A) | 20-75Ah(5A) | 20-75Ah(5A) | 20-75Ah(5A) | 20-75Ah(5A) |
| Charge 2 | 40-150Ah(10A) | 40-150Ah(10A) | 60-225Ah(15A) | 40-150Ah(10A) | 60-225Ah(15A) | 60-225Ah(15A) | 85-300Ah(20A) | 60-225Ah(15A) |
| Charge 3 | 60-225Ah(15A) | 60-225Ah(15A) | 130-450Ah(30A) | 60-225Ah(15A) | 130-450Ah(30A) | 100-375Ah(25A) | 170-600Ah(40A) | 130-450Ah(30A) |
| Charge 4 | 100-375Ah(25A) | 85-300Ah(20A) | 170-600Ah(40A)(boost) | 130-450Ah(30A)(boost) | 200-675Ah(45A)(boost) | 150-525Ah(35A)(boost) | 210-750Ah(50A)(boost) | 150-525Ah(35A)(boost) |
b. Choose the battery type ( 12): Liquide, Gel, AGM, Start/Stop. In the event that the battery type is unknown (Liquid, Gel, AGM, Start/Stop), select the UNIVERSAL mode.
- Press the START/STOP button ( - 9) to start the charge.
Three indicators show that the battery is charging :
- The charge LED (7).
- The display (2) : It alternates between the battery voltage and the percentage of charge (an evolution of both values should be noticed).
- The voltage and percentage LEDs (4 and 5). They remain on and alternate at the same time as the display.
The charge progression is shown in percentage (%)
| % Battery charge level Phase |
| 0% | Battery charge level | Testing phase |
| 25% | Charge start | Boost |
| 50% | Charge at 50% |
| 75% | Charging the remaining % | Absorption |
| 100% | Charged battery | Floating |
- Restricted and charge stop.
The battery charge does not start when :
- The battery voltage is inferior to 1V.
- The battery voltage does not match the voltage that is selected on the charger.
The battery charge stops when :
- The START/STOP button is pressed again.
- The continuous charge duration reaches 16h.
| ! | Once the battery is charged, the STARTIUM performs a floating/maintenance charge. The charge does not stop to compensate for self-discharge and maintain the battery at a 100%. |
| If it is a sealed battery and if the liquid boils, it means the battery is damaged. Is this occurs, it is recommended to stop the charge to prevent any risk of explosion. |
- The charger will stop if the « automatic restart » has not been activated.
5. Charger mode functions
a. Automatic restart feature:
In the event of a power cut :
- During a normal charge, the STARTIUM switches off. When it switches back on, it does not resume the charge. It must be manually resumed.
- During a charge with the «Automatic restart» feature on, the STARTIUM switches off. When it switches back on, it automatically resumes the charge.
To use the «Automatic restart» mode :
- Perform steps 1 and 2 of normal loading.
- When starting the charge (step 3), press the START/STOP button (-9) for a long time (>5 sec.). (\$ -9).
An indicator helps to check if the charge is indeed in «Automatic restart» mode :
- The voltage and percentage LEDs (4 and 5). They do not stay on but will blink.
| ! | In this mode, Press the START/STOP button to stop the charge. ( - 9). A power supply cut will not stop the charge from resuming. |
b. TIMER feature
The TIMER feature (n°14) is used to set a charging time from 10 to 120 min (by steps of 10 min).
| ! | The charge when using the TIMER feature is manual. This has the following consequences :
- Whatever is the battery health status (sulfated, short circuited, voltage < 1V), the charge will always be triggered.
- The charge starts even if the battery connection is faulty: clamps disconnected or in short circuit There is a risk of sparks if the connection instructions are not observed. |
To use the «TIMER» function:
- Perform step 1 of normal loading.
- In step 2, choose the charging rate (≡ - 13) while respecting the battery capacity. Then select the «TIMER» function with the selection button (≡ - 12).
- The button (14) allows you to select the desired charging time from 10 to 120 min in 10 min steps.
- Press the START / STOP button ( 9) to start the charge.
Two indicators can help to check that the charge has started :
- The display (n^2) . -It alternates between the battery voltage and the remaining time in minutes.
- The voltage and minutes LEDs (3 and 4). They remain on and alternate at the same time as the display.
The charge may be stopped in several ways :
- At the end of the selected time.
- When there is a power supply cut
- By pressing the START/STOP button.
c. charging several batteries simultaneously.
It is possible to charge several batteries simultaneously by connecting them in parallel. The positive terminals connected to the red clamp and the negative terminals connected to the black clamp. These batteries or battery groups must be of the same voltage, 12V or 24V.
Charging batteries in series is not recommended.
USE IN STARTER MODE (INTERFACE, P.5)

Do not disconnect the battery from the vehicle. Connecting the battery can lead to the vehicle's memory loss and a potential impossibility to restart it.
- Connection (p.15).
- Press the selection button ( - 13) until you reach the START ENGINE mode (1).
- Start the preload by pressing the START / STOP button ( 9).

- The «START ENGINE» mode detects sulfated batteries and will thus refuse to start the vehicle. The machine will automatically start the desulfating procedure in order to protect on-board electronics.
- If the battery is excessively damaged (e.g. sulfated), the charger will block the start. In this event, the startium intermittently indicates « CIP » (Charge in Progress) and 0% . This means that battery recovery is in progress. As long as «CIP» appears on the display, it is not possible to start the vehicle.
Make sure to follow the recommended precharge time, depending on the battery capacity.
| Product Battery capacity Starting Battery capacity Starting | | |
| STARTIUM 330E | 40 - 80 Ah Instantaneous 80 - 120 Ah 10 min | pre charge | | |
| STARTIUM 480E | 40 - 120 Ah Instantaneous 120 -160 Ah 10 min | pre charge | | |
| STARTIUM 680E | 50 - 180 Ah Instantaneous 180 - 200 Ah 10 min | pre charge | | |
| STARTIUM 980E | 50 - 240 Ah Instantaneous -- | | | |
- Once the precharge is done, go to the vehicle's dashboard. The «start» feature will activate when the first attempt to start is initiated (by turning the key). The attempt time must be for 10 secs maximum (a countdown appears on the display).
If your engine does not start, wait 2 minutes between each start attempt.

Nb : If the vehicle does not start, it may be a problem other than a faulty battery e.g. alternator, glowplug...
ALTERNATOR TEST
If the vehicle battery is regularly out of order, the problem may come from the alternator.
The STARTIUMS have an «alternator test» feature (€ - 12). It can show the alternator's charge capacity by intermittently displaying the voltage and the percentage.
To use this feature, the vehicle must be started :
- Connection (p.15).
- Select the «Test Alternator» function with the selection button (≡ - 12).
- The display shows a percentage. It provides information on the alternator's state of health according to the following table:
| Between 0 and a 100% | Undercharge fault, the battery is not correctly charged. |
| At a 100% | Alternator all good. |
| Between a 100% and 200% | Overcharge fault. |
PROTECTIONS
These clamps have been designed for maximum protection :
- The charging clamps are fully insulated.
- A fuse guarantees protection against polarity inversion and short circuits. Replacing it requires manual intervention.
| STARTIUM 330E | STARTIUM 480E / 680E | STARTIUM 980E |
- The thermal protection is monitored by a thermostat (cooling for approximately 1/4h). The fault indicator switches on, the display shows «th».
- If the machine is faulty, an extra thermal protection cuts the machine's power supply without further indications for the user. Place the machine in a well ventilated area and wait 15 minutes.
- In the event of power supply fault, the machine will enter fault protection mode, The error LED switches on and the display shows «dEF». If the fault is major, an internal fuse protects the machine. This fuse must be replaced by an aftersales technician.
TROUBLESHOOTING
| Symptoms Causes Remedies |
| The error LED switches on | Power supply problem. | Check your mains power supply. |
| The error LED switches on and the buzzer | Clamps in short circuit or polarity inversion. | Check that the fuses have not melted. |
| Do not put the clamps in short circuit. |
| Reverse polarities. |
| The battery that you are trying to charge is faulty. | Check the terminals' voltage with a voltmeter. If this voltage jumps instantaneously to 2.5V per element, the battery may be sulfated or damaged. |
| Voltage error (12 -24 V) | Check that the clamps are properly connected in 12V or 24V. |
| Battery not connected or <1V. Display: «BAT HS» | Connect a battery. |
| Select TIMER if the battery voltage is <1V. |
| Following intensive use, your device has entered thermal protection mode. Display : «th» | Wait 1/4h so the device can cool down. |
| Desulphation charging time > 1h The battery cannot be recovered. Change the battery. |
| No LED switches on | Major power supply fault Check your mains | power supply. |
| Machine overheat, the thermal protection «th» activates. | Ventilate the area. |
| The start/stop button is not pressed. Press the start/stop button. | |
| In START ENGINE mode, the display shows 0%. The start is impossible. | The battery is sulfated, the machine will automatically block the start in order to protect on-board electronics. | Charge the battery before re attempting a START ENGINE. |
| The battery boils. | The voltage selection 12V or 24V is incorrect. | Charge the battery before re attempting a START ENGINE. |
| Your battery has elements in short circuit. | The battery cannot be recovered, it must be changed. |
| Sparks at the clamps | Polarity reversal | Connect the clamps the correct way (+/+, -/-) |
| Timer mode active Cf. Connection and disconnection |
WARRANTY
The warranty covers faulty workmanship for 2 years from the date of purchase (parts and labour).
The warranty does not cover:
- Transit damage.
- Normal wear of parts (eg.: cables, clamps, etc...).
- Damages due to misuse (power supply error, dropping of equipment, disassembling).
- Environment related failures (pollution, rust, dust).
In case of failure, return the unit to your distributor together with:
- The proof of purchase (receipt etc ...)
- A description of the fault reported
Annapat npedha3HaueH dIy IcNoIb3OBAHnB N OmeuHn. He BbICTaTbTb IOd DOxDb.
3TOT aannapat mokeT 6bITb nCNoIb3OBAH DeTbMn cTapwe 8 JeT, a TAKKe nepcohamn C OrpaHnueHHbIMN fH3nueCKmN, ceHCOPhIM NJIY MCTBeHHbIMN BO3MOXHOCTaMn, a TAKKe He O6laJIoUImN ONbITOM N 3HaHnAIMN, pRyUCOBn EcIN 3a HIMN HaJLeKAsIMN 6bIOM Ha6JIIOJaOT INIeCN C HIMN IPOBEn INHCTpyKTaK NO 6e3OpacHomy nCNoIb3OBAHnIO aannapaTa N eCIn BCE BO3MOxHbIe PnCKN 6blnn ppeDyCMOTpeHbI. DeTI He DoJXHbI nIgPaTb C yCTpOCTBOM. YnCTKa N yXoN He DoJXHbI pON3BOIDTCa DeTbMn 6e3 HaJLeKAsero npSCMOtpa.
Hn B Koem clyuae He nCnoIb3yIe 3TO yCTPOIcTBO dJa 3apJdkn 6aTaapeek nII He3apJkaEmbIX 6aTaapei.
He nCnoIb3yIte annapaT ecn ceTeBOJ shHyp nII BnIka NOBpeK- DeHbl.
He nCnoIb3yIte aannapaT, ecn Ka6eIb 3apra da nobpeKdEn nIi He npaBnIbHo co6paH, BO n36exKaHne pNcKa KOpOTKOro 3aMbIkaHna aKKymJrTopa.
HnkOrda He 3apJkaTe NOBpeKdEHHbI nII 3aMep3uAn aKKymyJIaTOp.
He nokpbBaIte annapaT.
He yctaHaBnBaTb aannapat pydom C nCTOCHKOM TePna H He noD-BepraTb BbICOKIM Tempepatpam (Bblwe 60^ ) B TeueHn DInTeJb-Horo nepnoDa.
He nepekepbiaIte BeHTnlaCIOHbIe OTBepCTn. Ipeed nCnoJb3oBaHnem O3HaKOMbTeCb C pa3DeIOM «yCTaHOBKa» INHCTpyKcII.
ABTOMaTnueckn peKm, a TaKxpe OpraHnueHn npn erO nCNoIb-30BaHn, ONncAhbl DaJIeB B 3TOJ NHCTpyKcN.

Puck noxapa n B3pbBa!
Pn3apJe 6aTape MoKeT BbInyCTuB B3pbIBOOnaChbI Ra3.
- Bo Bpem 3aprAnk AKB doJxHa 6bItb nOmeeHa B xopoio npoBETpmbaemom MeCTe.

- I36eaiTe pIaMeHn n NcKp. He Kypntb.
3aunntte noBepxHocTn 6atapen OT 3neKtpnueckoro KOHTaKaTb BO n36exkaHne KOPOTKOro 3amblkHa.
He octabnIte 3apJxHbI aKKymyIaTOP Ha doJIroe BpeMja 6e3 npncMOtpa.


PnCK KNCIOTHbIX 6pbI3r!
Hocnte 3aunTHbIe OUKN n nepuaTkn.
B cnyuae KOHTaKTa C rIa3amn IIN KOKei, npOMoIte o6nIbHO BOIOH IN PpOKOHcYbTnpUyTe Bpaa 6e3 npOMEJIeHnI.
Поdkлочен / OTKлочен :
- OTKJIIOUHTe NOdauy NITaHnA Nepei TeM KaK NODKJIIOuHaTb IJIY OTKJIIOUaTb CoeINHeHnA K 6aTaapee.
- Chauana nodklouhnte klemmy AK5, he coeHHHyo c waccn. Btopoe noDCoeHNHeHne doJxHO 6bITb ocUeCTBJeHO Ha waccn KaK moXHO daJIbwe ot AK5 n OT TpyboPBOOBo TOIINBHO cnCTembl. 3aTeM, noDKlouhnte 3apAIDHO yCTPOINCTBO K CETN.
- После зарядкг OTКЛЮчITE зарядhoe устpoиCTBO OT cetn, 3aTeM OTcoeДИнHTe 3axIM OT wacCn n, HaKOHeU, 3axIM OT aKKyMylaTopa. DeiCTbYIte B yka3aHHom nopAKe.


680E n 980E
TOLbKO
680EN 980E
TOJIbKO


IopKJIoueHne:
- 3To yCTpoIcTBO DoJxHo 6bITb B pO3eTKy C 3a3eMJIeHHeM.
- ΘTOT annapat klacca A, npedha3haeHHbI dI pyoMbIJIeHHbIX NOMeueHn, He NOxOHT dIy IcNoB3OBaHnB B XINbIX KBapTaJax, rDe 3LeKtpnueckn TOK nOdaTcra O6IeCTBeHHoC NCTeMoN PNTaHn Hn3KOrO HanpJxKeHn. B TaKnx KBapTaJax MOyT BO3HNKHyTb TpydnoCTn ObecneueHn 3LeKtpomarHHTHyIO COBmecTMMOCTb I3-3a KOHdyKTNBbIX IN HNDyKTNBbIX NOMex Ha paDIOuCACTOTE.
- 3TOT annapaT He COOTBeTCTBye TnpeKtNBc CEI 61000-3-12 n npedHa3NaueH dIra pa6Obl OT qactHBx 3JIeKtpocTei, NOBDeHHbIX K O6UeCTBeHHbIM 3JIeKTPocETAM TOJbKO CpeDHeRo N BblCOKOr HAnpJxKeHn. CneuaJIncT, UCTaHOBbUHm annapaT, IIN PONb3OBaTeJIb, DOJXhBi Y6eINTBc, O6paTbNbUncb Prn HaIObHOCTN K OprAHn3aUHn, OTBeuAoUeJ 3a 3KcNlYaTaUcHcNTEmbl NTaHn, B TOM, UTO OH MOKeT K HeN POnkJIouHTbcr.
yxoA:
- Ecln shHyp nHTaHn noBpeXdeH, OH doJxKeH 6bItb 3aMeHeH npOuN3BOdnteJeM, eO cepBnCHo CnyK60n nn KBaInΦnCupOBaH-NbIM cneuaJIncTOM BO n36exKaHne ONaCHOCTn.
- TexHnueckoe 06cIyJxIBaHne IOnJXHO pOIN3BOIDtbcr TOnbKO KBaJIuΦnIupoBaHHbIM CNeUaJINCtOM.
BHHMaHHe! OTKInOHTe annapat OT po3eTKn Do hauaIpeMOHTHbIX pa60T.
-
Ecnn npedeoxpaHntelb pacnlaBnIcra, OHdoJxeh 6bITb 3aMeHeH npOn3BOuNTeIeM, erO cepBnCHo ClyXk60n nn KBaJIuΦnUPOBaHHbIM CneuaJIncTOM BO n36exKaHHe ONaCHOCTN.
-
Perylnpno OTKpbBaIte annapat n npOdyBaIte ero, yTo6bl OunCTnTb OT nbIn. Heo6xOJIMO TAKKe npOBepaTb BCE 3JeKtpnueckne coeINHeHnC NOMOsbIO N3OJInpOBaHHOrO INHCTpyMeHa. PpOBepka DOLXHa OCyUeCTBJIaTBcR KBAJIHΦNUPOBaHHbIM CNeuAInCTom.
- Hn B Koem Cnyaee He nCnoIb3OBAbTb paCTBOpNTeIN IIn npyrne Kopp03HbIe MOIOUcne cpeDCTBa.
OuHCTHTb NOBepxHOCTb aannapat c NOMOUI cyXoTpIKN.

Hopmbi npabila:
- Annapat COOTBETCTByet ДиpeKTnBaM EBpocoi03a
-Декларачи COOTBETCTBЯ ectb Ha Hauem caHTe.
3HaK COOTBeTCTBnA EAC (EBpa3nCKoe COOTBeTCTBnE KaueCTBa)
MaTePnAa COOTBeTCTByeT Tpe6oBaHnM BeJIko6pTuHn. 3aBLeHne O COOTBeTCTBnN DnA BeJIko6pTuHn DoCTyNHO Ha Ha-WeM Be6-caIte (cM. rIaNbHyIO cTpaHnU).
- Tobap COOTBETCTBYeT HopMaM MapOKKO.
-ДeКларачия C(CMIM)doCTylnHa ДЯ StKaЧиВаня Ha HauWeM caIte (cM Ha THTyIbHOn CTpaHnIe).
Ytvn3aun:
- ΘTOT annapat noДeЖИТ nepepa6OTke. He Bbl6pacbIBaTb B 06-uzn Mycopoc6OpHnK.
ONHCAHNE
AnnapaTbI STARTIUM npedHa3HaueHbI dIy 3apdKn I 3ayncKa CBnHcObBIX AKB c KndKocThbIM nn reJeBbIM 3JIeKTpoJNTOM Ha 12B nn Ha 24B.
MOHTIPOBAHHe pyuKn I KOJec (ToJIbKO dIy MoJeIe 480E, 680E n 980E) :
3JIEKTPONITAHNE
IpoBepbTe yTo nHTaHne I erO 3aunTbI (nlaBkne npedeoxpaHnteN) COBmecTmbI C TOKOM, Heo6xOdMbIM nIra pa60tbl annapata. Annapat doJXKeH 6bItb pacnoJoxKeH TaK, YTO6bl po3Etka 6bJa DoCTynHa. OH o6raTeJIbHO doJXKeH 6bITb noKnIOueH K po3Etke C 3A3EMJIEHNEM n Cneyra cNeDyUoIm peKomeHdaUaM:
| STARTIUM 330E | STARTIUM 480E | STARTIUM 680E | STARTIUM 980E |
| Нарражени сети | 230V - 1 ph | 230V - 1 ph | 230V - 1 ph | 230V - 1 ph |
| Зашита | 16 A | 16 A | 16 A | 16 A* |
| Мошносты | зарядки | 800 W | 1 700 W | 2 000 W | 2 000 W |
| залypsck | 6 500 W | 9 000 W | 10 000 W | 12 000 W |
*B Cnyae TpydHoro 3aynca 6oIbIwepy3HOrO aBToMObnI, NOMEHJIte BUNKy Ha 20A (He BXoDNT B KOMNJIeKT).
PekomeHdoBaHHoe ceueHne Ka6eI npu nCnoB3oBaHn ydInHnte: 3 x 2,5 MM².
NODKJIIOUOHEHNE NOTKJIIOUOHEHNE (cf p.5)
Ipeep noeknuehenm
- PoiKJIIOUChIte annapat K cTeN.
HaXmnte Ha KhONkY BKJ/BbIKJ.
3aropntcBcTeODnOHa nepeHne naHEn KaK noTBePckDeHne Bb6paHoro npaMeTpTa. EcnBb6paHHoe HapxKeHne He COoTBeTCTByeT HapxKeHIO ak6, 3apJaKe HaHHeTcra.
Cpa3y nocle noDCoeDHeHn, annapat STARTIUM daet HΦopMauNo no coCToHNIO aKKymyIaTopa. INdikatop (2) nonepemehno Noka3bIbaet pealbHOe HnnpjKeHne (4) npOBeHb 3apda B npoueHTax (5).
| 12V 24V |
| 100% | >12,8 V > 25,6 V | |
| ... | 11,8 V < tension < 12,8 V 23 | 6 V < tension < 25,6 V |
| 0% | < 11,8 V < 23,6 V | |
5.ИспльзуйTe annapat STARTIUMВ peximme zaraydkn,nycka nii TeCTa aIbTepHaTopa.
OTKJIIOUOHeHne


3apka AKB He Hauhetc ecn:
- Hanpajxhenie 6a tapen Mehee 1B.
- HanpjaKeHne 6aTapeH He COOTBeTCTByeT BbIbpaHHOMy Ha 3apJKe HanpjaKeHIO.
3apAk5 octaHOBITc eCNI:
- HaxkaT3aHOBO KhoNka START/STOP.
-Прдлжнельhoeь HenpepbBHOJ 3apdKn DoCTnIa 16U.
|  | Kak toIbko 6aTapeя 6ydeT 3apJxKeHa STARTIUM 6ydeT noIaBaTb hAnpJxKeHne IopIITkn. 3apJxJa He npEkrpatNTcra BO nI36ExJaHne aBTO-pa3PraDkn i dIy IopIeRkKn AK5 3apJxKeHno Ha 100%. |
| EcII NJIeKTPoIIT repMeTnUHoro aKKymyIaTopa NaHInHaet KINPeTb, To 3To 3NaHT, UTO aKKymyIaTOp nobpejdeH. PekOMeHdyETcra npEBA Tb 3apJxky B NaHane 3ToI rpocecca Bo nI36ExaHne pNcKa B3pbIbA. |
-БылОТКЛIOHcHHe NITaHnI ΦYHKLJIg«ABTOMaTNUeCKn Nepe3aNcK» He BKJIIOUHJNaCb.