LCD Gysmatic Goggle 3 - Safety glasses GYS - Free user manual and instructions
Find the device manual for free LCD Gysmatic Goggle 3 GYS in PDF.
| Product type | Welding protection goggles (opto-electronic mask) |
| Brand | GYS |
| Model | LCD Gysmatic Goggle 3 |
| Filter dimensions | 133.5 x 60.4 x 0.5 mm |
| Weight | 573 g |
| Power supply | Solar + 2 lithium batteries 3V CR2032 |
| Light shade | 3 |
| Dark shade (main window) | Cut: 4-8 / Weld: 8-13 |
| Dark shade (side windows) | 10 |
| Reaction time | 0.1 ms |
| Field of view | 130.8 x 58.5 mm (main), 52 x 48 mm (side) |
| Operating modes | WELD, CUT, GRIND |
| Settings | Shade (auto/manual), sensitivity, return delay, left/right windows |
| Compatible welding processes | MMA, TIG (>2A), MIG, grinding |
| Unauthorized processes | Oxyacetylene, laser, gas |
| Operating temperature | -5 °C to +55 °C |
| Storage temperature | -10 °C to +60 °C |
| Recommended lifespan | 5 years |
| Warranty | 2 years |
| Compliance standards | EN 175:1997, EN 166:2001, EN 379+A1:2009, CE, UKCA |
| Maintenance and cleaning | Clean the filter with a clean cotton cloth or special lens cloth; clean the inside and outside with a neutral detergent-disinfectant (no solvent); replace cracked or scratched protective screens. |
| Main spare parts | Outer protective screen, inner protective screen, side screens, filter, headband, sweatband (ref. 76001) |
| Battery replacement | Use 2 CR2032 batteries, replace once a year, recycle used batteries. |
Frequently Asked Questions - LCD Gysmatic Goggle 3 GYS
User questions about LCD Gysmatic Goggle 3 GYS
0 question about this device. Answer the ones you know or ask your own.
Ask a new question about this device
Download the instructions for your Safety glasses in PDF format for free! Find your manual LCD Gysmatic Goggle 3 - GYS and take your electronic device back in hand. On this page are published all the documents necessary for the use of your device. LCD Gysmatic Goggle 3 by GYS.
USER MANUAL LCD Gysmatic Goggle 3 GYS
text_image
Labeled diagram of a mechanical device with numbered parts for identificationtext_image
1 Unlock Press A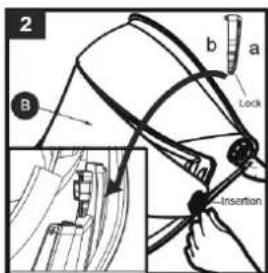
text_image
2 B a Lock Insertion
natural_image
Technical line drawing of a helmet with visible eye and ear components (no text or symbols)REPLACEMENT DU FILTRE
text_image
5 6 E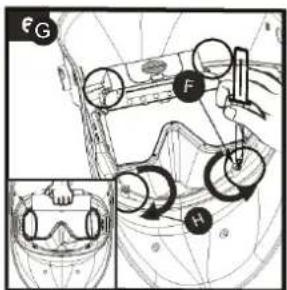
text_image
E G F H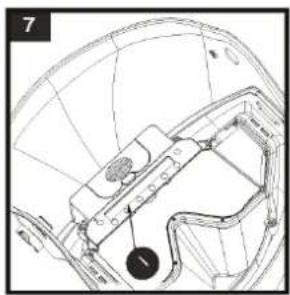
natural_image
Technical line drawing of a helmet with internal components and a numbered label (1), no readable text or symbols present.This user's manual includes information on the operation of the equipment and the precautions to be followed for the user's safety. Please read it carefully before first use and keep it in a safe place for future reference. These instructions must be read and understood before any operation. Any modification or maintenance not indicated in the manual must not be undertaken. Any damage to persons or property caused by use not in accordance with the instructions in this manual shall not be borne by the manufacturer. In the event of a problem or uncertainty, consult a qualified person to handle the product correctly.
Use the welding helmet only for eye and face protection against harmful ultra violet and infrared radiation, sparks and spatter from welding.

Never look directly at welding arcs without eye protection when the arc is initiated. Failure to do so may cause painful inflammation of the cornea and potentially irreversible damage to the lens which may result in cataracts.
Look out! Danger of injury if a person wearing a mask and goggles is hit by particles thrown at high speed.
The mask, filter and shields do not guarantee unlimited protection against major shocks or impacts, explosive mechanisms or corrosive liquids. Avoid welding or cutting in these severe environments.
Do not weld or cut above his head with this mask.
Move his face away from the smoky area. Use forced ventilation or local exhaust to remove smoke.
Oxyacetylene, laser or gas welding and cutting is not permitted with this mask.
Before each use :
- Carefully inspect the mask and its UV/IR filter.
- Replace worn or damaged parts immediately.
- Replace filter lenses or face shields if they are cracked or scratched to prevent damage to the user's eyes.
The headband can potentially cause allergies in sensitive individuals.
The operating temperatures of the optoelectronic filter are from -5^ to +55^ .
The opto-electronic filter in the mask is not waterproof and will not function properly if it has been in contact with water.
The welding mask must be moved carefully to avoid damage to the filter, guards and/or protective shell.
Maintenance :
- Do not place heavy objects or tools on or in the facepiece to avoid damage to the filter or face shields.
Mask storage temperatures range from -10^ to +60^ . - Clean the Optoelectronic Filter with a clean cotton or special lens cloth.
- Regularly clean and change the guard screens.
- Clean the inside and outside of the mask with a neutral detergent-disinfectant. Do not use solvents.
- Make sure that the sensors and cell are not obstructed by dust or debris.
- We recommend using the mask and visors for 5 years.
The length of use depends on various factors such as type of use, cleaning, storage and maintenance.
BEFORE WELDING
-Check that the welding helmet is in good condition and headband adjustment.
-Check whether the front cover lens, the front frame and filter are inserted and fixed in place. In case of anomalie, please proceed to its reconditioning.
-Make sure that the sensors and the cell are not obstructed by dust or debris.
-Make sure that the protection films on both screens are removed.
-Check that the protection level matches your welding processes. Please refer to the following chart to help your choice (cf. welding process board)
OPERATION
The opto-electronic GYSMATIC LCD GOGGLE 3 welding helmet instantaneously switches from light to dark state when a welding arc is struck and switches back to the light state when the arc stops.
text_image
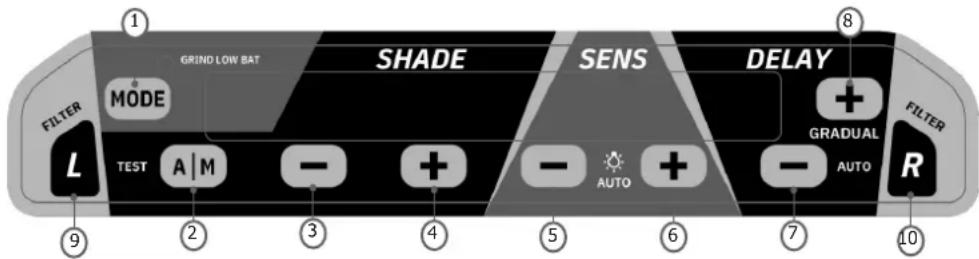
1 GRIND LOW BAT SHADE SENS DELAY FILTER MODE L TEST A | M - + - AUTO + - AUTO 8 FILTER GRADUAL R 9 2 3 4 5 6 7 10- Switch mode button «GRIND-WELD-CUT»
- «Automatic/Manual» switch shade button
- Decrease shade button
- Increase shade button
- Decrease sensitivity button
- Increase sensitivity button
- Decrease delay button
- Increase delay button
- Setting the left window
- Setting the right window
| 1 | MODE | Switch button «WELD / GRIND / CUT»:The « WELD / GRIND / CUT » switch botton is used to adjust the shade according to the selected adjustment range (4-8 or 8-13).WELD : shade 8-13CUT : shade 4-8GRIND : shade 3 (off)For non-welding operations such as grinding, it is possible to disconnect the sensor by switching the potentiometer to the «GRIND» mode.CAUTION: Make sure to switch back to «WELD» mode before any welding operation. |
| 2 | SENS | «Sensitivity» buttons : Setting of the sensitivity :- «-> : Short Press-Decrease the sensitivity. Long Press- Anti-light interference mode on/off. When Anti-light interference is on, the sensitivity area displays a bulb icon.- «++» : Short Press -Increase the sensitivity. Long Press - In the cut or weld mode, set sensitivity automatically.When automatic sensitivity function is enabled, SENS area will be shown «AUTO». The sensitivity numbers will increase from 0 to 8 in turn, and stop at the gear number which is automatically set. Then the system will quit the automatic sensitivity setting mode. |
| 3 | DELAY | «Delay» buttons : Time to get the clear state back.Delay is designed for slower switching time to clear state to eliminate remained bright rays.- «-> : Short Press : Decrease the delay time. Long Press : Enter or exit automatic delay time function. When automatic delay time function is enabled, the screen of DELAY area will show «AUTO». The gear numbers on the screen can adjust from -9 to +9.- «++» : Short Press : Increase the delay time. Long Press-Enter or exit gradual return function. In the weld mode, When gradual return function is enabled, the screen of DELAY area will show «G». |
GYSMATIC TRUECOLOR GOGGLE 3
| 4 | SHADE | • «Shade» buttons : Setting of the shade :- «A/M» : Short Press-In the welding mode switch automatic or manual setting the shade number. Long Press-Test Function: Screen Flashes—Grind—Cut—Weld.AUTO/MANUAL indicates the current shade number setting mode. In the manual mode (MANUAL), the screen will show current setting shade number. In the automatic mode (AUTO), the button («-> and «+») can adjust the automatic shade number from -2 to+2.- «-> : Short Press : Decrease the shade number. Long Press : In the welding and automatic shade number mode, main window quickly decreases the shade number.- «+» : Short Press : Increase the shade number. Long Press : In the welding and automatic shade number mode, main window quickly increases the shade number. |
| 5 | L | • «Left» button : Setting the left window.Short Press : Setting the left window and press the button once to increase the sensitivity. Long Press : Quickly back to the main window parameter display screen. |
| 6 | R | • «Right» button : Setting the right window.Short Press : Setting the right window and press the button once to increase the sensitivity. Long Press : Quickly back to the main window parameter display screen. |
PRECAUTIONS
- The welding helmet is suitable for use with virtually all welding processes except Oxy-Acetylene welding, laser welding and gas.
- Standard protective screens must be installed on both inside and outside surfaces of the module. Failure to use protective screens may constitute a safety hazard or result in irreparable damage to the module.
| Clear shade 3 | |
| Dark shade (main window) | Cut : 4-8 / Weld : 8-13 |
| Dark shade (side windows) | 10 |
| Filter dimension 110x90x8.5 mm | |
| Reaction speed 0.1 ms | |
| Power supply Solar + battery | |
| Weight 573 gr | |
| Field of vision 130.8x58.5 mm | |
| Applications MMA / TIG>2A / | MIG / Grind |
| Warranty | 2 years |
| Application temperature -5°C / + 55°C | |
| Storage temperature -10°C / | + 60°C |
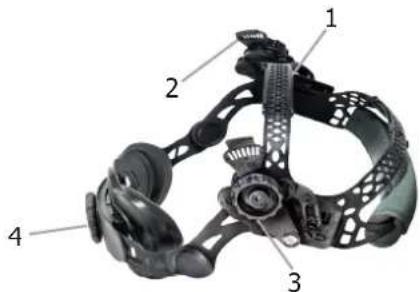
HEADBAND ADJUSTMENT
text_image
Labeled diagram of a mechanical device with numbered parts for identificationThe Ergolift+ headband is lightweight and ergonomic. Its 3 points adjustable
balance design provides more flexibility and comfort.
1- Headband adjustment
2- Headband slider(with 3 slots)
3- Block washer adjustment
4- Longitudinal adjustment
MAINTENANCE
- Expiration date: No expiration date for this product but the state of the GYSMATIC LCD GOGGLE 3 welding helmet must be checked before each use.
• The GYSMATIC LCD GOGGLE 3 must not be dropped
The deterioration of the optoelectronic filter or its protective screen can reduce the vision field or the protection level. Replace the damaged parts. - Do not use any tools or other sharp objects to remove any components of filter or helmet. Doing so may damage filter or helmet, preventing proper function, possibly causing injury or cancellation of the warranty.
- Clean and change protective screens on a regular basis.
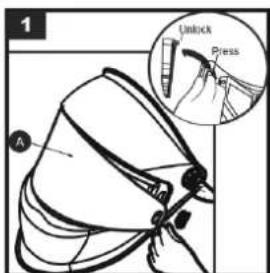
REPLACING SCREEN AND LENS
text_image
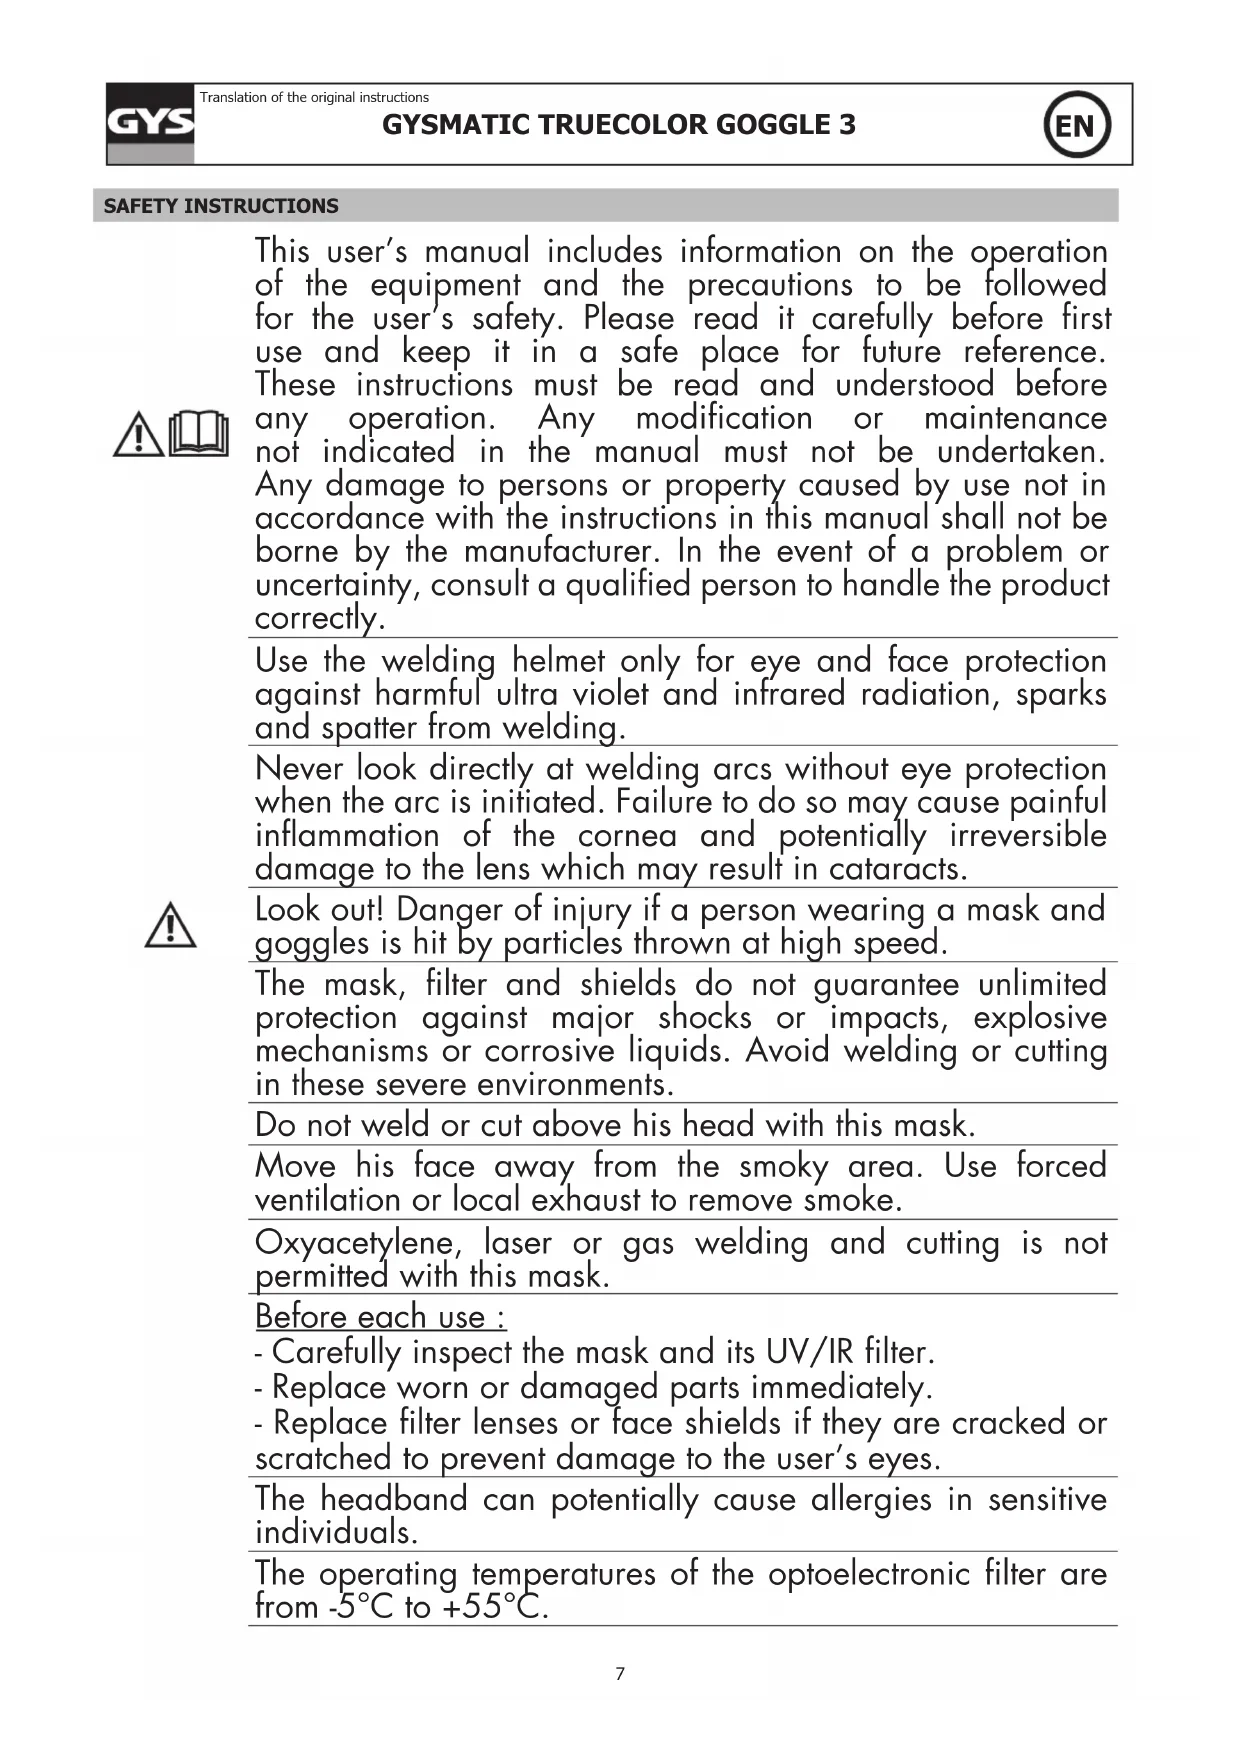
1 Unlock Press A
text_image
2 B a b Lock Insertion
natural_image
Technical line drawing of a helmet with visible eye and ear components (no text or symbols)- Unlock the snap joint of protection plate if it is locked (A). Press the snap joint for protection plate and then take out the plate (A).
- Change another protection plate and insert the snap joint (make sure "a" side close to the helmet) and then lock it (B).
- Insert a finger into the semicircular hole and pull out the inner protection lens (C). Remove protection film from lens. Place inside protection lens (C) back into the front of the helmet by inserting one side of the lens into either side slot and then bend the lens just enough that it will slip into the other side slot.
GYSMATIC TRUECOLOR GOGGLE 3
REPLACING BATTERIE
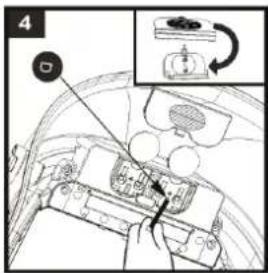
text_image
4The opto-electronic filter requires two 3V lithium battery (CR2032).
Follow the instructions below to change batteries:
- Using the battery remover to take out the battery (D).
- Change the battery and then put them back.
- It is recommended to replace the battery once a year.
CAUTION
- Recycle used lithium batteries. In Europe, batteries are considered as dangerous waste.
- Do not throw in the bin. To drop off only in collection point for used batteries.
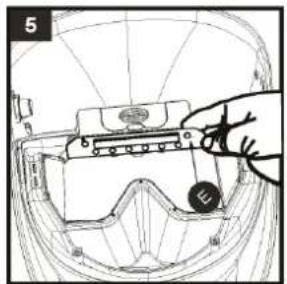
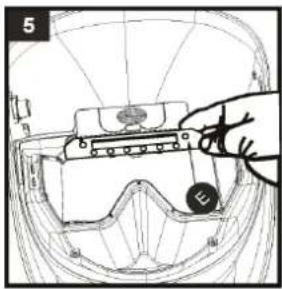
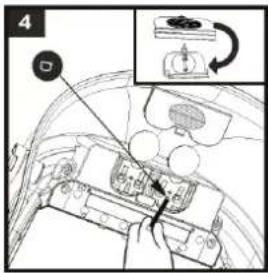
REPLACING FILTER
text_image
5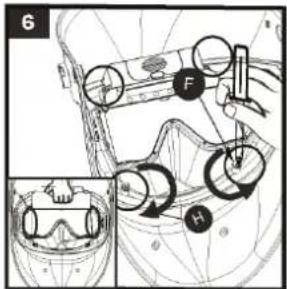
text_image
6 F H
natural_image
Technical line drawing of a mechanical component or assembly (no visible text or symbols)- Peel off the control panel (E).
- Loose the screw (F) and take out the filter (G) assembly from the shell. Tighten the screws (H).
- Paste the control panel (I).
SYMPTOMS AND SOLUTIONS
| The optoelectronic filter does not work. | Activate the solar charge by exposing the cell to the light between 20 to 30 minutes - Check and change battery if necessary. |
| Check that you have selected the 4-8 or 8-13 setting range with the «WELD» button. | |
| Filter stays dark after the weld arc is extinguished or when no arc is present. | Check and clean detectors if needed.Adjust sensitivity knob to the lower position (level 1). If the welding place is extremely bright, it is recommended to reduce light level. |
| Uncontrolled and sparkling switching: The filter lightens and darkens when welding. | Check arc sensors are not blocked from direct access to the arc light. Set the sensitivity level to 5. |
| Side of the filter is lighter than the center of viewing area. | It is a natural feature of LCD's, this symptom is not dangerous for the eyes. However for a maximum comfort, try to keep an view angle at around 90°. |
GYSMATIC TRUECOLOR GOGGLE 3
SAFETY LABEL
This label is displayed inside the welding helmet. It is important that the user understands the safety symbols signification. The list numbers match image numbers.

flowchart
graph TD
    A["Warning"] --> B["1: Book"]
    B --> C["?"]
    C --> D["Handages"]
    D --> E["Handages with tools"]
    E --> F["Warning icon 2"]
    F --> G["3: Place with hand"]
    G --> H["4: Headlamp with hand"]
    H --> I["5: Headlamp with hand"]
    I --> J["Warning icon 6"]
    J --> K["6: Headlamp with hand"]
    K --> L["6.1: Headlamp with hand"]
    L --> M["6.2: Hazard symbol"]
    M --> N["6.3: Hazard symbol"]
    N --> O["7: Hand welding"]
    O --> P["8: Shoe tool"]
Legend :
A. Warning ! Beware ! There are possible dangers as per the different symbols.
1. Read the instructions carefully before using the product or before welding.
2. Do not remove the warning label and do not paint on it.
3. Follow settings instructions and maintenance of the filter, the protective screens, the headband and the hood.
4. Inspect the helmet and the UV/IR filter carefully. Replace damaged or worn parts immediately. Cracked, scratched, filter glasses and protective screens decrease protection. Replace them immediately to avoid damaging your eyes.
5. Warning, if the UV/IR filter does not tint whilst welding or cutting, stop immediately and consult the user manual.
6. Arc radiation can cause eyes and skin burns.
6.1. Use a welding helmet with a good filtration or opacity. Wear complete protective clothing..
6.2. The helmet, filter and protective screen do not guarantee unlimited protection against, shocks, impacts, explosions or corrosive liquid. Avoid welding or cutting in rough environment.
6.3. Do not weld or cut above your head with this helmet.
7. Keep your head away from the smoke-filled area. Use a forced ventilation or a local aspiration system to eliminate smoke.
8. The oxyacetylene welding-cutting, laser or gas is not authorised with this helmet.
text_image
Labeled diagram of a mechanical device with numbered parts for identificationtext_image
1 Unlock Press A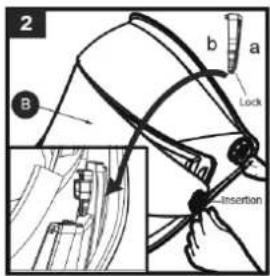
text_image
2 b a Lock B Insertion
natural_image
Technical line drawing of a mechanical component with two circular features and measurement indicators (no text or symbols)natural_image
Technical line drawing of a mechanical assembly or housing with no visible text or symbolsflowchart
graph TD
    A["Warning"] --> B["1: Book"]
    B --> C["2: Trigger icon"]
    C --> D["3: Arrow pointing to location pin"]
    D --> E["4: Head and hand protection"]
    E --> F["5: Arrow pointing to face mask"]
    F --> G["6: Trigger icon with hand"]
    G --> H["6.1: Head and face mask + shoe"]
    H --> I["7: Hazard symbol with welding tool"]
    I --> J["8: Head and hand protection"]
Zeichenerklärung :
text_image
Labeled diagram of a mechanical device with numbered parts for identificationtext_image
1 Unlock Press A
text_image
2 B a b Lock Insertion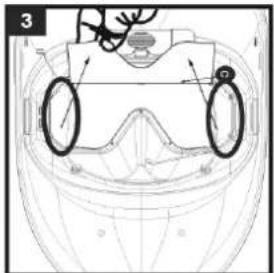
natural_image
Technical line drawing of a mechanical component with circular features and concentric rings (no text or symbols)REEMPLAZO DE LA PILA
text_image
Technical diagram of a car interior with labeled components and a directional arrow indicating rotation or movement.natural_image
Technical line drawing of a mechanical component or assembly (no visible text or symbols)text_image
Labeled diagram of a mechanical device with numbered parts for identificationtext_image
1 Unlock Press A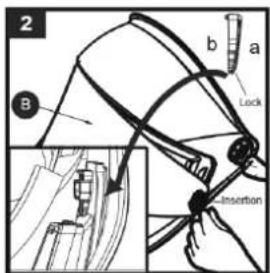
text_image
2 B a b Lock Insertion
natural_image
Technical line drawing of a mechanical component with circular features and mounting holes (no text or symbols)text_image
Diagram of a car interior with labeled components and a directional arrow indicating rotation or movement.natural_image
Technical line drawing of a mechanical component with no visible text or symbolstext_image
Labeled diagram of a mechanical device with numbered parts for identificationtext_image
1 Unlock Press A
text_image
2 B a b Lock Insertion
natural_image
Technical line drawing of a helmet with dual circular components (no text or symbols)text_image
Technical diagram of a vehicle interior with labeled components and a magnified inset showing a valve mechanism.natural_image
Technical line drawing of a helmet with internal components and a labeled component (no text or symbols)text_image
Labeled diagram of a mechanical device with numbered parts for identificationtext_image
1 Unlock Press A
text_image
2 B a b Lock Insertion
natural_image
Technical line drawing of a mechanical component with circular features and mounting holes (no text or symbols)natural_image
Technical line drawing of a helmet with internal components and a numbered marker (no text or symbols)flowchart
graph TD
    A["Warning"] --> B["1: Book"]
    B --> C["2: Hazard"]
    C --> D["3: Place"]
    D --> E["4: Head"]
    E --> F["5: Hand"]
    F --> G["6: Hazard"]
    G --> H["6.1: Face"]
    H --> I["7: Work Injury"]
    I --> J["8: Hazard"]
Legenda:
EN Manufacturer identification
EN Variations in Luminous transmittance class
EN Angle dependence of luminous transmittance class (optional)
EN Number of standard
DE Normung
text_image
Ref. 76001 ⑤ ⑥ Ref. 043466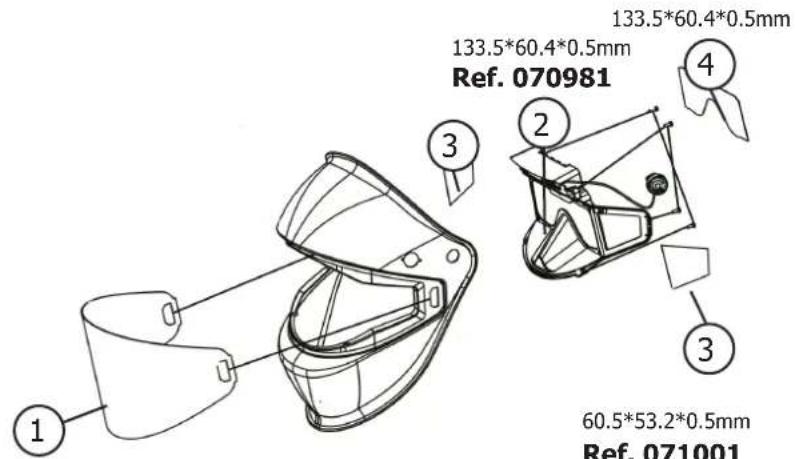
text_image
133.5*60.4*0.5mm Ref. 070981 133.5*60.4*0.5mm ④ ③ ② ③ 60.5*53.2*0.5mm Ref. 071001385.8*137.7*1.0mm
Ref. 070998
GYSMATIC TRUECOLOR GOGGLE 3
GARANTIE / WARRANTY / GARANTIE / GARANTÍA / ΓΑΡΑΗΤΙΑ / GARANTIE / GARANZIA
| FR | La garantie couvre tous défauts ou vices de fabrication pendant 2 ans, à compter de la date d'achat (pièces et main d'oeuvre).La garantie ne couvre pas :Toutes autres avaries dues au transport.Présence de grattons : travail sans vitre de protection (écran de garde)Verres cassésLes incidents dus à un mauvais usage (chute, démontage).En cas de défaut/panne, retourner l'appareil à votre distributeur, en y joignant :un justificatif d'achat daté (ticket de sortie de caisse, facture....)une note explicative de la panne/défaut. |
| UK | The warranty covers faulty workmanship for 2 years from the date of purchase (parts and labour).The warranty does not cover:Transit damage.Presence of scrapers: work without protective glass (guard screen)Damages due to misuse (dropping of equipment, disassembling).broken glassesIn case of failure, return the unit to your distributor together with:The proof of purchase (receipt etc ... )A description of the fault reported |
| DE | Die Garantieleistung des Herstellers erfolgt ausschließlich bei Fabrikations- oder Materialfehlern, die binnen 24 Monate nach Kauf angezeigt werden (Nachweis Kaufbeleg).Die Garantie erstreckt sich nicht auf :Alle anderen Schäden durch den Transport.Vorhandensein von Kratzern: Arbeiten ohne Schutzglas (Schutzschirm)Zerbrochene GläserVorfälle durch Missbrauch (Sturz, Demontage).Die Reparatur erfolgt erst nach Erhalt einer schriftlichen Akzeptanz (Unterschrift) des zuvor vorgelegten Kostenvoranschlages durch den Besteller. Im Fall einer Garantieleistung trägt GYS ausschließlich die Kosten für den Rückversand an den Fachhändler. |
| ES | La garantía cubre todos los defectos o vicios de fabricación durante 2 años, a partir de la fecha de compra (piezas y mano de obra)La garantía no cubre :Cualquier otro daño debido al transporte.Presencia de arañazos: trabajo sin cristal de protección (pantalla de protección)Gafas rotasIncidentes por mal uso (caída, desmontaje).En caso de fallo, regresen la maquina a su distribuidor, adjuntando:Un justificativo de compra con fecha (recibo, factura...)Una nota explicativa del fallo |
| RU | Гарантия распространяется на любой заводской дефект или брак в течение 2х лет с даты покупки изделия (запчасти и рабочая сила).Гарантия не распространяется на :Любые другие повреждения при транспортировке.Hаличие царапин: работа без защитного стекла (защитный экран)Разбитые очкиИнциденты, связанные с неправильным использованием (падение, демонтаж).При выходе из строя, обратитесь в пункт покупки аппарата с предъявлением следующих документов:документ, подтверждающий покупку (с датой): кассовый чек, инвойс....описание поломки. |
| NL | De garantie dekt alle gebreken en fabricagefouten gedurende twee jaar vanaf de aankoopdatum (onderdelen en arbeidsloon).De garantie dekt niet:Elke andere schade als gevolg van transport.Aanwezigheid van krassen: werken zonder beschermend glas (beschermrooster)Gebroken glazenIncidenten door verkeerd gebruik (vallen, afbreken).In geval van storing moet het apparaat teruggestuurd worden naar uw distributeur, samen met:Een gedateerd aankoopbewijs (betaalbewijs, factuur ... ).Een beschrijving van de storing. |
| IT | La garanzia copre qualsiasi difetto di fabbricazione per 2 anni, a partire dalla data d'acquisto (pezzi e mano d'opera).La garanzia non copre :Eventuali altri danni dovuti al trasporto.Presenza di graffi: lavoro senza vetro di protezione (schermo di protezione)Occhiali rottiIncidenti dovuti ad un uso improprio (caduta, smontaggio).In caso di guasto, rinviare il dispositivo al distributore, allegando:la prova d'acquisto con data (scontrino, fattura...)una nota esplicativa del guasto. |
DÉCLARATION DE CONFORMITÉ / DECLARATION OF CONFORMITY / KONFORMITÄTSERKLÄRUNG / DECLARACIÓN DE CONFORMIDAD / CEPTIФИКАТ COOTBETСТВИЯ / VERKLARING VAN OVEREENSTEMMING / DICHIARAZIONE DI CONFORMITÀ
UK The welding helmet GYSMATIC GOGGLE 3 TRUECOLOR complies with (UE) 2016/425. This confirmity is established in compliance with EN 175:1997, EN 166:2001, and EN 379+A1:2009.
Filter model : AWF PANOR GS
Model of the helmet : PANOR GS
UK Cell & Welding hood / Protection screen :
DE Zelle & Maske / Schutzschirm :