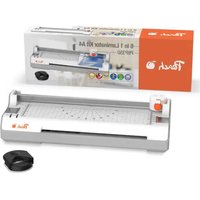
PH311 - Vacuum packaging machines Peach - Free user manual and instructions
Find the device manual for free PH311 Peach in PDF.
User questions about PH311 Peach
0 question about this device. Answer the ones you know or ask your own.
Ask a new question about this device
Download the instructions for your Vacuum packaging machines in PDF format for free! Find your manual PH311 - Peach and take your electronic device back in hand. On this page are published all the documents necessary for the use of your device. PH311 by Peach.
USER MANUAL PH311 Peach
natural_image
White rectangular electronic device with black and white casing, featuring a small circular icon on the lid (no text or symbols visible)Bedienungsanleitung
Operating instructions
Mode d'emploi
Before reading, unfold the page containing the illustrations and familiarise yourself with all functions of the device.
FR
This device is only intended for use in private households to vacuum and heat-seal bags. Any other use or modification to the device shall be considered improper use.
Safety notes


WARNING!
WARNING – DANGER
TO LIFE AND RISK OF ACCIDENTS FOR INFANTS AND CHILDREN! Never
leave children alone and un- supervised with the packaging material. The packaging material poses a suffocation hazard. Children frequently underestimate the dangers. Always keep children away from the product. This product is not a toy and should be kept out of the reach of children. Children cannot recognise the risks associated with the use of the product.
This product may be used by children aged 8 years and up, as well as by persons with reduced physical, sensory or mental capacities, or those lacking experience and/or knowledge, as long
as they are supervised or instructed in the safe use of the product and they understand the associated risks. Do not allow children to play with the product. Never allow children to clean or maintain this product unsupervised.
- The device is not a toy. Keep it out of the reach of children.

Avoid danger to life from electric shock!
● Always check the product for damage before connecting it to the power supply.
- Never use the product if it is damaged in any way.
- The product contains no parts which can be serviced by the user.
- Repairs to the product must be performed by authorised specialised companies or customer service. Improper repairs could result in significant hazards to the user. This will also void the warranty.
- Unplug the mains plug when the device is not in use.
- Do not use the product if the cable or the plug have been damaged.

WARNING - HOT SUR- FACES! HAZARD OF
BURNS! The heating element 7 can become very hot.
- To prevent injuries, do not touch the heating element immediately after shrink-wrapping.
- Do not leave the device unattended when it is switched on.
● Always place the device on a flat, solid and heat-resistant work surface during use. - Carefully read the operating instructions before use.
- Only operate the device indoors. Do not use it outside or in a damp environment.
- Do not use the device in conjunction with an extension cable.
- Keep the device and cable away from high temperatures and warm or damp environments.
-
The device does not require a lubricating agent. Do not use an organic solvent to clean the device.
-
To prevent pressure on the rubber seal 8 do not close the cover of the device after use.
- To prevent damage to the device, the vacuum tube cannot be cleaned. Please do not vacuum food products which contain a lot of water.
- To prevent injuries, do not open the cover or touch the vacuum chamber 11 when the device is connected to the power supply.
Parts description
1 Stop button
2 Vacuum seal button
3 Heat seal button
4 Cover release (left and right)
5 LED-Display
6 Heat seal surface
7 Heating element
8 Seal
9 Cutter
10 Vacuum pump vent
11 Vacuum chamber
Scope of delivery
1 Vacuum Sealer
1 Starterpack
1 Operating instructions
Before first use
- Remove all packaging material before first use.
Remove the transport securing device from the vacuum chamber 11. Carefully read the notes in the quick start guide and keep this in a safe place.
Functions
Vacuuming
Connect the device to the power supply and place the opening of the vacuum bag in the vacuum chamber 11.
Close the device cover by firmly pressing both sides of the cover down until you hear “clicking” sound. Press the vacuum button 2 to switch on the vacuum pump. The LED 5 will light up blue during this process. (The vacuum value reaches up to -50 kPa.)
As soon as it has finished vacuuming, the heat sealing process will begin automatically. When this step has finished, the device will switch off automatically and the blue LED 5 will fade out.
Note: In the case of an emergency you can switch off the device at any time using the stop button 1.
Note: The vacuuming process can take up to 2 minutes. If a complete vacuum cannot be created within a vacuum bag, after 2 minutes the display 5 will flash blue. Press the vacuum button 2 again. The heat sealing process will begin automatically after this.
Press the stop button1 to interrupt the process for products which are not meant to be completely vacuumed.
Then, press the heat seal button to continue the process.
When the heat sealing process has finished, the device will stop automatically.
Note: We recommend that you wait 20 seconds between individual vacuuming and heat sealing processes.
Heat sealing
Connect the device to the power supply and place the opening of the bag to be heat sealed in the vacuum chamber 11.
Press the heat seal button ^3 to close the bag directly without vacuuming beforehand.
Note: We recommend that you wait 20 seconds between individual vacuuming and heat sealing processes.
Cutting
The vacuum packaging device is equipped with a cutter 9. Lift up the cutter 9 and insert the vacuum film. Close the cutter 9 to hold the film in place. Slide the cutter 9 to the side and cut the film.
Note: The cutter is sharp. To prevent cut injuries do not touch it.
Creating a vacuum bag from a roll of film yourself
Open the cover and use the cutter ^9 to cut off the required amount of vacuum film.
Place each film end flat on the heat seal surface 6 and hold the film in place.
Close the device cover by firmly pressing both sides of the cover down until you hear "clicking" sound.
Connect the device to the power supply and press the heat seal button 3. The LED will light up blue. Heat sealing takes about 6 to 8 seconds. The blue LED goes off and the device will switch off automatically. It is recommended to open the cover after a further approx. 10 seconds, so that the welding seam can solidify optimally.
Press the cover release (we recommend pressing the right button and then the left one for the cover release 4. It is easier to open the cover this way). Open the cover and remove the vacuum bag.
Important notes:
The device is not suitable for vacuuming liquid food products.
The width of the vacuum bag and rolls of film should be up to 30 cm maximum.
Use a vacuum bag to vacuum. Normal bags are only suitable for heat-sealing and not for vacuuming.
Vacuuming prolongs the shelf life of food products but cannot prevent them from spoiling.
Cleaning and maintenance
○ Unplug the mains plug from the power supply before cleaning.
Never immerse the device or the cable in water or another liquid to clean them.
After the device has cooled down, use a soft sponge or a soft cloth to clean the device surface and the vacuum chamber 11.
Do not use brushes to clean it as this could scratch the device surface.
Use a handkerchief or a soft towel to clean food remnants and liquids from the vacuum chamber 11.
Keep the inside and the outside of the device dry so that the device is ready for use.
Troubleshooting
The device does not function
- Check to see if the device has been connected to the power supply.
Examine the cable, the mains plug and the device for damage.
Do not use the product if it has been damaged.
A complete vacuum is not created within the bag or automatic heat-sealing does not occur
☐ Ensure that the open end of the vacuum bag is positioned fully within the vacuum chamber 11.
☐ Check to see if the rubber seal has loosened.
☐ Ensure that there is no dirt on the heating element ⑦ or the rubber seal ⑧.
- Check to see if the device cover is closed securely.
- Ensure that no air can get into the vacuum bag through a hole. Immerse the vacuum bag in water to test this. If air bubbles rise up, then the bag is losing air. Get a new bag.
Air gets into the heat sealed bag after vacuuming
This problem may occur if creases, oil or other liquids are on the heat seal surface 6. Open the bag and clean the heat seal surface 6. Place the bag flat on the sealing surface 7 to vacuum and heat seal it.
☐ Check to see if air or liquid has entered the vacuum bag because of the food product. If this is the case, open the vacuum bag to vacuum and heat-seal it again. Alternatively, you can use another vacuum bag. For food products which contain a lot of water, we recommend that you freeze the food product before vacuuming and heat sealing it.
The vacuum process does not function perfectly
If the heating element ⑦ becomes overheated, the bag may melt. Open the cover of the vacuum sealer and allow the heating element ⑦ to cool down for a few minutes.
This problem may occur if creases, oil or other liquids are on the heat seal surface 6.
Wait 20 seconds after the vacuuming process is finished before you press the heat seal button 3 for the next process.
Food product shelf life
Vacuuming removes the air from food products. As a result, oxidisation and bacterial contamination are prevented.
| Storage, room temperature | Non-vacuumed storage | Vacuumed storage |
| Raw rice and pasta | 5 - 6 months | 12 months |
| freeze-dried | 1 - 2 months | 12 months |
| Coffee/tea | 2 - 3 months | 12 months |
| Bread / bread rolls | 2 - 3 days | 7 - 8 days |
| Storage, chilled (+5/-2 °C) | Non-vacuumed storage | Vacuumed storage |
| Game (meat) | 2 - 3 days 30 | - 40 days |
| Beef 3 - 4 days | 30 - 40 days | |
| Poultry 2 - 3 days | 6 - 9 days | |
| Whole fish 1 - 3 days | 4 - 5 days | |
| Raw vegetables | 5 days 18 - 20 days | |
| Fresh fruit 3 - 7 days | 8 - 25 days | |
| Boiled pasta 2 - 3 days | 8 - 12 days |
| Storage, deep-frozen (-15/-18 °C) | Non-vacuumed storage | Vacuumed storage |
| Meat, fish, poultry | 6 months 2 - 3 years | |
| Minced meat | 4 months 12 months | |
| Vegetables | 8 - 10 months | 2 - 3 years |
| Fruit | 6 - 12 months | 2 - 3 years |
| Bakery products | 6 - 12 months | 2 - 3 years |
| Coffee beans | 6 - 9 months | 2 - 3 years |
WARNING! VARNING - FARA FÖR
LIV OCH RISK FÖR OIL FÖR INFANTER OCH BARN!
Vacuum sealer PH 311
Operating voltage: AC220 - 240 V 50 Hz
Output: 100W
Shrink-wrapping duration: 6 - 8 seconds
Heating type: heating wire (12 V 2,5)
Vacuum value: -50 kPa
Max. width for the trimmer: 300 mm (30 cm)
Max. width for shrink-wrapping: 300 mm (30 cm)
Vacuum pump: 12 V, vacuum value: -60 kPa
Noise level: max. 80 DbA
Overall dimensions: 374 x 150 x 68 mm
Europe:
3T Supplies AG, Peach Division
CH-8834 Schindellegi (Switzerland)
support@peach.info