iZi Twist M iSize - Car seat BESAFE - Free user manual and instructions
Find the device manual for free iZi Twist M iSize BESAFE in PDF.

| Product type | Car seat |
| Brand | BeSafe |
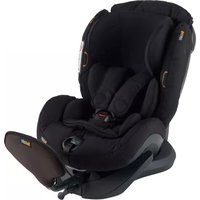
| Model | iZi Twist M iSize |
| Safety standard | i-Size (R129) |
| Usage | Rear-facing, children 61-105 cm (max 18 kg) |
| Dimensions (approx.) | 63 x 53 x 73 cm |
| Weight (approx.) | 14.5 kg |
| Installation | ISOFix + support leg |
| Rotation | 360° with automatic lock |
| Harness | 5-point, height-adjustable, with magnets to keep open |
| Side protection | Removable SIP+ on door side |
| Adjustments | Continuously adjustable headrest and harness, recline |
| Materials | Washable fabric, plastic shell |
| Care and cleaning | Clean with a soft cloth and soapy water, no harsh products |
| Spare parts and repairability | Covers, straps and buckles available from BeSafe |
| Warranty | 24 months |
| Lifespan | 7 years maximum |
| Important information | Do not install on front seat with active airbag |
Frequently Asked Questions - iZi Twist M iSize BESAFE
User questions about iZi Twist M iSize BESAFE
0 question about this device. Answer the ones you know or ask your own.
Ask a new question about this device
Download the instructions for your Car seat in PDF format for free! Find your manual iZi Twist M iSize - BESAFE and take your electronic device back in hand. On this page are published all the documents necessary for the use of your device. iZi Twist M iSize by BESAFE.
USER MANUAL iZi Twist M iSize BESAFE
BeSafe®
Scandinavian Safety

bar
| Country | Value | |---|---| | United Kingdom | 8 | | Denmark | 14 | | Sweden | 20 | | Finland | 26 | | Netherlands | 32 | | Germany | 40 | | France | 46 | | Spain | 52 | | Italy | 56 | | Greece | 64 | | Turkey | 70 | | Hungary | 76 | | Poland | 82 | | Romania | 88 | | Russia | 94 | | Ukraine | 100 | | Israel | 106 | | Japan | 112 | | South Korea | 118 | | Taiwan | 126 | | Hong Kong | 130 | | Singapore | 136 | | Norway | 142 | | Lithuania | 148 | | Belarus | 154 | | Kazakhstan | 160 | | Uzbekistan | 166 | | Kyrgyzstan | 172 | | Iraq | 178 | | Iran | 184 | | Pakistan | 190 | | Bangladesh | 196 | | Vietnam | 202 |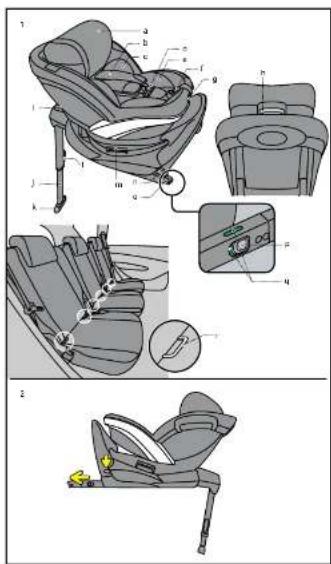
Thank you for choosing BeSafe I2I Twist I-Size
It is important that you read this user marva. DOONE installing your seat, incorrect installation on could undergo your choice.
! Vital Information
• The child sea MUST NOT be installed in a front
passenger seat WITH AN ACTIVATED AIRDAG.
• This seal can only be released in a car equipped with
Soll: 100-charge points approved to
- For the utility company in the core, over the vehicle license.
- The surface products were used to be a specific material. A force the car lost to 'and cut albus but an 'car metal' in any room for
The latest update of the radial rate is bound on the FaEale
website www.besafe.com. I your car is my current in the car(s).
please contact BeSis for further information
- iD Twist-LSize is approved near facing for children with a stay, re
Weight from 31 in 105 cm with maximum weight up to 18 kg
- When driving with a child sitting in the seat, the seat must always be
in the treat during driving direction of the vehicle, never drive with
the ses, related to the side when a chud is sitting in the seat.
-
-
-
-
-
-
-
-
-
-
-
-
-
-
-
-
-
-
-
-
-
-
-
-
-
-
-
-
-
-
-
-
-
-
-
-
-
-
-
-
-
-
-
-
-
-
-
-
-
-
-
-
-
-
-
-
-
-
-
-
-
-
-
-
-
-
-
-
-
-
-
-
-
-
-
-
-
-
-
-
-
- 99.
-
-
-
-
-
-
-
-
-
-
-
-
-
-
-
-
-
-
-
-
-
-
-
-
-
-
-
-
-
-
-
-
-
-
-
-
-
-
-
-
-
-
-
-
-
-
-
-
-
-
-
-
-
-
-
-
-
-
-
-
-
-
-
-
-
-
-
-
-
-
-
-
-
-
-
-
-
-
-
-
The ses, is empty. • Use harness Strat
- The research team's plan and strategy of the research team will be a member of the research team.
, The best
- The shoulder pass certain magnets. Magnets can influence
electrical equipment such as paramakers.
• Protect any part of the child's body which is exposed to the sun
- The floor support must always be used. Make sure that the floor
support is fully pushed down until it touches the floor of the vehicle
the front of the seat and that the seat is positioned horizontal in the
Vehicle with the spirit level in the middle. The indicators of the floor
4.10.2017
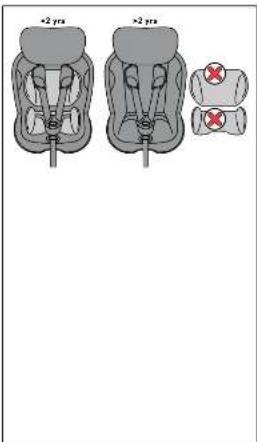
• Remove the seat rusting when the ship is over 2 years.
• humpers the size support when the cold is over 2 years.
when the child does not fit between these age supports anymore.
• After an accident, the sea must be replaced. Although it may look

undamaged if you were to have another accident, the best may not
be able to project your child to the level to which it was designed will meet the system becoming framed as signed on by
• 1. 2017年上海国际经济贸易
together, seals a door stir-firing door's. Make sure to link an the harness extremely small, so that you can no
beige was a hot in, as bellts. "On early, the latest, under
sure that the child is positioned well against the backrest.
- UC NUT attempt to dismantic, modifying or sick any part to the seal.
Warranty will be sold if non-original parts or accessories are used.
- Never leave your child unattended in the seat.
- Make sure all passengers are informed about how to release your
child in case of emergency
- Make sure, what is the other objects are possible; see, 1943. On set, two
Insgate, May, Canada. Several injuries to children and adults in case of 240/2001.
a. 12.0015
and may only be replaced by an original Higgs series.
• На пис. Use any speculative clearing projects; these may have
construct on material of the seat.
- DeSafe advises that child scars should not be bought or sold
second-hand.
- KEEP this user manual for later use with the best
- DO NOT use the seat for large than 7 years. Due to ageing, the
quality of the material may change
• Do NOT use S. Home. Has no. Even designed to no-he use and co-
b-Be used in Schells. "Why the child was in my
The 'e child' section is in our old - the cell check at a stress where the cold cast must touch the intestine. 'We recommence urine a
The5als' prostellum group is three-else in aortic rials, mocks to
discolouration to the interior of the vehicle, especially in vehicles with
leather or wooden interiors.
- If in doubt, consensus either the car seat manufacturer or the retailer.
Preparing to install
| • Adjustable headrest | (1a) |
| • Shoulder straps | (1b) |
| • Seat cushion | (1c) |
| • Harness buckle | (1d) |
| • Side support | (1e) |
| • Central adjuster | (1f) |
| • Reclining handle | (1g) |
| • Release handle headrest | (1h) |
| • Spirit level | (1i) |
| • Floor support | (1j) |
| • Floor support height indicator | (1k) |
| • Height adjuster floor support | (1l) |
| • Rotation release handle | (1m) |
| • Switch for ISOfix connectors (2x) | (1n) |
| • ISOfix connectors (2x) | (1o) |
| • ISOfix release switch | (1p) |
| • ISOfix indicators (2x) | (1q) |
| • ISOfix car anchorage (2x) | (1r) |
Installation
- When installing in the back seat of the vehicle, push the front seat of the vehicle forward as far as possible and adjust the back rest into an upright position (if it can be adjusted).
- When installing in the front seat of the vehicle, adjust the back rest into an upright position.
- Position the vehicle on a horizontal surface when installing the seat.
- When the base is lifted the floor support should fall downwards from underneath the base. Do this outside the car.
- Push down the switch for the ISOfix connectors at both sides to release the ISOfix connectors. (2)
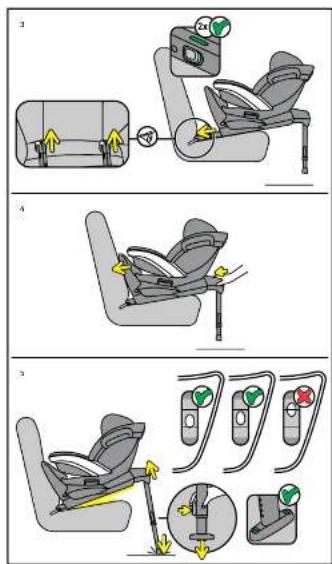
- Position the base on the vehicle seat. Click the ISOfix connectors on to the ISOfix anchorages on the vehicle seat. Make sure that both ISOfix indicators are green. (3)
- Push the seat towards the backrest of the vehicle seat until it touches the backrest. (4)
- The ISOfix connectors will have resistance sliding in, in the most outward positions, before they are connected with the ISOfix anchorage of the vehicle.
- Tip: once the ISOfix connectors are installed, the seat can be
turned towards the door of the vehicle to get a better view on the installation display.
- Remove the yellow cap from the floor support. Adjust the floor support, so it is in contact with the floor of the vehicle. (5)
- The height indicator of the floor support shows green when the floor support is in contact with the floor. (5)
- Lift the base at the front side (near the spirit level) and extend the floor support till the spirit level is in the middle, indicating a horizontal position of the base. (5)
- Tip: place one foot onto the bottom end of the floor support while lifting the base to make adjusting the length at this step easier.
- The alarm sound stops when the floor support indicators show green and it is in contact with the floor. Make sure that the horizontal spirit level shows a horizontal position of the seat. (5)
- When having the child seat installed rear facing in the back, it is recommended to position the front vehicle seat in a way that it is close to the touchpoint with the child seat. Make sure that the child seat can still rotate freely.
When having the child seat installed rear facing on the passenger seat in the front, it is recommended to position the passenger seat in a way that the dashboard is close to the touchpoint with the child seat. Make sure that the child seat can still rotate freely. - Tip: If you feel like the base has too much side movement, you can install the seat tighter against the vehicle seat backrest. Make the support leg short, grab the base and push it against the vehicle backrest with more force. Move it side to side until you hear one more 'click' per side, then lift the base into horizontal position again
- The seat is delivered with removable SIP+ (side impact protection +). This extra side impact protection should be used on the door side of the vehicle. It can be connected by slotting between the seat shell and the fabric. The seat already offers high level integrated side impact protection. This extra side impact protection improves the protection in the side impact still further. (Not on all models) (6)
- Tip: For an optimal height of the SIP+, position it between the two raised dots on the side of the seat shell.
- Do not use the SIP+ on the seat when the space between seat and door of the vehicle is too small, which might lead to a situation where the seat is not positioned correctly on the vehicle seat. (6)
Removal of the seat from the vehicle
- To remove the seat from the vehicle, turn the seat rear facing and push the seat upwards while adjusting the floor support to its shortest length.
- Release the ISOfix connectors out of the seat by pushing down the switch for the ISOfix connectors on both sides. Pull the ISOfix release switch on both sides to disconnect from the ISOfix car anchorage.
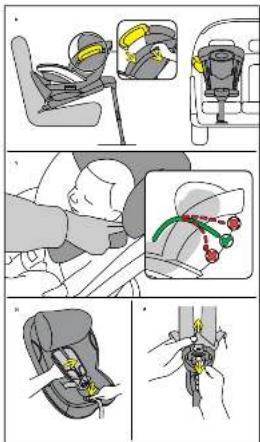
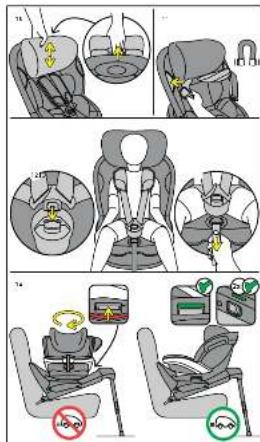
Positioning of the child
- Tur the seat towards the door while you pull the rotation release handle upwards.
- Check that the shoulder strap slots are level with your child's shoulders. (7)
- While pressing the button of the central adjuster, pull the shoulder straps away from the seat with a flat hand. Make sure to pull the straps evenly so that they stay at the same length. (8)
- Open the harness buckle. (9)
- The height of the shoulder straps and the headrest can be adjusted by pulling the release handle upwards at the back of the headrest and pulling the headrest up or down. (10)
- Position the shoulder straps over the marking at the sides of the seat to use the magnets to keep the harness open while you position the child. (11)
- When the child is positioned, place the shoulder straps over the child's shoulders and close the buckle: CLICK! (12)
- Pull the harness strap through the central adjuster in the direction of the arrow straight up/forwards. Continue pulling until the harness is a comfortable but a firm fit. (13)
- Turn the seat against the driving direction before driving and check if the release handles show green and the seat is locked into the driving direction. (14)
Removing and refitting the cover
- Do take care when you remove the cover, as re-fitting the cover is done in reverse.
- The cover of the headrest can be taken off separately by disconnecting the beads at the back and pulling off the fabric towards the front.
! Warning: potential misuse
- The child seat MUST NOT be installed in a front passenger seat WITH AN ACTIVATED AIRBAG.
- The floor support must always be used. Make sure that the floor support is fully pushed down and that the seat is positioned horizontal with the spirit level in the middle.
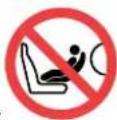
- Never drive with a child in the seat if the seat is rotated to the side.
• Make sure the indicators are green before you drive.
Guarantee
- Should this product prove faulty within 24 months of purchase due to materials or manufacturing fault, except covers and harness straps, please return it to the original place of purchase.
- The guarantee is only valid when you use your seat appropriately and with care. Please contact your retailer, they will decide if the seat will be returned to the manufacturer for repair. Replacement or return cannot be claimed. The guarantee is not extended through repair.
- The guarantee expires: when there is no receipt, when defects are caused by incorrect and improper use, when defects are caused by abuse, misuse or negligence.
Takk for at du valgte BeSafe iZi Twist i-Size
f facebook.com/BeSafe
@besafeinternational
BeSafe®
Scandinavian
Safety