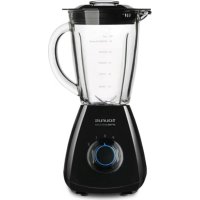
Optima Easy Glass - Blender TAURUS - Free user manual and instructions
Find the device manual for free Optima Easy Glass TAURUS in PDF.


| Product type | Blender |
| Brand | Taurus |
| Model | Optima Easy Glass |
| Bowl capacity | 1.5 L (1500 ml) |
| Bowl material | Glass |
| Power | Not specified (estimated: 500-700 W) |
| Power supply | 220-240 V ~ 50/60 Hz |
| Speeds | Variable electronic speed control |
| Pulse function | Yes (full power rotation in cycles) |
| Safety | Lockable lid with safety system preventing start if not properly closed |
| Blades | Removable sharp grinding blade set |
| Cleaning | Dishwasher-safe parts (bowl, lid, measuring cup); self-cleaning function |
| Maintenance | Unplug before cleaning; do not immerse motor base |
| Included accessories | Measuring cup, lid, gasket, bowl, retaining ring, blades |
| Weight | Not specified (estimated: 2-3 kg) |
| Dimensions | Not specified (approx. height 40 cm) |
| Usage | Household use only |
| Cable storage | Built-in compartment under the appliance |
| Warranty | Not specified (refer to authorized after-sales service) |
Frequently Asked Questions - Optima Easy Glass TAURUS
User questions about Optima Easy Glass TAURUS
0 question about this device. Answer the ones you know or ask your own.
Ask a new question about this device
Download the instructions for your Blender in PDF format for free! Find your manual Optima Easy Glass - TAURUS and take your electronic device back in hand. On this page are published all the documents necessary for the use of your device. Optima Easy Glass by TAURUS.
USER MANUAL Optima Easy Glass TAURUS
natural_image
Line drawing of a modern kitchen blender with handle and side panel (no text or symbols)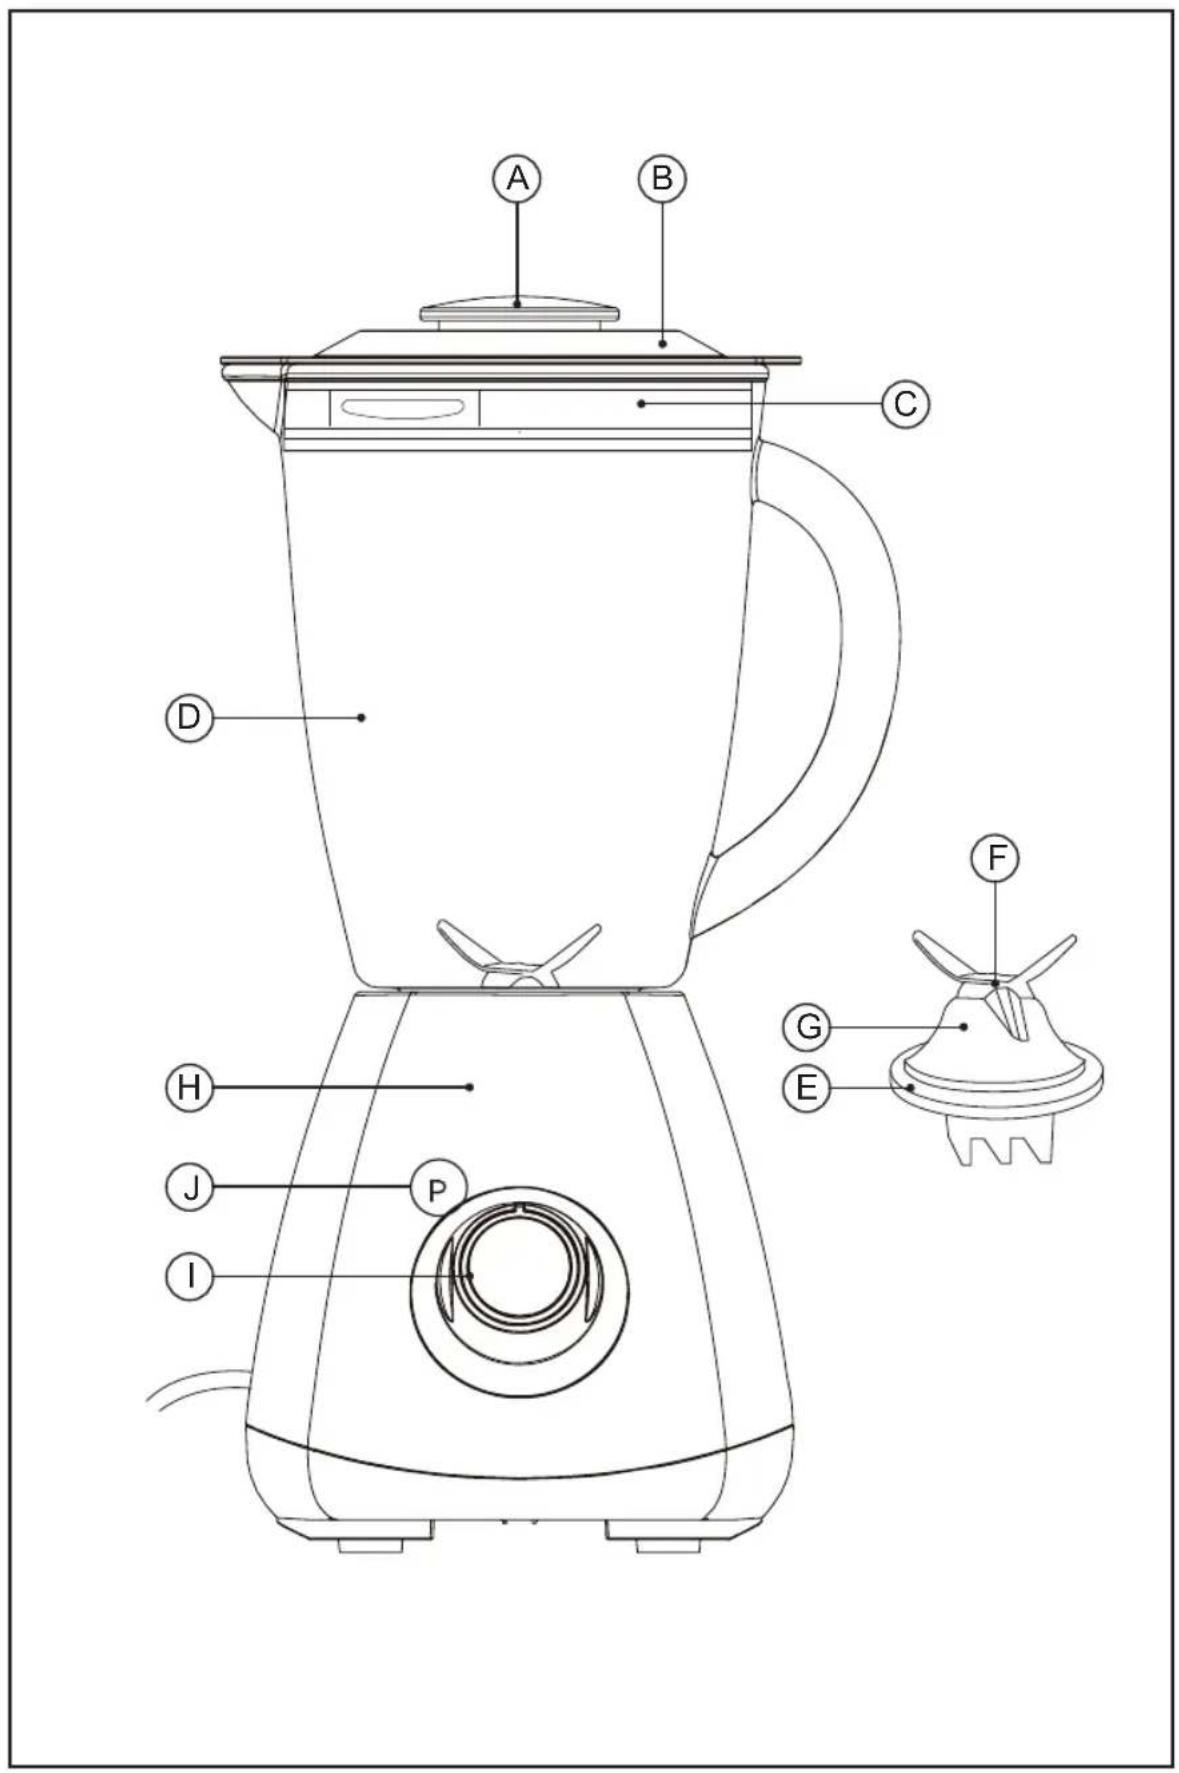
Fig.1 Fig.2
natural_image
Illustration of a hand holding a mechanical component with a curved arrow indicating direction (no text or symbols)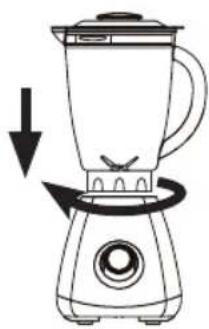
natural_image
Line drawing of a blender with a downward arrow indicating rotation (no text or symbols)Fig.3
natural_image
Line drawing of a blender with a handle and side ports, showing a curved arrow indicating rotation (no text or symbols)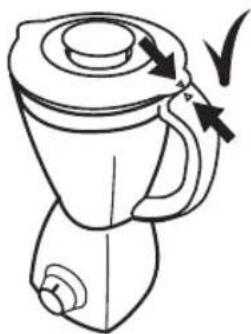
natural_image
Line drawing of a blender with handle and spout, showing no text or symbolsFig.4 Fig.5
natural_image
Line drawing of three different kitchen utensils: a circular bowl, a lid with a triangular handle, and a cylindrical container (no text or symbols)Fig.6

natural_image
Simple line drawing of a propeller inside a circular container with an arrow pointing downward (no text or symbols)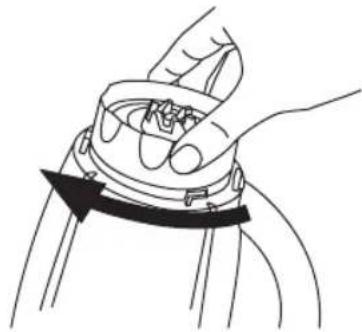
natural_image
Line drawing of a hand holding a mechanical component with a curved arrow indicating direction (no text or symbols)Español
Batidora
Optima Easy
Optima Easy Glass
Many thanks for choosing to purchase a TAURUS brand product.
Thanks to its technology, design and operation and the fact that it exceeds the strictest quality standards, a fully satisfactory use and long product life can be assured.
SAFETY ADVICE AND WAR- NINGS
- Read these instructions carefully before switching on the appliance and keep them for future reference. Failure to follow and observe these instructions could lead to an accident.
- Clean all the parts of the product that will be in contact with food, as indicated in the cleaning section, before use.
- This appliance shall not be used by children. Keep the appliance and its cord out of reach of children.
- This appliance can be used by people with reduced physical, sensory or mental capabilities or lack of experience and knowledge if they have been given supervision or instruction concerning use of the appliance in a safe way and understand the hazards involved.
- This appliance is not a toy.
Children should be supervised to ensure that they do not play with the appliance.
- Be careful if hot liquid is poured into the food processor or blender as it can be ejected out of the appliance due to a sudden steaming.
- Blades are sharp and could cause harm, be careful and avoid direct contact with the blades' cutting edges.
- Pay special attention when handling the blades, during assembly and disassembly operations, emptying the bowl and during cleaning.
- Always switch off the appliance and disconnect from supply if it is left unattended and before changing accessories or approaching parts that move in use, assembling, disassembling and cleaning.
- If the connection to the mains has been damaged, it must be replaced, take the appliance to an authorised technical support service. Do not attempt to disassemble or repair the appliance by yourself in order to avoid a hazard.
- Ensure that the voltage indicated on the rating label matches the mains voltage before plugging in the appliance.
- Connect the appliance to a socket that can supply a minimum of 10 amperes.
- The appliance's plug must fit into the mains
socket properly. Do not alter the plug. Do not use plug adaptors.
- The appliance must be used and placed on a flat, stable surface.
- Do not use the appliance if the cable or plug is damaged.
- If any of the appliance casings breaks, immediately disconnect the appliance from the mains to prevent the possibility of an electric shock.
- Do not use the appliance if it has fallen on the floor, if there are visible signs of damage or if it has a leak.
- Do not force the power cord. Never use the power cord to lift up, carry or unplug the appliance.
- Do not clip or crease the power cord.
- Do not use or store the appliance outdoors.
- Do not touch the plug with wet hands.
- Take the necessary measures to avoid starting the appliance involuntarily.
- Before using the appliance ensure that the blade is properly fixed in place.
- Do not touch any of the appliance's moving parts while it is operating.
- Exercise precaution after employing the stop operation on the appliance as the blade/s will continue moving from the effect of its own mechanical inertia.
USE AND CARE:
- Fully unroll the appliance's power cable before each use.
- Do not use the appliance if its accessories are not properly fitted.
- Do not use the appliance if the accessories attached to it are defective. Replace them immediately.
- Do not use the appliance while the jug is empty.
- Do not use the appliance if the on/off switch does not work.
- Do not move the appliance while in use.
- Do not turn the appliance over while it is in use or connected to the mains.
- Do not force the appliance's work capacity.
- Respect the MAX level indicator. (1500 ml).
- When using hot liquids do not fill the jug more than half way. At all times, when mixing hot liquids in the jug, select the slowest speed on the speed selector.
- This appliance is for household use only, not professional, industrial use.
- Store this appliance out of reach of children and/
or persons with physical, sensory or reduced mental or lack of experience and knowledge.
- Keep the appliance in good condition. Check that the moving parts are not misaligned or jammed and make sure there are no broken parts or anomalies that may prevent the appliance from operating correctly.
- Use the appliance and its accessories and tools in accordance with these instructions, taking into account the working conditions and the work to be performed. Use the appliance for operations different from those intended could result in a hazardous situation.
- Never use boiling liquids.
- Check that the lid is closed properly before starting the appliance.
- Never leave the appliance unattended while in use.
- Do not use the appliance with frozen goods or those containing bones.
- CAUTION: Do not use the appliance if the glass is cracked or broken.
SERVICE:
- Any misuse or failure to follow the instructions for use renders the guarantee and the manufacturer's liability null and void.
DESCRIPTION
A Measuring cup
B Jar lid
C Sealing jar ring (*)
D Jar 1,5 L
E Sealing blade ring
F Blade set
G Blade fixing ring (*)
H Motor body
I Speed selector
J Pulse function
(*) Only available in the model OPTIMA EASY GLASS
INSTRUCTIONS FOR USE
BEFORE USE:
- Make sure that all products' packaging has been removed.
- Before using the product for the first time, clean the parts that will come into contact with food in the manner described in the cleaning section.
USE:
- Unroll the cable completely before plugging it in.
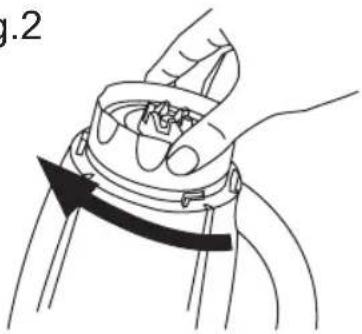
- Ensure the blade fixing ring is fixed properly to the jar (by turning clockwise) before putting on the motor body. (Fig.1).
- Place the jar onto to the motor unit; turn clockwise until the lock clicks into place. (Fig.2). (Only available in the model Optima Easy).
- Put the ingredients, after having first chopped them into small piece, into the jar with liquid (do not exceed the maximum marker).
- Put the lid on the jar; make sure it is properly fixed in place.
- Put the measuring cup in the lid.
- Connect the appliance to the mains.
- Turn the appliance on, by using the selection knob.
- Choose desired speed and start blending.
- If you wish to add more ingredients pull out the measuring cup.
- Add the ingredients and replace the measuring cup.
- To stop the appliance set the speed back to "0".
- To avoid a fierce start up of the fan, it is advisable to start off from the lowest speed position and, once the fan has been switched on, progressively increase the speed to the desired position.
ELECTRONIC SPEED CONTROL:
- The speed of the appliance can be regulated by using the speed regulator control (I). This function is very useful, as it makes it possible to adapt the speed of the appliance to the type of work that needs to be done.
ONCE YOU HAVE FINISHED USING THE APPLIANCE:
- Stop the appliance, selecting position 0 on the selector control.
- Unplug the appliance from the mains.
- Turn the mixing jar anticlockwise and remove it from the motor body.
- Clean the appliance.
"PULSE" FUNCTION
- The appliance works in highest speed to achieve optimal performance.
- Press this button to operate and release the button when you wish to stop operating.
- We recommend working by turning the speed selector in cycles of 3 seconds and repeating the operation until you obtain the desired result.
CABLE COMPARTMENT
- This appliance has a cable compartment situated on its underside.
LID WITH SECURITY SYSTEM AND FILTER (ONLY AVAILABLE IN THE MODEL OPTIMA EASY)
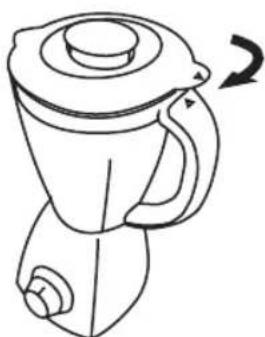
- The lid has a security system to guarantee the safety of the user. If the cover is not assembled correctly the product does not start. Before starting the appliance, place the lid on the jar and turn it until the lid and handle marks match. (Fig.3)
- The lid has a filter for the pulp of juices and purees.
CLEANING
- Disconnect the appliance from the mains and allow it to cool before undertaking any cleaning task.
- Clean the equipment with a damp cloth with a few drops of washing-up liquid and then dry.
- Do not use solvents, or products with an acid or base pH such as bleach, or abrasive products, for cleaning the appliance.
- Do not let water or any other liquid get into the air vents to avoid damage to the inner parts of the appliance.
- Never submerge the appliance in water or any other liquid or place it under running water.
- During the cleaning process, take special care with the blades, as they are very sharp.
- If the appliance is not in good condition of cleanliness, its surface may degrade and inexorably affect the duration of the appliance's useful life and could become unsafe to use.
-
The following pieces may be washed in a dishwasher (using a soft cleaning program):
-
Jug.
- Lid.
- Measuring cup
- Then dry all parts before its assembly and storage.
SELF-CLEANING FUNCTION:
- Put water and a small amount of washing up liquid in the jar.
- Select the function "pulse".
REMOVABLE BLADES FOR EFFECTIVE CLEANING
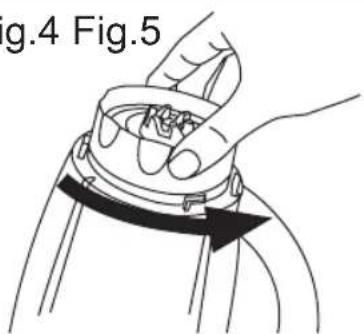
- Loosen the blade fixing ring by turning it in counter clockwise. (Fig. 4)
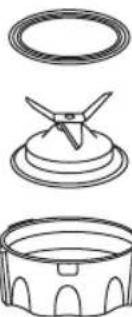
- Remove the blade fixing ring, blade set and sealing ring and clean them. (Fig. 5)
- After cleaning, replace the blade set and turn blade fixing ring in clockwise direction. (Fig 6)
ANOMALIES AND REPAIR
- Take the appliance to an authorised technical support service if product is damaged or other problems arise. Do not attempt to disassemble or repair the appliance yourself as this may be dangerous.
FOR EU PRODUCT VERSIONS AND/OR IN CASE THAT IT IS REQUESTED IN YOUR COUNTRY:
ECOLOGY AND RECYCLABILITY OF THE PRODUCT
- The materials of which the packaging of this appliance consists are included in a collection, classification and recycling system. Should you wish to dispose of them, use the appropriate public recycling bins for each type of material.
- The product does not contain concentrations of substances that could be considered harmful to the environment.

This symbol means that in case you wish to dispose of the product once its working life has ended; take it to an authorised waste agent for the selective collection of Waste from Electric and Electronic ment (WEEE).
This appliance complies with Directive 2014/35/EU on Low Voltage, Directive 2014/30/EU on Electromagnetic Compatibility, Directive 2011/65/EU on the restrictions of the use of certain hazardous substances in electrical and electronic equipment and Directive 2009/125/EC on the ecodesign requirements for energy-related products.
Français
Mixeur avec verre
Optima Easy
Optima Easy Glass
Cher Client,
ELEKTRISCHE SNELHEIDSCONTROLE:

- Español
- Batidora
- SAFETY ADVICE AND WAR- NINGS
- USE AND CARE:
- SERVICE:
- DESCRIPTION
- INSTRUCTIONS FOR USE
- BEFORE USE:
- USE:
- ELECTRONIC SPEED CONTROL:
- ONCE YOU HAVE FINISHED USING THE APPLIANCE:
- "PULSE" FUNCTION
- CABLE COMPARTMENT
- LID WITH SECURITY SYSTEM AND FILTER (ONLY AVAILABLE IN THE MODEL OPTIMA EASY)
- CLEANING
- SELF-CLEANING FUNCTION:
- REMOVABLE BLADES FOR EFFECTIVE CLEANING
- ANOMALIES AND REPAIR
- FOR EU PRODUCT VERSIONS AND/OR IN CASE THAT IT IS REQUESTED IN YOUR COUNTRY:
- ECOLOGY AND RECYCLABILITY OF THE PRODUCT
- Français
- Mixeur avec verre
- Cher Client,
- ELEKTRISCHE SNELHEIDSCONTROLE:
Brand : TAURUS
Model : Optima Easy Glass
Category : Blender