
Instant Tronic - Microwave Oven TAURUS - Free user manual and instructions
Find the device manual for free Instant Tronic TAURUS in PDF.

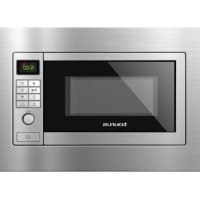
| Product Type | Microwave oven with grill and combined function |
| Brand | Taurus |
| Model | Instant Tronic |
| Capacity | 20 liters (estimate) |
| Microwave power | 800 W (estimate) |
| Grill power | 1000 W (estimate) |
| Power supply | 230 V ~ 50 Hz, 10 A |
| Control type | Electronic with LED display and rotary dial |
| Functions | Microwave, grill, combination, automatic defrost, auto cook, quick start, clock, child lock |
| Microwave power levels | 6 levels: 100%, 80%, 60%, 40%, 20%, 0% |
| Grill/combination modes | Grill only, Combi 1 (30% MW + 70% grill), Combi 2 (55% MW + 45% grill) |
| Timer | Up to 60 minutes |
| Maximum defrost weight | 1800 g |
| Turntable | Yes, glass |
| Interior light | Yes |
| Child safety lock | Yes, activation by 3-second press |
| Cavity material | Stainless steel (estimate) |
| Dimensions (W x D x H) | Approximately 45 x 35 x 25 cm (estimate) |
| Net weight | Approximately 12 kg (estimate) |
| Cleaning | Clean with a damp cloth and mild detergent; glass turntable dishwasher safe |
| Included accessories | Glass turntable, metal rack (for grill) |
Frequently Asked Questions - Instant Tronic TAURUS
User questions about Instant Tronic TAURUS
0 question about this device. Answer the ones you know or ask your own.
Ask a new question about this device
Download the instructions for your Microwave Oven in PDF format for free! Find your manual Instant Tronic - TAURUS and take your electronic device back in hand. On this page are published all the documents necessary for the use of your device. Instant Tronic by TAURUS.
USER MANUAL Instant Tronic TAURUS
Many thanks for choosing to purchase a TAURUS brand product.
Thanks to its technology, design and operation and the fact that it exceeds the strictest quality standards, a fully satisfactory use and long product life can be assured.
Description
- Door Safety lock System
- Oven window
- Wave guide
- Turntable roller
- Glass Tray
- Control panel
- Grill Heater *
- Metal rack *
(*) Only available in the model Instant Grill and Instant Tronic
- Read these instructions carefully before switching on the appliance and keep them for future reference. Failure to follow and observe these instructions could lead to an accident.
Safety advice and warnings
IMPORTANT SAFETY INSTRUCTIONS READ CAREFULLY AND KEEP FOR FUTURE REFERENCE
-
WARNING: If the door or door seals are damaged, the oven must not be operated until it has been repaired by a competent person.
-
WARNING: It is hazardous for anyone other than a competent person to carry out any service or repair operation that involves the removal of a cover which gives protection against exposure to microwave energy.
- WARNING: Liquids and other foods must not be heated in sealed containers since they are liable to explode.
- This appliance is only for domestic use, not for industrial or professional use. It is not intended to be used by guests in hospitality environments such as bed and breakfast, hotels, motels, and other types of residential environments, even in farm houses, areas of the kitchen staff in shops, offices and other work environments.
- The appliance requires suitable ventilation in order to work properly. Leave a space of 20cm above the appliance, 10cm behind the appliance, and 5cm on either side.
- Only use utensils that are suitable for use in microwave ovens.
- Metallic containers for food and beverages are not allowed during microwave cooking.
- When heating food in plastic or paper containers, keep an eye on the oven due to the possibility of ignition.
- The microwave oven is intended for heating food and beverage. Drying of food or clothing and heating of warming pads, slippers, sponges, damp cloth and similar may lead to risk of injury, ignition or fire.
- If smoke is emitted, switch off or unplug the appliance and keep the door closed in order to stifle any flames.
- Microwave heating of beverages can result in delayed eruptive boiling; therefore care must be taken when handling the container.
- The contents of feeding bottles and baby food jars shall be stirred or shaken and the temperature checked before consumption, in order to avoid burns.
-
Eggs in their shell and whole hard-boiled eggs should not be heated in microwave ovens since they may explode, even after microwave heating has ended..
-
Clean all the parts of the product that will be in contact with food, as indicated in the cleaning section, before use.
- The oven should be cleaned regularly and any food deposits removed.
- Failure to maintain the oven in clean condition could lead to deterioration of the surface that could adversely affect the life of the appliance and possibly result in a hazardous.
- The appliance shall not be cleaned with a steam cleaner
- The microwave oven is intended to be used freestanding
- The appliance shall not be placed in a cabinet
- This appliance can be used by children aged from 8 years and above and persons with reduced physical, sensory or mental capabilities or lack of experience and knowledge if they have been given supervision or instruction concerning use of the appliance in a safe way and understand the hazards involved.
- This appliance is not a toy. Children should be supervised to ensure that they do not play with the appliance.
- Cleaning and user maintenance shall not be made by children unless they are supervised.
- The temperature of the door and other accessible surfaces may be high when the appliance is in use.
- Do not use the appliance in association with a programmer, timer or other device that automatically switches it on.
- Do not remove the mica plate covering the wave guide
- If the connection to the mains has been damaged, it must be replaced, take the appliance to an authorised technical support service. Do not attempt to disassemble or repair the appliance by yourself in order to avoid a hazard.
- Ensure that the voltage indicated on the rating label matches the mains voltage before plugging in the appliance.
- Connect the appliance to a base with an earth socket withstanding a minimum of 10 amperes.
-
The appliance's plug must fit into the mains socket properly. Do not alter the plug. Do not use plug adaptors.
-
Do not force the power cord. Never use the power cord to lift up, carry or unplug the appliance.
- Do not clip or crease the power cord.
- Do not allow the power cord to hang or to come into contact with the hot surfaces of the appliance.
- Check the state of the power cord. Damaged or tangled cables increase the risk of electric shock.
- Do not touch the plug with wet hands.
- Do not use the appliance if the cable or plug is damaged.
- If any of the appliance casings breaks, immediately disconnect the appliance from the mains to prevent the possibility of an electric shock.
- Do not use the appliance if it has fallen on the floor, if there are visible signs of damage or if it has a leak.
- Keep the working area clean and well lit. Cluttered and dark areas invite accidents.
- Keep children and bystanders away when using this appliance.
- CAUTION: In order to prevent overheating do not cover the appliance.
- Do not use or store the appliance outdoors.
- Do not leave the appliance out in the rain or exposed to moisture. If water gets into the appliance, this will increase the risk of electric shock.
- Do not touch the heated parts of the appliance, as it may cause serious burns.
- Do not fry food in the oven. Hot oil can damage oven parts and utensils and even result is skin burns
- The accessible surface may be hot during operation
Use and care:
- Do not use the appliance if its accessories are not properly fitted.
- Do not use the appliance if the accessories attached to it are defective. Replace them immediately.
- Do not use the appliance when empty.
- Do not use the appliance if the on/off switch does not work.
- Do not move the appliance while in use.
- Do not turn the appliance over while it is in use or connected to the mains.
- Do not cover the cooking surface or food with aluminium foil and other similar materials.
- Do not cover or wrap the food with aluminium foil and other similar materials.
- Do not force the appliance's work capacity.
- Disconnect the appliance from the mains when not in use and before undertaking any cleaning task.
-
This appliance is for household use only, not professional, industrial use.
-
Store this appliance out of reach of children and/or persons with physical, sensory or reduced mental or lack of experience and knowledge.
- Keep the appliance in good condition. Check that the moving parts are not misaligned or jammed and make sure there are no broken parts or anomalies that may prevent the appliance from operating correctly.
- Use the appliance and its accessories and tools in accordance with these instructions, taking into account the working conditions and the work to be performed. Use the appliance for operations different from those intended could result in a hazardous situation.
- Do not use the appliance to dry pets or animals.
- Do not use the appliance with pets or animals.
- Do not use the appliance to dry textiles of any kind.
- Take care when handling recipients containing liquids heated in this appliance as they may boil fiercely.
- Use only utensils appropriate to support high temperatures.
- CAUTION: Do not use the appliance if the glass is cracked or broken.
- Make sure that the appliance is serviced only by specialist personnel, and that only original spare parts or accessories are used to replace existing parts/accessories.
- CAUTION: Maintenance or repair work, which requires only trained technicians, should carry out the removal of the microwave protection cover, as such actions are dangerous.
- CAUTION: There is a risk of fire if the appliance's cleaning is not done according to these instructions.
- Any misuse or failure to follow the instructions for use renders the guarantee and the manufacturer's liability null and void.
Installation
- Be sure to remove all packaging material from inside the appliance.
- Check the oven for any damage, such as misaligned or bent door, damaged door seals and sealing surface, broken or loose door hinges and latches and dents inside the cavity or on the door. If there is any damage, do not operate the oven and contact qualified personnel.
- Place the appliance on a horizontal, flat, stable surface, suitable for withstanding high temperatures and away from other heat sources and contact with water.
- Do not remove the support feet of the appliance.
- Do not cover or obstruct any of the openings of the appliance.
- The plug must be easily accessible so it can be disconnected in an emergency.

Instructions for use
Before use:
- Remove the appliance's protective film.
- Make sure that all the product's packaging has been removed.
- Before using the product for the first time, clean the parts that will come into contact with food in the manner described in the cleaning section.
- Some parts of the appliance have been lightly greased. Consequently, the first time the appliance is used a light smoke may be detected. After a short time, this smoke will disappear.
- Prepare the appliance according to the function you wish to use:
USE
Instant model
Control panel:
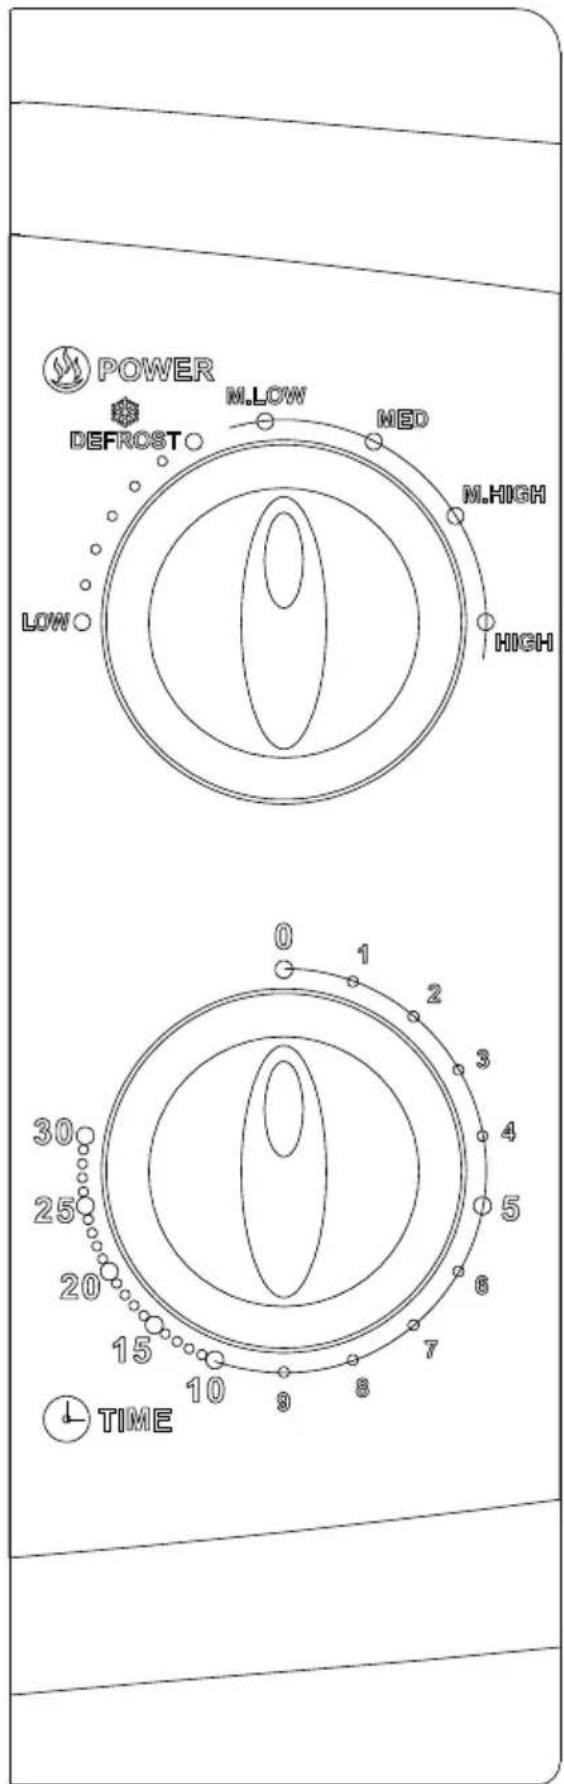
The control panel consists of two function operators. One is a time knob, and the other a power knob.
Power/Action Selector
You use this operator knob to choose a cooking power level. It is the first step to start a cooking session.
Timer Knob
Offer visual timing settings at easy turn of your thumb to select a desired cooking time up to 30 minutes per cooking session.
Microwave Cooking
For pure microwave cooking, there are six power levels from which to choose one as best fit to do the job at hand. Power level increases with the knob turning clockwise. The power levels can be classified as the following:
| Power Output | Description |
| 100% | High |
| 85% | M.High |
| 66% | Med |
| 48% | M.Low |
| 40% | Defrost |
| 17% | Low |
Operating instructions:
To start a cooking session,
- Place food into oven and close the door.
- Turn Power Selector to select a power level.
- Turn Timer knob to set a cooking time.
NOTE: As soon as the timer is turned, oven starts cooking. When selecting time for less than 2 minutes, turn timer past 2 minutes and then return to the correct time.
CAUTION: ALWAYS RETURN TIMER BACK TO ZERO POSITION if food is removed from oven before the set cooking time is complete or when oven is not in use. To stop oven during cooking process, push the door release button or open the door by the handle.
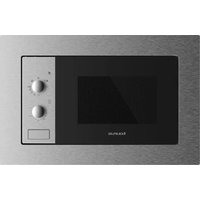
Instant Grill model:
Control panel:
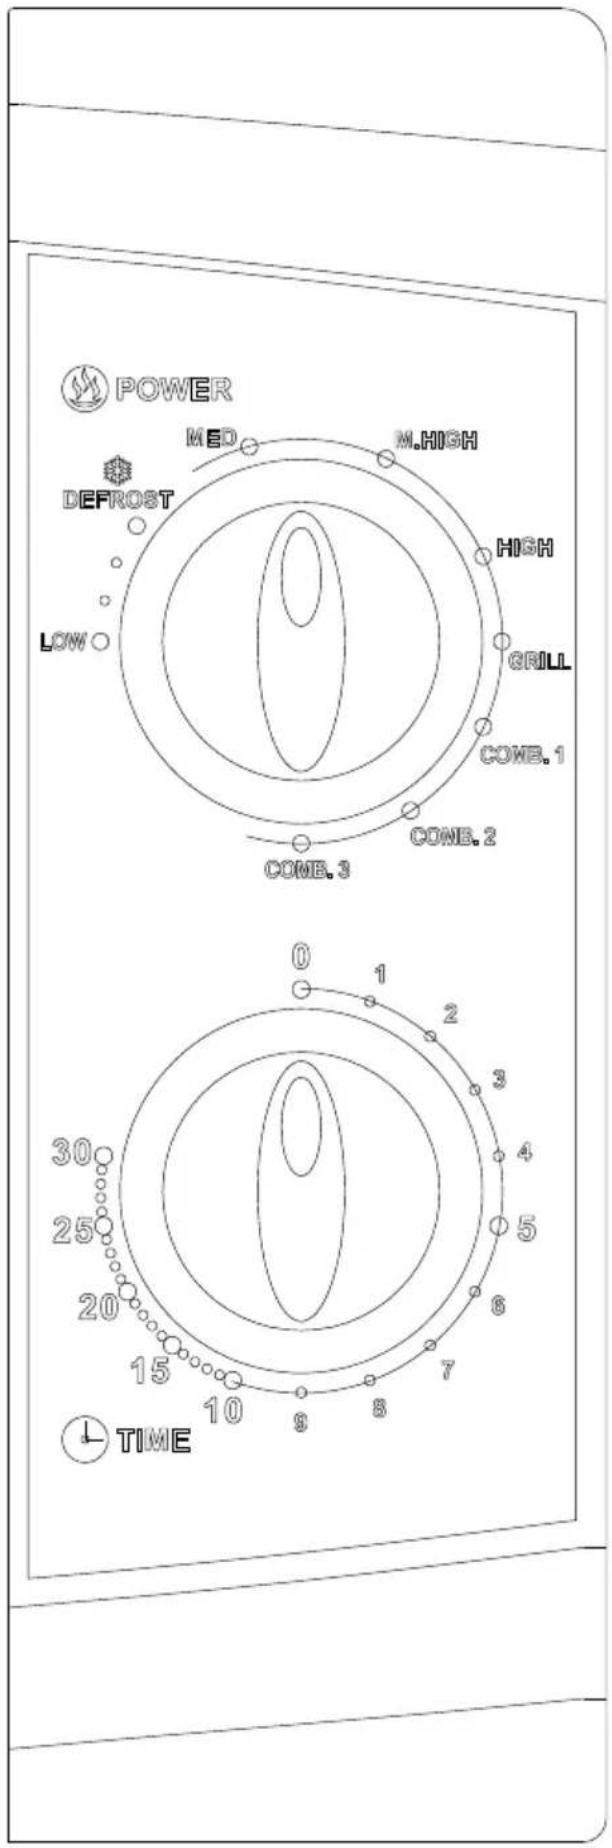
The control panel consists of two function operators. One is a time knob, and the other a power knob.
Power/Action Selector
You use this operator knob to choose a cooking power level. It is the first step to start a cooking session.
Timer Knob
Offer visual timing settings at easy turn of your thumb to select a desired cooking time up to 30 minutes per cooking session.
Microwave Cooking
For pure microwave cooking, there are five power levels from which to choose one as best fit to do the job at hand.
Power level increases with the knob turning clockwise. The power levels can be classified as the following:
| Power Output | Description |
| 100% | High |
| 81% | M.High |
| 58% | Med |
| 36% | Defrost |
| 18% | Low |
Grill Cooking
With the knob turning clockwise passing the highest microwave power level, the oven come to the grill cooking function which is particularly useful for thin slices of meat, steaks, chops, kebabs, sausages or pieces of chicken. It is also suitable for cooking hot sandwiches and au grain dishes.
Combination Cooking
By its name, this cooking operation combines microwave power with that of grill cooking. The operation is categorized into three levels with different combination power settings as you can see from the following table. These are particularly suitable for certain foods and culinary operations. As well as for keeping the much desired crispness of certain foods.
The following table shows 3 different power settings for combination programs.
| Program | Microwave cooking time | Grill cooking time | Suitable for |
| Combi.1 | 30% | 70% | Fish, potatoes, au grain |
| Combi.2 | 49% | 51% | Pudding, omelets, baked potatoes |
| Combi.3 | 67% | 33% | Poultry |
Operating instructions:
To start a cooking session,
- Place food into oven and close the door.
- Turn Power Selector to select a power level.
- Turn Timer knob to set a cooking time.
NOTE: As soon as the timer is turned, oven starts cooking. When selecting time for less than 2 minutes, turn timer past 2 minutes and then return to the correct time.
CAUTION: ALWAYS RETURN TIMER BACK TO ZERO POSITION if food is removed from oven before the set cooking time is complete or when oven is not in use. To stop oven during cooking process, push the door release button or open the door by the handle.
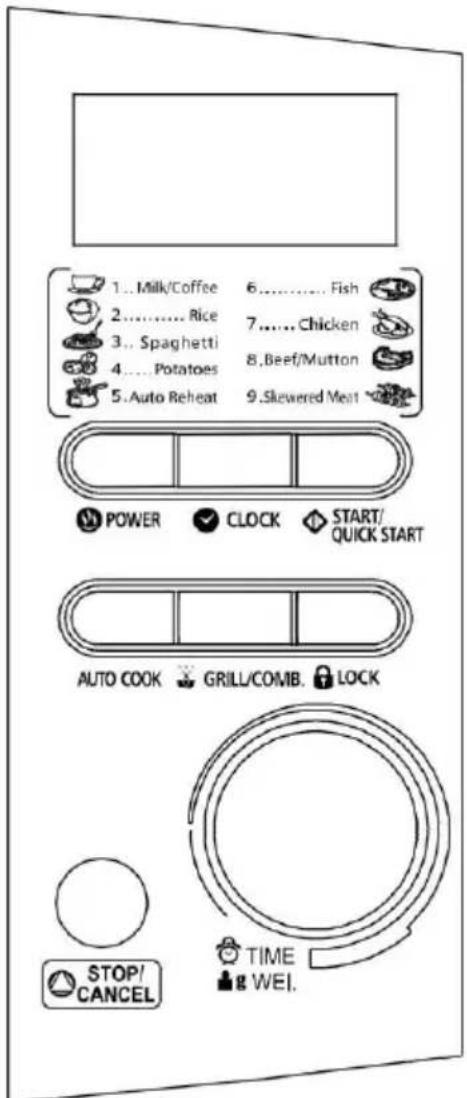
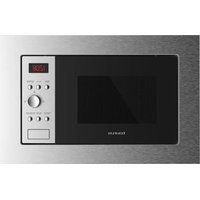
Instant Tronic model:
Control panel:


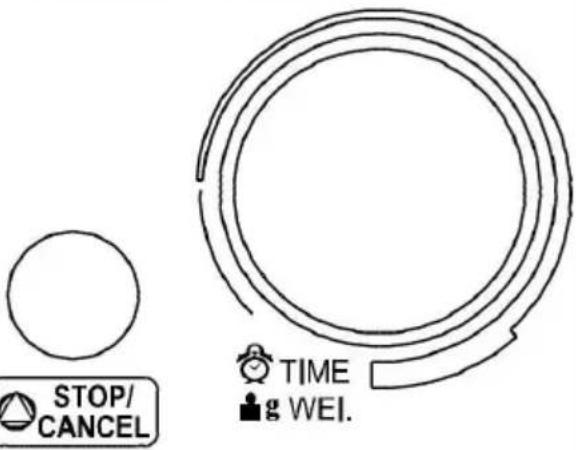
Menu action screen
Cooking time, power, action indicators, and clock time are displayed.
POWER
Touch this button a number of times to set microwave cooking power level.
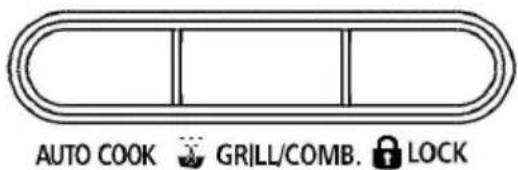
AUTO COOK
Press for instant settings to cook popular food, grill/comb.
Press this button a number of times to access grill cooking mode or one of two combination cooking settings.
clock
Touch this button to start setting the oven clock and ending by touching it again.
Time/wei.
Turn the dial to enter the oven clock time or input cooking time.
Rotate to specify food weight or number of servings
Start/quick start
Touch to start a cooking program.
Simply touch it a number of times to begin express cooking without previously setting power level and cooking time.
Stop/cancel
Press to cancel setting or reset the oven before setting a cooking program.
Press once to temporarily stop cooking, or twice to cancel cooking altogether.
lock
It is used for setting child lock.
How to set the oven controls
Each time a button is touched, a beep will sound to acknowledge the touch.
Setting digital clock
With the oven ready for input, touch the CLOCK button once or twice to set the digital clock in 12 or 24 hours cycle.
FOR EXAMPLE: Suppose you want to set the oven clock time to 8:30.
- Press CLOCK button once or twice
- Turn TIME/WEI. to indicate the hour digit 8.
- Press CLOCK button.
- Turn TIME/WEI. dial to indicate the minute digits until the screen shows 8:30.
- Press CLOCK to confirm the setting.
To check clock time during cooking, press the CLOCK button once.
Microwave cooking
To cook with microwave power alone, press the POWER button a number of times to select a cooking power level, and then use the TIME/WEI. dial to set a desired cooking time. The longest cooking time is 60 minutes.
Select power level by pressing the POWER button:
| PRESS POWER BUTTON | COOKING POWER |
| Once | 100% |
| Twice | 80% |
| 3 times | 60% |
| 4 times | 40% |
| 5 times | 20% |
| 6 times | 0 |
For example, suppose you want to cook for 1 minute at 60% of microwave power.
- Press POWER button 3 times.
- Turn TIME/WEI. to 1:00.
- Press START/QUICK START button.
Grill/comb.
Grill/comb. Cooking has three cooking mode: grill, combination 1, and combination 2. You can press the Grill/comb. Button circularly to select one. The longest cooking time is 60 minutes.
The grill cooking is particularly useful for thin slices of meat, steaks, chops, kebabs, sausages of piece of chicken. It is also suitable for hot sandwiches and au gratin dishes.
Combination 1: 30% time for microwave cooking, 70% for grill cooking. Use for fish, potatoes or au gratin.
Combination 2: 55% time for microwave cooking, 45% for grill cooking. Use for puddings omelettes, baked potatoes and poultry.
FOR EXAMPLE: Suppose you want to set combination 1 cooking for 25 minutes.
- Press GRILL/COMB. button twice.
- Turn TIME/WEI. to 25:00.
- Press START/QUICK START button.
Auto Defrost
The oven allows the defrosting of meat, poultry, and seafood. The time and the defrosting power are adjusted automatically once the weight is programmed. The range weight of frozen foods varies between 100g and 1800g.
FOR EXAMPLE: Suppose you want to defrost 600g of shrimp.
- Place the shrimp to be defrosted into the oven.
- Turn TIME/WEI. dial to choose a weight 600g.
- Press START/QUICK START button.
During cooking time the system will sound to remind you to turn over the food and press START/QUICK START button to resume.
Quick start
This feature allows you to start the oven quickly.
Press the START/QUICK START button a number of times to set the cooking time, the oven starts work at full power level immediately.
Child Lock
Use to prevent unsupervised operation of the oven by little children. The CHILD LOCK indicator will show up on display screen, and the oven can not be operated while the CHILD LOCK is set.
To set the CHILD LOCK: Press and hold the LOCK button for 3 seconds, a beep sounds and LOCK indicator lights.
To cancel the CHILD LOCK: Press and hold the LOCK button for 3 seconds until lock indicator on display goes off.
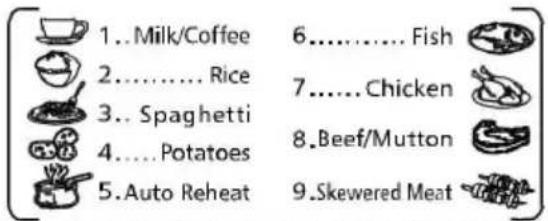
AUTO COOK
For food or the following cooking mode, it is not necessary to program the duration and the cooking power. It is sufficient to indicate the type of food that you wish to cook as well as the weight of this food.
For some programmer, in the middle of cooking time, the cooking programmer pause and beeps can be heard to remind you to open the door and check its doneness and turn food over to obtain uniform cooking; but be careful to handle with care of very hot food in the oven. To resume cooking, just close the door, & press start the oven will cook for the remaining time.
For example: to cook 400g of fish.
- Press the AUTO COOK button 6 times.
- Turn TIME/WEI. dial to indicate a weight of 400g.
- Press START/QUICK START button.
Auto Cook Menu
| Code | Food/cooking mode |
| 1 | Milk/Coffee (200ml per cup) |
| 2 | Rice (g) |
| 3 | Spaghetti (g)* |
| 4 | Potatoes (each 230g) |
| 5 | Auto Reheat (g) |
| 6 | Fish (g) |
| 7 | Chicken (g) |
| 8 | Beef/Mutton g) |
| 9 | Skewered Meat (g) |
Practical recommendations:
- Place the thickest part of the food near the outside edge of the recipient.
- Cover the food during cooking in order to avoid splashing and ensure an even cooking temperature.
- Pierce foods with heavy skins such as potatoes, whole squashes, apples and chestnuts before cooking
- Cooking utensils may become hot because of heat transferred from the heated food. Potholders may be needed to handle the utensil.
- Use gloves if you remove any heated food.
Cleaning
- Disconnect the appliance from the mains and allow it to cool before undertaking any cleaning task.
- Clean the equipment with a damp cloth with a few drops of washing-up liquid and then dry.
- Do not use solvents, or products with an acid or base pH such as bleach, or abrasive products, for cleaning the appliance.
- Do not let water or any other liquid get into the air vents to avoid damage to the inner parts of the appliance.
- Never submerge the appliance in water or any other liquid or place it under running water.
- Remove the glass plate for cleaning. Clean in hot, soapy water or in a dishwasher. Replace parts correctly.
- It is advisable to clean the appliance regularly and remove any food remains.
- If the appliance is not in good condition of cleanliness, its surface may degrade and inexorably affect the

Anomalies and repair
- Take the appliance to an authorised technical support service if product is damaged or other problems arise. Do not attempt to disassemble or repair the appliance yourself as this may be dangerous.
For EU product versions and/or in case that it is requested in your country:
Ecology and recyclability of the product
- The materials of which the packaging of this appliance consists are included in a collection, classification and recycling system. Should you wish to dispose of them, use the appropriate public recycling bins for each type of material.
- The product does not contain concentrations of substances that could be considered harmful to the environment.
- This symbol means that in case you wish to dispose of the product once its working life has ended; take it to an authorised waste agent for the selective collection of Waste from Electric and Electronic Equipment (WEEE).

- This symbol means that it is important to read the operating instructions.
This appliance complies with Directive 2014/35/EU on Low Voltage, Directive 2014/30/EU on Electromagnetic Compatibility, Directive 2011/65/EU on the restrictions of the use of certain hazardous substances in electrical and electronic equipment and Directive 2009/125/EC on the ecodesign requirements for energy-related products.
François
FOUR MICRO-ONDE
Instant
Instant grill
Instant Tronic
Cher client,
He n3JIaraiTe ypeHa Ha IbXd N ycNoBnHa BnIaRa. BoDaTa, npOnHKHaJa B Hero, nobuBa pncKa ot eJekTpueeCKn yIap.
- He nipaIte ToIInTe Yactn Ha ypeDa, Tb' KaTo TOBa MoKe da IpeDn3BnKa cepNo3Hn N3rapaHna.
- He u3noi3BaIte fypHaTa 3a nIbpxKeHe Ha xpaH. Iopeuata Ma3HnHa MoKe da noBpeDi YacTInTe Ha fypHaTa i CbIOBeTe, BkJIouHTeJIHO da npEdu3BnKa u3rapHnI NO Koxata.
IIO Bpeme Ha pa6oTa c ypeDa, OocTbHnHaTa NOBbpxHOCT MoKe Da ce 3aPeer.
YnOTope6a u MepKu 3a 6e3OnaChocT:
- He n3noI3BaIte ypeIa, ako akcecoapIte He ca do6pe noCTaBeHn.
He n3noJ3BaIe ypea c DeΦeKTHn npncTabKn. He3a6abHOr n 3aMeHeTe.
-He n3noJ3BaIte ypeJa npa3eH.
- He n3noJ3BaIte ypeJa npn nobpeJeHa cncTeMa 3a BKIIIOUBAHe/IN3KIIIOUBAHe.
-HeDnKTe ypeDa,doKaTo ceHAMpaBpa6oTeH peXIM.
-He obpbuaTe ypeDa,doKaTo pa6oTn nn E BkHoueH B eJeKTpueeckaTa Mpeka.
-
He nokpmbaTe, HnTo 3abuBaTe npOyKTte B aIyMnHneBO fOJIIO nJIn dpYrN nOIO6Hm MaTePnaJI.
-
He nokpmbaIte n He yBbAte XpaHITe c aJyMnHneBO FOJIO N Dpyr n oD6H MaTePnaJI.
-
He haDbuwaBaIte pa6oTHnT kanaIIT eT Ha ypeIa.
-ИЗключete 3axpaHbaHeTo OT Мржata, KOraTO ypeIbT He ce I3NoI3Ba, И пeДи I3BbPшВаHe KaKBAto I da 6nlo onepaunr no nOuInCTbaHe.
-
To3n ypeJ e npedHa3HaueH eDINHCTBeHO 3a 6HTOBN HxKdN, He 3a npoPecnoHaJIHa HHTO npomuJleHa yNoTpe6a.
-
CbxaHbAte To3n ypei n3BbH Docera Ha deca i/nJIn Xopa c HamaJIeHN fN3nueckn, ceH3OpHn IIN yMCTBeH N Bb3MOXHOCTn, INI TAKINBa 6e3 ONIT i 3HaHnra 3a 6opabHe c ypeia.
-Подьржайуpeда в добpo сбстони. Провере далл повхнite част He ca pa3цentroвани плokирани, далл Няма счунецч actи и дугп пообн Heu3правноctи, кoю Да пOBлият Ha npabINHOTO ФункшонираHe Ha MaunHaTa.
-ИзползваiteTo3и уред,КakTOи пистаькITEи Инстументe КьМ Hero KaTO cneДBaTe Te3иИнстукци,ИmaIKВпрдвID условятаHa pa6Otaи HerOBOTO пpeДha3нayehne. HenpaBUNHOTOn3ПOL3ВaHe
Ha ypeda nIIN HeCnA3BaHeTo Ha INHCTpyKcNITe 3a pa6Ota e onaCHO, anyInpa rapaHcIra Ta IOCBO6OJDaBa IpnON3BODInTeTg OTOTROBOPHOCT.
He n3noJ3BaIe ypea 3a noDcyuBaHa He daMaUH JIO6bMUn nn JIN KJBOTn.
-He n3noJ3BaIte ypea 3a domaunn IIO6mncn nn JxBOTHN.
-He n3noJ3BaIte ypeJa 3a noDcUshaBaHe Ha KaKbBTo I da e BnD npexn.
TeuHocHTe TOnJIeHN B To3n ypei KInrT MHOro CnJIHO; 3aTOBa 3aoCTpeTe BHImaHHeTo Cn Ipn6opabHe c Hero.
I3noJ3BaIte eEINHCTBHeO CbIOBE, I3IbPkaUHa BVCOKN TempePaTpyn.
-BHIMAHHE: He n3non3BaIte ypeDa, aKO CTbKJIoTo e NyKHaTo nn CuyneHo.
- Ybepete Ce, Ye noDpBxKkata Ha ypea ce ocBseCTBraBa OT CneuaJIn3npaHO JInCe I BNHaNnI3NoI3BaIte OpiuHnAHn KOHCymATNBn I pe3epBn YacTn.
-BHIMAHNE: POnpaBKeIe n pa6OHTe no PoDpBxKka, N3NCKBaUu NTcTpaHЯBaHe Ha 3aUHTHO TOKPHTne Ha MInKPOBbINHOBaTa ΦypHa MoRaT Da 6bDaT N3BbPbWBAHn Camo OT KBaJIINΦnIrpAHH JnUca. HeCna3BaHeTo Ha TOBa yKa3aHHe MoXe Da DoBeDe Do 3JIONoLyKn.
- BHIMAHNE: Haniue e puck OT Vb3nKbaHe Ha noxap, ako anapaTbT He ce nouchTa cblnaCHO yka3aHnraTa.
- HenpaBnHTo n3noJ3BaHe Ha ypeJa nn HeCna3BaHeTo Ha yka3aHnra 3a pa6oTa c Hero e onaCHO, anu npaRanrTa n ocbo6xdaBa npoN3BOJnteIg OTOTROBOPHOCT.
Инсталаре
- PpOBepeTe dAni CTe n3BaAnJIn BCnUKN ONaKOBKn OT BbTpewHocTTa Ha ypeJa.
- YBepTe ce, Ye MIKPOBbJIHOBaTa ΦypHa He e NOBpeDeHa, KaTo HAnpIMeP da e C n3KpNBHeH p6OBe IIMn IIMa BdIb6HaTInH; dAIr He e NOBpeDeHa yIbTHHeHneTO Ha BpaTata N Ha IOBbPxHOCTTa, Bbpxy KOrTo IraYyIbTHHeHneTO, DaIIr He ca NOBpeDeHn IIMn pa3XJa6eHn NaHTITE n 3akIIOUaIKITE Ha BpaTata, I daIIr HЯMa BdIb6HaTInH BbB BbTpEShOCTTa IIMn IIO BpaTata. Ako OTKpIeTe HeN3npaBHOCTn, He I3NoI3BaIte UpeDa, a ce CBbpxKeTe cbc cepBn3a 3a TexNHuecka POMOu.
- Пoctabete урета вьрху равна и стбилна поьрхнocт, способна за Издьржа на Високи Temператуни далоч OT дуги ИЗТочни Na ToPлна и eBentyaIIHn npbckn BODa.
- He cBaJIaIe Te KpaYeTaTa Ha ypeJa.
-He nokpmbaIte Hn He 3anywbaTe OTBOpnte Ha ypeHa. - Κεπεπβτ TραδBa ἀ δʰβε ἀ πεκηθοδctbπHΟ MЯCTO, 3a ἀ ΔΑ ΜΟχε πρι Cπeψηθοι T ypeβT ἀ δʰβε έπελιουην Εβp30.

HauHH ha ynoTpe6a
3a6eJexKn npEdu ynoTpe6a:
-MaxHeTe 3aunTHnT HauIOH OTypea.
- YBepete Ce, Ye CTe OTCTpaHnHn HanbJnHO BCaKaBA onaKOBKa Ha ypeHa.
- Празди ДИЗПОЛ3ВATE eI. ураздa 3a пьви пьт, поиспетe BCИЧКИ части, ВИЗЗДИ B KOHTaKT C XpaHITeJIHITe npODYкTи, сеДВайки упьТВанята от раздeл "ПочИСТВаHe".
HЯко ча'tи OT ypeда са Лек сma3aHn cbc cma3ka. BcneДCTBHe Ha TOBa, npn BKJIIOUbaHe Na ypeda 3a ПьрВи пт може да ce OTdeЛпЕн Лek ДИМ. Ckopo сл'd TOBa,ДIMbT ile n3Ye3He.
- PoiDrTBeTe ypeDa B 3aBnCmOcT OfФyHKuYraT KoYTo XeJaTe Da N3NoJ3BaTe:
YNOTPEBA
Moden Instant
KoHTpOJIeH naHEn.
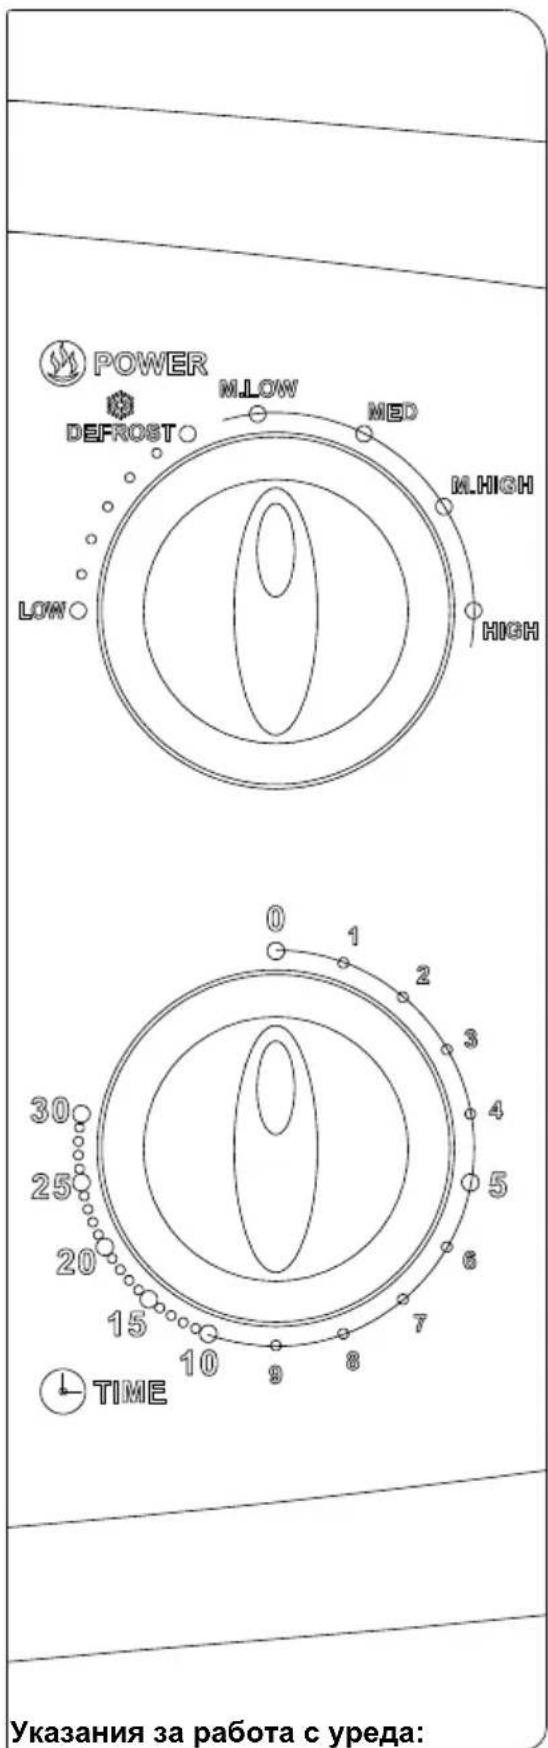
Upe3 nyI-Ta 3a ynpableneHne ce ynpabIbArDBe
fynKcN EHaTa e npableneHne Ha BpeMeTo, a
dpyrata - Ha MouHocTtA.
CENEKTOPAMOUHOCTTA/ΦYHKU
I36epete xeJahata MoHocT ToBa e nbpBaTaCTbIka, 3a 3aIOUbaHe Ha rotBeHETO
CEJEKTOP 3A BPEME (TEMIOPON3ATOP)
CenekTopbT 3a BpeMeTo N03BOJRA ba cAmO C Hatackane Ha napeza da n36epete XeHaHOTo BpeMe 3a npiroTBRe, KaTO MaKcImaJIHaTa My CTouHOCT e 30 MInHyTu.
TOTBEHE C MKNPOBbJIHOBATA ΦYPHA
MoxTe Da n3bepTe net cTeNeHn Ha MOuHocT. 3a n3bpaHe Ha keJahata MOUHocT, npocTo 3aBbptete KOHTpOJIepa HADcHcHo. CTeNEHtE Ha MOUHOCT OTROBAPr HA cPeIHNTE MOUHOCTH
PABOTACMKNPOBbJIHOBATAΦYPHA
MoXeTe Da n36epTe neT CTeneHn Ha MOUHOCT.
N36epTe MoUHOCTTa, 3aBbptaIKn CeJIeKTopa
3a MOUHOCT HaIaCHO CTeneHnTe Ha MOUHOCT
OTROBAPrT Ha CNeIHNTE MOUHOCTN
Moden Instant Tronic
KoHTpOJIeH naHEn:
EKPAHUE "MEHIO"
No3BOLRA pa3rJexJaHe BpeMeTo 3a rOTBeHe, MOUHOCCTTa, yHKnraTa n Yaca.
MOUHOCT
HaTnCHete HraKoJIko IbTu Do HaIaCraBaHe HaKeJahata MOuHOCt
ABTOMATNUHO TOTBEHE
HaTnchete, 3a da n36epete keJhaHata yHKun: MnkpoBbJIHOBa cypha,
ΓPJI NJI KOMBENHHPAHA ΦYHKLJIA.
HaTnchete HeKoJIkoKpaTHO 6byToHa, 3a Da n36epTe yHKzra "rpi" nn HraKoA OT KOHcNpyaunTe Ha CmeceHaTa yHKzra.
YACOBHNIK
HaTnCHete 6yToHa, 3a Da Harglacnte Yaca, Cnei KoETo HaTnCHete OTHOBO, 3a Da npNKIOUHTe HaIacBaHeto.
TIME/WEI.
3aBbPTeTe ynpabJIeHneTo, 3a Da BbBeJeTe Yaca NnBpeMeTo 3a npIroTBRe He Ha XpaHaTa.
3aBbptete KOHTpOlepa, 3a da n36epete terloto Ha xpaHata nn 6por npun.
START/QUICK START
HaTnchete START, 3a da 3anoyheTe nprirotbReTo Ha xpaHaTa.
3a da 3anoyHe npiroTBHeTo Ha xpaHata,doCTaTbUHO e edHO HATnCKaHe. He e Heo6xOIMO da HactpoBate MOuHocTTa IIN BpeMeTO 3a npiroTBAHe Ha xpaHata.
STOP/CANCEL
HaTnchete, 3a da npemaxheTe hactpoiknte nnn 3a da npehactponte cyphata, npedn da yctahOBHTe nporpama 3a npiroTBHe Ha xpaHata.
HaTnchete BeDhJx, 3a da cnpTe BpeMeHHO Ta3N yHKcIy; IJI N DBA NTn, 3a da Jn3Tpne Te HAnbJIHo.
LOCK
I3noJ3Ba ce, 3a da ce Harnacn 6JOKnpOBkata 3a Deca.
HactpoikKa Ha KOHTpOJIHnTe FyHKuIN
Pn HatackaHeTo Ha KOTo I da e 6yToH ce yBa n3CBnPbaHe.
HactpoKaHa YacOBnKa
- Description
- Safety advice and warnings
- IMPORTANT SAFETY INSTRUCTIONS READ CAREFULLY AND KEEP FOR FUTURE REFERENCE
- Use and care:
- Installation
- Instructions for use
- Before use:
- USE
- Instant model
- Power/Action Selector
- Timer Knob
- Microwave Cooking
- Operating instructions:
- Instant Grill model:
- Grill Cooking
- Combination Cooking
- Instant Tronic model:
- Menu action screen
- POWER
- AUTO COOK
- clock
- Time/wei.
- Start/quick start
- Stop/cancel
- lock
- How to set the oven controls
- Setting digital clock
- Grill/comb.
- Auto Defrost
- Quick start
- Child Lock
- Practical recommendations:
- Cleaning
- Anomalies and repair
- François
- FOUR MICRO-ONDE
- Cher client,
- YnOTope6a u MepKu 3a 6e3OnaChocT:
- Инсталаре
- HauHH ha ynoTpe6a
- 3a6eJexKn npEdu ynoTpe6a:
- YNOTPEBA
- Moden Instant
- CENEKTOPAMOUHOCTTA/ΦYHKU
- CEJEKTOP 3A BPEME (TEMIOPON3ATOP)
- TOTBEHE C MKNPOBbJIHOBATA ΦYPHA
- PABOTACMKNPOBbJIHOBATAΦYPHA
- Moden Instant Tronic
- MOUHOCT
- ABTOMATNUHO TOTBEHE
- ΓPJI NJI KOMBENHHPAHA ΦYHKLJIA.
- YACOBHNIK
- HactpoikKa Ha KOHTpOJIHnTe FyHKuIN
- HactpoKaHa YacOBnKa
Brand : TAURUS
Model : Instant Tronic
Category : Microwave Oven