
PCKA 1152 - Coffee machine PROFICOOK - Free user manual and instructions
Find the device manual for free PCKA 1152 PROFICOOK in PDF.
| Product type | Coffee machine with percussion mechanism (built-in grinder) |
| Model | PC-KA 1152 |
| Power supply | 220-240V~, 50-60Hz |
| Water tank capacity | 0.5 liter (approx. 5 cups) |
| Net weight | Approximately 2.5 kg |
| Protection class | I (grounded) |
| Adjustable grind | Yes – two levels: coarse (strong coffee) and fine (milder coffee) |
| Automatic shut-off | Yes – maximum 40 minutes after brewing (in accordance with Ecodesign directive) |
| Anti-drip system | Yes – closes the outlet when the carafe is removed |
| Light indicator | Blue (grinding in progress), red (brewing/heating) |
| Type of coffee usable | Roasted coffee beans (not raw, frozen or moistened beans) |
| Bean hopper capacity | Adjusted amount for one brew (1 measuring spoon per 100 ml cup) |
| Included accessories | Glass carafe with lid and nylon filter, permanent filter, measuring spoon, cleaning brush |
| Cleaning the grinding unit | Dishwasher safe or hand washable |
| Descaling | Recommended with a citric acid-based product when brewing time increases |
| Safety device | Safety switches preventing operation without the lid; hot surface indicated |
| Intended use | Household and indoor use only (not commercial) |
Frequently Asked Questions - PCKA 1152 PROFICOOK
User questions about PCKA 1152 PROFICOOK
0 question about this device. Answer the ones you know or ask your own.
Ask a new question about this device
Download the instructions for your Coffee machine in PDF format for free! Find your manual PCKA 1152 - PROFICOOK and take your electronic device back in hand. On this page are published all the documents necessary for the use of your device. PCKA 1152 by PROFICOOK.
USER MANUAL PCKA 1152 PROFICOOK
ATTENTION: Anti-goutte
Consummation : 750 - 900 W
Thank you for choosing our product. We hope you will enjoy using the appliance.
Symbols in these Instruction Manual
Important information for your safety is specially marked. It is essential to comply with these instructions in order to avoid accidents and prevent damage to the appliance:

WARNING:
This warns you of dangers to your health and indicates possible injury risks.

CAUTION:
This refers to possible hazards to the appliance or other objects.

NOTE: This highlights tips and information.
Contents
Overview of the Components 3
General Notes 35
Special Safety Instructions for this Appliance. 35
Designated Use 37
Unpacking the Appliance 37
Overview of the Components / Scope of Delivery 37
Notes for Use 37
Operation 38
Ending Operation 38
De-scaling 39
Cleaning 39
Storage. 39
Troubleshooting 39
Technical Data. 40
Disposal. 40
General Notes
Read the operating instructions carefully before putting the appliance into operation and keep the instructions including the warranty, the receipt and, if possible, the box with the internal packing. If you give this appliance to other people, please also pass on the operating instructions.
- The appliance is designed exclusively for private use and for the envisaged purpose. This appliance is not fit for commercial use.
- Do not use it outdoors. Keep it away from sources of heat, direct sunlight, humidity (never dip it into any liquid) and sharp edges. Do not use the appliance with wet hands. If the appliance is humid or wet, unplug it immediately.
- When cleaning or putting it away, switch off the appliance and always pull out the plug from the socket (pull the plug itself, not the lead) if the appliance is not being used and remove the attached accessories.
- Do not operate the appliance without supervision. If you leave the room you should always turn the appliance off. Remove the plug from the socket.
- The appliance and the mains lead have to be checked regularly for signs of damage. If damage is found the appliance must not be used.
- Use only original spare parts.
- In order to ensure your children's safety, please keep all packaging (plastic bags, boxes, polystyrene etc.) out of their reach.

WARNING:
Do not allow small children to play with the foil.
There is a danger of suffocation!
Special Safety Instructions for this Appliance
You will find the following symbol with warning character on the product:

WARNING: Hot surface!
Risk of burns!
- The hotplate and the pot get very hot. Only grab the glass pot by the handle. The surface of the warming plate may still be hot after having used the appliance.
WARNING: Hot surface!
Risk of burns!
- The striking mechanism application and the cover are also hot after brewing! Be careful while removing!
- Never open the lid of the water reservoir during the cooking process.

CAUTION:
This appliance is not intended to be immersed in water during cleaning. Please observe the instructions that we have included in the chapter "Cleaning".
- Use the appliance only on a level work surface.
- Only use the appliance when water is filled into the water container.
- Do not move the appliance when it is in operation.
- Always disconnect the appliance from the supply if it is left unattended and before assembling, disassembling or cleaning.
- Do not manipulate any safety switches.
- This appliance shall not be used by children.
- Keep the appliance and its cord out of the reach of children.
Children shall not play with the appliance. - Appliances can be used by persons with reduced physical, sensory or mental capabilities or lack of experience and knowledge if they have been given supervision or instruction concerning use of the appliance in a safe way and if they understand the hazards involved.
- Do not repair the appliance by yourself. Please contact authorized personnel. If the supply cord is damaged, it must be replaced by the manufacturer, its service agent or similarly qualified persons in order to avoid a hazard.
- Please see the following chapter "Designated Use". The abuse for any other purposes may result in injury.
Designated Use
- This appliance is used for grinding roasted coffee beans and making ground bean coffee.
- Only use the appliance in a dry, indoor area.
-
It is intended for domestic use and similar areas of use such as e. g.:
-
In staff kitchens in shops, offices and other commercial areas;
- By guests in hotels, motels and other accommodation facilities.
It is not intended for use in farm accommodation or Bed & Breakfast establishments.
Unpacking the Appliance
- Remove the appliance from its packaging.
- Remove all packaging material such as plastic films, filler material, cable ties and cardboard packaging.
- Sensitive surfaces are possibly protected with foil. Remove these foils.
- Check the content for any missing parts.
- In the event that the packaging content should be incomplete or if damages are noticeable, do not operate the appliance. Return it to the dealer immediately.
NOTE:
There may be dust and production residue on the appliance. We recommend cleaning the appliance as described under "Cleaning".
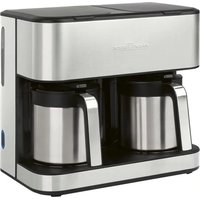
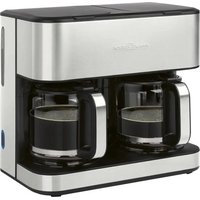
Overview of the Components / Scope of Delivery
1 Cover (striking mechanism / brewing head)
2 Release buttons for removing the cover
3 Steam outlet opening
4 Striking mechanism application (striking mechanism opening / ground coffee container)
5 Water outlet

CAUTION: Important!
Ensure that there are no coffee beans / coffee powder lying about the opening before attaching the cover.
6 Basic appliance
7 Function selector switch
8 START button
9 Indicator light
10 Glass jug with cover and nylon filter
11 Hot plate
12 Water tank lid
13 Drip stop
14 Permanent filter insert
15 Measuring spoon
16 Cleaning brush
Notes for Use
Placement
- Place the automatic coffee maker on a stable and level surface. Place the appliance in such way that it cannot tip over.
- Do not place the appliance in close proximity to a gas or electric stove or any other heat source.
Note About the Brewing Process
During the brewing process and depending on the degree of grinding and the used amount, the coffee powder absorbs a certain amount of water. That is why the quantity of coffee might diverge from the quantity of water in the water tank.
European Regulations on Energy Saving

NOTE:
The European Directive 2009 / 125 / EC (Ecodesign Directive) incorporates measurements for energy saving.
The following applies to coffee makers: The keep-warm period is limited to max. 40 minutes after which the appliance turns off automatically.
You benefit from better safety and lower energy consumption.
Electric Connection
-
Ensure that your mains power corresponds with the specifications of the appliance. The specifications are printed on the type label.
-
Connect the mains cable to a properly installed and earthed wall outlet.
Indicator Light
The indicator light indicates the functions.
Light blue = the beans are being ground
Light red = brewing operation; warming phase
Function Selector Switch
| Symbol | Meaning |
| Brew coffee with coffee powder | |
| OFF Appliance turned off | |
| 01 | Coffee beans are ground coarsely (strong coffee) |
| 02 | Coffee beans are ground finely (mild coffee) |
Coffee Beans

CAUTION:
Use only roasted coffee beans for grinding. Coffee beans that are raw, frozen or placed in liquid may damage the grinder.
Selection of Fineness of Grinding
Whether you grind the coffee finely or coarsely depends on your preference. The type of coffee beans and the roasting process have an additional impact on the taste.
- Fill the striking mechanism with only as much coffee beans as required for one cooking process.
- We recommend one measuring spoon of coffee beans for one cup of water (100 ml).
Initial Operation
Operate the appliance 2 times with clean water before brewing coffee for the first time. This removes dust, which may have collected during transport. Follow the instructions given under "Operation".
Operation
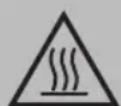
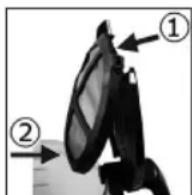
- Insert the nylon filter into the jug lid.
① Mount the nylon filter on the lid.
② Snap the bottom end of the nylon filter into place on the lid.
- Open the lid of the water tank.
- Fill cold water according to the desired amount of cups of coffee into the rear water tank. Use the jug to fill the water tank.

CAUTION:
Do not overfill the tank! There is an overflow opening on the back of the water tank.
- Now close the lid of the water tank.
- Remove the cover.
- Pour the appropriate amount of coffee beans or coffee powder directly into the opening of the striking mechanism / coffee powder container.
- Ensure that the permanent filter insert is inserted on the left.

CAUTION: Important!
Ensure that there are no coffee beans / coffee powder lying about the opening of the water outlet (5) before attaching the cover.
Place the cover back on. It must audibly click into place.
- Place the jug onto the warming plate.

CAUTION: Drip stop
Your appliance comes with a drip stop. It closes when removing the coffee pot. This prevents the dripping of coffee onto the hot plate, when there is still water in the filter area.
-
If there is still water in the tank, place the pot underneath as soon as possible. Otherwise the water could overflow.
-
Select the desired function using the function selector switch.
- Press the START button to begin operating the appliance. The indicator light indicates the function.

NOTE:
The appliance switches off automatically about 30 minutes after the brewing. You will hear two short beeps and the indicator light will go out.
The Coffee is Ready
- When no more coffee is flowing through the filter you can remove the pot.
- Turn the appliance off.
- Would you like to keep the remaining coffee warm? Leave the appliance turned on until the end of the keep-warm period. If you wish to keep the coffee warm even after the keep-warm period has finished, pour the remaining coffee into a thermal flask.
- Clean the appliance after each use! Proceed as described under "Cleaning".
Ending Operation
- To switch off the appliance or to prematurely terminate the brewing process, set the function selector switch to the OFF position.
- Then unplug the power plug from the socket.
- Clean the appliance after each use!
De-scaling
De-scaling is necessary when the brewing time increases substantially.
- Use only commercially available citrus acid-based de-scaler.
- Dose as indicated on packaging or instruction leaflet.

WARNING:
- Afterwards you should boil fresh water in the pot three or four times in order to rinse out residues of the de-scaling agent.
- Do not use any coffee powder!
- Do not use this water for consumption.
Cleaning

WARNING:
- Before cleaning, always remove the mains plug and wait until the appliance has cooled down.
- Do not immerse the appliance in water. Otherwise this might result in an electric shock or fire.

CAUTION:
- Do not use a wire brush or any abrasive items.
-
Do not use any acidic or abrasive detergents.
-
First, allow the appliance to briefly cool down after use.
- Open the water tank lid, remove the covering and let the appliance cool down completely.
- Remove the permanent filter insert and the striking mechanism application.
Basic Appliance, Cover
- The exterior of the appliance should be cleaned as necessary with a slightly damp cloth - without any additives.
- Remove spilled coffee grounds with a paper towel from the inner casing. Afterwards wipe with a damp cloth.
- You can remove the disc on the underside of the cover for cleaning. Clean the disc as usual in a rinse bath. Place the disc back on once it has completely dried.
Glass Jug with Cover and Nylon Filter, Permanent Filter Insert, Measuring Spoon
Clean the parts in a rinsing bath in the usual manner. Use a soft brush if necessary.
Striking Mechanism Application
You can clean the striking mechanism application as usual in a rinse bath or in the dishwasher. In particular, clean the opening under the striking mechanism. Rinse it with plenty of water.
Storage
- Clean the appliance as described and let it dry completely.
- We recommend that you store the appliance in its original packaging when it is not to be used for a longer period.
- Always store the appliance at a well ventilated and dry place outside the reach of children.
Troubleshooting
| Problem Possible cause Solution | |
| The appliance does not work. The appliance is not connected to mains power. | Check the wall outlet with a different appliance. |
| Insert the plug properly in the wall outlet. | |
| Check the fuse. | |
| The appliance is equipped with safety switches. These prevent it to switch on without the cover being in place. | Check that the cover is fitted properly. |
| The appliance is defective. Contact our service or a repair centre. | |
| Problem Possible cause Solution | ||
| Filter blockage: coffee grounds spill over the edge of the filter. | The drip stop is closed: The glass jug with lid is not standing on the warming plate. | 1. Switch the appliance off. Disconnect from mains power supply.2. Put the coffee pot with lid on the warm-ing plate so that the filter is emptied.3. Clean the appliance as described. |
| There is too much coffee powder in the ground coffee container. | ||
| Coffee grounds in the coffee. The permanent filter insert is not inserted properly. | Check to ensure the permanent filter insert is fitted properly. | |
| There is too much coffee powder in the ground coffee container. | Use less coffee powder. | |
| The brewing process takes too long. | Lime-scale deposits in the appliance. De-calcify the appliance as described. | |
| The appliance turns off automatically. | This is not a malfunction of the appliance. In order to comply with the Ecodesign Directive (2009 / 125 / EC), the appliance turns off automatically after max. 40 minutes after the brewing process has finished. | |
Technical Data
Model: PC-KA 1152
Power supply: 220 - 240 V~, 50 - 60 Hz
Power consumption: 750-900W
Filling quantity: 0.5 litre
Protection class: I
Net weight: approx. 2.5kg
The right to make technical and design modifications in the course of continuous product development remains reserved.
This appliance has been tested according to all relevant current CE guidelines, such as electromagnetic compatibility and low voltage directives, and has been constructed in accordance with the latest safety regulations.
Disposal
Meaning of the "Dustbin" Symbol

Protect our environment: do not dispose of electrical equipment in the domestic waste. Please return any electrical equipment that you will no longer use to the collection points provided for their disposal.
This helps avoid the potential effects of incorrect disposal on the environment and human health.
This will contribute to the recycling and other forms of re-utilisation of electrical and electronic equipment.
Information concerning where the equipment can be disposed of can be obtained from your local authority.
Instrukcja obslugi
Yka3bIbaeHa BO3MOxHyO ONaCHOCTb INI3JeINN INpynx OKpyxaIOxN INpeDMTOB.

IPIMMEUHNA:JaetcoBETiNnHdopmaunIO.
CopepkanHe
Ob3op detanei np6opa 3
O6uHe 3ameyHn. 54
CneuaalbHbe yka3aHnno
6e3oNaChocTu nIg 3ToI np6opa. 54
Ha3haeHne 56
PacnaKOBka yCTpoiCtBa. 56
063op detanei npnbopa/KomnneKT nocTbKn 56
PpmeaHnno nncnboBaHnna 57
Pa6ota 57
3aBepueHne pa6oTbI 58
UdaneHne Hakn.. 58
UncTka 58
Xpahene 59
UcTpaHHe HeNCpPaBHOCTe. 59
TexHHueckme daHHbIe. 60
YTNIM3aIur 60
06uue 3aMeuHn
Ipeed Haayanom 3KcNpyataunn np6opba BHNMaTeIbHO npouTaNte npuIraeMyo HNCTpykTuNO no 3KcNpyataunn COxpaHNTe ee B HAdexKHOM MeCTe, BMeCTe C rapaHTINHBIM TaIOHOM, KaccOBbIM YekOM N, NO BO3MOXHOCTN, KAPTOHHO KOp6KOc C yNAKOBOUHbIM MaTePnANOM. Ecn daTe KOy-1No 0nONb3OBAtbc np6obpOM, ObraaTeNbHO daInTe B pNiDaCy DaHHyo INCTpykTuNO n 3KcNpyataunn.
-Пользуйтесь пибором только чаТьим орраЗм и по ha3haЧeHHIO. Пибор He пpeДнaЗHAчЕн ДЯ КOMМерчeCKOTO ИСПЛьЗВАИ.
He nIb3yIeTcB np6OpOM IOJ OTKpbITbIM He6OM. PpeDoxpaHnTe np6Op OT kApbl, pRmblx CoNHeuHbIX LyUey, BnaxKHOCTN (HN B KOem cNyueae He nOprpykaTe ero B BoY) n yapob 06 ocTpble yrbl. He npkacaiTe b K np6OpBy BnaxKbIMn pykam. Ecn np6Op BynaxKnncn nn HAMOK, TyT Xe BbIbTe BuIKy n3 po3eKn.
- После ekрлуataи, мотатxe пинадпхостeи, чьстke Или поломке прибoga BCERda Bынмай Te BИКу n3 розетк (ТянITE 3a BИКу, a He 3a Ka6eЛb).
He octabJnTe yctpoNCTBO 6e3 HAn30pa BO BpempaObToI.Oba3aTeNbHO BbIKIOuAte yctpoNCTBO,ecINnOKnJaTe nomeueHne.NBNeKaTe BNkNy n3 po3ETKn.
-ПибориКабeь ceteBOrO nITaHnI Heo6xOДIMOp peryIЯрнообследоваТ haHaJIuYne cIeJOB NOBpeKdENII.Пи obHApUKeHnIOBpeKdENHn IOJIb3OBAtbcrпибopOM 3anpeuaTbCra.
Vicnoj3yuteToIbKOopnHaJIbHbIe3aIuaCTN.
- IV3 coobpaqhen 6e0nacnoctn dIy deTeH He ocTabJIaIte JExaTb ynaKOBky (PiactNKOBbie MeWKIn, KapTOH, NeHONlact n T.D.) 6e3 npncmOTpa.

IPEDYUNPEXDEHNE:
He no3B0JrTe DeTm nIpaTb c noIIN3TnIeHOBOI nIeHKO. OnachocTb ydyuBa!
CneuaHbIe yka3aHnI NO 6e3oNaChOCTn IJRA 3TOrO np60pa
Ha n3dennn imeOTc sJeDyUoIne npEynpeXdaUOJIne cIMBOJ:

I P E D U N P E X K D E H N E:
- Bcerda nepeq uNCTKO BbHMaTe ceTeBOJ WTeKeP n Xdnte, Poka np6op He octbIHeT.
He norgykaite npnbop B Body. 3To moKet 6bItb npuHoi 3IeKtpnueckoro yda pa nn noxapa.
BHUMAHNE:
He nCnoB3yIte npBOOnOHyU 8eKu nn Dpyn e a6pa3nBhie INHCTpyMeHTbl.
He nCnoJb3yIte KcNtHbIe nn a6pa3nBhIe moIO-
- Chauana, daiTe npibopy HemHoro octbTb nocne NCIOJIb3OBAHn.
- OTKpoIe KpbIuKy pe3epByapa Inra BoIbI, CHIMNte HAKnAky I daIte npnbopny NOJIHOCTbIO OCTbITb.
- CHIMITE BCTABKY NOCTOHHORO QINJBTPa N HAKNADKy 3acbIHORO MEXAHH3Ma.
Ba3OBbI np6Op, KpbIkwA
C HapyxHoi CTOpOHBI, pNr Heo6xoDMOCtN, npOTn paTte npi6op cJeKa BnaXHO TpAknKo 6e3 Do6aBneHnRA MOUxNX CpeCTB.
- YdaHnTe npocbInabWnecra 3epHa KoFe C BHyTpHenHe CTOpOHbI KOpTyCa C NOMOuBIO ByMaXHOrO NOnIoTeHua. Pocne 3TOrO BbITpNe TIOBepxHOCTb BlaXHOB BetoUbIO.
Mozhno ChrTb DNCK Ha HmKHe Yactn KpbIkwN DnO uNCTKn. OuNCTnte DNCK o6bUHbIM cnOCobom nOd npToOHo BDOJ. IocJIe NOnHO RbICbIXaHnR NoCTabBte DNCK o6paTHO.
CTeKJIaHHbI KyBUnH c KpbIuKOIN HeIIOHOBBIM ΦnIbTpOM, BcTaBka NocToaHHOrO fNltpa, MepHaJ IOKKa
OuHCTNTe COCTaBHBie Yactn B paKOBInHe oBlyHbIM
obpa3om. Ppi Heo6xOIMOCtN, BocnoJIb3yITecb MraKoI
TckoI.
Haklaika 3acbInHO MekaHn3Ma
Moxho OunchTb HakJaDky 3acBInHOro MexaHn3Ma
06bIuHbIM CnOCo6om NOJ IPOTOUHO BODOIN IN B Nocy-
domoeHoi MaunHe. B YactHcTe, OunchTe OTBepCTne
NOd 3acBlnHbIM MexaHn3MOM. IpomOte B 6oJIbWOM
KoJInuCeTBe BObl.
XpaHeHne
-ПочNTte yCTpoIcTBO B COOTBcTcTBn C ONICaHHeM, n DaIte EmY NOJIHOCTbIO BBICOXHyTb.
- Pekomehnyetc xpaHnty yctpoiCtBO B erO opnHaJIb-Ho yIaKOBke,ecn OHO He 6ydt NcIOJIb3ObaTbcrДnITeJIbHoe Bpem.
Bcerda xpaHnTe yctpoNCTBO B cyXOM, xopoOIO npoBeTpnaEMOM MeCe, HeIOCTyHOM IJIa DeTei.
YcTpaHHe HEnCnPaBHOCTe
Jglio 10g aagall 10s jalqll jzai p 10s
gaihui gaii jaij ooggbi aaiia oaoaio 0
SLL 0
100x10g 100x10y10
| الله | الله | الله |
| .الله جامع الحرفية بانيال大全 ملاوي نهشام | الله جامع الحرفية بانيال大全 ملاوي نهشام | .الله جامع الحرفية |
| .الله جامع الحرفية بانيال大全 ملاوي نهشام | .الله جامع الح註冊ميابيّة بانيال大全 ملاوي نهشام | .الله جامع الح註冊ميابيّة |
| .(الله) ادانيال大全 ملاوي نهشام | .الله جامع الح註冊ميابيّة بانيال大全 ملاوي نهشام | .الله جامع الح註冊ميابيّة |
| .الله جامع الح註冊ميابيّة بانيال大全 ملاوي نهشام | .الله جامع الح註冊ميابيّة بانيال大全 ملاوي نهشام | .الله جامع الح註冊ميابي/الله جامع الح註冊ميفication |
| .الله جامع الح註冊ميفication | .الله جامع الح註冊ميفication | .الله جامع الح註冊مربالله الله الله الله الله الله الله الله الله الله الله الله الله الله الله الله الله الله الله الله الله الله الله الله الله الله الله الله الله الله الله الله الله الله |
| .الله اللهاللهاللهاللهاللهاللهاللهاللهاللهاللهاللهاللهاللهاللهاللهاللهاللهاللهاللهاللهالله | .اللهاللهاللهاللهاللهاللهاللهاللهاللهاللهاللهاللهاللهاللهاللهاللهاللهاللهالله | .اللهاللهاللهاللهاللهاللهالله |
| .اللهاللهاللهاللهاللهاللهاللهاللهاللهاللهاللهالله | .اللهاللهاللهاللهاللهاللهالله | .اللهاللهالله |
| .اللهاللهاللهاللهالله | .اللهاللهالله | .الله |
| .اللهاللهالله | .الله | .الله |
| .اللهالله | .الله | .الله |
| .الله | .الله | .الله |
| .الله | .الله | .الله |
| .الله | .الله | .الله |
| .الله | .الله | .الله |
| .الله | .الله | .الله |
| .الله | .الله | .الله |
jglj jno jalil
"alalgioo"jor
a 1y j 100
A. .
JLJoo aai 1g aaii aaiy j0j0 joo yao
aullglaaa blaai
alaiab1 aaiallg aaiill 5y
a000 xix dzyb cyliuill jolalil jzaii
Joo 1000000000000000000000000000000000000000000
jolll jil jia jigy jll glll lglg jg jla
clalal lab daiia g jiaibilg auiu g biliog 11 g
a3 = a1 + 2 = 3
jIgog jgJSTART 11
.aaabgll
4b > 3a

cIaolal 3g oagall lglj Jabbl pjjll
y = - x^2 + 1
10 10
a1j 11j! lai jia wu g jg
1ggaal Lua Joo 1pduu y
y=161joo
#
.
. ①
gugulu uo jouyduu
.
| x^ | = 1| x| · | r1^2 + r2^2 + r_3^2| ≤ 34| x| ^2
- 0e j0j
.11j 11 j 116 11 j 11 j 11 j 11 j 11 j 11 j 11 j 11 j 11 j 11 j 11 j 11 j 11 j 11 j 11 j 11 j 11 j 11 j 11 j 11 j 11 j 1
:
jlll jlll aeall jgai daaa dgaig lji jil jil jil
| x^ | = | y^ | = 1
a a a 100000000000000000000000000000000
.
3 8juaoggall gaaa gglgall gao jao wulil jdaill ay a.6
.0gglggsclg/2aill a
1 7
!ploa:aa

8.
4k = 10
i
jai (gall aagil) EC/2009/125 gglll d
aBb1y6gU C0l,
Jaaa 3jolal oJ j:ooall aol J cIuSlo Jd yLo qab
Lilaljglalnabla Looa a 40
a111 100000000000000000000000000000
y
aegbdo lalolgbljagdll lalolgo ggygll jglg jgs 1
. gill glalo
jogg g wulbilo wu wu wu wu wu
a1bgl 1
a3 = 32a2,a4 = 32a3.
jouill 100: jouill 400
a#
ab = 30.
jglglll lglgjjlglg jglgglg
"abill" 1gill 3j gill
aaii gbi/1gki 1e aole ojbi
()
a1 = 2,a2 = - 4, b_2^2 = 4^2 - 2^2 = - 8
jolj 3
(aagolalgogaiuaggl/2aill aJdax)cuaill aJl o1s4
501
!plo:aa
J3 axiai Jds o8g 3gmo/ogg g0g0g0g0g0g
.
6
START 8
S OBC = S BOC + S_ BOC
jgblzgoglaizjgj10
11
161 jj 12
13
a 14
wla dao 15
16
J 1
j( x,y) = ( ax + y) ( 0 < x < 1)
a2jb jll 0. Cg g a1 b8 g a1y all agall ax
ab 共
jua g jgl jglg jgljgl jgljgl jglg
2 = 1 - 12
nassallalacjabgolo
aie aodcui 1sgl g jalll ddo jdlg uall dae eli jao a5 selj alolol yla lissg ell jao axo a5 ogall gaxn
a1 = 1,a2 = 2
$$ \bullet g i w o \mathrm {z b w} $$
$$ \bullet \bullet \mathrm {l b} \mathrm {l} \mathrm {j} \mathrm {j} \mathrm {j} \mathrm {j} $$
$$ \bar {j} \bar {j} j \bar {j} j \bar {j} j \bar {j} j \bar {j} j \bar {j} j \bar {j} j \bar {j} j \bar {j} j \bar {j} j \bar {j} j \bar {j} j \bar {j} j \bar {j} j \bar {j} j \bar {j} j \bar {j} j \bar {i} $$
$$ \cdot g ^ {1} \Delta S S \alpha \beta $$
$$ . \dot {a} \dot {b} \dot {c} \ddot {c} $$
$$ \bullet \bullet \mathrm {l o w} \downarrow \Downarrow \Downarrow \Downarrow $$
$$ . \bullet J _ {a b} ^ {i j} \downarrow_ {i} \ddot {q} $$
$$ . J l a b \bar {b} \bar {y} I J g l $$
$$ \bullet j _ {4} \text {a l l} j g $$
aLac g aS1rJg aJlaow Jyaw JwJyaw Jyaw Jyaw Jyaw
aalzbl clllgl 1r yll g jg l. aeg sbg oaae eoo g dgd
.
Ll lal 100 jI5 15. doo y bJ Lai . Jg Jg Jg Jg
i 1
S OBC = S COD + S_ BOC
sddg sds 1ypluclwll oLw! "jabol pduwul" jI I JdAeJr
.
juaob1pUus
gall gagall gagll gagll gagll
.aaab61
.
:Jia dIaIob1 jSloy 3 pUdoWu g bao Jjibl pldoWu jolal pa
,4yJzIyJzIyJzIyJzIyJzIyJzIyJzIyJzIyJzIyJzIyJzIyJzIyJzIyJzIyJzIyJzIyJzIyJzIyJzIyJzIyJzIyJzIy
aikwlll laiib jno lae g g aoljwylg dlaill yjdo
Jgglgglglll aalab lglg jjglj5Lw0 pduuauu uuaa
61
61.
61
61.
aole cIbso
j 1 j 1 j 1 j 1 j 1 j 1 j 1 j 1 j 1 j 1 j 1 j 1 j 1 j 1 j 1 j 1 j 1 j 1 j 1 j 1 j 1 j 1 j 1 j 1 j 1 j 1 j 1 j 1 j 1 j 1 j 1 j 1 j 1 j 1 j
.5jglil plilu wJ jglil li
(aLw sLo g l (aIba daa y) aIg bIg oIaIbI aai I aIg I IaIbI jIagll 15 I. alio ay g Japal pao y.oalgl bIy I g all de ly


- ATTENTION: Anti-goutte
- Symbols in these Instruction Manual
- WARNING:
- CAUTION:
- Contents
- General Notes
- Special Safety Instructions for this Appliance
- WARNING: Hot surface!
- Risk of burns!
- Designated Use
- Unpacking the Appliance
- NOTE:
- Overview of the Components / Scope of Delivery
- CAUTION: Important!
- Notes for Use
- Placement
- Note About the Brewing Process
- European Regulations on Energy Saving
- Electric Connection
- Indicator Light
- Coffee Beans
- Selection of Fineness of Grinding
- Initial Operation
- Operation
- CAUTION: Drip stop
- The Coffee is Ready
- Ending Operation
- De-scaling
- Cleaning
- Basic Appliance, Cover
- Glass Jug with Cover and Nylon Filter, Permanent Filter Insert, Measuring Spoon
- Striking Mechanism Application
- Storage
- Technical Data
- Disposal
- Meaning of the "Dustbin" Symbol
- Instrukcja obslugi
- CopepkanHe
- 06uue 3aMeuHn
- IPEDYUNPEXDEHNE:
- CneuaHbIe yka3aHnI NO 6e3oNaChOCTn IJRA 3TOrO np60pa
- I P E D U N P E X K D E H N E:
- BHUMAHNE:
- Ba3OBbI np6Op, KpbIkwA
- CTeKJIaHHbI KyBUnH c KpbIuKOIN HeIIOHOBBIM ΦnIbTpOM, BcTaBka NocToaHHOrO fNltpa, MepHaJ IOKKa
- Haklaika 3acbInHO MekaHn3Ma
- XpaHeHne
- jglj jno jalil
- #
- aaii gbi/1gki 1e aole ojbi
- J 1
- juaob1pUus
- aole cIbso
Brand : PROFICOOK
Model : PCKA 1152
Category : Coffee machine