Aspirovac Flex 25.6V - Broom Di4 - Free user manual and instructions
Find the device manual for free Aspirovac Flex 25.6V Di4 in PDF.

| Product type | 2-in-1 cordless stick vacuum cleaner |
| Brand | Di4 |
| Model | Aspirovac Flex 25.6V |
| Nominal voltage | 25.6 V |
| Charging time | Approximately 2.5 hours |
| Filter type | Washable HEPA filter |
| Suction power | 2 modes: low and high |
| Main features | Vertical stick mode and detachable handheld vacuum; motorized brush with LED; foldable handle for under-furniture cleaning |
| Included accessories | Crevice tool, small square brush, charging base, charger |
| Safety | Use by children aged 8+ under supervision; do not vacuum liquids, hot or sharp objects |
| Maintenance and cleaning | Dust compartment and filter washable with water; washable roller brush |
| Warranty | 2 years (excluding misuse) |
| Batteries | Built-in battery, removable for recycling |
| Compliance | WEEE Directive 2012/19/EU |
Frequently Asked Questions - Aspirovac Flex 25.6V Di4
User questions about Aspirovac Flex 25.6V Di4
0 question about this device. Answer the ones you know or ask your own.
Ask a new question about this device
Download the instructions for your Broom in PDF format for free! Find your manual Aspirovac Flex 25.6V - Di4 and take your electronic device back in hand. On this page are published all the documents necessary for the use of your device. Aspirovac Flex 25.6V by Di4.
USER MANUAL Aspirovac Flex 25.6V Di4
Cordless vacuum cleaner
Aspirateur sans fil
Aspirapolvere scopa
ESPAÑOL
AGRADECEMOS QUE HAYA DEPOSITADO SU CONFIANZA EN DI4 Y DESEAMOS QUE EL FUNCIONAMIENTO DEL PRODUCTO LE SATISFAGA PLENAMENTE.
ATENCIÓN
WE WOULD LIKE TO THANKS YOUR FOR CHOOSING DI4, WE WISH THE PRODUCT PERFORMS TO YOUR SATISFACTION AND PLEASURE.
WARNING
PLEASE READ THE INSTRUCTIONS FOR USE CAREFULLY PRIOR TO USING THE PRODUCT. STORE THESE IN A SAFE PLACE FOR FUTURE REFERENCE.
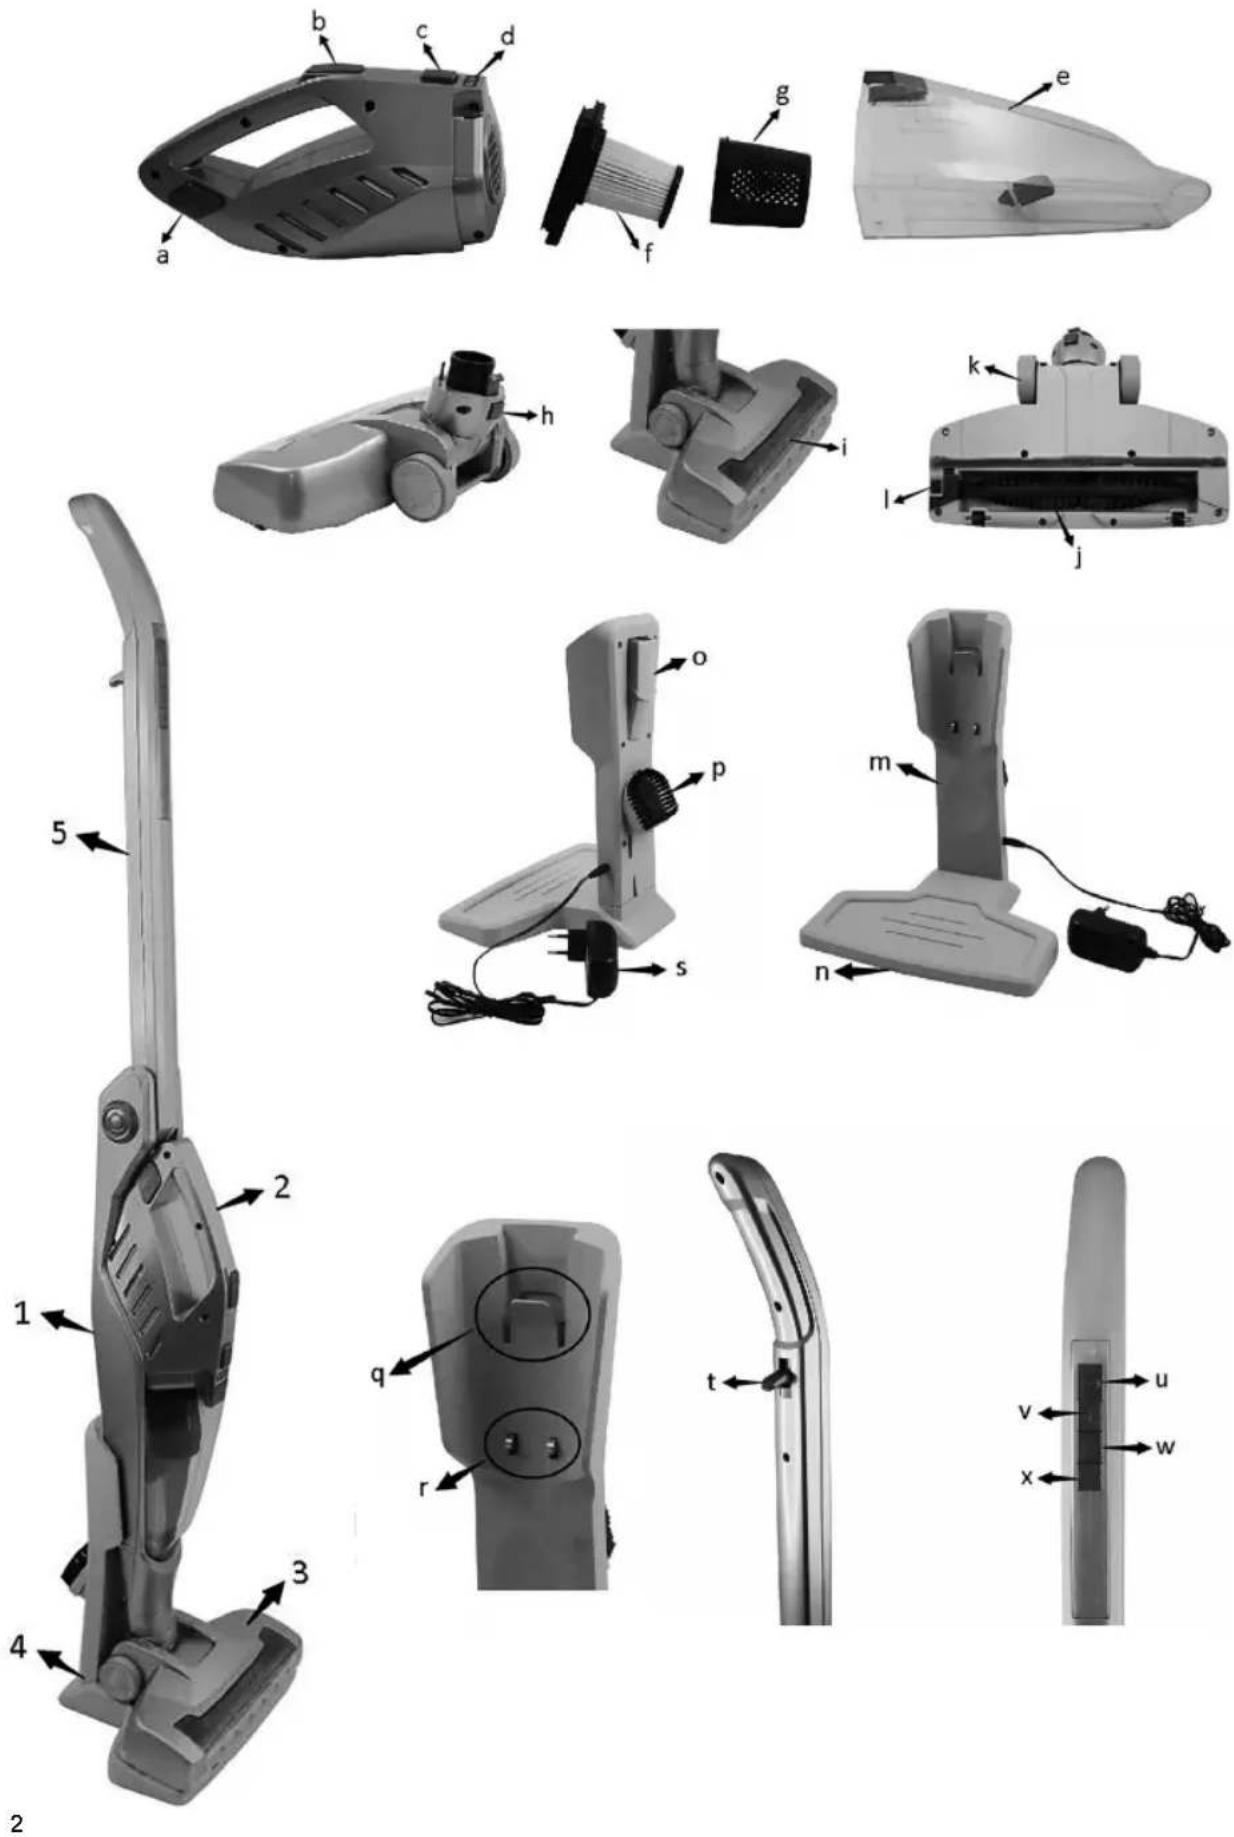
DESCRIPTION
- Main body
- Handheld vacuum cleaner
a. Release button for handheld vacuum cleaner
b. On/Off button for handheld vacuum cleaner
c. Release button for dust container
d. Pilot lights of charging
e. Dust container
f. HEPA filter
g. Filter protector
- Suction head
h. Suction head lock/release button
i. LED lights
j. brush
k. Wheels
l. Pro brush lock
- Charging base
m. Charging support piece
n. Charging support base
o. Small nozzle
p. Small square brush
q. Vacuum body hook
r. Charging conducting strip
s. Battery charger
- Handle
t. Handle bending/upright lock
u. On/off button for the upright vacuum cleaner
v. High suction power button
w. Low suction power button
x. On/off button for the LED lights & brush
SAFETY INSTRUCTIONS
This appliance can be used by children aged from 8 years and
above and persons with reduced physical, sensory or mental capabilities or lack of experience and knowledge if they have been given supervision or instruction concerning use of the appliance in a safe way and understand the hazards involved. Children shall not play with the appliance. Cleaning and user maintenance shall not be made by children without supervision.
The cord of the adaptor cannot be replaced; if the cord is damaged, the adaptor shall be scrapped.
Plug must be removed from socket-outlet before cleaning or maintaining the appliance.
This device can only be used with the adapter model supplied with the device and powered at very safety voltage indicated on the appliance specifications plate.
Follow the DEVICE CHARGE instructions in order to charge it. Follow the device BATTERY REMOVAL instructions for removal of the batteries from the device.
IMPORTANT WARNINGS
Prior to plugging in the product, check that your mains voltage is the same as the one indicated on the product label.
The mains connection cable must not be tangled or wrapped around the product during use.
Do not pull on the connection cord in order to unplug it.
Do not use, connect or disconnect the device to the mains with your hands or feet wet.
Proceed according to the conservation and cleaning section of this manual for cleaning.
Unplug the product immediately from the mains in the event of any breakdown or damage and contact an authorised Technical support service.
In order to prevent any risk of danger, do not open the device. Only qualified technical personnel from the brand's Official Technical support service may carry out repairs or procedures on the device.
Any incorrect use or improper handling of the product shall render the warranty null and void. Only an authorised technical support service centre may carry out repairs on this product.
This appliance is designed exclusively for domestic use, in no case should be a commercial or industrial use. In case of misuse or tampering with the product, it will be out of warranty.
Do not use the appliance to vacuum liquids (water, etc), sharp objects (pins, pins, nails, glass, etc), incandescent objects (matches, cigarettes)
Never use the turbobrush to: Polish floors, suck (Liquids, wet or damp dust, hot ash, burning objects, such as cigarettes, matches, sharp and hard items, such us: razors, pins, thumbtacks, pieces of glass, etc), flour, cement, plaster, printer or photocopier toner, etc.
B&B TRENDS SL. disclaims all liability for damages that may occur to people, animals or objects, for the non-observance of these warnings.
BEFORE FIRST USE
- Remove the main body of the appliance and other parts/accessories from the packaging.
- Unfold the main body to have the handle uprightly fixed.
- Insert the suction head into the bottom of the main body. Make sure they are fastened firmly. To remove the suction head from the main body, press the suction head lock/release button and pull it out.
- There is a lock on bottom of suction head to fix the brush. Make sure it's locked in place for use.
DEVICE CHARGE
This charge will take approximately 4,5 hours.
- Attach the charging support piece to the charging support base.
- Hang the appliance onto the vacuum body hook of the charging base. Make sure the appliance fits steadily on the base.
- Plug the charger into the charging base first, and then into the mains socket.
- Charge the batteries at room temperature between 4 and 40.
- While charging, the pilot light will be flashing to indicate the charger is under working. When the charging operation is finished, the charger will switch off automatically and the pilot lights will be on instead of flashing.
- After charging, unplug the charger from the mains socket and the appliance. Do not use the appliance while it is connected to the charger. Store the charger in a safe place for future charges. The appliance is now ready for use.
INSTRUCTIONS FOR USE
- To switch the appliance on, press the on/off button (u) on the handle. Both the LED lights on the suction head and the pilot lights on the handheld vacuum cleaner will light on in blue.
- You can choose the suction power by pressing the high suction power button (v) or low suction power button (w) on the handle.
- Animal Pro brush and LED lights on the suction head will be working or stop working at the same time controlled by the on/off button (x) on the handle. Use the brush to clean the carpet or floor.
- You can also push up the bending/upright lock (t) on the handle to fold the appliance inwards for easy cleaning under the beds, desks and other similar places.
- After use, switch off the appliance and push up the bending/upright lock on the handle to fold the appliance for easy parking.
TO USE THE HANDHELD VACUUM CLEANER SEPARATELY
- Press the release button to uncouple the handheld vacuum cleaner from the main body.
- Take off the nozzle and the small square brush from the back of charging base.
- Install the nozzle to clean corners and crevices. Install the brush to clean the upholsteries, such as sofa.
- Press the center of on/off button for handheld vacuum cleaner to make the machine work. Press the center of the button again to switch off the machine.
- Put the handheld vacuum cleaner back into its place on the main body after use.
MAINTENANCE AND CLEANING
- Switch off the appliance and let it cool before undertaking any cleaning task.
-
Clean the outside of the appliance with a damp cloth. Do not use abrasive products or solvents.
-
Do not submerge the appliance in water or any other liquid. Make sure that no water enters the appliance.
- Remove any dirt (hair and other fibers) tangled around the brush and wheels.
CLEANING DUST CONTAINER AND FILTER
- Uncouple the handheld vacuum cleaner. Dismantle it by pressing the release button for dust container. 2. Take out the Hepa filter and filter protector. Empty the dust container and filter. 3. If the parts are heavily soiled, wash the dust container, filter and its protector under running water with detergent. Check that all the parts are completely dry before fitting them back.
CLEANING BRUSH
- Unlock the brush from the suction head. Take it out and remove any dirt (hair and other fibers) tangled around the roller. 2. Wash the brush under running water with mild detergent. Make sure that it is completely dry before replacing it.
TROUBLESHOOTING
| MALFUNCTION POSSIBLE REASONS SOLUTIONS | ||
| MOTOR DOES NOT TURN ON | Battery is power offThe hand-held vacuum cleaner is not properly installed in the body assembly (because the body assembly requires a hand-held vacuum cleaner to provide power, which itself cannot work independently) | Charge the vacuum cleanerCorrectly install the hand-held vacuum cleaner and body assembly |
| SUCTION REDUCED | Dust cup has been full of dustThe Filter is full of dustAir duct of the Electric brush is blocked or roller brush stallThe battery is low | Dump the dust in the dust cupClean or replace the FilterClean the garbage attached to the electric roller brushFully charge the battery as indicated in the charging section |
| CHARGING INDICATOR DOES NOT FLASH RECYCLE WHEN CHARGING | The hand-held vacuum cleaner is not fitted to the body assembly | Properly assemble the hand-held vacuum cleaner and the body assembly |
| THE USING TIME IS NOT ENOUGH AFTER CHARGING | The charging time is insufficient Fully charge the battery as indicated in the charging section |
BATTERY REMOVAL
The appliance must be disconnected from the supply mains when removing the battery
Ensure that the product is discharged of all power
Unscrew the screws on the product housing.
Lift or pry the product halves apart, exposing the battery.
Cut the wires on both ends of the battery and remove it from the battery case.
Pull downward the battery set from the unit.
The battery must be removed from the appliance before it is scrapped.
The battery is to be disposed of safety.
PRODUCT DISPOSAL
This product complies with European Directive 2012/19/EU on electrical and electronic devices, known as WEEE (Waste Electrical and Electronic Equipment), provides the legal framework applicable in the European Union for the disposal and reuse of waste electronic and electrical devices. Do not dispose of this product in the bin, instead going to the electrical and electronic waste collection centre closest to your home.
The product may contain batteries. Remove them before disposing of the product and dispose in special containers approved for this purpose.
FRANÇAIS
MERCI D'AVOIR PLACÉ LEUR CONFIANCE EN DI4 ET NOUS ESPÉRONS QUE CE PRODUIT VOUS DONNERA ENTIÈRE SATISFACTION ET PLAISIR.
ATTENTION
VEUILLEZ LIRE ATTENTIVEMENT LE MANUEL D'UTILISATION AVANT D'UTILISER LE PRODUIT. CONSERVEZ CE MANUEL D'UTILISATION DANS UN ENDROIT SÛR EN VUE DE CONSULTATION FUTURE.
DESCRIPTION
ÉLIMINATION DU PRODUIT
B&B TRENDS, SL. guarantees compliance of this product for the purpose for which it is intended for a period of two years for the entire Spanish territory. In the case of breakdown during the term of this warranty, you are entitled to repair or to the replacement of the product at no charge if the former is unavailable, unless one of these options prove impossible or disproportionate. In this case, you can then choose a reduction in price or cancellation of the sale, which must be dealt with directly with the sales vendor. This also covers replacement of spare parts provided that the product has been used according to the recommendations specified in this manual for both cases, and has not been tampered with by any third party that is unaccredited by B&B TRENDS, SL. This warranty does not affect your rights as a consumer in accordance with the provisions of Law 23/2003 dated 10 July 2003 on warranties on the sale of consumer goods in the Spanish territory.
USE OF WARRANTY
Consumers should contact a technical service centre authorised by B&B TRENDS, SL. for repair of the product as any tampering thereof by persons not authorised by B&B TRENDS, SL., as well as misuse or inappropriate use, will lead to the cancellation of this warranty. The warranty must be fully completed and delivered along with the receipt or delivery docket for the effective exercise of rights under this warranty.
Claims must take place within three years from delivery of the product according to the provisions of the warranty, and the consumer must inform the sales vendor of the lack of conformity, provided that such claim is made within the statutory period of warranty. This warranty should be retained by the user as well as the invoice, receipt or the delivery docket to facilitate the exercise of these rights. For technical service and after-sales care outside the Spanish territory, please submit your query to the point of sale where you purchased the item or by contacting B&B TRENDS, SL.
BOLETIM DE GARANTIA
SUM. ELECT. DALMAU, S.C.P.
VILADOMAT, 108
934539276
sdalmau@ono.com
08240 MANRESA
SERVICIO ELDE - JORGE MANERO
BRUCH, 55
938728542
elde@eldeservei.com
08027 BARCELONA
SELAROM
PASSEIG MARAGALL, 102
933 521 805
amoralesnieto@hotmail.com
08020 BARCELONA
SAT MARINE, S.C.P.
C/HUELVA, 67-69
932664697
satmarine@satmarinescp.com
08620 SANT VICENÇ DELS HORTS
SAT JARO -
C/MALAGA, 20-22
647 054 779
jroca78@gmail.com
08950 ESPLUGUES DE LLOBREGAT
SAT J. BAUTISTA
POL.INDR."DOMENYS I" NAVE 9
938904852
fred@fredvilafranca.com
SUREDA I ASSOCIATS, S.C.
FRANCESC ARTAU, 2
972236588
resuredgirona@gmail.com
17200 PALAFRUGELL
NEW MERESA
DE LA SURERA BERTRAN, 23
972304454
comercial@newmeresa.com
17300 BLANES
FRANCISCO PORTILLO PEIRO
ASIAS MARC 1
972331249
serviciotecnico@portillotv.com
17740 VILAFANT
ELECTRONICA VILAFANT - SAT
NAVATA, 13
972506515/615090154
electronicavilafant@hotmail.com
GRANADA
18015 GRANADA
LUNSOL, S.L.
SANTIAGO APOSTOL 18 Local
959283415/627349431
URBISAT (BALEAR SERVICE)
C/MATEU OBRADOR,8
971-733886/733879
alanurbisat@gmail.com
7740 MENORCA
ES MERCADAL
SERVEIS MENORCA, S.L.
CARRER NOU N° 53
971375380
serveismenorca@gmail.com
JAÉN
23400 UBEDA
MAGOCA UBEDA
GRANADA 7
953751838
ubedasatmagoca@gmail.com
23001 JAEN
CARRIL DE LAS FLORES, 34-B
982242015
teleservicio@telefonica.net
27400 MONFORTE DE LEMOS
RAUL E HIJOS,S.L.
CAMPO DE LA COMPAÑÍA, 19
982400711
raulehijos@gmail.com
27850 VIVERO (CASCO
SERVICIO TECNICO SILDO 101, S.L.U.
LODEIRO, 26
982061819
MADRID
28931 MOSTOLES
Valle Inclan 32 Local
917054624
pimaruno@gmail.com
28047 CARABANCHEL
REPARACIONES CARLOS (CARLOS
GOMEZ YUSTE)
GUABAIRO,2
914665369
Electro Servicio Muñoz S. L. (ESM
Corella)
C/ Santa Barbara, 52
948780729
satcorella@gmail.com
31500 TUDELA
ELECTRICIDAD FERNANDO, S.C.I.
YANGUAS Y MIRANDA, 12
948826457
electrohogar@electrohogartoledo.com
VALENCIA
46600 ALZIRA
TALLERES MOYA
C/ FAVARETA,49
96 241 85 87
tamoya@talleresmoya.com
46011 VALENCIA
ROBERTO BARRACHINA ALIAGA
-VALENCIANA, SA TECNICA-
C/FRANCISCO BALDOMA, 86 Bajos
963554244/607304279
valencianasat@gmail.com
46700 GANDIA
RELGAN - CAMILO GARCIA
MAGISTRADO CATALA, 16
962872810
relgangandia@gmail.com
46005 VALENCIA
RELEVAN,S.L.
C/ MATIAS PERELLO,49
963 222 529
merce@relevansl.com
46800 XATIVA
JOSE PASTOR DIEZ
C/ ABU MASAIFA. 6
962274794
sat-xativa@josepastor.es
46680 ALGEMESI
JOSE A. LLACER SANGROS
ALBALAT, 88
962423519
satllacer@hotmail.com
46700 GANDIA
JOAQUIN MAYOR ESTRUGO
(TECNOGAR)
PRIMER DE MAIG 41-B
962865335
tecnogar33@gmail.com