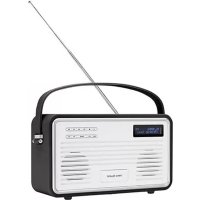
SusieQ - Radio View Quest - Free user manual and instructions
Find the device manual for free SusieQ View Quest in PDF.
| Product type | Multiband connected radio |
| Brand | View Quest |
| Model | SusieQ |
| Power supply | AC mains (220-240 V, 50/60 Hz) |
| Radio bands | DAB+, FM (RDS), Internet radio (Wi-Fi) |
| Wireless connectivity | Wi-Fi 802.11 b/g/n, Bluetooth, NFC |
| Audio streaming | Spotify Connect, UPnP, media server |
| Auxiliary inputs | 3.5 mm AUX In, USB (charging and playback) |
| Audio outputs | 3.5 mm headphone output, left/right line outputs (2x RCA) |
| Speakers | Built-in, stereo |
| Equalizer | MyEQ (presets: Normal, Jazz, Rock, Classical, Pop, customizable) |
| Practical features | Dual alarm, standby, sleep timer, adjustable backlight |
| Multiroom | Multiroom groups via UNDOK app |
| Memory | 10 presets per mode (DAB, FM, Internet) |
| Display | LCD screen with backlight |
| Antenna | Telescopic antenna for DAB/FM |
| Dimensions (approx.) | 300 x 150 x 200 mm (estimated) |
| Weight (approx.) | 1.5 kg (estimated) |
| Care and cleaning | Unplug before cleaning; use a soft dry cloth; avoid liquids and abrasive products |
| Safety | Do not expose to moisture, heat sources or shocks; use only the provided power supply |
| Support and repairability | Support via MyVQ.com; phone assistance at 0333 1234601; factory reset possible |
Frequently Asked Questions - SusieQ View Quest
User questions about SusieQ View Quest
0 question about this device. Answer the ones you know or ask your own.
Ask a new question about this device
Download the instructions for your Radio in PDF format for free! Find your manual SusieQ - View Quest and take your electronic device back in hand. On this page are published all the documents necessary for the use of your device. SusieQ by View Quest.
USER MANUAL SusieQ View Quest
If you need a little more help...
www.MyVQ.com
0333 1234601
support@myvq.com
Susie-Q Manual
ENG
Contents
4-Susie Q Basics
8-9. Setup Wizard
10time / Date Settings
12. Language Settings
13-15. DAB Menu
16-17. FM Radio
18-19. Internet Radio
2Bluetooth and Spotify Connect
21. AUX In
22M25Music/Music Player
26-29. Multi-Room
30-33. Other Features
34-39. Network Settings
40-41. Software
42-45. Backlight Options
4 viewing System Info
47. Factory Reset
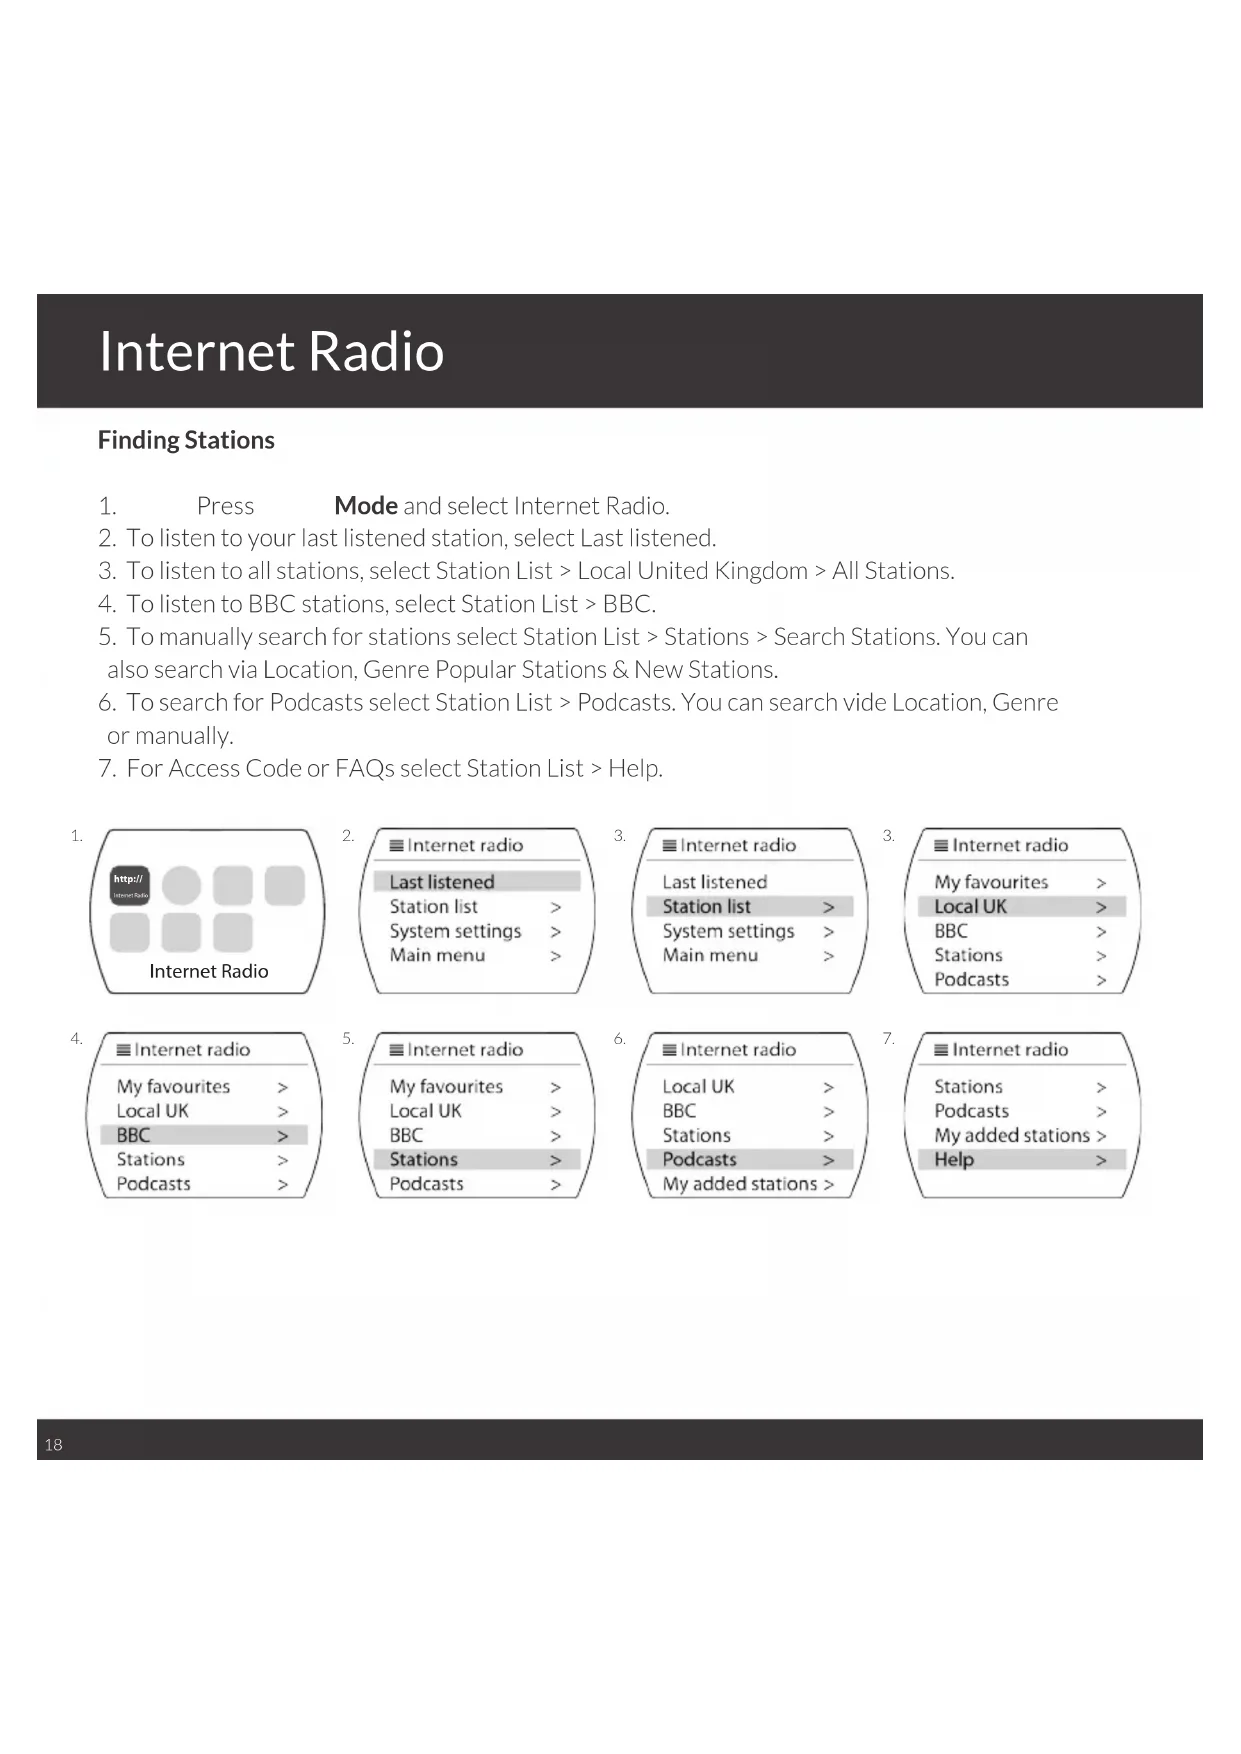
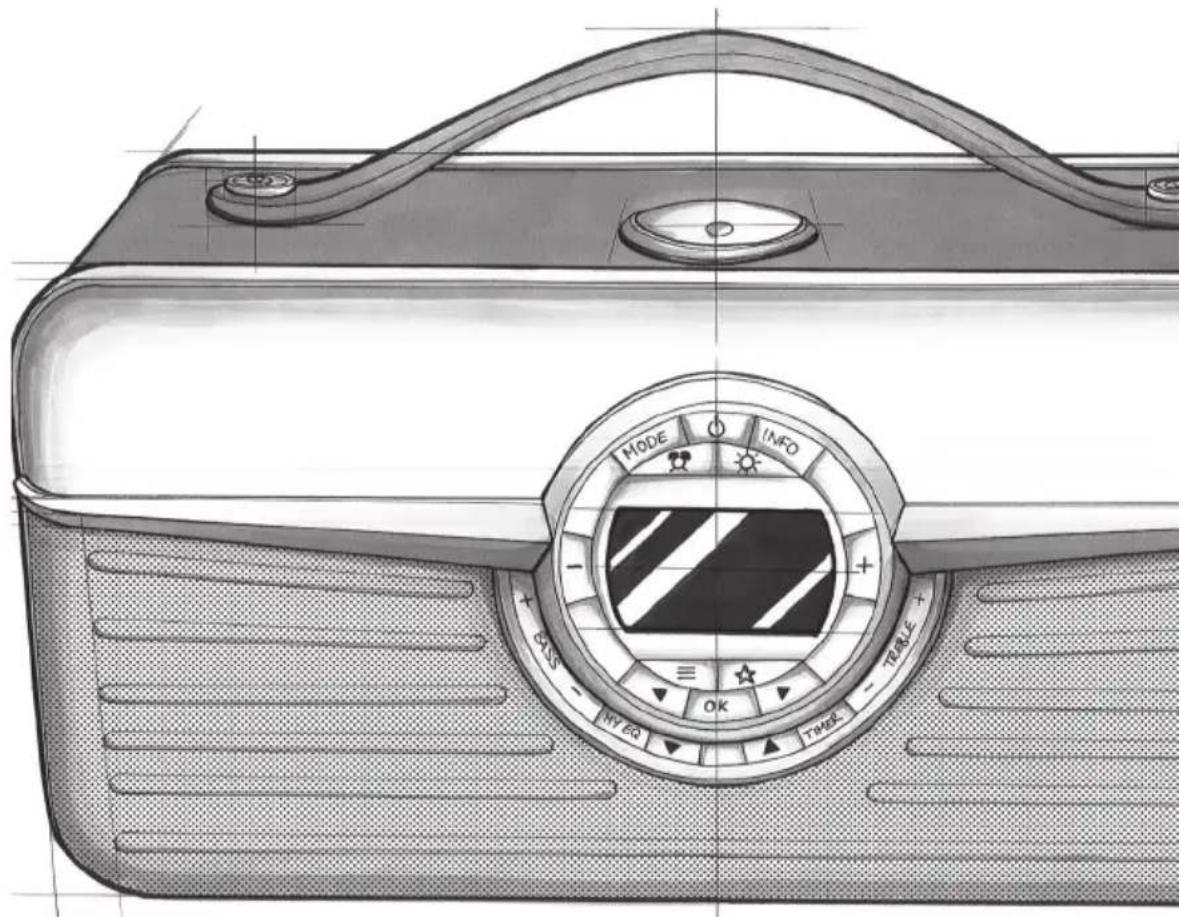
Susie-Q Basics - Front
Front Layout
- Standby On/Off
- Info
- Mode
- Alarm
- Mute
- Volume -
- Volume +
- List/Menu
- Pre-sets/Favourites
- Navigate Left
- OK
- Navigate Right
- Bass +
- Bass -
- MYEQ
- Navigate Down
- Navigate Up
- Back
- Treble -
- Treble +
ENG
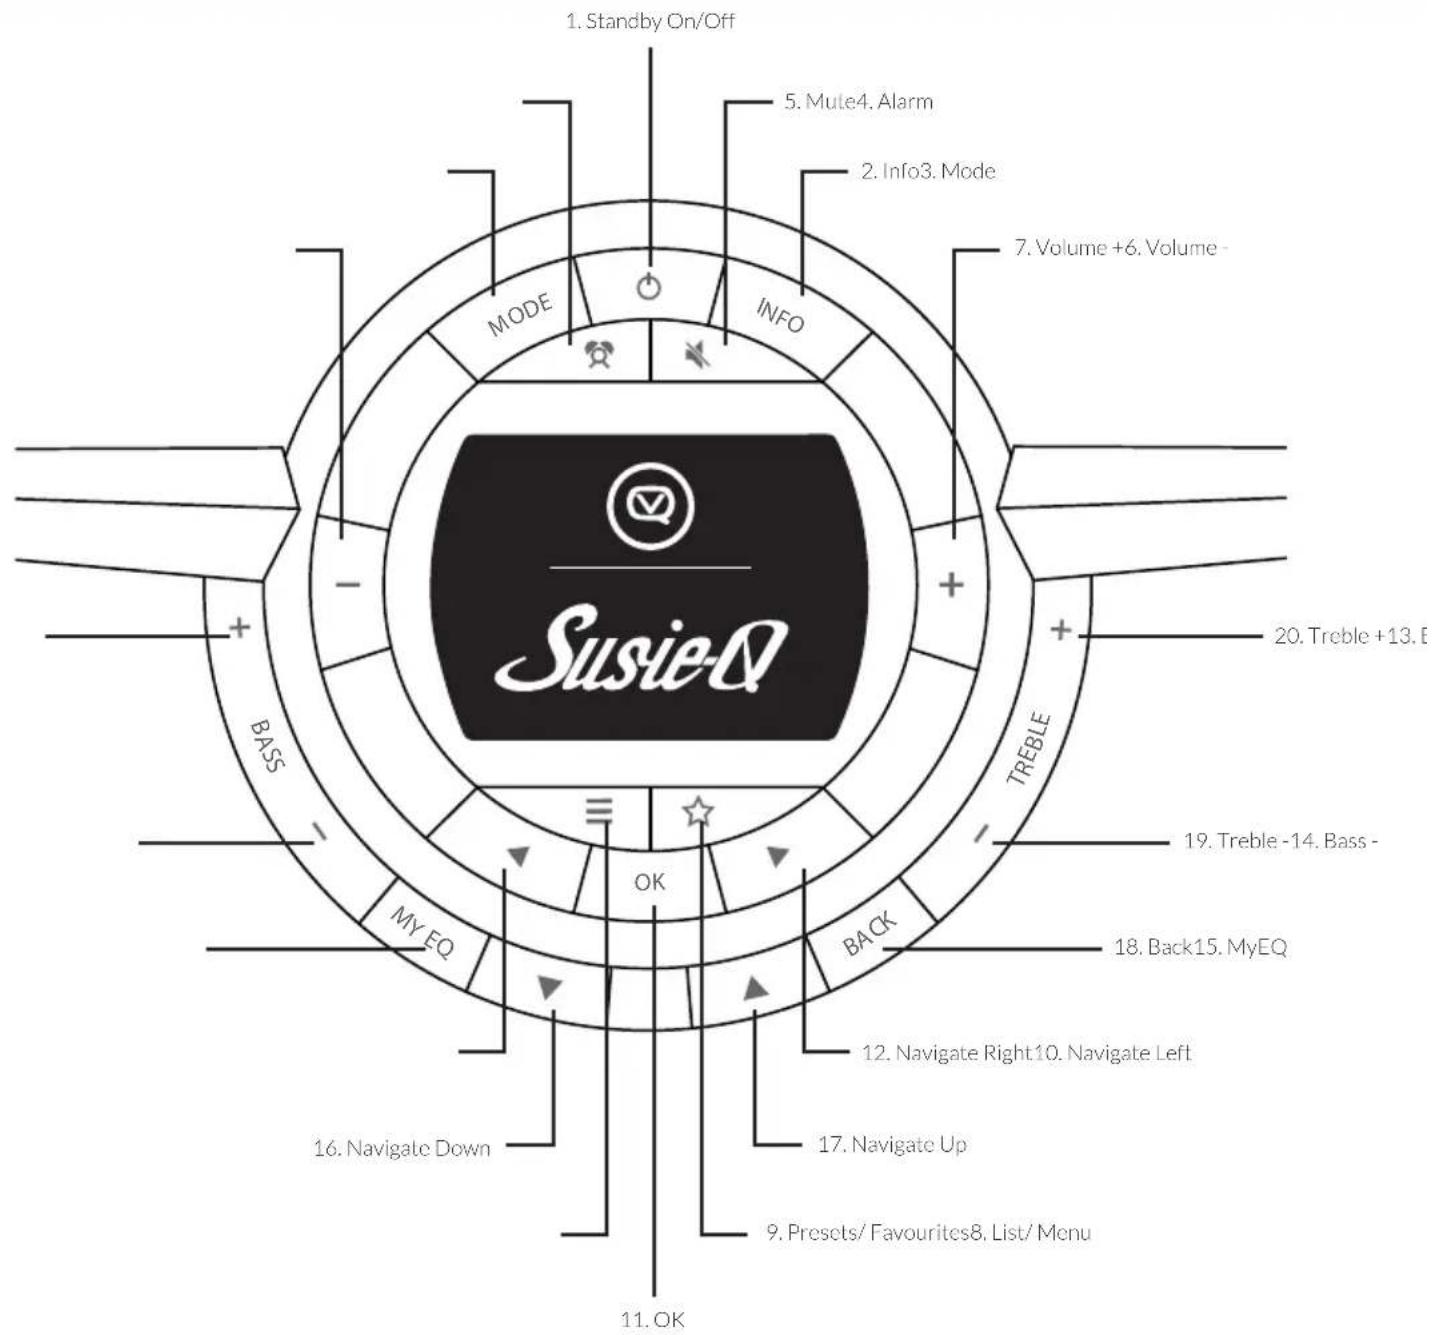
Susie-Q Basics - Back
Back Layout
- Line out LEFT (1&2)
- Line out RIGHT(1&2)
- AC mains
- Auxiliary (3.5mm)
- Headphone socket
- USB
- On/Off
- Aerial / Antenna
8. Aerial/ Antenna
Susie-Q Basics - Top
ENG
Top Layout
-
Navigation Wheel & NFC Touch Point
-
Push button to OK current selection.
- Rotate button to easily scroll through menu options (up/down only)
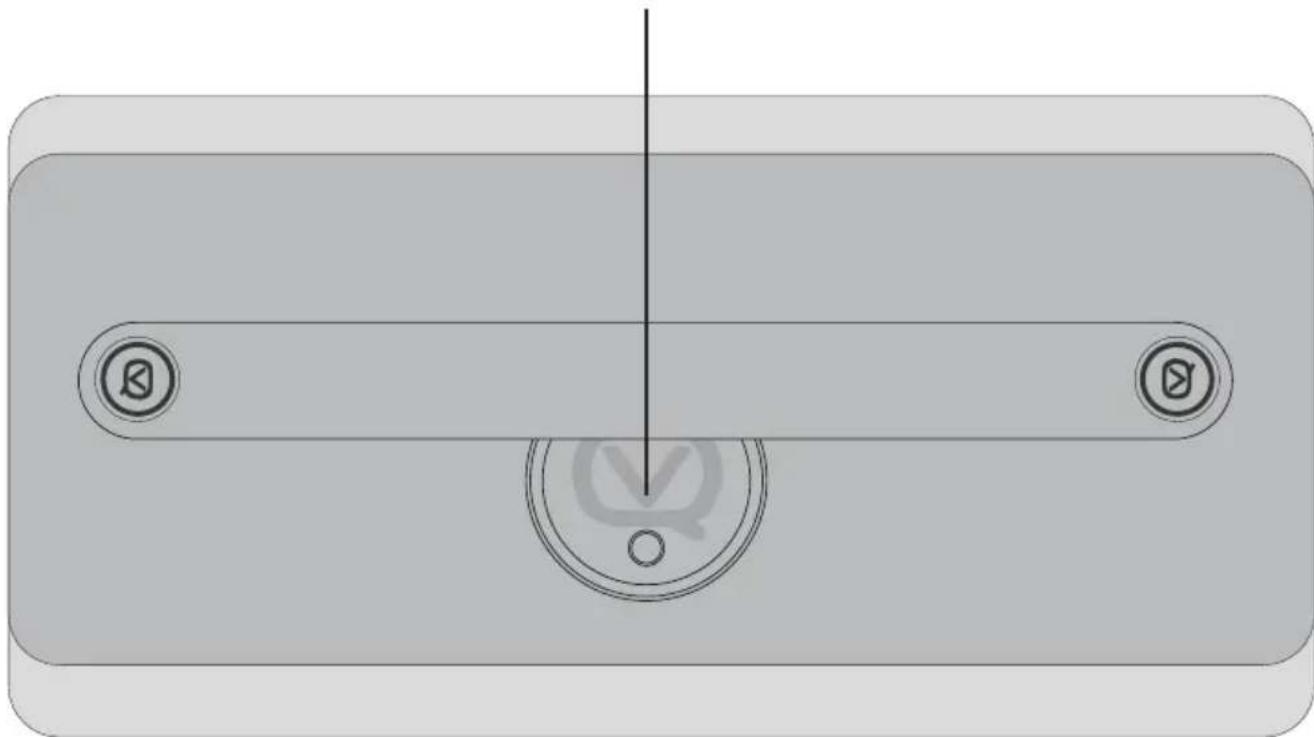
1. Navigation Wheel & NFC Touch Point
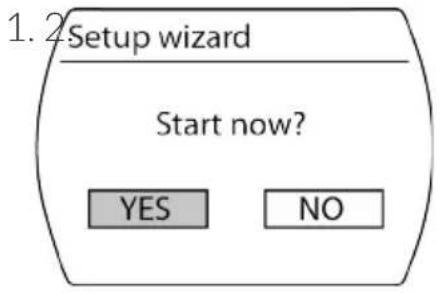
Setup Wizard
Setup Wizard
NOTE: Periods of inactivity will cause the Susie-Q to go into standby mode.
NOTE: Select options by either pressing OK or pressing the Navigation Wheel.
-
Start Now?
-
Select YES
-
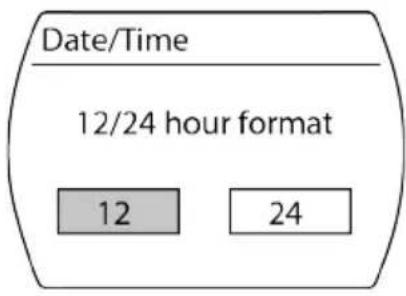
12/24 hour format
-
Select either 12 or 24^ *
-
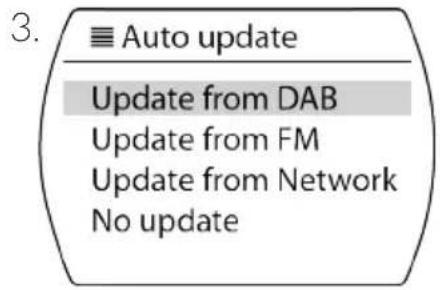
Auto Update
-
Select either Update from DAB*, Update from FM, Update from Network or No update
-
Set Time Zone
-
Select applicable time zone
-
Daylight Savings
-
Select ON or OFF
-
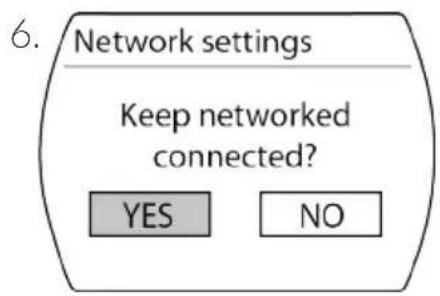
Keep Network Connected?
-
Select either YES* or NO
-
(IF YES*)
-
Select Most of Europe
NOTE: Susie-Q will go through a scanning network process, this may take a few moments.
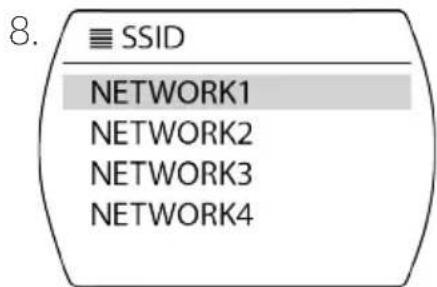
-
SSID
-
Select the name of your Network
- Input your PIN using the Wheel or Navigation Arrows to select characters, push OK or
Wheel to select.
NOTE: Susie-Q may take a few minutes to connect to Network.
- Setup wizard completed!
ENG
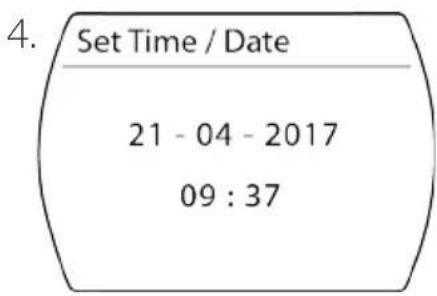


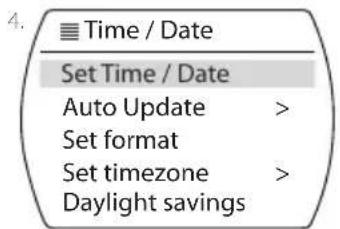
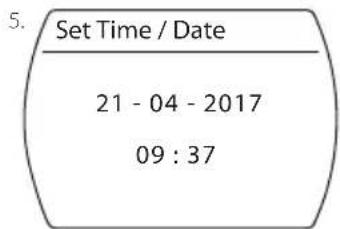
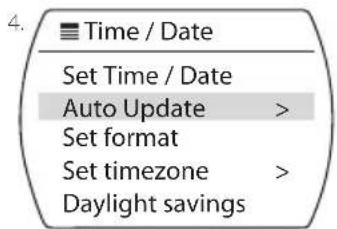
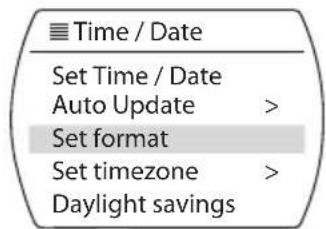
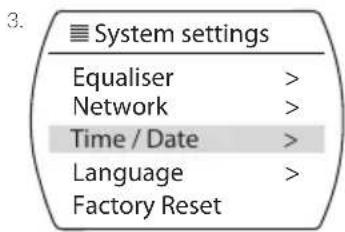
Time / Date Settings
Manually Set Time/Date
- Press List/Menu button.
- Navigate to and select System settings.
- Navigate to and select Time/Date.
- Select Set Time/Date.
- Use Wheel or Arrows to set Day, then select or OK to move onto Month, Year etc.
NOTE: If there is no activity for approximately 15 seconds the menu will close and return to stage 4.

Time/Date Auto update
- Press List/Menu button.
- Navigate to and select System settings.
- Navigate to and select Time/Date.
-
Select Auto update
-
Select either Update from DAB*, Update from FM, Update from Network or No update
Set Format
- Press List/Menu button.
- Navigate to and select System settings.
- Navigate to and select Time/Date.
-
Select Set format.
-
Select either 12 or 24^ *
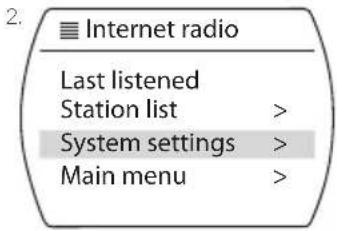
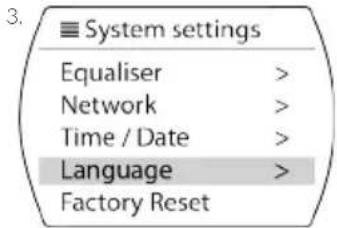
Language Settings
Change Language
- Press List/Menu button.
- Navigate to and select System settings.
-
Navigate to and select Language.
-
Choose your Language (English/Dutch/Finnish etc.)
DAB Menu
ENG
After you have finished setup wizard, Press Mode, click DAB, and Susie-Q will autoscan for all available stations.
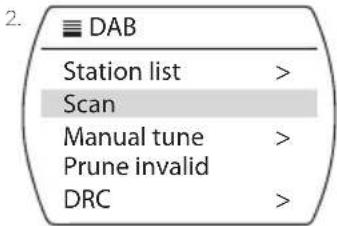
Scan For Stations
- Press the Menu / List button.
- Navigate to and select Scan.
- It is advisable to rescan from time to time as new stations may be available. To improve reception you can extend or alter the position of the antenna.
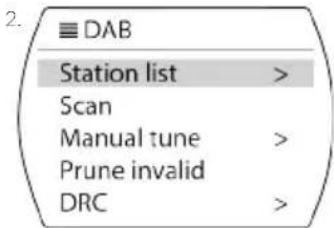
Selecting a Station from Station List
- Press the Menu / List button.
- Navigate to and select Station List.
- Navigate to and select the desired station using the UP or DOWN arrow keys, or navigation wheel.
DAB Menu (contd.)
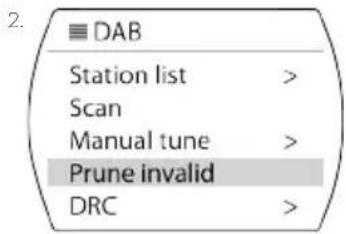
Prune Invalid Stations
- Press the Menu / List button.
- Navigate to and select Prune Invalid.
- Navigate to Yes and press the OK button.
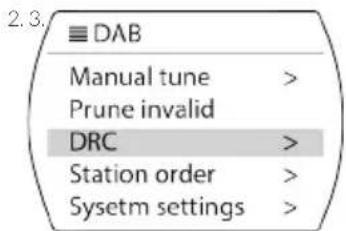
DRC Settings
DRC (Dynamic Range Control) will ensure there are not large volume variations between stations and content.
- Press the Menu / List button.
- Navigate to and select DRC.
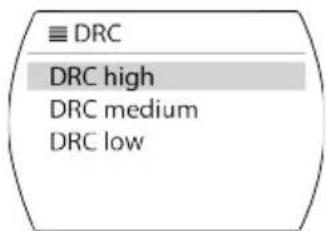
-
Select the desired DRC Option:
-
DRC High.
DRC Low. - DRC Off.
Station Order
- Press the Menu / List button.
- Navigate to and select Station Order.
-
Select the desired option:
-
Alphanumeric
- Ensemble
- Valid
2.3.
DAB
Manual tune > Prune invalid DRC >
Station order > Sysetm settings >
Station order
Alphanumeric Ensemble Valid
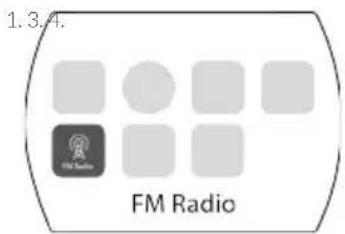
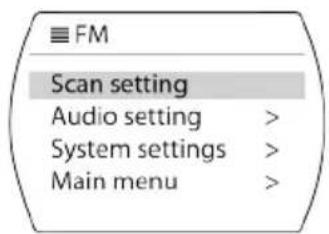
FM Radio
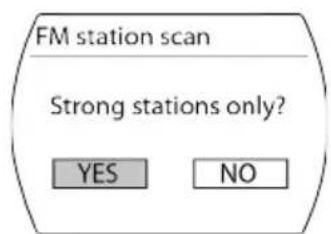
Scan Setting
- Press Mode and select FM Radio.
- Press & Hold the UP and DOWN arrows to autoscan, or single press for fine manual adjustments.
- Press Menu to go Scan setting.
- "Strong Stations Only?" Select either YES* or NO.
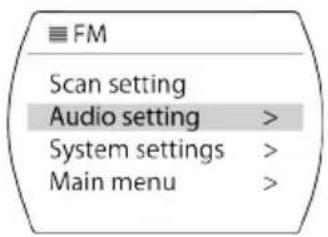
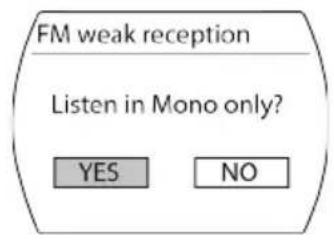
Audio Setting
- Press Mode and select FM Radio.
- Press the Menu / List button.
- Select Audio setting button.
- "Listen in Mono only?" Select either YES or NO*.

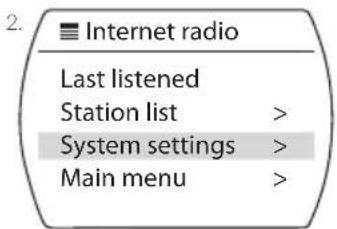
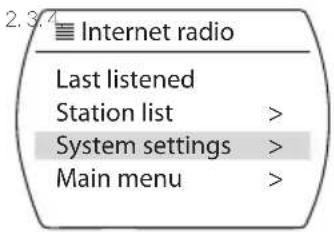
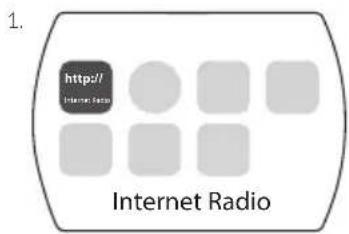
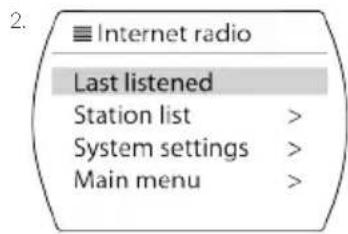
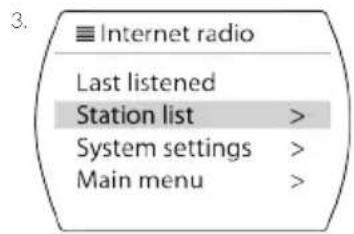
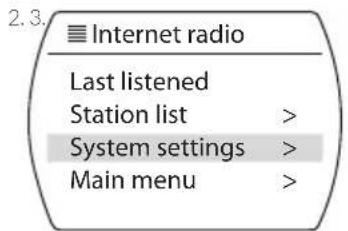
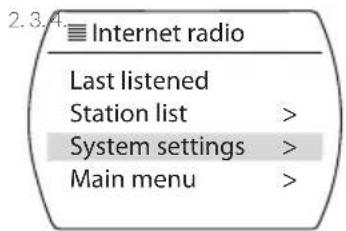
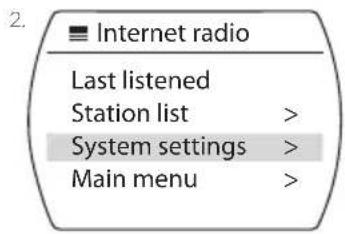
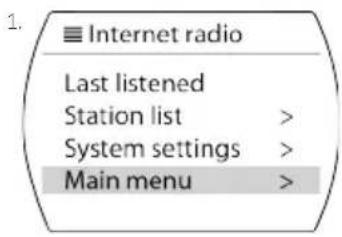
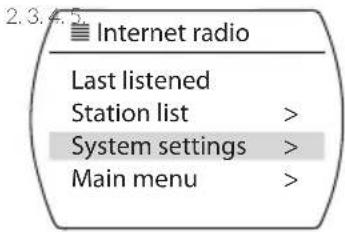
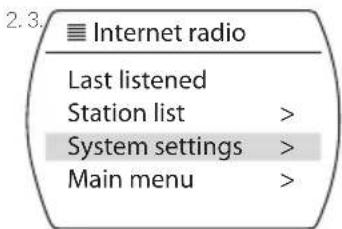
Internet Radio
Finding Stations
- Press Mode and select Internet Radio.
- To listen to your last listened station, select Last listened.
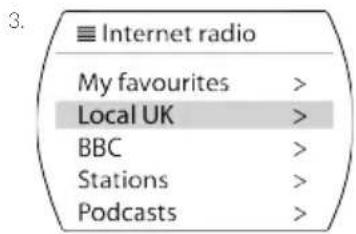
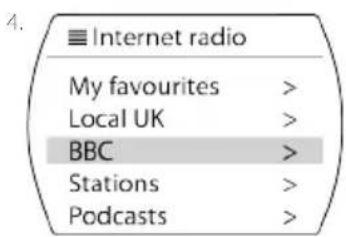
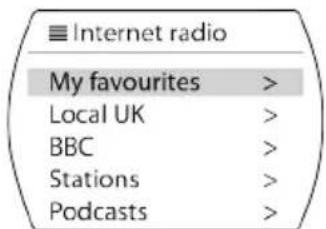
- To listen to all stations, select Station List > Local United Kingdom > All Stations.
- To listen to BBC stations, select Station List > BBC.
- To manually search for stations select Station List > Stations > Search Stations. You can also search via Location, Genre Popular Stations & New Stations.
- To search for Podcasts select Station List > Podcasts. You can search vide Location, Genre or manually.
- For Access Code or FAQs select Station List > Help.


ENG
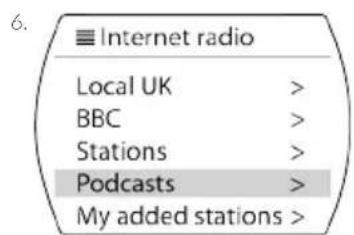
My Favourites
- Select Station List > My Favourites to find your saved Internet Favourites.
- VQ have a partnership with UNDOK (App available on iOS and Android) which allows you to create personalised lists for example, Talk shows or Saturday Hits.
- To use this favourites feature, you can register your radio via the app and what's more, it's also compatible with other devices giving you the freedom to have your lists with you everywhere.
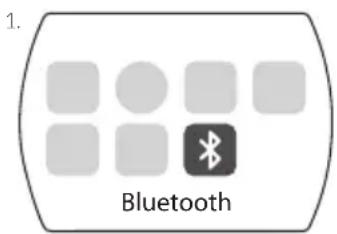
Bluetooth and Spotify
Connecting a Bluetooth Device
- Press Mode and select Bluetooth.
NOTE: This will make the Susie-Q visible to searching devices.
- Pair Bluetooth device with Susie-Q.
- Use Bluetooth device or Susie-Q as the control.
- Press OK to play & pause a track.
- Press LEFT & RIGHT arrows to skip tracks.
Spotify Connect
- Press Mode and select Spotify Connect.
- Press OK (play) and follow the steps on your phone / tablet within the app to connect to Susie-Q.
- Press OK to play & pause a track.
- Use the LEFT & RIGHT arrows to skip tracks.

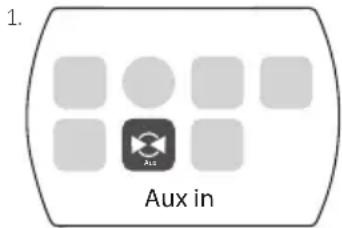
AUX In
ENG
Connecting An Auxiliary Input
- Press Mode and select Aux in.
- Use auxiliary device as control.
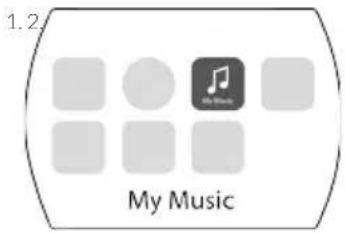
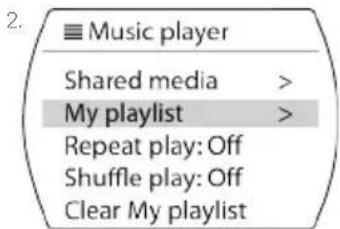
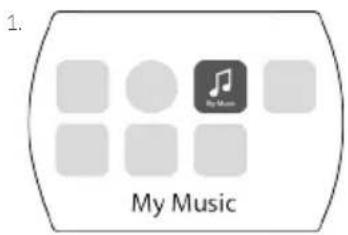
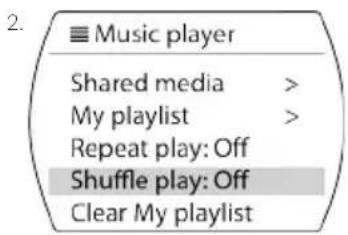
My Music / Music Player
Connecting To A UPnP Server
- Press Mode and select Music Player.
- Navigate to and select Shared Media.
- Navigate to and select the UPnP Server Name.
-
Select the desired filter preference:
-
Artist / Album.
- Album.
- Title.
Composer.
Genre. - Style.
Dynamic Browsing. - Internet Radio.
- Playlists.
- Advanced Search.
-
. -
Navigate to the desired song and press OK to play.
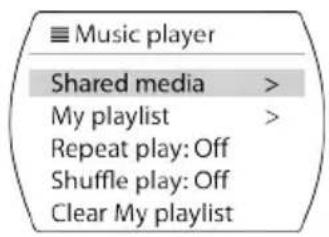
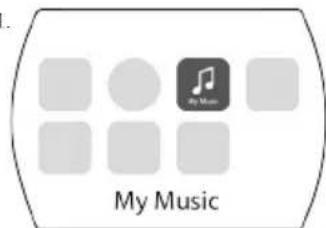
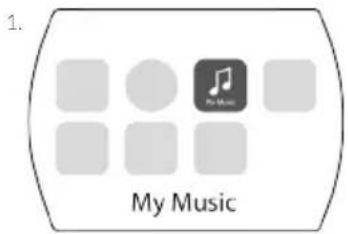
Playlists
- Press Mode and select Music Player.
-
Navigate to and select My playlist.
-
Your available playlists will be displayed.

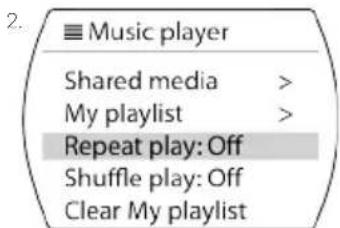
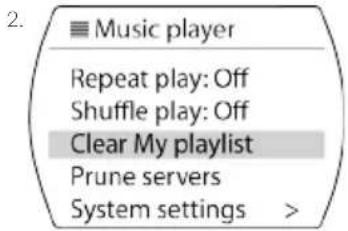
Repeat Play
-
Press Mode and select Music Player.
-
Navigate to and select Repeat play: Off/On.
My Music / Music Player (contd.)
Shuffle Play
- Press Mode and select Music Player.
- Navigate to and select Shuffle play: Off/On.
Clear My Playlist
- Press Mode and select Music Player.
- Navigate to and select Clear My playlist.
ENG
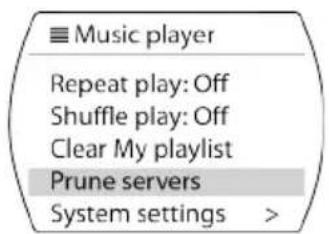
Prune Servers
- Press Mode and select Music Player.
- Navigate to and select Prune servers.
-
"Prune shared media wake on LAN servers?"
-
Select Yes/No.
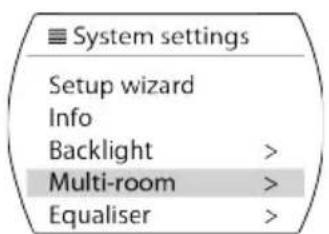
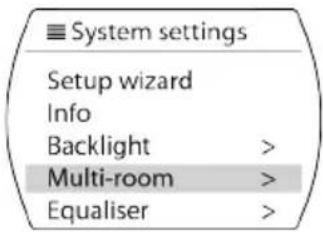
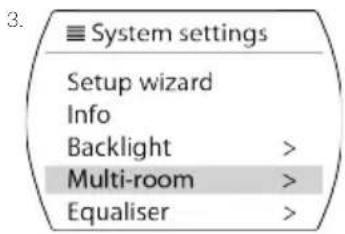
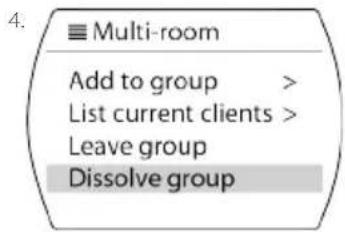
Multi-Room
Create New Multi-Room Group
- Press the Menu / List button.
- Navigate to and select System Settings.
- Navigate to and select Multi-Room.
- Navigate to and select Create New Group.
- Use navigation wheel to select letter or number.
- Press navigation wheel to confirm selection.
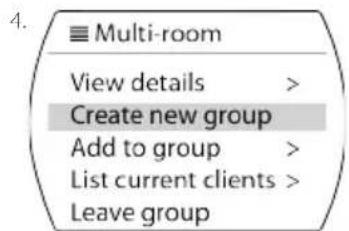
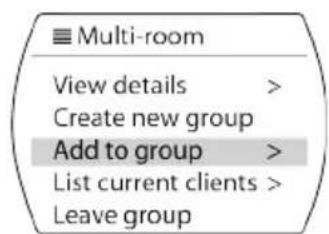
Add To Group
- Press the Menu / List button.
- Navigate to and select System Settings.
- Navigate to and select Multi-Room.
- Navigate to and select Add To Group.
- Navigate to and select the desired group.
- The device will be automatically added to the group. This function is also available via the undock app.
ENG
View Multi-Room Details
- Press the Menu / List button.
- Navigate to and select System Settings.
- Navigate to and select Multi-Room.
- Navigate to and select View Details.

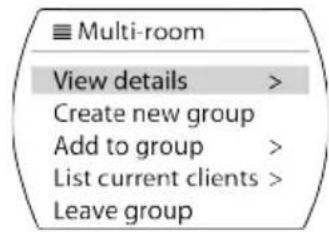
Multi-Room (contd.)
Leaving Group
- Press the Menu / List button.
- Navigate to and select System Settings.
- Navigate to and select Multi-Room.
- Navigate to and select Leave Group.
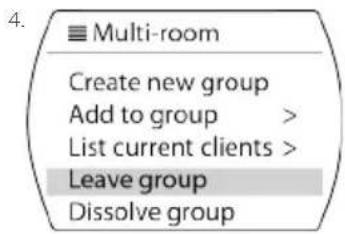
Dissolve Group
This will delete the group and remove all products within.
- Press the Menu / List button.
- Navigate to and select System Settings.
- Navigate to and select Multi-Room.
- Navigate to and select Dissolve Group.

ENG
Other Features - Radio Presets
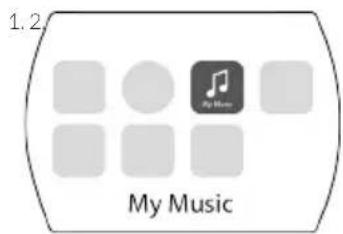
Saving a Radio Preset (DAB/FM)
- To save a preset, Press & Hold the Star button and select an empty number.
- To recall a preset, Click the Star button and select the preferred station.
- You can save up to 10 presets on Internet, DAB and FM mode.
1.2
Save to Preset
- BBC Radio 2
- [Not Set]
- [Not Set]
- [Not Set]
- [Not Set]
Recall from Preset
- BBC Radio 2
- [Not Set]
- [Not Set]
- [Not Set]
- [Not Set]
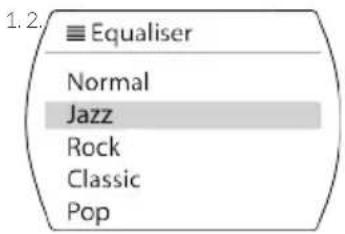
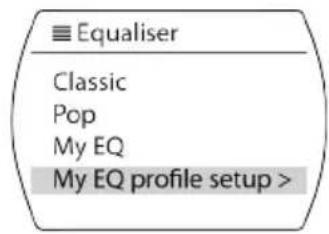
Other Features - MyEQ
ENG
MyEQ
- Press the MyEQ button and select either Normal, Jazz, Rock, Classic, Pop or MyEQ.
- To set up your own MyEQ, select MyEQ profile setup and set accordingly.
- For quick Bass and Treble adjustments, use the + and - buttons on the front of the unit.
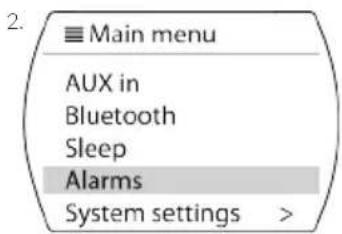
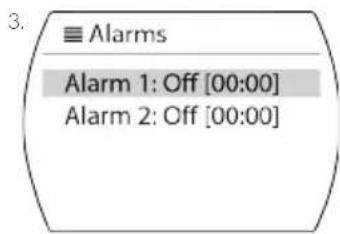
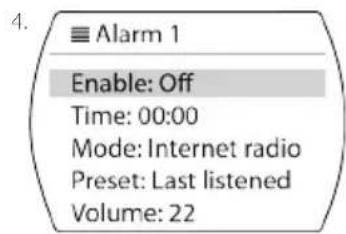
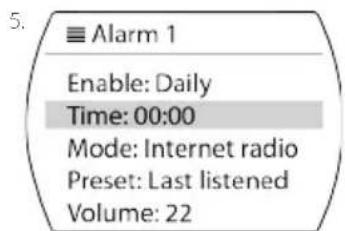
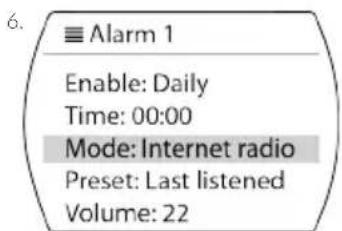
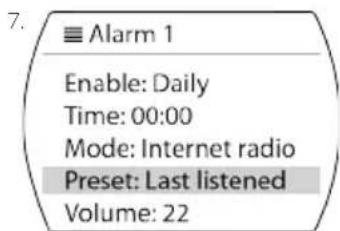
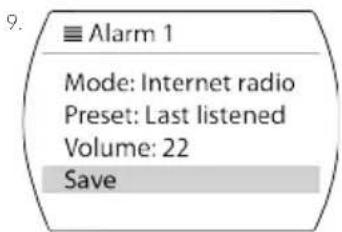
Other Features - Alarms
Setting an Alarm
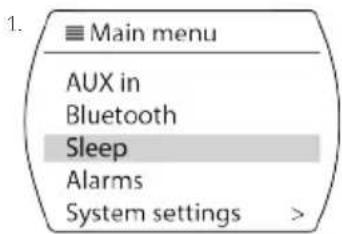
- Susie-Q has dual alarms. Press the Menu / List Button then select Main Menu.
- Use the LEFT & RIGHT arrows or Navigation Wheel to select Alarm.
- Use the to select either Alarm 1 or Alarm 2.
- Click Enable then select either Off, Daily, Once, Weekends or Weekdays.
- Set the Date & Time.
- Click Mode and Select either Buzzer, Internet Radio, DAB or FM.
- Click Preset and either Last Listened or Preset Number.
- Click Volume and adjust accordingly.
- Click Save.

Snoopze & Cancel Alarm
- To snooze, press the Navigation Wheel and use < to select snooze time of either 5, 10, 15 or 30 minutes.
- To turn snooze or alarm off, press the On/Off button.

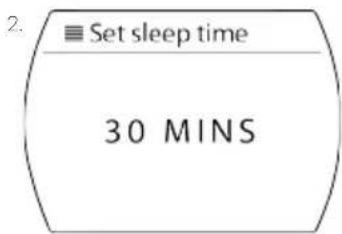
Set Sleep Timer
- To set the Sleep Timer select Sleep in Main Menu.
- Set the timer for either 15, 30, 45 or 60 minutes.
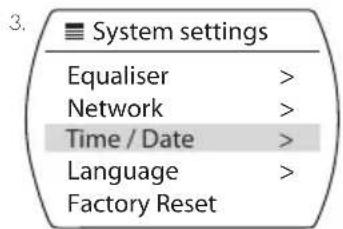
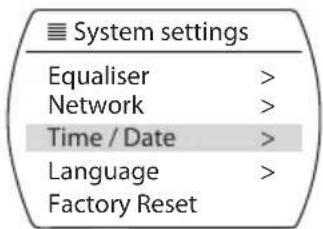
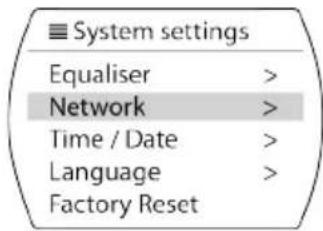
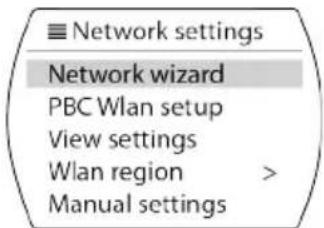
Network Settings
Network Wizard
- Press List/Menu button.
- Navigate to and select System settings.
- Navigate to and select Network.
- Select Network Wizard.
NOTE: Susie-Q will go through a scanning network process, this may Lake a few moments.
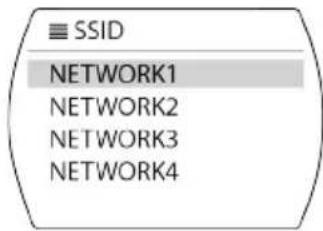
-
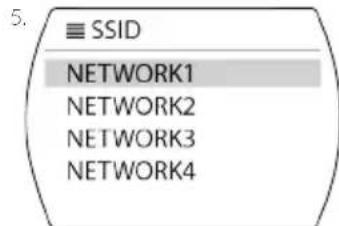
SSID
-
Select the name of your Network
- Input your PIN using the Wheel or Navigation Arrows to select characters, push OK or Wheel to select.
NOTE: Susie-Q will take a few minutes to connect to Network.
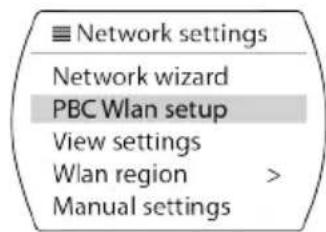
PBC Wlan Setup
NOTE: PBC = Push Button Connect.
- Press List/Menu button.
- Navigate to and select System settings.
- Navigate to and select Network.
-
Select PBC Wlan setup.
-
Push WPS button on Modem/Router.
- Press OK or Wheel to continue.
NOTE: Susie-Q will take a few minutes to connect.
Network Settings (contd.)
View Settings
- Press List/Menu button.
- Navigate to and select System settings.
- Navigate to and select Network settings.
- Select View settings. The following will be displayed:
Active connection:
- MAC Address:
Wlan region:
DHCP:
SSID:
- IP address:
- Subnet mask:
- Gateway address:
Primary DNS:
Secondary DNS:
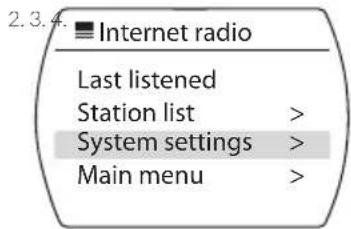
2.3.4
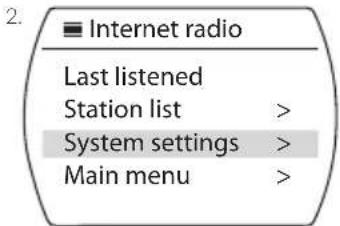
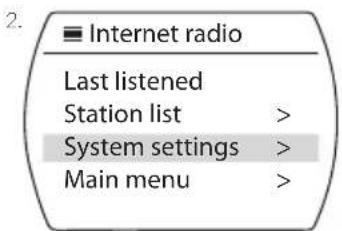
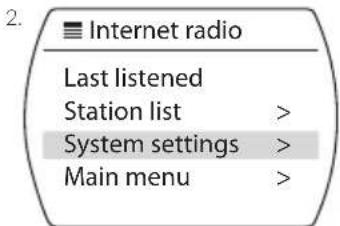
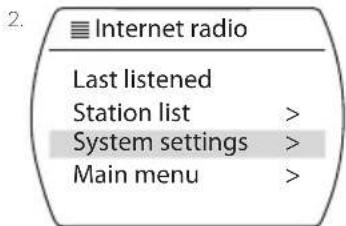
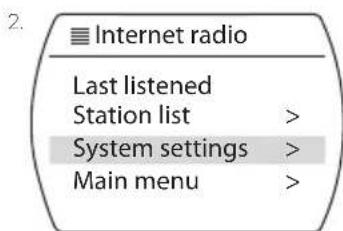
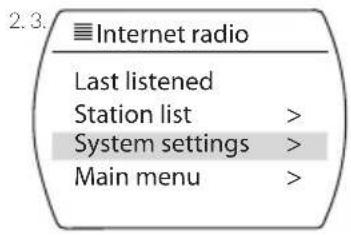
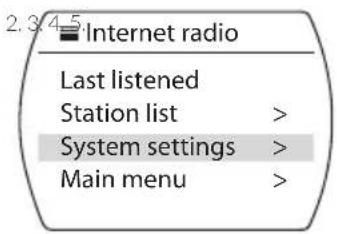
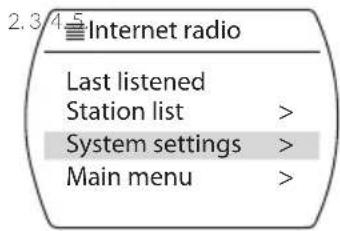
internet radio
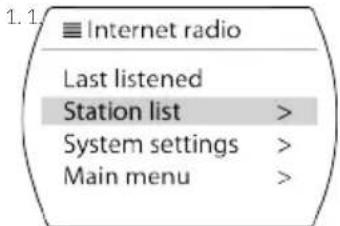
Last listened
Station list
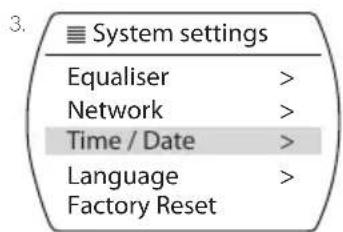
System settings
Main menu
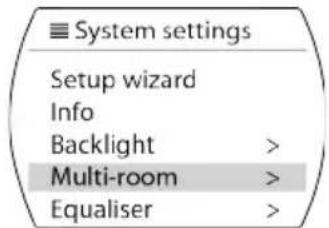
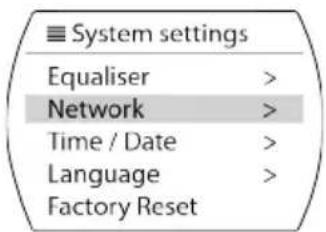
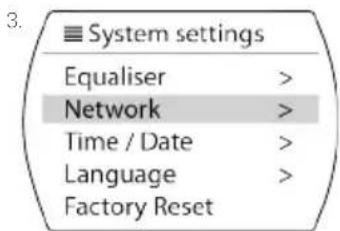
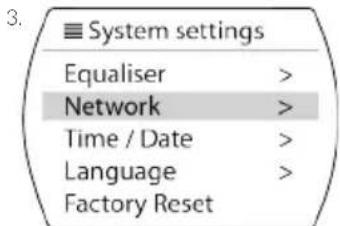
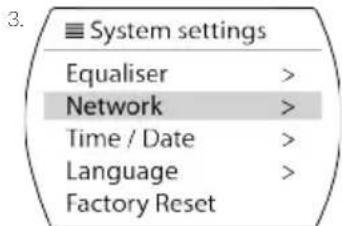
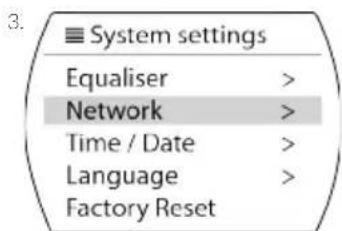
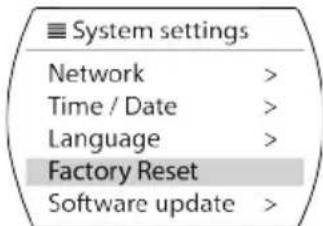
System settings
Equaliser
Network
Time/Date
Language
Factory Reset
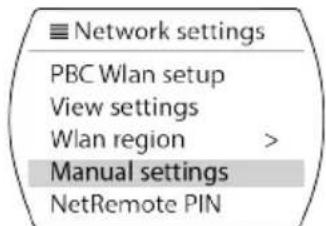
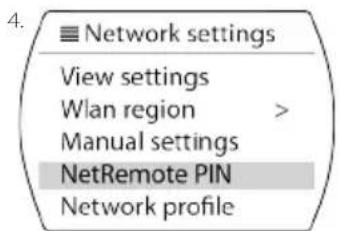
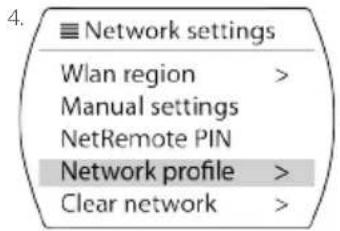
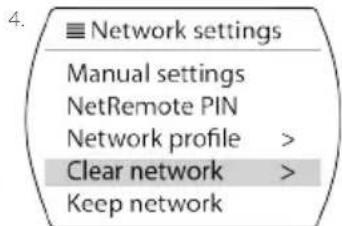
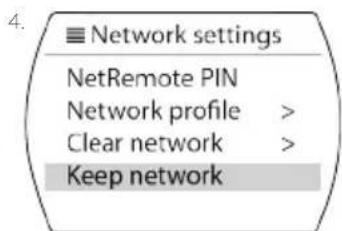
Network settings
Network wizard
PBC Wlan setup
View settings
Wlan region
Manual settings
ENG
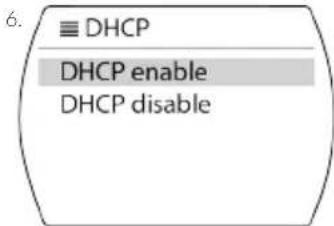
Select Manual Settings
- Press List/Menu button.
- Navigate to and select System settings.
- Navigate to and select Network settings.
- Select Manual settings.
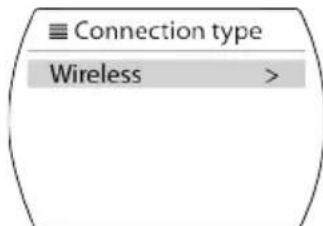
- Select Wireless.
- Select either DHCP enable or DHCP disable.
- Input SSID, select OK.
- Select either Open or WEP or WPA/WPA2.
- Input PIN, select OK.

Network Settings (contd.)
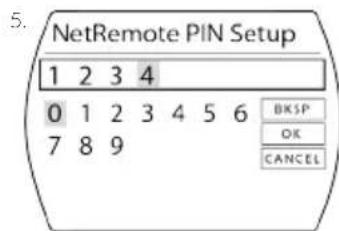
NetRemote PIN Setup
- Press List/Menu button.
- Navigate to and select System settings.
- Navigate to and select Network settings.
- Select NetRemote PIN Setup.
- Set any 4 Digit PIN code, and select OK.
Network Profile Settings
- Press List/Menu button.
- Navigate to and select System settings.
- Navigate to and select Network settings.
- Select Network profile.
- Select SSID name.
ENG
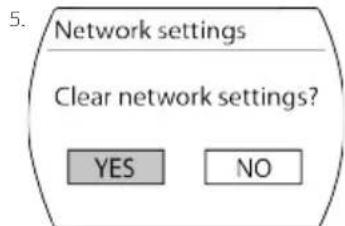
Clear Network Settings
- Press List/Menu button.
- Navigate to and select System settings.
- Navigate to and select Network settings.
- Select Clear network settings.
- Select either YES or NO.
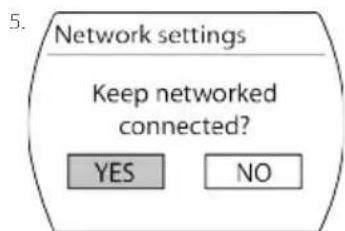
Keep Network Connected
- Press List/Menu button.
- Navigate to and select System settings.
- Navigate to and select Network settings.
- Select Keep network connected.
- Select either YES or NO*.
Software
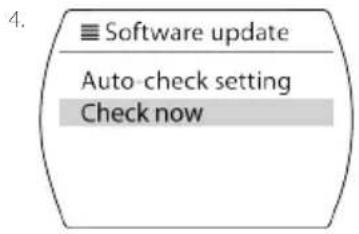
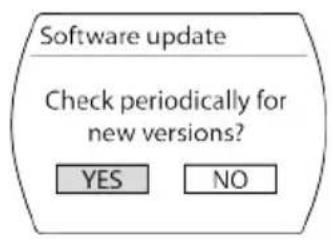
Check for Software Update
- Press List / Menu button.
- Navigate to and select System Settings.
- Navigate to and select Software Update.
- Navigate to and select Check Now.


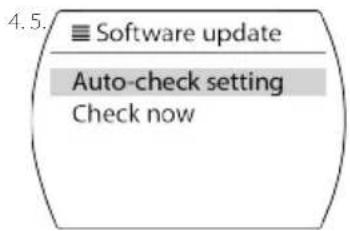
Set Automatic Check For Update
- Press List / Menu button.
- Navigate to and select System Settings.
- Navigate to and select Software Update.
- Navigate to and select Auto-Check Setting.
- Navigate to and Select Yes.

ENG
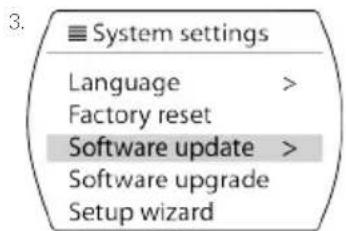
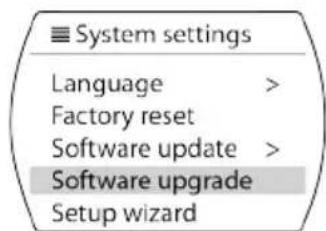
Software Upgrade
- Press List / Menu button.
- Navigate to and select System Settings.
- Navigate to and select Software Upgrade.
- Press Info to confirm upgrade.
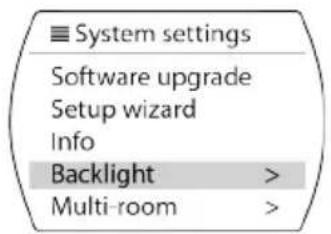
Backlight Options
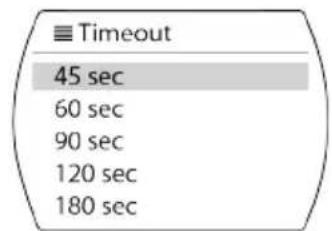
Change Backlight Timeout Time
- Press the Menu / List button.
- Navigate to and select System Settings.
- Navigate to and select Backlight.
- Navigate to and select Timeout.
-
Navigate to and select the desired time:
-
On.
10 Sec.
20 Sec.
30 Sec.
45 Sec. -
60 Sec.
90 Sec.
120 Sec.
180 Sec. -
Press the OK button to confirm time.
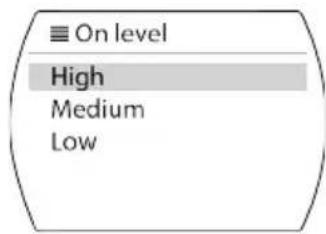
Change Backlight On Level
- Press the Menu / List button.
- Navigate to and select System Settings.
- Navigate to and select Backlight.
- Navigate to and select On level.
- Select the desired level:
High.
Medium.
Low.
- Press the OK button to confirm.
Backlight Options (contd.)
Change Backlight Dim Level
- Press the Menu / List button.
- Navigate to and select System Settings.
- Navigate to and select Backlight.
- Navigate to and select Dim level.
- Select the desired level:
Medium.
Low.
2.3
Internet radio
Last listened
Station list
System settings
Main menu
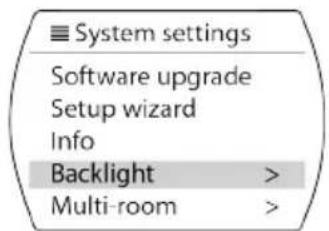
System settings
Software upgrade
Setup wizard
Info
Backlight
Multi-room
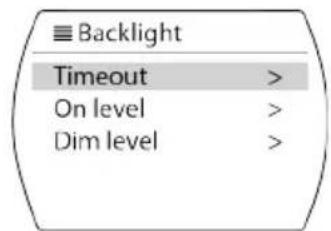
Backlight
Timeout
On level
Dim level
Dim level
Medium
Low
ENG
Viewing System Info
Viewing System Info
- Press Menu/List button.
- Navigate to and select System Settings.
- Navigate to and select Info.
- Press the OK button.
- Use the Up/Down button to navigate.
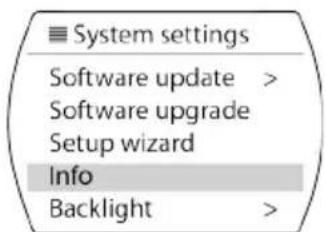
Factory Reset
ENG
Factory Reset
- Press the Menu / List button.
- Navigate to and select System Settings.
- Navigate to and Select Factory Reset.

Susie-Q
HANDBUCH


MyVQ.com
Support
Sender speichern (DAB/FAM)
Verbinding makes meteen UPnP-server
Aan.
10 sec.
20 sec.
30 sec.
45 sec.
- 60 sec.
90 sec.
120 sec.
180 sec.
REMARQUE: PBC = Push Button Connect.
10 Sec.
20 Sec.
30 Sec.
45 Sec.
- 60 Sec.
90 Sec.
120 Sec.
180 Sec.
NOTA: PBC = Push Button Connect.
| Internet radio | |
| Last listened | |
| Station list | > |
| System settings | > |
| Main menu | > |
| System settings | |
| Equaliser | > |
| Network | > |
| Time / Date | > |
| Language | > |
| Factory Reset | |
| Network settings |
| Network wizard |
| PBC Wlan setup |
| View settings |
| Wlan region > |
| Manual settings |
MERK: PBC = Push Button Connect.
- Trykk
Liste/many.
NetRemote PIN-oppsett
- Trykk