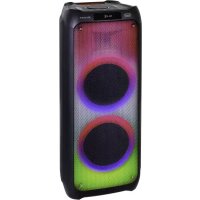
XF 1500 KB - Sound system Trevi - Free user manual and instructions
Find the device manual for free XF 1500 KB Trevi in PDF.

| Product type | Portable sound system with telescopic cart |
| Brand | Trevi |
| Model | XF 1500 KB |
| Dimensions | 460 x 390 x 705 mm |
| Weight | 20.8 kg |
| Mains power supply | 100-240 V~, 50/60 Hz |
| Internal battery | Rechargeable lead-acid 12 V, 7 Ah |
| Maximum consumption | 96 W |
| Maximum audio power | 120 W |
| Frequency response | 40 Hz - 20 kHz |
| Signal-to-noise ratio | ≥ 62 dB |
| Channel separation | > 40 dB |
| Bluetooth | Version 2.1+EDR (Class 2, range approx. 10 m) |
| Audio inputs | AUX-IN (3.5 mm jack), MIC (6.35 mm jack), USB, Micro SD |
| Audio output | AUX OUT (3.5 mm jack) |
| Auxiliary power input | 12 V DC (terminal) |
| Supported formats | MP3 (via USB or Micro SD) |
| Included accessories | Wired microphone, remote control (CR2025 battery included), power cable, AUX cable |
| Functions | Bluetooth, USB/SD, AUX, microphone with volume and echo, mic priority, preset equalizer (6 modes), disco light effect, transport cart |
| Cleaning | Soft slightly damp cloth, no solvents |
| Safety | Do not expose to water, do not place near heat sources, use at moderate volume to protect hearing |
| Repairability | Contact a TREVI authorized service center; battery replaceable by a professional |
Frequently Asked Questions - XF 1500 KB Trevi
User questions about XF 1500 KB Trevi
0 question about this device. Answer the ones you know or ask your own.
Ask a new question about this device
Download the instructions for your Sound system in PDF format for free! Find your manual XF 1500 KB - Trevi and take your electronic device back in hand. On this page are published all the documents necessary for the use of your device. XF 1500 KB by Trevi.
USER MANUAL XF 1500 KB Trevi
Connection and Operation Manual
HAUT-PARLEUR PORTABLE AMPLIFIE
natural_image
Black XFEST audio amplifier device with blue LED and control panel (no visible text or symbols on body)WARNINGS

ATTENZIONE
RISCHIO DI SCOSSE ELETTRICHE! NON ESPORRE A PIOGGIA E UMIDITÀ

ATTENZIONE: NON APRITE L'APPARECCHIO. ALL'INTERNO NON VI SONO COMANDI MANIPOLABILI DALL'UTENTE NE PARTI DI RICAMBIO. PER TUTTE LE OPERAZIONI DI SERVIZIO RIVOLGERSI AD UN CENTRO DI ASSISTENZA AUTORIZZATO TREVI

ATTENTION
RISQUE DE DECHARGES ELECTRIQUES NE PAS EXPOSER A LA PLUIE ET A L'HUMIDITE

ATTENTION: NE PAS OUVRIR L'APPAREIL, A L'INTERIEUR IL N'Y A PAS DE COMMANDES A MANIPULER PAR L'UTILISATEUR OU DE PIECES DE RECHANGE. POUR TOUTES LES OPERATIONS DE SERVICE IL FAUT S'ADRESSER A UN SERVICE D'ASSISTANCE AUTORISE TREVI.

ATENCION
PELIGRO DE CHOQUES ELECTRICOS NO EXPONER A LLUVIA Y HUMEDAD

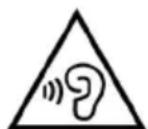
To avoid possible hearing damage, limit the listening time to high volumes
WARNING: DO NOT OPEN THE SET. NEITHER CONTROLS OR SPARE PARTS TO BE USED BY THE USER ARE TO BE FOUND INSIDE IT. APPLY TO AUTHORISED TREVI CENTERS FOR SERVICE OPERATIONS.

ACHTUNG
AUX-OUT (USCITA AUDIO)
Listening at high volume for a long time may damage your hearing.
This is a precision electronic appliance; avoid using it in the following cases:
- Near magnetic fields.
- Near heat sources such as heaters and heaters.
- In very humid places like bathrooms, swimming pools, etc ...
- In very dusty places.
- In places subject to strong vibrations.
- Do not place your ear near the loudspeaker during the set-up and volume adjustment phases, and in particular keep the volume at minimum during the ignition phase.
- Position the appliance so that there is always enough space on its sides for the free circulation of air (at least 5 cm).
- If liquids enter the appliance, immediately disconnect the plug from the socket and take the appliance to the nearest authorized TREVI service center.
- Always check before recharging the appliance, that the power and connection cables are installed correctly.
- No naked flame sources, such as lighted candles, should be placed on the appliance.
- The appliance must not be exposed to dripping or splashing water and no objects filled with liquids, such as vases, must be placed on the appliance.
- Instruct children and people with poor knowledge of the product to use correctly.
- Keep this manual for future reference.
CARE AND MAINTENANCE
Use a slightly damp soft cloth for cleaning. Do not use solvents and abrasive substances.
IMPORTANT
This device is designed for non-professional home use. The good construction of this device guarantees its perfect functioning for a long time. If, however, a problem should arise, it is advisable to consult the nearest TREVI Authorized Service Center.
TREVI follows a policy of ongoing research and development. Therefore products may have different features from those described.
LOCATION OF CONTROL
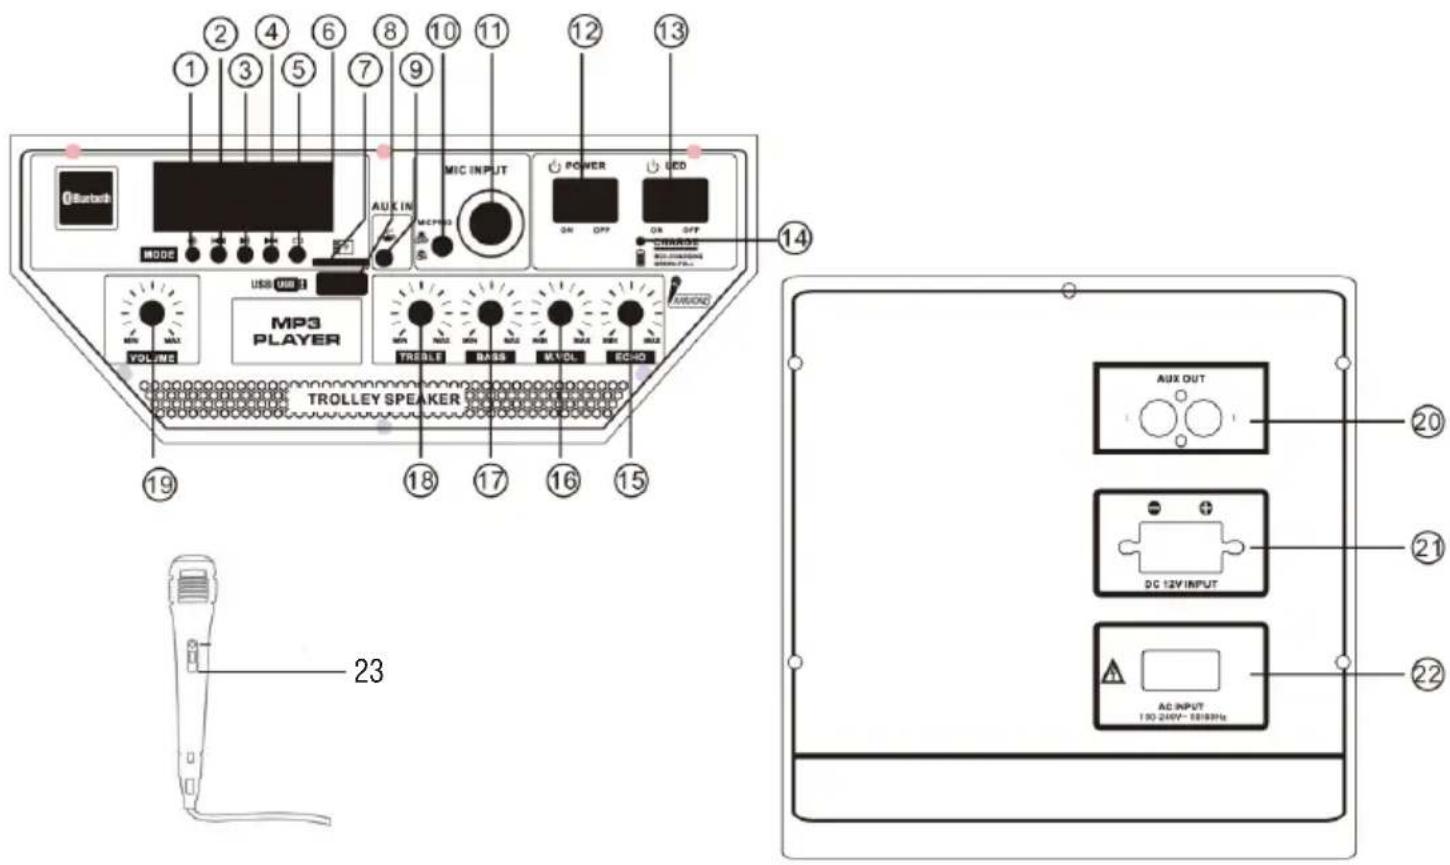
- MODE key, to select input signal source
- ◀ button. Previous key
- ▶ II button, Play/Pause key
- ▶▶I button. Next key
- button, repeat key
- Display Screen
- TF card slot
- USB jack
- AUX IN
- MIC priority switch
- MIC jack
REMOTE CONTROL
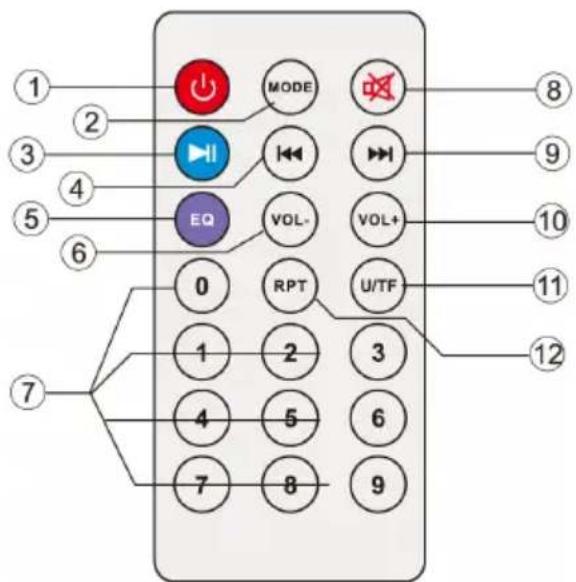
- Power switch
- LED switch
- Charging LED (Red-Char, Green-Full)
- Echo control
- MIC Volume control
- Bass control
- Treble control
- Volume knob, to adjust the master volume
- Line out
- DC 12V External battery input
- 220V , Power Socket
-
Microphone
-
Stand-by key
- Mode key - To select input signal source
- ▶ II button, Play/Pause key
- ◀ button, Previous key
- EQ mode key
- Volume decrease key
- Tracks select key
- MUTE key
- ▶▶I button, Next Key
- Volume increase key
- MP3 mode is for USB/TF card switching
- REPET key
ACTIVATION AND REPLACEMENT REMOTE CONTROL'S BATTERY
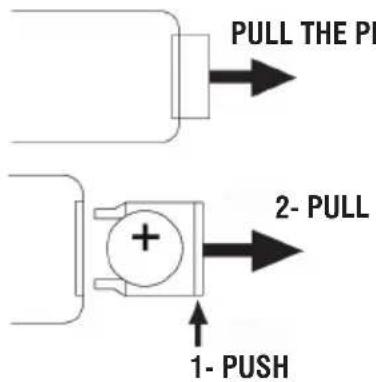
The remote control is equipped with a CR2025 battery
To activate the battery of the remote control (included), remove the plastic protection tab.
For battery replacement:
- Push the battery's plastic holder compartment to the right;
- Remove the battery compartment;
- Insert a new battery, taking care to respect the polarities;
- Close the battery compartment.
TRANSPORTATION
Press the button on the handle of the trolley, lift the handle up to the block (you will hear a metallic click). For transport, by acting on the handle of the trolley, slightly bend the appliance and take advantage of the two rear wheels.
To unlock and close the trolley, press the button on the handle again and lower the handle completely.
For transport, it is also possible to use the two handles placed laterally to the appliance.
POWER
This unit works with internal rechargeable lead battery 12V -7Ah or 230V 50Hz mains power supply.
When the battery is running out or the unit does not turn on, turn the main POWER ON/OFF switch (12) to the "OFF" position, insert the power cord into the socket (22) of the device and plug it into a socket to recharge the internal battery, the Red Led indicator (14) will light up.
Indicator LED status with battery charging:
- LED indicator light (14) RED fixed: the device is correctly connected to the power cable and the battery is being charged.
- LED indicator light (14) GREEN fixed: charging operation completed, the battery is charged.
Note: Do not connect the appliance to an outlet with a voltage other than that indicated.
BASIC FUNCTIONS
POWER ON/OFF
Set the main switch POWER ON/OFF(12) to "ON" to turn on and use the device with its internal battery.
Set the main switch POWER ON/OFF(12) to "OFF" to completely switch off the device or charge the battery.
STAND-BY
It is possible to bring the appliance into Stand-by mode using the button ⏻(2) on the remote;
Caution:
- In stand-by function there is no LED indicating.
- Leaving the unit in stand-by function the battery discharges faster than using the POWER ON/OFF switch(18).
MODE SETTING FUNCTION
To change the mode function, press more times the Ⓐ(1) key on the unit or press MODE button(2) on the remote control to select: BLUETOOTH (on display BLUE), USB/Micro SD (only if the socket USB(8)/Micro SD socket(7) is connected to a memory, a small writing "USB" or "SD" appears on the display), AUX-IN (on display LINE).
ADJUSTING THE VOLUME
- Turn the VOLUME knob(19) to increase or decrease the general playback volume or use the Vol+(10) and Vol-(6) buttons on the remote control for finer adjustment;
Attention: the two settings add up, therefore, to have the maximum volume it is necessary that both settings are at maximum, while, if the VOLUME knob (19) is at minimum, increasing that of the remote control will not change.
- Turn the MIC VOL knob (16) to adjust the volume of the signal at the MIC input(11).
PRE-EQUALIZER
This unit has a pre audio equalization system set. Press the EQ button(5) on remote control to select one of 6 available audio equalizers, and that best suits the sound playback.
SETTING TONE TREBLE AND BASS
Turn the TREBLE knob(18) to adjust the high tones.
Turn the BASS knob(17) to adjust the bass tones.
ECHO EFFECT
Turn the ECHO knob(15) to increase or decrease the echo effect on the input MIC.
Note: the echo only works on microphone input.
DISCO-LIGHT EFFECTS
Press the LED switch(13) to activate the Disco-Light effect on the loudspeaker.
To deactivate the Disco-Light effect, press the LED switch(13) again.
BLUETOOTH FUNCTION
- Switch the appliance on and press the button Ⓞ(1) on the unit or the MODE button(2) on remote control and select the bluetooth function; the word "BLUE" appears on the display;
- In the Bluetooth mode, the symbol ⚙ and the word "BLUE" on the display will start to flash and the system will automatically go into search mode;
- Activate the Bluetooth feature on the external device to be coupled;
- Initiate a search for devices. After select the "XF 1500 KB";
- Enter the password "0000" if required;
- Press the ▶ II (3) button on the unit or the key(3) on remote control, to start playing and the buttons ▶▶l(4) o ◀◀(2) on the unit, or the keys ▶▶l(9) and ◀◀(4) for selection of songs.
PLAY ON INPUT USB/MICRO SD
- Switch the appliance on;
- Insert a USB memory or an Micro SD card in the corresponding entries (8/7). Playback starts automatically;
- To pause playback, press the ▶ II (3) button on the unit or the key ▶ II (3) on remote control, the display will show "PAUS";
- To resume playback, press the ▶ II (3) on the unit or on the remote control;
- Press ▶▶(4) button on unit or key ▶▶(9) on remote control while listening to switch to the next track. Press the ◀◀(2) button on unit or ◀◀(4) on remote to go to the previous tracks;
- Using the numeric keypad(7) on remote control you can directly enter the number of the song you want to play;
- Press the button (5) on the unit once, or the RPT button(12) on remote control, the display will show "ONE" (to reproduce the same track continuously); press it a second time, the word "ALL" will appear on the display (to continuously play all the tracks contained in the USB/Micro SD device).
Note:
- The player may not support some USB/Micro SD devices, this is due to the incompatibility of some processors.
- To avoid harmful interference, always connect USB devices directly to the unit, do not use extension cords.
- From the computer to format the USB memory/SD FAT (16 or 32).
AUX-IN
- Press the button (5) on the unit or press the button MODE(2) on remote control and select the "LINE IN" function;
- Connect any unit equipped with audio output, through a cable 3.5mm jack (included) to the AUX IN(9);
- Use the external device from their commands.
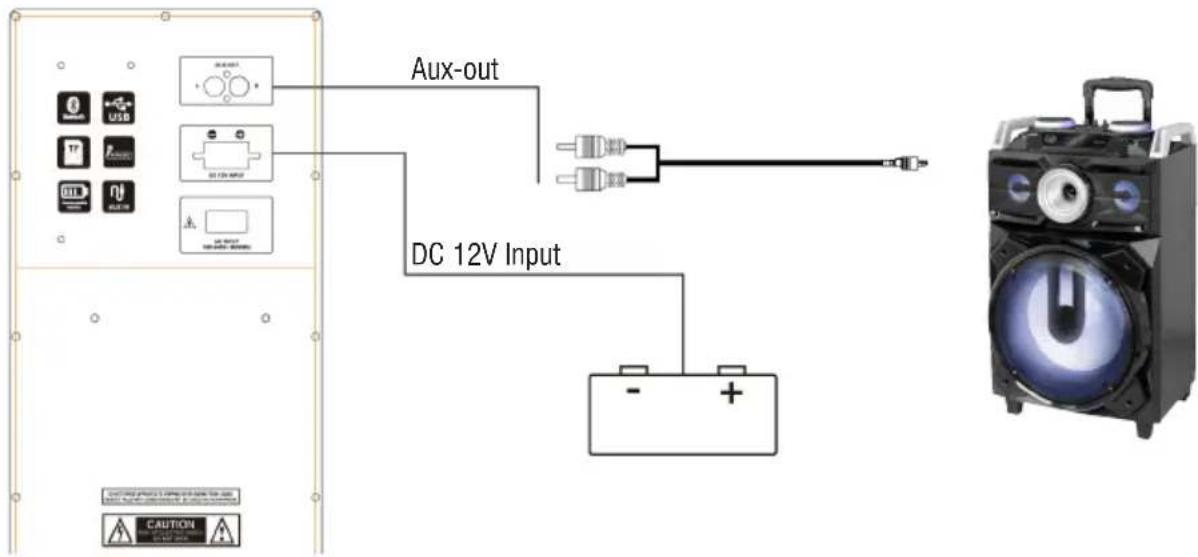
AUX-OUT
This output(20) can be used to connect the unit to other amplified devices (by AUX-IN input) to increase audio and total power.
BATTERY AUXILIARY CONNECTION
The appliance is set up to connect an auxiliary battery if you were with the internal battery completely empty and there was no possibility of connecting the appliance to a mains socket.
Use the rear socket (21) and connect an external 12V battery making sure to respect the indicated polarities.
- Connect the supplied microphone into the jack MIC(11);
- Turn on the microphone using the switch on the handle of the microphone to the ON position;
- Adjust the volume(16) of the microphone input and the echo effect(15) as desired using the appropriate commands;
- Press the button(10) if you want to give priority to the microphone's voice compared to the music played (the music is automatically lowered in volume when speaking with the microphone), press it again to return it to the normal condition.
TROUBLESHOOTING
If a problem occurs, follow the steps in the table below.
If the problem still can't be solved, please contact your retailer.
| Problem Possible cause Solution | ||
| No sound when power is turned ON | 1. No input sound source comes2. Volume knob in the lowest position3. Voice switch off4. USB/Micro SD card not plugged | 1. Input AUX signal2. Adjust volume3. Turn on voice switch4. Plug USB/Micro SD card, play MP3 |
| Distorted sound 1. Volume is too loud2. Audio file error | 1. Turn the volume down2. Check and change the audio file | |
| No sound from the microphone | 1. Microphone socket may not be plugged properly.2. Microphone switch may not be on.3. Microphone volume is on lowest mode. | 1. Ensure the microphone is correctly plugged into the socket.2. Turn on the microphone3. Adjust the microphone volume as per users wish |
| No sound comes after inserting USB/ Micro SD Card | 1. Incorrect file format2. USB/Micro SD may not be plugged properly | 1. File format should be MP32. Plug USB/Micro SD card correctly |
| Unable to charge or the battery works only for short duration | 1. Connect with power cord to charge2. Battery not fully charged3. Battery life may have ended | 1. Check if power cord connected properly2. Extend charging time;normally it takes 6-8 hour to fully charge3. Replace old batteries with the same specification as the old batteries. |
| Speaker makes loud noises | 1. Microphone switched on but may too close to the speaker2. Microphone switched on but is not being used3. Microphone volume may be too loud4. Mobile phone is being used too close to the speaker5. Other wireless equipment may be placed very close to the speaker | 1. Keep the microphone 2 meters away from the speaker2. Turn off microphone if not in use.3. Adjust microphone volume to lower mode4. Keep mobile away from the speaker whilst a ending a call.5. Keep the speaker away from other wireless equipment |
INFORMATION NOTE ON THE REMOVAL BATTERY
Warning: Only high-qualified personnel should perform this operation!
BATTERY REMOVAL
The appliance should not be plugged to the mains socket when performing this operation!
- Remove the screws that tighten the trolley;
- Remove the screws that tighten the rear metal panel;
- Remove it and locate the battery;
- Disconnect the battery and remove it.
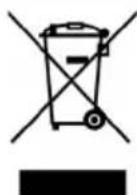
INFORMATION ON DISPOSAL BATTERY
Used batteries should not be disposed of with household waste or thrown into fire or water. Used batteries should be recycled or disposed of in separate waste collection centres.


INFORMATION TO USERS
pursuant to Legislative Decree No. 49 of March 14, 2014
"Implementation of Directive 2012/19/EU on Waste Electrical and Electronic Equipment (WEEE)"
This wheeled bin symbol on the product indicates that at the end of its life must be collected separately from other waste. The user must, therefore, take the remote control integrates the essential components that got to its life to the appropriate differentiated collection centers for electronic and electro-technical waste, or return it to the dealer when purchasing a new appliance of equivalent type, in terms of one to one, or one to zero for equipment having longer side of less than 25 cm. Appropriate separate collection for the decommissioned equipment for recycling, processing and environmentally compatible disposal helps prevent negative impact on the environment and human health and promotes recycling of the materials making up the product. Illegal dumping of the product by the user entails the application of administrative sanctions stated in Legislative Decree n. Legislative Decree No. 49 of March 14, 2014.
TECHNICAL SPECIFICATIONS
| Power Supply: 100-240V 50/60Hz | |
| internal lead acid rechargeable battery 12V 7Ah | |
| Power: | Max 96W |
| Operating temperature: | 0° ~ 40°C |
| Humidity: | 5% ~ 90% |
| Output Audio power: | 120W |
| Frequency response: | 40Hz - 20KHz |
| S/N ratio: | ≥62dB |
| Class Bluetooth: | 2 |
| Bluetooth peak transmission power: | 2,5mW |
| Bluetooth max power transmission: | 1,9mW |
| Band transmission Bluetooth: | 2,4GHz |
| Dimensions: | 460x390x705mm |
| Weight: | 20,8 kg |
NOTES D'EMPLOI
AUX-OUT (AUDIO-AUSGANG)
Simplified EU Declaration Of Conformity
Hereby TREVI S.p.a declares that equipment type "Power portable speaker with trolley" model XF 1500 KB is in compliance with Directive 2014/53/EU.
The full text of the EU declaration of conformity is available at the following internet address www.trevi.it

Trevi S.p.A.
Strada Consolare Rimini-San Marino, 62
47924 Rimini (Rn) Italia
Tel. 0541/756420
Fax 0541/756430
www.trevi.it
e-mail: info@trevi.it

Made in CHINA