
DV 5000 - Dashcam Trevi - Free user manual and instructions
Find the device manual for free DV 5000 Trevi in PDF.
| Product type | Dashcam |
| Brand | Trevi |
| Model | DV 5000 |
| Screen size | 2 inches TFT |
| Video resolution | 1080P (interpolated), 720P, 480P |
| Video format | AVI, MJPG |
| Photo format | JPG |
| Viewing angle | 120° ultra wide angle |
| G sensor | Yes, adjustable sensitivity (High/Medium/Low/Off) |
| Motion detection | Yes, with automatic recording |
| Power supply | USB 5V 1A (car charger or USB cable) |
| Internal battery | Lithium, 360 mAh |
| Storage | Micro SD card up to 32 GB (Class 6 or higher recommended) |
| Maintenance and cleaning | Wipe the lens with a soft, lint-free cloth |
| Safety | Do not obstruct air vents, do not use near heat sources, respect privacy laws |
| Spare parts and repairability | Battery replaceable by a technician; contact after-sales service |
| General information | Loop recording, automatic power on/off, SOS, G-sensor, built-in microphone |
Frequently Asked Questions - DV 5000 Trevi
User questions about DV 5000 Trevi
0 question about this device. Answer the ones you know or ask your own.
Ask a new question about this device
Download the instructions for your Dashcam in PDF format for free! Find your manual DV 5000 - Trevi and take your electronic device back in hand. On this page are published all the documents necessary for the use of your device. DV 5000 by Trevi.
USER MANUAL DV 5000 Trevi
DASHBOARD Camera (User Manual)
Thank you for purchasing the product Trevi DV 5000. The information contained in this document is subject to change without notice.
This document may not be reproduced or transferred, even partially, in any way and by any means, electronic, mechanical, photocopied, nor copied or translated into other languages for any purpose without express permission from the manufacturer.
Names, designs and trademarks contained in this manual are the property of their respective owners.
Read carefully this instruction manual and the following information before installing and using the product.

CAUTION
Failure to follow the instructions below may result in serious or fatal overcrowding or accidents.
NOTICE ON THE INSTALLATION OF THE APPLIANCE IN THE VEHICLE
-
When installing the device on a vehicle, always choose a safe position that does not obstruct the driver's vision and does not interfere with the vehicle controls; Do not place it near the steering wheel, shift lever, pedals or other controls.
-
Do not place the appliance near or above the airbag.
-
Do not place the appliance on the dashboard as it may not be optimal with the suction cup. (Spray for polishing dashboards or curved dashboards does not guarantee a good suction cup).
-
Do not place the device without inserting the lock on the bracket.
-
It is possible that the windshield mount does not remain attached to any condition, so we recommend that you do not place the support in points that can be easily distracted if the media is unplugged. Always keep the windscreen clean to ensure that the support can remain attached and check the windshield mount seal frequently
-
Always follow common sense while driving and drive carefully. Do not distract yourself to watch the device and always pay close attention to driving. Reduce the shutter speed of the device while driving.
USAGE NOTES
This device is a precision electronic instrument; do not then use it in the following cases:
Near heat sources such as radiators and heaters.
In an environment that is too cold or too hot.
- In very damp places, The appliance is not waterproof.
- In very dusty places. Dust contamination in the lens or other components may affect the quality of the video. Please keep the lens clean using a soft, dust-free cloth.
In environments immersed in magnetic fields. - Please stop power if an abnormal phenomenon is found to avoid short circuits.
- Do not close the ear to the loudspeaker during step setting and volume adjustments, and in particular keep the volume at idle during power-up.
- Place the appliance so that there are enough free space on its sides for free air circulation (at least 5 cm).
- If liquids enter the appliance, disconnect the power plug immediately and bring the appliance to the nearest authorized TREVI service center.
- Always check before recharging the unit, that power and connection cables are properly installed.
- No naked flame sources such as lit candles should be placed on the appliance.
- The appliance must not be exposed to dripping or splashing, and no objects filled with liquid, such as pots, should be placed on the appliance.
- Keep this manual for future reference.
WARNING
- Respect national privacy law strictly. In some countries, taking photos or videos of people or vehicles with these devices may be considered as a breach of privacy. It is your responsibility to know and comply with the laws and the privacy laws of your country.
- Do not use this equipment for illegal purposes.
- Do not obstruct the ventilation slots.
- Do not remove the label on the appliance.
- Do not remove or try to remove the battery inside the appliance.
- The operating temperature of this device is -10^ 50^ . Continuous exposure to direct sunlight for a long period of time can cause malfunction, color distortion, distortion of the housing and image of the device, especially in vehicles parked when the cab temperature exceeds 70^ .
PACKAGE CONTENTS
- DVR Camera
- Bracket
- Car charger
- USB cable/ Mini USB
- Manual
Camera DESCRIPTION
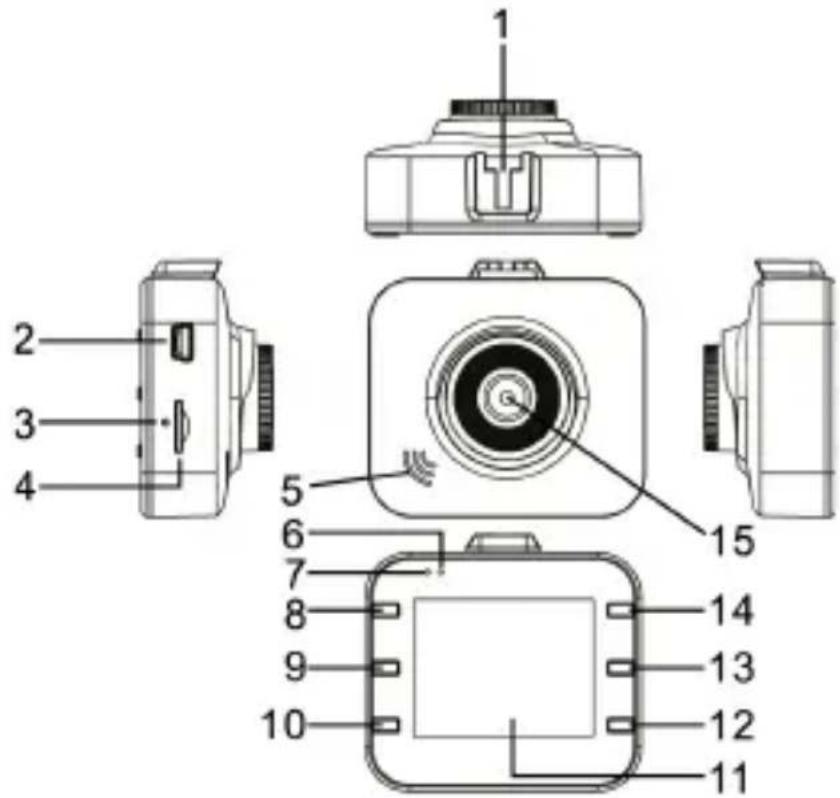
I. Bracket hole
2. USB port. 5V-1A
3. Reset key
4. Micro SD card slot
5. Seaker
6. Working indicator light
7. Power indicator light
8. ON/OFF key
-
MODE key
-
MENU key
II. LCD - DOWN key
- REC key
- UP key
- Lens
FEATURES
I. Support multiple video resolution, such as 1080P, 720P, 480P and etc with superior video and image quality.
- Built-in Microphone/ Speaker.
- Voice/ Mute shortcut key.
- LCD shortcut key.
- Support high capacity Micro SD Card.
- Support seamless loop video and as recording as charging.
-
Automatically take video when car engines on. Automatically turn off on delay 5 seconds after car engines off.
-
Support Motion detection.
- Support SOS and G-sensor to prevent important files from being overwritten.
INSTALLATION
MICRO SD CART INSERTION
Before you turn on and use the device, you must install a memory card.
I. Insert a Micro SD Memory Card into the slot (4) of the device, paying attention to the correct insertion side.
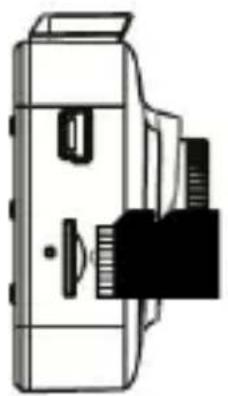
- Press it towards the bottom until you hear a "click" and it is locked inside.
To remove the memory card, push it towards the bottom until you hear a "click" and unlock it.
Note:
- Insert the Micro SD card correctly to prevent damage to the card or device.
- Format the micro SD card (delete all files) before inserting it into the device. It is recommended that you back up important files before formatting the card.
- We recommend using micro SD cards CLASS 6 or higher.
- We recommend backing up your micro SD card files once a week. This product is not a permanent storage device, so please back up important files to avoid being deleted.
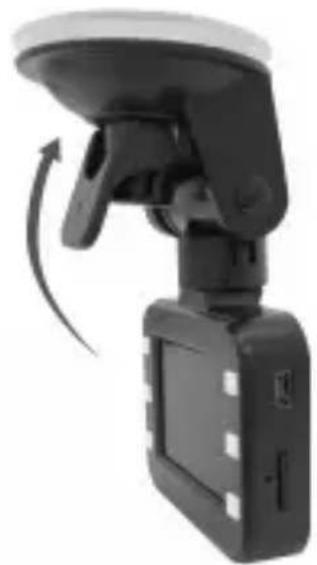
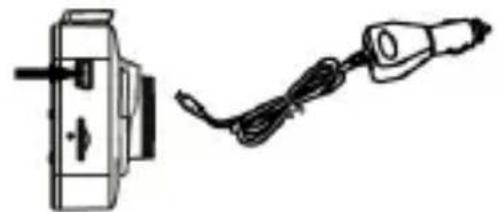
INSTALLING THE DEVICE
Clean the windscreen well before installing the device.
- With the vehicle switched off, connect the car power cable (supplied) to a cigarette lighter socket of the vehicle.
- Connect the other end of the power cord to the Mini USB (2) jack of the device.
- Insert the support bracket into the bracket hole (I) of the unit.
- Press the suction cup of the bracket on the windscreen and push the lever of
the bracket backwards.
Notes:
-
The device must be mounted on the windshield as indicated above, the upside down or lateral installation causes the recording of the up or down video.
-
Turn on the vehicle. When the device is connected to a cigarette lighter socket, the device will turn on automatically when the vehicle is switched on. When disconnecting the power cord, the unit will automatically save the current file and will turn off with a 5 second delay.
MANUAL ON/OFF OF THE DEVICE
I. POWER ON
In the off state, short press ON/OFF (8) key. DVR enters the video mode and start recording automatically with green flashing. Or DVR is connected with car charger in the off state to enter video mode and start recording automatically. When unplug the charger, DVR will automatically save the current file and shut down in 5 seconds delay.
Note: LCD screen writes “no card” if Micro SD card not inserted. If the Micro SD card is inserted with DVR in working state, DVR will automatically power off.
2. POWER OFF
In work state, long press ON/OFF (8) key to power off DVR.
Note: In low battery state, DVR display writes "Low battery" and automatically saves the current file and shuts down.
BATTERY CHARGING
Two ways to charge:
I. With USB cable

- With car charger (suggested)
Note: In charging, red indicator light will be steady on and automatically turn off with full charged.
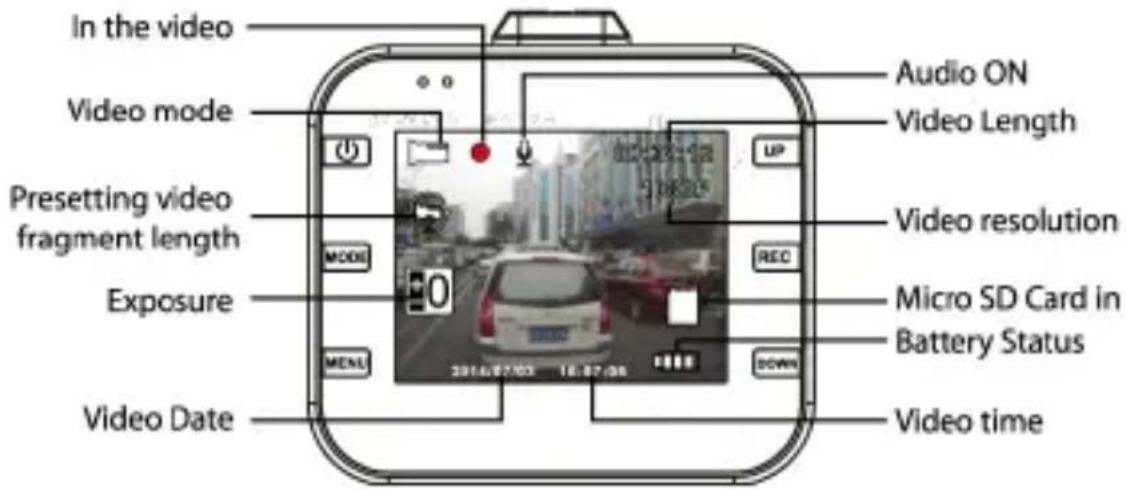
VIDEO
Press ON/OFF (8) key to power on DVR. Green indicator light (6) flashes in video mode. Press the REC (13) key to stop recording and save the current file, then DVR goes into standby mode with green indicator light steady on.
Press again to stop recording.
In standby mode, press ON/OFF (8) key to turn on/off the sound.
In video mode, press UP (I4) key to choose LCD on or off to be on energy saving mode.
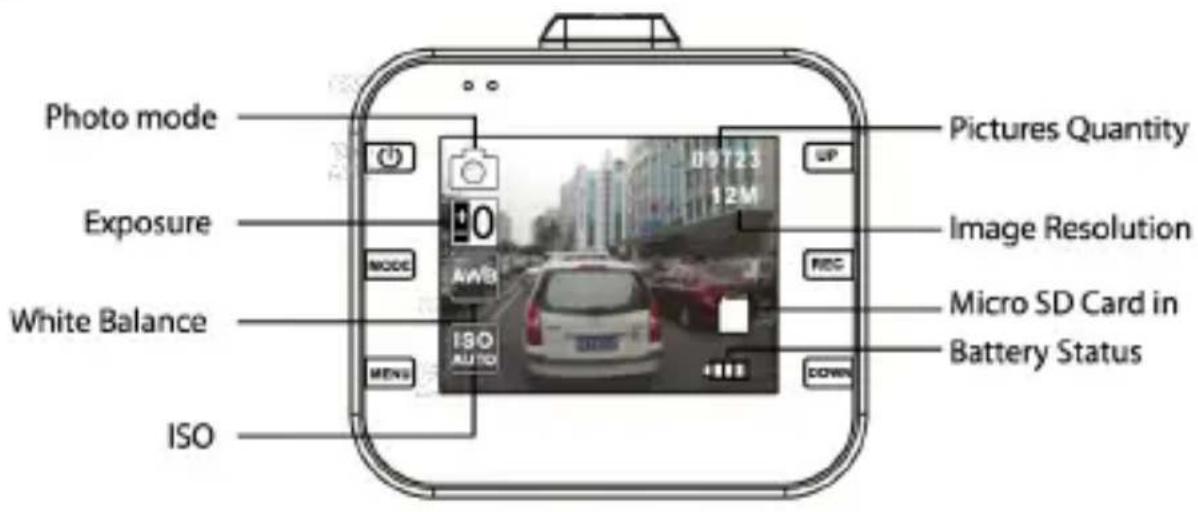
PHOTO
In standby mode, press MODE (9) key to enter into photo mode. Press REC (13) key to take photos with sound prompt. In photo mode, press UP (14) key to choose LCD on or off to be in energy saving mode.
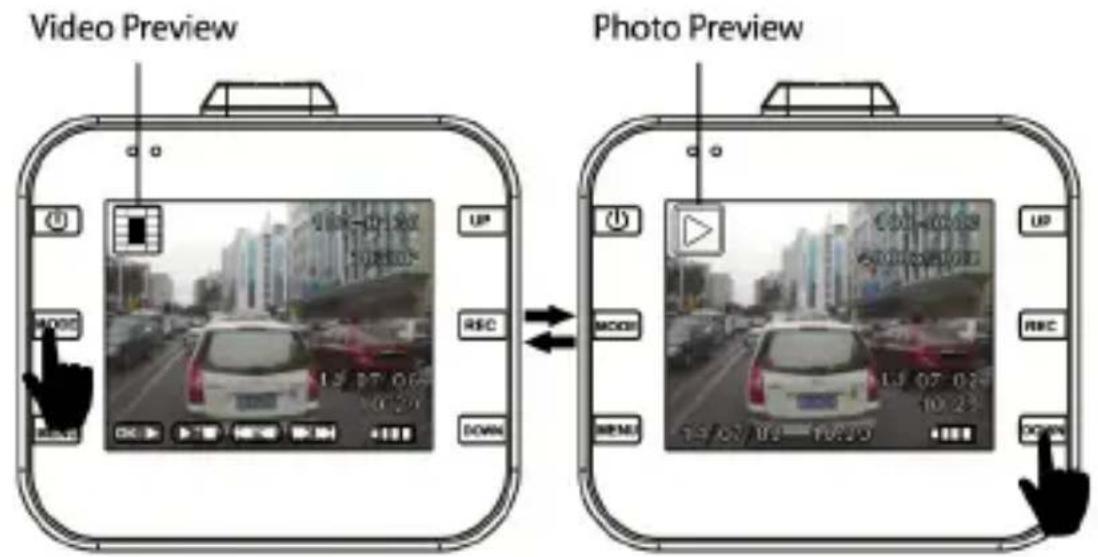
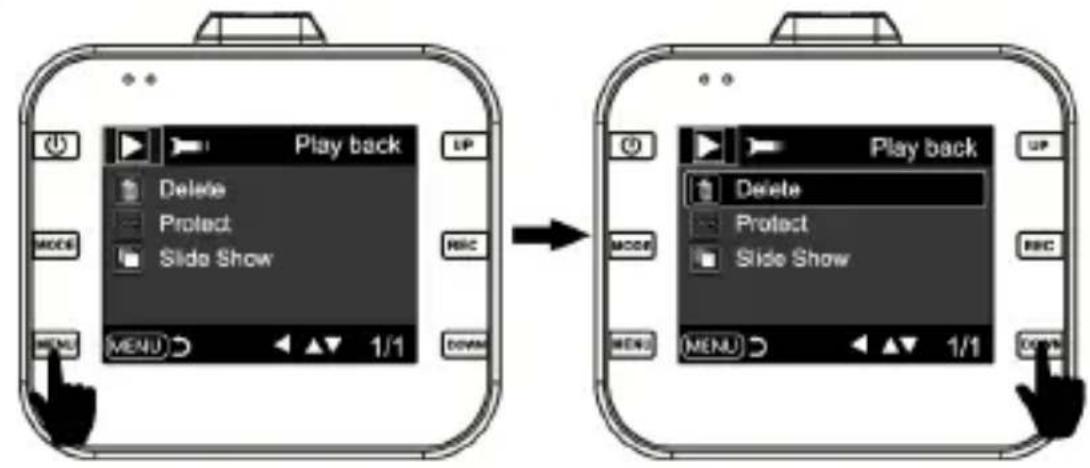
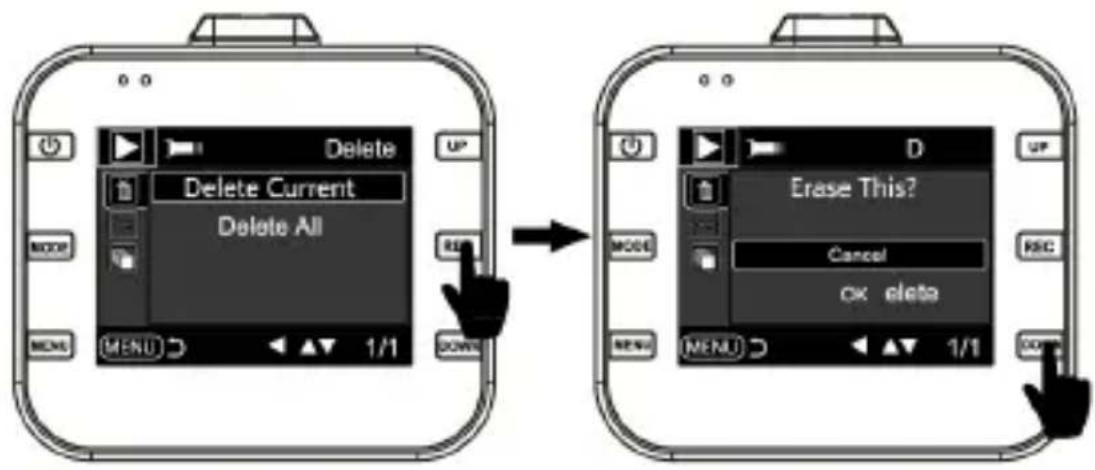
PLAYBACK AND DELETE
In standby mode, short press MODE (9) key twice to enter into playback mode. Press UP (14) / DOWN (12) key to select the file. REC (13) key is used for play or pause; If you want to delete files, press MENU (10) key to be in Delete menu. UP (14)/DOWN (12) key is used to be in delete mode. Press REC (13) key to confirm operation. Select "Delete current" or "delete all" and press REC (13) key to delete. Press MENU (10) key to exit Delete mode and go back to playback mode.
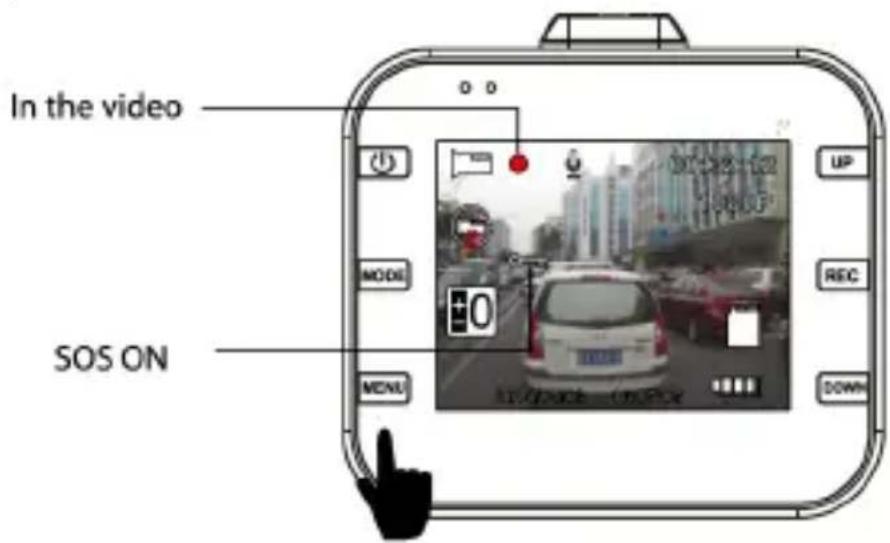
SOS
In video mode, short press MENU (10) key to save the file manually in case of important files are lost.
Description: Press MENU (10) key in the first 10 seconds of the video clip, the current and previous video clip are saved. If in the last 10 seconds of the video clip, the current and the next video clip are saved. If in the middle, the current video clip is only saved.
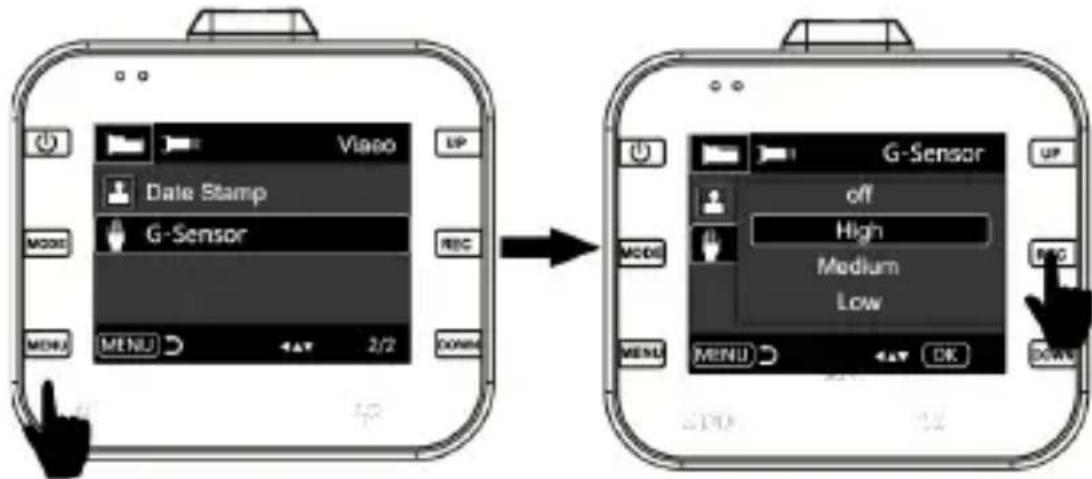
G-SENSOR
In video mode, the car brackes suddenly or hit heavily, G-sensor will activate to prevent the current video clip from overwritten. Three grades setting (high, medium, low) is to cater for different car owners. The description is as same as that of SOS.
MOTION DETECTION SHORTCUT KEY
In standby mode, press DOWN (12) key to enter into motion detection directly. When DVR detects moving objects, it starts to record. If there is no movement for 5 seconds, DVR stops to record and enters into motion detection mode. DVR records again when detecting any movement. Press DOWN (12) key, DVR exits motion detection mode after saving video clip.
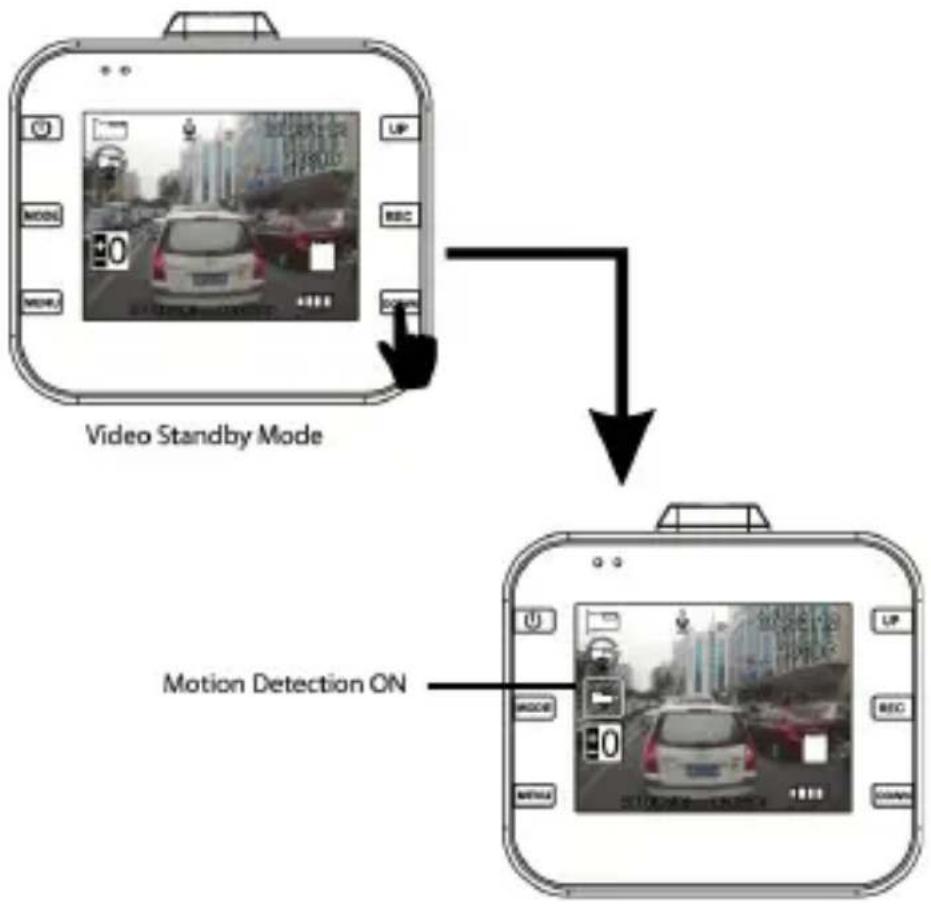
Motion Detection Mode
SYSTEM SETTING
In standby mode, press MENU key to enter system setting. Press UP (I4)/DOWN (I2) key to select the setting item and press REC key to be in sub-categories. Press UP (I4) or DOWN (I2) key to select the specific parameters and press REC to confirm finally. To exit system setting, please press MENU key.
Here is specific categories.
| Mode Category Sub-category | ||
| Video | Resolution 1080FHD 1920x10901080P 1440x1080720P 1280x720WVGA 848x480VGA 640x480 | |
| loop recording OFF/30 sec./l Min/2 Min | ||
| Exposure +2.0, +5/3, +4/3, 1.0, +2/3, +1/3, +0.0, -1/3,-2/3, -1.0, -4/3, -5/3, -2.0 | ||
| Video | Record Audio OFF/ON | |
| Data stamp OFF/ON | ||
| G-sensor OFF/high/Medium/low | ||
| Photo | Capture Mode Single, 2s | 5s, 10s |
| Resolution 12M 4032x3024 | ||
| 10M 3648x2736 | ||
| 8M 3264x2448 | ||
| 5M 2592x1944 | ||
| 3M 2048x1536 | ||
| 2MHD 1920x 1080 | ||
| VGA 640x480 | ||
| 1.3M 1280x960 | ||
| Sequence OFF/ON | ||
| Quality Strong, Normal, | Economical | |
| Sharpness Strong, Normal, Light | ||
| White Balance Auto | Day Light Cloudy Tungsten Fluorescent | |
| Color Color | Biack & White Sepia | |
| ISO Auto, 100, 200, 400 | ||
| Exposure +2.0, +5/3, +4/3 | 3, 1.0, +2/3, +1/3, +0.0, -1/3, -2/3, -1.0, -4/3, -5/3, -2.0 | |
| Anti-shaking OFF/ON | ||
| Quick Preview Off, 2 seconds, 5 seconds | ||
| Data Stamp Off, Date, Date/time | ||
| Playback | Delete Delete current/D | Delete all |
| Protect Lock current/Unlock | lock current/Lock all/Unlock all | |
| Slide Preview 2sec, 5sec. | 8sec. | |
| System setting | Date/Time MM/DD/YY, DD/MM/YY, YY/MM/DD | |
| Auto Power off Off, IMin, 3Min | ||
| Beep Sound. OFF/ON | ||
| Language English, Franca se, Italian, Deutsch, Espanol, Portuguese | ||
| Frequency 50Hz, 60Hz | ||
| Format Micro SD Card | ||
| Default setting Factory Default/Cancel/ok | ||
| LCD OFF Off, IMin, 2Min, 5Min | ||
| Version Current version number | ||
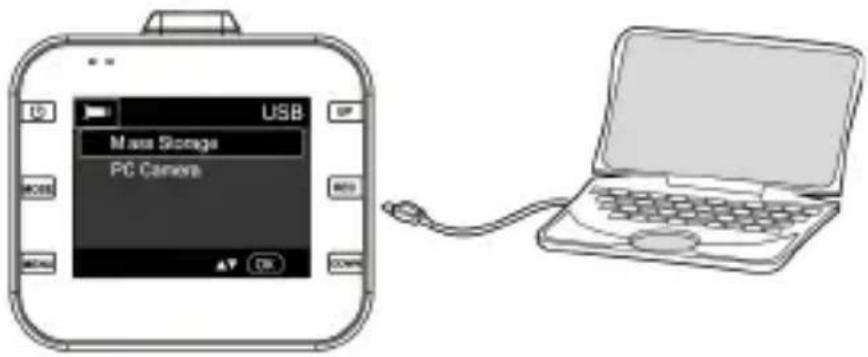
CONNECTED TO THE COMPUTER
Video and Photo Download
- When USB cable connects to your computer and DVR, red indicator light will be steady on. The screen pops up categories-Mass Storage and PC Camera.
- If select Mass Storage and DVR screen changes to be blue. The Micro SD card disk will be recognized by computer.
- Use compuetr to browse and manage files.
- When select PC Camera, DVR can be used as PC Camera and DVR screen changes to be blue. Long press ON/OFF (8) key and pull out the USB cable to power it off.
- Press ON/OFF (8) key to power off DVR to be battery charge. The red indicator light will be steady on.
Note: Improper operation can be caused DVR crash. Please use small hard objects to press the reset key. When DVR restarts, it is back to normal.
INFORMATION ON REMOVAL AND DISPOSAL OF BATTERIES
Caution: This operation is reserved exclusively to qualified technical personnel only!
PROCEDURE FOR BATTERY REMOVAL
Only work if no appliance is connected to the mains!
- Remove the screws that secure the front panel;
- Remove the panel and locate the battery;
- Disconnect the battery and remove it.
BATTERY DISPOSAL INFORMATION
No matter what kind of battery is used, it should not be thrown into household waste, fire or water. Keep the battery away from sources of heat. Any used battery should be recycled or disposed of at dedicated dedicated collection centers.
INFORMATIONTOUSERS
pursuant to Legislative Decree No. 49 of March 14, 2014
"Implementation of Directive 2012/19/EU on Waste Electrical and Electronic Equipment (WEEE)"
This wheeled bin symbol on the product indicates that at the end of its life must be collected separately from other waste. The user must, therefore, take the remote control integrates the essential components that got to its life to the appropriate differentiated collection centers for electronic and electro-technical waste, or return it to the dealer when purchasing a new appliance of equivalent type, in terms of one to one, or one to zero for equipment having longer side of less than 25~cm . Appropriate separate collection for the decommissioned equipment for recycling, processing and environmentally compatible disposal helps prevent negative impact on the environment and human health and promotes recycling of the materials making up the product. Illegal dumping of the product by the user entails the application of administrative sanctions stated in Legislative Decree n. Legislative Decree No. 49 of March 14, 2014.
TECHNICAL SPECIFICATIONS
LCD Size 2.0 inch TFT screen
Viewing Angle 120 degree ultra-wide viewing angle
Minimum illumination. LUX
Video resolution. 1080P (interpolate), 720P, 480P
Video Format.. AVI, MJPG
Image Format.JPG
Frame 25fps under 1080P, 30fps under 720P
Memory Card Capacity up to 32GB (genuine high speed class 6 or above suggested)
Power supply. USB 5V -T A
Battery Capacity. 360mAh
Size 60x55x27mm
Weight 50g
BIENVENUE
Dimensions. 60x55x27mm
Poids. 50g
WILLKOMMEN

- CAUTION
- NOTICE ON THE INSTALLATION OF THE APPLIANCE IN THE VEHICLE
- USAGE NOTES
- WARNING
- PACKAGE CONTENTS
- Camera DESCRIPTION
- FEATURES
- INSTALLATION
- MICRO SD CART INSERTION
- Note:
- INSTALLING THE DEVICE
- Notes:
- MANUAL ON/OFF OF THE DEVICE
- POWER ON
- POWER OFF
- BATTERY CHARGING
- VIDEO
- PHOTO
- PLAYBACK AND DELETE
- SOS
- G-SENSOR
- MOTION DETECTION SHORTCUT KEY
- SYSTEM SETTING
- CONNECTED TO THE COMPUTER
- Video and Photo Download
- INFORMATION ON REMOVAL AND DISPOSAL OF BATTERIES
- PROCEDURE FOR BATTERY REMOVAL
- BATTERY DISPOSAL INFORMATION
- INFORMATIONTOUSERS
- TECHNICAL SPECIFICATIONS
- BIENVENUE
- WILLKOMMEN
Brand : Trevi
Model : DV 5000
Category : Dashcam