USER MANUAL GEDD 5481 XB GRUNDIG
SAFETY INFORMATION 3
CHARACTERISTICS. 6
INSTALLATION 8
USE 18
CARE AND CLEANING 20
INHOUDSOPGAVE
NL
VEILIGHEIDSINFORMATIE 22
EIGENSCHAPPEN 25
INSTALLATIE 27
GEBRUIK 37
ZORG EN REINIGING 39
SOMMAIRE
FR
CONSIGNES DE SECURITE 42
CHARACTERISTIQUES 45
INSTALLATION 47
UTILISATION 57
NETTOYAGE ET ENTRETIEN 59
INHALTSVERZEICHNIS
DE
For your safety and correct operation of the appliance, read this manual carefully before installation and use. Always keep these instructions with the appliance even if you move or sell it. Users must fully know the operation and safety features of the appliance.
The wire connection has to be done by specialized technician.
- The manufacturer will not be held liable for any damages resulting from incorrect or improper installation.
- The minimum safety distance between the cooker top and the extractor hood is 650~mm (some models can be installed at a lower height, please refer to the paragraphs on working dimensions and installation).
- If the instructions for installation for the gas hob specify a greater distance, this must be respected.
- Check that the mains voltage corresponds to that indicated on the rating plate fixed to the inside of the hood.
- Means for disconnection must be incorporated in the fixed wiring in accordance with the wiring rules.
- For Class I appliances, check that the domestic power supply guarantees adequate earthing.
- Connect the extractor to the exhaust flue through a pipe of minimum diameter 120mm . The route of the flue must be as short as possible.
- Regulations concerning the discharge of air have to be fulfilled.
-
Do not connect the extractor hood to exhaust ducts carrying combustion fumes (boilers, fireplaces, etc.).
-
If the extractor is used in conjunction with non-electrical appliances (e.g. gas burning appliances), a sufficient degree of aeration must be guaranteed in the room in order to prevent the backflow of exhaust gas. When the cooker hood is used in conjunction with appliances supplied with energy other than electric, the negative pressure in the room must not exceed 0,04 mbar to prevent fumes being drawn back into the room by the cooker hood.
- The air must not be discharged into a flue that is used for exhausting fumes from appliances burning gas or other fuels.
- If the supply cord is damaged, it must be replaced from the manufacturer or its service agent.
- Connect the plug to a socket complying with current regulations, located in an accessible place.
- With regards to the technical and safety measures to be adopted for fume discharging it is important to closely follow the regulations provided by the local authorities.
WARNING: Before installing the Hood, remove the protective films.
- Use only screws and small parts in support of the hood.
WARNING: Failure to install the screws or fixing device in accordance with these instructions may result in electrical hazards.
- Do not look directly at the light through optical devices (binoculars, magnifying glasses...).
- Do not flambé under the range hood; risk of fire.
- This appliance can be used by children aged from 8 years and above and persons with reduced physical, sensory or mental capabilities or lack of experience and knowledge if they have been given supervision or instruction concerning use of the appliance in a safe way and understand the hazards involved. Children shall not play with the appliance. Cleaning and user maintenance shall not be made by children without supervision.
- Children should be supervised to ensure that they do not play with the appliance.
- The appliance is not to be used by persons (including children) with reduced physical, sensory or mental capabilities, or lack of experience and knowledge, unless they have been given supervision or instruction.
Accessible parts may become hot when used with cooking appliances.
-
Clean and/or replace the Filters after the specified time period (Fire hazard). See paragraph Care and Cleaning.
-
There shall be adequate ventilation of the room when the range hood is used at the same time as appliances burning gas or other fuels (not applicable to appliances that only discharge the air back into the room).
-
The symbol on the product or on its packaging indicates that this product may not be treated as household waste. Instead it shall be handed over to the applicable collection point for the recycling of electrical and electronic equipment. By ensuring this product is disposed of correctly, you will help prevent potential negative consequences for the environment and human health, which could otherwise be caused by inappropriate waste handling of this product. For more detailed information about recycling of this product, please contact your local city office, your household waste disposal service or the shop where you purchased the product.
Extending/retracting the appliance Risk of injury!
Risk of jamming when retracting and extending the appliance. Never reach into the moving area of the appliance while it is being retracted or extended. Keep children at a safe distance.
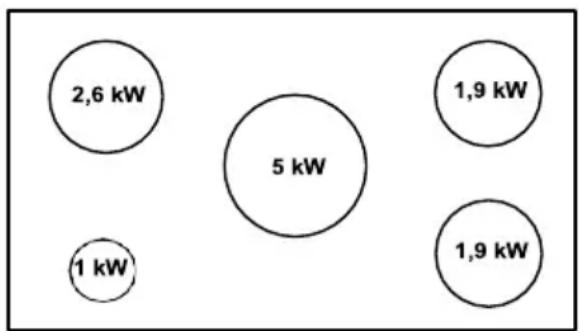
- This Cooker hood can be used in conjunction with a Gas Cook Top having the following characteristics:
Maximum power 12,4 kW
- 5 fire like the picture.
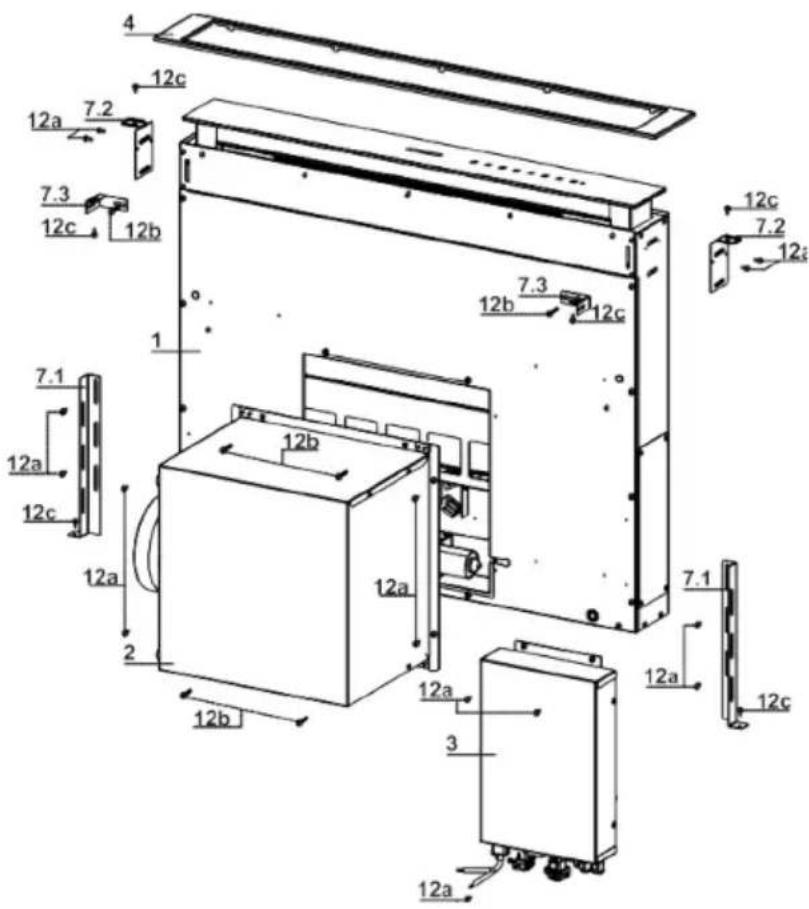
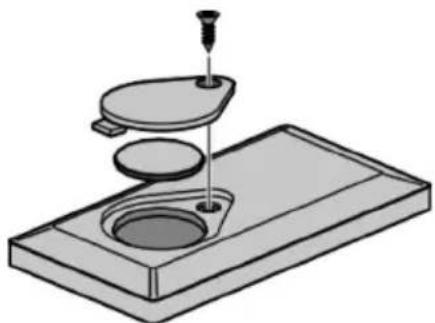
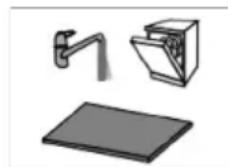
Components
| Ref. | Q.ty | Product Components |
| 1 | 1 | Hood Canopy complete with: Controls, Light, Filters |
| 2 | 1 | Motor unit |
| 3 | 1 | Electric unit |
| 4 | 1 | Front Frame |
| Ref. | Q.ty | Installation Components |
| 7.1 | 2 | Splashback Fixing Bracket |
| 7.2 | 2 | Hob Fixing Bracket |
| 7.3 | 2 | Side Bracket |
| 12a | 16 | Screws 3.5 x 9.5 |
| 12b | 6 | Screws M4 x 8 |
| 12c | 6 | Screws 4 x 15 |
| Q.ty | Documentation |
| 1 | Instruction Manual |
INSTALLATION
This Hood is set up to be fitted inside the kitchen unit in:
Ducting version:
Evacuation to the outside.
Recirculation version:
Internal recirculation.
Sequence of operations - Installation
- Drilling the Support Surface and Fitting the Hood
- Connections
- Functional Check
- Disposal of Packaging
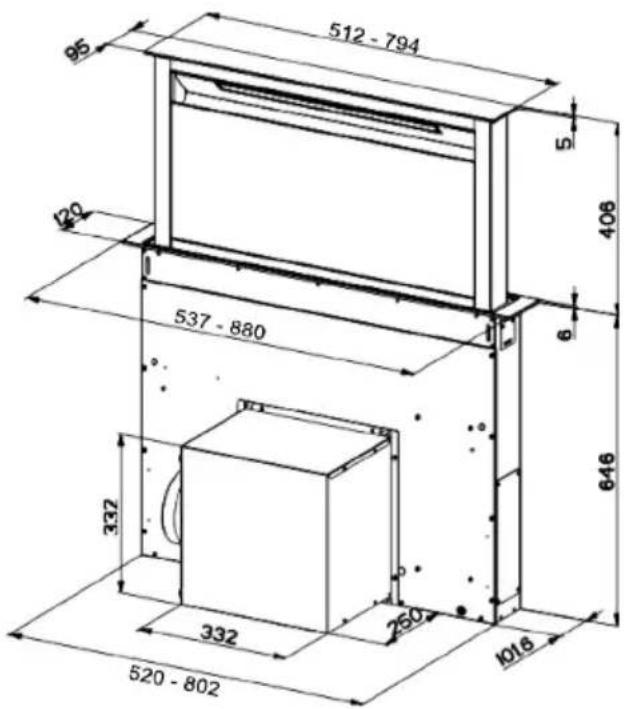
Drilling the Support Surface
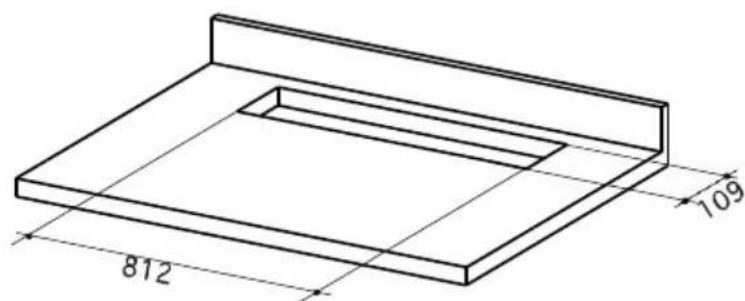
IMPORTANT
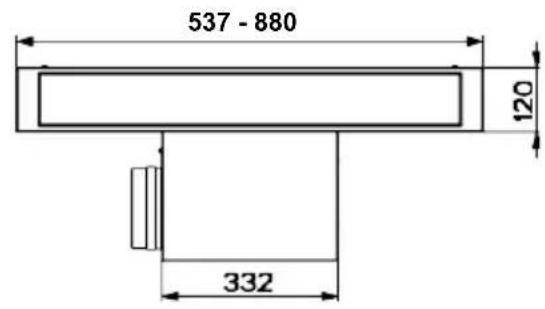
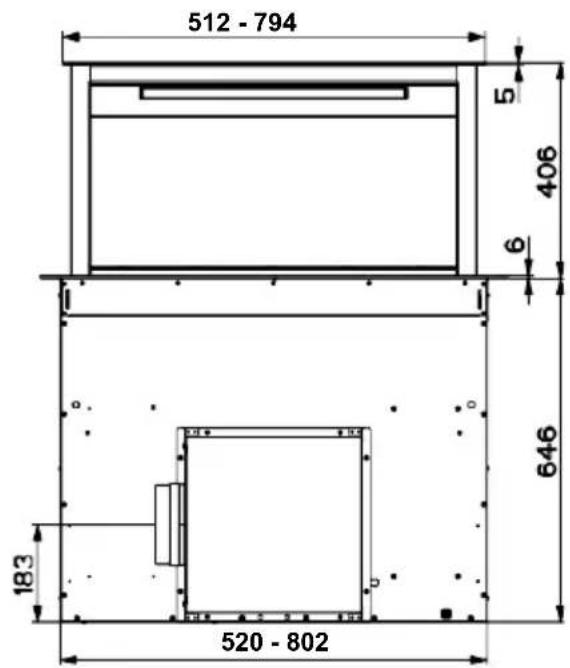
The distance between the opening made for the cooker hob and the one for the suction device must be minimum 3cm - maximum 5cm , according to the strength of the material used for the top.
- The Hood is built ready for front installation of the Motor Unit.
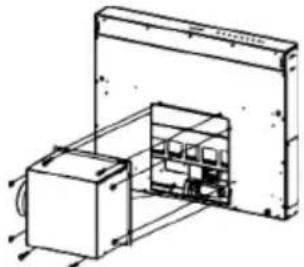
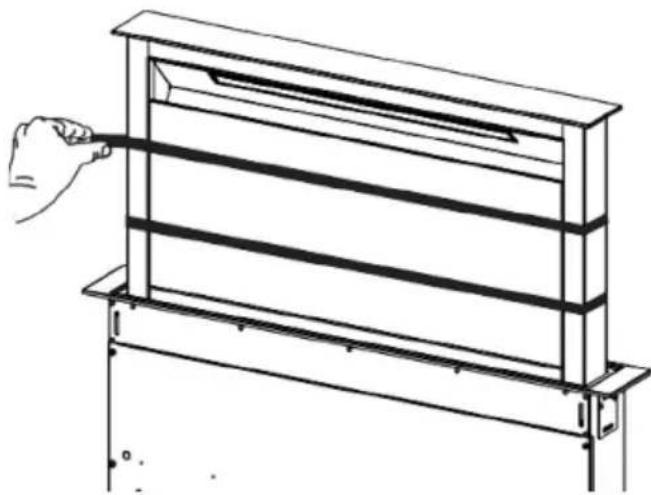
- If the kitchen unit is arranged differently and the Motor Unit has to be fitted on the back, the Plug already fitted on the back of the Hood Canopy must be removed and replaced at the front, and the Cable with cable raceway for connection of the Motor must also be repositioned using the slot provided on each side (A).
Before proceeding, the Motor Unit must be fixed to the Hood Canopy (see paragraph on Fixing the Motor Unit).
-
Insert the Hood Canopy from below into the support worktop, drilled as described above.
-
With the aid of a support, lift the Hood Canopy until the front comes out of the Worktop.
-
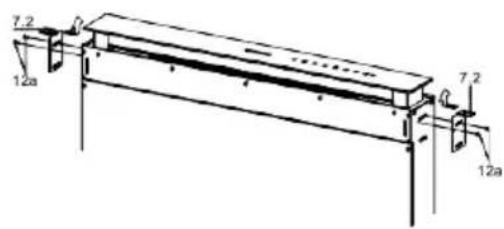
Insert the Brackets 7.2, as indicated in the figure, into the slots provided and fix them with the screws 12a provided.
-
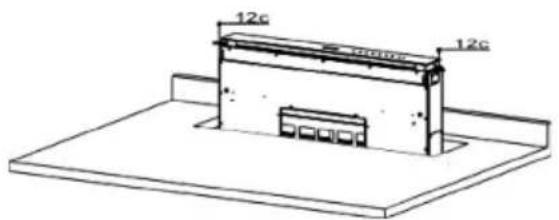
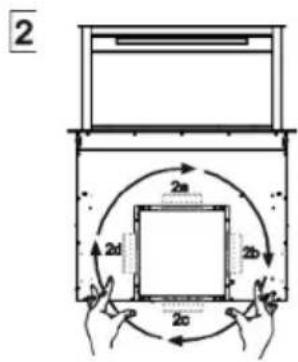
Centre the Hood Canopy with respect to the Cooking Hob slot.
-
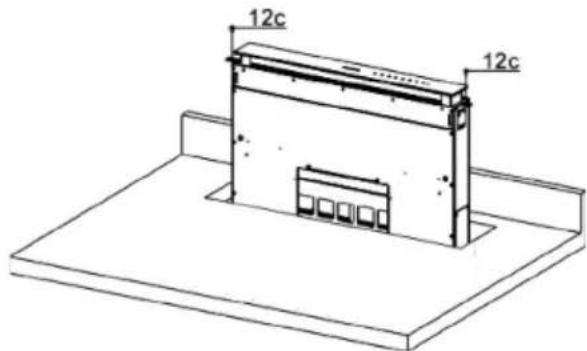
Using the 2 screws 12c provided, fix the Hood Canopy to the worktop and remove the supports.
Warning:
If the cooker top is made from a material that does not allow the screws 12c to be inserted, use a small amount of silicone to glue the Brackets 7.2 to the top and allow it to dry completely before proceeding with installation
- Insert the Brackets 7.2, as indicated in the figure, into the slots provided and fix them with the screws 12a provided.
The Hood is built ready for front installation of the Motor Unit.
- If the kitchen unit is arranged differently and the Motor Unit has to be fitted on the back, the Plug already fitted on the back of the Hood Canopy must be removed and replaced at the front, and the Cable with cable raceway for connection of the Motor must also be repositioned using the slot provided on each side (A).
- Insert the Hood Canopy into the cooker top, drilled as described above.
- Centre the Hood Canopy with respect to the Cooking Hob slot.
Fix the Hood Canopy with the 2 screws 12c provided.
Warning:
If the cooker top is made from a material that does not allow the screws 12c to be inserted, use a small amount of silicone to glue the Brackets 7.2 to the top and allow it to dry completely before proceeding with installation.
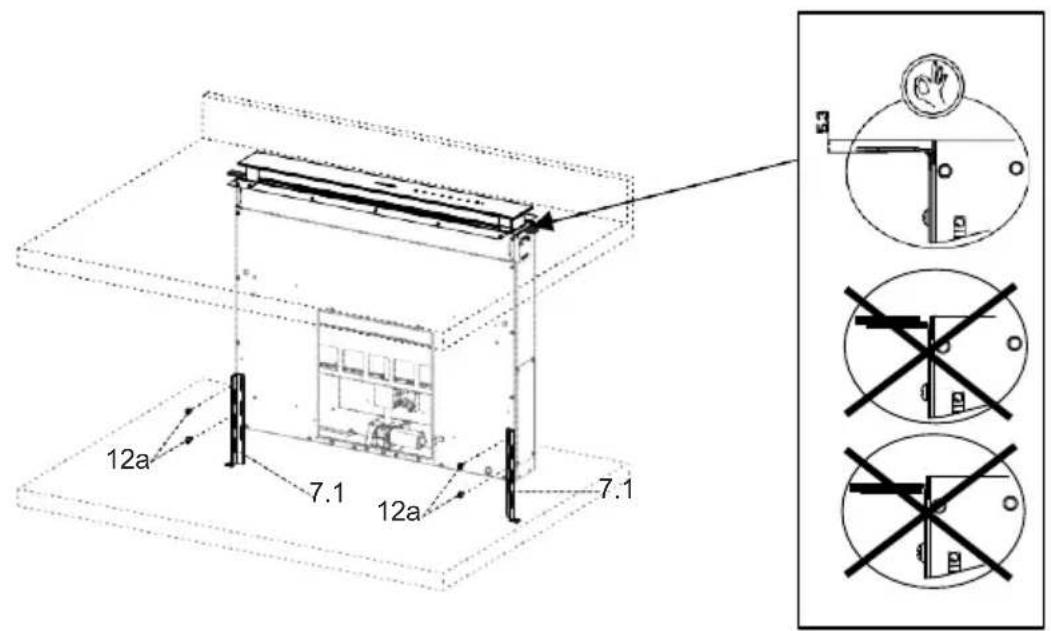
-
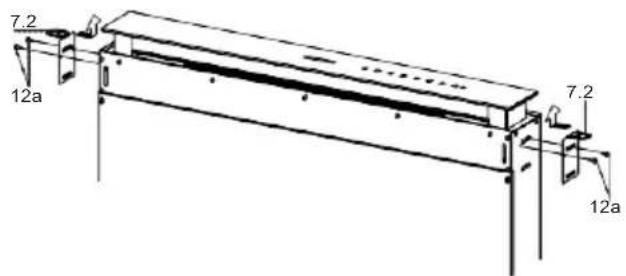
Screw the brackets 7.1 to the front of the Hood Canopy using the screws 12a provided.
-
Before tightening the Brackets completely, make all the adjustments to allow them to rest on the lower base of the worktop to avoid deformation of the upper brackets 7.2 as shown in the figure.
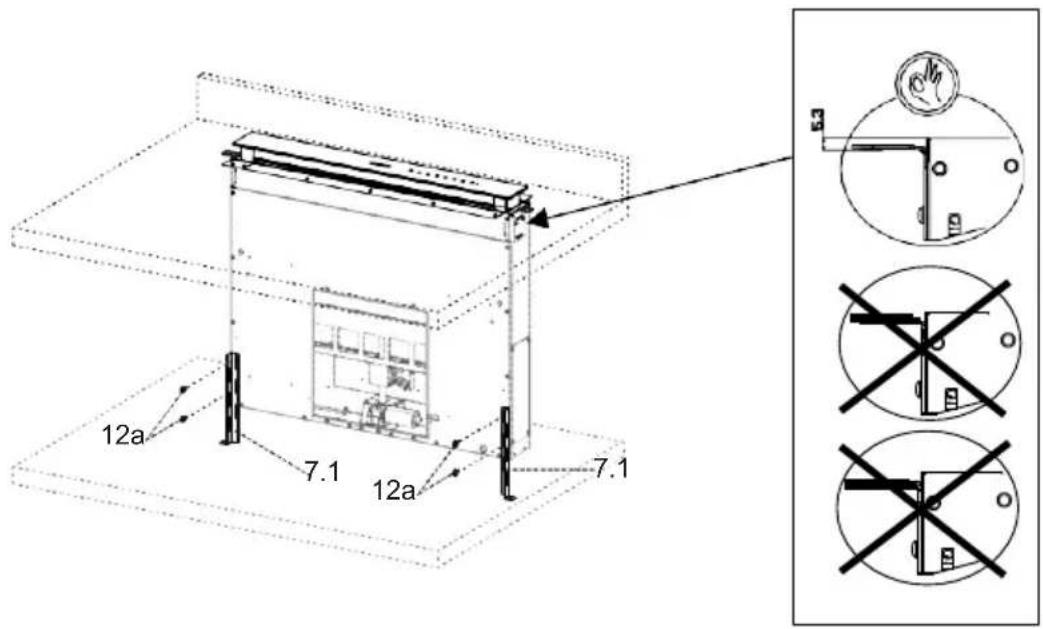
- With the aid of a spirit level, set the Hood Canopy level vertically and fix it to the Lower Surface using 2 screws 12c provided.
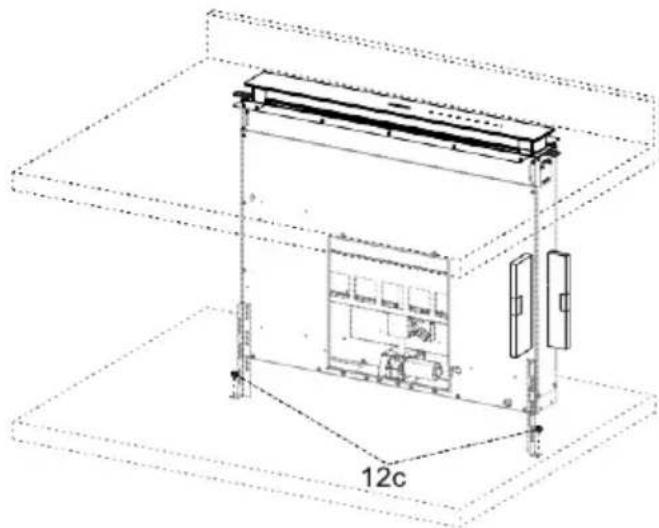
- Tighten the screws 12a completely.
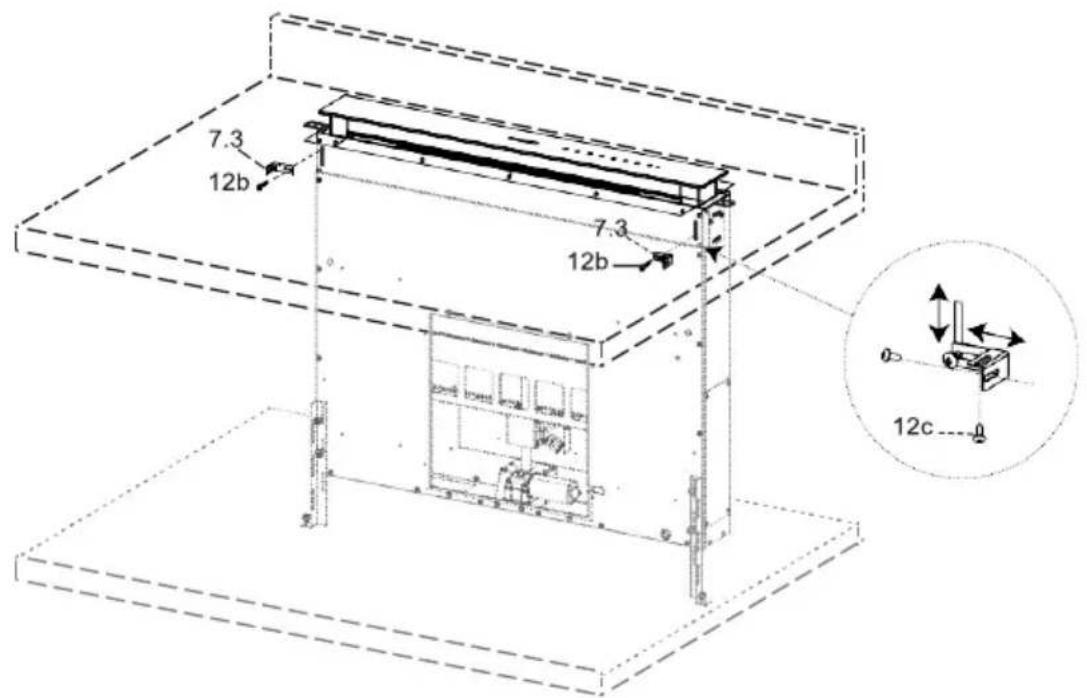
Fixing the Squaring Brackets
-
Screw the brackets 7.3 to the Hood Canopy using the screws 12b provided, without tightening completely.
-
Using the screws 12c provided, fasten the other part of the brackets 7.3 either to the side walls of the unit or to the lower part of the cooker top.
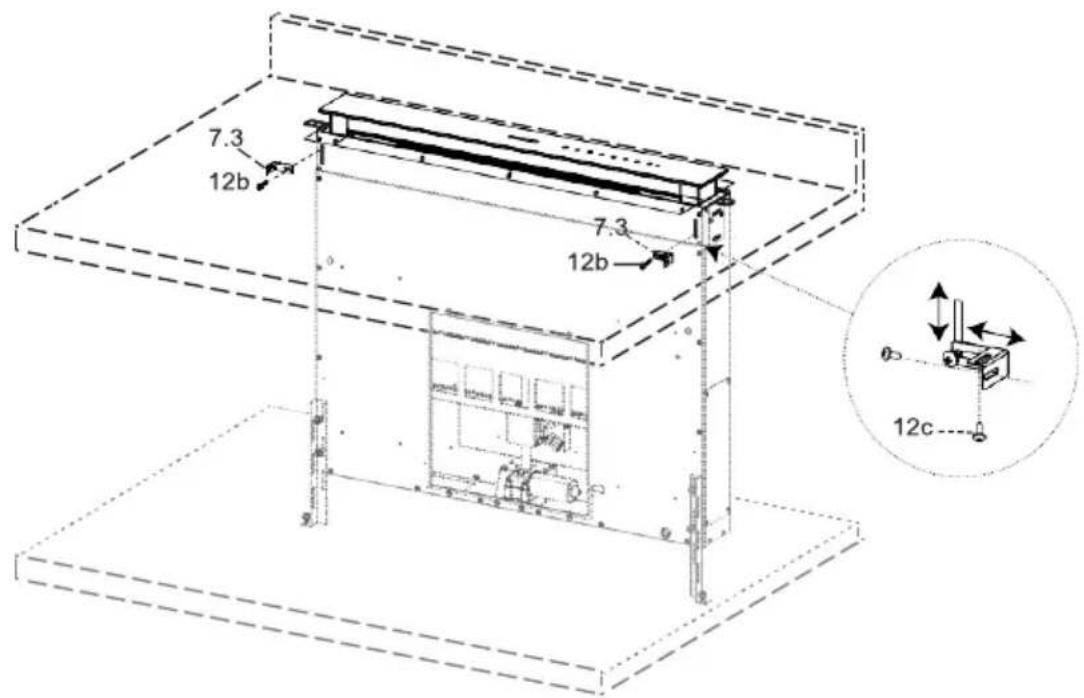
-
Tighten the screws 12c and 12b completely.
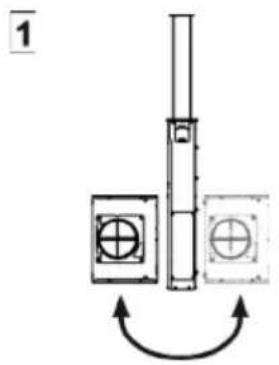
-
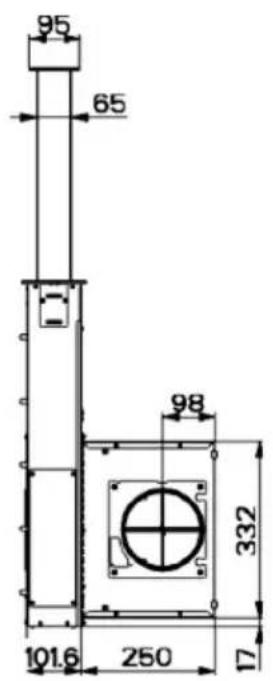
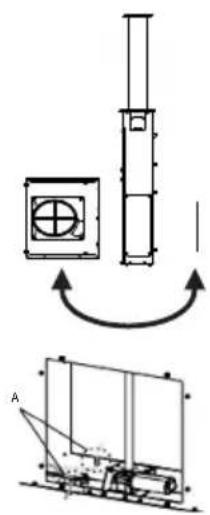
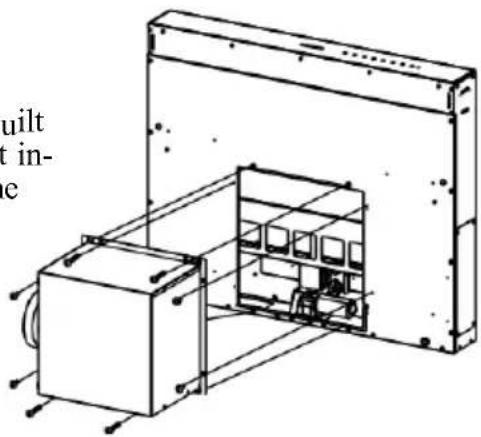
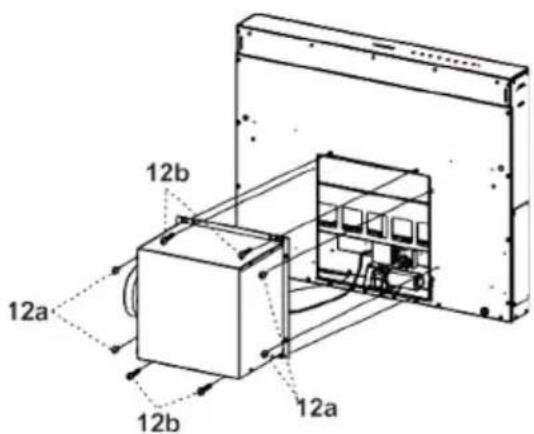
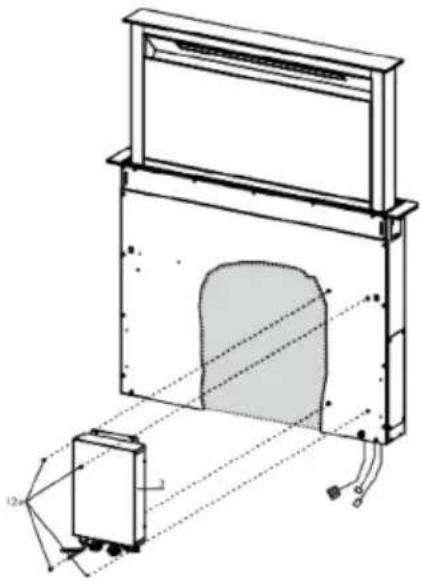
Installation of the Motor Unit (1) at the front or rear must be decided according to the position of the Kitchen unit, making sure that the plug is properly positioned.
- Subsequently, according to where the air outlet opening has been created on the unit, the Motor Unit can be turned by 90^ at a time so as to allow the air to come out on all 4 sides in correspondence with the opening in Unit (2).
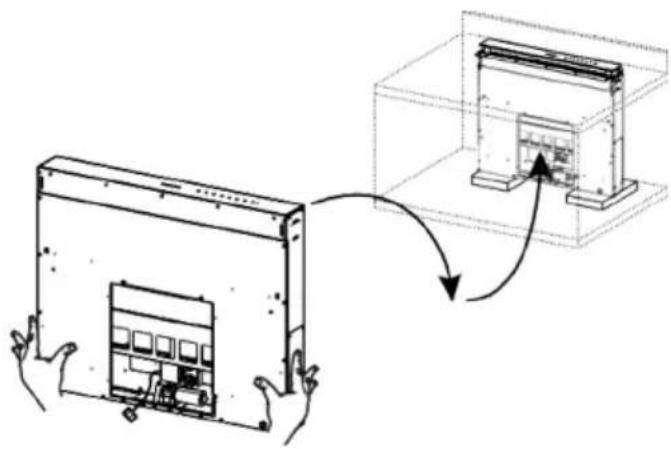
- Connect the connector from the Hood Canopy to the Motor Unit connection.
- Screw the Motor Unit to the Hood Canopy using the screws 12a and 12b provided as shown in the figure.


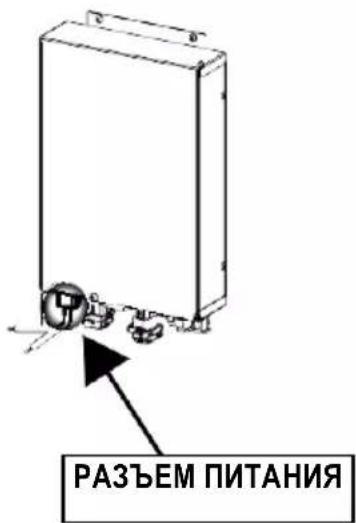
- Connect the Electric cables that come out of the lower right hand part of the Hood Canopy to the Connectors on the Electric unit.
Each cable connector has a corresponding connector on the Electric Unit, so take care not to make mistakes when connecting up.
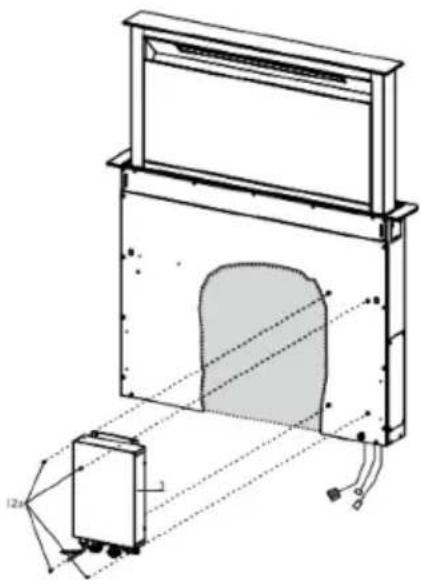
Fix the Electric Unit to the Hood Canopy using the screws 12a provided.
- The position indicated in the figure is only an option, as if necessary it may also be fitted on the left of the Hood Canopy or even left free on the base of the unit if there are no structural or safety problems involved.
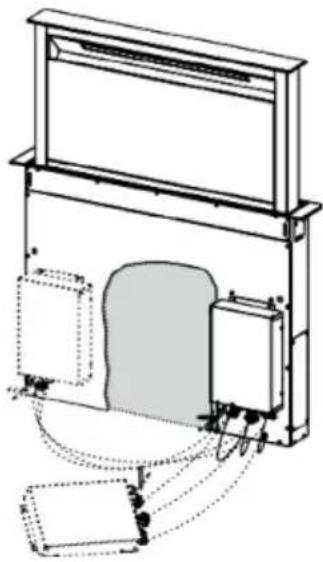
Warning.: Do not install the product in such a way that the wiring box is in contact with the floor.
Connections
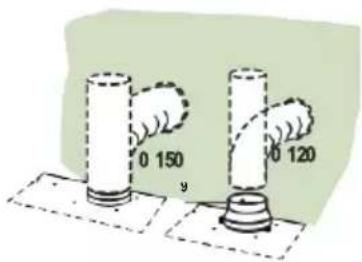
DUCTED VERSION AIR EXHAUST SYSTEM
When installing the ducted version, connect the hood to the chimney using either a flexible or rigid pipe 150 or 120~mm the choice of which is left to the installer.
- To install a 120 mm air exhaust connection,in insert the reducer flange 9 on the hood body outlet.
Fix the pipe in position using sufficient pipe clamps (not supplied).
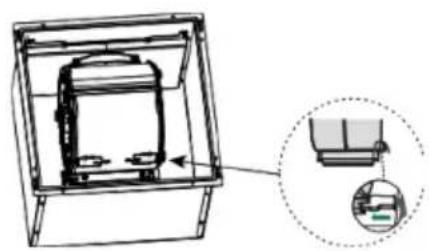
- Remove possible charcoal filters.
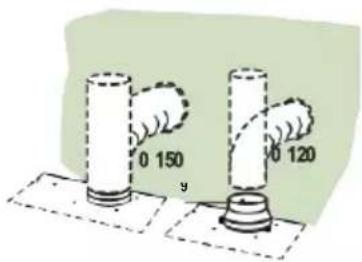
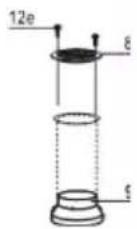
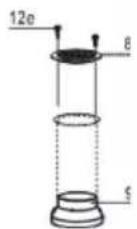
AIR OUTLET - RECIRCULATION VERSION
- Connect the Flange to the air outlet opening using a rigid or flexible pipe of 120 or 150mm
- To connect using a 0120 ~mm pipe, insert the reduction Flange 9 onto the Hood canopy outlet.
- Fasten the pipe using suitable pipe clamps. The materials required to do so are not provided.
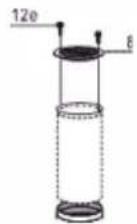
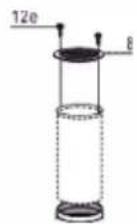
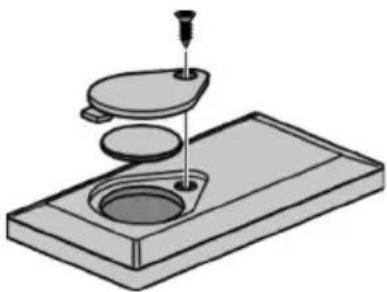
Fix the directional Grid 8 on the outlet, using 2 screws 12e (2.9 x 9.5) provided.
- Make sure that the activated charcoal filters are present (see paragraph on Activated Charcoal Filter Maintenance).
ELECTRICAL CONNECTION
- Connect the hood to the mains through a two-pole switch having a contact gap of at least 3mm .
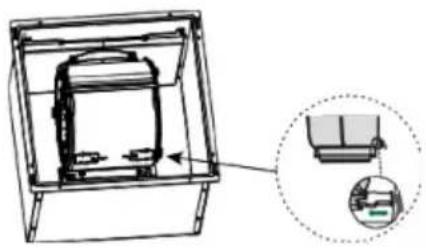
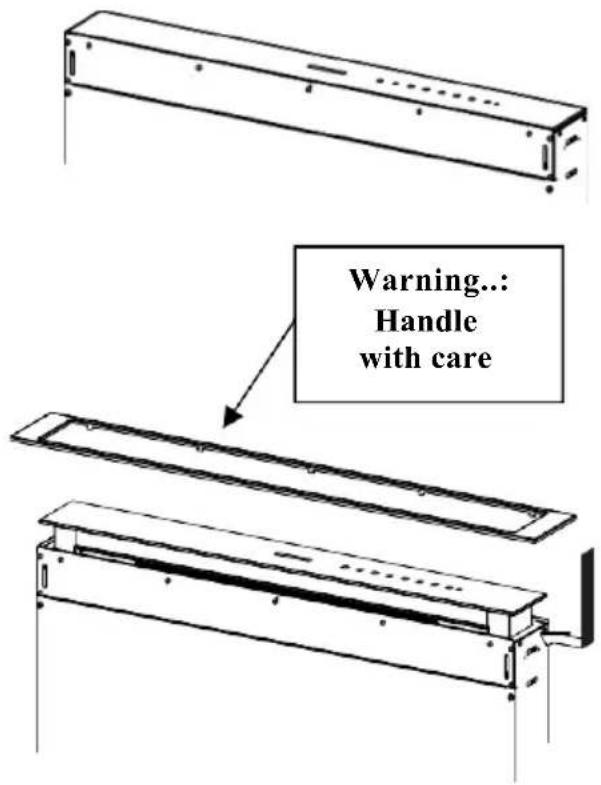
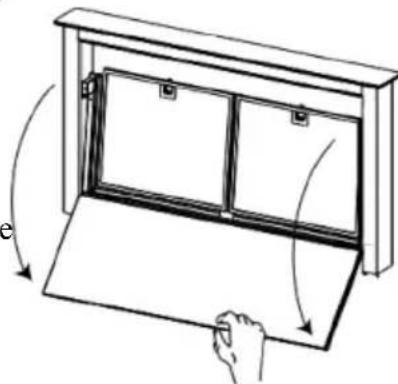
Fitting the Front element
- Lift the mobile hood canopy (see paragraph on Use) by just a few centimetres.
- To stop movement, simply press down on the mobile canopy as it lifts up.
Warning: Never block the sliding door when it is opening or closing, except during the operations required to fit the frame.
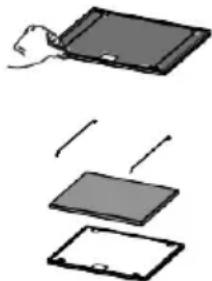
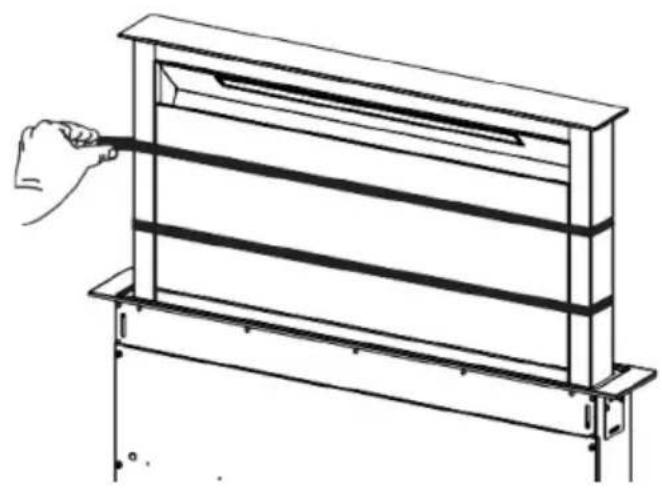
- Remove the sponge guards from the corners of the glass.
Take the front Frame and insert it from above, making sure that its tabs insert into the slots provided on the Hood and sliding it to the left.
Warning.: All the tabs must be inserted.
- Use a tool (hammer) to tap all along the front Frame from right to left until it is completely flush.
A piece of wood or similar element can be inserted between the hammer and the front Frame to prevent any damage.
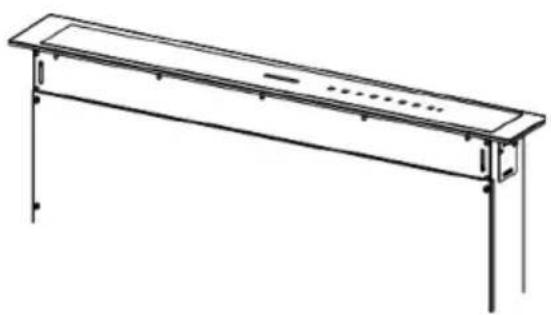
- Please refer to the paragraph on Use for indications of how to return the mobile canopy to the Standard position.

- Open the Hood Door (see USE).
- Remove the 2 strips of adhesive tape fastening the panel during transport.
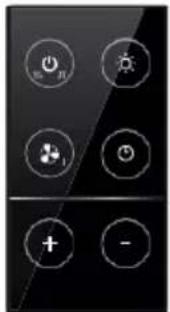
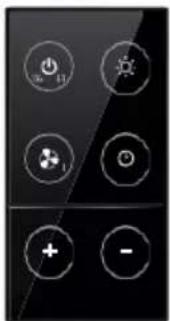
Control panel
| Button | Function | LED button |
| A | The button only works when the door is open. | |
| Press Briefly = Turns the Lights On/Off at maximum intensity. | |
| Press and hold for 2 Seconds = Turns the Courtesy Lights On/Off. | |
| B | Only works with the Door Open.
Press briefly = Activates/Deactivates Delay mode, causing automatic shutdown of the Motor and the Lighting system from any speed with a 30° delay. It is disabled by pressing the same button again, turning the motor off or closing the door. | LED Button B+ Button for the set Speed are lit. |
| Works both with the Door Closed and Open.
Press and hold for 2 Seconds = With the filter alarm triggered the Filter Alarm is Reset, all leds flashing 3 times. These indications are only visible when the motor is turned off. | Fixed LED button:
Indicates the need to wash the metal grease filters.
The alarm is triggered after the Hood has been in operation for 100 working hours.
Flashing LED button:
Indicates the need to change the activated charcoal filters, and also to wash the metal grease filters. The alarm is triggered after the Hood has been in operation for 200 working hours. |
| C | Only works with the Door Open.
Press briefly = Activates speed four. | Fixed LED button |
| Only works with the Door Open.
Press and hold for 2 seconds = Enables/Disables the Intensive speed. This speed is timed to run for 6 minutes. At the end of this time the system will return to the speed set previously.
It is disabled by pressing the same button again, turning the motor off or closing the door. | Flashing LED button |
| D | Only works with the Door Open.
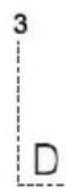
Activates speed three. | Fixed LED button |
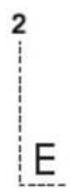
| E | Only works with the Door Open
Activates/Deactivates speed two. | Fixed LED button |
| Works both with Door Closed and Open with Motor + Lights = Off.
Press and hold for 4 Seconds = Enables/disables the Keyboard lock. | All the LED buttons flash twice. During the Lock the LED buttons light up in sequence. |
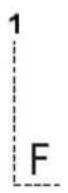
| F | Only works with the Door Open.
Press briefly = Activates/Deactivates speed one. | Fixed LED button |
| Door Open or Closed
Press and hold for 2 Seconds = Enables/Disables the Activated Charcoal Filter Alarm with the Motor turned off and no Filter Alarm triggered. | LED button B flashes twice = Activated Charcoal filter Alarm Activated
LED button B flashes once = Activated Charcoal filter Alarm Deactivated |
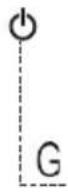
| G | Door Open
Press briefly = Turns the Motor off | LED button goes out |
| Door Open or Closed
Press and hold for 2 Seconds with Motor and Lights Off = Enables/Disables the Remote control. | LED button G + F flashes twice = Remote control
Enabled
LED button G + F flashes once = Remote control
Disabled |
| H | Door Open = Closes the Door + Lights and Motor Off
Door Closed = Opens the Door + Lights and Motor On.
Warning: If the Door remains partially open for any reason, press the Button to complete the opening or closing cycle. | |
REMOTE CONTROL (OPTIONAL)
This appliance can be commanded using a remote control, powered by a CR2032 type 3 V battery (not supplied).
- Do not place the remote control near heat sources.
- Do not discard the batteries with normal waste, they must be put into the specific containers.
Remote control panel
Warning... The remote control receiver is deactivated when first supplied. To activate it, see the paragraph Use.
| Motor | Door Closed: Opens the door, turns the motor on at speed one and turns the lights on at maximum intensity. Door Open: Brief pressure: Motor On / Off Pressed for 2 Seconds: Closes the Door and Motor + Lights = Off |
| ↓↑ | - | - |
| 86 | - | - |
| Light | Only with Door Open: Brief pressure: Lights On / Off Pressed for 2 Seconds: Courtesy lights On / Off |
| 31 | Intensive | Only with Door Open: Activates the Intensive function |
| 0 | Delay | Only with Door Open: Activates the Delay function |
| + | Only with Door Open: Increases the working speed each time it is pressed. |
| - | Only with Door Open: Decreases the working speed each time it is pressed. |
Cleaning the Comfort Panels
- Open the Comfort Panel by pulling it at the top.
- Disconnect the panel from the hood canopy.
The comfort panel must never be washed in the dishwasher.
- Clean the outside with a damp cloth and neutral detergent.
- Clean the inside using a damp cloth and neutral detergent; do not use wet cloths or sponges, or jets of water; do not use abrasive substances.
- On completing the operation, hook the panel and close it.
These can also be washed in the dishwasher, and need to be cleaned whenever button B lights up or at least once every 2 months use, or more frequently if use is particularly intensive.
Resetting the alarm signal
- Turn the Lights and the Suction Motor off.
- Press and hold button B for 2 seconds.
Cleaning the Filters
- Open the Door (see USE).
- Open the Comfort panel by pulling it.
- Remove the Filters one at a time, pushing them towards the back of the unit and at the same time pulling downward.
- Wash the Filters without bending them, and leave them to dry completely before replacing. (If the surface of the filter changes colour as time goes by, this will have absolutely no effect on the efficiency of the filter itself.)
- Replace, taking care to ensure that the handle faces forwards.
- Close the Comfort panel.
Activated Charcoal Filter (Recirculation Version)
Can be washed in the dishwasher. It must be washed when button B flashes or at least once every 4 months, or more frequently if use is particularly intense. Guaranteed to operate after washing for up to a maximum of 5 times before requiring replacement. The Alarm signal, if it has been activated, only appears when the Suction motor is turned on.
Activating the alarm signal
CHANGING THE ACTIVATED CHARCOAL FILTER
Resetting the alarm signal
- Turn the Lights and the Suction Motor off.
- Press and hold button B for 2 seconds.
Changing the Filter
- Remove the comfort panel.
- Remove the Metal grease filters.
- Remove the metal filter stops from the grease filter and clean the saturated activated charcoal odour filter.
- Replace the clean activated charcoal odour filter, hooking it back up to the grease filter using the metal filter stops.
- Replace the Metal grease filters.
- Close the comfort panel.
Lighting unit
- For replacement contact technical support ("To purchase contact technical support").
Evpyooinon toovayepuou
ecJH MaTePHaJI, H3 KOTOpO H3rOToBJIeHa BApOuHa IIaHeJIb, He IIo3BOJIaET IprHBHTHTb BnHTb 12c, BOCIOJIb3yIteCb He6OJIbIIHM KOJIInueCTBOM ChJINKOHa, YTO6bl IIpHKJIeHTb KPOHIteHbI 7.2 K IIaHeJIH, H daIte emy KaK cJIeIyEt BbICOXHyTb, IpeJde Yem IpoJOJIkHTb yCTaHOBky.
- IIpHKpeHNTe KPOHIITeHHbI 7.1 cIepeIN K KopNcy BBITJAKKN IIpNJlaRaEMbIMN B KOMIIJEKTE BHTAMN 12a.
- Ipejde yem OKOHaTeJbHO 3aTMyTb KpeJIeHne KPOHHTeHOB, OtperyIHyTe Hx IOIOKeHHe TaK, TTObI OHN OINpaJIncb Ha HIXKHee OCHOBaHHe IIOJIKN, He JeOpMnpy Ipn HToM BepXHHe KPOHIteHbI 7.2, KaK IOKa3aHO Ha pncyHke.
C IIOMOIbIyPOBnBaHTe KOpIyc BbITJxKn IIO BepTHKaJIH 3aKpeIInTe eRO K HIXHeI IOJIke IIpaIaEmbIMN B KOMIIJEKe 2 BnHTaMn 12c.

-
OKOHyateJIbHO 3aTAYHtE BnHTbI 12a.
-
IIpHKpeIHTe KPOHIITeHbI 7.3 K KOpIIcY BbITJAKKII INPJIaRAEMBIMN B KOMJIJEKTE BHHTaMH 12b, He 3aTARBA.
- IIpHbHTIe IIpHJIaRaEMbIMn BnHTaMn 12c BTopyIO IOJIOBHy KPOHIteHOB 7.3 K 6OKOBbIM CTeHKam Me6eJIIN HJN K HNJKHeJ YacTHn BaOpOH NHaJIIN.
- OKOHyateJIbHO 3aTAHHTe BHHtB1 12c H 12b.
PeHHeO6 yCTaHOBKe 1BnIaTeJIa (1) cIepeHN HJN C3aIN 3aBNCHT OT cTpkykTypbI KxOHHOm Me6JIH; pIn 9TOM CJcNyCT y6cINTbcra B IpaBnIbHOM IOIOXCHHH 3aRIyIKN.
3aTEM B 3aBHCNMOCTH OT IOJIOKeHHBbIyCKHOOTBepCTNa BIOJIkeBBHrAteJIb MOKHO IOBOPaHNBaTb Ha 90^ CTEM, YTO6bI BO3dYx MOF BbIXOHTb CO BCEX4 CTOPOH JIIa COBMeIeHHa C OTBepCTHeM BMe6eJH (2).
CoeHHTe pa3bem KOpIyca BbITJxKc pa3bemOM IbHrataJI.
- PnBHTTE BnraTeJb K Kopnycy BbITXKN IIpHJIaRaembIMN BnHTAMN 12a H 12b, KaK IOKa3aHO Ha pncyHke.

CoeHHHe 3JIeKTPnueckHe IPOBOda, BbIXOJHnE C IIpaBO HnKHeI CTOpOBH KOpIyCa BbITJxKKn, C pa3beMaMH pacIIpeJeJIHTeJIbHOH KOp6Kn.
KaKIOMy Ka6eJIbHOMy pa3bemy COOTBcTByeT pa3bEM BpacIpeJeJIHTeJIbHOI Kopo6ke; 6yIbTe BHIMaTeJIbHbI, YTO6bI He OINbHTbcR bNx CoEJIHHHn
- PpHKpeHrTe pacPpeJeJIHTeJbHyO Kopo6ky K KopIycy BbITgKKn IIpHJaIaEaEMbIMN B KOMIIIEKTc BnHTAMU 12a
Ioka3aHHoe Ha pncyHke IIOIOxKeHne paCnpeJIHTeJIbHOJ KOpO6Kn opHeHTnpoBOuHc; ee MoXHo 3aKpeINt b c JIEBOI CTOpOHbI KOpIIyCa BbITXKN HIn DaKe OCTaBHTB CBO6OJHOM COCTOHN HA IOJIke, ecIN OTOMY He MeIaIOT OCO6EHHOCTH KOHCTpyKUnn HIn YCIOBNAchOCTN.
BnmaHHe: He yctaHaBJIbAaTe BbITJkKy TaK, YTO6bI paCnppeJeNTeJbHa Kopo6ka KacaJaacb noJa.
BbIyCK BO3DyXA I3 BCACbIBAIOUeN BbITJxKIN
Дя yctaHOBKn BCacbIBaIOHe BbITJKKN COeHHHTbe C BblIyckHoi Tpy6oJ JecTKoH HIn rH6KO Tpy6koJ IHaMeTpOM 150 Hn120 MM, TII KOtOpO MoKcT BbIpaTb MOHTaXHK.
Ia coeHHeHH Tpy6Ko 120 MM BCTaBHTb IepexOHNbI IaHe9 BBbIyCKHOEOTBepCTHeKOpNcABbIgKKn.
3aKpeIHTb Tpy6ky COOTBcTCTByIOHMn Tpy6HbIMN 3aXHMamH. Heo6xOdHMbIKpeIeKHBMaTePnaJI He BXoIHT B KOMIIJEKT.
- BbHyTb ΦHbTpbl OT 3aHaxOB Ha aKTHBHom yrJle.
BbIyCK BO3DyXA B PEXKIME ΦNJIbTPALIN
CoeHHHe C BbIyckHbIM OTBepCTHeM BO3Jyxa JecTKoHn H6KO Tpy6Ko 120 Hn 150 MM.
-Дя coeHHeHЯ c Tpy6KoI 0 120 MM BCTaBbTe IepCxOHNbI ΦJIaHeI 9 B BBInyCKHoe OTBepCTHe B KOpNyCe BbITJxKN.
3aKpeHnTe Tpy6ky CneuHaJIbHbIMN Tpy6HbIMN 3aKHMamn. Heo6xOHNbM MaTePnaJI He BXOHT B KOMIIJEKT NOCTaBKN.
3aKpeHnTe peRyIInpyeMyo peIeTKy 8 Ha BbIyCKe BO3JyXa 2 IIpHJaRaembIMN B KOMIIJeKTe BHTaMn 12e (2,9 x 9,5).
- IIpoBepbTe HaJIHcHHe 0nJBTpOB IIpoTHB 3aIIaxOB Ha aKTHBnPoBAHHOM yTJe (CM. pa3JeI O6cJyXkBaHHc 0nJBTpOB Ha aKTHBnPoBAHHOM yTJe).
3NEKTPNUECKOE NOKJIIOUYEHNE
CoeINHHTb BBITKky c ceTeBbIM HAnpJKeHHem, yCTaHOBHByXIOJIIOCHbIb BIKJIOHaTeJIb c pa3BeJeHHem KOHTaKTOB He McHee 3 MM.
YcTaHOBka nepeDnei paMkn
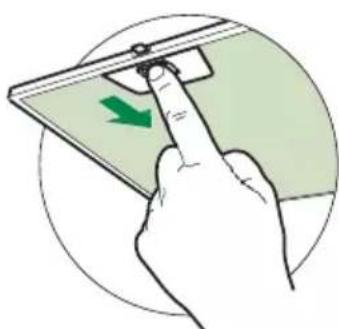
- IOHHMHTe IOIBHXHbIKoPnyc BbITXKN (cm. pa3JeI 3KcIIyataaHa) Bcero HaHECKOJIbKO caHTHMcTPOB.
- UTO6bI 6JIOKHPoBaTb cTo IIBHXeHHe, IIpHXMHTe IIOHNMaemBn KOpIyC BHN3.
BHHMaHHe: HNKoIa He OCTaHaBJIbBaIte IbNKeHne pa3IbNkHO CTBOpKN BO BpeMg OTKpbITn HJIN 3aKpbITn; 3TO IOIyCKaETc T0JIbKO B XOJe yCTaHOBKn paMKn.
- BbINbTe IIpoKJIaIKn H3 rY6KN H3 yTJIOB CTeKJIa.
BcTaBbTe nepeHIOU pAMKy CBepxy; IpocJIeIHTe, YTO6bI 3bYKn pAMKn BOJIIN B CnEuaJIbHbIe OTBepCTHa HbITJXKe; cDBrHbTe pAMKy BJIEBO.
BHHMaHHe:Bce 3bIyKn IOJIxHbI HAXOHTbcra B OTBepCTHX.
- UTo6bI CdBHyTb IepEnHIOO paMKy IOp yIopA,IOCTyHTe IHO He cIIpaBa HAJIeBO HHeTPymEHTOM (MOJOTKOM). UTo6bI He IOBpeINTb paMKy, IIOJIIOXHTc IIOI MOJOTOK IepCBYIIIky COOTBCTCTBYIOIeTO pa3Mepa.
Cm.pa3eJ3KcHJaTaAHH, YTO6bI IIpHBecTH IOBnKHN KOpIyc BbITAKN B CTaHapTHoe IIOJKeHne.
BHHMaHHe: o6paIaITe
OTKpoITe CTBOpKY BbITJKKN (cm. pa3JeJI 3KcIIyataHna).
- YdaJInte 2 IIOLOCKKJIeIKoN JIeHTbI, cJyKaIIHc TOJIbKO JJIa 6e3OJaacHOIpeBcKn IIaHeJI.

PanaHb ynpabneHn
| Коньа | Функеля | Конькасимкаторь |
| A | Конькалдостучыкогноротькгы�сгосторь. | |
| Кралков Сралков = Вралков = Вралков = Вралков = Вралков = Вралков = Вралков = Вралков = Вралков = Вралков = Вралков = Вралков = Вралков = Вралков = Вралков = Вралков = Вралков = Вралков = Вралков = Вралков = Вралков = W� | |
| Надамбов Точемп = Вралков = Вралков = Вралков = Вралков = Вралков = Вралков = W. | |
| B | Денистучыкогноротькгы�сгostорь. | Венистучыкогноротькгы�сгostорь = HDAHKOATOPOM B = KONKIAHACTPOEHIOI |
| Кралков Нралков = Вралков = Вралков = Вралков = Вралков = 3aDAPKKA: abtOMaTHHECKOeBbIKHOJHcHcEaDEPAKOi30cckyHdINIHHTATEHINCHCTEMBI OCBENHIMN H3JIbO6OIIckopocinHACIpOiHK.Ор.khoаетсян.Hakimнem STOJ KEXHOKI,БыкJOHcHcHcHcHcHcHcHcHcHcHcHcHcHcHcHcHcHcHcHcHcHcHcHcHcHcHcHcHcHcHcHcHcHcHcHcHcHcHcHcHcHcHcHcHcHcHcHcHcHcH c | |
| Денистучыкогноротькгы�сгostорь. | Кенистучыкогноротькгы�сгostорь = HDAHKOATOPOM: YAZBIAEETHa He6XOHNMOCTI HOMbIb MTeaIITHECKHKe JIAPOROBIE φHILIPbI. CHTIAT BKKTOHAcTERTNOCT100 cacoB (ΦKTHHECKOJAP60BJBBAKKN. |
| Надамбов Точемп = Вралков = Вралков = Вралков = W. | Кенистучыкогноротькгы�сгostорь = YAZBIAEETHa He6XOHNMOCTI ZAMeHITbФHcIbHa HApIbRrPoAHOMYTTAE, a TAOKE POMbIb MCTaIITHPOCKHKe JIAPOROBIE φHILIPbI. CHTIAT BKKTOHAcTERTNOCT200 cacoB (ΦKTHHECKOJAP60BJBBAKKN. |
| C | Денистучыкогноротькгы�сгostорь. | Кенистучыкогноротькгы�сгostорь = HDAHKOATOPOM |
| Кралков Нралков = Вралков = Вралков = W. | Кенистучыкогноротькгы�сгostорь = HDAHKOATOPOM |
| Денистучыкогноротькгы�сгostорь. | Кенистучыкогноротькгы�сгostорь = HDAHKOATOPOM |
| D | Денистучыкогноротькгы�сгostорь. | КенистучынMHINHINKHATOPOM |
| Вралков Мергеля = Вралков = W. | КенистучынMHINHINKHATOPOM |
| E | Денистучыкогноротькгы�сгostорь. | КенистучынMHINHINKHATOPOM |
| Вралков Мергеля = Вралков = W. | Соасунгелуху:
Вралков МERGELLOHIMINTELEHOCBEHIN. |
| Денистучыкогноротькгы�сгostорь. | Вралков МERGELLOHINTELEHOCBEHIN. |
| F | Денистучыкогноротькгы�сгostорь. | КенистучынMHINHINKHATOPOM |
| Вралков МERGELLOHINTELEHOCBEHIN. | KOLIOHOOHOOHOOHOOHOOHOOHOOHOOHOOHOOHOOHOOHOOHOOHOOHOOHOOHOOHOOHOOHOOHOOHOOHOOHOOHOOHOOHOOHOOHOOHOOHOOHOOHOOHOOHOOHOOHOOHOOHOOHOOHOOHOOHOOHOOHOOHOOHOOHOOHOOHoo |
| Соасунгелуху:
Вралков МERGELLOHINTELEHOCBEHIN. | 2 BKTLYHOOHOOHOOHOOHOOHOOHOOHOOHOOHOOHOOHOOHOOHOOHOOHOOHOOHOOHOOHOOHOOHOOHOOHOOHOOHOOHOOHOOHOOHOOHOOHOOHOOHOOHOOHOOHOOHOOHOOHOOHOOHOOHOOHOOHOOHOOHOOHOOHOOH |
| G | Вралков МERGELLOHINTELEHOCBEHIN. | Вралков МERGELLOHINTELEHOCBEHIN. |
| Соасунгелуху:
Вралков МERGELLOHINTELEHOCBEHIN. | 2 BKTLYHOOHOOHOOHOOHOOHOOHOOHOOHOOHOOHOOHOOHOOHOOHOOHOOHOOHOOHOOHOOHOOHOOHOOHOOHOOHOOHOOHOOHOOH |
| Соасунгелуху:
Вралков МERGELLOHINTELEHOCBEHIN. | 1 BKTLYHOOHOOHOOHOOHOOHOOHOOHOOHOOHOOHOOHOOHOOHOOHOOHOOHOOHOOHOOHOOHOOHOOHOOHOOHOOHOOHOOHOOHOOHOOHOOHOOHOOHOOHOOHOOHOOHOOHOOHOOHOOHOOHOOHOOHOOHOOHOOHOO |
| H | Соасунгелуху:
Вралков МERGELLOHINTELEHOCBEHIN. | |
IYJbT INCTAHUHHO YIPABJEHNA (DIOJIHNTEJIbHO)
Pa60To np60pa MoXHO ynpaBnTb NylbTOM nuctaHcnoHHoro ynpabHeHn, KOTOpbI pa6oTaet Ha 6atapeKe 3 B Tnna CR2032 (He BXOHT B KOMNJIeKTI NOCTABKN).
He octabnayte npbT nctaunOHoro ynpaBneHn oKOJIO nCTOuHKOB Tepna.
He BbIbpaCbIbAaTe 6bTaapeKn B Mycop, a TOnbKO B CneuNbHbIe EMKoCTn No c6opy Otpa6OtaHHbIX 6bTaapeek.
PanaHb npNbTa Dy
BnMaHne: n3HaayalbHo npneMHO yCTpoiCTBO nyIbTa ynpaBHeHra OTKIOueHO, cm. cnoc6 erO BKIOUeHRA B pa3deJe NcnoNb3OBaHne.