Sweeva 6000 - Vacuum Cleaner TCL - Free user manual and instructions
Find the device manual for free Sweeva 6000 TCL in PDF.
| Product type | Intelligent robot vacuum |
| Brand | TCL |
| Model | Sweeva 6000 |
| Dimensions | Φ342 × 94.5 mm |
| Power supply | Adapter 19 V / 0.6 A; charging station 24 V / 1 A |
| Battery | Lithium-ion 5000 mAh |
| Runtime | Approximately 180 minutes (standard level) |
| Charging time | 4 to 5 hours |
| Maximum suction | 2700 Pa |
| Noise level | ≤ 68 dB (standard level) |
| Main functions | Automatic cleaning, real-time mapping, Wi-Fi and TCL Home app, silent/standard/turbo/max modes, automatic return to base, obstacle detection, UV-C lamp, auto-empty suction (Sweeva 6500) |
| Maintenance and cleaning | Washable dust box, washable high-performance filter, removable roller brush, removable side brush, regular cleaning of sensors and electrodes |
| Safety | Anti-drop sensors, cliff detection sensors, laser sensors, child safety (do not let children play), UV-C lamp with exposure warning |
| Spare parts and repairability | Side brushes, roller brushes, filters, dust bags, battery. Repair only by authorized after-sales service. |
| Warranty | Main unit: 1 year; adapter, battery and accessories: 6 months |
Frequently Asked Questions - Sweeva 6000 TCL
User questions about Sweeva 6000 TCL
0 question about this device. Answer the ones you know or ask your own.
Ask a new question about this device
Download the instructions for your Vacuum Cleaner in PDF format for free! Find your manual Sweeva 6000 - TCL and take your electronic device back in hand. On this page are published all the documents necessary for the use of your device. Sweeva 6000 by TCL.
USER MANUAL Sweeva 6000 TCL
Robot Vacuum User Manual
Please read this manual carefully before using this product and keep it for later use
English
Sweeva 6000/6500 User Manual
01-30
Deutsch
Thank you for purchasing this product. Please read the user manual carefully before use, and keep it properly.
Sweeva 6000/6500
User Manual
Contents
- Safety Instructions 04
Operational instructions
Safety precautions
About child safety
About the battery
Scope of use
Disclaimers - Package Information 08
3.Product Description 09
Button light interaction
Introduction of main modules
4.Installation Instructions 13
5.APPDownloadand 16
Network Operation (Optional) - Operating Instructions 18
7.Daily Maintenance 22
Clean the dust box
Clean the rolling brush
Clean the side brush
Clean the universal wheel
Clean the charging electrode
Clean up the dust channel
Replace the dust bag
Clean the sonor
- Exceptions and Self-check 25
9.List of Faults 27 - Technical Specifications 28
11.Environmental 29
Statement (Optional)
12.Warranty Card 30
Thank you for choosing Sweeva 6000/6500 intelligent robot vacuum. We hope our product can bring about a better life for you!
If you have any questions about the product during use, please call our service hotline: 4006-671-909.
Please pay attention to the following basic safety precautions before using the product:
- Read the user manual carefully and follow the instructions in the user annual when using the product.
- Keep the user manual well for future reference.
- If you need to transfer the product to a third party, please attach the user manual along with the product.
- Any operation not in conformity to the instructions in the user manual may result in serious personal injury or damage to the product itself.
- If the user manual is missing, please contact your local dealer or call the after-sales service department to obtain an electronic user manual.
- Due to the constant improvement of the product, the actual product shall prevail. Our company reserves the right to update the product.
Safety Instructions
Scope of use
- Read the user manual carefully and use the product in accordance with the instructions in the manual to avoid damage due to improper operation.
- This product can only be used indoors for the cleaning of wooden floors, ceramic tiles and short-staple carpets.
- Do not use the product in high - temperature, humid, flammable, explosive or corrosive environments.
To prevent the product from falling accidentally, do not use this product in a suspended place without a protective fence, which may result in personal injury.
Safety precautions
- This product contains a UV-C emitter that cannot be replaced.
- Improper use of the machine or damage to the housing may cause UV-C leakage. Even small doses of UV-C radiation can cause damage to the eyes and skin.
- Before removing the safety protection accessories of the UV-C lamp, please make sure that the power of the product is disconnected.
This product can only adopt the adapter, battery and charging dock provided. Failure to do so may result in damage to the product. The user shall not replace the battery without authorization. - If the main machine and accessories of this product are found to be damaged, please contact our service technicians for repair. Except for the service technicians designated or authorized by our company, no one may disassemble, repair or modify this product.
- Prevent the suction of water, oil or other liquids, which may damage the sweeper.
- Do not use this product to suck in sharp objects (e.g. shattered glass and nails) for fear of damage to the product.
- Before use, remove fragile objects, and arrange scattered wires on the floor for fear of affecting the normal operation of the sweeper.
- The charging dock and self-emptying dustbin shall be placed against the wall and on a flat floor. When the product is working, removal of the charging dock or self-emptying dustbin will affect the normal recharging of the machine.
Safety Instructions
EN
Safety precautions
Prevent clothing or any part of your body (hair, fingers, etc.) from getting caught in the brush or wheel of the sweeper. Failure to do so may result in personal injury.
- Unplug the product before maintenance. Do not touch the power plug or the product when your hands are wet, as this may result in electrical shock.
- A damaged power cord shall be replaced by the manufacturer, its service department or a similar professional to avoid danger.
- Unplug the charging dock if it remains unused for a long time.
- Appliances that are obviously damaged must not be operated.
About child safety
Children under the age of 8 are not allowed to use this product. Persons with physical, sensory or intellectual disabilities or lack of relevant experience/knowledge cannot use the machine unless under supervision, operating instructions or awareness of the danger.
Children are not allowed to play with the machine or clean/repair the machine unless under supervision.
Children are not allowed to play with the product's packaging bag for fear of suffocation.
Safety Instructions
About the battery
- Only the batteries provided by the manufacturer are applicable to the product.
The battery shall be removed when the product is discarded.
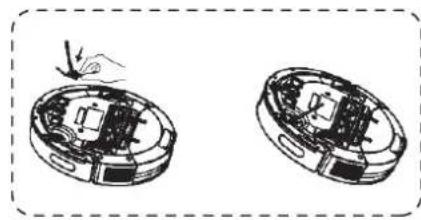
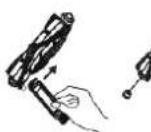
Steps to remove the battery:
A. Make sure to disconnect the power of the machine when removing the battery;
B. Use a screwdriver to remove the bottom screws, and then remove the front bumper and middle shell in turn;
C. Take out the motherboard and the battery cover;
D. Unplug the connection line between the battery and the robot vacuum;
E. Remove the battery.
If you need to replace the battery of the robot vacuum, please contact our after-sales service department. Use of wrong batteries may cause a safety accident.
- Do not damage the battery during disassembly for fear of short circuit or battery leakage. If the battery leaks, prevent the contact of the liquid with the skin or clothing. Immediately wipe it with a dry cloth and send it to the recycling station or the designated maintenance point. Do not discard it randomly.
- Please properly dispose of the old battery of the product. The battery contains hazardous substances harmful to the environment. Please follow the local environmental regulations and send them to the designated recycling site.
- This appliance contains batteries that are only replaceable by skilled persons.
Disclaimers
Under any of the following circumstances, the product will be excluded from the scope of free warranty, but paid repair can be provided:
A. Damage due to the user's failure to operate the product in strict accordance with our user manual or due to improper storage;
B. The machine or parts have exceeded the free warranty period;
C. Damage due to disassembly by those other than the maintenance personnel of our company or authorized by our company;
D. A valid purchase voucher number cannot be provided;
Safety Instructions
EN
Disclaimers
E. The product model on the warranty card does not match that of the product to be repaired or is altered;
F. Damage caused by irresistible factors such as natural disasters;
G. Product failure or damage caused by unexpected factors or man-made causes (including operational errors, liquid ingress, improper plugging/unplugging, scratching, handling, bumping, input of inappropriate voltage, etc.)
Note: Our company provides a warranty for the product in accordance with the "National New Regulations on Warranty". For details, please check the warranty card for the product.

Package Information
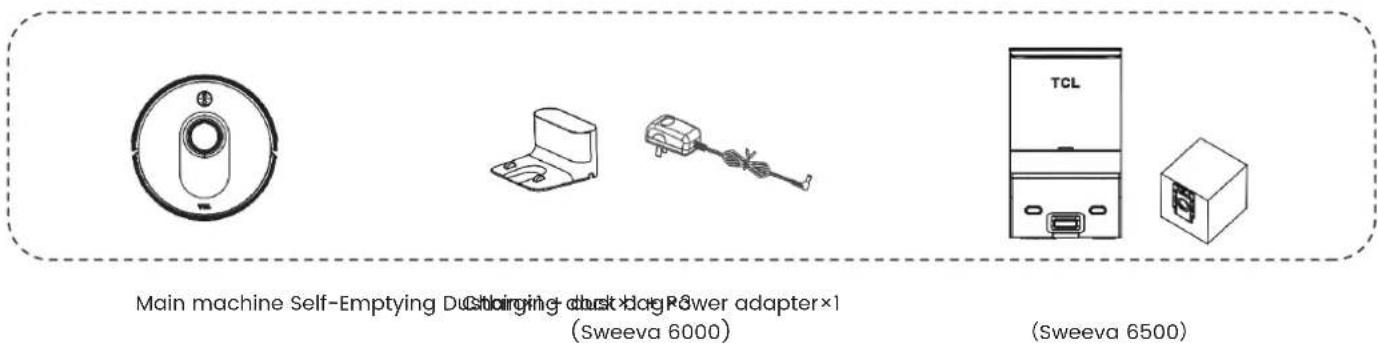

Side brush × 2
Filter×1
User manual × 1
Cleaning brush × 1
- The number of accessories does not cover the filter and battery of the main machine.
Product Description
EN
Button light interaction
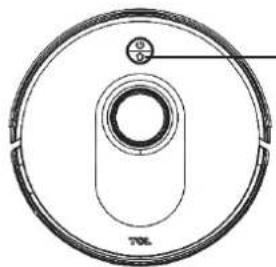
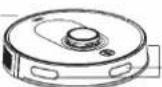
Main machine

Cleaning/ switch button
- Press and hold for 3 seconds to turn on/off the machine.
- Press once to start cleaning.

Recharging button
- Press once to return for recharging.
- Press and hold for 15 seconds to restore factory settings.

+Recharging button + Cleaning/ switch button
- Press and hold the two buttons simultaneously for 3 seconds
to enter the network configuration mode.
Light Status
Solid blue light: standby/running/return for charging (normal battery level)
Solid orange light: standby/running (low battery)
- Blue light breathing: return for charging
- Orange light breathing: charging/startup at low battery
- Blue light flashing: connect to Wi-Fi.
Red light flashing: error or fault
Product Description
Button light interaction

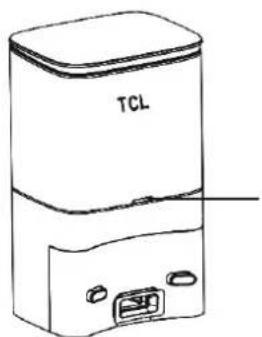
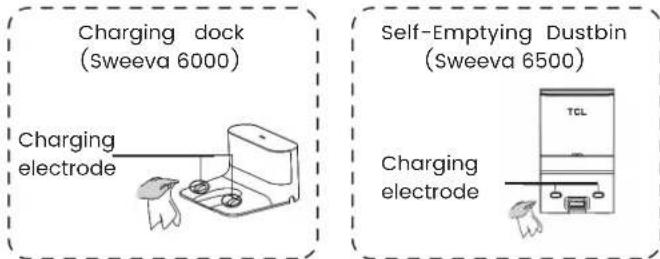
Charging Dock (Sweeva 6000)
Charging dock indicator
Normally on: When the main machine is not connected to the charging dock.
Off: Power off or the main machine and the charging dock are correctly connected.
Self-Emptying Dustbin (Sweeva 6500)
Self-Emptying dustbin indicator
Solid white light: When the main machine is not connected to the self-emptying dustbin.
White light off: The main machine and the self-emptying dustbin are correctly connected.
Solid red light: The dust bag is not in place.
Red light flashing: Abnormal state.
Product Description
EN
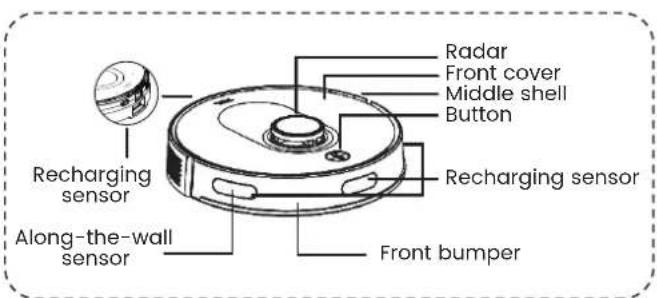
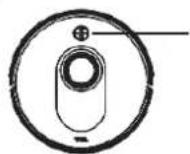
Introduction of Main Modules
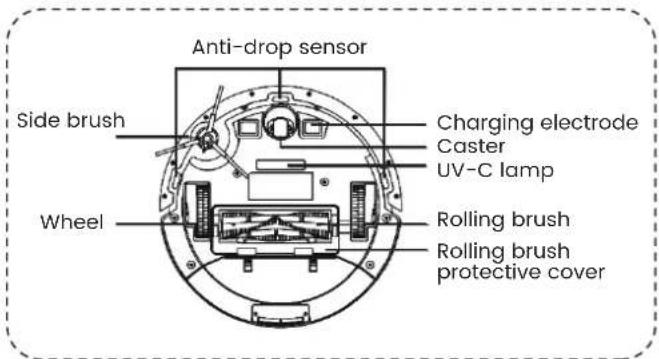

Warning: Take care to avoid direct exposure to human eyes with the UV-C lamp. Improper use of the machine or damage to the housing may cause UV-C leakage.
Product Description
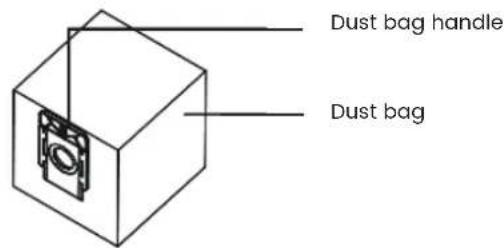
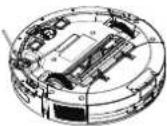
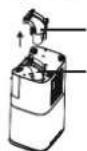
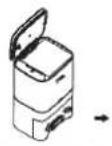
Introduction of Main Modules
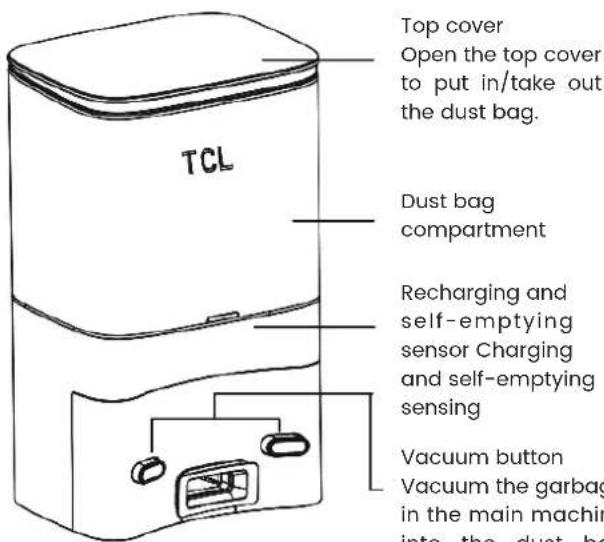
Top cover
Open the top cover to put in/take out the dust bag.
Dust bag
compartment
Recharging and self-emptying sensor Charging and self-emptying sensing
Vacuum button
Vacuum the garbage in the main machine into the dust bag through the vacuum button.
Installation Instructions
EN
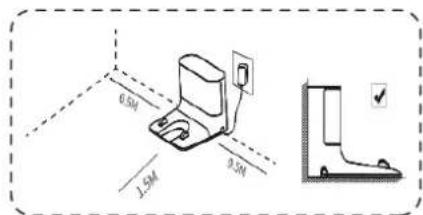
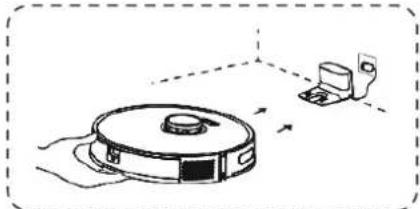
① Installation and placement of Sweeva 6000 charging dock
- Connect the charging dock with the power adapter, and be sure to organize the adapter cable to prevent the robot vacuum from being entangled during cleaning.

- Place the charging dock against and perpendicular to the wall on a level, hard floor, without obstacles within 1.5m in front and 0.5m on the left and right.
Note:
-
Install the charging dock in a position where the robot vacuum can easily reach. It is recommended to place the charging dock against the wall on a level, hard floor, not on the carpet.
-
Always keep the charging dock powered on, otherwise the robot vacuum will not automatically return.
-
To ensure normal charging, please do not move the charging dock frequently. After the location of the robot vacuum is changed, the robot vacuum may regenerate a map due to failure to relocate (for details, please refer to this Manual > Operating Instructions > Map Management).
Installation Instructions
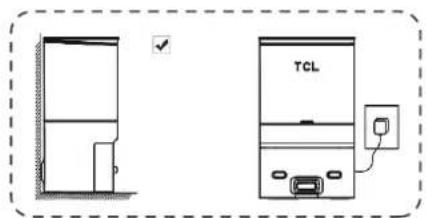
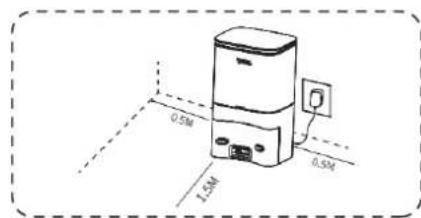
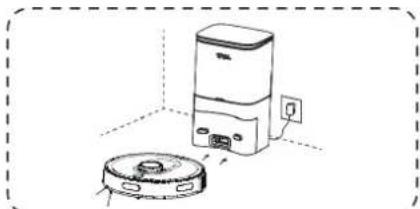
② Installation and placement of Sweeva 6500 self-emptying dustbin
- Place the self-emptying dustbin against and perpendicular to the wall on a level, hard floor, then insert the power plug into the socket that meets the requirements and turn on the power.
- Place the charging dock against and perpendicular to the wall on a level, hard floor, without obstacles within 1.5m in front and 0.5m on the left and right.
③ Remove the protective strip ④ Install the side brush
- Before use, remove the protective strips on both sides of the front bumper.
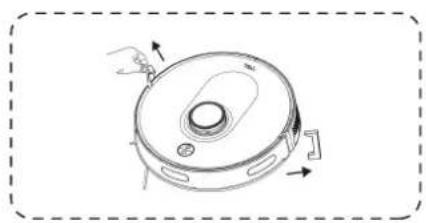
- Side brush installation: align with the holes and press gently to fix the side brush on the machine.
Installation Instructions
EN
⑤ Startup and charging
For initial use, press and hold the "O" button for 3 seconds to turn on the machine.
The main machine needs to be fully charged (approximately 4 hours) to ensure normal operation.
- Manually place the robot vacuum on the self-emptying dustbin and aim it at the charging port. When the white indicator light of the charging dock goes out, charging will start.
NOTE: The color of the power indicator indicates the battery level:
- Blue light: ≥15%
- Orange light: <15%
APP Download and Network Operation (Optional)
① Download
- Search for "TCL Home" in the mobile app store to download the APP.

② Reset the network
- Press and hold the button and the button simultaneously until a voice prompt is heard, then the indicator light flashes slowly in blue, and the machine enters the pairing state.
Indicator light: Blue light flashing slowly.wait for connection Blue light flashing quickly.Wi-Fi connection in progress Blue light normally on:Wi-Fi connected
③ Add a device
Open the APP, create a new account, and follow the operation instructions in the App.
③ Add a device
Before setting the Wi-Fi, please make sure that the main machine and Wi-Fi network meet the following requirements.
A. Main machine:
The battery level of the main machine is greater than 20% or the main machine is placed on the charging dock.
B. Wi-Fi network:
- Use the correct wireless network password.
- Do not use a VPN (Virtual Private Network) or proxy server.
The Wi-Fi router supports 802.11b/g/n and IPv4 protocols.
- The router frequency band is 2.4GHz or a dual-band router that supports the 2.4GHz frequency band is used. The main machine does not support the 5GHz frequency band.
If the main machine cannot be connected in the 2.4/5GHz dual-band Wi-Fi network, please switch to the 2.4 GHz network for Wi-Fi settings. After the setting is completed, you can switch back.
- When connecting to a hidden network, please make sure to enter the correct network name - SSID (case sensitive) and connect to a 2.4GHz wireless network.
- When using a wireless extender/repeater, please make sure that the network name (SSID) and password are the same as that of the main network.
- Set the firewall and port of the Wi-Fi router to allow them main machine to connect to the APP server.
Network security requirements:
- Use a WPA or WPA2 network encrypted with TKIP, PSK, AES/CCMP.
APP Download and Network Operation (Optional)
EN
Wi-Fi connection failure
If you cannot use your smart phone to control the main machine, please try the following solutions. If the problem persists, please contact our customer service personnel in time.
| Wi-Fi status indicator | Cause Solution | |
| Blue light normally on | The main machine is con- nected to the router, but cannot be connected to the network. | ·Check whether the router is connected to the network. ·Contact the network operator to find out whether there are any network connection problems. |
| Blue light flashing quickly | The main machine cannot be connected to the wire- less router. | ·Check whether the network name and password have been changed. ·If necessary, reset the Wi-Fi connection. Please refer to the “Operating Instructions>Use of the Main Machine>Reset Wi-Fi Connection” in this manual. |
| Blue light flashing slowly | The Wi-Fi connection has been reset or has not been set before. | ·Establish Wi-Fi connection with the main machine. Please refer to “Use App to Control the Main Machine” in this manual. ·If necessary, reset the Wi-Fi connection. Please refer to the “Operating Instructions>Use of the Main Machine>Reset Wi-Fi Connection” in this manual. |
- If other operations are triggered in the networking process, the indicator light will change, and the device will still maintain the network configuration state.
- If the connection between the mobile phone and the robot vacuum fails, you can reset the Wi-Fi again to enter the network configuration mode, and add the device again.
- Due to version upgrades and updates, please follow the APP internal guide for actual operation.
Operating Instructions
Power on/off
Press and hold the button for 3 seconds to turn on the machine.
Press and hold the button for 3 seconds to turn off the machine.
Start cleaning
Press the button to start the automatic cleaning mode. After starting, the robot vacuum will leave the charging dock,
automatically scan to generate a map, intelligently determine its cleaning path, and divide the space into multiple zones. The cleaning path will be planned along the wall, and then the robot vacuum will conduct cleaning back and forth in a "bow" shape to complete the cleaning of each zone one by one.
Start cleaning
If the battery is too low, the cleaning cannot be started, please charge first and then start the cleaning.
- Before cleaning, all cables on the floor shall be organized to avoid power interruption or damage to items caused by pulling the power cord during cleaning.
- In automatic cleaning mode, if the set cleaning time is less than 10 minutes, it will conduct cleaning twice by default.
- Do not move the charging dock during cleaning, and make sure that the charging dock is powered on, otherwise the robot vacuum may not be able to return for charging.
Operating Instructions
EN
Pause
- During the operation of the robot vacuum, the operation will pause by pressing any button.
Charging
- Automatic recharging: After the cleaning task is completed, it will automatically return for charging.
- Manual recharging: a. At the time of pause, you need to press the button for automatic recharging; b. When the robot vacuum is stuck or cannot find the charging dock, please manually put the robot vacuum back on the charging dock for charging.
Suction level selection (only applicable to the APP)
The cleaning level can be selected according to the needs in the APP:
- Quiet level
- Standard level
- Turbo level
- Max level
Sleep
- If it is inactive for 5 minutes, the robot vacuum will automatically switch to the sleep mode.
- The robot vacuum will automatically switch to the sleep mode 5min after fully charged.
- Sleep mode will end the current task.
Operating Instructions
System resetting Relocation and regeneration of a map
In the standby mode, press and hold the button for 15 seconds to reset the system.
- After resetting the system, the robot vacuum will lose the map and the original settings including the virtual boundary.
Map management
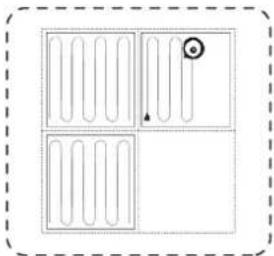
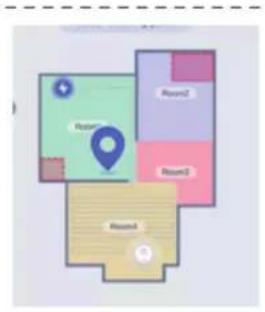
Real-time drawing of a room map
Real-time drawing of a room map can help you easily understand the cleaning path and environment. The map will be updated in real time during each cleaning to ensure normal navigation.
To generate a complete room map:
a. Remove objects that may block or seize the robot vacuum;
b. After the map is generated, please do not move the charging dock or disconnect the power supply.
When the robot vacuum is moved or the surrounding environment changes significantly, the robot vacuum will try to relocate itself and may regenerate a map to match with the surrounding environment. Details are as follows:
a. If the relocation is successful, the robot vacuum will resume cleaning;
b. If the relocation fails, the robot vacuum will regenerate a map to ensure normal navigation for new cleaning; if the original map has a virtual boundary (forbidden zone), the robot vacuum will not start new cleaning to avoid crossing the forbidden zone.
Make sure that the robot vacuum starts cleaning from the charging dock every time.
During cleaning, do not move the robot vacuum frequently. If you has moved the robot vacuum, please put it back to its original position.
Zone cleaning mode (only applicable to the App)
You can use the mobile APP to set three cleaning modes:
- room cleaning, area cleaning and spot cleaning.
- Only after the main machine successfully creates a map, zone cleaning can be started.
Operating Instructions
EN
Zone cleaning mode (only applicable to the App)
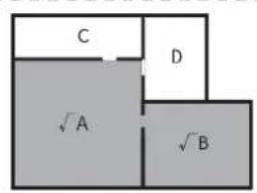
- Room cleaning: The robot vacuum will clean one or more rooms checked on the zooming map in the APP.
- After starting to clean, the robot vacuum may enter the zone outside the selected zone, so please clear the floor obstacles around the selected zone. The zone selection can not ensure safe isolation.
- Area cleaning: Set up a cleaning zone. The robot vacuum will only clean the zone and return to the charging dock after cleaning.
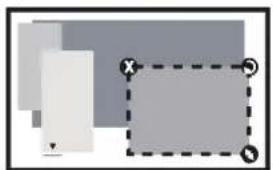
- Spot cleaning: Click the cleaning position, then the robot vacuum will clean in the 1.5m× 1.5m area centered on this position, and return to the charging dock after cleaning
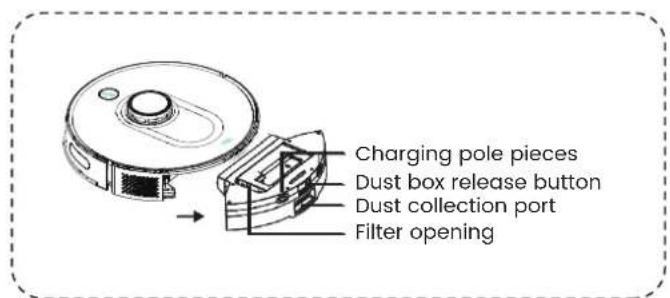
Daily Maintenance
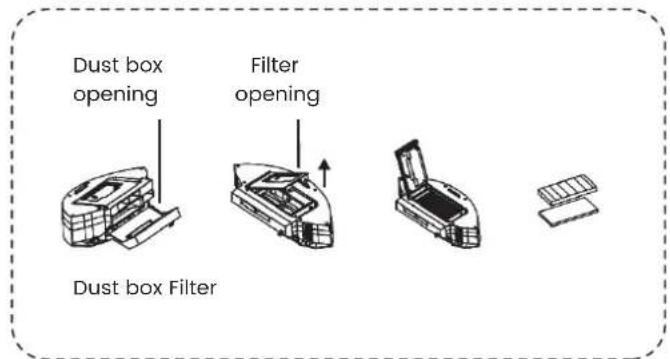
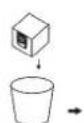
Clean the dust box
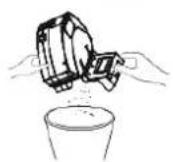
① Empty the dust box, put the dust box close to the trash can, and tap the dust box gently to knock off the excess dirt.
Disassemble the removed filter assembly, take out the high-performance filter, and clean the filter with the supplied cleaning brush.
③ The dust box and filter assembly can be thoroughly rinsed with water as needed. (Note: The filter cannot be cleaned with hot water or detergent.)
④ After cleaning, the dust box and filter assembly must be thoroughly air-dried. (Note: Repeated washing will destroy the material of the high-performance filter and make it ineffective. Please clean it with caution.)
⑤ Reassemble the air-dried dust box and filter assembly, and put it back into the robot vacuum.
- If the wet dust box and filter assembly are put back into the robot vacuum, it may cause damage to the main machine or fan.

Clean the dust box


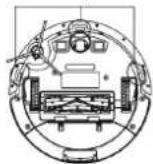
Clean the rolling brush
① As shown in the figure below, press the buckle to take out the protective cover, and take out the rolling brush upwards.
② Clean the rolling brush with a cleaning tool, and the blade can cut off the hair entangled on the rolling brush.
③ Remove the spool at one end of the rolling brush and clean away the hair entangled on it.
④ After cleaning, put the rolling brush back and make sure it is installed in place.

Daily Maintenance
EN
Clean the side brush
① Remove the side brush and clean away the hair or foreign objects on it. You can choose whether to wipe it with a damp cloth according to your needs.
② Put the side brush back and press it tightly to ensure it is installed in place.
- It is recommended to replace the side brush every 3-6 months to ensure the cleaning effect.
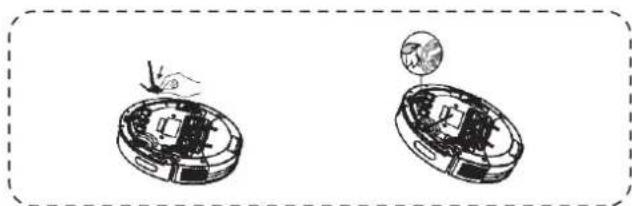
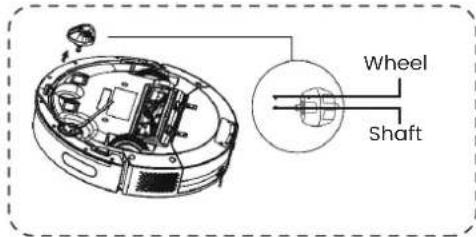
Clean the universal wheel
As hair is entangled on the universal wheel or dust particles adhere to it easily, be sure to clean the universal wheel regularly or as needed.
① Pull the universal wheel upwards.
② Clean up the hair or debris entangled around the universal wheel or in the chamber of the universal wheel.
Clean the universal wheel
③ Reinstall the universal wheel and push it in until it clicks into place.
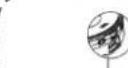
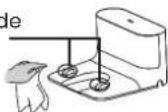
Clean the charging electrode
Please clean the charging electrode regularly, and wipe off the dust on the charging electrode with a soft dry cloth or cleaning brush.
Daily Maintenance
Clean up the dust channel
If the full dust icon on the screen of the self-emptying dustbin flashes in red after replacing the dust bag, it is recommended to unplug the power plug, reverse the self-emptying dustbin, and check whether the dust channel is blocked by foreign objects. If the dust channel is blocked, refer to the figure below, use a screwdriver to remove the transparent cover of the dust channel, and clean out foreign objects.
Note: Violent disassembly is prohibited. After cleaning, put it back as it is.
Transparent cover of the dust channel
Dust channel
Replace the dust bag
When the dust bag is full, the full dust icon on the screen of the self-emptying dustbin flashes in red or the APP gives a notice to remind you to replace the dust bag in time. The green light and white light of the dust collection icon flash when the dust bag is in normal use.
Replace the dust bag
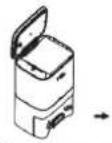
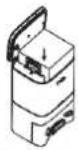
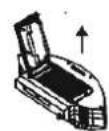
Open the top cover.
Pull up the handle of the dust bag to take out the dust bag.
Discard the old dust bag
Install a new dust bag and close the top cover.
Clean the sensor
Please clean the sensor regularly, and wipe off the dust on the sensor with a soft dry cloth or cleaning brush.
Recharging sensor
Recharging sensor
Along-the-wall sensor
Anti-drop sensor
Exceptions and Self-check
EN
When the product works abnormally, the red indicator light on the main machine will flash, and the relevant voice prompts will be heard at the same time. Please follow the voice prompts to solve the problem.
| Voice Prompt | Solution |
| The bumper is stuck. Please check. | ·The bumper is stuck. Please tap repeatedly to remove foreign objects. If there are no foreign objects, please move the machine to a new position and restart it. |
| The wheels are stuck. Please check whether the wheels are stuck with foreign objects, or move the machine to a new position and restart it. | ·The wheels are stuck. Please check whether the wheels are stuck with foreign objects, or move the machine to a new position and restart it. |
| The side brush is stuck. Please check. | ·The side brush may be entangled with foreign objects. Please clean and restart it. |
| The rolling brush is stuck. Please remove the rolling brush and clean it. | ·The rolling brush may be entangled with foreign objects. Please remove the rolling brush and clean the rolling brush, connection part of the rolling brush, rolling brush cover and the dust suction port. |
| The wheels are suspended. Please move the machine to a new position and restart it. | ·The wheels are suspended. Please move the machine to a new position and restart it. |
| The machine is trapped. Please move the machine to a new position and restart it. | ·The machine is trapped. Please clear the obstacles around the machine. |
| Voice Prompt Solution | |
| The machine is tilted. Please place the machine on a level floor and restart it. | ·The machine is tilted at the time of startup. Please place the machine on a level floor and restart it. |
| The along-the-wall sensor is blocked. Please wipe it. | ·The along-the-wall sensor is blocked. Please wipe it. |
| The cliff sensor is blocked. Please wipe it. | ·The cliff sensor is blocked. Please wipe it. |
| The laser sensor is blocked. Please wipe it. | ·The laser ranging sensor is blocked. Please clear the blockage. Reflective environments, such as open space and metal mirrors, will also affect the normal operation of the laser ranging sensor. So please move the machine to a new position and restart it. |
| A forbidden zone is detected. Please move the machine to a new position and restart it. | ·The machine is too close to the forbidden zone at the time of startup. Please move the machine to a new position and restart it. |
| The battery is too low, and the system will shut down automatically. | ·Put the machine back into the charging base to charge. |
| Please clean and replace the dust bag in the bucket. | ·Please replace the dust bag with a new one. |
| The dust bag is not installed. Please install the dust bag before starting dust collection. | ·Please install the dust bag correctly. |
| The dust bag has been taken out, so dust collection is suspended. | ·Please put back the dust bag. |
| Please put back the dust box. | ·Please put back the dust box and filter, and confirm that the filter and dust box are installed in place, and then start cleaning again. |
List of Faults
EN
When the main machine fails, the red indicator light on the main machine will flash, and the relevant voice prompts will be heard at the same time. If you still cannot solve the fault according to the prompts, please contact our after-sales service department.
| Voice Prompt Solution | |
| Error 1: The battery is abnormal. Please refer to the user manual or the APP. | ·Please open the battery compartment and check whether the battery is properly connected, and restart the machine. ·The battery temperature is too high or low. Please do not use it until the battery return to the normal temperature (0°C~40°C/32°~104°F). |
| Error 2: The wheel module is abnormal. Please refer to the user manual or the APP. | ·Please check whether the wheels are stuck with foreign objects, and restart the machine. |
| Error 3: The side brush module is abnormal. Please refer to the user manual or the APP. | ·Please check whether the side brush is stuck with foreign objects, and restart the machine. |
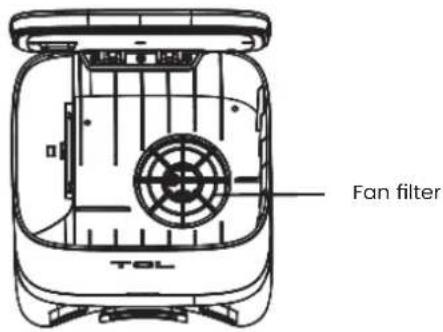
| Error 4: The fan is abnormal. Please refer to the user manual or the APP. | ·Please check whether foreign objects are stuck in the fan port, and restart the machine. ·Please clean the dust box and filter, and restart the machine. |
| Error 5: The rolling brush is abnormal. Please refer to the user manual or the APP. | ·Please remove the rolling brush, and clean the rolling brush, connection part of the rolling brush, rolling brush cover and the dust suction port. ·Please restart the machine after cleaning. |
| Error 6: The laser sensor is abnormal. Please refer to the user manual or the APP. | ·Please check whether there are foreign objects on the laser sensor, and restart the machine after cleaning. |
| Error 7: The charging is abnormal. Please clean the charging contact area. | ·Please check whether the charging area is contaminated, and clean the charging pole pieces. ·Please check whether the battery is installed properly. |

Technical Specifications
| Functional parameters of the main machine | |
| Operating voltage | 14.4 V |
| Approx. WRated power | |
| Battery | Lithium battery |
| Battery capacity | Nominal 5,000mAh |
| Charging time | 4-5 hours |
| Operating hours | Approx. 180min (standard level) |
| Working temperature range | 0°C-40°C |
| Operating humidity range | ≤90%RH |
| Noise | ≤68dB (standard level) |
| Service life of the machine | Continuous operation - 1,000h |
| Dimensions | Φ342*94.5mm |
| Maximum suction | 2,700Pa |
| Functional parameters of accessories | |
| Power adapter | |
| Input voltage | 100-240 V AC |
| Input current | 0.6A MAX |
| Output voltage | 19 V |
| Output current | 0.6A |
| Charging dock | |
| Output voltage | 24V |
| Output current | 1A |
| Charging temperature range | 0°C-35°C |
Tip: Our company reserves the right to make any technical or design changes to the product due to constant product improvement needs and give explanations accordingly.
Environmental Statement
EN
Names and contents of harmful substances in the product
| Component Name | Harmful Substances | |||||
| Lead (Pb) | Mercury (Hg) | Cadmium (Cd) | Hexavalent chromium (Cr (VI)) | Polybrominated biphenyl (PBB) | Polybrominated diphenyl ethers (PBDE) | |
| Shell component | ○ | ○ | ○ | ○ | ○ | ○ |
| Internal plastic parts | ○ | ○ | ○ | ○ | ○ | ○ |
| Metal parts | × | ○ | ○ | ○ | ○ | ○ |
| Electrical components and control components | × | ○ | × | ○ | ○ | ○ |
| Dry battery | × | ○ | ○ | ○ | ○ | ○ |
| Rechargeable battery | × | ○ | ○ | ○ | ○ | ○ |
| This form is prepared in accordance with the provisions of SJ/T 11364. ○: It indicates that the contents of the hazardous substance in all homogeneous materials of this part are below the required limit specified in GB/T 26572. ×: It indicates that the content of the hazardous substance in at least one of the homogeneous materials of this part exceeds the required limit specified in GB/T 26572. (All parts marked with “×” in the form are in conformity to the EU RoHS Directive, but cannot be replaced by hazardous substances due to global technological development limits.) (This form indicates that these hazardous substances exist in our company's products, but not all of the products included in the package contain all of the above parts.) | ||||||
The service life of the rechargeable battery provided is 3 years.
The service life of the rechargeable battery provided is 5 years.
Note: The material restrictions in this form shall be based on the China RoHS Report. If there is no China RoHS Report, this form shall not be marked.
Warranty Card II
| User name | (II) Settlement form of the warranty provider | |
| Address | ||
| Tel/Mobile | ||
| Postal code | ||
| Product model | ||
| Purchase date | ||
| Invoice number | ||
| Warranty period | ||
| Product warranty description:1. From the date of the user's purchase of this product, the warranty period is one year for the host machine, and six months for the adapter, the rechargeable battery and other accessories.2. After receiving the product repair request, the after-sales service staff will solve the problem within 15 working days.3. The user can learn about relevant technical problems through the user manual of the product or the after-sales service hotline, and get a clear solution. Hotline: 4006-671-909.4. When a performance failure occurs during the user's normal use, our company promises to provide the above warranty service unless otherwise stipulated by the applicable laws, rules and regulations of the state.5. During the warranty period, paid maintenance service will be provided under any of the following circumstances:(1) Damage caused by man-made factors or irresistible natural phenomena;(2) Failure or damage caused by improper operation of the user;(3) Damage due to the user's disassembly or alteration without authorization. | ||
Warranty Card I
| User name | |
| Address | |
| Tel/Mobile | |
| Postal code | |
| Product model | |
| Purchase date | |
| Invoice number | |
| Warranty period |
| Date Repairman Maintenance record | ||
Ladestation (Sweeva 6000)
Station de charge (Sweeva 6000)
Electrode de charge
Specifications techniques
FR