
Sweeva 2000 - Vacuum Cleaner TCL - Free user manual and instructions
Find the device manual for free Sweeva 2000 TCL in PDF.
| Product Type | Robot vacuum |
| Brand / Model | TCL Sweeva 2000 |
| Dimensions (L × W × H) | 320 × 324 × 70 mm |
| Net Weight | 4,07 kg |
| Battery Type | Lithium-ion (Li-ion) 2900 mAh |
| Rated Voltage | 14,1 V |
| Rated Power | 30 W |
| Power Supply (Charger) | Input 100-240 V ~ 0,5 A max, 50/60 Hz ; Output 19 V === 0,6 A |
| Connectivity | Wi-Fi 2,4 GHz ; TCL Home app (iOS/Android) |
| Voice Control | Compatible with Alexa and Google Assistant (via app) |
| Cleaning Modes | Automatic, edge, spot, scheduled |
| Sensors | Anti-drop (3), anti-collision (front infrared), wall sensor |
| Additional Features | Virtual wall (magnetic strip), remote control, automatic return to charging base |
| Package Contents | Robot, charging base, power adapter, spare filter, cleaning knife, 4 side brushes, magnetic strip × 2, manual |
| Maintenance | Dustbin: after each use; filter: once/week (2 with pets); roller brush and side brushes: once/week; sensors and charging contacts: once/month |
| Consumable Replacement | Filter: every 2-3 months; roller brush: 6-12 months; side brushes: 3-6 months |
| Safety | Auto shut-off when lifted, stair detection, front bumper, overload protection |
| Certifications | FCC Part 15 Class B |
Frequently Asked Questions - Sweeva 2000 TCL
User questions about Sweeva 2000 TCL
0 question about this device. Answer the ones you know or ask your own.
Ask a new question about this device
Download the instructions for your Vacuum Cleaner in PDF format for free! Find your manual Sweeva 2000 - TCL and take your electronic device back in hand. On this page are published all the documents necessary for the use of your device. Sweeva 2000 by TCL.
USER MANUAL Sweeva 2000 TCL
Robot Vacuum User Manual
Sweeva 2000

English
Robot Vacuum User Manual 01-18
Deutsch
- Production descripti no 02
- Packaging list....03
- Safety instructions.... 04-06
P 4. roduct use 07-14 - Maintenance/replacing consumables....15-17
- Maintenance and replacement frequency....17
- Troubleshooting.... 18
- Basic parameters.... 18
1.Product description
Robot Vacuum

Bottom of Robot Vacuum

Charging base

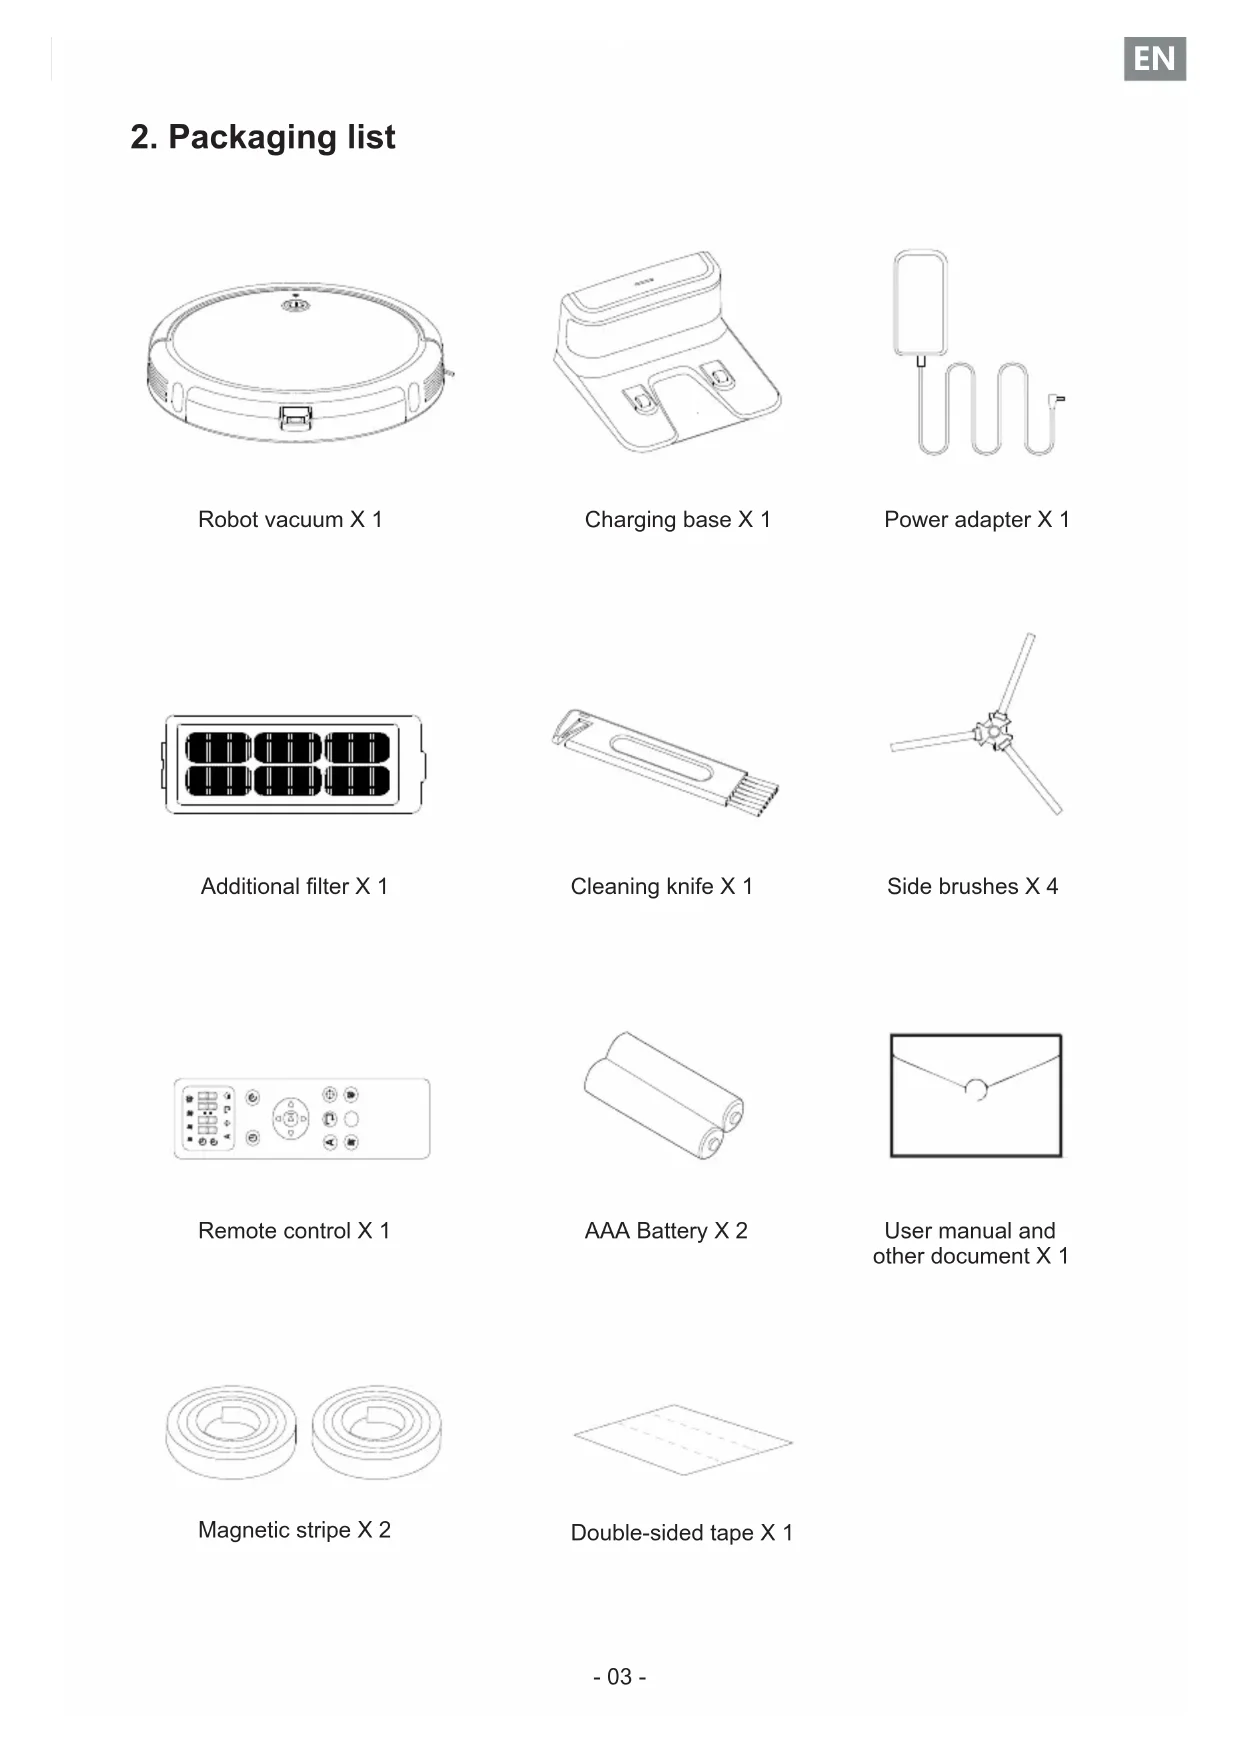
2. Packaging list

natural_image
Line drawing of a circular mechanical component with mounting holes and a central hub (no text or symbols)Robot vacuum X 1

natural_image
Line drawing of a two-port device with a closed lid and two side buttons (no text or symbols)Charging base X 1

natural_image
Simple line drawing of a medical or laboratory device with a rectangular tube and coiled tubing (no text or symbols)Power adapter X 1

natural_image
Pure electrical circuit lines without any symbolsAdditional filter X 1

natural_image
Line drawing of a mechanical component with a handle and internal grooves (no text or symbols)Cleaning knife X 1

natural_image
Simple line drawing of a three-blade propeller or fan with no text or symbolsSide brushes X 4

Remote control X 1

natural_image
Simple line drawing of two rolled-up cylindrical objects (no text or symbols)AAA Battery X 2
natural_image
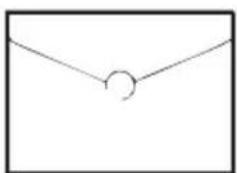
Simple line drawing of an envelope with a circular cutout at the center (no text or symbols)User manual and other document X 1

natural_image
Two identical 3D isometric diagrams of concentric circular rings with no text or symbolsMagnetic stripe X 2

Double-sided tape X 1
3. Safety instructions
The following precautions guide users on how to use the product safely and correctly to avoid the risk of injury or damage.
▲Basic precautions
After reading this manual, please keep it in an easily accessible place.
◆ This symbol is a warning symbo. This symbol warns you of potential hazards that may cause property damage or serious injury or death.
◆ Warning refers to a situation that, if not avoided, may result in death or serious injury.
◆ Be careful of flashing indicator. It may cause slight or moderate injury if not avoided.
Warning
◆ Please read this manual carefully to learn about product use and precautions before using the product.
◆ This appliance can be used by children aged from 8 years and above Persons with physical, mental or sensory impairments are prohibited from using or operating this product.
◆ This product is not a toy. Children shall not play with the appliance. Small children and pets should be supervised when the robot is operating.
◆ Children are prohibited from playing with the product package, otherwise it may cause suffocation.
◆ Please do not insert any body parts(such as hands or feet) under the brushes or wheels of the appliance when it is operating.
◆ Do not place any objects on the stationary or moving robot. Please do not sit or lean on the appliance.
◆ Do not clean any burning objects.
◆ Do not use the appliance to pick up hard or sharp objects, such as glass sheets, iron nails, etc.
◆ Do not use this appliance in humid or flammable, explosive, corrosive environments, or in exposed power socket.
Do not spray or place flammable materials (gasoline, thinner, etc.), surfactants (cleaners, bathroom items, etc.) or beverages around the appliance, otherwise it may cause fire or product failure.
◆ Do not pour water, detergent, etc. into the appliance, otherwise it may cause product failure.
This product is for indoor use only. Do not use it outdoors or in a suspended environment without protective fence to prevent it from falling. At the same time, physical barriers should be used to prevent it from entering the balcon to ensure safe operation.
◆ To avoid electric shock, do not expose the robot's electronics, batteries or charging base. It is strictly prohibited for users to repair the robot themselves. Please hand maintenance work over to qualified maintenance personnel. Do not operate the robot with wet hands.
◆ Do not clean or maintain the main machine and charging base with the power on.
◆ Please make sure to use original adapters, batteries and other accessories. Do not use third-party accessories.
This product contains batteries. Please do not place the product in water or on fire. Please stop using this product if there is any battery problem; the battery needs to be recycled separately. and the used battery should be put in a sealed plastic bag and handled in accordance with local environmental laws and regulations.
◆ Please only use a cloth dampened with clean water to clean the appliance.
◆ Please note that the robot moves by itself. Take care when walking in the area the robot is cleaning to avoid stepping on it or tripping over it.
◆ The appliance is not to be used by persons (including children) with reduced physical, sensory or mental capabilities, or lack of experience and knowledge, unless they have been given supervision or instruction.
◆ The appliance is only to be used with the unit provided.
◆ It must only be supplied at SELV.
◆ This appliance contains batteries that are only replaceable by skilled persons.
◆ For the purposes of recharging the battery, only use the detachable supply unit provided with this appliance.
◆ This device is for indoor use only. It should be clean and maintained regularly. The appliance is only to be used with the unit provided.
This appliance can be used by children aged from 8 years and above and persons with reduced physical, sensory or mental capabilities or lack of experience and knowledge if they have been given supervision or instruction concerning use of the appliance in a safe way and understand the hazards involved.
◆ Children shall not play with the appliance. Cleaning and user maintenance shall not be made by children without supervision
◆ The battery must be removed from the appliance before it is scrapped;
◆ The appliance must be disconnected from the supply mains when removing the battery;
◆ The battery is to be disposed of safely.
Be careful
◆ Carefully protect the power cord, avoid pulling, twisting, being caught by the door, or damage and crushing caused by other heavy objects; Do not use the appliance if the cord is damaged.
◆ If the charging base is not used for a long time, the power plug should be unplugged from the socket.
◆ Please place the cleaning brush out of the reach of children.
◆ Empty the dustbin frequently and keep it clean. Do not usr the appliance when the dustbin is full.
◆ Keep the main frame and charging terminal of the charging base away from metal objects.
◆ This appliance is specifically designed to prevent floor scratching. however, we still recommend that you use this appliance to clean a small area of the room before cleaning the entire room to ensure that the floor is not scratched.
◆ Please purchase and use the original consumables.
▲ Reminder
Before using this appliance, please check the following items:
◆ Remove fragile or unnecessary objects from the cleaning area, including papers, blinds, or curtain cords; remove expensive pottery, valuables and inflammables from the floor.
◆ Do not use this appliance in a room where children sleep alone. otherwise, the child may be injured.
◆ Check whether the battery power is sufficient. Please charge it if the power is low.
◆ Please empty the dustbin box if it is full.
◆ Please close the door of the room if you do not want the robot to enter. During cleaning, the robot may enter other rooms and continue cleaning.
In most cases, the anti-fall sensor will prevent the robot from roller down the stairs. If the sensor is dirty or used on a carpet or on a reflective / very dark floor, the effect of the sensor will be compromised it is recommended to set up physical barriers where the robot may fall.
◆ Please do not use the robot on the tassels of a carpet in the folding area, so at to prevent the robot from being entangled. Avoid cleaning dark and high pile carpets or carpets thicker than 1.02/26mm, as they may cause robot failure.
Notice

This symbol on the device or its packaging indicates: Do not dispose of electrical appliances as unsorted municipal waste; use separate collection facilities. Contact your local authority for information regarding the collection systems available. If electrical appliances are disposed of in landfills or dumps, hazardous substances can leak into the groundwater and get into the food chain, damaging your health and well-being. When replacing old appliances with new ones, the retailer is legally obliged to take back your old appliance for disposal at least free of charge.
FCC Statement
NOTE: This equipment has been tested and found to comply with the limits for a Class B digital device, pursuant to part 15 of the FCC Rules. These limits are designed to provide reasonable protection against harmful interference in a residential installation. This equipment generates uses and can radiate radio frequency energy and, if not installed and used in accordance with the instructions, may cause harmful interference to radio communications. However, there is no guarantee that interference will not occur in a particular installation. If this equipment does cause harmful interference to radio or television reception, which can be determined by turning the equipment off and on, the user is encouraged to try to correct the interference by one or more of the following measures:
◆ Reorient or relocate the receiving antenna.
◆ Increase the separation between the equipment and receiver.
◆ Connect the equipment into an outlet on a circuit different from that to which the receiver is connected.
◆ Consult the dealer or an experienced radio/TV technician for help.
◆ Changes or modifications not expressly approved by the party responsible for compliance could void the user's authority to operate the equipment.
RF Exposure Warning Statements:
This equipment complies with FCC radiation exposure limits set forth for an uncontrolled environment. This equipment shall be installed and operated with minimum distance 20cm between the radiator & body.
This device complies with Part 15 of the FCC Rules. operation is subject to the follow two conditions:
(1) This device may not cause harmful interference.
(2) This device must accept any interference received, including interference that may cause undesired operation.
4. Product use
Important Tips Before Use
a Remove power cords and small objects from the floor that may entangle Robot Vacuum.
b Fold tasseled edges of area rugs underneath to prevent tangling Robot Vacuum. Avoid cleaning very dark-colored high-pile rugs or rugs thicker than 1.02 in / 26 mm as they may cause Robot Vacuum to malfunction.
C Keep Robot Vacuum away from spaces lower than 2.87 in/73 mm to prevent Robot Vacuum from getting stuck. If necessary, place a physical barrier to block off the problem areas.
d Keep Robot Vacuum away from wet areas.
e Robot Vacuum may climb on top of objects less than 0.63 in / 16 mm in height. Remove these objects if possible.
Anti-drop sensors prevent Robot Vacuum from tumbling down stairs and steep drops. They may work less effectively if dirty or used on reflective/very dark-colored floors. It is recommended to place physical barriers to block off areas where Sweeva may fall.

Place physical barriers in front of fireplaces and areas that may cause damage to Robot Vacuum if entered.
Prepare
- Please install side brushes before use.

- Remove the limit stripes in the Sweeva's forward collision bumper on both sides


Before use, the user should remove the foam placed on both sides of the front bumper
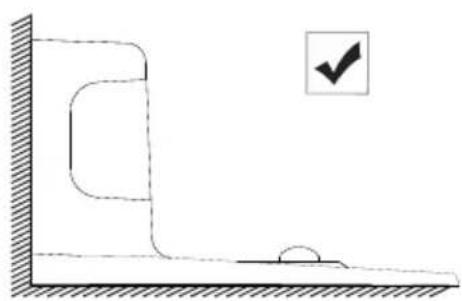
- Place the Charging base on a hard ,level surface and against a wall
natural_image
Simple line drawing of a room corner with a checkmark symbol (no text or labels)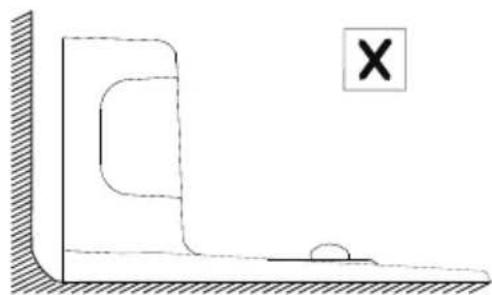
natural_image
Simple line drawing of a vertical wall and horizontal ground with a small circle near the bottom (no text or symbols)- Remove objects within 3ft/1m of the left and right side and within 6ft/2m of the front of the charging base.


Do not face the charging base onwards strong light or high magnetic fields. (e.g., television, refrigerator and other home appliances)
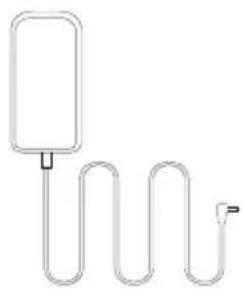
- Connect the round connector of the adapter into the power socket on the charging base and the charging base and the other end into a wall outlet.
When the charging base connects to AC power, the LED indicator on the charging case will turn b solid blue.

natural_image
Line drawing of a mobile phone device with a cable and connector (no text or symbols)
Install the Charging Base in a location that Robot Vacuum can easily access. It is recommended to place the Charging Base against a wall, and on a hard-level surface rather than on rugs or carpets. Always keep the Charging Base plugged in, otherwise Robot Vacuum will not automatically return to it.
Charge Your Robot Vacuum
Sweeva has a pre-installed rechargeable battery that has to be fully charged before use.
Sweeva returns to the Charging Base at the end of a cleaning cycle or when its battery is running low.
◆ Method 1: Attach Sweeva to the Charging Base by aligning its charging pins with the charging pins on the base.

natural_image
Line drawing of a vacuum cleaner with attached device and circular base (no text or symbols)◆Method 2: robot vacuum to the Press the charging button on the remote control to return Charging Base.

◆Method 3:Press and hold the start button on the machine for 3 seconds to return it to the charging base.

natural_image
Line drawing of a vacuum cleaner next to an open refrigerator, showing components and wiring (no text or symbols)
Turn off the main powers witch if Sweeva will not be used for along period of time. To preserve the battery's lifespan, recharge at least once every 6 months.
How to start operating
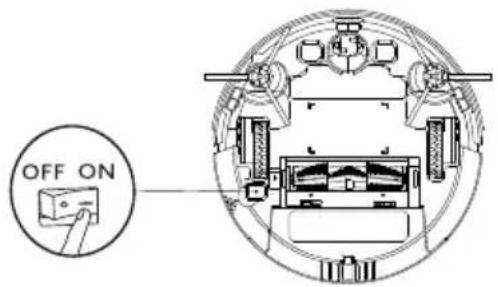
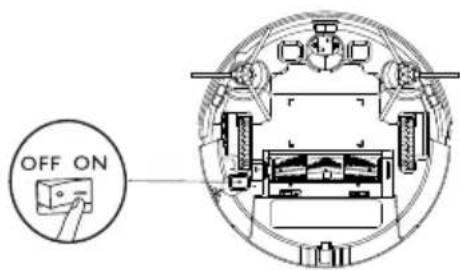
- Turn on: Turn on the rocker switch button at the bottom of the robot ( shift the gear to the "ON" state )
- Start: Short press the "Start button" on the top of the robot to start the automatic cleaning mode.
- Pause: When the robot is operating, short press the "start button" ① on top, the robot will pause and enter the standby mode.
- Recharge: Press and hold the "Start button" ① for three seconds, Once the device beeps once, release the button, robot vacuum will enter recharge mode, It will automatically find its way back to the charging base.
- Sleep: If there is no operation within 90 seconds, the status light will turn off and the robot will enter sleep mode.
Download TCL Home APP and pair it with robot
You need to download the TCL Home APP with your mobile phone, and pair it with the robot through the WiFi at home. Control the robot with the TCL Home APP. The process of downloading the APP and pairing it with the robot it as follows:
1. Download TCL Home APP
Download and install TCL Home APP (ios)
Method1: Scan the QR code below and Install this app.
Method2: Tap the "App Store" icon on your iPhone. Search "TCL Home" in the search bar.

Download and install TCL Home APP (Android)
Method1: Scan the QR code below and Install this app.
Method2: Tap the "Google Play" icon on your iPhone. Search "TCL Home" in the search bar.

- Create TCL account (Please refer to the in-app user instructions for more details)

3. Pair the app with the robot
- Press the rocker switch on the back of the Robot to ensure it is power on, the star / stop button will have solid blue light;
- Press and hold the start / stop button for 7 seconds, the Robot will make two beeps.

natural_image
Line drawing of a circular device with a hand icon and a button, no text or symbols present- When the Wi-Fi indicator flashes blue rapidly; to connect your device and to Wi-Fi network, please follow the steps below:

- As shown in the picture, click the button ① or ② to add the "robot"

- Select device: select "Sweeva 2000"

- Select Wi-Fi first, then enter the password (the device only supports 2.4 GHz Wi-Fi)

- When the figure turns 100%, it means that the robot has been successfully connected to the Wi-Fi network

- After setting the name of the robot and names of rooms, click the "Try Now" button to start using it

- The main operation interface on Sweeva 2000 APP
(Notes: The detailed distribution network steps can be operated according to the steps on the app.)
4. Reset Wi-Fi
When the robot fails to be connected with the Internet, please press Ⓐ and hold it for 7 seconds before the Wifi light turns off. Then, it starts to flash slowly, accompanied by a buzzer sound. This indicates that the robot is ready for new connection.
5. More APP functions
The TCL Home APP has scheduled cleaning, automatic cleaning, corner cleaning, fixed-point cleaning, voice control (connected with Alexa and Google voice assistant) and other functions, please refer to relevant instructions on the APP.

Due to the continuous development and upgrade of the APP, there may be some minor adjustments on the APP page, please refer to the actual version.
- Wi-Fi wireless connection only supports networks in the 2.4GHz frequency band and does not support networks in the 5GHz frequency band.
◆ If the pair is unsuccessful, please check the Internet status and try to pair again.
Virtual wall
A virtual wall can be used to isolate areas that you do not want to be cleaned. In areas that do not need the robot to enter, a virtual wall can be created along the entrance (as shown in the figure below);

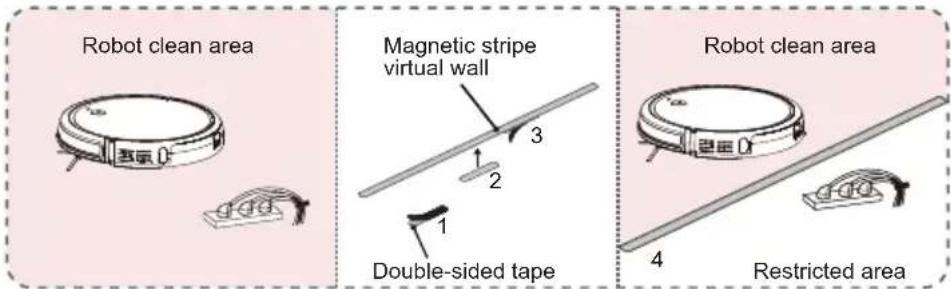

Stick the virtual device firmly on the floor. Please do not paste a virtual wall near the charging based, so as not to affect recharge.
Key indicator status description
 | Blue | Normal power, can enter working mode/standby mode as required |
| Red | Error warning | |
| Red flashes | Error warning | |
| Orange | In low battery stat at working mode/standby mode/return to charging base | |
| Orange flashes | The appliance is charging |
Error Tones and Indicators
| Status | Buzzer alarm | Action |
| Roller brush stuck | One beep, flash red light | Turn off Sweeva's and remove any hair or debris from the roller brush. |
| Anti-drop sensors are dirty | Two beeps, solid blue light | Clean the anti-drop sensors. |
| Side brush failure | Two beeps, flash red light | Turn off Sweeva's and remove any hair or debris from the side brushes. |
| Side wheel failure | Three beeps, flash red light | Turn off Sweeva's and remove any hair or debris from the wheel. |
| Forward collision bumper stuck | Four beeps, solid blue light | After repairing the stuck forward collision bumperpress the “start button” to restart the robot. |
| Suction failure | Five beeps, flash red light | 1.Turn off Sweeva's, then remove and empty the dust collector.2.Make sure the suction inlet is not blocked by any hair or debris. |
| Low battery warning | Seven beeps, solid orange light | Manually put the robot to the charging base for charging. |
How to turn off the robot
Turn off the power button on the bottom side of the robot (turn the gear to "OFF" state)
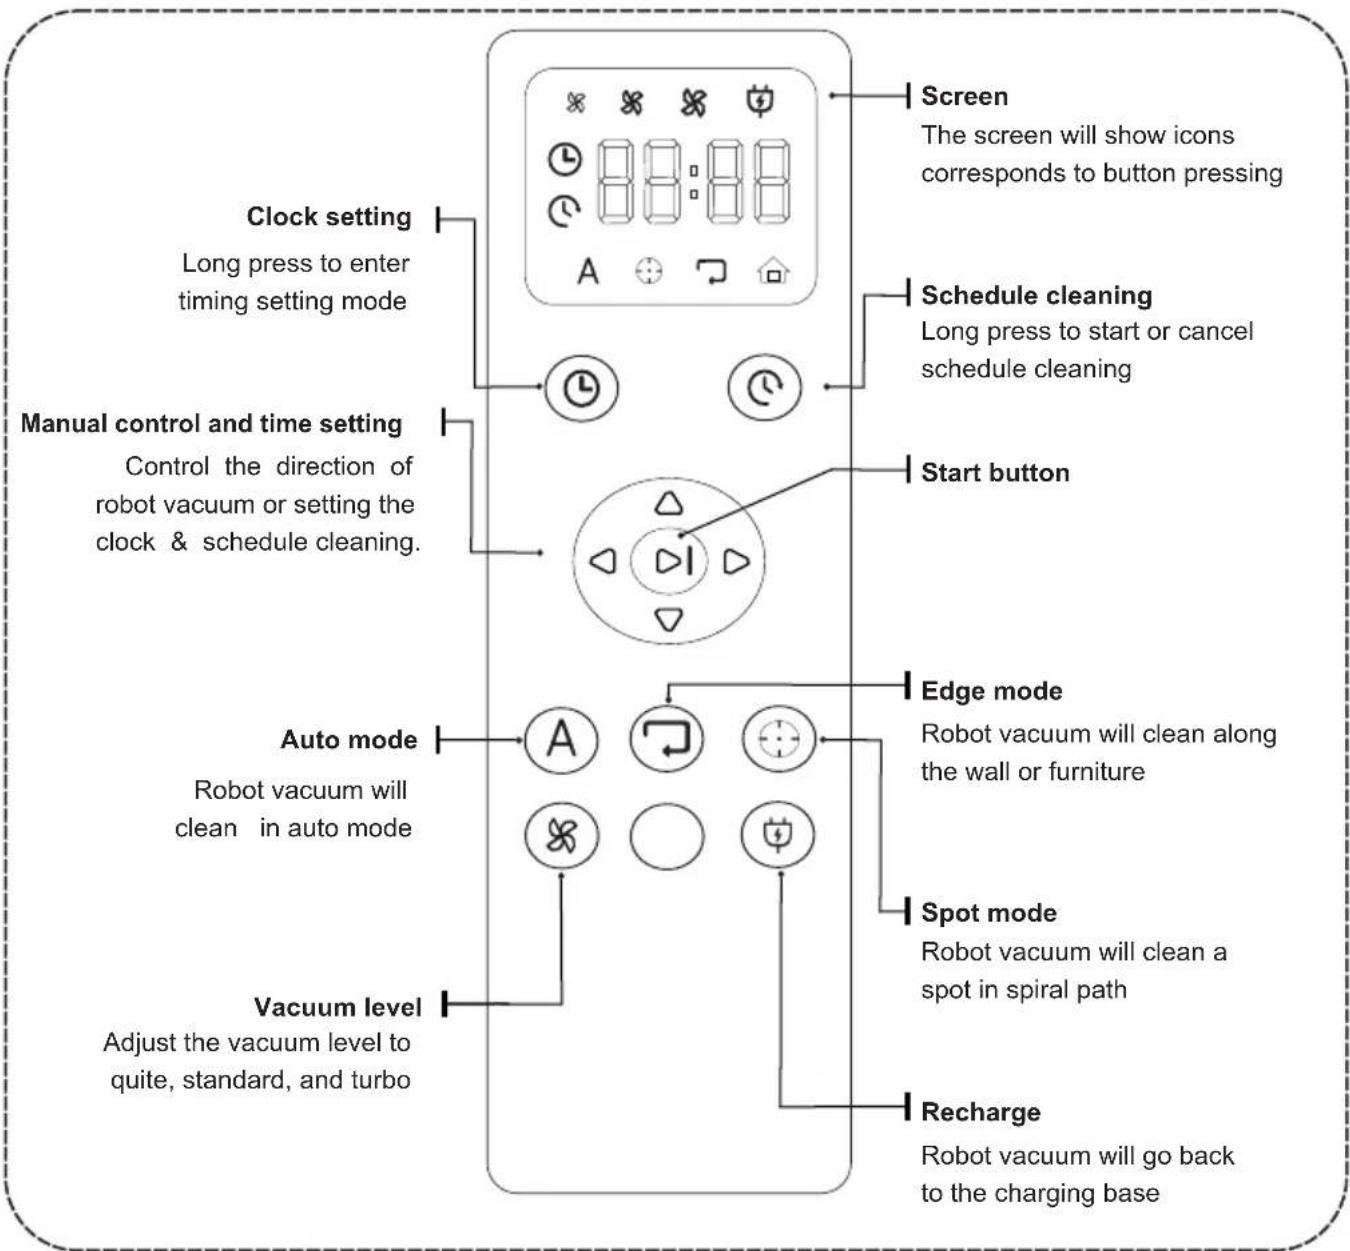
How to use the remote control How to use the remote control

- Use two AAA battery for the remote control. The battery is included in the package.

- Before using the remote, please set the clock time to be your local time zone.

natural_image
Simple diagram of a circular control knob with four triangular buttons and a central play button (no text or symbols)- Short press the Start Button to start cleaning.
5. Maintenance/replacing consumables
◆ 1. Cleaning of dustbin and filter net (filter net is replaceable)

Please power off the power before maintenance
Note: Please turn off the power (bottom rocker switch) of the robot before product maintenance / replacing consumables.
The suction power may become weak if the dustbin is full. The dustbin needs to be cleaned before and after each cleaning.
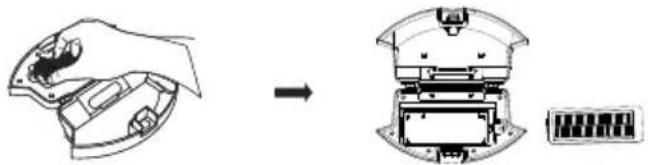
① Press the buckle of the dustbin with your thumb, and drag the dustbin out.

natural_image
Diagram showing a circular device being processed into a separate housing (no text or symbols present)② (When taking out the dustbin, do not turn it upside down) Hold the dustbin up and down with both hands, and open the dustbin forcefully;

natural_image
Diagram showing a hand holding a device before and after assembly, with no visible text or symbols③ Hold the dustbin with your left hand, tilt it at a suitable angle, and use the cleaning tool with your right hand to pour out the dust in the dustbin;

natural_image
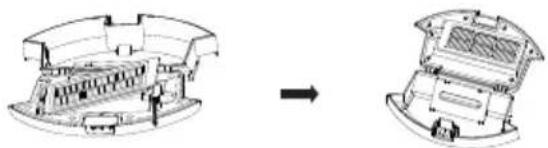
Diagram showing a device being processed into a fan or tray, with no visible text or symbols.④ Hold this position with your thumb to the left and pull up the filter;
natural_image
Diagram showing a hand holding a device before and after assembly, with no visible text or symbols⑤ Rinse the dustbin and filter(not frequently, monthly cleaning is recommended), wash for at least 1 minute, and shake off the water drops. Please wait until the dust bin and filter are completely dried(≥24h) before using it, to ensure their service life.

⑥ Filter installation/new filter net replacement: Insert the filter net into the housing slot, and then fasten the filter downwards until it buckles into place.
natural_image
Diagram showing a mechanical assembly before and after transformation, with no visible text or symbols.⑦ After closing the upper cover, push the dustbin into the main machine (make sure the dustbin is fully inserted until it buckles into the right place).

natural_image
Diagram showing a device transforming into a circular housing (no text or symbols present)◆ 2. Cleaning of roller brush (roller brush are replaceable)
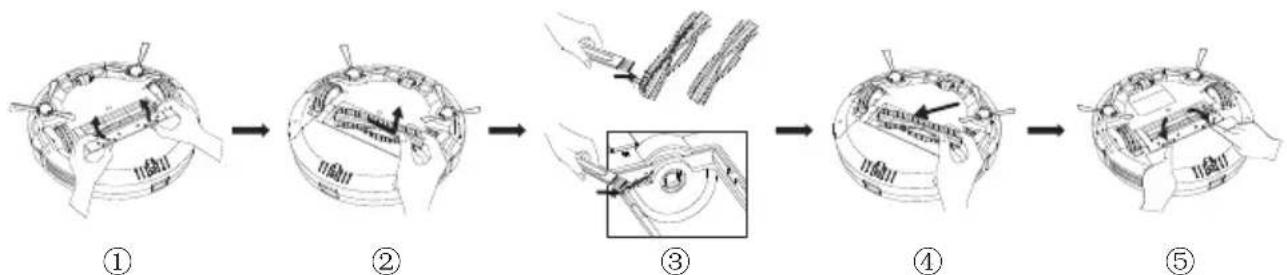
Foreign substances such as hair is easy to adhere to roller brushes. Roller brush may be damaged if there is too much foreign substances on them. It is recommended to clean them once a week.
① Turn the main machine over (with the bottom shell facing upwards), hold the buckle with both hands, lift it up, and take out the brush cover.
② Use your fingers to hold the bearing far away from the switch, and take the other end of the support holder, and take out the roller brush upwards.
③ Use cleaning tools to clean the hair and other dirt on the roller brush slot.
④ Roller brush installation/new roller brush replacement: Insert one end of the roller brush square bearing seat into the corresponding square slot of the roller brush slot and slide into place (reverse installation does not work).
⑤ Make sure the main brush is aligned properly in the robot and then fasten the roller brush cover downward.
flowchart
graph LR
    A["① Component"] --> B["② Component"]
    B --> C["③ Component"]
    C --> D["④ Component"]
    D --> E["⑤ Component"]
◆3. Cleaning of side brushes (side brushes are replaceable)
Foreign substances such as hair is easy to adhere to side brushes. side brushes may be damaged if there is too much foreign substances on them. It is recommended to clean them once a week.
① With the bottom shell of the main machine facing upwards, pull out the side brush forcefully;
② Use a cleaning tool to clean up the dirt on the side brush and the slot, and the hair on the side brush can be cut off with a cleaning tool (dry brushing works, washing doesn't work).
③ Reinstall the side brush/new side brush replacement: hold one corner of the side brush, and the other side against the corresponding buckle, press the side brush down into the slot.

flowchart
graph TD
    A["①: Device with internal components"] --> B["②: Component being inserted"]
    B --> C["③: Component being added to interior space"]
◆ 4. Cleaning of sensor
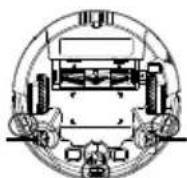
Foreign substances may adhere to the sensors on the bottom and side rear of the robot. If too much foreign substances adhere to the sensor at the bottom of the robot, the robot may fall off ledges. It is recommended to clean the sensors once a week.
Please gently wipe each sensor cover with a soft dry cloth, including:
(1) Wall sensors on both sides of the robot;
(2) Front infrared anti-collision sensors;
(3) 3 anti-fall sensors on the bottom side;

① Wall sensors on both sides of the robot;

② Front infrared anti-collision sensor;
③3 anti-fall sensors at the bottom
◆5. Cleaning of charging contacts
Foreign substances may adhere to the bottom of the machine and the charging contacts of charging base. If too much foreign substances adheres to the contact pins at the bottom of the machine, the machine may not be able to charge normally. It is recommended to clean them once a week.
The position in the figure is where the charging contacts are located. Please use a dry cloth to clean the charging pole pieces on the main machine and the charging base (please turn off the power when cleaning)
natural_image
Cross-sectional diagram of a mechanical assembly or enclosure with no visible text or symbolscharging contacts on the main machine

charging contacts on the charging base
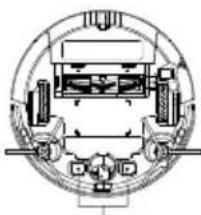
◆6. Cleaning of the omni-direction wheel
Foreign substances may adhere to the omni-direction wheels of the machine. If too much foreign substances adheres to the omni-direction wheels at the bottom of the machine, it may prevent the machine from moving forward and make it unable to clean or cause low cleaning efficiency.
It is recommended to clean them once a week.
Remove the wheels from the front caster assembly and remove the hair or dirt in the assembly shell and those entangled on the axle; When completed, reinstall the wheels into the front caster assembly.

flowchart
graph LR
    A["Device with tools and components"] --> B["Assembly step"]
    B --> C["Close-up assembly of internal parts"]
6. Maintenance and replacement frequency
| Name | Maintenance frequency | Replacement frequency |
| Dustbin | After each use | - |
| Filter | Once a week (twice a week for families with pets) | Every 2-3 months |
| Roller brush | Once a week (twice a week for families with pets) | Every 6-12 months |
| Side brush | Once a week (twice a week for families with pets) | Every 3-6 months |
| Sensor | Once a month | - |
| Charging contact | Once a month | - |
| Omni-direction wheel | Once a month | - |

Note: Sweeva has many different spare parts and components. Please purchase spare parts through the "TCL Home" App or by visiting TCL's offline or online stores.
7. Troubleshooting
| Failure description | Solutions |
| Low battery voltage | Charge the robot manually |
| Roller brush is not spinning | Remove hair and foreign substances on the roller brush. |
| Side brush is not spinning | Remove hair and foreign substances on the side brush. |
| Unable to start the robot | Confirm whether the robot is fully charged. Confirm whether the power button on the bottom of the robot is in the “ON” position |
| Weak suction | Check whether the fan suction port is blocked by foreign substances. Empty the dustbin.Clean or replace the high-efficiency filter of the dustbin. |
| Louder noise | Confirm whether the dustbin is installed correctly. Confirm whether the high-efficiency filter of the dust bin is installed. Check if there is any foreign substances stuck on the roller brush or side brushes. |
| Unable to start with the remote control | Replace the remote control battery (triple-A battery) |
| Unable to charge | Remove the objects around the charging base and make sure that the power supply is connected to the charging base Please wipe the charging contacts of the charging base with a dry cloth. Please wipe the charging contacts of the main machine with a dry cloth. |
| The robot stops automatically | Whether the roller brush is stuck and stops spinning, whether the side brush is stuck and stops spinning. Whether the side wheel is stuck, which makes the robot unable to move forward Confirm whether the robot is feeding. |
8. Basic parameters
Sweeva2000 main machine
 | Model | Global: B200AEU: SW2000B SW2000WUK: SW2000BK SW2000WK | |
| Size | 320mmX323.5mmX70mm | ||
| Battery | Li-Ion mAh2900 | ||
| Net weight | 4.07kg | ||
| Rated voltage | 14.1V | ||
| Rated power | 30W | ||
| Power input | 19V = 0.6A | ||
 | Model | B100G00AA | |
| Input | 19V = 0.6A | ||
| Output | 19V = 0.6A | ||
Sweeva2000 main adapter
| Model:GSC"X"0600S019V12E(X=U,T,V,B,U=US,T=JP,V=EU,B=UK). | Connector type | DC5.5 |
| Rated input | 100-240V~0.5AMax, 50/60Hz | |
| Rated output | 19V =0.6A |
X=U stands for US plug, X=T stands for Japan plug, X=V stands for Europe plug, X=B stands for UK plug.
Sweeva2000
Saugroboter
Katalog 19
natural_image
Line drawing of a circular vacuum cleaner with lid and mounting bracket (no text or symbols)Saugroboter X 1

natural_image
Line drawing of a two-port device with buttons and a lid (no text or symbols)Ladestation X 1

natural_image
Simple line drawing of a medical or laboratory device with a rectangular tube and coiled tubing (no text or symbols)Netzteil X 1

natural_image
Pure electrical circuit lines without any symbolsnatural_image
Line drawing of a mechanical component with a rectangular body and internal oval feature (no text or symbols)natural_image
Simple line drawing of a three-blade propeller or fan with no text or symbolsSeitenbürsten X 4

natural_image
Front panel of a remote control unit with buttons and display (no readable text or symbols)Fernbedienung X 1
natural_image
Simple line drawing of two rolled-up cylindrical objects (no text or symbols)AAA-Batterie X 2

natural_image
Simple line drawing of an envelope with a circular cutout at the center (no text or symbols)natural_image
Two identical isometric diagrams of concentric circular rings with no text or symbolsMagnetstreifen X 2


natural_image
Simple line drawing of a vertical wall with an open door and a small semicircular object near the base, no text or symbols present.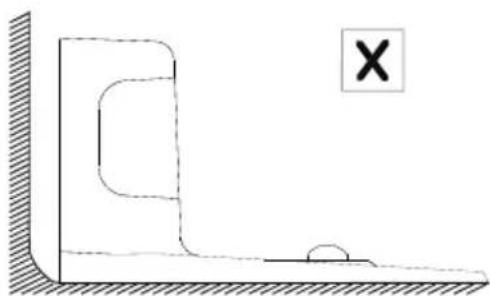
natural_image
Simple line drawing of a room corner with a wall and a horizontal floor, no text or symbols present.natural_image
Line drawing of a mobile phone connected to a wall-mounted device (no text or symbols)
natural_image
Line drawing of a robotic vacuum cleaner with a mounted device and a circular base (no text or symbols)
natural_image
Line drawing of a circular device with a hand interacting with a button (no text or symbols)
natural_image
Circular device with four triangular buttons and a central play button, enclosed in a dashed border (no text or symbols)natural_image
Diagram showing a device being processed from a circular component, with no visible text or symbols.natural_image
Diagram showing a hand holding a device before and after assembly, with no visible text or symbolsnatural_image
Diagram showing a mechanical device being processed into a circular component, with no visible text or symbols.natural_image
Diagram showing a hand holding a device before and after assembly, with no visible text or symbolsnatural_image
Diagram showing a vehicle interior with structural components before and after assembly (no text or labels)natural_image
Diagram showing a device transforming into a circular housing (no text or symbols present)flowchart
graph LR
    A["Step ①: Initial component with screw and nut"] --> B["Step ②: Component being cut"]
    B --> C["Step ③: Component being inserted into a circular component"]
    C --> D["Step ④: Component being assembled with a tool"]
    D --> E["Step ⑤: Final assembly with screw and nut"]
natural_image
Cross-sectional diagram of a vehicle showing front, rear, and side views (no text or labels)flowchart
graph LR
    A["Internal Gear Component"] --> B["Assembly Step"]
    B --> C["Exploded Assembly"]
    C --> D["Final Assembly"]
natural_image
Line drawing of a circular vacuum cleaner with a lid and mounting bracket (no text or symbols)Robot aspirador X 1

natural_image
Line drawing of a two-port device with a handle and base (no text or symbols)Base de carga X 1
natural_image
Simple line drawing of a medical or laboratory device with a rectangular block and coiled tubing (no text or symbols)natural_image
Pure electrical circuit lines without any symbolsnatural_image
Line drawing of a mechanical component with a handle and internal oval feature (no text or symbols)natural_image
Simple line drawing of a three-blade fan or propeller with no text or symbolsCepillos laterales X 4

Control remoto X 1

natural_image
Simple line drawing of two rolled-up cylindrical objects (no text or symbols)Pila AAA X2

natural_image
Simple line drawing of an envelope with a circular cutout at the center (no text or symbols)natural_image
Two identical 3D isometric diagrams of concentric circular rings with no text or symbolsBanda magnética X 2
natural_image
Simple line drawing of a room corner with a checkmark symbol (no text or labels)
natural_image
Simple line drawing of a room corner with a wall and a horizontal floor, no text or symbols present.natural_image
Line drawing of a mobile phone device with a cable and connector (no text or symbols)
natural_image
Line drawing of a vacuum cleaner with attached circuit board and circular base (no text or symbols)natural_image
Line drawing of a vacuum cleaner next to a mounted device, showing internal components and wiring (no text or symbols)
natural_image
Line drawing of a circular device with a hand interacting with the top surface (no text or symbols)
natural_image
Illustration of a remote control with a digital display and battery pack (no text or symbols)natural_image
Simple circular diagram with four directional arrows and a central play button, enclosed in a dashed border (no text or symbols)natural_image
Diagram showing a circular device being processed into a smaller device (no text or symbols present)natural_image
Diagram showing a hand holding a mechanical component before and after assembly, with no visible text or symbols.natural_image
Diagram showing a hand using a device to press or install a component, then to clean or store items (no text or symbols present)natural_image
Diagram showing a hand holding a device next to a mechanical component, with no visible text or symbols.natural_image
Diagram showing a vehicle interior with structural components before and after assembly (no text or labels)natural_image
Diagram showing a vehicle's side profile before and after transformation, with no visible text or symbols.flowchart
graph TD
    A["①: Component 1 with arrows indicating assembly"] --> B["②: Component 2 with hand fastening"]
    B --> C["③: Component 3 with hand and fan icon"]
flowchart
graph LR
    A["Engine with gears and sensors"] --> B["Assembly step"]
    B --> C["Hand holding tool, inspecting gear part"]
    C --> D["Motor assembly with gears and sensors"]
natural_image
Line drawing of a circular vacuum cleaner with ventilation slots and a central mounting bracket (no text or symbols)natural_image
Line drawing of a two-port device with a handle and two ports (no text or symbols)Base de chargement X 1

natural_image
Simple line drawing of a medical or laboratory device with a rectangular block and coiled tubing (no text or symbols)natural_image
Pure electrical circuit lines without any symbolsnatural_image
Line drawing of a mechanical component with a handle and ribbed end (no text or symbols)natural_image
Simple line drawing of a three-bladed propeller or fan with no text or symbolsnatural_image
Front panel of a remote control unit with buttons and display (no readable text or symbols)Télécommande X 1

natural_image
Simple line drawing of two rolled-up cylindrical objects (no text or symbols)Pile AAA X2

natural_image
Simple line drawing of an envelope with a circular cutout at the center (no text or symbols)natural_image
Two identical 3D isometric diagrams of concentric circular rings with no text or symbols
Bande double-face X 1
natural_image
Simple line drawing of a vertical wall with an open door and a small semicircular object near the base, no text or symbols present.
natural_image
Simple line drawing of a ramp and block on a horizontal surface, with a cross symbol in the corner (no text or labels)natural_image
Line drawing of a mobile phone device with a cable and connector (no text or symbols)
natural_image
Line drawing of a robotic vacuum cleaner with a mounted device and a circular base, showing wiring connections (no text or symbols)natural_image
Line drawing of a vacuum cleaner next to a circular device, showing components and wiring (no text or symbols)
natural_image
Line drawing of a circular device with a hand pointing at a button (no text or symbols)
natural_image
Illustration of a remote control with a battery and two cylindrical batteries (no text or symbols)natural_image
Circular device with five triangular buttons arranged symmetrically around a central play button (no text or symbols)natural_image
Diagram showing a circular device being processed into a housing, with no visible text or symbols.natural_image
Diagram showing a hand holding a device before and after assembly, with no visible text or symbolsnatural_image
Diagram showing a hand using a device to clean or store items, with no visible text or symbols.natural_image
Diagram showing a hand holding a device before and after assembly, with no visible text or symbolsnatural_image
Diagram showing a vehicle interior with structural components before and after assembly (no text or labels)natural_image
Diagram showing a vehicle chassis transforming into a circular housing component (no text or symbols present)flowchart
graph TD
    A["①: Device with handle and screw"] --> B["②: Component with hand and screw"]
    B --> C["③: Component with hand and screw"]

① Wall sensors on both sides of the robot;
natural_image
Cross-sectional diagram of a vehicle or mechanical assembly (no visible text or labels)natural_image
Line drawing of a circular mechanical device with mounting holes and a central knob (no text or symbols)Aspirapolvere Robot 1 X

natural_image
Line drawing of a two-port device with a handle and two buttons (no text or symbols)Base di ricarica X1

natural_image
Simple line drawing of a medical or laboratory device with a rectangular block and coiled tube (no text or symbols)natural_image
Pure electrical circuit lines without any symbolsnatural_image
Line drawing of a mechanical component with a rectangular body and internal oval cutout (no text or symbols)Lama per pulizi X 1

natural_image
Simple line drawing of a three-blade fan or propeller with no text or symbolsnatural_image
Simple line drawing of two cylindrical objects with rounded ends, resembling a rolled-up paper or mechanical component (no text or symbols)natural_image
Two identical 3D-rendered circular ring or washer-like structure with concentric rings and a small rectangular cutout (no text or symbols)Banda magnetica X 2
Keep Robot Vacuum away from spaces lower than 2.87 in/73 mm to prevent Robot Vacuum from getting stuck. If necessary, place a physical barrier to block off the problem area.

natural_image
Simple line drawing of a room corner with a checkmark symbol (no text or labels)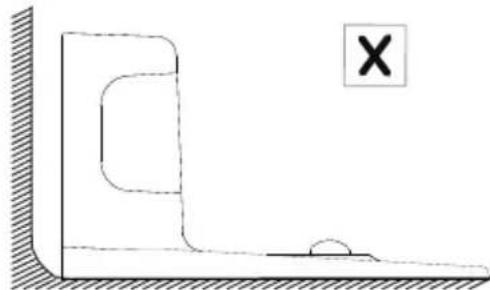
natural_image
Simple line drawing of a mechanical component with a cross mark and a small semicircular feature, no text or symbols present.natural_image
Line drawing of a mobile phone connected to a wall-mounted device (no text or symbols)
natural_image
Line drawing of a robotic vacuum cleaner with attached screen and circular base (no text or symbols)natural_image
Line drawing of a robotic vacuum cleaner with attached device and paper clip (no text or symbols)

natural_image
Line drawing of a circular device with a hand pointing at the center (no text or symbols)
natural_image
Illustration of a remote control with a battery and two cylindrical batteries (no text or symbols)natural_image
Simple circular diagram with four directional arrows pointing inward, no text or symbols presentnatural_image
Diagram showing a circular device being processed into a smaller circular component (no text or symbols present)natural_image
Diagram showing a hand holding a device with an arrow indicating rotation, next to a close-up of the device's internal structure (no text or symbols)natural_image
Diagram showing a mechanical assembly process with an arrow indicating transformation (no text or symbols present)natural_image
Diagram showing a hand pressing a component into a device, then adding a resistor to a battery pack (no text or symbols present)natural_image
Technical line drawing of a mechanical component before and after assembly (no text or symbols)natural_image
Diagram showing a device before and after transformation, with no visible text or symbolsflowchart
graph LR
    A["① Component identification"] --> B["② Component assembly"]
    B --> C["③ Component detail"]
    C --> D["④ Assembly with tool"]
    D --> E["⑤ Final assembly"]
flowchart
graph TD
    A["Step ①: Top view of mechanical component"] --> B["Step ②: Top view of internal structure"]
    B --> C["Step ③: Top view of internal structure with hand fastening"]
    C --> D["Step ④: Top view of internal structure with hand fastening and plastic fan"]
natural_image
Cross-sectional diagram of a vehicle or mechanical assembly (no text or labels visible)flowchart
graph LR
    A["Internal Gear with Component"] --> B["Assembly Step"]
    B --> C["Exploded Equipment"]
    C --> D["Final Gear Assembly"]
- Robot Vacuum User Manual
- Sweeva 2000
- 1.Product description
- Robot Vacuum
- Bottom of Robot Vacuum
- Charging base
- Packaging list
- Safety instructions
- ▲Basic precautions
- Warning
- Be careful
- ▲ Reminder
- Notice
- FCC Statement
- Product use
- Important Tips Before Use
- Prepare
- Charge Your Robot Vacuum
- How to start operating
- Download TCL Home APP and pair it with robot
- Download TCL Home APP
- Pair the app with the robot
- Reset Wi-Fi
- More APP functions
- Virtual wall
- Key indicator status description
- Error Tones and Indicators
- How to turn off the robot
- How to use the remote control How to use the remote control
- Maintenance/replacing consumables
- ◆ 1. Cleaning of dustbin and filter net (filter net is replaceable)
- ◆ 2. Cleaning of roller brush (roller brush are replaceable)
- ◆3. Cleaning of side brushes (side brushes are replaceable)
- ◆ 4. Cleaning of sensor
- ◆5. Cleaning of charging contacts
- ◆6. Cleaning of the omni-direction wheel
- Maintenance and replacement frequency
- Troubleshooting
- Basic parameters
- Sweeva2000 main machine
- Sweeva2000 main adapter
- Sweeva2000
- Saugroboter
- Katalog 19
Brand : TCL
Model : Sweeva 2000
Category : Vacuum Cleaner