
CM2100 - Manicure and pedicure set ADE - Free user manual and instructions
Find the device manual for free CM2100 ADE in PDF.
| Product type | Electric manicure and pedicure set |
| Brand | ADE |
| Model | CM2100 |
| Power supply | AC adapter 100‑240 V~, 50/60 Hz, output 30 V ⎓ 0.25 A |
| Power consumption | 7.5 W (output), ≤ 0.1 W at no load |
| Protection class | II (device), III (adapter) |
| Main functions | Filing, shaping, polishing, sharpening nails; removing calluses and cuticles |
| Included accessories | 2 sharpening cones (round and pointed), 2 files (fine and coarse grit), fine sharpening cone, coarse sharpening cone, felt polishing cone |
| Speed | 5 levels, always starts at level 1 |
| Rotation direction | Left (L) or right (R) selectable |
| Lighting | Integrated LED lamp (non-replaceable) |
| Continuous operation time | 10 minutes maximum, then 10 minutes cooling |
| Ambient operating temperature | 0 to 40 °C |
| Care and cleaning | Wipe with a slightly damp cloth; accessories: brush dry or with 90% alcohol |
| Safety | Do not immerse; use only the supplied adapter; do not use on damaged or infected skin |
| Intended use | Care of fingernails and toenails, callus removal – household use only |
| Warranty | 2 years (material or manufacturing defects) |
| Distributor | Waagen-Schmitt GmbH, Hammer Steindamm 27–29, 22089 Hamburg, Germany |
| Package contents | Handheld device, AC adapter, 7 accessories, storage bag, instruction manual |
Frequently Asked Questions - CM2100 ADE
User questions about CM2100 ADE
0 question about this device. Answer the ones you know or ask your own.
Ask a new question about this device
Download the instructions for your Manicure and pedicure set in PDF format for free! Find your manual CM2100 - ADE and take your electronic device back in hand. On this page are published all the documents necessary for the use of your device. CM2100 by ADE.
USER MANUAL CM2100 ADE
natural_image
Black-and-white photo of a handheld electric shaver with multiple screwdriver tips (no text or symbols visible)Bedienungsanleitung
CM 2100
Operating instructions | Instrucciones de operación Mode d'emploi | Istruzioni per l'uso | Instrukcja obsługi

natural_image
Icon of a person using a laptop inside a circle (no text or symbols)natural_image
Two identical cylindrical mechanical components with metallic end caps, no visible text or symbols.natural_image
Two identical mechanical tool holders with metallic tips and plastic caps, no visible text or symbols.22089 Hamburg, Germany
You have chosen to purchase a high-quality ADE brand product, which combines intelligent functions with an exceptional design. The many years of experience of the ADE brand ensure a high technical standard and proven quality.
We wish you much pleasure!
Your ADE Team
Scope of delivery
Electric manicure/pedicure set with accessories
- Mains adaptor
- Carrying bag
- Operating Manual
Table of Contents
Scope of delivery 24
General information....26
Intended use 27
Safety 27
Overview 32
Check scope of supply.... 33
Before you start....34
Important usage information....34
Choosing the right attachment 35
Use 37
Inserting the attachment and connecting the handset 37
Switching on and operating the handset .... 37
Tips for an optimal result....38
Cleaning....39
Storage....40
Fault/Remedy 41
Technical data.... 41
Warranty 42
Declaration of conformity....42
Disposal 43
about this operating manual

This operating manual describes how to operate and maintain your product safely.
Keep this operating manual in a safe place for future reference. If you pass this product on to someone else, pass on this operating manual as well. Failure to observe this operating manual may result in injuries or damage to your product.
Explanation of symbols

This symbol combined with the word DANGER warns of serious injuries.

This symbol combined with the word WARNING warns of moderate and mild injuries.

This symbol combined with the word NOTE warns of material damage.

This symbol indicates additional information and general notes.
Intended use
- The set is intended for fingernail and toenail care as well as for the removal of calluses.
- It is not suitable for commercial use e.g. in fingernail studios or medical pedicure.
- If possible, attachments should not be used by more than one person. This prevents the transmission of diseases such as nail fungus.
Safety
- This product may be used by children aged 8 and above, as well as by persons with reduced physical, sensory, or mental capacities or lacking experience and knowledge if they are supervised or have been instructed in the safe use of the product and understand the risks that may arise.
- The device and network adapter must be kept out of reach of children under 8 years of age.
-
Cleaning and user maintenance must not be carried out by children, unless they are 8 years of age or older and are being supervised.
-
Do not leave the manicure/pedicure set unattended during operation.
- Store the manicure/pedicure set out of the reach of children.
- Do not allow children to play with the packaging film. You can get caught in it and suffocate while playing.
- The delivery includes small parts that can be swallowed. Keep them out of the reach of children. You can swallow small parts and choke on them.
- Use only the supplied mains adaptor KH8-300025EUG and replace it only with the same type. The mains adaptor may only be used in dry indoor spaces and must be protected from moisture.
DANGER from electricity
- The handset and mains adaptor must not be immersed in water or other liquids. Risk of electric shock! Therefore, do not use the set near sources of moisture. Do not operate the device outdoors.
-
Connect the device to a correctly installed socket that has a voltage corresponding to that described under "Technical Data".
-
Make sure the power socket is easily accessible, so that the network adapter plug can be pulled out quickly if necessary.
-
Do not use the device:
-
if the device itself or its parts are damaged,
- if the network adapter cable or network adapter plug is damaged,
- if the device has fallen down.
- Unwind the network adapter cable completely before each use. Make sure the network adapter cable does not become damaged by sharp edges or hot objects.
- Pull the network adapter plug out of the power socket:
- when you are not using the device,
- before filling it with or emptying it of water
- before cleaning or putting away the machine,
- if there appears to be a malfunction during operation,
- during thunderstorms.
- Always pull by the network adapter plug, not by the cable.
- Do not modify the device or power cord. Have repairs carried out only by a specialist workshop as improperly repaired devices endanger the user.
RISK of injuries
- Do not use the device in an environment where aerosols or oxygen have recently been used.
- Use eye protection when operating the device.
- Use the device in a clean environment.
- Always make sure that the device is switched off before connecting it to the mains using the mains adaptor. Only change the attachments when the handset is switched off.
CAUTION - property damage
- Protect the device from shocks, extreme temperatures and direct sunlight.
- Avoid heat build-up and do not operate the device under a blanket or pillow.
- Do not use the device for more than 10 minutes at a time. Allow the device to cool down for approx. 10 minutes after use.
- Use only original accessories. The use of non-original accessories increases the risk of accident. No liability arises in the event of accidents or damage as a result of using non-original accessories.
- Do not cover the mains adaptor to avoid heat build-up.
- Do not clean the device with hard, scratchy or abrasive cleaners, steel wool or the like.
Consult your doctor before use ...
- ... if you suffer from open wounds, rash on fingers or toes, skin irritations or skin diseases such as neurodermatitis, psoriasis, etc.
- ... if you suffer from diabetes, have problems with veins and blood vessels or have wound healing disorders.
- ... if you are not sure whether the device is suitable for you.
Symbols on the mains adaptor
Protection class II Protection class III
Short-circuit proof safety transformer
Ta=40 °C
Mains adaptor can be used at ambient temperatures up to 40 °C.
Electronic assembly that converts an unstabilised input voltage into a constant output voltage.
IP20
Degree of protection IP20: Protection against contact with fingers, protection against foreign bodies of 12.5 mm or larger.
Use only in enclosed spaces.

The product meets the requirements of the German Product Safety Act.
Output socket polarity

Direct current
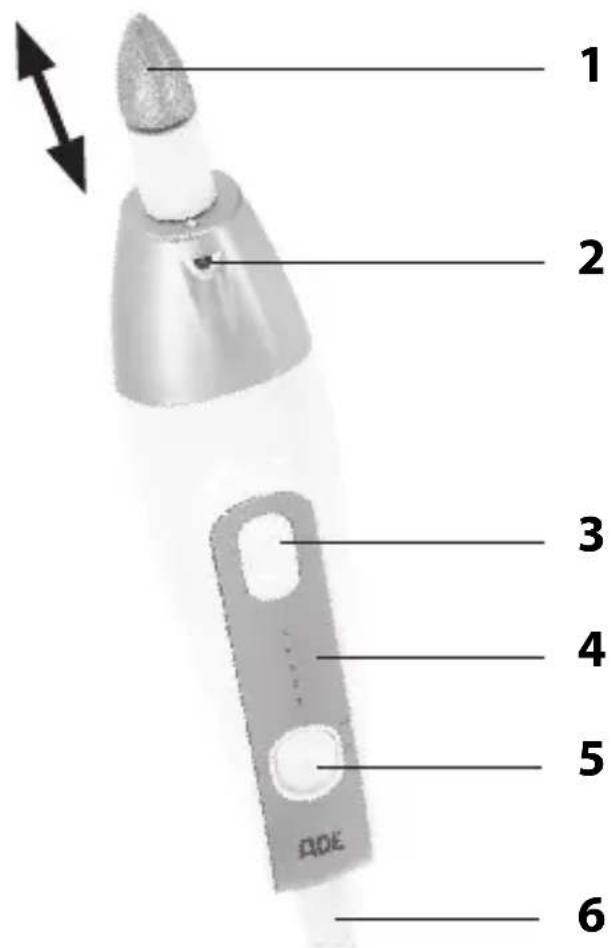
Overview
Handset
Attachments
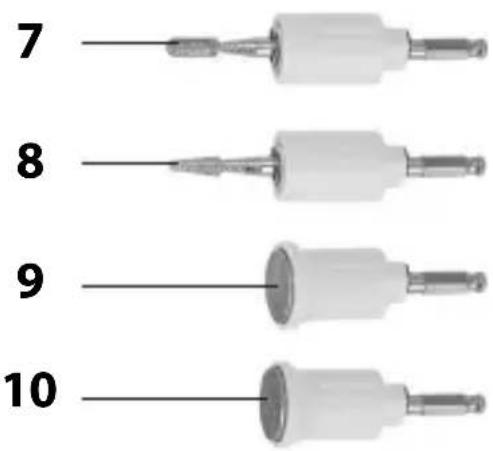
1 Inserted attachment
2 LED light

If the LED light no longer lights up, it is defective. It cannot be replaced.
3 Control buttons + and -
$$ + = \text { Increase speed } $$
$$ - = \text { Decrease speed } $$
4 Speed indicator
5 Slide switch for direction of rotation
6 Socket plug (from the mains adaptor)
7 Round grinding cone
8 Pointed grinding cone
9 Fine-grain nail file
10 Coarse-grain nail file
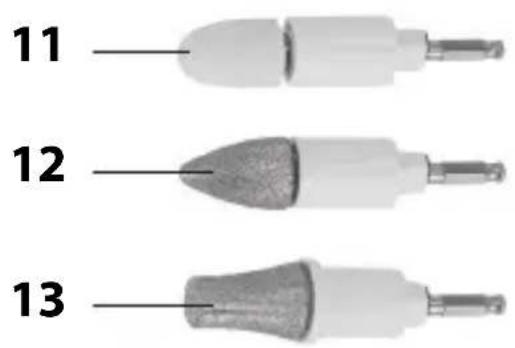
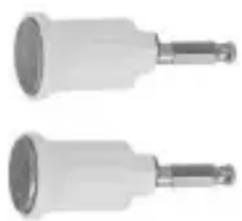
11 Felt polishing cone
12 Fine grinding cone
13 Large grinding cone
Not depicted:
- Mains adaptor, carrying bag
Check scope of supply
-
Remove all parts from the packaging. Keep packaging and small parts away from children. Dispose of the packaging in an environmentally friendly manner.
-
Check whether the manicure/pedicure set or its individual parts are damaged. If this is the case, do not use the device.
Contact the dealer from whom you bought the product. - Check that all parts are present.
Before you start

WARNING: Risk of injury!
Excessive grinding can damage the nail surface or skin.
Important usage information
- See chapter "Tips for an optimal result".
- Stop grinding at the latest when the nail gets warm.
- Handle your skin with care. Watch out for skin redness and stop treatment early.
- Nails can “lignify” and then get a brownish-yellow colour. The causes for this range from tight-fitting shoes to external pressure and fungal infections. Do not try to remove this shade by excessive grinding, as the nail surface could become too thin and nails can break.
-
Ingrown nails can be painful. Their elimination is usually quite tedious and requires professional treatment. Consult your doctor or podiatrist whether and how you can support treatment with this manicure/pedicure set.
-
Do not use the manicure/pedicure set in the event of nail diseases, skin or nail inflammation, wounds or rashes, etc.
- Do not use the manicure/pedicure set if you cannot adequately reach the areas to be treated.
Choosing the right attachment Large grinding cone
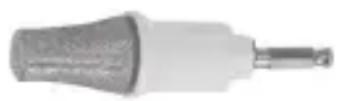
- Treatment of nails and nail surfaces
- Removal of dry skin, calluses or weals
Fine grinding cone
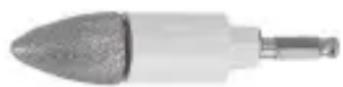
- Grinding and smoothing of woody nail surfaces

- Gently move the attachment over the area to be treated.
- Wash your hands and feet only after the treatment.
- After the treatment, massage your hands and feet with a moisturising cream.
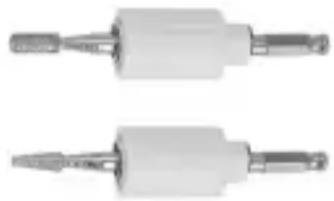
Nail file with fine and coarse grain
natural_image
Two identical mechanical components with cylindrical heads and threaded shafts, shown side by side (no text or symbols visible)- Filing and shaping of fingernails and toenails

- Place the file vertically on the nails.
- Treat your nails with even pressure.
- Proceed with slow movements.
- Do not hold the file in one place for too long to prevent friction related heat build-up.
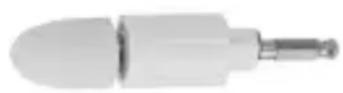
Round and pointed grinding cone
natural_image
Two identical mechanical tool holders with metallic shafts and threaded ends (no text or symbols visible)- Surface treatment of thick toenails
■ Removal of dry skin and cuticles - Removal of calluses

- Start on one side of the nail and slowly move the attachment to the other side of the nail and back again.
- Do not push the attachment too far under the cuticle to avoid injury.
Felt polishing cone
- Polishing of fingernail tips and fingernail surfaces after treatment.

- Move the cone with steady movements.
- Do not hold the cone in one place for too long to prevent friction related heat build-up.
Inserting the attachment and connecting the handset
- Make sure the handset is switched off.
- Select the desired attachment (see "Choosing the right attachment").
- Insert the attachment into the handset (see "Overview").
If necessary, turn it slightly until it fits into the holder. The attachment clicks into place. - Insert the socket plug of the mains adaptor into the connection socket of the handset.
The plug clicks into place. - Plug the mains adaptor into the power socket. The device is ready for use.
Switching on and operating the handset

NOTE - Risk of damage
- Use the handset for a maximum of 10 minutes at a time and then allow it to cool down for at least 10 minutes to prevent motor from being overloaded.
Switching on and selecting the direction of rotation
- Switch on the device by setting the slide switch to R (clockwise) or L (counter-clockwise).
The device runs at the lowest level 1. The LED light goes on.
Selecting speed
- Increase speed: Repeatedly press the + button
- Decrease speed: Repeatedly press the - button Note the speed indicator (1-5).
Switching off
- Set the slide switch to 0.

When the device is switched on again, it always starts at the lowest speed 1, even if it was previously running at a higher speed.
Tips for an optimal result
The following tips and information should help you to achieve the best possible result.
Take your time
- Take your time, especially if you have never used the device before. Check the result again and again by stroking the nail surface.
- Also take a short break from time to time and check the result.
Use little pressure
- Always bring the attachments to nails without pressure.
- Then guide the handset and attachment with circular movements and low pressure. This protects the motor and attachments and prevents the parts of the body under treatment from heating up.
- For best results, keep the motor running at full speed and do not apply pressure that may brake it. Reduce pressure if the motor is braked too hard.
Select and pay attention to the direction of rotation
- The correct direction of rotation depends inter alia on which hand you use the device with.
- Choose the direction of rotation so that the nail dust is moved away from you.
- When handling nail edges, choose the direction of rotation so that the nail is not pulled up by the rotating attachment.
Do not remove too much skin
- You should not bathe your feet before the pedicure. Due to softened skin there is a risk that you will remove too much of it. Bathe your feet after the procedure.
- Do not remove calluses completely; always leave a bit of callus to protect the skin.
Cleaning
Electric shock HAZARD
- The device and the network adapter cable or network adapter plug must not come into contact with liquids or be submerged in water or other liquids.
- Switch off the handset and pull the mains adaptor out of the power socket and the socket plug out of the handset.
-
Allow the handset to cool down.
-
Remove the attachment from the handset.
- Wipe the handset, mains adaptor and carrying bag with a slightly moistened cloth.
- Tap out the grinding attachments to remove the grinding dust.
- Clean other attachments with a suitable brush, a suitable soft brush or a dry cloth.
- Allow all parts to dry completely before putting them in the bag.

The attachments can be disinfected with a small, soft brush and 90% alcohol (available in pharmacies). You can also use a suitable disinfectant spray instead of alcohol (available from specialist shops).
Storage
- We recommend to store the device in the carrying bag.
- Store the manicure/pedicure set in a dry, well ventilated place at ambient temperatures from 0 °C to 40 °C.
Fault/Remedy
| Fault Possible cause | |
| No function. The mains adaptor or the socket plug is not fully inserted or not inserted at all.- Plug in the mains adaptor or socket plug. | |
Technical data
Handset
Input voltage: 30 V ---
Input current: 0.25 A
Protection class: III
Short-time operation: 10 minutes, then a 10 minute cooldown
Mains adaptor
Type: KH8-300025EUG
Input voltage: 100–240 V\~
Frequency: 50/60 Hz
Input current: 0.3 A max.
Protection class: II
Output voltage: 30 V ---
Output current: 0.25 A
Output power: 7.5 W
Average active efficiency: 80.26%
Low load efficiency: (25%): 78.71%
No-load power ≤ 0.1 W
consumption:
Distributor: Waagen-Schmitt GmbH
Hammer Steindamm 27-29
22089 Hamburg, Germany
Our products are constantly being developed and improved. For this reason, design and technical modifications are possible at any time.
Warranty
Dear Valued Customer,
Waagen-Schmitt GmbH warrants for 2 years from the purchase date the cost-free rectification of defects in material and workmanship through repair or exchange.
In the event of a warranty claim, please return the product with the proof of purchase (specifying the reason for claim) to your dealer.
Declaration of conformity
Waagen-Schmitt GmbH hereby declares that the
manicure/pedicure set complies with EU directives
2014/30/EU, 2014/35/EU, and 2011/65/EU.
The declaration will lose its validity if any modification is
made to the device without our consent.
Disposal
Disposing of the packaging

Dispose of the packaging with similar materials. Dispose of cardboard with waste paper and of films with recyclable materials.
Disposing of the product
Dispose of the product in accordance with the regulations that apply in your country.
Devices must not be disposed of in normal household waste
At the end of its life, the product must be disposed of in an appropriate way. In this way, valuable materials contained in the device will be recycled and the burden on the environment avoided. Bring the old device to a collection point for electronic waste or to a recycling depot. For more information, contact your local waste disposal firm or your local administrative body.
Chère cliente, cher client !
natural_image
Two identical cylindrical mechanical components with metallic end caps, no visible text or symbols.natural_image
Two identical mechanical tool holders with metallic shafts and threaded ends (no text or symbols visible)natural_image
Two identical cylindrical mechanical components with metallic end caps, no visible text or symbols.natural_image
Two identical mechanical tool holders with metallic tips and plastic caps (no text or symbols visible)natural_image
Two identical mechanical components with cylindrical heads and metallic shafts, no visible text or symbols.natural_image
Two identical mechanical tool holders with metallic shafts and threaded ends (no text or symbols visible)22089 Hamburg, Germany
natural_image
Two identical mechanical components with cylindrical heads and threaded shafts, no visible text or symbols.natural_image
Two identical mechanical tool holders with metallic shafts and threaded ends (no text or symbols visible)natural_image
Two identical mechanical components with cylindrical ends and threaded shafts, shown side by side (no text or symbols visible)natural_image
Two identical mechanical tool holders with metallic shafts and threaded ends (no text or symbols visible)- Bedienungsanleitung
- Scope of delivery
- Table of Contents
- about this operating manual
- Explanation of symbols
- Intended use
- Safety
- DANGER from electricity
- RISK of injuries
- CAUTION - property damage
- Consult your doctor before use ...
- Symbols on the mains adaptor
- Overview
- Handset
- Attachments
- Check scope of supply
- Before you start
- WARNING: Risk of injury!
- Important usage information
- Choosing the right attachment Large grinding cone
- Fine grinding cone
- Nail file with fine and coarse grain
- Round and pointed grinding cone
- Felt polishing cone
- Inserting the attachment and connecting the handset
- Switching on and operating the handset
- NOTE - Risk of damage
- Switching on and selecting the direction of rotation
- Selecting speed
- Switching off
- Tips for an optimal result
- Take your time
- Use little pressure
- Select and pay attention to the direction of rotation
- Do not remove too much skin
- Cleaning
- Electric shock HAZARD
- Storage
- Fault/Remedy
- Technical data
- Mains adaptor
- Warranty
- Declaration of conformity
- Disposal
- Disposing of the packaging
- Disposing of the product
- Devices must not be disposed of in normal household waste
- Chère cliente, cher client !
Brand : ADE
Model : CM2100
Category : Manicure and pedicure set