PAS254D - Receiver Monacor - Free user manual and instructions
Find the device manual for free PAS254D Monacor in PDF.
User questions about PAS254D Monacor
0 question about this device. Answer the ones you know or ask your own.
Ask a new question about this device
Download the instructions for your Receiver in PDF format for free! Find your manual PAS254D - Monacor and take your electronic device back in hand. On this page are published all the documents necessary for the use of your device. PAS254D by Monacor.
USER MANUAL PAS254D Monacor
These instructions are intended for users without any special technical knowledge. Please read these instructions carefully prior to operation and keep them for later reference. All operating elements and connections described can be found on page 2.
Contents
1 Overview 12
2 Safety Notes 13
3 Applications and Accessories 14
3.1 Wireless microphones and transmitters. 14
3.2 Conformity and approval 14
4 Setting into Operation 14
4.1 Recharging the battery 14
4.2 Establishing audio connections 14
4.2.1 Microphone 14
4.2.2 Audio source with line level 14
4.2.3 Amplifier or recorder. 15
4.2.4 Speakers 15
4.3 Remote control. 15
4.4 Connecting an additional battery. 15
5Operation 15
5.1 Operation with wireless microphones. 16
5.1.1 Setting the transmission channels 16
5.1.2 Adjusting the volume 17
5.1.3 Setting the squelch 17
5.2 Audio player 18
5.3 Bluetooth receiver 18
5.4 Operation overview of audio player/Bluetoothreceiver 19
6 Specifications 19
1 Overview
1 USB port (type A) for the connection of a USB flash drive to reproduce audio files
2 Slot for an SD memory card to reproduce audio files
3 Display to indicate the Bluetooth function or the storage medium selected and the current title number or the time played of the title
4 Control buttons for the audio player / Bluetooth receiver (Chapter 5.4)
5 Combined XLR / 6.3 mm jack 1 MIC / LINE IN for the connection of a microphone or of another mono audio source (e.g. mixer)
6 Volume control LEVEL for a microphone or audio unit connected to (5)
7 Volume control 2 WIRELESS for wireless microphones
8 Common sound control TONE for a microphone or audio unit connected to (5) and for wireless microphones
9 RCA jacks 3 LINE IN for the connection of an audio source (e. g. CD player); when a stereo audio source is connected, a mono signal will be created in the amplifier
10 RCA outputs LINE LINK to record the mixed signal or to route it to another amplifier system; for stereo recorders, two jacks are available
11 Volume control PLAYER for the input 3 LINE IN (9) and for the audio player / Bluetooth receiver
12Sound control TONE for the input 3 LINE IN (9) and for the audio player / Bluetooth receiver
13 Function VOICE OVER to mute the sound of an audio source connected to the input 3 LINE IN and of the audio player / Bluetooth receiver while speaking into the microphone LED MUSIC will light up when the sound is muted Control DEPTH to adjust the sensitivity for muting the sound
14LED status indicators for the rechargeable battery
CHARGE Red: during the charge process
Green: when the charge pro
cess has been terminated
FULL charging state: full
OK charging state: sufficient
LOW charging state: low
15 LED indicator LIMITER; will light up when the level limiter is active
16 Power indicator PWR ON
17 Power switch
18 Connection jack to charge the battery; only use the charger provided
19 Switch INTERNAL SPEAKER to switch on / off the speaker system of the amplifier
20 Jack EXT.SPEAKER for the connection of an (additional) speaker
Note: To make sure that the amplifier will not be overloaded when the volume is high and an external speaker is connected, it is recommended to switch off the speaker system of the amplifier PAS-254D by means of the switch INTERNAL SPEAKER (19).
21 Cover for the battery compartments
2 Safety Notes
The units (amplifier system and charger) correspond to all relevant directives of the EU and are therefore marked with
WARNING

The charger uses dangerous mains voltage. Leave servicing to skilled personnel. Inexpert handling may result in electric shock.
- Never use the amplifier system in heavy rain and always make sure that no moisture will get into the system. The cover provided will protect the speaker system against moisture. The charger is suitable for indoor use only. Protect it against dripping water, splash water
and high air humidity. The admissible ambient temperature range for the units is 0 - 40^
- Do not place any vessels filled with liquid, e. g. drinking glasses, on the charger.
-
Do not operate the units and immediately disconnect the mains cable of the charger from the mains socket
-
if a unit or the mains cable is visibly damaged,
- if a defect might have occurred after a unit was dropped or suffered a similar accident,
- if malfunctions occur.
In any case the units must be repaired by skilled personnel.
- Never pull the mains cable of the charger to disconnect the mains plug from the socket, always seize the plug.
- A damaged mains cable must be replaced by skilled personnel only.
- For cleaning only use a soft cloth, dry or slightly wet; never use chemicals or aggressive detergents.
- No guarantee claims for the units and no liability for any resulting personal damage or material damage will be accepted if the units are used for other purposes than originally intended, if they are not correctly connected or operated, or if they are not repaired in an expert way. Likewise, no liability will be accepted for data loss caused by a defect or operating errors and for any consequential damage of this data loss.

If the units are to be put out of operation definitively, take them to a local recycling plant for a disposal which is not harmful to the environment.
3 Applications and Accessories
The amplifier system PAS-254D is powered by a rechargeable battery and can be carried as a backpack during processions, for example. Above the amplifier, there is a frame with a speaker system with four full-range speakers that will radiate the sound in the forward and backward direction. The amplifier is equipped with mixable inputs for a microphone, a (stereo) audio source (e.g. CD player) and a receiver section for two wireless microphones. In addition, audio files can be reproduced from a USB flash drive or an SD/ MMC memory card or via the integrated Bluetooth receiver (e.g. from a smartphone). It is possible to automatically mute the music, for example, while speaking into the microphone. With a fully charged battery, the amplifier system can be operated for up to 7 hours.
A second rechargeable battery (NPA-12/7), available as a separate accessory, can be used to increase the operating time. Additional compartments on the left and right sides of the backpack for items such as microphones and connection cables are also provided.
3.1 Wireless microphones and transmitters
The following units are available from MONACOR:
| Type Model | |
| Hand-held wireless microphone TXA | 800HT |
| Pocket transmitter with tie clip microphone and headband microphone | TXA-800HSE |
| Transmitter with line level input for audio signals | TXA-800ST |
To provide sound to larger areas, the radio signals of the transmitters can be simultaneously received by multiple PAS-254D.
3.2 Conformity and approval
Herewith, MONACOR INTERNATIONAL declare that the wireless receiver of the PAS-254D complies with the directive 2014/53/EU. The EU declaration of conformity is available on the Internet:
www.monacor.com
The wireless system (transmitter and receiver) is generally approved for operation in EU and EFTA countries, it is licence-free and requires no registration.
4 Setting into Operation
4.1 Recharging the battery
To recharge the built-in battery and an additionally connected battery, connect the charger provided to the low-voltage jack (18) and to a mains socket (230V / 50Hz) . The LED status indicators (14) will indicate the charging state: FULL, OK and LOW. The LED indicator CHARGE will light up in red while the battery is being recharged. The amplifier may be switched off during recharging.
Once the battery has been recharged (LED indicator CHARGE lights up in green), disconnect the charger from the amplifier and the mains.
4.2 Establishing audio connections
4.2.1 Microphone
Connect a microphone with an XLR plug to the jack 1 MIC/LINE IN (5).
For microphones that require phantom power supply (e.g. electret microphones), a phantom power of 12V is available at the XLR contacts of the jack.
Note: Never connect microphones or other audio sources with an unbalanced output to the XLR jack; they may be damaged by the phantom power.
It also possible to connect microphones with a 6.3mm plug to the jack 1 MIC / LINE IN; this input, however, is slightly less sensitive.
4.2.2 Audio source with line level
Via a 6.3 mm plug, a mono audio source with line signal level (e.g. mixer, additional receiver for wireless microphones) can be connected to the jack 1 MIC / LINE IN (5). As an alternative, this audio source can also be connected to one of the RCA jacks 3 LINE IN (9).
Connect a stereo audio source (e.g. CD/ MP3 player, radio, mixer) to the jacks 3 LINE IN (9). The amplifier is monophonic; therefore, the stereo signals are internally transformed into a mono
signal. It is possible to mute the signal of an audio source connected to one of the jacks 3 LINE IN while speaking into the microphone (function VOICE OVER chapter 5).
4.2.3 Amplifier or recorder
An additional amplifier system or a recorder can be connected to the jacks LINE LINK (10). For stereo recorders, two jacks are available. The amplifier is monophonic; therefore, the signals at the two jacks are identical.
4.2.4 Speakers
It is possible to connect an additional speaker to the Speakon®-compatible jack EXT. SPEAKER (20). This speaker can be used in addition or as an alternative to the existing speaker system.
Connect the speaker plug to the jack and then turn the plug clockwise until it locks. To remove the plug, pull back the safety latch on the plug and turn the plug counter-clockwise.
If required, use the switch INTERNAL SPEAKER (19) to switch off the speaker system of the PAS-254D.
Note: To make sure that the amplifier will not be overloaded when the volume is high and an external speaker is connected, it is recommended to switch off the speaker system of the amplifier PAS-254D.
4.3 Remote control
The remote control for operation of the audio player / Bluetooth receiver is supplied with a separate battery. Prior to initial operation, insert the battery: On the rear side of the remote control, push the small latch with the groove to the right and remove the battery support.

2 Removing the battery support
Insert the battery in the battery support as indicated on the remote control (make sure to observe the polarity "+" and then push back the battery holder into the remote control.
When the operating range of the remote control decreases, replace the battery with a battery of the same type.
If the remote control is not used for a longer time, remove the battery as a precaution so that the remote control will not be damaged in case the battery should leak.

Never put discharged batteries in the household waste. To protect the environment, always take them to a special waste disposal, e. g. collection container at your retailer.
4.4 Connecting an additional battery
An additional rechargeable battery of the type NPA-12 / 7 (separately available as an accessory) can be connected to increase the operating time. Incorrect handling is hazardous; therefore, the battery should only be connected by skilled personnel.
1) Make sure that the PAS-254D is switched off and disconnected from the charger.
2) Remove the central screw of the cover (21) for the battery compartments and then open the cover.
3) Connect the battery to the two cables in the empty compartment; make sure to observe the correct polarity (red = +) .
Note: If the battery does not fit into the empty compartment, you may exchange the position and connections of the two batteries.
4) Close the cover.
5 Operation
1) Prior to initial switch-on, set all volume controls (6, 7, 11) to "0" to avoid an unexpectedly high volume when the amplifier is switched on.
2) Switch on the audio sources connected and/or the wireless transmitters.
3) Use the power switch (17) to switch on the amplifier. The LED power indicator PWR ON (16) will light up. In addition, the appropriate LED indicator (14) will indicate the current charging state of the battery. When the LED indicator LOW lights up, the battery must be recharged (Chapter 4.1).
4) Replay music, for example, from an audio source connected or speak into a wireless microphone or a microphone connected via a cable (operation of the audio player / Bluetooth receiver chapters 5.2 to 5.4).
5) Adjust the volume of the audio sources with the corresponding control.
LEVEL (6): Audio sour ce at the input 1 MIC/LINE IN
2 WIRELESS (7): Wireless microphones, also refer to chapter 5.1.2
PLAYER (11): Audio source at input 3 LINE IN and audio player / Bluetooth receiver
WARNING

Never operate the amplifier when the speakers are close to anybody's ears! The high volume may cause hearing damage.
To avoid acoustic feedback (loud howling), never position the speaker towards the microphone and always make sure that there is a sufficient distance between the speaker and the microphone.
A level limiter will automatically prevent distortions at high volumes. The LED indicator LIMITER (15) will light up when the limiter is active.
6) Use the control TONE (8) to adjust the desired sound for the microphones or for an audio source connected to the jack (5). Use the control TONE (12) to adjust the sound for an audio source connected to the jacks 3 LINE IN and for the audio player / Bluetooth receiver. The remote control provides additional sound adjustment options for the audio player / Bluetooth receiver ( chapter 5.4, button "EQ").
7) To automatically mute the sound of an audio source connected to the jacks 3 LINE IN (9) or of the audio player / Bluetooth receiver during announcements via the microphone [VOICE OVER (13)], adjust the control DEPTH in such a way that the LED indicator MUSIC will light up while speaking into the microphone.
8) To avoid unnecessary discharging of the battery, switch off the amplifier with the power switch (17) after operation or during longer pauses.
If the amplifier system is not used for a longer period of time, completely charge the battery
prior to storage and recharge it approx. every six months to make up for normal self-discharge.
5.1 Operation with wireless microphones
The amplifier system is equipped with a receiver module for two wireless microphones / transmitters. The receiver module is located beneath the speaker system.
3 Wireless receiver module
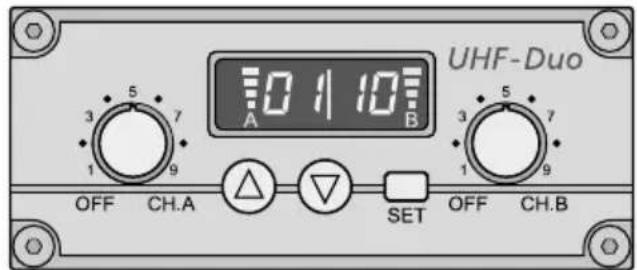
Each receiver section (A and B) is equipped with a control to adjust the volume and to switch it on and off (fig. 3). The display is divided into two parts: left half for receiver section A, right half for receiver section B. When a receiver section has been switched on, the display will indicate the transmission channel. To briefly indicate the radio frequency, press the button (for section A) or (for section B).
5.1.1 Setting the transmission channels
Use the controls to switch on the receiver sections. Do not switch on the corresponding wireless microphones / transmitters for the time being.
5.1.1.1 Channel scan
Keep the buttons and simultaneously pressed for approx. 1 second until 5 appears on the display. The scan will start: The receiver sections will be set to free channels without mutual interference. If no free channels are found, the channels set will be kept.
Note: The channel scan can also be started for one section only (button for section A or button for section B).
5.1.1.2 Manual channel selection
When both receiver sections A and B are switched on:
1) Keep the button SET pressed until the channel indication for receiver section A starts flashing on the display.
2) Select the channel for receiver section A with the button or and then confirm with the button SET.
3) The channel indication for receiver section B starts flashing on the display. Select the channel for receiver section B with the button or and then confirm with the button SET.
When only one receiver section A or B is switched on:
Keep the button SET pressed until the channel indication starts flashing on the display. Select the channel with the button or and then confirm with the button SET.
Notes:
- The receiver sections cannot be set to the same channel
- If a channel is not confirmed within 10 seconds with the button SET, the setting mode will be exited and the channel previously set will be kept.
- If, with the transmitter switched off, the respective segment bar A or B on the display indicates reception, interference signals or signals from other transmitters are being received. In this case, use a different channel
5.1.2 Adjusting the volume
Switch the wireless microphones / transmitters on and set one to the channel of receiver section A and the other to the channel of receiver section B. The respective segment bars on the display will then indicate the strength of the radio signals received. Use the controls to adjust the desired volume for each receiver section.
Use the control 2 WIRELESS (7) to adjust the volume of the audio signals received.
Note: If no signal is received from the wireless microphone, make sure that the microphone transmits on the correct frequency (channel) and check the battery of the microphone. If required, reduce the distance between the amplifier system and the microphone.
5.1.3 Setting the squelch
The squelch function will mute the respective receiver section when the level of the radio signal falls below the threshold value adjusted. Thus, interference signals will not cause noise when the transmitter is switched off or when its radio signal is poor: If the levels of the interference signals are below the threshold value, the receiver section will be muted. A high threshold value offers high interference resistance, but it will also reduce the transmission range.
1) Switch off the receiver sections A and B. Then keep the button SET pressed while switching on a receiver section. The display will indicate F1 or F2 with the number flashing.
2) Press the button SET to activate the squelch setting mode: 59for "Squelch") and the current value (flashing) will appear on the display.
3) Use the button or to set the value (level 7 = highest threshold value). Press the button SET to exit the squelch setting mode.
Note: The setting modes will be automatically exited after 5 seconds if no button is pressed. Any settings made will be saved.
5.2 Audio player
The integrated audio player can reproduce audio files in the MP3 or WAV format. USB flash drives or SD[HC] memory cards (also MMC cards) can be used as storage media.
Note: Due to the large number of storage device manufacturers and device drivers, it cannot be guaranteed that all storage media are compatible with the audio player.
Insert a USB flash drive into the USB port (1) and /or insert a memory card (contacts facing upwards) into the slot (2).
When the unit is switched on, the audio file most recently replayed will be selected and the audio player will be in the pause mode (indication: USB flash drive will take priority over the memory card. When a storage medium is inserted during operation, it will be automatically selected.
The audio player can be operated via the buttons (4) or the remote control provided (fig. 4) (13 chapter 5.4). Point the remote control to the infrared sensor on the right of the display (3).
The display indicates the time played of the current title. The volume of the replay depends on the settings of the audio player and the control PLAYER (11).
5.3 Bluetooth receiver
As an alternative to the reproduction from a USB flash drive or a memory card, the integrated Bluetooth receiver can be used for wireless connection to a Bluetooth audio source (e.g. smartphone or tablet computer).
1) When no USB flash drive and no memory card is connected, the PAS-254D will be automatically in the Bluetooth mode: The display (3) will show b t.
When a storage medium is connected, press the button M repeatedly until neither TF nor USB lights up on the left of the display. The display will show better a few seconds.
2) Activate the Bluetooth function at the Bluetooth source. PAS-254D (designated as "BT-SPEAKER") will appear in the list of available units.
3) Pair the source with "BT-SPEAKER" (if required, see the instruction manual of the Bluetooth source). The two units will then be automatically connected.
Once the connection has been established, a two-tone sequence will sound.
The replay via the Bluetooth receiver can be controlled by means of the buttons (4) or the remote control provided (fig. 4) (13 chapter 5.4). Point the remote control to the infrared sensor on the right of the display (3).
The volume of the Bluetooth replay depends on the settings of the Bluetooth source, the audio player / Bluetooth receiver and the control PLAYER (11).
When neither the audio player nor the Bluetooth receiver are used, switch them off by means of the remote control (button) This will increase the operating time of the battery and prevent any undesired Bluetooth reception.
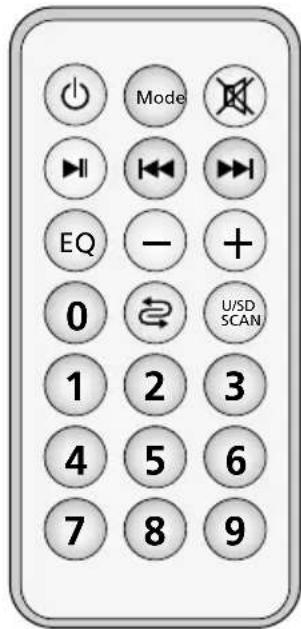
Remote control
5.4 Operation overview of audio player / Bluetooth receiver
| Button | Function | |
| on the remote control | ||
| at the unit | ||
| Mode | to change the source*USB storage medium "USB"memory card "TF"Bluetooth receiver "b t" | |
| M | ||
| U/SD SCAN | to change betweenUSB storage medium "USB"memory card "TF" | |
| II | to start the replay andto change between replay andpause "P A U S" * | |
| 1...9,0 | direct title selection | |
| I / I | previous/nexttitle*:press the button brieflyfast forward / fast reverse (onlywith remote control): keep thebutton pressed (sound muted) | |
| -/+I / I | to change the volume*"u 00...u 15"(keep I / / I pressed) | |
| X | to mute and unmutethe sound* | |
| repeat mode- repeat of all titles"ALL"- repeat of a single title"ONE"- replay of a single title"I tr", then "St OP | ||
| EQ | 6 sound presettings*“N O r” = neutral | |
| audio player/ Bluetooth receiveron/off "OFF | ||
*also for Bluetooth replay
6 Specifications
Amplifier
Amplifier class: .D
RMS power at 2 Ω: . . . . . . . . . . . . . . . . . . . . . . . . . . . . . . . . . . . . . . . . . . . . . . . . . . . . . .
Peak power: .80W
Frequency range: .80-20 000 Hz
Inputs (connections, type, sensitivity)
Microphone: .XLR, bal., 2 mV with 12 V phantom power supply
Line: .6.3 mm, bal., 14 mV
RCA, unbal., 80 mV
Wireless receiver sections: . 2
Reception range: .30 m approx.
Received frequencies
| Channel | Frequency | Channel | Frequency |
| 01 | 863.1 MHz | 09 | 863.2 MHz |
| 02 | 864.1 MHz | 10 | 864.2 MHz |
| 03 | 863.6 MHz | 11 | 863.7 MHz |
| 04 | 864.6 MHz | 12 | 864.7 MHz |
| 05 | 863.3 MHz | 13 | 863.4 MHz |
| 06 | 864.3 MHz | 14 | 864.4 MHz |
| 07 | 863.8 MHz | 15 | 863.9 MHz |
| 08 | 864.8 MHz | 16 | 864.9 MHz |
Storage media: USB flash drive,
SD/SDHC/MMC card
Audio file formats: . . . . . . MP3, WAV
Bluetooth profile: .A2DP
Outputs
Line Link: .RCA, 300 mV
Ext. Speaker: . . . . . . . . Speakon©-compatible,
4Ω min.
Power supply: . . . . . . . . . . . . . . . . . . . . . . . . . . . . . . . . . . . . . . . . . . . . . . . . . . . . . . . . . . . . . . . . . . . . . . . . . . . . . . . . . . . . . . . . . - 12 V/7.2Ah - 12 V/7.2Ah
Ambient temperature: . . .0-40°C
Total height: 120 cm
Weight: .7.7 kg
Subject to technical modification.
Supports de mémoire: ... .support USB, carte SD/SDHC/MMC
Format file audio: .MP3, WAV
Profilo Bluetooth: . . . . . .A2DP
Uscite
Line Link: .RCA, 300 mV
Speaker esterno: . . . . . . compatible Speakon*
min. 4
Alimentazione: . . . . . . . . . . . . . . . . . . . . . . . . . . . . . . . . . . . . . . . . . . . . . . . . . . . . . . . . . . . . . . . . . . . . . . . . . . . . . . . . . . . . . . . Batteria ricaricabi-
le12V/7,2Ah
Temperatura d'exercizio: ..0-40°C
Line Link: .Cinch, 300 mV
Ext. speaker: . . . . . . . Speakon®-compatible, min. 4Ω
Voedingsspanning: .Accu 12V/7,2Ah
Omgevings-
Line Link: .RCA, 300 mV
Line Link: .RCA, 300 mV
Ext. Speaker: .........Typu speakon, 4Ω min.
Zasilanie: akumulator, 12V/7,2Ah
Zakres temperatur: .0-40°C