
CK 2010 - Alarm Clock ADE - Free user manual and instructions
Find the device manual for free CK 2010 ADE in PDF.
| Product type | Digital radio alarm clock |
| Brand | ADE |
| Model | CK 2010 |
| Dimensions (L x W x H) | 142 x 95 x 60 mm |
| Mains power supply | Adapter 9 V / 2 A (100-240 V~, 50/60 Hz) |
| Backup battery | CR2032, 3 V (pre-installed) |
| Wireless charging power | 10 W max. (Qi standard) |
| Number of alarms | 2 independent alarms |
| Snooze function | Yes, repeat every 8 minutes |
| Temperature display | Range -9 to 39 °C (16 to 102 °F) |
| Screen brightness | Adjustable, can be turned off |
| Time format | 12h or 24h |
| Automatic alarm stop | After 2 minutes |
| Cleaning | Slightly damp cloth, unplug before |
| Warranty | 2 years (material or manufacturing defects) |
| Distributor | Waagen-Schmitt GmbH, Hamburg, Germany |
Frequently Asked Questions - CK 2010 ADE
User questions about CK 2010 ADE
0 question about this device. Answer the ones you know or ask your own.
Ask a new question about this device
Download the instructions for your Alarm Clock in PDF format for free! Find your manual CK 2010 - ADE and take your electronic device back in hand. On this page are published all the documents necessary for the use of your device. CK 2010 by ADE.
USER MANUAL CK 2010 ADE
natural_image
Icon of a person using a laptop inside a circle (no text or symbols)natural_image
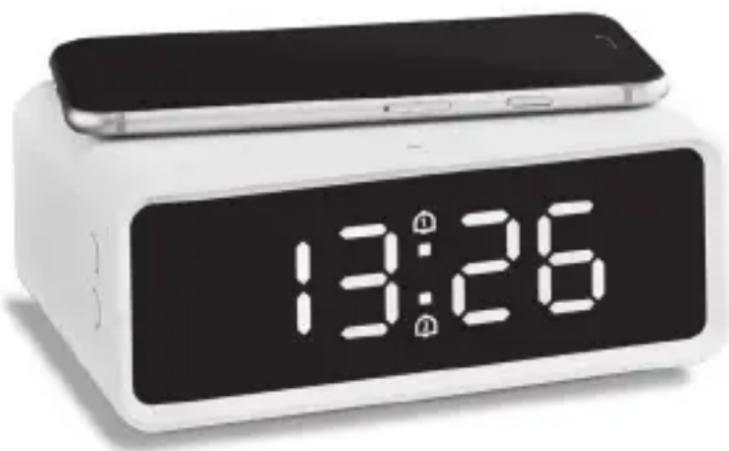
White digital alarm clock with dual phone top and 13:26 time display (no text or symbols on face)22143 Hamburg, Germany
natural_image
Symbol of a trash bin with crossed lines indicating no waste or plastic, and a solid black rectangle below (no text or labels)natural_image
Symbol of a trash bin crossed out by two diagonal lines (no text or numbers present)You have chosen to purchase a high-quality ADE brand product, which combines intelligent functions with an exceptional design.
With this alarm clock, you always have a precise time in view. The wealth of experience of the ADE brand ensures a high technical standard and proven quality.
We wish you easy timing at any time!
Your ADE Team
Scope of delivery
- Digital alarm clock
- Mains adaptor
- Backup battery (pre-installed)
- Operating Manual
Table of Contents
Scope of delivery 24
General information....26
Safety 27
Intended use 30
Overview 31
Start-up 35
Setting the time....36
Alarm....37
Charging your smartphone 39
Other functions....39
Cleaning 41
Fault/Remedy 41
Technical data....42
Warranty 42
Declaration of Conformity 43
Disposal 43
about this operating manual

This operating manual describes how to operate and maintain your product safely. Keep this operating manual in a safe place for future reference. If you pass this product on to someone else, pass on this operating manual as well. Failure to observe this operating manual may result in injuries or damage to your product.
Explanation of symbols

This symbol combined with the word DANGER warns of serious injuries.

This symbol combined with the word WARNING warns of moderate and mild injuries.

This symbol combined with the word NOTE warns of material damage.

This symbol indicates additional information and general notes.
Safety
- This product may be used by children aged 8 and above, as well as by persons with reduced physical, sensory, or mental capacities or lacking experience and knowledge if they are supervised or have been instructed in the safe use of the product and understand the risks that may arise.
- Batteries can be life-threatening. Therefore, keep batteries out of reach of small children. If a battery has been swallowed or has entered the body in any other way, seek medical help immediately. Failure to do so within 2 hours may result in severe internal burns that could cause death.
- The device and network adapter must be kept out of reach of children under 8 years of age.
- Cleaning and user maintenance must not be carried out by children, unless they are 8 years of age or older and are being supervised.
- Children must not play with the device.
- Keep wrapping and packaging material away from children. There is a choking hazard. Also pay attention that children do not pull the packaging material over their heads.
- Only use the supplied mains adaptor and replace it only with one of the same type. The mains adaptor may only be used in dry indoor spaces and must be protected from moisture.
- Do not use the device if the battery compartment can no longer be secured with the screw.
DANGER from electricity
- Connect the device to a correctly installed socket that has a voltage corresponding to that described under "Technical Data".
- Make sure the power socket is easily accessible, so that the network adapter plug can be pulled out quickly if necessary.
- Do not use the device:
-if the device itself or its parts are damaged,
-if the network adapter cable or network adapter plug is damaged,
-if the device has fallen down.
- Unwind the network adapter cable completely before each use. Make sure the network adapter cable does not become damaged by sharp edges or hot objects.
- Pull the network adapter plug out of the power socket: - before cleaning the alarm clock, - if, during operation, there appears to be interference, - during a storm. - Always pull by the network adapter plug, not by the cable.
- Do not make any modifications to the device. Have repairs carried out only by a specialist workshop as improperly repaired devices endanger the user.
- When the cable or mains adaptor is damaged, it must be disposed of and replaced with a mains adaptor of the same type.
Risk of injuries
- Attention: Risk of explosion if batteries are improperly used. Batteries must not be recharged, reactivated by other means, dismantled, thrown into fire, or short-circuited.
- Avoid contact of the battery fluid with skin, eyes, and mucosa. If you do come into contact with the fluid, you must immediately flush the affected areas thoroughly with clean water and promptly see a doctor.
CAUTION - property damage
- Protect the device from strong shocks, vibrations, direct sunlight, dirt and excessive moisture.
- Do not place the device on hot surfaces and in the immediate vicinity of electrical equipment and sensitive items.
- Remove the battery from the device when it is flat or when you will not be using the device for a long time. You will thus avoid damage that may result from leakage of battery acid.
- Do not expose the battery to extreme conditions, for example, by storing it on radiators or exposing it to direct sunlight. Increased risk of leakage!
- Clean the battery and device contacts, as needed, before inserting the battery.
-
Do not make any modifications to the device. Only allow repairs to be carried out at a specialist workshop and pay attention to the guarantee conditions.
-
The device has support feet at the bottom. Since furniture surfaces are made of various materials and are treated with various care products, it cannot be completely ruled out that some of these substances contain ingredients that attack and soften the feet of the device. If necessary, place a non-slip pad underneath the device.
- Never use hard, scratching or abrasive cleaning agents or similar to clean the alarm clock.
Note on wireless charging
Currently, the Qi Standard (a standard for wireless charging of smartphones) is not supported by all manufacturers and all models.
Please refer to the user manual of your smartphone.
Further information on this topic can also be found on the Internet.
Intended use
- The digital alarm clock is designed exclusively for private use in dry interiors.
- It also has an induction interface (Qi Standard) with which smartphones can be charged.
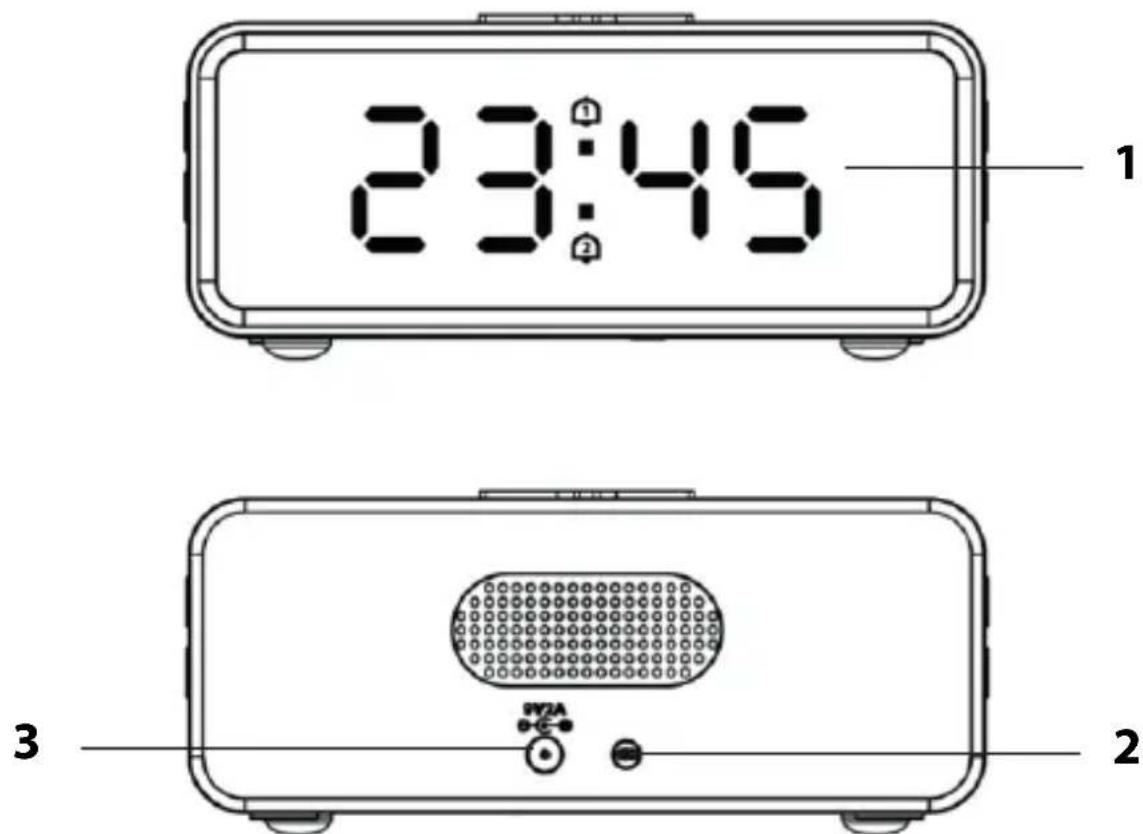
Front and rear view
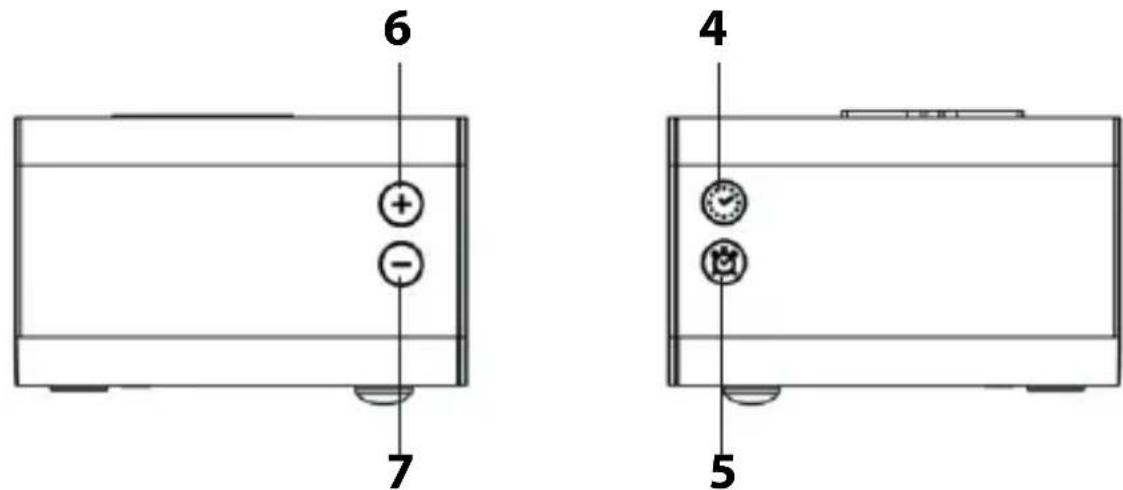
Side view
1 Display
2 Temperature sensor
3 Connection socket 9V 2A for mains adaptor
4 Button:
-Display temperature for approx. 5 seconds -Setting the time
5 Button ☎:
-Setting the alarm time -Enable and disable alarm function
6 + button:
-Switching alarms on and off -increases values
7 - button:
-Determine display indication -reduces values
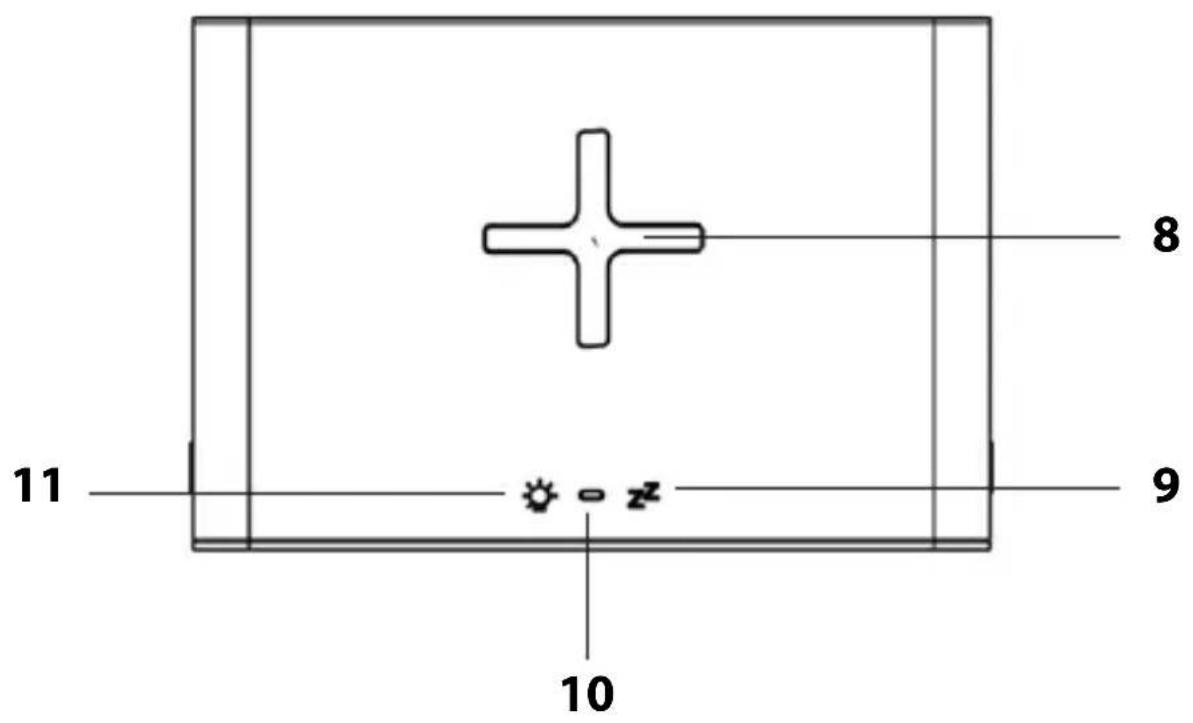
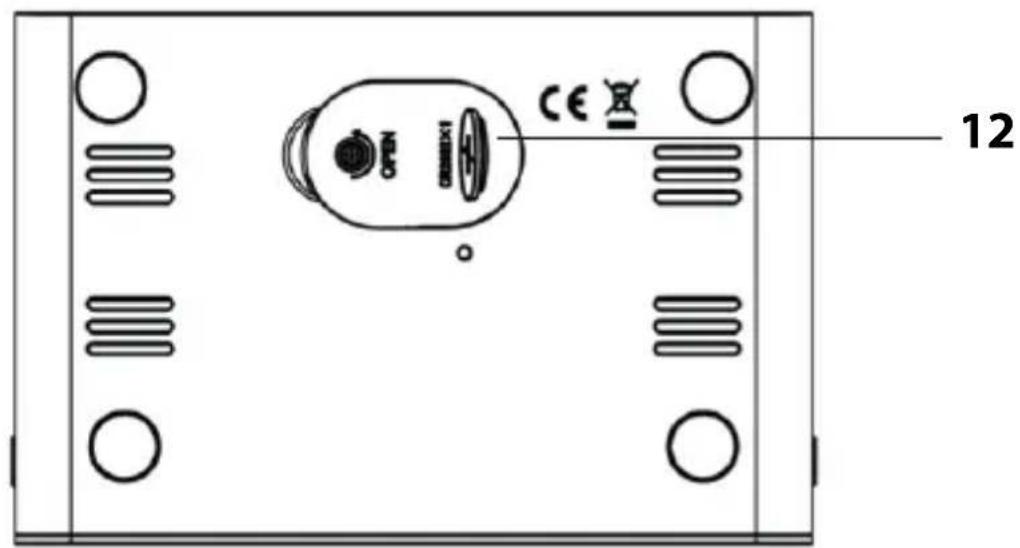
Top and bottom view
English
8 Interface for charging a smartphone
9 Button z^z :
-Alarm repeat function (SNOOZE)
10 Charging control light
11 Button 👤:
-Setting display brightness
12 Battery compartment for CR2032, 3 V
Not depicted:
- CR2032 battery (pre-installed)
- Mains adaptor

NOTE on material damage
-Use only the supplied mains adaptor.
In the event of a power outage, a 3 V CR2032 battery ensures that settings made (e.g. alarm times) remain stored for several hours. Upon delivery, the backup battery is already inserted and is provided with an iso strip to protect against premature discharge.
- Unscrew the fastening screw of the battery compartment cover on the underside with a fine Phillips screwdriver.
- Remove the battery compartment cover.
- Pull out the iso-strip.
- Replace the battery compartment cover and secure it in place using the fastening screw.
- Insert the plug of the supplied mains adaptor into the 9V 2A connection socket of the alarm clock.
- Plug the mains adaptor into a socket that has a voltage corresponding to that described under "Technical Data".

- If more than 15 seconds pass between two button presses, the setting process is automatically terminated and you have to repeat it.
- If you hold the + / - buttons down in each case, the run-up of the displayed values takes place faster.
-
Press and hold the ⚙ button until "24 Hr" (or "12 Hr") flashes on the display.
-
Use the +/- buttons to select the desired time format. If you choose the 12-hour time format, morning hours will be marked with "A" and afternoon hours with "P" on the display.
-
Press the ⚙ button to confirm the selection.
-
Proceed as described above to make the following settings one after the other:
-Set hours
-Set minutes
-Temperature unit (°C or °F)
- Finally, press ⚙ in order to complete the process.
You can set two different alarm times on the alarm clock. The procedures for setting are identical.
Setting the alarm time
Starting with the normal time display:
- Use the ⚙ button to select the alarm time ☐ or . ☑
- Keep the ⚙ button pressed (while the matching alarm time symbol is still flashing). The hour indicator flashes.
- Use the + / - buttons to set the desired alarm hour. The minute indicator flashes.
- Use the + / - buttons to set the desired alarm minute.
- Now proceed as described to set the second alarm time, if necessary, or press 📋 repeatedly until the normal time is displayed again on the display.

To control the set alarm times later, simply press the 🎨 button repeatedly.
Waking up
You will be woken up by the increasing alarm sound at the set time.
Interrupting the alarm for 24 hours
-Press any button (except ⚙ to interrupt the alarm. After 24 hours, the alarm will be triggered again (or flashes on the display).
Auto-stop function
If you do not press a button, the alarm switches off automatically after 2 minutes. After 24 hours, the alarm will be triggered again.
Repeat alarm (snooze function)
-Press when the alarm sounds.
The alarm time and the or symbol flash on the display.
After approx. 8 minutes, the device will turn on again and wake you up again. This procedure can be repeated multiple times.
Switching the alarm function off and on again
- Press the + button repeatedly to switch the matching alarm times on and off again.
Note the display: As soon as and/or are displayed, the matching alarm function (or both) is active.

Please read the "Note on wireless charging" at the beginning of this manual.
natural_image
White digital alarm clock with dual phone top and 13:26 time display (no text or symbols on face)-Place your smartphone on the device as shown.
Lights red: Smartphone is loading.
Lights green: Smartphone is fully charged (currently supported by only a few models).

The temperature display is not available during charging, as charging can generate additional heat. After charging, 20-30 minutes are required for the temperature to be displayed again.
Other functions
Setting display brightness
-Tap repeatedly to set the desired display brightness.
You can also completely darken the display indication. As soon as you press a button, the content is displayed with lower brightness.
Switching on alternate display
- By repeatedly pressing the - button, you can select the display indication.
dP-1 Time is displayed permanently
dP-2 Time and temperature are displayed alternately on the display.

If the time is displayed permanently later, you can press ⚙briefly to display the temperature for 5 seconds.
Replacing the backup battery
-
Open the battery compartment on the underside using a fine Phillips screwdriver.
-
Remove the battery compartment cover and remove the old battery.
-
Slide the new battery under the two retaining tabs and then push them down with a little force so that the battery is firmly under the retaining tab and audibly clicks into place. Pay attention to the correct polarity (+/-). The plus pole (+) must point upwards.
-
Replace the battery compartment cover and secure the battery compartment cover with the Phillips screw.
Cleaning
- Disconnect the device from the mains power.
- Wipe the case clean with a slightly damp cloth.
- Dry the device completely before you reconnect it with the mains adaptor.
Fault/Remedy
| Fault Possible cause | |
| No function. · Connected to power? | |
| The temperature indication in the display appears too high. | · Check whether the device is exposed to direct sunlight. |
| The alarm did not sound to wake you up. | · Did you activate the correct alarm time? |
| The display is black. | · Tap repeatedly in order to set the desired display brightness. |
| The smartphone does not charge. | · Check whether your smartphone supports the Qi Standard. |
Technical data
Model: CK 2010 digital alarm clock
Mains adaptor: Input: 100 – 240 V\~, 50/60 Hz,
0.8 A max
Output: 9 V = - / 2 A
Battery: CR2032, 3 V
三
Charging output: max. 10 W
Temperature range: -9 to 39 °C (16 to 102 °F)
Dimensions: 142 x 95 x 60 mm
Distributor: Waagen-Schmitt GmbH
Neuer Höltigbaum 15
22143 Hamburg, Germany
Our products are constantly being developed and improved. For this reason, design and technical modifications are possible at any time.
Warranty
Dear Valued Customer,
Waagen-Schmitt GmbH warrants for 2 years from the purchase date the cost-free rectification of defects in material and workmanship through repair or exchange.
In the event of a warranty claim, please return the product with the proof of purchase (specifying the reason for claim) to your dealer.
Declaration of Conformity
Waagen-Schmitt GmbH hereby declares that the CK 2010 digital alarm clock complies with directives 2014/30/EU, 2014/35/EU and 2011/65/EU.
The declaration will lose its validity if any modification is made to the device without our consent.
Hamburg, July 2020
Waagen-Schmitt GmbH

Disposal
Disposing of the packaging

Dispose of the packaging with similar materials. Dispose of cardboard with waste paper and of films with recyclable materials.
Disposing of the product
Dispose of the product in accordance with the regulations that apply in your country.

natural_image
Symbol of a trash bin crossed with no text or numbers, representing waste sorting or disposal (no text present)Devices must not be disposed of in normal household waste
At the end of its life, the product must be disposed of in an appropriate way. In this way, valuable materials contained in the device will be recycled and the burden on the environment avoided. Bring the old device to a collection point for electronic waste or to a recycling depot.
For more information, contact your local waste disposal firm or your local administrative body.

natural_image
Simple line drawing of a trash bin with two crossed lines indicating no waste or restriction (no text or symbols)Standard and rechargeable batteries should not be disposed of along with household waste
All batteries and rechargeable batteries must be brought to a local or district collection point or to the retailer. Such batteries and rechargeable batteries can thus be disposed of in an environmentally friendly way.
natural_image
Symbol of a trash bin crossed with no text or numbers, representing waste sorting or disposal (no text present)natural_image
Symbol of a trash bin crossed with diagonal lines, representing no waste or discharge (no text or labels)natural_image
White digital alarm clock with dual phone top and 13:26 time display (no text or symbols on face)natural_image
Symbol of a trash bin crossed with no text or numbers, representing waste sorting or disposal (no text present)natural_image
Simple line drawing of a trash bin with two crossed lines indicating no waste or prohibition (no text or symbols)natural_image
White digital alarm clock with dual phone top and 13:26 time display (no text or symbols on device body)natural_image
Symbol of a trash bin crossed with no text or labels, accompanied by a black rectangular block below (no readable text or symbols)natural_image
Simple line drawing of a trash bin with two crossed lines indicating no waste or prohibition (no text or symbols)natural_image
Symbol of a trash bin crossed with no text or numbers, representing waste sorting or disposal (no text present)natural_image
Simple line drawing of a trash bin with two crossed lines indicating no waste or prohibition (no text or symbols)- Scope of delivery
- Table of Contents
- about this operating manual
- Explanation of symbols
- Safety
- DANGER from electricity
- Risk of injuries
- CAUTION - property damage
- Note on wireless charging
- Intended use
- Top and bottom view
- NOTE on material damage
- Setting the alarm time
- Waking up
- Interrupting the alarm for 24 hours
- Auto-stop function
- Repeat alarm (snooze function)
- Switching the alarm function off and on again
- Other functions
- Setting display brightness
- Switching on alternate display
- Replacing the backup battery
- Cleaning
- Technical data
- Warranty
- Declaration of Conformity
- Disposal
- Disposing of the packaging
- Disposing of the product
- Devices must not be disposed of in normal household waste
- Standard and rechargeable batteries should not be disposed of along with household waste
Brand : ADE
Model : CK 2010
Category : Alarm Clock