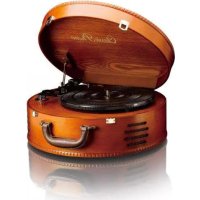
TT34 - Turntable LENCO - Free user manual and instructions
Find the device manual for free TT34 LENCO in PDF.



| Product type | Turntable (record player) |
| Brand | Lenco |
| Model | TT34 |
| Speeds | 33, 45 and 78 RPM |
| Drive type | Belt drive |
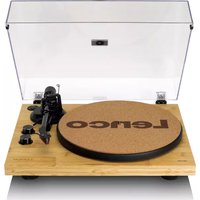
| Housing material | Wood |
| Connectivity | USB port for PC connection |
| Functions | Digital recording via Audacity software, automatic tonearm return |
| Included accessories | 45 RPM adapter, USB cable, CD with Audacity software |
| Power supply | AC power adapter |
| Safety instructions | Important instructions: do not open, risk of electric shock, use only specified parts |
| Maintenance | Clean with a dry cloth, do not use water or liquid products |
| Spare parts and repairability | Use only parts specified by the manufacturer; repairs entrusted to qualified personnel |
| Warranty | Warranty according to European legislation; contact the retailer for service |
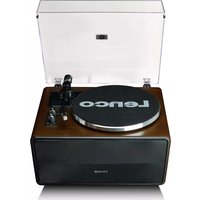
| General information | Vintage wood turntable with USB function and Audacity recording software |
Frequently Asked Questions - TT34 LENCO
User questions about TT34 LENCO
0 question about this device. Answer the ones you know or ask your own.
Ask a new question about this device
Download the instructions for your Turntable in PDF format for free! Find your manual TT34 - LENCO and take your electronic device back in hand. On this page are published all the documents necessary for the use of your device. TT34 by LENCO.
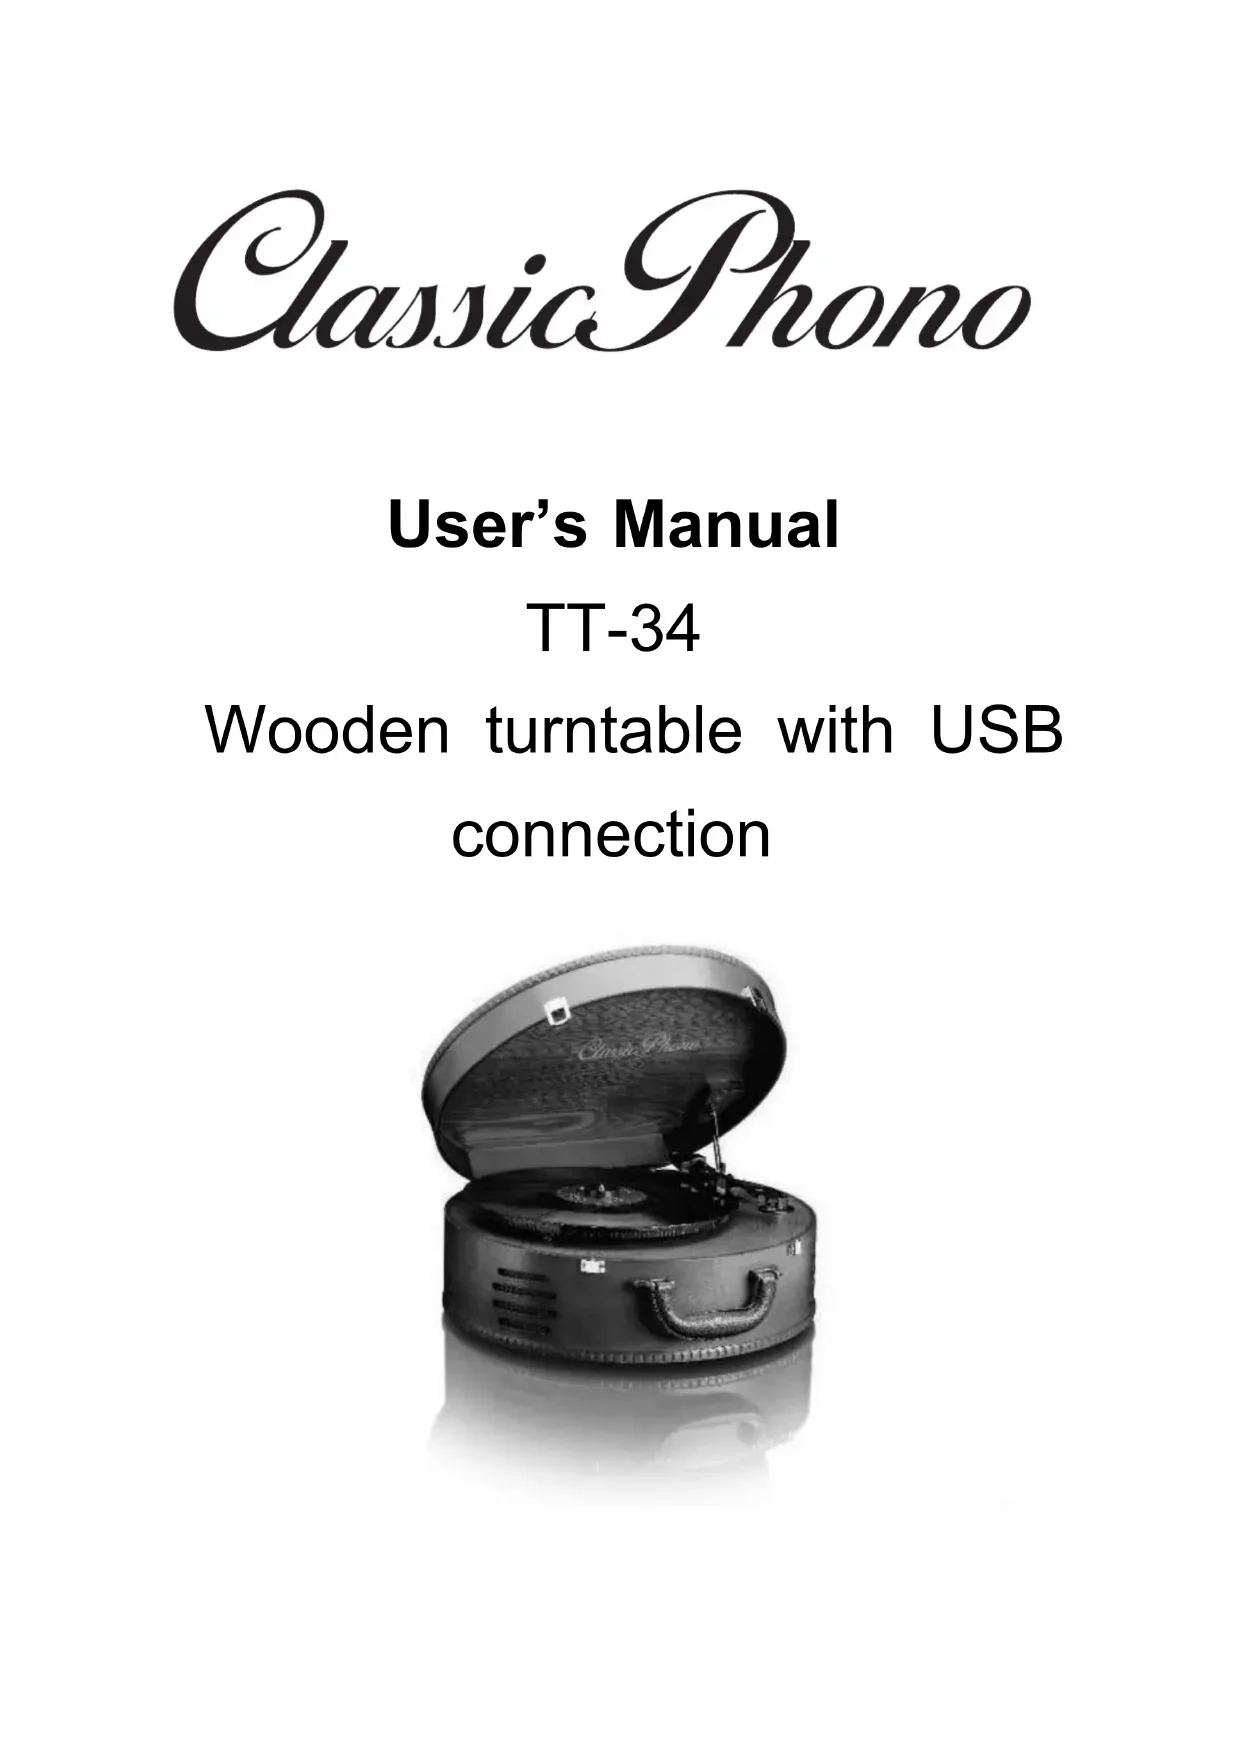
USER MANUAL TT34 LENCO
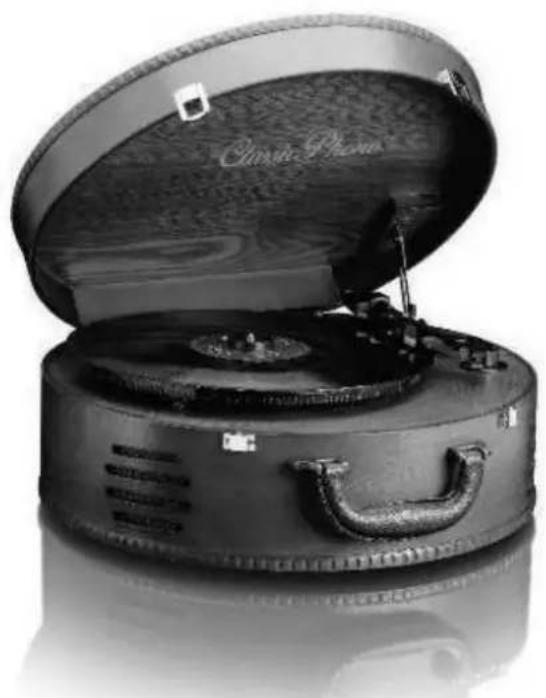
Wooden turntable with USB connection
natural_image
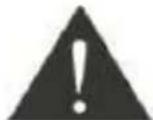
Black-and-white photo of a vintage suitcase with open lid and visible branding (no text or symbols on main subject) The lightning flash with arrowhead symbol, within an equilateral triangle is intended to alert the user to the presence of uninsulated ‘dangerous voltage’ within the product’s enclosure that may be of sufficient magnitude to constitute a risk of electric shock to persons. The lightning flash with arrowhead symbol, within an equilateral triangle is intended to alert the user to the presence of uninsulated ‘dangerous voltage’ within the product’s enclosure that may be of sufficient magnitude to constitute a risk of electric shock to persons. | CAUTIONRISK OF EXECTRICSHOCKDO NOT OPENWARNING: TO REDUCETHE RISK OF ELECTRICSHOCK DO NOT REMOVE COVER (OR BACK), NO USER SERVICE ABLE PARTS INSIDE REFER SERVICEING TO QUALIFIED SERVICE PERSONNEL |  The exclamation point within an equilateral triangle is intended to alert the user to the presence of important operating and maintenance (servicing) instructions in the literature accompanying the appliance The exclamation point within an equilateral triangle is intended to alert the user to the presence of important operating and maintenance (servicing) instructions in the literature accompanying the appliance |
IMPORTANT SAFETY INSTRUCTIONS
1) Read these instructions
2) Keep these instructions
3) Heed all warnings
4) Follow all instructions
5) Do not use this apparatus near water
6) Clean only with dry cloth
7) Do not block any ventilation openings. Install in accordance with the manufacture.
8) Do not install near any hot sources such as radiations, heat registers, stoves, or other.
9) Only use attachments/accessories specified by the manufacturer.
10) Unplug this apparatus during lightning storms or when unused for long periods of time.
11) Refer all servicing to qualified service personnel. Servicing is required when the apparatus has been damaged in any way, such as power-supply cord or plug is damaged, liquid has been spilled or objects have fallen into the apparatus, the apparatus has been exposed to rain or moisture, does not operate normally, or has been dropped.
12) This appliance shall not be exposed to dripping or splashing water and no object filled with liquid such as vases shall be placed on the apparatus.
13) Do not overload wall outlet. Use only power source as indicated.
14) Use replacement parts as specified by the manufacturer.
15) The product may be mounted to a wall only if recommended by the manufacturer.
16) Upon completion of any service or repairs to this product, ask the service technician to perform safety checks.
PREPARATION FOR USE
UNPACKING AND SET UP
- Carefully remove the unit from the display carton and remove all packing material from the unit.
- Unwind the AC power plug and extend it to its full length.
- Place the unit on a stable, level surface, convenient to an AC outlet, out of direct sunlight, and away from source of excess heat, dust, moisture, humidity or strong magnetic field.
- Connect the plug to your AC outlet.
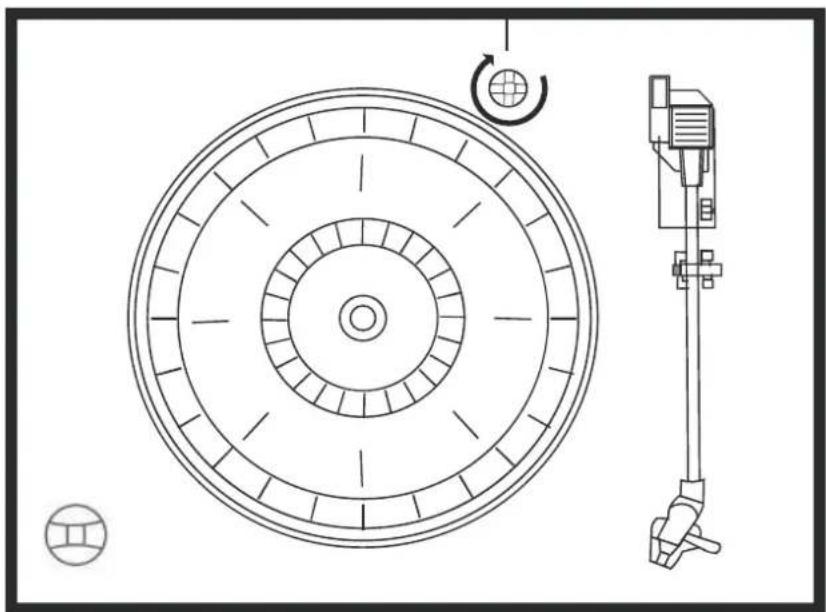
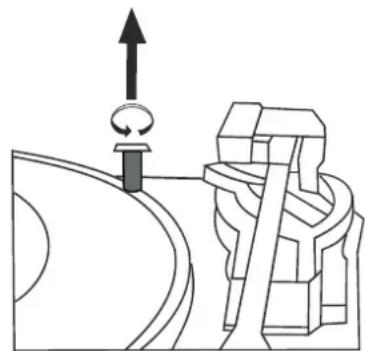
- Raise the lid to expose the phonograph. The phonograph has been secured for shipment with a transit screw.
- Use a coin or screwdriver to turn the transit screw clockwise. This will allow the turntable to "float".
TRANSIT SCREW
natural_image
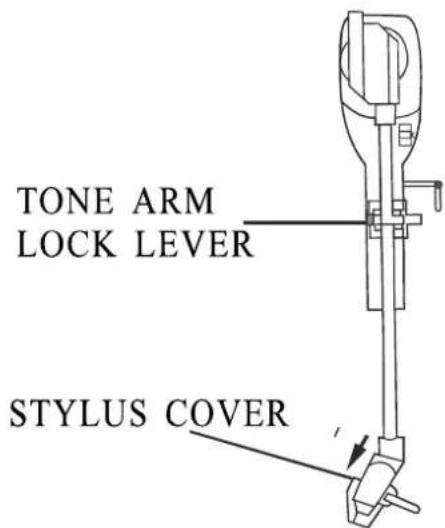
Technical diagram of a circular mechanical component with a rotating arm and base mount (no text or symbols)- Remove the opaque while plastic stylus cover from the phonograph stylus by sliding it in the direction of the arrow.
Discard the stylus cover.
- Remove the twist-tie that was used to secure the tone arm during shipment.
- Release the tone arm lock lever.
- Connect the plug to your AC outlet.
• This system uses an AC adaptor.
- You should have your outlet changed by a qualified licensed electrician.
- In order to make operation run correctly, the power plug and power jack should be a suitable match.
IMPORTANT: Raising and Lowering the Lid
To open the lid, raise it as far as it will go until the lid support bracket "locks" in the open position.
To close the lid, lift it upward slightly until the lid support bracket "unlocks", and then gently lower the lid.
TO AVOID DAMAGING THE CABINET OR THE LID, NEVER FORCE THE LID
PROTECT YOUR FURNITURE
This model is equipped with non-skid rubber “feet” to prevent the product from moving when you operate the controls. These “feet” are made from non-migrating rubber material specially formulated to avoid leaving any marks or stains on your furniture. However certain types of oil based furniture polishes, wood preservatives, or cleaning sprays may cause the rubber “feet” to soften, and leave marks or a rubber residue on the furniture. To prevent any damage to your furniture we strongly recommend that you purchase small self-adhesive felt pads, available at hardware stores and home improvement centers and apply these pads to the bottom of the rubber “feet” before you place the product on fine wooden furniture.
LOCATION OF CONTORLS AND INDICATORS FORNT PANEL
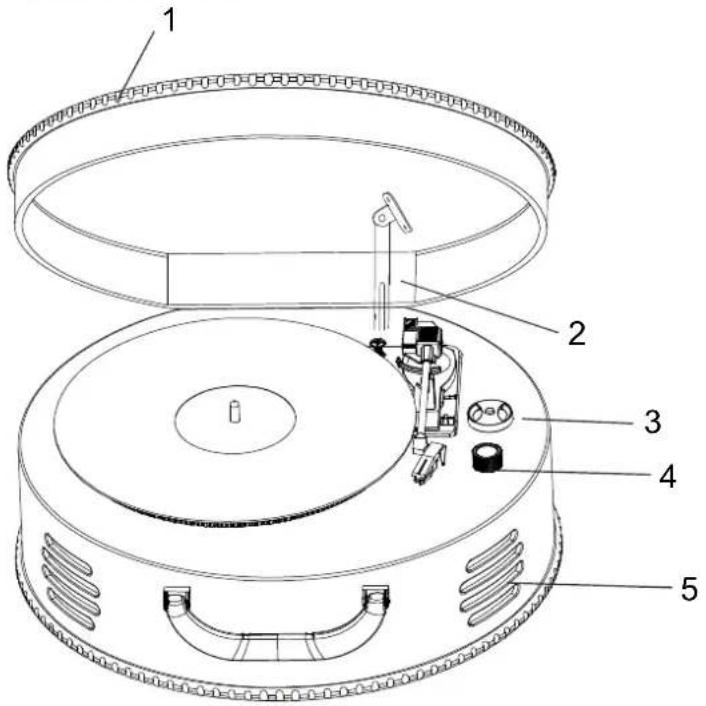
1) PHONOGRAPH LID
2) PHONOGRAPH LID SUPPORT BRACKET
3) 45RPM ADAPTOR
4) VOLUME CONTROL
5) SPEAKERS
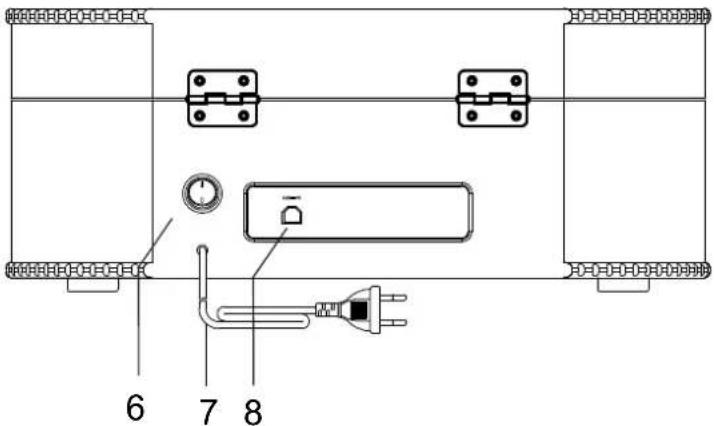
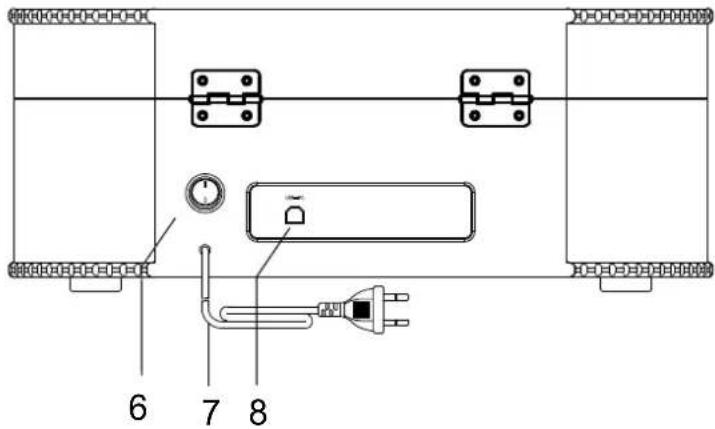
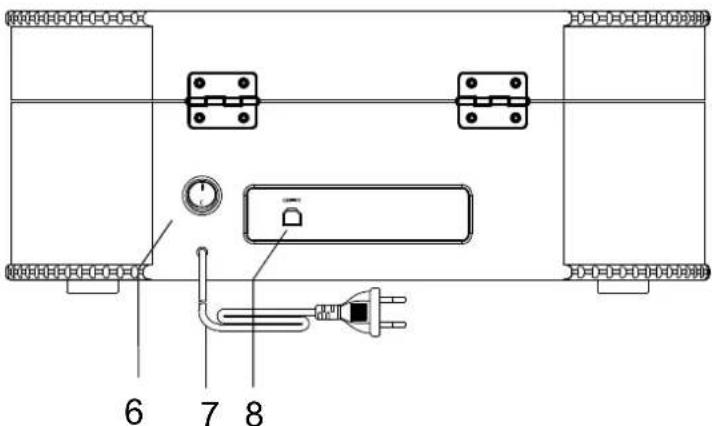
BACK PANEL
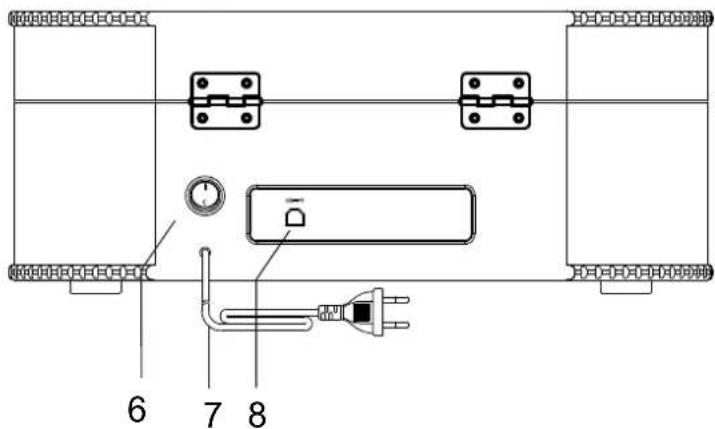
6) POWER ON/OFF BUTTON
7) AC POWER CORD
8) USB SOCKET
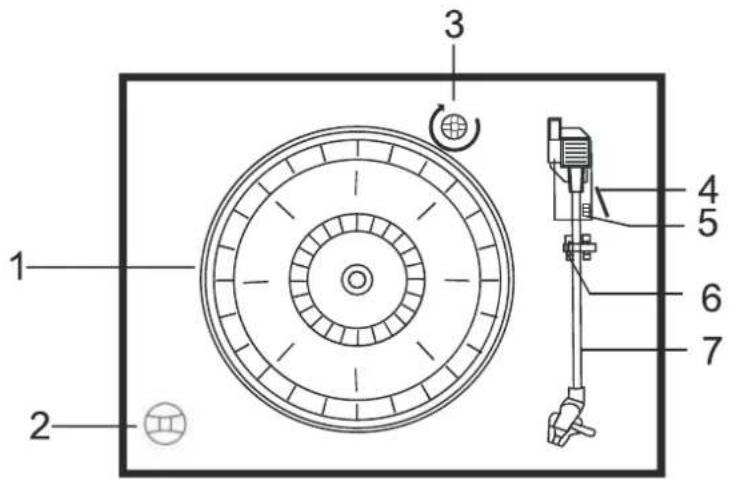
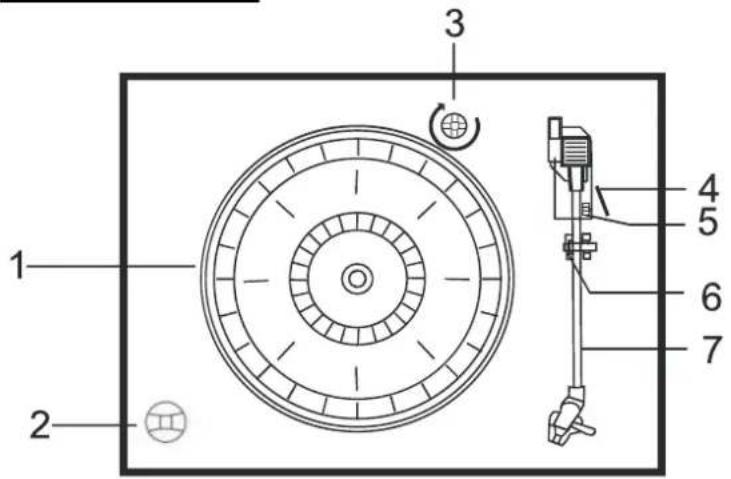
PHONOGRAPH
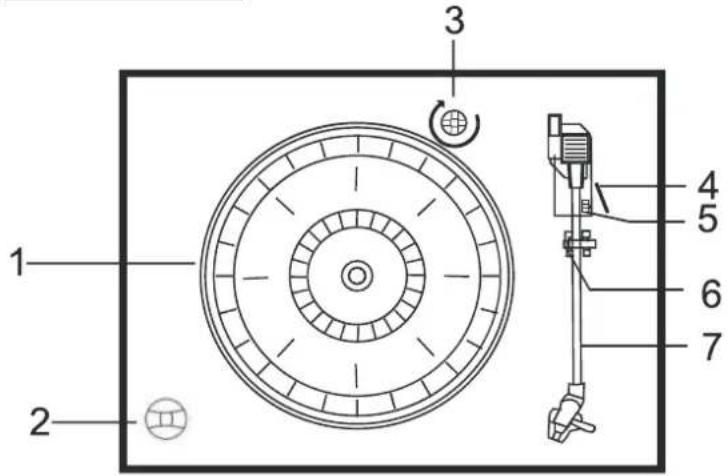
1) Turntable
2) 45RMP Adaptor
3) Transit Screw
4) Cue Lever
5) Speed Selector (33 & 45 & 78RPM)
6) Tone Arm Lock
7) Tone Arm with Stylus
PLAYING RECORDS
This system includes a full-size, 3-speed, belt-drive turntable. You can play 33, 45, and 78RPM records.
1) Press the POWER button to turn on the unit.
2) Make sure that you have removed the stylus cover from the stylus and have released the Tone Arm Lock that secured the tone arm to the tone arm rest.
3) Set the turntable Speed Selector to the appropriate speed, 33, 45, or 78RPM. If you are playing 45RPM singles, place the 45RPM adapter on the center spindle.
4) Place your record on the center spindle.
5) Raise the CUE lever to lift the tone arm off its rest. Move the tone arm to the edge of the record. The turntable starts automatically. Use the CUE lever to gently lower the tone arm onto the record.
6) When the tone arm reaches the end of the record it automatically returns to the tone arm rest and the record player stops.
7) To turn the system "Off", press and hold the POWER button 2 seconds.
NOTE: Do not turn or stop the turntable manually, Moving or jarring the Turntable without securing the Tone Arm clamp could result in damage to the Tone Arm.
IMPORTANT
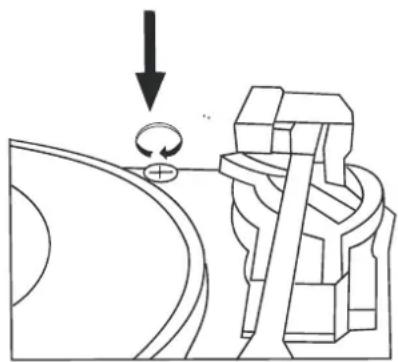
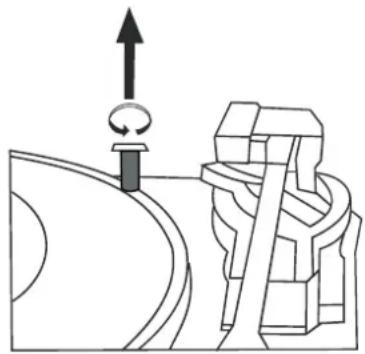
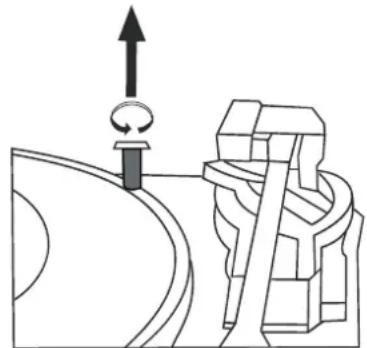
• TO PROTECT THE TURNTABLE FROM DAMAGE DURING TRANSPORTATION, A SILVER TRANSIT SCREW IS LOCATED AT THE UPPER RIGHT OF THE TURNTABLE PLATFORM.
- BEFORE PLAYING, PLEASE USE A SCREWDRIVER TO TURN THE TRANSIT SCREW IN CLOCKWISE DIRECTION (SCREW GOING DOWN) COMPLETELY TO UNLOCK THE TURNTABLE
natural_image
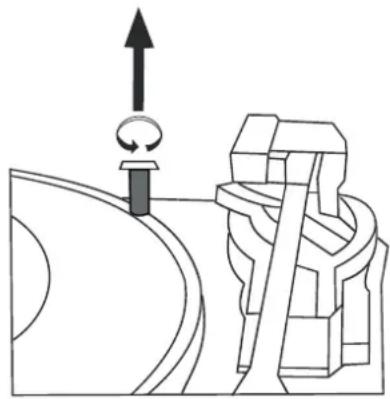
Mechanical diagram showing a rotating component with a plus sign, no text or symbols present- TO LOCK THE TURNTABLE AGAIN FOR TRANSPOTATION, PLEASE TURN THE SCREW IN COUNTER-CLOCKWISE DIRECTION.
natural_image
Mechanical diagram showing a rotating component and a spring-loaded assembly (no text or symbols)Audacity and USB Connection
It supports Windows95 or more advanced version, with the EMS memory more than 128M and Audacity takes space of 5MB.
Installing the Audacity Software
- To install the Audacity software on your computer:
- Insert the Audacity disc into the CD drive of your computer.
- Click on My Computer on the desktop.
- Dblclick CD drive to view the contents of the Audacity disc.
- Dblclick Audacity Set Up to install the Audacity software according to the instruction.
Install the USB Drive
- Make sure the Audacity disc is still in your CD drive.
- Use the included USB cable to connect the turntable to your computer.
- Follow screen instruction to install the USB driver.
Running the software
- Double click the Audacity software showing red and orange sound waves streaming out the blue headphone, and the following interface will appear.
*Note: Please review the software licensing and distribution restrictions found on the software disc. Use of the Audacity software is subject to those conditions and restrictions.
**For additional help with recording and editing music using the Audacity software, please go to: http://audacity.sourceforge.net.
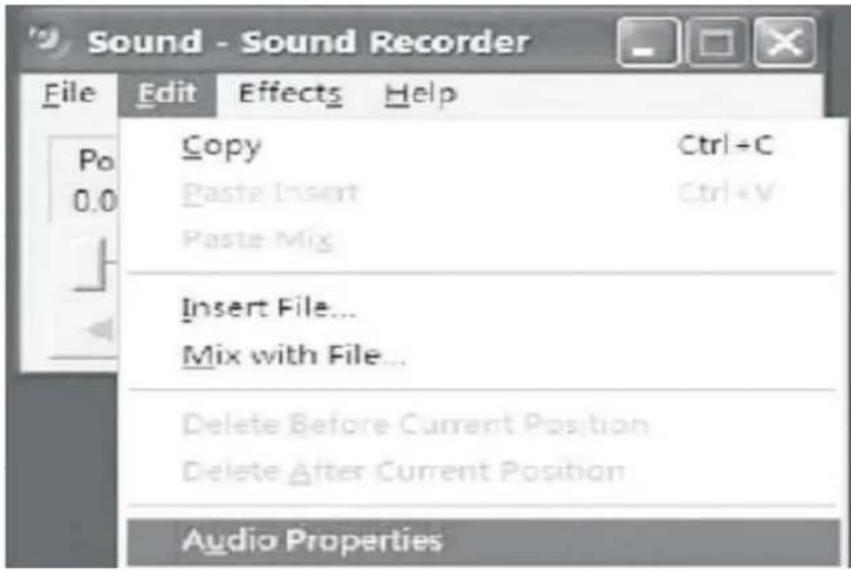
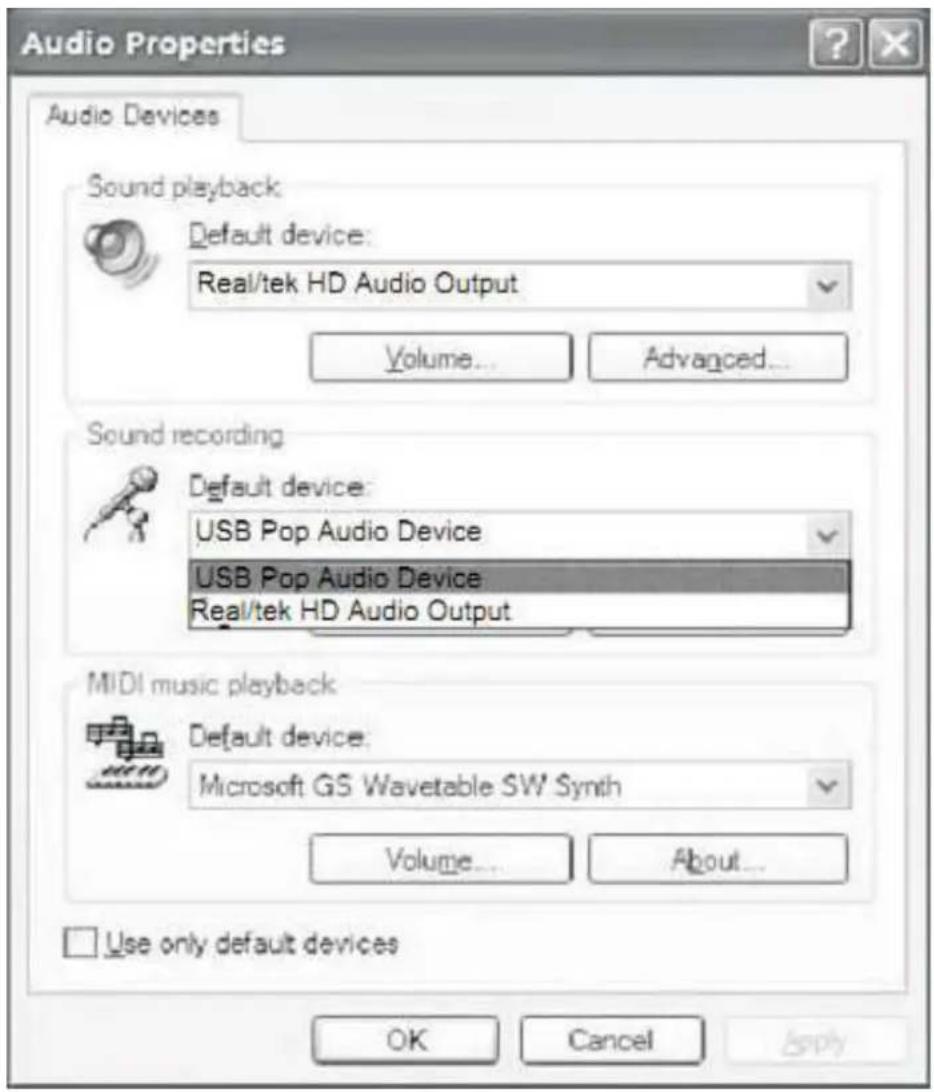
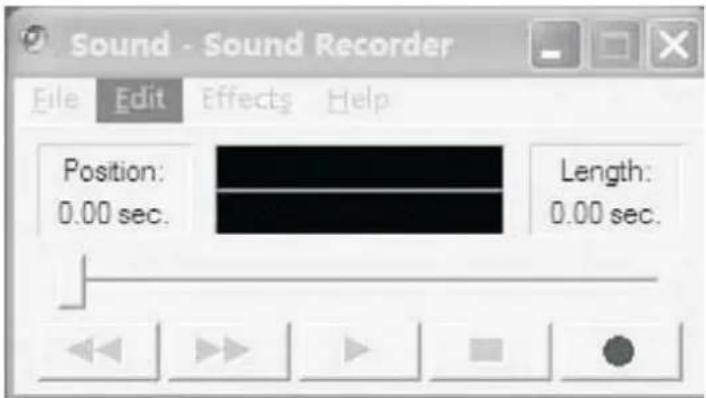
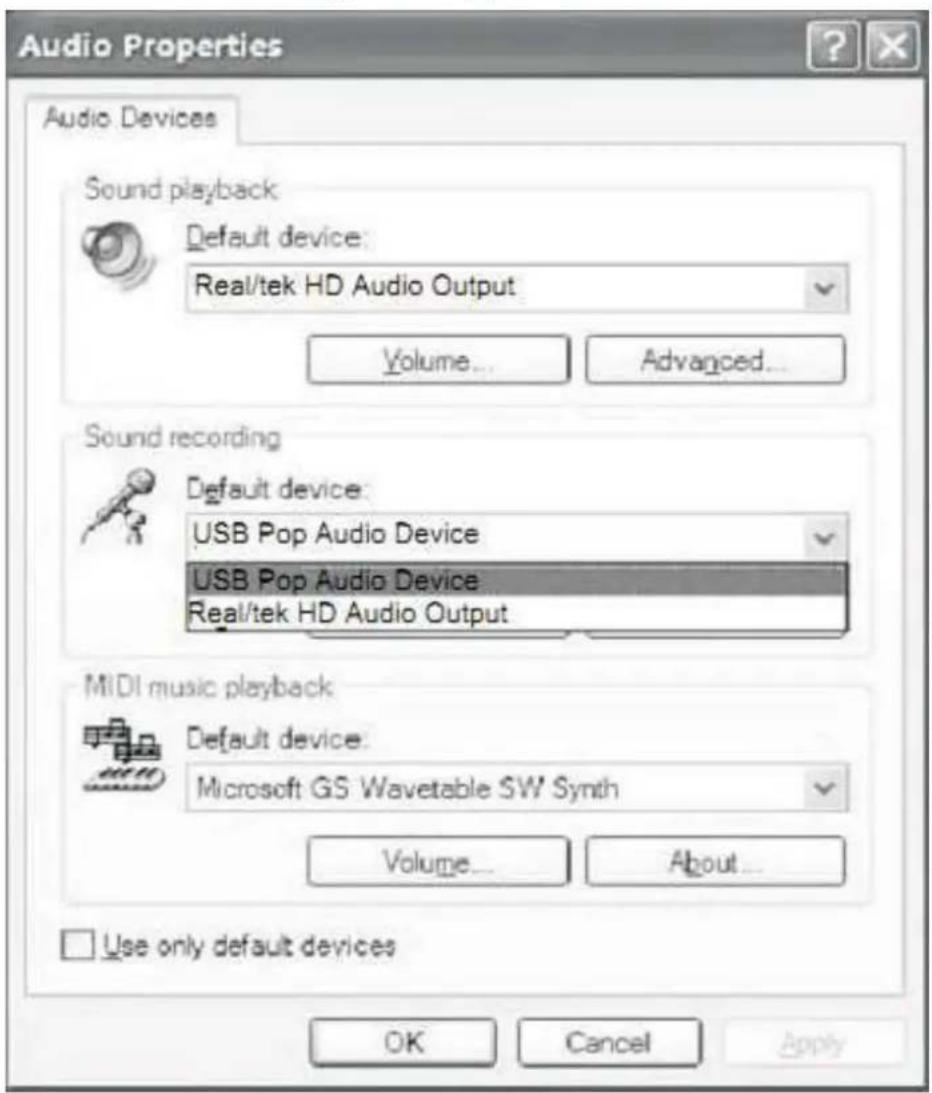
- Click the "start" in the left corner of the computer, Select "Programs", "Accessories", "Entertainment", "Sound Recorder" to open the sound record interface. Select Edit and click "Audio Properties" in the bottom of the menu to open "Audio Properties" interface;
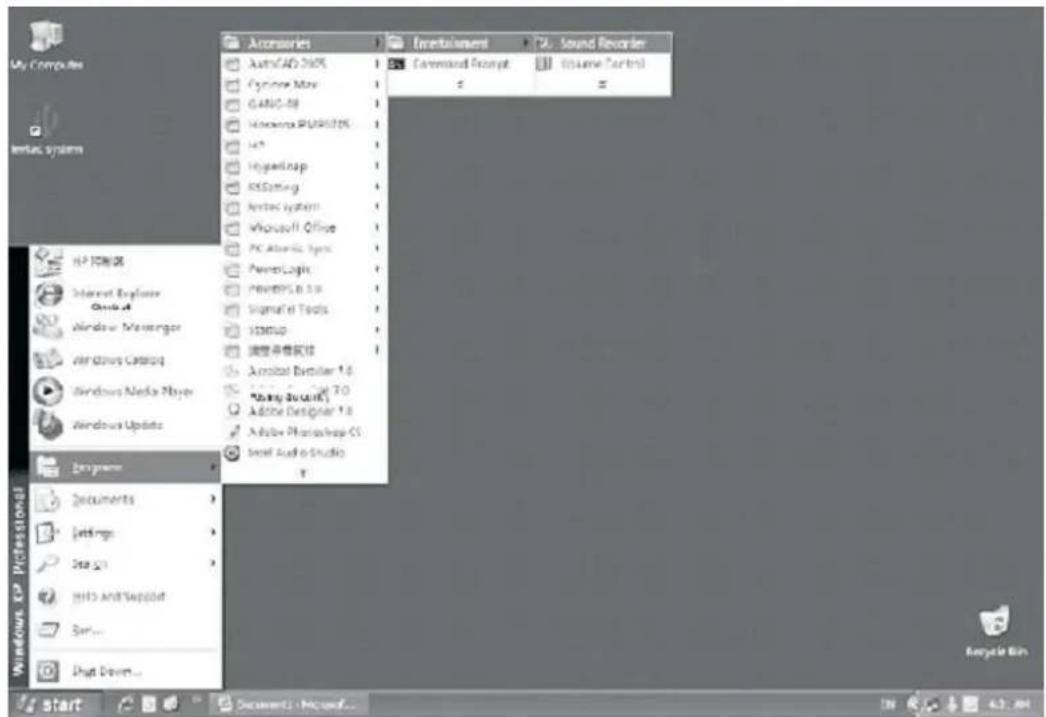
Audacity and USB Connection
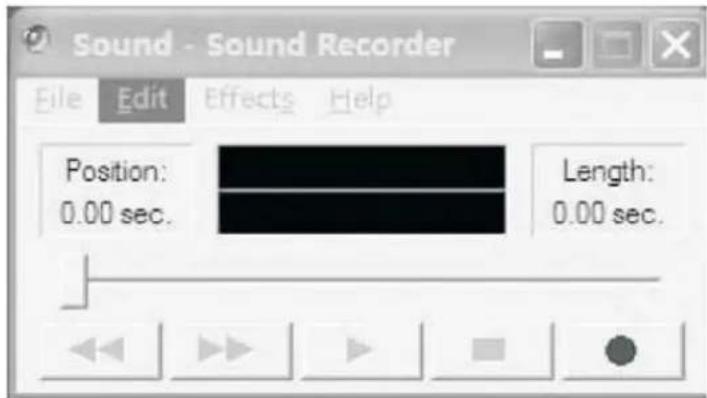
- Sound Recorder Interface
- Select Edit and click "Audio Properties" in the bottom of the menu to open "Audio Properties" interface;
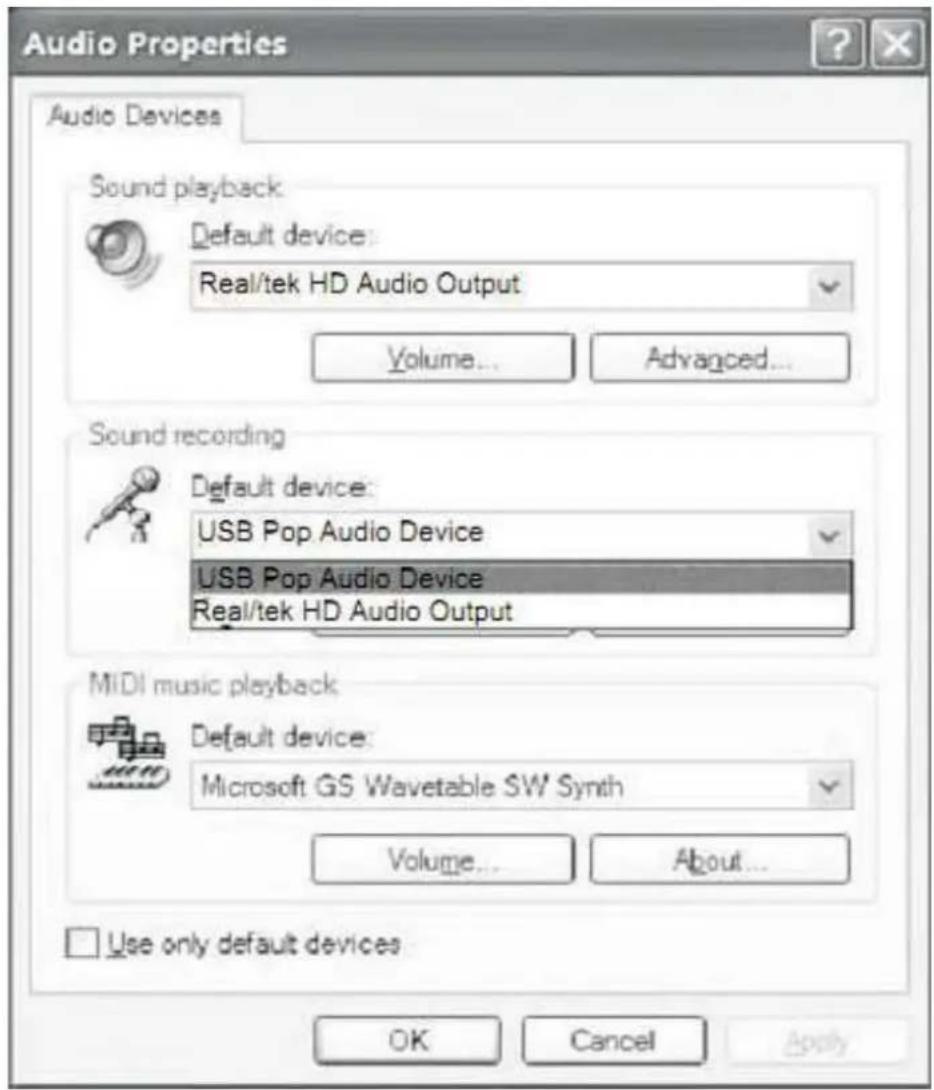
4. Audio Properties Interface
Audacity and USB Connection
- Select sound recording volume and open "Recording Control" interface: Adjust the line in volume to max or medium, and the sound wave will show on the interface when recording.
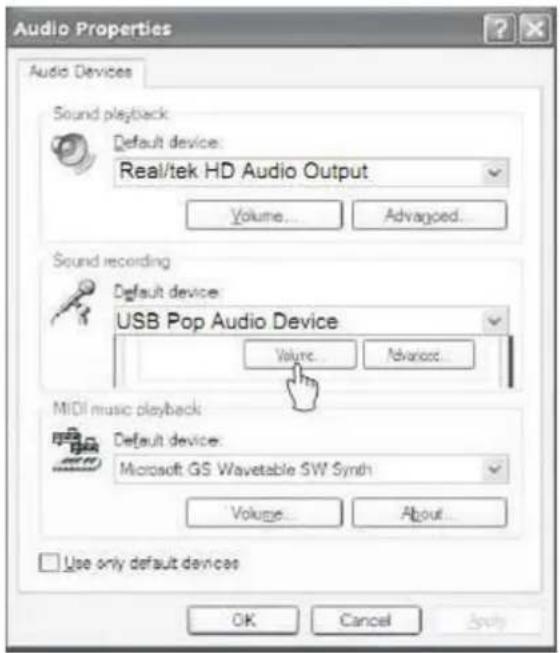
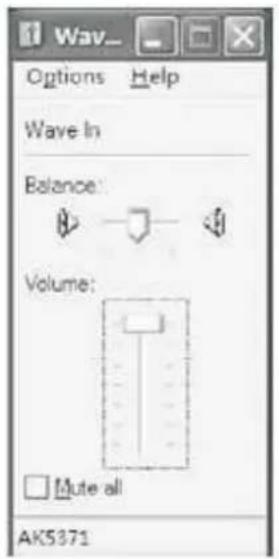
Audacity and USB Connection
![Audacity File Edit View Project Generate Effect Analyze Help I ← * L R -36 -24 -12 0 Stereo -1.0 0.0 1.0 2.0 3.0 4.0 5.0 6.0 7.0 Project rate: 44100 Cursor: 0.00.00000 min sec [Snap-To Off]](/content/2026/03/567401/images/b63ea00d7b82ea97d01a00b577b05ababf92fe83fdf59ef0537a264f70e7551e.jpg)
- Using the attribute controls button at the top of the screen, go to beginning, Play, Record, Pause, Stop and go to end. Use the File, Edit, View, Project, Generate, Effect and Analyze menus to Save, Export, and edit the music.
- Select preferences at the bottom of the menu which will open up Audacity Preferences. You can set the Audio I/O, Quality, File Formats, Spectrograms, Directories Interface, Keyboard and Mouse in the Audacity preference Interface.
![Audio File Edit View Broadcast Generate Effect Analyze Lab Undo Record Ctrl+2 Ctrl+Base Ctrl+1 Ctrl+2 Ctrl+2 Ctrl+3 Ctrl+2 Ctrl+4 Ctrl+1 Unicase Ctrl+2 Slope Ctrl+2 Slope Select... Duplicate Ctrl+0 Select... Final Save Coverage Selection Save Selection Restore Move Cursor... Snap-To... References Ctrl+9 -0.5 -1.0 Audio Track 1.0 Stereo, 44100Hz 32bit Beat 0.5 Disk spots remain for recording 6 hours and 38 minutes Project rate: 44100 Cursor: 2.02.276061 minut/sec [Snap-To Off]](/content/2026/03/567401/images/e0921ba530248b66e33c6f9a6a5f112ed3e8ac04e418f4112c198def590340b6.jpg)
Audacity and USB Connection
Audacity Preference
![AudiokHz Preferences Audio 2/0 | Quality | File Format | Spectrogram | Directioner | Interfatics | Keyboard | Playback Device: Microsoft 声音映射器 - output Recording Service: USB Pop Audio Device Channel: (Conc) Play other tracks will record new user Outperform Playthrough (Play user to track while recording it) Audio Track Audio Track Stereo 44100Hz 35-bit load Audio Track Stereo 44100Hz 35-bit load Cancel OK Disk space remains for recording 6 hours and 38 minutes. Project viewer: 44100 Current: 2:00-27:00 min sec [Stop-To Off]](/content/2026/03/567401/images/2aca4e840ee7aee2a21844a0e6d3ac8b906f8f9e01677685c9420719a233690f.jpg)
3. Adjust the output and input volume.
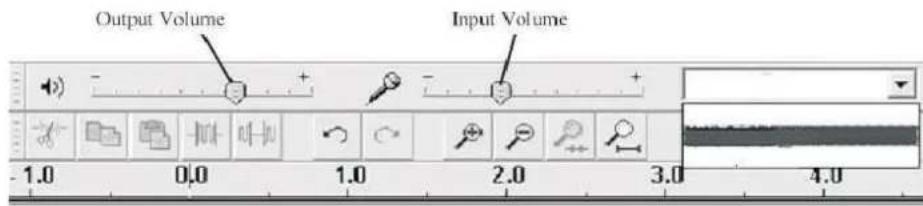
| EN EN | |
| Output Volume Output Volume | |
| Input Volume Input Volume |
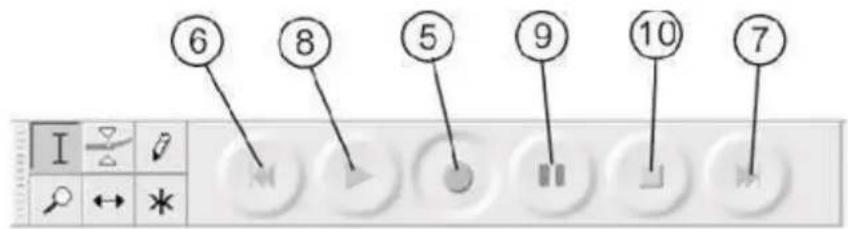
- Select the record button ♦o record the disc, the left and right tracks will show on the interface.
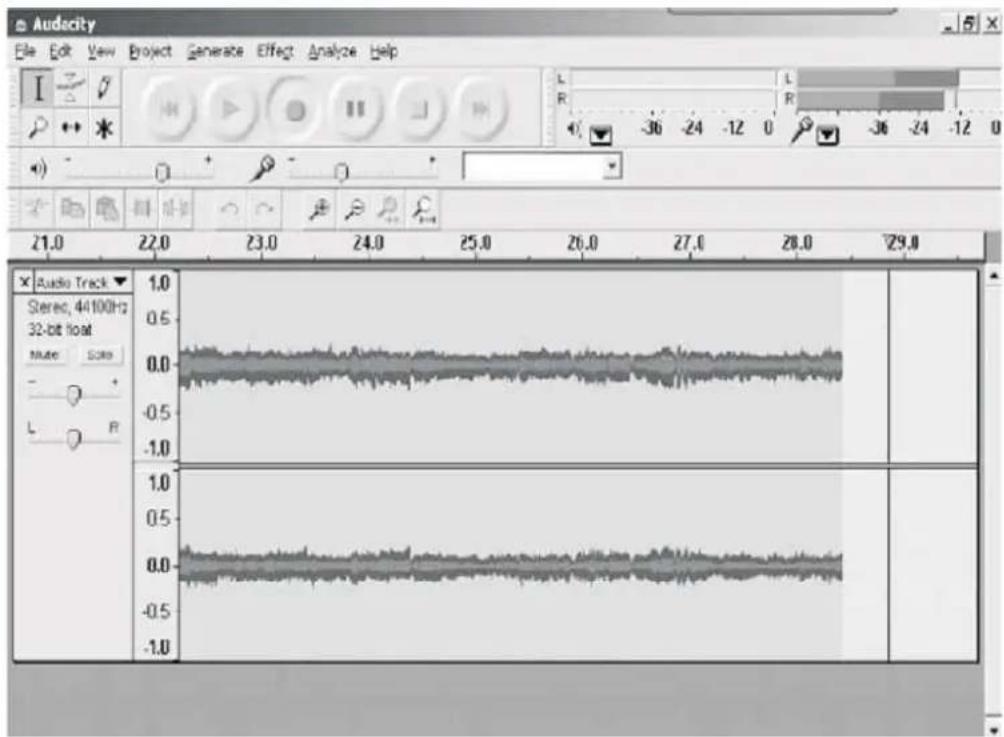
5.1 Press this button, start recording.
5.2 Click the button to skip to start;
5.3 Click the button to skip to end;
5.4 Click the button to play;
5.5 Click the button to pause the record play;
5.6 Click the button to stop the recording.
-
Export the Music Files for WAV, MP3, Ogg.
-
Once you have finished recording, you should save your music to the computer.
- Click File menu and move down to Export as WAV format, Mp3 format or Ogg format.
- Click on any format to save the music, and you will be asked for the file name of the music recording.
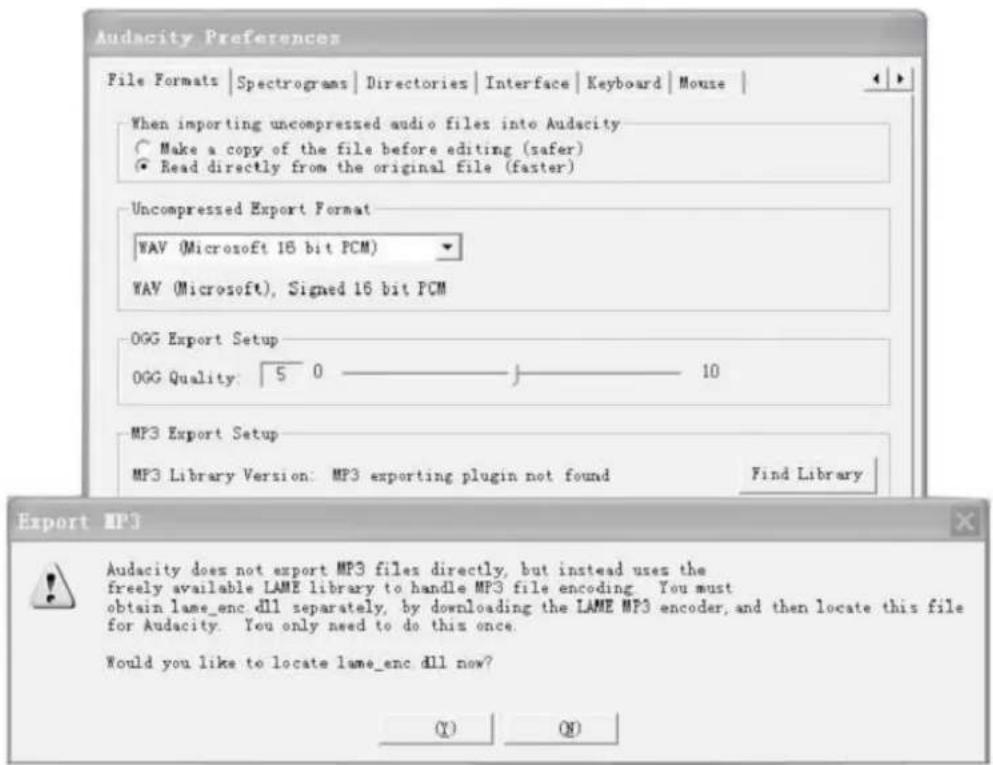
NOTE: Audacity does not export Mp3 files directly;
you should download the LAME Mp3 encoder;
A link to find LAME Mp3 can be found at http://audacity.sourceforge.net
If do not see the sound waves on the Interface, when recording, please adjust the line in volume as follows:
Audacity and USB Connection
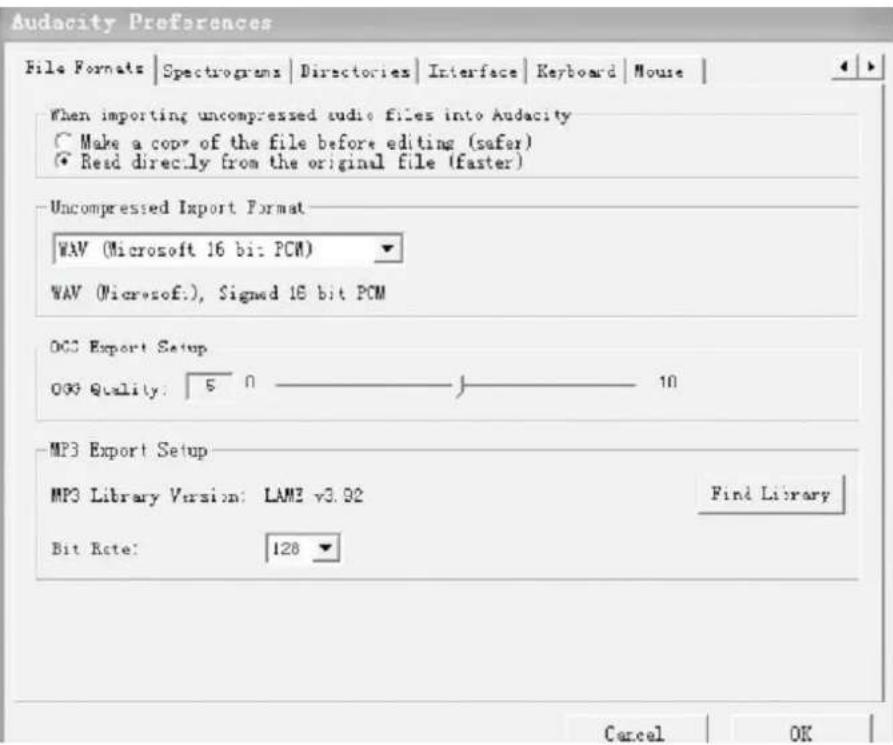
Specific Steps as follows:
1) Download "lame_enc.dll" file, and install it to the software list.
2) After starting the program, you have to click at "edit" in the menu bar, "Preference", "File Formats", and click the "search".
Audacity and USB Connection
3) After opened, it will come to the following message box, click "YES" to go to "Lame_enc.dll", and find the file's location:
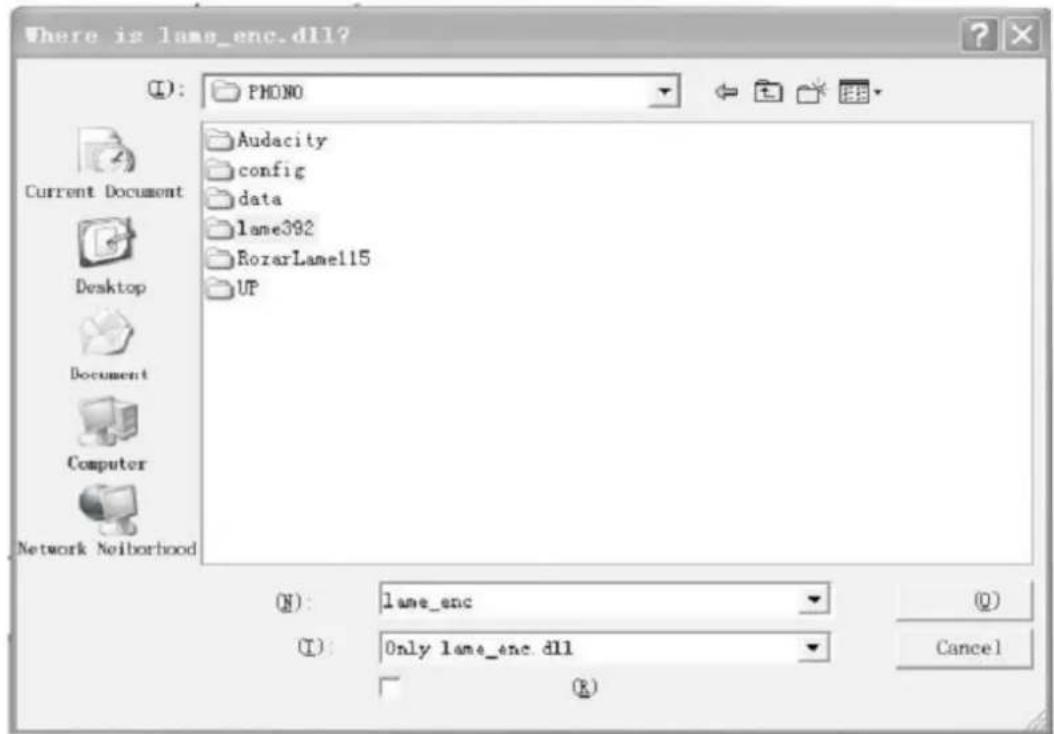
4) After you find the "Lame_enc.dll" file, open it and click "Y" to finish the installation
Service and support
For helpdesk support and more information, please visit: www.lenco.com
Lenco offers service and warranty in accordance with European law, which means that in case of repairs (both during and after the warranty period) you should contact your local dealer.
Important note: It is not possible to send products that need repairs to Lenco directly.
Important note: If this unit is opened or accessed by a non-official service center in any way, the warranty expires.
This device is not suitable for professional use. In case of professional use, all warranty obligations of the manufacturer will be voided.
ENGLISH

Products with the CE marking comply with the EMC Directive (2004/108/EC) and the Low Voltage Directive (2006/95/EC) issued by the Commission of the European Community.
The declaration of conformity may be consulted at
www.lenco.com
natural_image
Simple line drawing of a trash bin with crossed lines indicating no waste or discharge (no text or symbols)This symbol indicates that the relevant electrical product or battery should not be disposed of as general household waste in Europe. To ensure the correct waste treatment of the product and battery, please dispose them in accordance with any applicable local laws of requirement for disposal of electrical equipment or batteries. In so doing, you will help to conserve natural resources and improve standards of environmental protection in treatment and disposal of electrical waste (Waste Electrical and Electronic Equipment Directive).
®All rights reserved
Classic Phono
Benutzerhandbuch
TT-34
natural_image
Black-and-white photo of a vintage convertible wristbox with open lid and handle, no visible text or symbols on the device itself.
natural_image
Technical diagram of a circular mechanical assembly with a mounted device and directional arrows (no text or labels)1) PHONOGRAPHENDECKEL
2) PHONOGRAPHENDECKELSTÜTZE
3) 45 U/min-ADAPTER
4) LAUTSTÄRKEREGLER
5) LAUTSPRECHER
RÜCKSEITE
6) EIN/AUS-SCHALTER
7) AC STROMKABEL
8) USB-PORT
PHONOGRAPH
natural_image
Mechanical diagram showing a rotating component with a plus sign, no text or symbols presentnatural_image
Mechanical diagram showing a rotating component and a mechanical assembly (no text or symbols)4. Audioeigenschaftenfenster
natural_image
Simple line drawing of a trash bin with crossed lines indicating no waste or plastic (no text or symbols)natural_image
Black-and-white photo of a vintage suitcase with open lid and visible branding (no text extraction needed)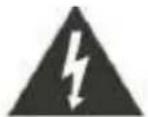
The lightning flash with arrowhead symbol, within an equilateral triangle is intended to alert the user to the presence of uninsulated 'dangerous voltage' within the product's enclosure that may be of sufficient magnitude to constitute a risk of electric shock to persons.
LET OP
RISICO OP ELEKTRISCHE SCHOK OPEN HET APPARAAT NIET
WAARSCHUWING:
COVER (OF ACHTERZIJDE) NIET VERWIJDEREN OM HET RISICO OP ELEKTRISCHE SCHOKKEN TE VOORKOMEN, GEEN INTERNE ONDERDELEN DIE U ZELF KUNT REPAREREN, LAAT REPARATIES OVER AAN GEKWALIFICEERD PERSONEEL
natural_image
Technical line drawing of a circular mechanical component with a rotating arm and base mount (no text or symbols)1) DEKSEL VAN DRAAIPLATEAU
2) DEKSELSTEUN
3) 45RPM ADAPTER
4) VOLUMEREGELAAR
5) LUIDSPREKERS
ACHTERPANEEL
natural_image
Mechanical diagram showing a rotating component with a plus sign, no text or symbols present- OM HET DRAAIPLATEAU WEER TE VERGRENDELEN VOOR TRANSPORTATIE, DIENT U DE SCHROEF LINKSOM VAST TE DRAAIEN.
natural_image
Mechanical diagram showing a rotating component and a gear mechanism (no text or symbols)2. Interface Audiorecorder
4. Interface Audio-eigenschappen
| EN NL | |
| Output Volume Uitgangsvolume | |
| Input Volume Ingangsvolume |
natural_image
Simple line drawing of a trash bin with crossed lines indicating no waste or plastic (no text or symbols)
natural_image
Black-and-white photo of a vintage suitcase with open lid and visible branding (no text or symbols on main subject)
natural_image
Technical line drawing of a circular mechanical component with a vertical assembly and circular base, showing internal structure and rotation indicator (no text or symbols)SOURCE D'ALIMENTATION
1) COUVERCLE DU PHONOGRAPHE
2) SUPPORT DU COUVERCLE DU PHONOGRAPHE
3) ADAPTATEUR 45 TOURS
4) RÉGLAGE DU VOLUME
5) ENCEINTES
PANNEAU ARRIÈRE
6) BOUTON MARCHE/ARRÊT
7) CORDON D'ALIMENTATION SECTEUR
8) CONNECTEUR USB
PHONOGRAPHE
natural_image
Diagram of a mechanical or electrical component with a rotating element and a plus symbol, no text or labels present.- POUR RE-BLOQUER LE TOURNE-DISQUE POUR LE TRANSPORT, TOURNEZ LA VIS DANS LE SENS INVERSE DES AIGUILLES D'UNE MONTRE.
natural_image
Mechanical diagram showing a rotating component and a brick structure with a curved base (no text or symbols)Audacity et port USB
Audacity et port USB
![Audacity File Edit View Project Generate Effect Analyze Help I ← → * Stereo -1.0 0.0 1.0 2.0 3.0 4.0 5.0 6.0 7.0 Project rate: 44100 Cursor: 0.00.000000 min sec [Snap-To Off]](/content/2026/03/567401/images/e67210d86255a97dd772522bbe3daf02faa24439cb18f4179dfb8e208629cd7c.jpg)
Audacity et port USB
Audacity et port USB
Service et assistance
natural_image
Simple line drawing of a trash bin with crossed lines indicating no waste or discharge (no text or symbols)natural_image
Black-and-white photo of a vintage cassette tape with open lid and handle, no visible text or symbols on the device itself.
natural_image
Technical diagram of a circular mechanical component with a mounted device and two circular components (no text or symbols)natural_image
Mechanical diagram showing a rotating component with a plus sign, no text or symbols present• PARA VOLVER A BLOQUEAR EL TOCADISCOS PARA SU TRANSPORTE, POR FAVOR, GIRE EL TORNILLO EN SENTIDO ANTIHORARIO.
natural_image
Mechanical diagram showing a rotating component and a gear mechanism (no text or symbols)| EN ES | |
| Output Volume Volumen de salida | |
| Input Volume Volumen de entrada |
natural_image
Simple line drawing of a trash bin with crossed lines indicating no waste or discharge (no text or symbols)
- Wooden turntable with USB connection
- IMPORTANT SAFETY INSTRUCTIONS
- PREPARATION FOR USE
- UNPACKING AND SET UP
- IMPORTANT: Raising and Lowering the Lid
- TO AVOID DAMAGING THE CABINET OR THE LID, NEVER FORCE THE LID
- PROTECT YOUR FURNITURE
- LOCATION OF CONTORLS AND INDICATORS FORNT PANEL
- PLAYING RECORDS
- IMPORTANT
- Audacity and USB Connection
- Installing the Audacity Software
- Install the USB Drive
- Running the software
- Audio Properties Interface
- Audacity Preference
- Adjust the output and input volume.
- Specific Steps as follows:
- Service and support
- ENGLISH
- Classic Phono
- Benutzerhandbuch
- TT-34
- RÜCKSEITE
- PHONOGRAPH
- Audioeigenschaftenfenster
- LET OP
- WAARSCHUWING:
- Interface Audiorecorder
- Interface Audio-eigenschappen
- SOURCE D'ALIMENTATION
- PHONOGRAPHE
- Audacity et port USB
- Service et assistance
Brand : LENCO
Model : TT34
Category : Turntable