GTR 55225 Professional - Sander BOSCH - Free user manual and instructions
Find the device manual for free GTR 55225 Professional BOSCH in PDF.
| Brand | Bosch |
| Model | GTR 55225 Professional |
| Product type | Drywall sander (dry) |
| Reference | 3601 GD4 0.. |
| Rated power input | 550 W |
| No-load speed (variable speed) | 340 – 910 rpm |
| Sanding pad diameter | 215 mm |
| Abrasive disc diameter | 225 mm |
| Suction connection diameter | 45/35 mm |
| Length (short version) | 1,1 m |
| Length (standard version, 1 extension tube) | 1,7 m |
| Length (long version, 2 extension tubes) | 2,3 m |
| Weight (short version) | 4,1 kg |
| Weight (standard version) | 4,8 kg |
| Power supply | 230 V ~, 50/60 Hz |
| Protection class | Class I (with earth connection) |
| Main functions | Dry sanding of partitions, ceilings, interior/exterior walls; removal of paints, glue, plaster |
| Electronics | Speed preselection, electronic constant, soft start |
| Suction system | Suction hose with power adjustment (1-6) and internal/external air flow |
| Included accessories | Flexible sanding pad, interface pad, abrasive discs, extension tubes, suction hose, safety hook |
| Maintenance | Clean ventilation slots, replace abrasive discs and connecting hose if necessary |
| Safety | On/off switch, safety brake, anti-restart device, mandatory use of a vacuum cleaner with suitable filter |
| Repairability | Spare parts available (pad, hose, brush segments); repair by authorized Bosch service center |
| Intended use | Dry sanding only; do not use in explosive atmosphere |
Frequently Asked Questions - GTR 55225 Professional BOSCH
User questions about GTR 55225 Professional BOSCH
0 question about this device. Answer the ones you know or ask your own.
Ask a new question about this device
Download the instructions for your Sander in PDF format for free! Find your manual GTR 55225 Professional - BOSCH and take your electronic device back in hand. On this page are published all the documents necessary for the use of your device. GTR 55225 Professional by BOSCH.
USER MANUAL GTR 55225 Professional BOSCH
General Power Tool SafetyWarnings
WARNING
Read all safety warnings, instructions, illustrations and specifica
tions provided with this power tool. Failure to follow all instructions listed below may result in electric shock, fire and/ or serious injury.
Save all warnings and instructions for future reference.
The term "power tool" in the warnings refers to your mains-operated (corded) power tool or battery-operated (cordless) power tool.
Work area safety
- Keep work area clean and well lit. Cluttered or dark areas invite accidents.
- Do not operate power tools in explosive atmospheres, such as in the presence of flammable liquids, gases or dust. Power tools create sparks which may ignite the dust or fumes.
- Keep children and bystanders away while operating a power tool. Distractions can cause you to lose control.
Electrical safety
Power tool plugs must match the outlet. Never modify the plug in any way. Do not use any adapter plugs with earthed (grounded) power tools. Unmodified plugs and matching outlets will reduce risk of electric shock.
- Avoid body contact with earthed or grounded surfaces, such as pipes, radiators, ranges and refrigerators. There is an increased risk of electric shock if your body is earthed or grounded.
Do not expose power tools to rain or wet conditions. Water entering a power tool will increase the risk of electric shock.
Do not abuse the cord. Never use the cord for carrying, pulling or unplugging the power tool. Keep cord away from heat, oil, sharp edges or moving parts. Damaged or entangled cords increase the risk of electric shock.
When operating a power tool outdoors, use an extension cord suitable for outdoor use. Use of a cord suitable for outdoor use reduces the risk of electric shock.
If operating a power tool in a damp location is unavoidable, use a residual current device (RCD) protected supply. Use of an RCD reduces the risk of electric shock.
Personal safety
Stay alert, watch what you are doing and use common sense when operating a power tool. Do not use a power tool while you are tired or under the influence of drugs, alcohol or medication. A moment of inatten
tion while operating power tools may result in serious personal injury.
Use personal protective equipment. Always wear eye protection. Protective equipment such as a dust mask, non-skid safety shoes, hard hat or hearing protection used for appropriate conditions will reduce personal injuries.
Prevent unintentional starting. Ensure the switch is in the off-position before connecting to power source and/or battery pack, picking up or carrying the tool. Carrying power tools with your finger on the switch or energising power tools that have the switch on invites accidents.
- Remove any adjusting key or wrench before turning the power tool on. A wrench or a key left attached to a rotating part of the power tool may result in personal injury.
- Do not overreach. Keep proper footing and balance at all times. This enables better control of the power tool in unexpected situations.
Dress properly. Do not wear loose clothing or jewellery. Keep your hair and clothing away from moving parts. Loose clothes, jewellery or long hair can be caught in moving parts.
If devices are provided for the connection of dust extraction and collection facilities, ensure these are connected and properly used. Use of dust collection can reduce dust-related hazards.
Do not let familiarity gained from frequent use of tools allow you to become complacent and ignore tool safety principles. A careless action can cause severe injury within a fraction of a second.
Power tool use and care
Do not force the power tool. Use the correct power tool for your application. The correct power tool will do the job better and safer at the rate for which it was designed.
Do not use the power tool if the switch does not turn it on and off. Any power tool that cannot be controlled with the switch is dangerous and must be repaired.
- Disconnect the plug from the power source and/or remove the battery pack, if detachable, from the power tool before making any adjustments, changing accessories, or storing power tools. Such preventive safety measures reduce the risk of starting the power tool accidentally.
- Store idle power tools out of the reach of children and do not allow persons unfamiliar with the power tool or these instructions to operate the power tool. Power tools are dangerous in the hands of untrained users.
- Maintain power tools and accessories. Check for misalignment or binding of moving parts, breakage of parts and any other condition that may affect the power tool's operation. If damaged, have the power tool repaired before use. Many accidents are caused by poorly maintained power tools.
- Keep cutting tools sharp and clean. Properly maintained cutting tools with sharp cutting edges are less likely to bind and are easier to control.
Use the power tool, accessories and tool bits etc. in accordance with these instructions, taking into account the working conditions and the work to be performed. Use of the power tool for operations different from those intended could result in a hazardous situation. - Keep handles and grasping surfaces dry, clean and free from oil and grease. Slippery handles and grasping surfaces do not allow for safe handling and control of the tool in unexpected situations.
Service
Have your power tool serviced by a qualified repair person using only identical replacement parts. This will ensure that the safety of the power tool is maintained.
SafetyWarnings for Sander
Only use the power tool for dry sanding. Water entering a power tool will increase the risk of electric shock.
Warning: Danger of fire! Avoid overheating the workpiece and the sander. Always empty the dust container before taking a break from work. Sanding dust in the dust bag, microfilter, paper bag (or in the filter bag or vacuum cleaner filter) can spontaneously ignite under unfavourable conditions. This risk is increased if the sanding dust is mixed with paint or polyurethane residue or with other chemical substances and if the workpiece is hot as a result of prolonged work.
Always wait until the power tool has come to a complete stop before placing it down.
- Secure the workpiece. A workpiece clamped with clamping devices or in a vice is held more secure than by hand.
Hold the power tool firmly with both hands and make sure you have a stable footing. The power tool can be more securely guided with both hands.
Connect the power tool to a mains supply that is properly connected to earth. The socket and extension cable must have a fully functioning protective conductor.
Products sold in GB only:
Your product is fitted with an BS 1363/A approved electric plug with internal fuse (ASTA approved to BS 1362). If the plug is not suitable for your socket outlets, it should be cut off and an appropriate plug fitted in its place by an authorised customer service agent. The replacement plug should have the same fuse rating as the original plug. The severed plug must be disposed of to avoid a possible shock hazard and should never be inserted into a mains socket elsewhere.
Product Description and Specifications

Read all the safety and general instructions. Failure to observe the safety and general instructions may result in electric shock, fire and/or serious injury.
Please observe the illustrations at the beginning of this operating manual.
Intended Use
The power tool is intended for dry sanding dry wall that has had filler applied, ceilings and walls in indoor and outdoor areas, and for removing coats of paint, adhesive residues and loose plaster.
Product Features
The numbering of the product features refers to the diagram of the power tool on the graphics page.
(1) Suction power thumbwheel
(2) Speed preselection thumbwheel
(3) On/off switch
(4) Handle (insulated gripping surface)
(5) Extraction hose
(6) Extraction outlet
(7) Handle section
(8) Safety hook
(9) Clamping lever
(10) Extension tube
(11) Sanding head
(12) Brush segment locking mechanism
(13) Suction power adjusting lever
(14) Sanding sheet
(15) Intermediate pad
(16) Screw for sanding pad
(17) Sanding pad
(18) Brush segment
(19) Connection hose
(20) Sanding pad holder
(21) Eccentric screw
(22) Hose/cable clip a)
(23) Hose clamp
(24) Inner housing
(25) Hose mount
a) Accessories shown or described are not included with the product as standard. You can find the complete selection of accessories in our accessories range.
Technical Data
| Dry wall sander GTR 550 | |
| GTR 55-225 | |
| Article number | 3601 GD4 0.. |
| Speed preselection ● | |
| Constant electronic control ● | |
| Soft start ● | |
| Rated power input W 550 | |
| No-load speed n0 min | -1 340-910 |
| Sanding pad diameter mm 215 | |
| Sanding sheet diameter mm 225 | |
| Dust extraction diameter mm 45/35 | |
| Short version length (without extension tube) | m 1.1 |
| Standard version length (with one extension tube)A) | m 1.7 |
| Long version length (with two extension tubes) | m 2.3 |
| Weight according to EPTA-Procedure 01:2014 | |
| - Short version kg 4.1 | |
| - Standard version kg 4.8 | |
| Protection class /I | # |
A) Standard scope of delivery
The specifications apply to a rated voltage [U] of 230 V. These specifications may vary at different voltages and in country-specific models.
Assembly
Pull the plug out of the socket before carrying out any work on the power tool.
Changing the Sanding Sheet (see figure A)
To remove the sanding sheet (14), lift it from the side and pull it off the intermediate pad (15).
Remove dirt and dust from the intermediate pad (15), e.g. with a paintbrush, before attaching a new sanding sheet.
The surface of the intermediate pad (15) is fitted with a hook-and-loop fastening, allowing sanding sheets with a hook-and-loop backing to be secured quickly and easily. Press the sanding sheet (14) firmly onto the underside of the intermediate pad (15).
To ensure optimum dust extraction, make sure that the punched holes in the sanding sheet (14) are aligned with the punched holes in the intermediate pad (15) and the drilled holes in the sanding pad (17).
Note: An intermediate pad (15) is not required when working with the medium-hard sanding pad; the sanding sheet (14) is attached directly to the sanding pad (17). In all other cases, the change is performed as described here.
Selection of the Sanding Plate
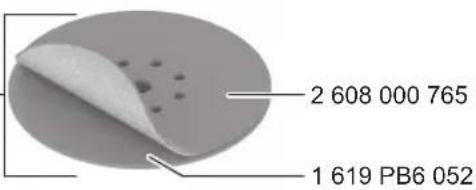
| Soft sanding pad set1) (2 608 000 766) | - For universal use on flat and curved surfaces - The set consists of a soft sanding pad and an intermediate pad (2 608 000 765). The sanding pad may only be used with an intermedi- ate pad. |
| Medium-hard sanding pad (2 608 000 764) | - High material removal rate, ideal for hard plaster and removing old wall paints - For use on flat surfaces - Optimal suction support makes work easier when using a dust extractor. |
A) Standard scope of delivery
Changing the Intermediate Pad (see figure A)
An intermediate pad (15) must always be used when working with the soft sanding pad (part of standard items included).
To remove the intermediate pad (15), lift it from the side and pull it off the sanding pad (17).
Remove dirt and dust from the sanding pad (17), e.g. with a paintbrush, before attaching a new intermediate pad.
The surface of the sanding pad (17) is fitted with a hook-and-loop fastening, allowing intermediate pads to be secured quickly and easily.
Press the intermediate pad (15) firmly against the underside of the sanding pad (17).
To ensure optimum dust extraction, make sure that the punched holes in the intermediate pad (15) are aligned with the drilled holes in the sanding pad (17).
Changing the Sanding Pad (see figure B)
Note: Replace damaged sanding pads (17) immediately.
Pull off the sanding sheet (14) and the intermediate pad (15). Unscrew the screw (16) completely and remove the sanding pad (17). Attach the new sanding pad (17) and retighten the screw.
Note: When attaching the sanding pad, make sure that the teeth of the catch mate with the recesses in the sanding pad.
Note: Damaged sanding pads must only be replaced by an after-sales service centre authorised to work with Bosch power tools.
Inserting/Removing the Extension Tube (see figures C-D)
Only use the extension tubes (10) if necessary. The effort required for the sanding is significantly lower when working without extension tubes.
Note: A maximum of two extension tubes may be inserted.
Undoing the Connection between Sanding Head/Handle Section/Extension Tube (see figure C):
-
Open the clamping lever (9).
-
Open the safety hook (8).
- ③ Pull the previously connected parts apart.
Fastening the Connection between Sanding Head/ Handle Section/Extension Tube (see figure D):
- Slide the sanding head (11), handle section (7) and/or extension tubes (10) into each other depending on the required connection.
- Close the safety hook (8).
- Push the clamping lever (9) until it is at a right angle to the sanding head (11), handle section (7) or extension tube (10).
- ⑦ Firmly tighten the eccentric screw (21).
- Close the clamping lever (9).
Always check that all the connection elements are secured with the safety hooks (8) and clamping levers (9) and are firmly attached.
Dust/chip extraction
Dust from materials can be harmful to health. Touching or breathing in this dust can trigger allergic reactions and/or cause respiratory illnesses in the user or in people in the near vicinity.
Certain dusts are classified as carcinogenic.
- Use a dust extraction system that is suitable for the material wherever possible.
- Provide good ventilation at the workplace.
- Always wear a P2 filter class breathing mask.
External dust extraction
Attach the dust extraction hose (5) to the extraction outlet (6) on the handle section (7).
Connect the dust extraction hose (5) to an extractor (accessory).
The dust extractor must be suitable for the material being worked.
When extracting dry dust that is especially detrimental to health or carcinogenic, use a special dust extractor.
For large surfaces, use the GAS 35 L/M AFC or GAS 55 L/ M AFC dust extractor since these models guarantee the continuous suction power required.
When working on vertical surfaces, hold the power tool with the dust extraction hose facing downwards.
Installing/Removing the Hose/Cable Clip (see figure E) Place the hose/cable clip (22) over the extraction hose (5). Insert the power cable into the cable groove of the hose/cable clip.
To remove the hose/cable clip (22), pull it off the extraction hose (5) and remove the power cable from the hose/cable clip.
Operation
Starting Operation
Pay attention to the mains voltage. The voltage of the power source must match the voltage specified on the rating plate of the power tool. Power tools marked with 230V can also be operated with 220V .
▶ Products that are only sold in AUS and NZ: Use a residual current device (RCD) with a nominal residual current of 30 mA or less.
Preselecting the Speed
You can preselect the required speed using the speed preselection thumbwheel (2), even during operation. The higher numbers indicate a high speed, while the smaller ones represent a low speed.
The Constant Electronic keeps the speed at no load and under load virtually consistent, guaranteeing uniform performance.
The electronic soft start limits the torque when the power tool is switched on and increases the service life of the motor.
Switching On/Off
Make sure that you are able to press the On/Off switch without releasing the handle.
To switch on the power tool, slide the on/off switch (3) forward so that "I" appears on the switch.
To switch off the power tool, slide the on/off switch (3) backwards so that "0" appears on the switch.
Application Overview
| Bodyfiller/ plaster hardness | Wall/ ceiling | internal/external air flow | Suction power Speed setting Sanding sheet grit | |
Very soft/soft Wall/ceiling ① 62-4 From P180
Medium hardness Wall ① 64-6 From P120
Ceiling 1-5 (optimum:3)
10 | English
| Bodyfiller/ plaster hardness | Wall/ ceiling | internal/external air flow | Suction power Speed setting Sanding sheet grit |
③ on even surfaces 1-3
Working Advice
Pull the plug out of the socket before carrying out any work on the power tool.
Always wait until the power tool has come to a complete stop before placing it down.
Do not put the power tool down on its side. This could permanently warp the sanding pad.
This power tool is not suitable for bench-mounted use. It must not be clamped into a vice or fastened to a workbench, for example.
Sanding Surfaces
Switch the power tool on, place the entire sanding surface against the surface of the workpiece and apply moderate pressure as you move the sander over the workpiece.
The material removal rate and sanding result are primarily determined by the choice of sanding sheet, the preselected speed setting and the contact pressure.
Only immaculate sanding sheets achieve good sanding performance and make the power tool last longer.
Be sure to apply consistent contact pressure in order to increase the lifetime of the sanding sheets.
Excessively increasing the contact pressure will not lead to increased sanding performance, rather it will cause more severe wear of the power tool and of the sanding sheet.
Do not use a sanding sheet for other materials after it has been used to work on metal.
Use only original Bosch-sanding accessories.
Sanding Close to Edges (see figures F-G)
Thanks to the removable brush segment, you can reduce the lateral distance between the wall/ceiling and the sanding pad.
- Press and hold the locking mechanism (12) for the brush segment (18).
- Swivel the brush segment (18) forwards and remove it.
- To insert, hook the brush segment (18) onto the opposite side of the locking mechanism (12), and swivel it towards the sanding head (11) until it clicks into place.
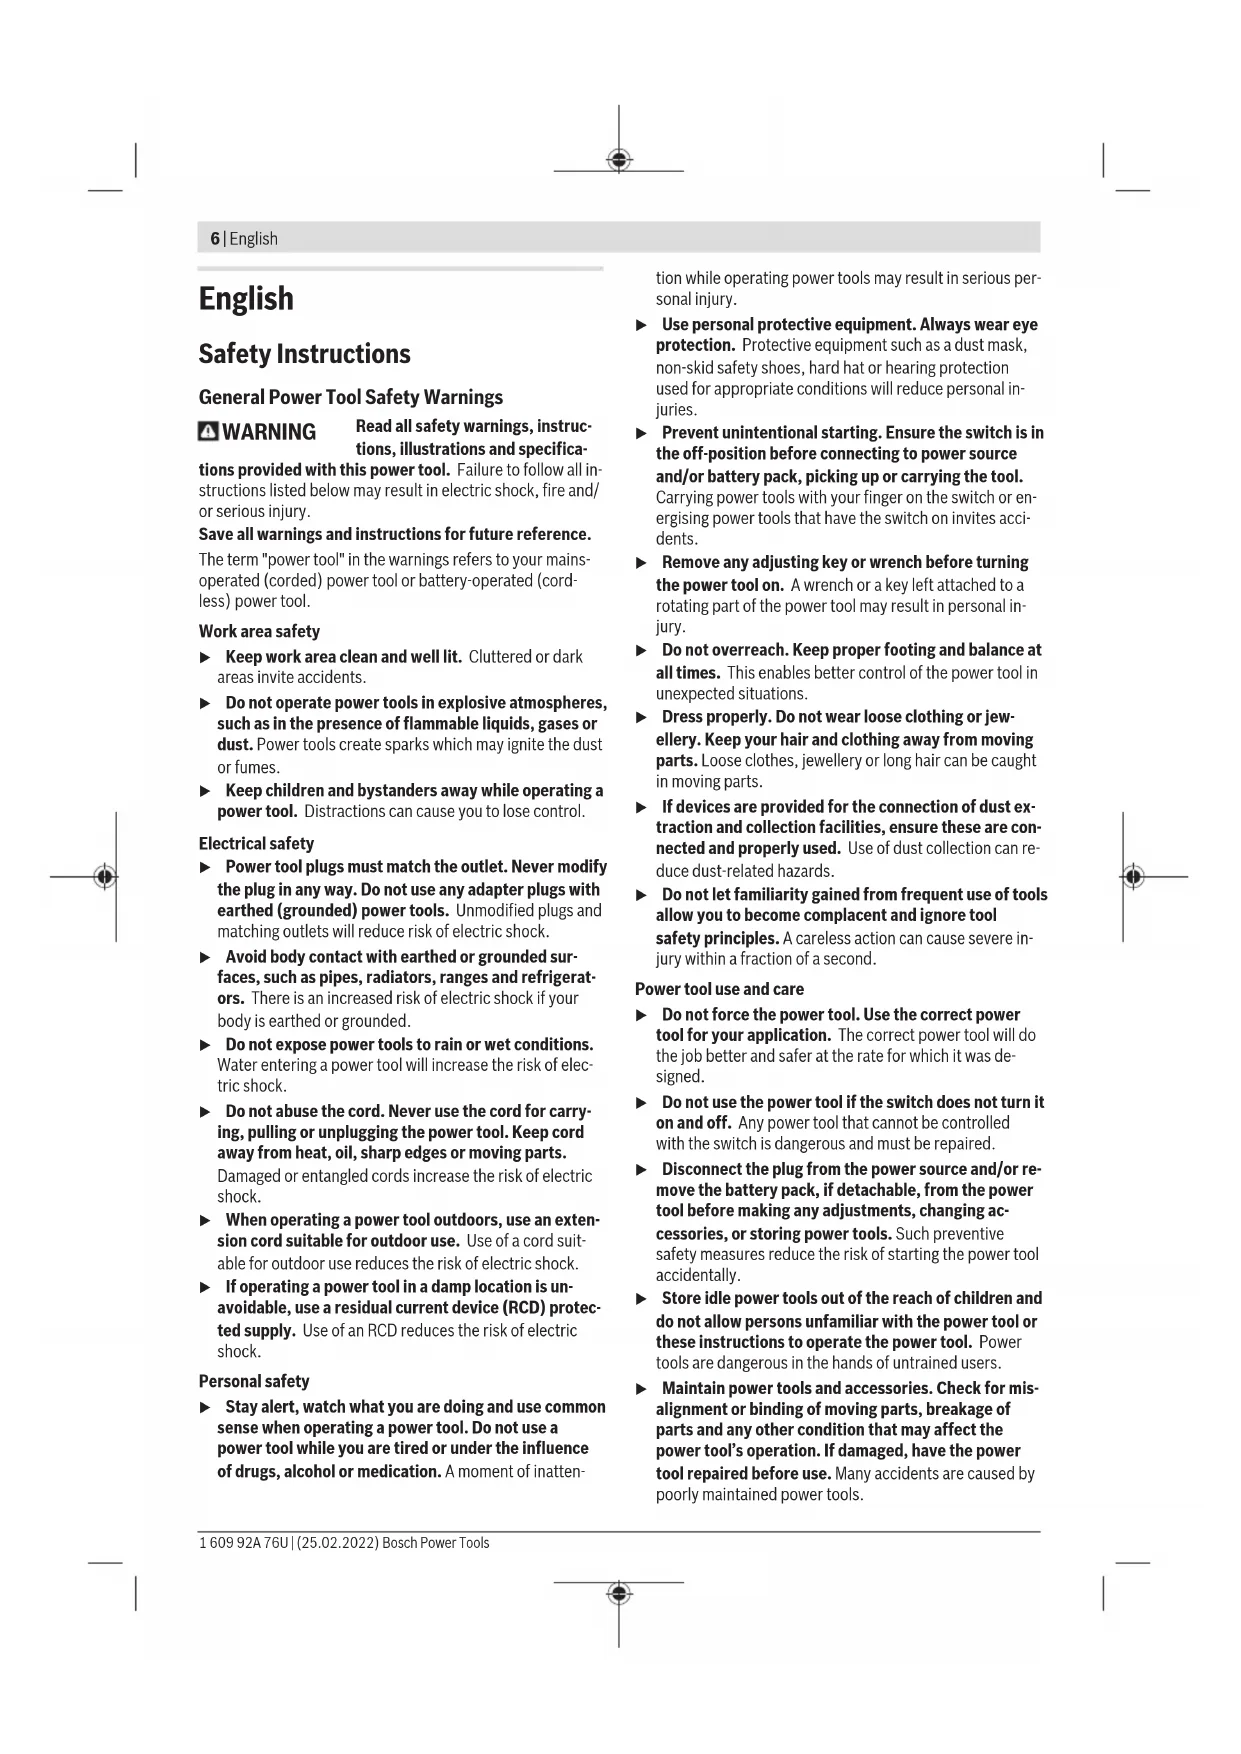
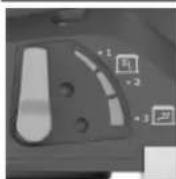
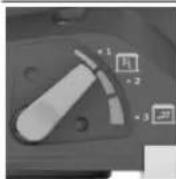
Adjusting the Internal/External Airflow
Depending on the vacuum pressure, the perceived tool weight can be reduced.
You can switch between different air flow operating modes depending on the intended use. Turn the suction power adjusting lever (13) to one of the 3 positions.
Switch position Type of airflow Use
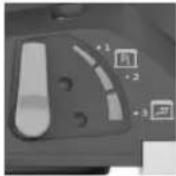
① External airflow Ideal for sanding walls at high sand-ing speeds and without vacuum pressure
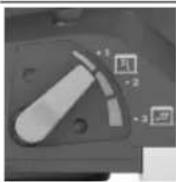
② Mixed external Medium sanding and internal airflow performance with vacuum pressure effect
③ Mixed external ideal for sanding and internal air- ceilings at low flow sanding speeds but with high va- cuum pressure (suction power) for a low perceived flow weight
Adjusting suction power
You can adjust the suction power to achieve your preferred balance between sanding speed and suction power. This regulation is only possible when the internal airflow is activated (position ③ in the table above).
Adjust the suction power with the thumbwheel (1):
-1-5: Low to high suction power, suitable for sanding ceilings
- 6: Highest suction power, suitable for sanding walls Start with a low suction power (position 1) and increase slowly, until there is a noticeable contact pressure.
High suction power allows low-fatigue sanding of ceilings and walls. An excessively high suction power can cause the power tool to vibrate, which can make handling more difficult.
Errors - Causes and Corrective Measures
Cause Corrective measure
The drywall sander does not run smoothly or jolts across the surface.
| The suction effect is too strong. | Reduce the suction power or switch to external dust extraction, if necessary. |
The bodyfiller material and/ or substrates are hard.
Reduce the suction power or switch to external dust extraction, if necessary.
English | 11
| Cause Corrective measure | |
| Reduce the speed. | |
| The removal rate of the material to be machined is too high. | |
| The drywall sander's speed is too high. | Reduce the speed. |
| The suction effect on the dry-wall sander is too strong. | Reduce the suction effect or switch to external dust extraction. |
| The bodyfiller material has a high proportion of filler or is very soft. | Switch on the external dust extraction, set the suction power thumbwheel to setting 6 and, in extreme cases, reduce the speed. |
| The grit of the abrasive is too coarse. | Use a sanding sheet with a finer grit. |
| The surface quality is not optimal. | |
| The grit of the abrasive is too coarse. | Use a sanding sheet with a finer grit. |
| The drying times for the bodyfiller material have not been observed. | Refer to the technical information sheets and manufacturer's recommendations. |
| The suction effect is too strong. | Reduce the suction power. |
| The bodyfiller material has a high proportion of filler or is very soft. | Use a sanding sheet with a finer grit. |
| The running power tool has been positioned on the surface (scoring). | Position the power tool before switching it on. |
| Work on the surface and always work with the removable brush segment. | |
| There are sanding marks on the surface. | |
| The hard sanding pad has been positioned at an angle on the surface. | Use a soft sanding pad with an intermediate pad. |
| In the case of very soft bodyfiller material, the sanding pad is too hard or the grit of the abrasive is too coarse. | Use a soft sanding pad with an intermediate pad. |
| Choose a finer abrasive grit. | |
| The suction effect is insufficient. | |
| The suction power on the dust extractor is too low. | Increase the suction power on the dust extractor. |
| The drywall sander's speed is too high. | Reduce the speed. |
| The internal dust extraction on the drywall sander is too low. | Reduce the suction power or switch to external dust extraction. |
| The bodyfiller material has a high proportion of filler or is very soft. | Switch on the external dust extraction, set the suction power thumbwheel to setting |
| Cause Corrective measure | |
| 6 and, in extreme cases, reduce the speed. | |
| The main filter on the dust extractor is blocked/ jammed. | Clean the filter element regularly: - Option 1: Set the suction power regulation to the maximum suction power. Seal the nozzle, extraction hose or intake port on the dust extractor with the palm of your hand for 10 seconds until the automatic cleaning starts. - Option 2: Clean the filter element mechanically (extraction). - Option 3: Check the filter element for damage and blockages. Insert a new filter element regularly. |
| A fleece dust bag is being used. | Use a waste disposal dust bag. |
| The extraction hose is blocked or twisted. | Remove the blockage or untwist the hose. |
| The dust extractor's dust container is full. | Empty the dust extractor's dust container. |
Maintenance and Service
Maintenance and Cleaning
Pull the plug out of the socket before carrying out any work on the power tool.
To ensure safe and efficient operation, always keep the power tool and the ventilation slots clean.
In order to avoid safety hazards, if the power supply cord needs to be replaced, this must be done by Bosch or by an after-sales service centre that is authorised to repair Bosch power tools.
Changing the Connection Hose (see figure H)
To remove the connection hose (19), loosen the screw on the hose clamp (23) with a screwdriver and lift the hose clamp (23) off with the connection hose (19). Remove the hose clamp (23). Pull out the inner housing (24) of the hose mount (25) at the other end of the connection hose (19). Hold the inner housing (24) in place and unscrew the connection hose (19).
To insert a new connection hose (19), hold the inner housing (24) in place and screw in the new connection hose (19) all the way. Fit the hose clamp (23) on the other side of the connection hose (19). Position the screw head so that you can tighten the hose clamp (23) effortlessly on the sanding head (11) with a screwdriver with a torque of around 2 Nm.
12 | Français
After-Sales Service and Application Service
Our after-sales service responds to your questions concerning maintenance and repair of your product as well as spare parts. You can find explosion drawings and information on spare parts at: www.bosch-pt.com
The Bosch product use advice team will be happy to help you with any questions about our products and their accessories.
In all correspondence and spare parts orders, please always include the 10-digit article number given on the nameplate of the product.
Malaysia
Robert Bosch Sdn. Bhd.(220975-V) PT/SMY
No.8A,Jalan 13/6
46200 Petaling Jaya
Selangor
Tel.: (03) 79663194
Toll-Free: 1800 880188
Fax: (03) 79583838
E-Mail: kiathoe.chong@my.bosch.com
www.bosch-pt.com.my
You can find further service addresses at:
www.bosch-pt.com/serviceaddresses
Disposal
The power tool, accessories and packaging should be recycled in an environmentally friendly manner.
Do not dispose of power tools along with household waste.
Français
Robert Bosch Morocco SARL
- Rue Lieutenant Mahmoud Mohamed
20300 Casablanca
Tel.: +212529314327
E-Mail: sav.outillage@ma.bosch.com
www.bosch-pt.com/serviceaddresses
www.bosch-pt.com/serviceaddresses
Eliminação
www.bosch-pt.com/serviceaddresses
处理废弃物
www.bosch-pt.com/serviceaddresses
廢棄物處理
aunnnnnaanannnnaa: an uunnnnna nanaananaanana aananaananaananaananaananaananaananaananaananaananaananaananaananaananaananaananaananaananaananaananaananaananaananaananaananaananaananaananaananaananaananaananaananaananaananaananaananaananaananaananaananaananaananaananaananaananaananaananaananaananaan ana/nae
nannnnnnnnnnnnnnnnnnnnnnnnnnnnnnnnnnnnnnnnnnnnnnnnnnnnnnnnnnnnnnnnnnnnnnnnnnnnnnnnnnnnnnnnnnnnnnnnnnnnnnnnnnnn
m|39
JUaunrnnnnae
wunwnnnn nn nnnnnnnnnnnnnnnnnnnnnnnnnnnnnnnnnnnnnnnnnnnnnnnnnnnnnnnnnnnnnnnnnnnnnnnnnnnnnnnnnnnnnnnnnnnnnnnnnnnnnnnnnnnnnnnnn
nannnnn
山
(1) mss
(2) = ( x1,y1) , = ( x2,y2)
(3)
(4)
(5) ①
(6)
(7)
(8)
(9)
(10)
(11)
(12)
(13) = +
(14) n#n#n#na
(15) unru
(16)
(17)
(18)
(19)
(20)
(21)
(22) 甲国甲国/甲国甲
(23) unalil
(24) Jaenannulu
(25)
a) nnnnnae neennnnnne eannnnnne annnne nnnnne nnnnne nnnnne nnnnne nnnnne nnnnne nnnnne nnnnne nnnnne nnnnne nnnnne nnnnne nnnnne nnnnne nnnnne nnnnne nnnnne nnnnne nnnnne nnnnne nnnnne nnnnne nnnnne nnnnne nnnnne nannnee
yantunna
| ### | GTR 550 GTR 55-225 |
| ### | 3601 GD4 0.. |
| ### | ● |
| ### | ● |
| ### | ● |
| ### | 550 |
| ### | min-1 340-910 |
| ### | mm. 215 |
| ### | mm. 225 |
| ### | mm. 45/35 |
| ### | mm. 1.1 |
| ### | mm. 1.7 |
| ### | mm. 2.3 |
| ### | EPTA-Procedure 01:2014 |
| - ### | mm. 4.1 |
| - ### | mm. 4.8 |
A)
nnnnnnnnnnnnnnnnnnnnnnnnnnnnnnnnnnnnnnnnnnnnnnnnnnnnnnnnnnnnnnnnnnnnnnnnnnnnnnnnnnnnnnnnnnnnnnnnnnnnnnnnnnnnnnnnnnnnnnnnnnnnnnnnnnnnnnnnnnnnnnnnnnn
T
WwJnIwaonnnnnaaunauuua
nunnnnna (nnaa A)
(14)wnnnnna (15)
nnuu: nnuuunnuuunnuu uuuuauu uuuu uuuuuuuuuuuuuuuuuuuuuuuuuuuuuuuuuuuuuuuuuuuuuuuuuuuuuuuuuuuuuuuuuuuuuuuuuuuuuuuuuuuuuuuuuuuuuuuuuuuuuuuuuuuuuuuuuuuuuuuuuuuuuuuuuuuuuuuuuuuuuuuuuuuuuuuuuuuuuuuuuuuuuuuuuuuuuuuuuuuuuuuuuuuuuuuuuUU
la/anaanana (nunwnun C-D)
(10)i#yuiu:i#yuiu
muaa: aannnnaeaae 2 nnnn
unannnnaaennnnnnae /nauu/mua (nnw
-0 1nunu (9)
-2 8
-3
Danuou D:
-103:110000000000000000000000000000000000000
- 4
nngnnnnnnnnnnnnnnnn
(5)(6)(7)
niinjnu(5)nnu(unnu)
n
H
m|41
nnaaannnnnnaaunuulnuuauuuuuaanennnnnnae nanaanannnnnnaaunu uuuuauuuuauuuuuuuuuuuuuuuuuuuuuuuuuuuuuuuuuuuuuuuuuuuuuuuuuuuuuuuuuuuuuuuuuuuuuuuuuuuuuuuuuuuuuuuuuuuuuuuuuuuuuuuuuuuuuuuuuuuuuuuuuuuuuuuuuuuuuuuuuuuuuuuuuuuuuuuuuuuuuuuuuuuuuuuuuuuuuuuuuuuuuuuuuuuuuuuuuuuuuUU
Bosch
Jauu (aunwunnu F-G)
2017年/12月2日
-(12)(18)
-nyuunulununun (18) uanon
- lunrta 18) nuaanana (12) uunuunnu (11) unnaa
nunwnlnaeauanrnnnnae
aannnnnnaanennnnnnnnnnnnnnnnnnnnnnnnnnnnnnnnnnnnnnnnnnnnnnnnnnnnnnnnnnnnnnnnnnnnnnnnnnnnnnnnnnnnnnnnnnnnnnnnnnnnnnnnnnnnnnnnnn
nannnnnnaaennnnnnae nnnnnnne nnnnnnne (13)
iunwnnnn nnnnnnnn nn nnnnnnnn
1 mlnawo nnannnu/ nwn
nnaa nnaa
② malnaiyuyannnnnaaennnnnnaaannnnnnnnnnnnnnnnnnnnnnnnnnnnnnnnnnnnnnnnnnnnnnnnnnnnnnnnnnnnnnnnnnnnnnnnnnnnnnnnnnnnnnnnnnnnnnnnnnnnnnnnnnnnnnnnnnnnnnnnnn
y
-1-5:
-6:waJWJWJWJWJWJWJWJWJWJWJWJWJWJWJWJWJWJWJWJWJWJWJWJWJWJWJWJWJWJWJWJWJWJWJWJWJWJWJWJWJWJWJWJWJWJWJWJWJWJWJ
y
ywnn - nnnnnnnnnnnnnn
nannnnnnnnn
wovogovnuu uauuuganauuunnnaa
aannnnnnaanennnnnnnnnnnnnnnnnnnnnnnnnnnnnnnnnnnnnnnnnnnnnnnnnnnnnnnnnnnnnnnnnnnnnnnnnnnnnnnnnnnnnnnnnnnnnnnnnnnnnnnnnnnnnnnnnnnnnnnnnnnnnnnnnnnnnnnnnnnnnnnnnnnn
nnaanannnuu
yannnnn nn nnnnnnnnnnnnnnnnnnnnnnnnnnnnnnnnnnnnnnnnnnnnnnnnnnnnnnnnnnnnnnnnnnnnnnnnnnnnnnnnnnnnnnnnnnnnnnnnnnnnnnnnnnnnnnnnnnnnnnnnnnnnnnnnnnnnnnnnnnnnnnnnnnnnnn
m|43
| ### | |
| ### | |
| ### | |
| ### | |
| ### | |
| ### | |
| ### | |
| ### | |
| ### | |
| ### | |
| ### | |
| ### | |
| ### | |
| ### | |
| ### | |
| ### | |
| ### | |
| ### | |
| ### | |
| ### | |
| ### |
Wwannnnaaauu
WnnuuauunnuuauuaaauauauauauuuuauuuuuuuuuuuuuuuuuuuuuuuuuuuuuuuuuuuuuuuuuuuuuuuuuuuuuuuuuuuuuuuuuuuuuuuuuuuuuuuuuuuuuuuuuuuuuuuuuuuuuuuuuuuuuuuuuuuuuuuuuuuuuuuuuuuuuuuuuuuuuuuuuuuuuuuuuuuuuuuuuuuuuuuuuuuuuuuUU
nwnnnnnnnnnnnnnnnnnnnnnnnnnnnnnnnnnnnnnnnnnnnnnnnnnnnnnnnnnnnnnnnnnnnnnnnnnnnnnnnnnnnnnnnnnnnnnnnnnnnnnnnnnnnnnnnnnnnnnnnnnnnnn
wauiauaa (nunuH)
aIina nanglu: www.bosch-pt.com
nuuunnuuunnuu uovuunnuuunnuuunnuuunnuuunnuuunnuuunnuuunnuuunnuuunnuuuuunnuuuuuuuuuuuuuuuuuuuuuuuuuuuuuuuuuuuuuuuuuuuuuuuuuuuuuuuuuuuuuuuuuuuuuuuuuuuuuuuuuuuuuuuuuuuuuuuuuuuuuuuuuuuuuuuuuuuuuuuuuuuuuuuuuuuuuuuuuuuuuuuuuuuuuuuuuuuuuuuuuuuuuuuuuuuuuuuuuuuuuuuuuuuuuuuuuuuuuuuuuUU
ln
Inu 150
Inu 150
Inu 150
Inu 150
Inu 150
Inu 150
Inu 150
Inu 150
Inu 150
Inu 150
Inu 150
Inu 150
Inu 150
nngnngnngnnnngn n
www.bosch-pt.com/serviceaddresses
#
Keselamatan personnel
Palma Tower 10th Floor
Jalan RA Kartini II-S Kaveling 6
Pondok Pinang, Kebayoran Lama
www.bosch-pt.com/serviceaddresses
Caramembuang
May hut bui phai thich hop danh cho loai vat liu dang gia cong.
Khi hut bui kho loai dac biét gay nguy hai den suc khoe hoac gay ra ung thu, hay su dung may hut bui loai chuyen dung.
Su dung may hut bui GAS 35 L/M AFC hoac GAS 55 L/M AFC cho cac be mat Ion, vi chung dam bao cong suat hut lien tuc can thiet.
Khi gia cóng be mat thang dung, nam dung dien cach sao cho voi hut huong xuong.
Lap/thao kep ong/kep cap (xem hinh E)
Xoay kep ong/kep cap (22) qua ong hut (5). Hay cam cap nguon vao ranh cap cua kep ong/kep cap. De thao hay rut kep ong/kep cap (22) khoi ong hut (5) va keo cap luoi dien ra khoi kep ong/kep cap.
Vân Hnh
Bat Dau Van Hanh
Hay can than voi nguon dien! Dien the nguon phai dung voi dien the da ghi ro tren nhan may. Dung cu dien duoc ghi 230 V cung co the duoc van hanh o 220 V.
Chon Truc Toc Do
Voi num vān de chon truoc toc do (2), ban co the chon truoc so vong quay can thiet ca khi dang van hanh. So cao hon co nghia la toc do cao, so thap hon co nghia la toc do thap.
www.bosch-pt.com/serviceaddresses
Su thai bo
May, linh kien va bao bi phai duoc phan loai de tai che theo huong than thien voi moi truong.
Khong duoc thai bo dung cu dien vao chung voi rac sinh hoat!
Iooaal jno yolll Jaaasu yao
aLao psswLg aBpI gJgJgJgJgJgJgJgJgJgJgJgJgJgJgJgJgJgJgJgJgJgJgJgJgJgJgJgJgJgJgJgJgJgJgJgJgJgJgJgJgJgJg
auius oec pssu 1. jssy auijg sll
jiu cui ngsi lo sic gl ueo ngsl oic
olui psc.a ggl ggl uasall
auijg sll oessl pdswla sic odag aball
.ubc uol! U
aalll jjg jjj jgg jll lai s jolal g jll jagl gll gll gll gll gll gll gll gll gll gll gll gll gll gll gll gll gll gll gll gll gll gll gll gll gll gll gll gll gll gll gll gll gll gll gll gll gll gll gll gll gll gll gll gll gll gll gll gll gll gll gell
g j 1 g j 1 1 1 1 1 1 1 1 1 1 1 1 1 1 1 1 1 1 1 1 1 1 1 1 1 1 1 1 1 1 1 1
aaiolgl oolxI gog auljseJoo JlqJg jgao
aagaaa aaii jgi gagag aalgall jai jia jai jai jai jai jai jai jai jai
J 1 J 1 J 1 J 1 J 1 J 1 J 1 J 1 J 1 J 1 J 1 J 1 J 1 J 1 J 1 J 1 J 1 J 1 J 1 J 1 J 1 J 1 J 1 J 1 J 1 J 1 J 1 J 1 J 1 J 1 J 1 J 1 J 1 J 1 J
Lgolsswaiagagogogeljositig bawuJuswai Jy. 1sJy
a a a a a a a a a a a a a a a a a a a a a a a a a a a a a a a a a a a a a a a a a a a a
aJgSJJ sssj pI sWlg aLoo jns
a a a a a a a a a a a a a a a a a a a a a a a a a a a a a a a a a a a a a a a a a a a a a a a a a a a a a a a a a a a a a a a
Jc 166
10 10 10 10 10 10 10 10 10 10 10 10 10 10 10 10 10 10 10 10 10 10 10 10 10 10 10 10 10 10 10 10 10 10 25 25 25 25 25 25 25 25 25 25 25 25 25 25 25 25 25 25 25 25 25 25 25 25 25 25 25 25 25 25 25 25 25 25
JU JU UUUUUUUUUUUUUUUUUUUUUUUUUUUUUUUUUUUUUUUUUUUUUUUUUUUUUUUUUUUUUUUUUUUUUUUUUUUUUUUUUUUUUUUUUUUUUUUUUUUUUUUUUUUUUUUUUUUUUUUUUUUUUUUUUUUUUUUUUUUUUUUUUUUUUUUUUUUUUUUUUUUUUUUUUUUUUUUUUuuuuuuuuuuuuuuuuuuuuuuuuuuuuuuuuuuuuuuuuuuuuuuuuuuuuuuuuuuuuuuuuuuuuuuuuuuuuuuuuuuuuuuuuuuuuuuuuuuuuuuuuuuuuuuuuuuuuuuuuuuuuuuuuuuuuuuuuuuuuuuuuuuuuuuuuuuuuuuuuuuuuuuuuuuuuuuuuuuuuuuuuuuuuuuuuuuuuuuuu uu
oJgaaJI-IjZI
oJgj jgai jgi ju uui Jgjll gjll aoo oogagai aui j
baaiI bJbO bJb (1)
LaaaIuI SscbOjlb (2)
Labg Juaui liao (3)
(ugjoojgabw) jao (4)
(a) baij pgbj (5)
aaiI aog (6)
j7 (7)
jull elu (8)
EJ (9)
jgbl oJgwl (10)
_,^ (11)
olwjollao (12)
baWll o9g bua 13
(a)uU UoJ (14)
duu duu (15)
gJgl
17
olwJgdo (18)
joggj (19)
auiuiee baiueoegiukl lssol 1Ldlo!puu uug oba mia jIablg
JLJI JIJI JIJI JIJI JIJI JIJI JIJI JIJI JIJI JIJI JIJI JIJI JIJI JIJI JIJI JIJI JIJI JIJI JIJI JIJI JIJI JIJI JIJI JIJI JIJI JIJI JIJI JIJI JIJI JIJI JIJI JIJI JIJI JIJI JIWIJ
4ic uuul lus 1s aagaae Jie 5j 8. jIguiu oJ saiu
aJg 1000000000000000000000000000000000000000000000000000000
aJ 1 aJ 1 J 1 J 1 J 1 J 1 J 1 J 1 J 1 J 1 J 1 J 1 J 1 J 1 J 1 J 1 J 1 J 1 J 1 J 1 J 1 J 1 J 1 J 1 J 1 J 1 J 1 J 1 J 1 J 1 J 1 J 1 J 1 J 1 J 1 J
yllsallgallgsa lgsallssc jI gagjnsogjUkuiuuiu
Lg 10000000000000000000000000000000000000000000000000000000000
gagglj no aalag ablig ala Jusill y dajll ealall abwlg jolll 1gagolll g odll g oasll g agall
do
4.öjlagäkjgbi
Ugglg d 1
abj Jlsswug juaaiaJll JaaJI abwIg. 1c abglal uJn aag aJluJluJI .JqJI Uloi
aaljlll jloxl 1
auiuJcI.
Jlll Jn! auiuul 11 11 11
4.1JIJI b
aabai j
pabaaagssa aalglaa p 1111111111111111111111111111111111111111111111111111111111111111111111
60
| GTR 550 GTR 55-225 | aHaJaA |
| 3601 GD40.. | JFpJpJpJpJpJpJpJpJpJpJpJpJpJpJpJpJpJpJpJpJpJpJpJpJpJpJpJpJpJpJpJpJpJpJpJpJpJpJpJpJpJpJpJpJpJpJpJpJpJpJpJP |
| ● | LdMmMmMmMmMmMmMmMmMmMmMmMmMmMmMmMmMmMmMmMmMmMmMmMmMmMmMmMmMmMmMmMmMmMmMmMmMmMmMmMmMmMmMmMmMmMmMmMmMmMmMcmMcmMcmMcmMcmMcmMcmMcmMcmMcmMcmMcmMcmMcmMcmMcmMcmMcmMcmMcmMcmMcmMcmMcmMcmMcmMcmMcmMcmMcmMcmMcmMcmMcmMcmMcmMcmMcmMcmMcmMcmMcmMcmMcmMcmMcmMcmMcmMcmMcmMmMcmMcmMcmMcmMcmMcmMcmMcmMcmMcmMcmMcmMcmMcmMcmMcmMcmMcmMcmMcmMcmMcmMcmMcmMcmMcmMcmMcmMcmMcmMcmMcmMcmMcmMcmMcmMcmMcmMcmMcmMcmMcmMcmMcmMcmMcmMcmMcmMmMmMcmMcmMcmMcmMcmMcmMcmMcmMcmMcmMcmMcmMcmMcmMcmMcmMcmMcmMcmMcmMcmMcmMcmMcmMcmMcmMcmMcmMcmMcmMcmMcmMcmMcmMcmMcmMcmMcmMcmMcmMcmMcmMcmMcmMcmMcmMcmMmMcmMmMcmMcmMcmMcmMcmMcmMcmMcmMcmMcmMcmMcmMcmMcmMcmMcmMcmMcmMcmMcmMcmMcmMcmMcmMcmMcmMcmMcmMcmMcmMcmMcmMcmMcmMcmMcmMcmMcmMcmMcmMcmMcmMcmMcmMcmMcmMcmMmMmMmMcmMcmMcmMcmMcmMcmMcmMcmMcmMcmMcmMcmMcmMcmMcmMcmMcmMcmMcmMcmMcmMcmMcmMcmMcmMcmMcmMcmMcmMcmMcmMcmMcmMcmMcmMcmMcmMcmMcmMcmMcmMcmMcmMcmMcmMcmMmMcmMcmMmMcmMcmMcmMcmMcmMcmMcmMcmMcmMcmMcmMcmMcmMcmMcmMcmMcmMcmMcmMcmMcmMcmMcmMcmMcmMcmMcmMcmMcmMcmMcmMcmMcmMcmMcmMcmMcmMcmMcmMcmMcmMcmMcmMcmMcmMcmMmMcmMmMmMcmMcmMcmMcmMcmMcmMcmMcmMcmMcmMcmMcmMcmMcmMcmMcmMcmMcmMcmMcmMcmMcmMcmMcmMcmMcmMcmMcmMcmMcmMcmMcmMcmMcmMcmMcmMcmMcmMcmMcmMcmMcmMcmMcmMcmMcmMmMmMcmMmMcmMcmMcmMcmMcmMcmMcmMcmMcmMcmMcmMcmMcmMcmMcmMcmMcmMcmMcmMcmMcmMcmMcmMcmMcmMcmMcmMcmMcmMcmMcmMcmMcmMcmMcmMcmMcmMcmMcmMcmMcmMcmMcmMcmMcmMcmMmMmMmMmMcmMcmMcmMcmMcmMcmMcmMcmMcmMcmMcmMcmMcmMcmMcmMcmMcmMcmMcmMcmMcmMcmMcmMcmMcmMcmMcmMcmMcmMcmMcmMcmMcmMcmMcmMcmMcmMcmMcmMcmMcmMcmMcmMcmMcmMmMcmMcmMcmMmMcmMcmMcmMcmMcmMcmMcmMcmMcmMcmMcmMcmMcmMcmMcmMcmMcmMcmMcmMcmMcmMcmMcmMcmMcmMcmMcmMcmMcmMcmMcmMcmMcmMcmMcmMcmMcmMcmMcmMcmMcmMcmMcmMcmMcmMmMcmMcmMmMmMcmMcmMcmMcmMcmMcmMcmMcmMcmMcmMcmMcmMcmMcmMcmMcmMcmMcmMcmMcmMcmMcmMcmMcmMcmMcmMcmMcmMcmMcmMcmMcmMcmMcmMcmMcmMcmMcmMcmMcmMcmMcmMcmMcmMcmMmMcmMmMcmMmMcmMcmMcmMcmMcmMcmMcmMcmMcmMcmMcmMcmMcmMcmMcmMcmMcmMcmMcmMcmMcmMcmMcmMcmMcmMcmMcmMcmMcmMcmMcmMcmMcmMcmMcmMcmMcmMcmMcmMcmMcmMcmMcmMcmMcmMmMcmMmMmMmMcmMcmMcmMcmMcmMcmMcmMcmMcmMcmMcmMcmMcmMcmMcmMcmMcmMcmMcmMcmMcmMcmMcmMcmMcmMcmMcmMcmMcmMcmMcmMcmMcmMcmMcmMcmMcmMcmMcmMcmMcmMcmMcmMcmMcmMmMmMcmMcmMmMcmMcmMcmMcmMcmMcmMcmMcmMcmMcmMcmMcmMcmMcmMcmMcmMcmMcmMcmMcmMcmMcmMcmMcmMcmMcmMcmMcmMcmMcmMcmMcmMcmMcmMcmMcmMcmMcmMcmMcmMcmMcmMcmMcmMcmMmMmMcmMmMmMcmMcmMcmMcmMcmMcmMcmMcmMcmMcmMcmMcmMcmMcmMcmMcmMcmMcmMcmMcmMcmMcmMcmMcmMcmMcmMcmMcmMcmMcmMcmMcmMcmMcmMcmMcmMcmMcmMcmMcmMcmMcmMcmMcmMcmMmMmMmMcmMmMmMcmMcmMcmMcmMcmMcmMcmMcmMcmMcmMcmMcmMcmMcmMcmMcmMcmMcmMcmMcmMcmMcmMcmMcmMcmMcmMcmMcmMcmMcmMcmMcmMcmMcmMcmMcmMcmMcmMcmMcmMcmMcmMcmMcmMmMmMcmMcmMcmMmMmMcmMcmMcmMcmMcmMcmMcmMcmMcmMcmMcmMcmMcmMcmMcmMcmMcmMcmMcmMcmMcmMcmMcmMcmMcmMcmMcmMcmMcmMcmMcmMcmMcmMcmMcmMcmMcmMcmMcmMcmMcmMcmMcmMcmMmMmMmMcmMcmMmMmMcmMcmMcmMcmMcmMcmMcmMcmMcmMcmMcmMcmMcmMcmMcmMcmMcmMcmMcmMcmMcmMcmMcmMcmMcmMcmMcmMcmMcmMcmMcmMcmMcmMcmMcmMcmMcmMcmMcmMcmMcmMcmMcmMcmMmMcmMcmMcmMcmMmMmMcmMcmMcmMcmMcmMcmMcmMcmMcmMcmMcmMcmMcmMcmMcmMcmMcmMcmMcmMcmMcmMcmMcmMcmMcmMcmMcmMcmMcmMcmMcmMcmMcmMcmMcmMcmMcmMcmMcmMcmMcmMcmMcmMmMmMcmMcmMcmMcmMmMmMcmMcmMcmMcmMcmMcmMcmMcmMcmMcmMcmMcmMcmMcmMcmMcmMcmMcmMcmMcmMcmMcmMcmMcmMcmMcmMcmMcmMcmMcmMcmMcmMcmMcmMcmMcmMcmMcmMcmMcmMcmMcmMmMmMcmMcmMcmMcmMcmMmMmMcmMcmMcmMcmMcmMcmMcmMcmMcmMcmMcmMcmMcmMcmMcmMcmMcmMcmMcmMcmMcmMcmMcmMcmMcmMcmMcmMcmMcmMcmMcmMcmMcmMcmMcmMcmMcmMcmMcmMcmMcmMcmMmMcmMcmMcmMcmMcmMcmMmMmMcmMcmMcmMcmMcmMcmMcmMcmMcmMcmMcmMcmMcmMcmMcmMcmMcmMcmMcmMcmMcmMcmMcmMcmMcmMcmMcmMcmMcmMcmMcmMcmMcmMcmMcmMcmMcmMcmMcmMcmMcmMmMmMcmMcmMcmMcmMcmMcmMmMmMcmMcmMcmMcmMcmMcmMcmMcmMcmMcmMcmMcmMcmMcmMcmMcmMcmMcmMcmMcmMcmMcmMcmMcmMcmMcmMcmMcmMcmMcmMcmMcmMcmMcmMcmMcmMcmMcmMcmMcmMmMmMcmMcmMcmMcmMcmMcmMcmMmMmMcmMcmMcmMcmMcmMcmMcmMcmMcmMcmMcmMcmMcmMcmMcmMcmMcmMcmMcmMcmMcmMcmMcmMcmMcmMcmMcmMcmMcmMcmMcmMcmMcmMcmMcmMcmMcmMcmMcmMcmMmMcmMcmMcmMcmMcmMcmMcmMcmMmMmMcmMcmMcmMcmMcmMcmMcmMcmMcmMcmMcmMcmMcmMcmMcmMcmMcmMcmMcmMcmMcmMcmMcmMcmMcmMcmMcmMcmMcmMcmMcmMcmMcmMcmMcmMcmMcmMcmMcmMmMmMcmMcmMcmMcmMcmMcmMcmMcmMmMmMcmMcmMcmMcmMcmMcmMcmMcmMcmMcmMcmMcmMcmMcmMcmMcmMcmMcmMcmMcmMcmMcmMcmMcmMcmMcmMcmMcmMcmMcmMcmMcmMcmMcmMcmMcmMcmMcmMmMmMcmMcmMcmMcmMcmMcmMcmMcmMcmMmMmMcmMcmMcmMcmMcmMcmMcmMcmMcmMcmMcmMcmMcmMcmMcmMcmMcmMcmMcmMcmMcmMcmMcmMcmMcmMcmMcmMcmMcmMcmMcmMcmMcmMcmMcmMcmMcmMcmMmMcmMcmMcmMcmMcmMcmMcmMcmMcmMcmMmMmMcmMcmMcmMcmMcmMcmMcmMcmMcmMcmMcmMcmMcmMcmMcmMcmMcmMcmMcmMcmMcmMcmMcmMcmMcmMcmMcmMcmMcmMcmMcmMcmMcmMcmMcmMcmMcmMmMmMcmMcmMcmMcmMcmMcmMcmMcmMcmMcmMmMmMcmMcmMcmMcmMcmMcmMcmMcmMcmMcmMcmMcmMcmMcmMcmMcmMcmMcmMcmMcmMcmMcmMcmMcmMcmMcmMcmMcmMcmMcmMcmMcmMcmMcmMcmMcm M |
Aosjgall aawll oJguagacgao
aWulll aWill Ugb (UgbuWl20)
1^ A( 2a)
J.
J.
J.
J.
J.
J.
J.
J.
J.
J.
J.
J.
J.
J.
J.
J.
J.
J.
J.
J.
J.
J.
J.
J.
J.
J.
J.
J.
J.
J.
J.
J.
J.
J.
1 J 1 J 1 J 1 J 1 J 1 J 1 J 1 J 1 J 1 J 1 J 1 J 1 J 1 J 1 J 1 J 1 J 1 J 1 J 1 J 1 J 1 J 1 J 1 J 1 J 1 J 1 J 1 J 1 J 1 J 1 J 1 J 1 J 1 J 2
JLsOJ 10aIu aaio Jc abalw sawl - 1JUWJauu Uso aggUc bgl - Jo uaiu gEiig .JU Lc loj wJ - P2 aajai
(6)aill alg (5) bai (7) aai j 1alu (5) bai (gj ggi
62|
pIaIwIgIe aol oJbai
J 1 J 1 J 1 J 1 J 1 J 1 J 1 J 1 J 1 J 1 J 1 J 1 J 1 J 1 J 1 J 1 J 1 J 1 J 1 J 1 J 1 J 1 J 1 J 1 J 1 J 1 J 1 J 1 J 1 J 1 J 1 J 1 J 1 J 1 J
aalal lalosw g oaw oai aog paa W .Bosch wg
(F-GgJJIjJI)gJJI JU
Jai gai aIgai oIgai gao jn Jn cKs
JIaII IJn Jn Gw/1Jn Jn ayai JAIgai
Ugsa (18) oJgai gao (12) Jaaia
-olalg,polo 1
63
#
Jc Jaaal a 1000000000000000000000000000000000000000000
(HoJgll)Igglgglgglgglgglgglgglgglgglgglgglgglgglgglgglgglgglgglgglgglgglgglgglgglgglgglgglgglgglgglgglgglgglgglgglgglgglgglgglgglgglgglgglgglgglgglgglgglgglgglg
JUWJUWJUUJUUGUJU UUJUUJUUJUUUUUUUUUUUUUUUUUUUUUUUUUUUUUUUUUUUUUUUUUUUUUUUUUUUUUUUUUUUUUUUUUUUUUUUUUUUUUUUUUUUUUUUUUUUUUUUUUUUUUUUUUUUUUUUUUUUUUUUUUUUUUUUUUUUUUUUUUUUUUUUUUUUUUUUUUUUUUUUUUUUUUUUUUUUUUUUUUUUUUUUUUUUUUUUUUUUUuuuuuuuuuuuuuuuuuuuuuuuuuuuuuuuuuuuuuuuuuuuuuuuuuuuuuuuuuuuuuuuuuuuuuuuuuuuuuuuuuuuuuuuuuuuuuuuuuuuuuuuuuuuuuuuuuuuuuuuuuuuuuuuuuuuuuuuuuuuuuuuuuuuuuuuuuuuuuuuuuuuuuuuuuuuuuuuuuuuuuuuuuuuuuuuuuuuuuuuu uu u u u u u u u u u u u u u u u u u u u u u u u u u u u u u u u u u u u u u u u u u u u u u u u u u u u u u uu uu uu uu uu uu uu uu uu uu uu uu uu uu uu uu uu uu uu uu uu uu uu uu uu uu uu uu uu uu uu uu uu uu uu uu uu uu uu uu uu uu uu uu uu uu uu uu uu uu uu uu uu uu uu uu uu uu uu uu uu uu uu uu uu uu uu uu uu uu uu uu uu uu uu uu uu uu uu uu uu uu uu uu uu uu uu uu uu uu uu uu uu uu uu uu uu uu uu uu kuu
.issjg jI jolggbolss
aaiw g g o sijg juiag a iwi si jjiiaobjls aabg,swo wosoo .gawaiuqsi cws alwg dsi|
JiaboguIggsagg 10o jntaba cws g sU
yI yI yI yI yI yI yI yI yI yI yI yI yI yI yI yI yI yI yI yI yI yI yI yI yI yI yI yI yI yI yI yI
Jg g Ugsa
IgaiimlgjGoljgwsdam
Cue jLwUuWl.
UeUwUJooUoUgws J
UaJUwUgSiaqw,

laimJ ajjg Jgl slqai jggl gjgi
olkiwsjIoslaiwJlg0
Sglg j0d1w Sj yj jj 1n J aJl g g aaw o w dgi Sw i j n Jg jy g g jy g
olkawJajg
| العربية و الحرفية | الإستعمال |
| الإستعمال | الإستعمال |
| الإستعمال | الإستعمال |
| الإستعمال | الإستعمال |
| الإستعمال | الإستعمال |
| الإستعمال | الإستعمال |
| الإستعمال | الإستعمال |
| الإستعمال | الإستعمال |
| الإستعمال | الإستعمال |
| الإستعمال | الإستعمال |
| الإستعمال | الإستعمال |
| الإستnzcation | الإستnzcation |
| الإستnzcation | الإستnzcation |
| الإستnzcation | الإستnzcation |
| الإستnzcation | الإستnzcation |
| الإستnzcation | الإستnzcation |
| الإستnzcation | الإستnzcation |
| الإستnzcation | الإستnzcation |
| الإستnzcation | الإستnzcation |
| الإستnzcation | الإستnzcation |
| theoremy | theoremy |
| الإستnzcation | thenz |
| الإستnzcation | thenz |
| الإستnzcation | thenz |
| الإستnzcation | thenz |
| theoremy | theoremy |
| الإستnzcation | thenz |
| theoremy | theoremy |
| theoremy | theoremy |
| theoremy | theoremy |
| theoremy | theoremy |
| theoremy | theoremy |
| theoremy | theoremy |
| theoremy | theoremy |
| theoremy | theoremy |
| theoremy | theoremy |
| theoremy | theoremy |
| theoremy | theore my |
| theoremy | theoremy |
| theoremy | theoremy |
| theoremy | theoremy |
| theoremy | theoremy |
| theoremy | theoremy |
| theoremy | theoremy |
| theoremy | theoremy |
| theoremy | theoremy |
| theoremy | theoremy |
| theoremy | theoreomy |
| theoremy | theoremy |
| theoremy | theoremy |
| theoremy | theoremy |
| theoremy | theoremy |
| theoremy | theoremy |
| theoremy | theoremy |
| theoremy | theoremy |
| theoremy | theoremy |
| theoremy | theoremy |
| theoremy | theoreMY |
| theoremy | theoremy |
| theoremy | theoremy |
| theoremy | theoremy |
| theoremy | theoremy |
| theoremy | theoremy |
| theoremy | theoremy |
| theoremy | theoremy |
| theoremy | theoremy |
| theoremy | theoremy |
| theoremy | theore My |
| theoremy | theore my |
| theoremy | theore my |
| theoremy | theore my |
| theoremy | theore my |
| theoremy | theore my |
| theoremy | theore my |
| theoremy | theore my |
| theoremy | theore my |
| theoremy | theore my |
| theoremy | theore my |
| theoremy | theore MY |
| theoremy | theore my |
| theoremy | theore my |
| theoremy | theore my |
| theoremy | theore my |
| theoremy | theore my |
| theoremy | theore my |
| theoremy | theore my |
| theoremy | theore my |
| theoremy | theore my |
| theoremy | theore My |
| theoremy | theore my |
| theoremy | theore my |
| theoremy | theore my |
| theoremy | theore my |
| theoremy | theore my |
| theoremy | theore my |
| theoremy | theore my |
| theoremy | theore my |
| theoremy | theore My |
| theoremy | theore My |
| theoremy | theore my |
| theoremy | theore my |
| theoremy | theore my |
| theoremy | theore my |
| theoremy | theore my |
| theoremy | theore my |
| theoremy | theore my |
| theoremy | theore my |
| theoremy | theore MY |
| theoremy | theore MY |
| theoremy | theore my |
| theoremy | theore my |
| theoremy | theore my |
| theoremy | theore my |
| theoremy | theore my |
| theoremy | theore my |
| theoremy | theore my |
| theoremy | theore my |
| theoremy | theore MY |
| theoremy | theore My |
| theoremy | theore my |
| theoremy | theore my |
| theoremy | theore my |
| theoremy | theore my |
| theoremy | theore my |
| theoremy | theore my |
| theoremy | theore my |
| theoremy | theore my |
| theoremy | theoreMY |
| theoremy | theore my |
| theoremy | theore my |
| theoremy | theore my |
| theoremy | theore my |
| theoremy | theore my |
| theoremy | theore my |
| theoremy | theore my |
| theoremy | theore my |
| theoremy | theore my |
| theoremy | theoreMY |
| theoremy | theoreMY |
| theoremy | theore my |
| theoremy | theore my |
| theoremy | theore my |
| theoremy | theore my |
| theoremy | theore my |
| theoremy | theore my |
| theoremy | theore my |
| theoremy | theore my |
| theoremy | theore MY |
| theoremy | theoreMY |
| theoremy | theore my |
| theoremy | theore my |
| theoremy | theore my |
| theoremy | theore my |
| theoremy | theore my |
| theoremy | theore my |
| theoremy | theore my |
| theoremy | theore my |
| theoremy | theoreMY |
| theoremy | theore MY |
| theoremy | theore my |
| theoremy | theore my |
| theoremy | theore my |
| theoremy | theore my |
| theoremy | theore my |
| theoremy | theore my |
| theoremy | theore my |
| theoremy | theore my |
| theoremy | theoreMY |
| theoremy | theore My |
| theoremy | theore my |
| theoremy | theore my |
| theoremy | theore my |
| theoremy | theore my |
| theoremy | theore my |
| theoremy | theore my |
| theoremy | theore my |
| theoremy | theore my |
| theoremy | theore y |
JSoSgjPoaIoo (13)
(a) _i = 1^n_j = 1^m - i_k = 1^j_l = 1^m - k_ = 1^n - l (14)
jilo dao (15)
oJiu w aS (16)
osuWosS(17)
J W J (18)
Ij Sill (19)
oJiuW L aS oJjL d (20)
jJo jI Jz (21)
(22)
SiswOg (23)
UdUs (24)
Siiw Cw (25)
(a0soljooJg
jol oJoo JgOy jgy CwI
COWQjI JcLalso Jols CwU Labe. gW
Jai uuoi cLalso aolij
gi 1
.0s olaiw (jS aobg) 0sl
aagj1lawjLJUoo dsswduwdsg
wJgWuLg
jig jgso gai gao swo jl aam
.015 o 1 P2 wLs
1go yw uSso
(6) _ dz d dg du dl (5) _ d
uio (7) diw Cawg 59j
jucg sbsosydu5)ssSsilw
uog(ulalio)
jbi jgo 15 daob 1y dy o si so oBws
.duu cwouio
g jao 102Lw sJdS Jue g Jsso
Ssa dwlj So g uu
.1s 0laow ygaoo o sioo lbiu jI y
L GAS 35 L/M AFC o SiSo jI gawg gaww (S)
jI jJ 5GAS 55 L/M AFC
jooj jpjgglu ufo oolw
S OBC = S COD + S_ BOC
(5)g6b (5)gac gcbw jJL Ugb JjUa
sJwJjUyOuSsoSilldS
gaj) 1s/silw oJ5 J/ai jogai
(Egawd
(5)uSo Silw gJ (22) J/
jgagogaw
.
(22)山S/山
j j g j 5)
.
LssJjSjjb
oljw sjlogajg jsljol
gio jUg!s dga g@u w jUg
19j jggo Jlao L 10
L O JI W L S I S L J W J B g jg jg j
.
auiu 5s ojjg j s u wj g j dsi
Bosch 1j1 j0 s1suiai j L
.15d0a1y
gaj)blj dgl jwlsy/5jdsL o
(C-D μgloaiuS
oJaiw oogj U g J 10) bJ sl dgl j
sju jg jg jj jg jg jg jg jg jg jg jg jg jg jg jg jg jg jg jg jg jg jg jg jg jg jg jg jg jg jg jg jg jg
uU uUuUgog uS Uu
.5s olaowl jgj 2j1 dgl 2j jisda
LJJG Waii (Jgao g Jg jgj
Jg sglol yds Labw gj O sluW JUeog Cgjulg jI jOlsuws g0sL .CusJd dabg (5g)
LsiuacaljSgJyJluo jUjogCw dJsOuiuEgj 1Jd,0
yI JJUwOJUWgLoAeLbag .SIS LIOJ UJUJUJUACUGgOu JUJUo gPabio Juigduuuaosu OJUw SLoAeLpgluJUsd
j1cLd 5g jJ j Jw gJgWJy dSly, wuai j Ss oui wJg W Ooui wclg
UJlS oLiuW SjI jI dS Ouiw dcs
Lg 001w 1j1 .s w sio
Bosch Lw Lai
70|
| ### | |
| ### | |
| ### | |
| ### | |
| ### | |
| ### | |
| ### | |
| ### | |
| ### | |
| ### | |
| ### | |
| ### | |
| ### | |
| ### | |
| ### | |
| ### | |
| ### | |
| ### | |
| ### | |
| ### | |
| ### |
| olj | lqw | jw | g | g |
uSo ujgi pabuiogai
ds uis pabii ygbI j uSo uIgai glo lau uSo uIgogolw cewu nn bji sgo Ulaa sW Go Jalaolj bagpabui nJd. w slal j ③ Coo) Swu Jlq galsgwn d
(1)pui j0laWlJg
-(yjcuwLio,sUjU 1
-(S)LwU(S)UW UJg
1g(1cog)sEgws So jgl y 1wai jwluu wu g uol .siS wauo
1u Suaa uys LwUy Suu 1g
dui. sL G uynkso U Lg Ug Uu
duu o uu uuuu uu uuuu uuuu uuuu uuuu uuuu uuuu uuuu uuuu uuuu uuuu uuuu uuuu uuuu uuuu uuuu uuuu uuuu uuuu uuuu uuuu uuuu uuuu uuuu uuuu uuuu uuuu uuuu uuuu uuuu uuuu uuuu uuuu uuuu uuuuu
UolgUxJ-1b
www.bosch-pt.com/serviceaddresses
olwJs jL oJjI
gdu j 15u g uolao yjuljuyg jla oJl cwwj kbaa U
.
j 1

Jj!SgJ!SJ≤a
jJl jI jI Jauai dawg s kss
01j jil 8g
jaua jls laow giaI li:
daw jlaai yS yS yS yS yS yS yS yS yS yS yS yS yS yS yS yS yS yS yS yS yS yS yS yS yS yS yS yS yS yS yS yS yS yS yS yS yS yS yS yS yS yS yS yS yS yS yS yS yS yS y
Jaa 1g jgjI Jss
sEgaj)blj Silaw agaogai
(Hgaa
Silw oS (19) 1j Sllw jS Ia
2608000766 (soft pad set)

2608000764 (medium-hard pad)

M480 Net (225 mm)
| 2 608 900 707 | P80 |
| 2 608 900 708 | P100 |
| 2 608 900 709 | P120 |
| 2 608 900 710 | P150 |
| 2 608 900 711 | P180 |
| 2 608 900 712 | P220 |
| 2 608 900 713 | P240 |
| 2 608 900 714 | P320 |
| 2 608 900 715 | P400 |