
633872 - Water pump SILVERLINE - Free user manual and instructions
Find the device manual for free 633872 SILVERLINE in PDF.

| Product type | Electric drum pump |
| Brand | Silverline |
| Model | 633872 |
| Power supply | 230 V~, 50 Hz |
| Power | 400 W |
| Fuse rating | 5 A |
| Max. flow rate | 2,500 L/h (41.6 L/min) |
| Max. delivery head | 12 m |
| Max. pressure | 0.7 bar |
| Max. immersion depth | 7 m |
| Max. water temperature | 35 °C |
| Hose connection | Quick coupling 1/2" |
| Max. particle size | 3 mm |
| Power cable length | 10 m |
| Max. head height | 1.5 m |
| Residual water depth | Up to 15 mm from the base |
| Protection rating | IPX8 |
| Protection class | Class I (⏚) |
| Dimensions (L x W x H) | 180 x 140 x 1,325 mm |
| Weight | 4.55 kg |
| Warranty | 3 years (upon registration) |
Frequently Asked Questions - 633872 SILVERLINE
User questions about 633872 SILVERLINE
0 question about this device. Answer the ones you know or ask your own.
Ask a new question about this device
Download the instructions for your Water pump in PDF format for free! Find your manual 633872 - SILVERLINE and take your electronic device back in hand. On this page are published all the documents necessary for the use of your device. 633872 by SILVERLINE.
USER MANUAL 633872 SILVERLINE
Water Butt Pump 400W 2500L/h
NL Waterreservoirpomp, 400 W
natural_image
Exterior view of a portable water spray gun with adjustable handle and base (no text or symbols visible)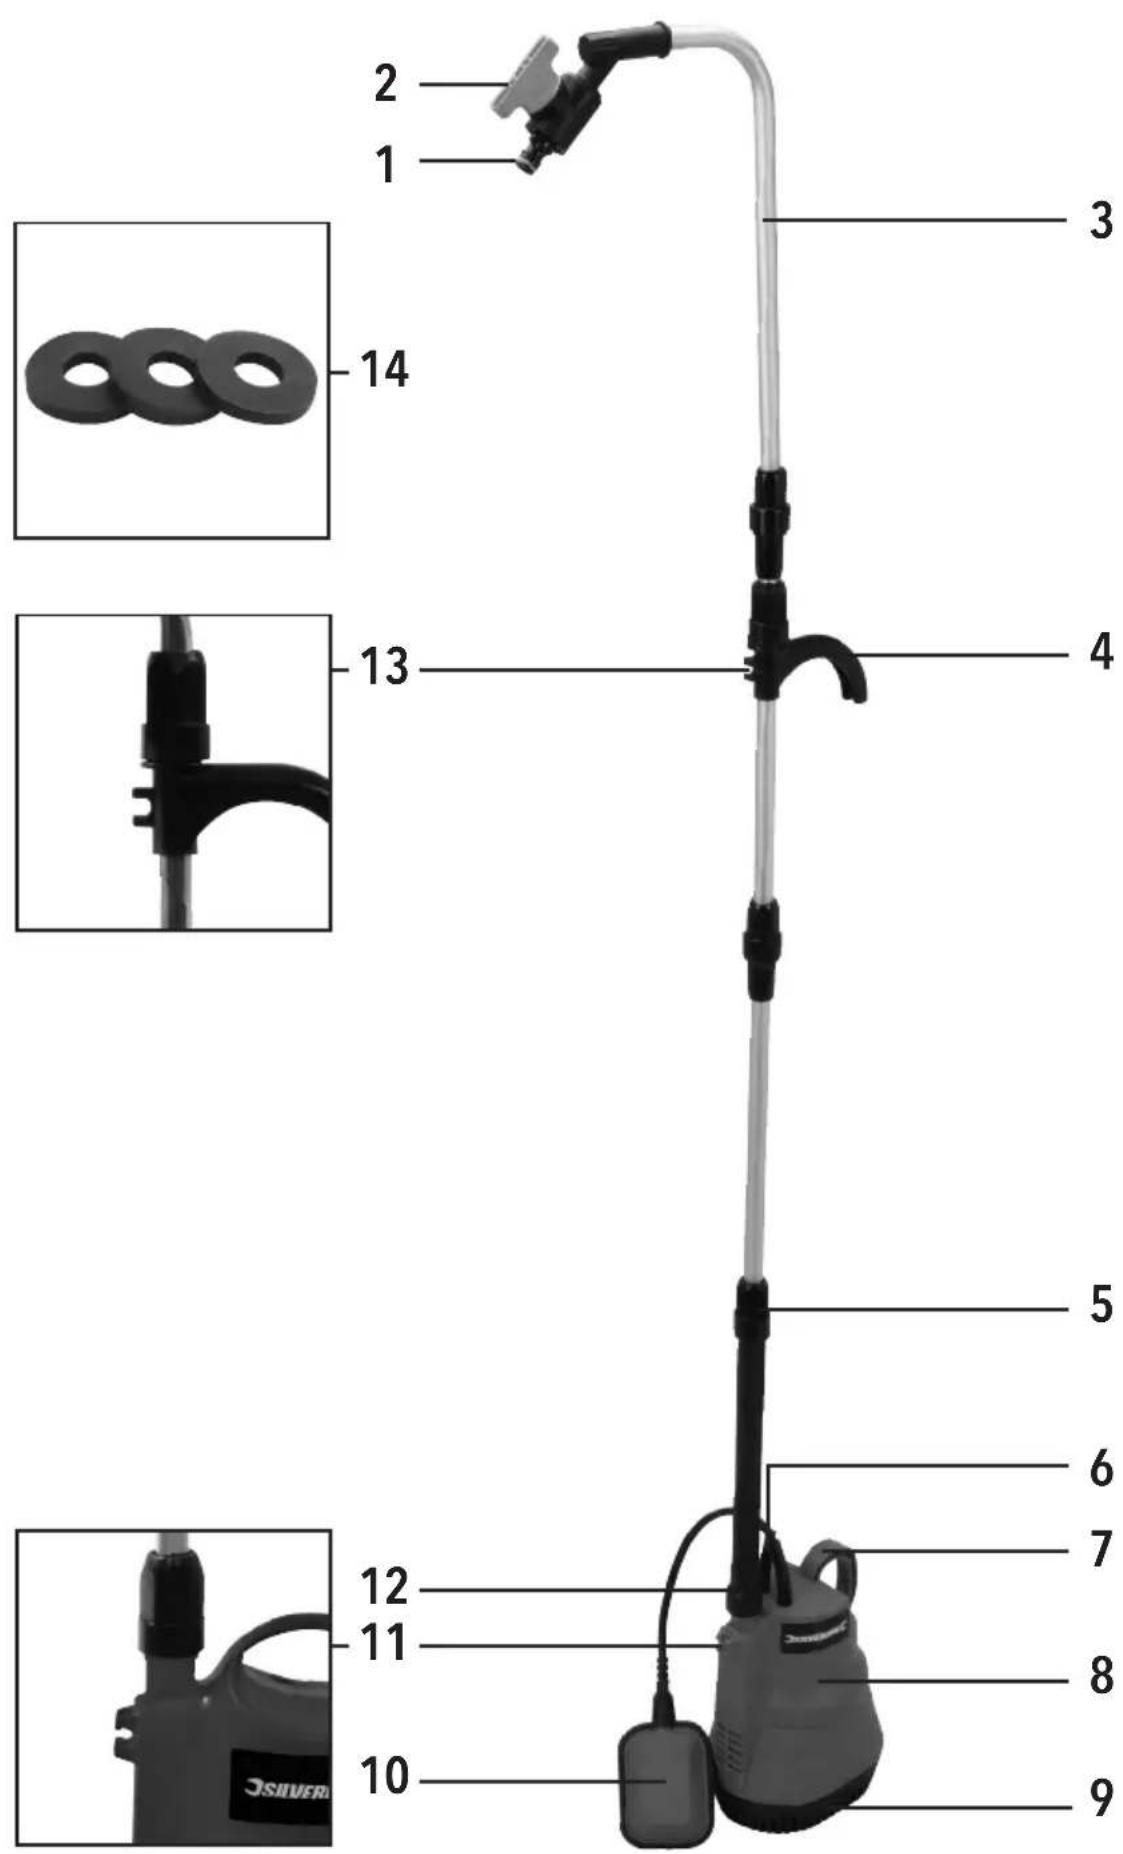
Fig.1
natural_image
Diagram of a laboratory apparatus with a water container, tubing, and a submerged object (no text or labels)Fig.11
natural_image
Line drawing of a vertical medical or laboratory device with three circular components and a handle (no text or symbols)Fig.III Fig.IV
natural_image
Line drawing of a handheld electric shaver with cooling fins and a handle (no text or symbols)
natural_image
Line drawing of a medical or laboratory device with a bulb and connector (no text or symbols)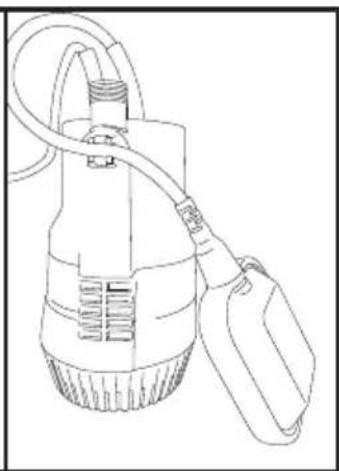
natural_image
Line drawing of a handheld electric shaver with attached cable (no text or symbols)English ......06
Français ......10
Deutsch......14
Español......18
Italiano ......22
Nederlands ......26
Polski ......30
Introduction
Thank you for purchasing this Silverline tool. This manual contains information necessary for safe and effective operation of this product. This product has unique features and, even if you are familiar with similar products, it is necessary to read this manual carefully to ensure you fully understand the instructions. Ensure all users of the tool read and fully understand this manual.
Description of Symbols
The rating plate on your appliance may show symbols. These represent important information about the product or instructions on its use.

Wear hearing protection
Wear eye protection
Wear breathing protection
Wear head protection

Wear hand protection

Caution!

Risk of electrocution!

Read instruction manual

Conforms to relevant legislation and safety standards

Environmental Protection
Waste electrical products should not be disposed of with household waste. Please recycle where facilities exist. Check with your local authority or retailer for recycling advice.
Technical Abbreviations Key
| V Volts | |
| ~, a.c. Alternating current | |
| Hz Hertz | |
| A Ampere | |
| W Watt | |
| m Meter | |
| mm Millimeter | |
| L/h Litres per hour | |
| L/min Litres per minute | |
| bar Metric unit of pressure | |
| °C Degree Celsius |
Specification
Voltage: 230V\~50Hz
Fuse rating: 5A
Power: 400W
Mains cable length: 10m
Max. delivery height: 12m
Max. flow: 2500L/h
Max. pressure: 0.7bar
Max. immersion depth: 7m
Max. water temperature: 35°C
Hose connection: 1/2" quick connector
Max. size solid: 3mm
Max. head height: 1.5m
Residual water depth: To within 15mm of the base of the pump
Ingress protection: IPX8
Protection class:
Dimensions (L x W x H)....180 x 140 x 1325mm
Weight: 4.55kg
As part of our ongoing product development, specifications of Silverline products may alter without notice.
General Appliance Safety Warnings
⚠ WARNING: Read all safety warnings, instructions, illustrations and specifications provided with this appliance. Failure to follow all instructions listed below may result in electric shock, fire and/or serious injury.
Save all warnings and instructions for future reference.
The term "appliance" in the warnings refers to your mains-operated (corded) appliance or battery-operated (cordless) appliance.
1) General Safety
a) Keep appliance away from heat, sharp objects, oil and other hazards.
b) Do not place the cord under carpets or other textile coverings such as clothes or dust sheets.
c) Do not place the cord in areas where it may pose a trip hazard.
d) Do not use the appliance if the cable or plug is damaged.
e) Do not use the appliance if the switch does not turn it ON and OFF. Any appliance that cannot be controlled with the switch is dangerous and must be repaired.
f) Ensure appliance is switched OFF before connecting to mains power supply.
g) Disconnect the plug from the source and/or remove the battery pack, if detachable, from the appliance before making any adjustments, changing accessories, or storing appliances. Such preventive safety measures reduce the risk of starting the appliance accidentally.
h) Store idle appliances out of the reach of children and do not allow persons unfamiliar with the appliance or these instructions to operate the appliance. Appliances are dangerous in the hands of untrained users.
i) Maintain appliances and accessories. Check for misalignment or binding of moving parts, breakage of parts and any other condition that may affect the appliance's operation. If damaged, have the appliance repaired before use. Many accidents are caused by poorly maintained appliances.
j) Children must not play with the appliance. Cleaning and user maintenance must not be made by children without supervision.
k) When moving from one place to another, consider the weight of the machine.
2) Electrical safety
a) Appliance plugs must match the outlet. Never modify the plug in any way. Do not use any adapter plugs with earthed (grounded) appliances. Unmodified plugs and matching outlets will reduce risk of electric shock.
b) Do not abuse the cord. Never use the cord for carrying, pulling or unplugging the appliance. Keep cord away from heat, oil, sharp edges or moving parts. Damaged or entangled cords increase the risk of electric shock.
c) Use proper extension cord. Make sure your extension cord is in good condition. When using an extension cord, be sure to use one heavy enough to carry the current your product will draw. An undersized cord will cause a drop in line voltage resulting in loss of power and overheating.
d) Always check that the power supply corresponds to the voltage on the rating plate. The electric motor is designed for a single voltage only.
e) The supply cord cannot be replaced. If the cord is damaged the appliance should be scrapped.
3) Service
a) Have your appliance serviced by a qualified repair person using only identical replacement parts. This will ensure that the safety of the appliance is maintained.
Electric Water Butt Pump Safety
WARNING: If you use an extension lead, ensure the extension connections are protected from exposure to rain and/or water discharged by the pump.
a) The pump must always be transported, used, submerged, and stored, vertically. Carry the pump only by the lifting handle. Never carry, lift or submerge the pump by its power cable.
b) NEVER use this pump when ambient temperatures are close to freezing.
c) DO NOT attempt to operate the pump below the minimum water level as this will cause permanent damage.
d) This pump must be operated exclusively on power points that are protected by an RCD with a maximum tripping current of 30mA and a maximum delay of 40ms.
e) The electrical supply should be the same as detailed on the pump casing.
f) DO NOT use this pump in swimming pools or ponds that are occupied. When in operation, the area around the pump should be clear of all people and animals.
g) Ensure hands are dry whenever connecting or disconnecting the plug from the power supply.
h) When using the pump after prolonged periods of storage, first check the pump casing and cable for any obvious signs of damage. If in doubt, consult a qualified electrician.
i) Protect the cable and plug from exposure to oil, excessive heat, and sharp objects.
j) Never place excessive strain on the cable as this could weaken its connections to the pump and/or power plug.
k) DO NOT allow children to touch the product or any of its components.
I) This pump is designed for use in clean water environments but will discharge, in the liquid, suspended solids no larger than 3mm diameter.
m) DO NOT use this pump with substances other than water.
n) Sand and other abrasive materials present in the liquid being pumped will cause increased wear.
o) Where possible, avoid using the pump continuously for more than 10 minutes.
p) This pump is designed for domestic applications only, in and around the home and garden. Do not use in a commercial or industrial environment as the pump is not designed for heavy-duty use. It is designed for periodic on/off cycles, not for long-term continuous operation.
q) DO NOT use with liquid that has a temperature greater than 35°C.
r) Dry running of the pump creates excessive wear and must be avoided.
s) When not in use, protect the pump from frost damage and store in a dry place.
t) ALWAYS observe local laws and regulations when connecting submersible pumps to the power supply. Consult a qualified electrician when necessary.
Product Familiarisation
| 1. | Male Quick Connector 1/2" |
| 2. | Shut-Off Valve |
| 3. | Exit Pipe |
| 4. | Stabilising Arm |
| 5. | Telescopic Extension Pipe |
| 6. | Power Cable |
| 7. | Carrying Handle |
| 8. | Jump Unit |
| 9. | Suction Base |
| 10. | Float Switch |
| 11. | Lower Cable Clip |
| 12. | Outlet Connector |
| 13. | Upper Cable Clip |
| 14. | Washers |
Intended Use
Electric water butt pump, for pumping water from a water butt. Maximum submersible depth of 7 m, with filtration to prevent blockages, provides usable collected water at a flow rate of 41.6 L/min.
Unpacking your Tools
- Carefully unpack and inspect your new appliance. Familiarise yourself with all its features and functions.
- Ensure that all parts of the appliance are present and in good condition. If any parts are missing or damaged, have such parts replaced before attempting to use this appliance.
Before Use
⚠ WARNING: Ensure the appliance is disconnected from the power supply before attaching or changing any accessories or making any adjustments.
Pipe assembly
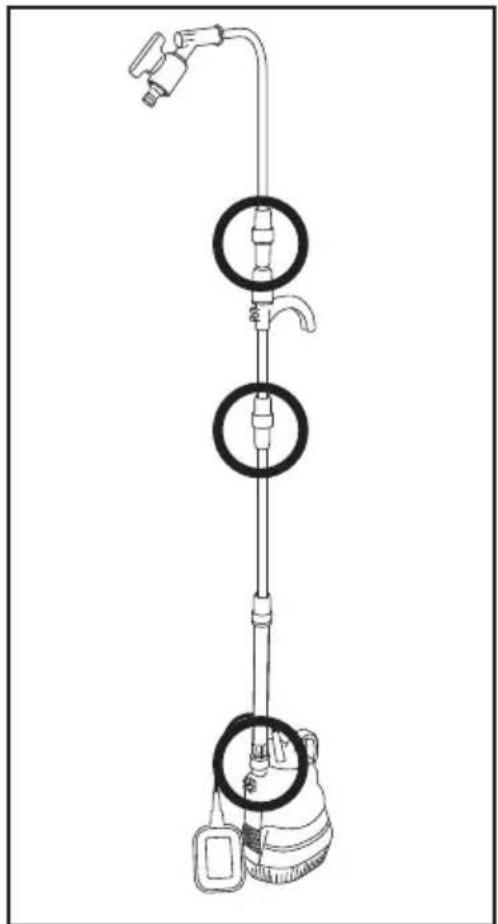
Note: During assembly, ensure a Washer (14) is placed between each pipe connection (See 'Fig. II' for each position).
- Position the Pump Unit (8) on a secure flat surface.
- Take the Telescopic Extension Pipe (5), position the Washer, and screw the female connector onto the threaded male Outlet Connector (12) located at the top of the Pump Unit.
- Take the Stabilising Arm (4), position the Washer, and screw the female collar onto the threaded male connector of the Telescopic Extension Pipe.
- Take the Exit Pipe (3), position the Washer, and screw the female collar onto the threaded male connector of the Stabilising Arm.
Height adjustment
- To adjust the height of the Exit Pipe (3), unscrew the plastic collar at the top of the Telescopic Extension Pipe (5), then re-position and tighten the collar.
Stabilising Arm adjustment
Note: The height of the Stabilising Arm (4) should correspond with the depth of the water container. Use the Stabilising Arm to support the pump against the side of the water container.
IMPORTANT: The Stabilising Arm must not be used to hang or hold the weight of the pump during use.
- To adjust the height of the Stabilising Arm, unscrew the plastic collar immediately above the arm, then re-position and tighten the collar.
Hose connection
- Attach a female hose quick connector (not included) to the garden hose, and push-fit onto the Male Quick Connector (1).
Operation
Note: If the base of the water container is lined with solids, dirt, or debris, elevate the pump from the bottom of the water container using a stable platform.
Switching ON & OFF
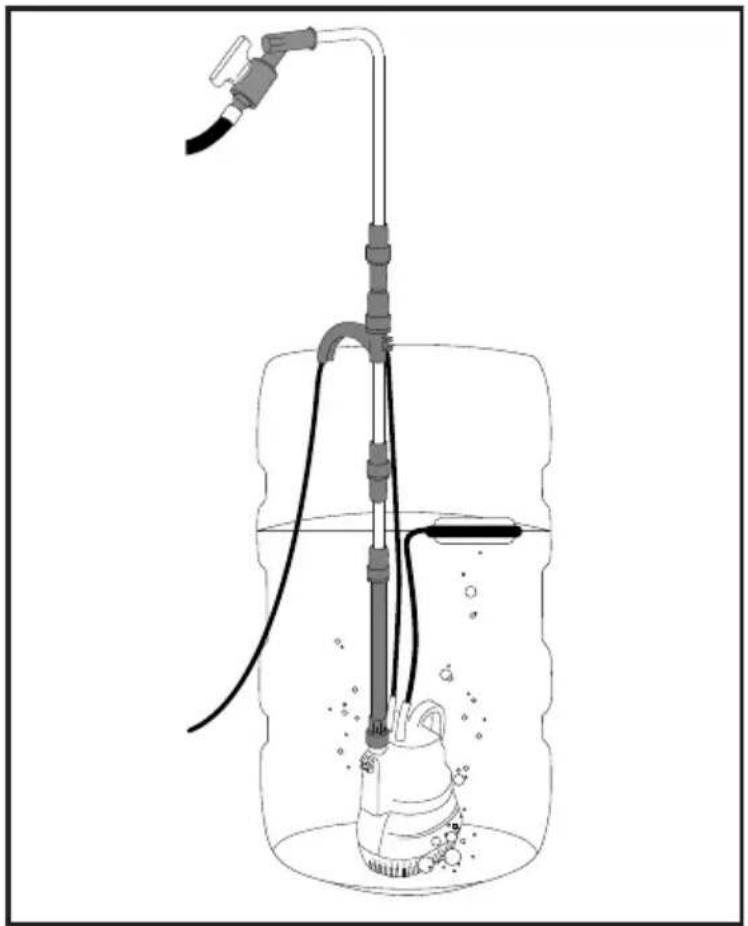
- Ensure that the pump is situated in a secure location, inside the water container, with the Pump Unit (8) entirely submerged (Fig. I).
- Plug the power cord into the mains power socket.
- Switch the mains ON. The pump will start automatically.
- To switch the pump OFF, switch OFF at the mains.
Float Switch
- The Float Switch (10) prevents the pump running dry if the water level becomes too low (15mm depth).
IMPORTANT: Ensure the Float Switch is not obstructed.
- The pump will switch OFF when the Float Switch is at a downward angle away from the Pump Unit (8) (Fig. III).
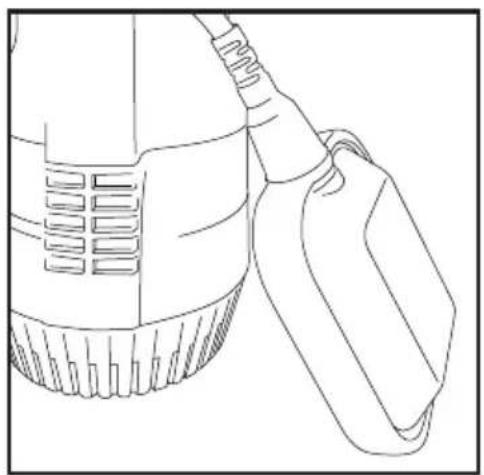
- To adjust the water level that the pump will switch OFF, shorten the Float Switch cable using the Lower Cable Clip (11) (Fig. IV).
Accessories
- A range of accessories and consumables—including a Reinforced PVC Hose, Hose Guide and a variety of different connectors and fittings—is available from your Silverline stockist.
- Spare parts can be obtained from toolsparesonline.com
Maintenance
⚠ WARNING: ALWAYS disconnect from the power supply before carrying out any inspection, maintenance or cleaning.
General inspection
- Regularly check that all the fixing screws are tight.
- Inspect the supply cord of the appliance, prior to each use, for damage or wear. Repairs should be carried out by an authorised Silverline service centre. This advice also applies to extension cords used with this appliance.
Cleaning
- Keep the appliance clean at all times. Dirt and dust will cause internal parts to wear quickly and will shorten the machine's service life.
- Clean the body of the machine with a soft brush or dry cloth. If available, use clean, dry, compressed air to blow through the ventilation holes.
- Clean the appliance casing with a soft damp cloth using a mild detergent. Do not use alcohol, petrol or strong cleaning agents.
- Never use caustic agents to clean plastic parts.
Cleaning the filter
-
To gain access to the air filter element, remove the 4 x Phillips head screws from the Suction Base (9) to release the base from the body of the pump.
-
Check for obstructions within the exposed area, such as small stones or gravel.
-
Remove the filter element and wash using clean water; check the Suction Base cover for any debris, remove the debris, and wash with clean water.
Note: If the pump has been used to pump chlorinated water or any liquid with residues, the pump should be rinsed after use with clean water.
Brushes
• Over time the carbon brushes inside the motor may become worn.
- Excessively worn brushes may cause loss of power or intermittent failure.
- If you suspect that the brushes may be worn, have them replaced at an authorised Silverline service centre.
Contact
For technical or repair service advice, please contact the helpline on (+44) 1935 382 222
Web: www.silverlinetools.com
UK Address:
Toolstream Ltd.
Boundary Way
Lufton Trading Estate
Yeovil, Somerset
BA22 8HZ, United Kingdom
EU Address:
Toolstream B.V.
Holtum-Noordweg 11
Unit 4
6121 RE Born
The Netherlands
Storage
- Store this appliance carefully in a secure, dry place out of the reach of children.
Disposal
Always adhere to national regulations when disposing of appliances that are no longer functional and are not viable for repair.
- Do not dispose of power appliances, or other waste electrical and electronic equipment (WEEE), with household waste.
- Contact your local waste disposal authority for information on the correct way to dispose of appliances.
Troubleshooting
Problem Possible cause Solution
| Pump automatically cuts-out | Pump over-heated and shut-off due to the thermal overload switch | A normal feature to protect the pump from damage, ensure the pump is sufficiently submerged in water, and that no blockage is present |
| Worn motor brushes Get brushes replaced at an authorised Silverline service centre | ||
| Poor water pressure | Blockage | Check the fluid intake and all pipes for blockages that may restrict fluid flow |
| If the above troubleshooting solutions fail, contact your dealer or an authorised Silverline service centre. | ||
Silverline Tools Guarantee
This Silverline product comes with a 3 year guarantee
Register this product at www.silverlinetools.com within 30 days of purchase in order to qualify for the 3 year guarantee. Guarantee period begins according to the date of purchase on your sales receipt.
Registering your purchase
Registration is made at silverlinetools.com by selecting the Guarantee Registration button. You will need to enter:
- Your personal details
• Details of the product and purchase information
Once this information is entered your guarantee certificate will be created in PDF format for you to print out and keep with your purchase.
Terms & Conditions
Guarantee period becomes effective from the date of retail purchase as detailed on your sales receipt.
PLEASE KEEP YOUR SALES RECEIPT
If this product develops a fault within 30 days of purchase, return it to the stockist where it was purchased, with your receipt, stating details of the fault. You will receive a replacement or refund. If this product develops a fault after the 30-day period, return it to:
Silverline Tools Service Centre PO Box 2988
Yeovil
BA21 1WU, UK
The guarantee claim must be submitted during the guarantee period.
You must provide the original sales receipt indicating the purchase date, your name, address and place of purchase before any work can be carried out.
You must provide precise details of the fault requiring correction.
Claims made within the guarantee period will be verified by Silverline Tools to establish if the deficiencies are related to material or manufacturing of the product.
Carriage will not be refunded. Items for return must be in a suitably clean and safe state for repair, and should be packaged carefully to prevent damage or injury during transportation. We may reject unsuitable or unsafe deliveries.
All work will be carried out by Silverline Tools or its authorised repair agents.
The repair or replacement of the product will not extend the period of guarantee
Defects recognised by us as being covered by the guarantee shall be corrected by means of repair of the tool, free of charge (excluding carriage charges) or by replacement with a tool in perfect working order.
Retained tools, or parts, for which a replacement has been issued, will become the property of Silverline Tools.
The repair or replacement of your product under guarantee provides benefits which are additional to and do not affect your statutory rights as a consumer.
What is covered:
- The repair of the product, if it can be verified to the satisfaction of Silverline Tools that the deficiencies were due to faulty materials or workmanship within the guarantee period.
- If any part is no longer available or out of manufacture, Silverline Tools will replace it with a functional replacement part.
What is not covered:
Silverline Tools does not guarantee repairs required as a result of:
- Normal wear and tear caused by use in accordance with the operating instructions e.g. blades, brushes, belts, bulbs, batteries etc.
- The replacement of any provided accessories such as drill bits, blades, sanding sheets, cutting discs and other related items.
- Accidental damage, faults caused by negligent use or care, misuse, neglect, careless operation or handling of the product.
- Use of the product for anything other than normal domestic purposes.
- Change or modification of the product in any way.
- Use of parts and accessories which are not genuine Silverline Tools components.
- Faulty installation (except if installed by Silverline Tools).
- Repairs or alterations carried out by parties other than Silverline Tools or its authorised repair agents.
- Claims other than the right to correction of faults on the tool named in these guarantee conditions are not covered by the guarantee.
Introduction
Silverline Tools Service Centre
PO Box 2988
Yeovil
Silverline Tools Service Centre
PO Box 2988
Yeovil
Silverline Tools Service Centre
PO Box 2988
Yeovil
BA21 1WU, VK
Silverline Tools Service Centre
PO Box 2988
Yeovil
BA21 1WU, UK
natural_image
Black and white photo of a portable water spray gun with a stand and handle (no text or symbols visible)EN 3 Year Guarantee. Register online within 30 days. Terms and Conditions apply.

- Water Butt Pump 400W 2500L/h
- Introduction
- Description of Symbols
- Specification
- General Appliance Safety Warnings
- 1) General Safety
- 2) Electrical safety
- 3) Service
- Electric Water Butt Pump Safety
- Product Familiarisation
- Intended Use
- Unpacking your Tools
- Before Use
- Pipe assembly
- Height adjustment
- Stabilising Arm adjustment
- Hose connection
- Operation
- Switching ON & OFF
- Float Switch
- Accessories
- Maintenance
- General inspection
- Cleaning
- Cleaning the filter
- Brushes
- Contact
- UK Address:
- EU Address:
- Storage
- Disposal
- Troubleshooting
- Silverline Tools Guarantee
- This Silverline product comes with a 3 year guarantee
- Registering your purchase
- Terms & Conditions
- PLEASE KEEP YOUR SALES RECEIPT
- Silverline Tools Service Centre PO Box 2988
- BA21 1WU, UK
- What is covered:
- What is not covered:
- Silverline Tools Service Centre
- PO Box 2988
- Yeovil
- BA21 1WU, VK
Brand : SILVERLINE
Model : 633872
Category : Water pump