
CCSD18 A1 - Solar shower CRIVIT - Free user manual and instructions
Find the device manual for free CCSD18 A1 CRIVIT in PDF.

| Product type | Outdoor solar shower |
| Brand | Crivit |
| Model | CCSD18 A1 |
| Capacity | 18 litres |
| Total height | 226 cm |
| Tank diameter | 11 cm |
| Weight | Approximately 6.3 kg |
| Maximum water pressure | 4 bar |
| Water temperature | Up to 60 °C (solar heating) |
| Main material | PVC and ABS |
| Power supply | Solar energy (no electrical connection) |
| Functions | Shower with single-lever mixer, integrated foot rinser |
| Safety | Non-potable water, risk of burns, do not use during thunderstorms |
| Maintenance and cleaning | Clean with clear water and a soft cloth; do not use aggressive products |
| Frost resistance | No, must be disassembled and stored frost-free in winter |
| Warranty | 3 years |
| Package contents | Upper and lower parts, shower head, single-lever mixer, foot rinser, quick hose adapter, screws, wall plugs, Teflon tape, manual |
| Assembly | Ground anchoring (concrete or slab); required tools: drill, 12 mm concrete drill bit, screwdriver, 16 mm wrench, hammer |
| Usage | Fill with garden hose; expose to sunlight to heat water; adjust temperature with mixer |
Frequently Asked Questions - CCSD18 A1 CRIVIT
User questions about CCSD18 A1 CRIVIT
0 question about this device. Answer the ones you know or ask your own.
Ask a new question about this device
Download the instructions for your Solar shower in PDF format for free! Find your manual CCSD18 A1 - CRIVIT and take your electronic device back in hand. On this page are published all the documents necessary for the use of your device. CCSD18 A1 by CRIVIT.
USER MANUAL CCSD18 A1 CRIVIT

natural_image
Black industrial showerhead with a circular vent and handle, isolated on white background (no text or symbols visible)DE AT CH
Before reading, unfold the pages containing the illustrations and familiarise yourself with all functions of the device.
FR BE
GB / IE Operation and Safety Notes Page 21
natural_image
Pure diagram of a black curved pipe with multiple side supports, no text or symbols present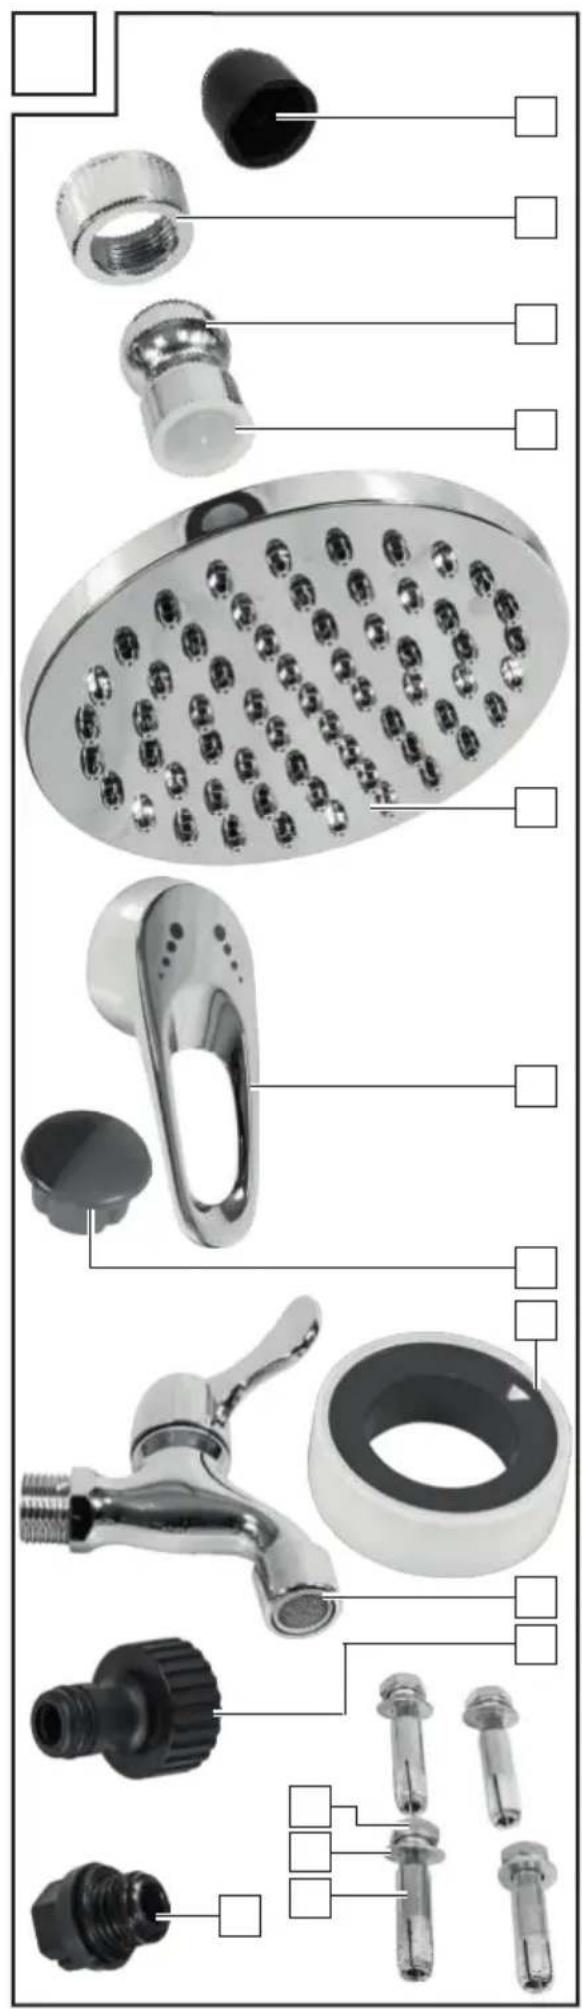
natural_image
Technical diagram of a mechanical assembly with bolts and a central cylindrical component (no text or labels)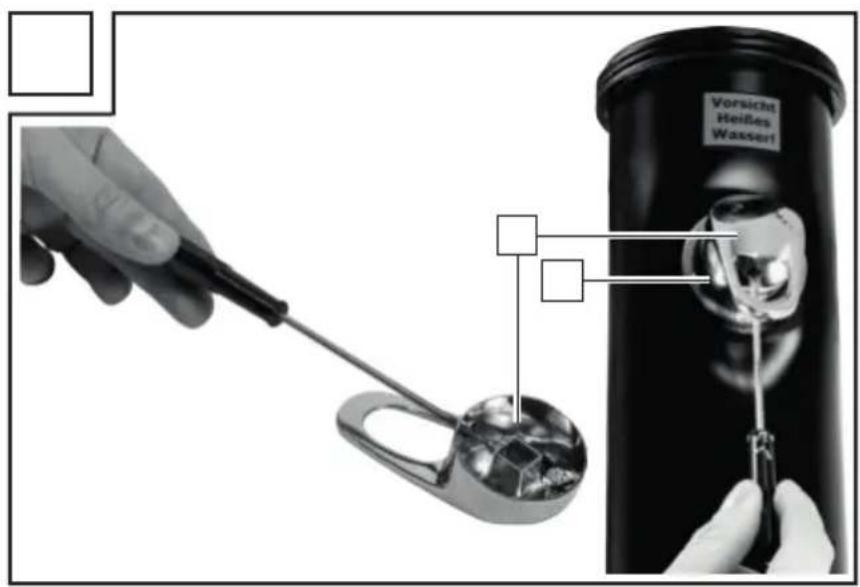
natural_image
Diagram of a mechanical component with directional arrows indicating motion or force (no text or symbols)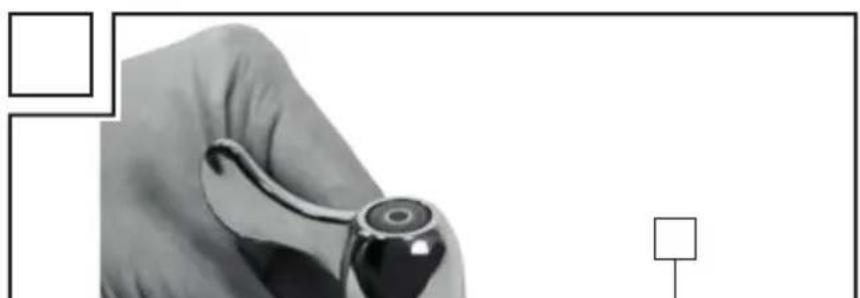
natural_image
Close-up of a hand holding a stainless steel kitchen sink (no text or symbols visible)
natural_image
Two mechanical components with mounting holes and a central hub, shown from different angles (no text or symbols visible)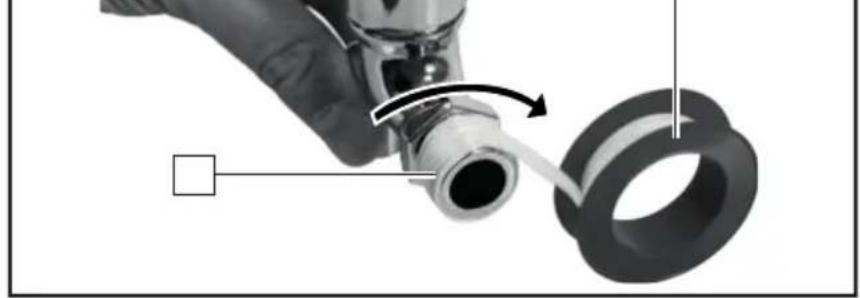
natural_image
Close-up of a hand holding a pipe fitting with a coiled black ring, showing a directional arrow (no text or symbols)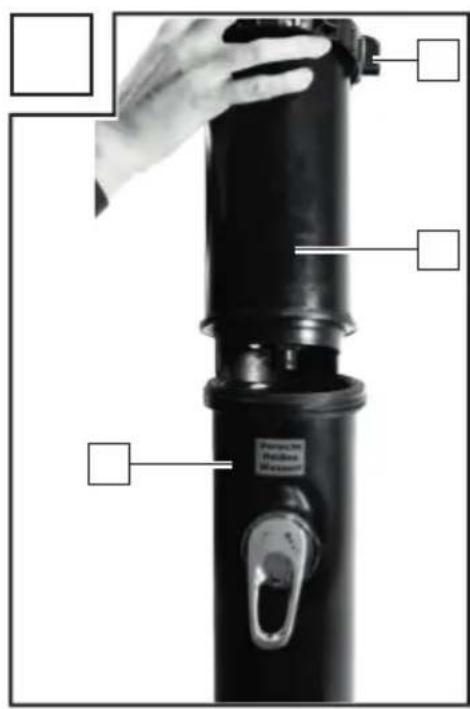
natural_image
Two black mechanical components with arrows indicating a turning mechanism, shown from different angles (no text or symbols present)Intended use Page 22
Delivery scope Page 23
Description of parts Page 23
Technical data...... Page 24
Safety notes.... Page 24
Installation...... Page 26
Commissioning....Page 28
Troubleshooting Page 29
Cleaning and maintenance Page 31
Removal and winter storage ...... Page 31
Environmental notes and disposal information ...... Page 32
Notes on warranty and service processing...... Page 32
Warranty terms Page 32
Warranty period and statutory claims for defects...... Page 32
Warranty scope Page 32
Processing of a warranty claim.... Page 33
Service...... Page 33
| Key of the icons used | ||||
 |  | Read the operating manual! |  | Observe the warning and safety notes! |
 | Note | 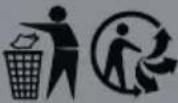 | Dispose of the packaging and device environmentally compatibly! | |
 | Made of recycled material. | 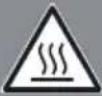 | Attention!Hot surface! | |
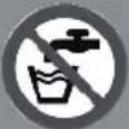 | Attention!No drinking water! |  | Attention!Do not use any tools for installation! | |
 | The solar shower is not frost-proof. |  | Made of polyvinyl chloride. | |
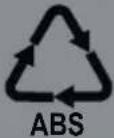 | Made of acrylonitrile butadien styrene plastic. | |||
OUTDOOR SOLAR- POWERED SHOWER CCSD 18 A1
- Introduction
Congratulations! You have chosen a high-quality product from our company. Familiarise yourself with the product before first commissioning. For this, read the following operating manual and safety notes with care.
DO NOT LET THE DEVICE GET INTO THE HANDS OF CHILDREN!
- Intendeduse
The 18 l solar shower serves as an outdoor shower for operation on a fixed
22 GB/IE
or variable water connection. The tap water in the solar shower is heated to up to 60 °C by pure solar radiation. The black colour ensures that the solar shower absorbs the greatest share of the sunlight. This way, heat can accumulate inside the solar shower and heat up the water in it.
The solar shower is energy-saving and environmentally compatible. No additional energy supply is needed. The water is heated only by sunlight. The water is heated up as long as the sun is shining during the day. Only use the product as described and for the indicated areas of use. Store this manual with care. Enclose all documents when passing the product on to any third parties.
This solar shower is not fit for commercial use. Commercial use causes the warranty to lapse. The device was
developed for private use and is not suitable for commercial or industrial use. Commissioning only by instructed persons. Any other use may cause damage to the device and pose a severe risk for the user. The manufacturer shall not be liable for any damage caused by non-intended or wrong use. Observe the local provisions concerning use of soap, cleaning agents, and similar. The water used must be properly discharged. Do not waste any water.
- Delivery scope
| 1 | Solar shower top |
| 1 | Solar shower bottom |
| 1 | Shower head |
| 1 | Cap nut |
| 1 | Ball joint with connection thread |
| 1 | Single-lever mixing handle with covering cap for screw hole |
| 1 | Foot shower |
| 1 | Quick-connection adapter for garden hose (tap connector 26,5 mm G ^3/4 ") |
| 1 | Drain screw (pre-installed on the solar shower bottom) |
| 4 | Metal dowel |
| 4 | Screws to attach the solar shower |
| 4 | Caps for fixing screws |
| 4 | Washers |
| 1 | Roll of Teflon tape |
| 1 | Operating manual |
NOTE!
The terms "product" or "device" in the subsequent text refers to the solar shower covered in this operating manual.
• Description of parts
1 Cap nut
2 Ball joint with connection thread
3 Transport protection cap
4 Shower head
5 Single-lever mixing handle
6 Covering cap for single-lever mixer
7 Teflon tape
8 Foot shower
9 Quick-connection adapter for garden hose (tap connector 26,5 mm G 3/4")
10 Attachment screw
11 Washer
12 Dowel
13 Drain screw
14 Attachment holes
15 Base of the solar shower
16 Connection of the drain screw
17 Connection for the garden hose
18 Solar shower bottom
19 Connection for the foot shower
20 Holder for the single-lever mixer
21 Cap nut for connecting the top and bottom parts of the shower
22 Solar shower top
23 Shower head connection
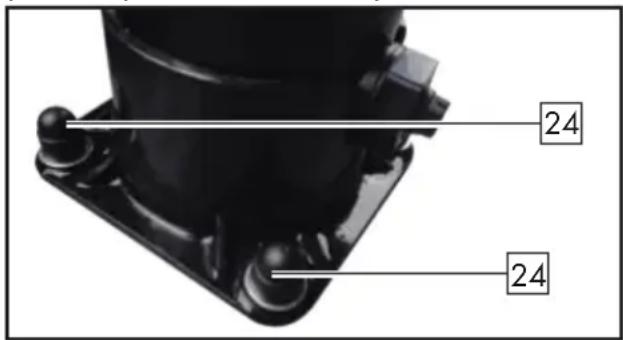
24 Caps for fixing screws
NOTE!
You will need the following tools, which are not enclosed, to set up the solar shower:
Drill
12 mm stone drill
Phillips screwdriver
Hammer
- Technical data
| Model: CCSD18 A1 | |
| Volume: 18 l | |
| Total height: 226 cm | |
| Diameter: 11 cm | |
| Water temperature: >2 °C | |
| Weight: approx. 6,3 kg | |
| Maximum pressure: 4 bar | |
| Quick-connection adapter for garden hose (tap connector) | 26,5mm G^3/4 " |
Technical and visual changes may be made without notice within the scope of further development. All dimensions, notes and information in this operating manual are given without warranty. Legal claims that are filed based on the operating manual cannot be asserted for this reason.
Function
The solar shower tank is filled with waver via the connected garden hose. The sunlight will heat up the water, since the black surface of the base tank reflects only very little solar energy. The solar shower also has a direct cold-water supply line to the single-lever mixer, which allows perfect temperature adjustment of the shower water.
- Safety notes
Read all safety notes and instructions!
WARNING!
▶ Please read the operating manual with care before use. Familiarise yourself with the device, its proper use and the safety notes using this operating manual. It is part of the device and must be kept at hand at all times!
ATTENTION!
The water from the shower is not suitable as drinking water!
WARNING!
▶ Never point the water jet at any people or animals!
If the shower is not in use, it should be drained and the water tap should remain open to prevent germ growth. Flush the solar shower thoroughly with water after an extended time without use. This device may be used by children aged 8 and above, as well as by people with reduced physical, sensory or mental capacities or lack of experience and knowledge, provided that they are supervised or instructed in safe use of the device and understand the resulting risks.
Children must not play with the device. Cleaning and user maintenance must not be performed by children without supervision.
Children should be supervised in order to ensure that they do not play with the device or the packaging material used.
■ Ensure that no electrical devices and/or power connections are in contact with the shower or in reach of the water jet from the shower.
■ Avoid accidental activation.
- Do not use any additives such as cleaning agents or other liquids.
The water in the shower will become very hot in the sun. Never stand with your entire body under the shower if you want to use it after a heating phase. Always start by carefully testing the water temperature, and use the fittings to reduce the temperature to a pleasant degree using the cold water supply (with the same procedure as in a normal shower). There is a risk of burns!
- Keep the disassembled device in a dry location and out of the reach of children.
- Check the device for damage before using it and use it only in
an impeccable condition.
The device will turn hot in use. There is a risk of burns when touching the hot surfaces.
■ Ensure that neither sand nor other smaller particles enter the openings of the shower head.
■ Protect the device from frost. There is a risk of property damage and injury if any water freezes inside the device and the device bursts.
⚠️ RISK OF LIGHTING STRIKE!
If you use the solar shower during a thunderstorm, you may be struck by lightning. Therefore, never use the solar shower in any thunderstorms.
■ Supervise any children younger than 8 years when they use the solar shower.
■ Never leave the solar shower unsupervised when in use.
- Do not let children play with the packaging film. Children may be caught in it when playing, and suffocate.
The solar shower is not a toy or climbing frame. It must not be used to carry clothes lines, hammocks or similar objects.
RISK OF INFECTION!
The water from the solar shower generally is not of drinking water quality. If the shower is not used for any extended period, germs and bacteria may grow in the warm water. They may cause illness if swallowed, when coming into contact with the mucosa or any open wounds.
■ Use the solar shower only when it is firmly anchored in the ground.
■ Use the solar shower only on water connections with a reliable maximum water pressure of 4 bar.
- Stop using the solar shower if the parts of the solar shower have any cracks or tears or if they are deformed. Replace any damaged parts only with matching genuine spare parts.
In order to avoid frost damage, disassemble the solar shower in winter and store it as described in "Removal and winter storage". Any modifications are prohibited.
- Do not add any salt or frost-protection agents to the water for the solar shower.
■ Always place the garden hose to avoid the risk of tripping.
WARNING!
The tap must be closed after any use of the product.
- Installation
NOTE!
Always check that the delivery scope is complete and that the solar shower is in an impeccable condition right after unpacking. Do not use the solar shower if it has any defects.
Note: The solar shower must be anchored in the level and horizontal ground to permit safe use. The solar shower is set up most securely on a level and smooth stone floor. If the desired location has no stone flooring, we recommend using it on a paving slab of 40 × 40 × 5 cm.
Proceed as follows to set up the solar shower 18:
- Find a place for the solar shower where as much sunlight as possible falls during the day.
- Put down a paving slab if there is no stone flooring in the desired location. Ensure that the paving slab is securely attached and cannot come loose.
- Place the bottom of the solar shower 18 on the stone flooring. If you use a paving slab, centre the bottom of the solar shower 18 on it.
- Align the bottom of the solar shower 18 so that the single-lever mixing handle 5 can be reached comfortably and there
is enough space for showering in front of the solar shower. Also ensure that there is enough space on the rear of the solar shower to connect the garden hose to the garden hose connection 17.
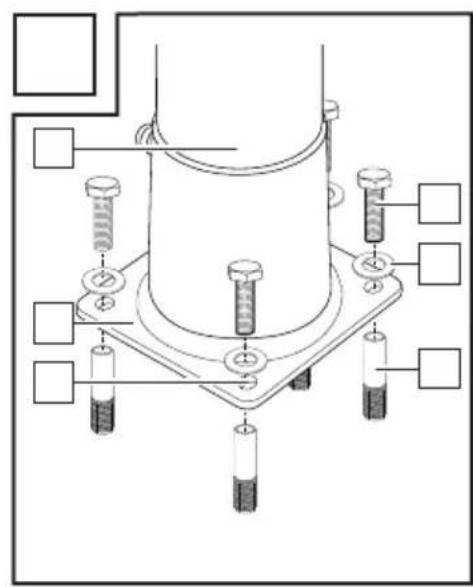
- Mark the positions of the four bores on the supporting base using the attachment holes 14 in the solar shower base 15.
- Drill the holes for the attachment screws with a 12-mm stone drill 10. The bores must be at least 45 mm deep when using the enclosed attachment screws 10 and dowels 12.
- Push the dowels 12 completely into the bores. Use a hammer if necessary.
- Push the four attachment screws 10 with the washers 11 through the base of the solar shower 15 and the attachment holes 14 into the dowels 12 (see fig. C).
- Tighten the four attachment screws 10 with a wrench, with a width across flats of 16 mm.
- Put the cover caps 24 on the heads of the attachment screws 10. The caps 24 protect your feet from injuries.
Installation of the solar shower:
ATTENTION! RISK OF DAMAGE
■ Improper handling of the solar shower may cause damage to the solar shower.
- Do not use any tools to assemble the solar shower. Tighten the connections only by hand unless use of tools is described explicitly.
Proceed as follows to assemble the solar shower:
- Wind a sufficient amount of Teflon tape 7 around the outer thread of the connection for the shower head 23 at the top of the solar shower 22 (see fig. D).
- Remove the transport protection cap 3 from the ball joint with a connection thread 2. Guide the cap nut 1 over the ball joint 2 (see fig. E1) from the threaded side of the ball joint. Then screw on cap nut 1 to the thread of the shower head 4. Tighten the cap nut hand-tight (see fig. E2).
- Screw the shower head 4 to the connection for the shower head 23 using the thread on the ball joint 2. Tighten the ball joint 2 only hand-tight.
- Place the top of the solar shower 22 vertically into the upper opening of the bottom of the solar shower 18 (see fig. F).
- Check that the top of the solar shower 22 and the bottom of the solar shower 18 are placed firmly on top of each other.
- Place the cap nut over the connection point of the top of the solar shower 22 and the bottom of the solar shower 18 to
connect the shower top and bottom 21 (see fig. F).
- Tighten the cap nut to connect the top and bottom parts of the shower 21 well manually.
- Push the single-lever mixing handle 5 onto the holder of the single-lever mixer 20 so that the handle of the single-lever mixer points down.
- Guide a narrow Phillips screwdriver through the opening of the single-lever mixing handle 5 and tighten the screw at the single-lever mixing handle 5 to fasten the single-lever mixing handle 5 on the holder for the single-lever mixer 20 (see fig. G).
- Push the covering cap of the single-lever mixer 6 onto the opening of the single-lever mixing handle 5. Ensure that the hot/cold marks of the covering cap 6 are aligned to match the hot/cold marks on the single-lever mixing handle 5.
- Wind Teflon tape 7 around the threaded connection of the foot shower 8 as shown in fig. H.
- Screw the foot shower 8 into the foot shower 19 connection. Tighten the foot shower 8 only hand-tight until it is aligned vertically with the operating lever facing upwards. If the foot shower 8 is leaking or not aligned vertically, remove it again. Wind another few layers of Teflon tape 7 around the threaded connection of the foot shower 8. Screw the foot shower 8 onto the foot shower connection 19 again.
- Wind Teflon tape 7 around the connection for the garden hose 17 (see fig. I). Screw the quick-connection adapter for the garden hose (tap
connector 26,5 mm G ^3/4 ) 9 onto the connection for the garden hose 17 (see fig. J).
- Push your garden hose onto the quick-connection adapter for the garden hose (tap connector 26,5 mm G ^3/4 ") 9.
Note: For example, use "Gardena regulation stop" 13mm ( 12 ).
Attention!
The shower is very heavy when filled with water. It must be firmly anchored in the ground. Severe injury and/or property damage may result if the shower tips over. Ensure that the solar shower cannot tip over due to strong wind or other outer forces.
Important warning note when drilling:
Before drilling, ensure that there are no gas, water or power lines in the drilling location. Installation must be performed by specialist staff. The manufacturer bears no responsibility for damage caused by improper connection between the ground and dowels.
Note:
The optimal site of setup should be exposed to sunlight all day and should not be covered by the shadows of trees or bushes that may impair heating of the water. Never screw in any threads with excessive application of force. They may take damage.
- Commissioning
Connect a suitable hose to the quick-connection adapter for the garden hose (tap connector 26,5 mm G ^3/4 ) and open the control valve of your hose's water supply. Fill the solar shower with
water entirely. For this, set the single-lever mixing handle 5 to the maximum temperature and open it carefully by pulling it towards you. This prevents enclosed air when first filling the shower. The shower is ready for use as soon as water comes out of the shower head 4. Close the single-lever mixing handle 5 and set it to a medium temperature. Check if the shower is leaking anywhere. Before first use of the solar shower, you need to give the sun enough time to heat up the water. Always test the water temperature before you step under the shower to prevent a risk of scalding. The cold water position is marked with a blue mark on the single-lever mixing handle 5, the hot water position with a red one.
Note:
There is no pressure on the shower while the water tap is closed. The water tap must be opened and stay open for the shower to work.
■ The shower has no pressure if no garden hose is connected or if the
water tap is not opened. It will not work in this case.
The shower will drain as soon as the water hose is disconnected from the quick-connection adapter for the garden hose (tap connector 26,5 mm G ^3/4 ") 9. If you want to avoid this, you may install a check valve (not enclosed, sold by many DIY stores), for example.
■ Ensure that the connected hose is placed properly. Injury and property damage may occur if your foot catches and you tear off the hose.
- Troubleshooting
Note:
When troubleshooting or remedying errors, you may need to unscrews some components that cause water to drain from the shower body as soon as they are removed. Act with care and drain the water before fixing the issue if necessary.
| Error Potential cause | Remedy | |
| No water comes out of the shower. | The shower head 4 is dirty. | Clean the shower head 4. |
| No water in the main pipe. | Fill the main pipe. | |
| Connections not properly engaged. | Check the connections. | |
| Water tap not opened. Open the water tap. | ||
| Only little water comes out of the shower. | Water pressure too low due to:■ large hose reel garden water connection | Remove the hose reel and use a piece of hose instead. Some outdoor water connections are supplied with relatively little pressure by default. This is not an issue of the shower. If this is the case, use a different connection for your shower. |
| Water escapes when not desired (leak)...a) ...at the shower head 4, at the foot shower 8 or at the drain screw 16. | Shower head 4 or foot shower 8 or drain screw 16 screwed in loose/leaking. | Check the shower head 4, foot shower 8 or drain screw 16 for tight fit and wind new Teflon tape around the thread of the corresponding part if necessary. |
| b) ... the plug connection between the top of the solar shower 22 and the bottom of the solar shower 18. | Top of the solar shower 22 and bottom of the solar shower 18 set up canted. | Disconnect the parts and set them up anew:Place the top of the solar shower 22 vertically into the upper opening of the bottom of the solar shower 18 (see fig. F).Check that the top of the solar shower 22 and the bottom of the solar shower 18 are placed firmly on top of each other.Place the cap nut over the connection point of the top of the solar shower 22 and the bottom of the solar shower 18 to connect the shower top and bottom 21 (see fig. F).Tighten the cap nut to connect the top and bottom parts of the shower 21 well manually. |
- Cleaning and maintenance
If the solar shower no longer works properly after some time, the shower head 4 or the inlet and outlet openings may be clogged by deposits. Regular maintenance and cleaning is necessary in order to ensure proper function of the solar shower.
After use of the solar shower, water will evaporate and leave behind a dirt layer made up of deposits that were previously dissolved in the water. External environmental influences will also cause dirt deposits. The shower therefore should be cleaned at regular intervals. This increases the service life of the solar shower and its effectiveness.
Wipe the housing or fittings with a moist, soft rag after each use in order to avoid deposits and contamination on the shower. Use only clear water for this, and never use any cleaning agents. Rinse the openings, seals and the shower head with clear water to clear them of dirt.
Never use any aggressive or abrasive cleaning agents to remove the dirt!
Check before any use whether the moving parts of the device work properly and are not jammed, and whether any parts are broken or otherwise damaged. Have damaged parts repaired before using the device. Check that the screens and seals are intact.
- Removal and winter storage
The solar shower is not frost-proof. The solar shower must be removed and stored for winter as soon as the first frost is threatening. It is not sufficient to drain the shower. Proceed as follows:
- Close the water tap to which the garden hose is connected.
- Remove the garden hose from the quick-connection adapter for the garden hose (tap connector 26,5 mm G ^3/4 ") 9.
-
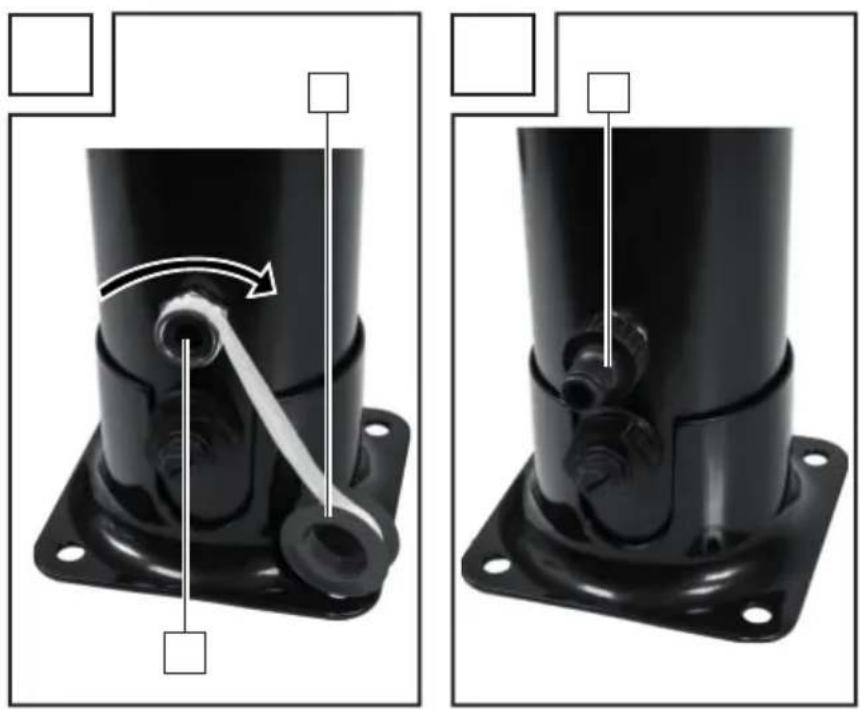
Open the single-lever mixing handle 5 in the middle position. Turn the drain screw 13 entirely from the connection for the drain screw 16 with a slotted screwdriver. The water can now drain from the shower.
-
Release the cap nut for connecting the top and bottom parts of the shower 21 by turning it counter-clockwise and lift the top of the solar shower 22 from the bottom of the solar shower 18.
-
Release the attachment screws 10 at the base of the solar shower 15.
-
You can now clean the solar shower as described in the chapter on cleaning and maintenance and put it in storage.
Ensure that no water remains in the shower when you store it away. The shower components must not be exposed to frost, since this may destroy the shower and its technical parts. The shower must be stored dry and protected from frost, outside of the reach of children. Also make sure that you cover the bores, which may fill up with dirt over winter.
- Environmental notes and disposal information
Raw material recycling instead of waste disposal!
The device, accessories and packaging should be delivered to environmentally compatible recycling.
Do not throw the solar shower into domestic waste, fire or water. If possible, devices that are no longer functional should be recycled. Request the help of your local vendor.
- Notes on warranty and service processing
Warranty of Creative Marketing & Consulting GmbH
Dear Customer, this device comes with a warranty of 3 years after the purchasing date. In the case of product defects, you will have statutory rights against the vendor of the product. These statutory rights are not limited by our warranty as described below.
- Warranty terms
The warranty term shall commence on the purchasing date. Please keep the original receipt. You will need that document as evidence of your purchase. If any defect of material or craftsmanship appears during a period of three years after the purchasing date, we will repair or replace the product free of charge for you - at our choice. This warranty service requires that the defective device and the purchasing document (receipt) are submitted during the period of three years, and that the defect, as well as the time of its occurrence, are briefly described in writing. If the defect is covered by our warranty, we will return the repaired product to you or send you a new one. Repair or replacement shall not cause a new warranty period to commence.
- Warranty period and statutory claims for defects
The warranty period shall not be extended by warranty services performed. This shall also apply to replaced and repaired parts. Any damage and defects that are present at purchase already must be reported at once after unpacking. Any repairs required after the end of the warranty period shall be subject to fees.
- Warranty scope
The device has been carefully produced based on strict quality directives and thoroughly inspected before delivery. The warranty service is available for defects of material or craftsmanship. This warranty shall not cover any product parts that are subject to regular wear and therefore may be considered wear parts, or to any damage to fragile parts, such as switches, rechargeable batteries, or parts made of glass.
This warranty shall be void if the product has been damaged, used or serviced improperly. Proper use of the product requires compliance with all instructions listed in the operating
manual. Purposes of use and actions that are advised or warned against in this operating manual must be avoided.
The product is only intended for private, non-commercial use. Abuse and improper treatment, application of violence and any manipulation not performed by our authorised service office shall void the warranty.
- Processing of a warranty claim
In order to ensure quick processing of your request, observe the following notes:
Keep your receipt and the item number (e.g. IAN) at hand as proof of purchase if you submit any requests. For the item number, see the rating plate, an engraving, the title page of your instructions (lower left) or the sticker on the rear or bottom. If any functional errors or other defects occur, contact the service department designated below by phone or email first. You can send a part recorded as defective to the service address provided to you postage paid. The shipment must include the purchasing document (receipt) and information on what the defect is and when it occurred.

Note:
This and many other manuals, product videos and software can be downloaded from www.lidl-service.com.
This QR code will take you directly to the Lidl service page (www.lidl-service.com) where you can open your operating manual by entering the item number (IAN) 334344_1907.

Service
How to contact us:
GB, IE
Name: C. M. C. GmbH
Website: www.cmc-creative.de
E-mail: service.gb@cmc-creative.de
Phone: 0-808-189-0652
Registered office: Germany
IAN 334344\_1907
Please note that the following address is not a service address. Contact the above service point first.
Address:
C.M.C.
Creative Marketing & Consulting GmbH
Katharina-Loth-Str. 15
DE-66386 St. Ingbert
GERMANY
Ordering spare parts:
Marketing & Consulting
GmbH Service CZ
Internetová adresa: www.cmc-creative.de
E-mail: info@bohemian-dragomans.com
Telefon: +420 608 600485
Sídlo: Německo
IAN 334344\_1907

- FR BE
- Safety notes.... Page 24
- Installation...... Page 26
- Commissioning....Page 28
- Troubleshooting Page 29
- Cleaning and maintenance Page 31
- Environmental notes and disposal information ...... Page 32
- Notes on warranty and service processing...... Page 32
- OUTDOOR SOLAR- POWERED SHOWER CCSD 18 A1
- - Introduction
- DO NOT LET THE DEVICE GET INTO THE HANDS OF CHILDREN!
- - Intendeduse
- - Delivery scope
- NOTE!
- • Description of parts
- - Technical data
- Function
- - Safety notes
- Read all safety notes and instructions!
- WARNING!
- ATTENTION!
- ⚠️ RISK OF LIGHTING STRIKE!
- RISK OF INFECTION!
- - Installation
- Proceed as follows to set up the solar shower 18:
- Installation of the solar shower:
- ATTENTION! RISK OF DAMAGE
- Important warning note when drilling:
- Note:
- - Commissioning
- - Troubleshooting
- - Cleaning and maintenance
- - Removal and winter storage
- - Environmental notes and disposal information
- Raw material recycling instead of waste disposal!
- - Notes on warranty and service processing
- Warranty of Creative Marketing & Consulting GmbH
- - Warranty terms
- - Warranty period and statutory claims for defects
- - Warranty scope
- - Processing of a warranty claim
- Service
- How to contact us:
- GB, IE
- IAN 334344\_1907
- Address:
- Ordering spare parts:
Brand : CRIVIT
Model : CCSD18 A1
Category : Solar shower