AACE - Car seat Nuna - Free user manual and instructions
Find the device manual for free AACE Nuna in PDF.
| Product type | Booster seat for child |
| Brand | Nuna |
| Model | AACE |
| Category | Car seat |
| Minimum age | 4 years (high-back mode), 5 years (backless mode) |
| Child weight | 18 to 50 kg (high-back mode), 23 to 54 kg (backless mode) |
| Child height | 96 to 152 cm |
| Usage modes | High-back booster and backless booster |
| Cover material | Machine-washable polyester (delicate cycle, cold water) |
| Restraint system | Vehicle three-point seatbelt (lap + shoulder belt) |
| Lower anchors | Removable lower anchor connectors (ISOFIX) |
| Side protection | Deployable side impact protection (SIP) device |
| Adjustable headrest | Yes, 9 positions, adjusts to child's shoulder height |
| Base adjustment | 3 depth positions for thigh support |
| Backrest recline | 2 positions (upright and reclined) only in high-back mode |
| Cup holder | Yes, removable, do not put hot liquid |
| Shoulder belt clip | Yes, to adjust shoulder belt position |
| Cleaning | Cover machine wash cold, air dry; shell wiped with soft cloth |
| Approval | For automotive use only (not in aircraft) |
| Warranty | Personalized warranty (contact Nuna for details) |
| Dimensions (approx.) | Height: 60-80 cm depending on adjustment; Width: 45 cm; Depth: 40 cm |
| Product weight | Approximately 5.5 kg |
Frequently Asked Questions - AACE Nuna
User questions about AACE Nuna
0 question about this device. Answer the ones you know or ask your own.
Ask a new question about this device
Download the instructions for your Car seat in PDF format for free! Find your manual AACE - Nuna and take your electronic device back in hand. On this page are published all the documents necessary for the use of your device. AACE by Nuna.
USER MANUAL AACE Nuna
natural_image
Illustration of a car seat with white outline lines, no text or symbols presentnuna®
Designed around your life
IMPORTANT! KEEP THESE INSTRUCTIONS FOR FUTURE REFERENCE:
READ CAREFULLY
Contents
Product information
Product Registration 3
Recall Information 3
Warranty 4
Contact 4
Child Usage Requirements 5
Warnings 6
Parts List 11
Installation 12
Product Set Up and Use 14
Cleaning and Maintenance 30
Francais (FR) 31
WARNING: Carefully read and comply with all instructions and warnings in this manual, and those labeled on your child restraint. Failure to do so can result in the SERIOUS INJURY or DEATH of your child. Store manual in pocket on bottom of booster seat base for future use.
Product Information
Model Number:
Manufactured date:
Product Registration
Please fill in the above information. The model number and the manufactured date can be found on a label underneath your child restraint. Fill out the prepaid registration postcard attached to the seat cover and mail it today.
Child restraints could be recalled for safety reasons. You must register this restraint to be reached in a recall. Send your name, address, e-mail address if available and the restraint's model number and manufacturing date to:
Nuna Canada
4500 Thimens Blvd, Suite 100
Saint-Laurent (QC) H4R 2P2
or call 1-800-667-4111 or register online at:
www.nuna.eu/caen
Recall Information
For recall information, call Transport Canada at
1-800-333-0371 or go to www.tc.gc.ca
Nuna Canada: 1-800-667-4111 or
www.nuna.eu/caen
Warranty
We have purposely designed our high-quality products so that they can grow with both your child and your family. Because we stand by our product, our gear is covered by a custom warranty per product, starting from the day it was purchased. Please have the proof of purchase, model number and manufactured date available when you contact us.
For warranty information please visit:
www.nuna.eu/caen
Contact
Please contact our Customer Service Department with any questions you may have concerning parts, use, or maintenance.
When you contact us, please have your product's model and manufactured date ready so we may help you efficiently. These numbers can be found on a sticker on the underside of your booster seat.
Nuna Canada: 1-800-667-4111 or
www.nuna.eu/caen
service@nunababy.ca
Child Usage Requirements
Z
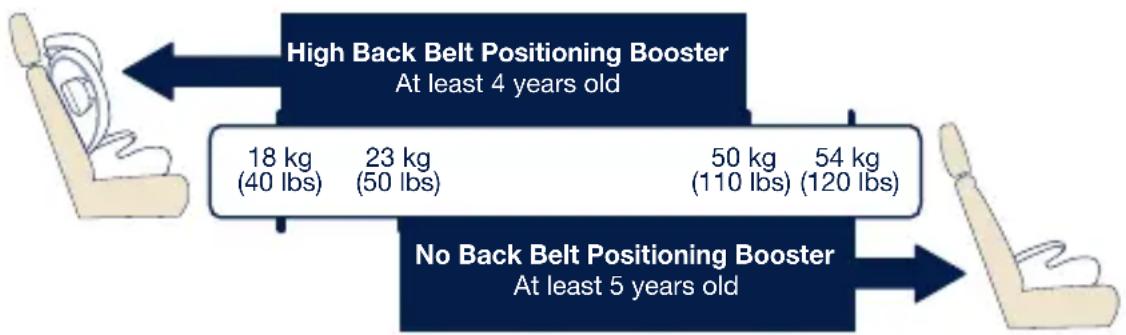
Use as a High Back Belt Positioning Booster
Your child must meet ALL of the following requirements below:
Age: At least 4 years old
Weight: 18–50 kg (40–110 lbs)
Height: 96–152 cm (38–60 in) tall
Use as a No Back Belt Positioning Booster
Your child must meet ALL of the following requirements below:
Age: At least 5 years old
Weight: 23–54 kg (50–120 lbs)
Height: 96–152 cm (38–60 in) tall
flowchart
graph LR
    A["High Back Belt Positioning Booster\nAt least 4 years old"] --> B["18 kg\n(40 lbs)"]
    A --> C["23 kg\n(50 lbs)"]
    A --> D["50 kg\n(110 lbs)"]
    A --> E["54 kg\n(120 lbs)"]
    F["No Back Belt Positioning Booster\nAt least 5 years old"] --> G["..."]
Warnings
WARNING
DEATH OR SERIOUS INJURY CAN OCCUR
Read all instructions before using this booster seat.
Keep instructions for further use.
Use the bottom of the booster seat base for storage of the instructions.
Read the instructions for this booster seat before use or installation in a vehicle. In addition, read the vehicle owner's manual for information on child restraint installation. Failure to follow the booster seat instruction manual or the labels on this product can result in DEATH or SERIOUS INJURY.
Your child should be at least 4 years old and 18 kg (40 lbs) before using this booster seat.
DO NOT allow anyone who has not read the instructions to install or use this booster seat.
Warning! Use only the vehicle's lap and shoulder belt system when restraining the child in this booster seat.
WARNING
DEATH OR SERIOUS INJURY CAN OCCUR
THIS RESTRAINT IS NOT cERTIFIED FOR AIRcRAFT USE.
DO NOT use booster 10 years after the date of purchase (proof of purchase required) or date of manufacture. Check the manufacturer's label on the bottom of the booster.
DO NOT use another manufacturer's soft goods with this booster as the soft goods constitute an integral part of the booster performance.
DO NOT use in any configuration not shown in the instructions.
DO NOT install rear facing or side facing.
ONLY install this booster seat in a forward facing vehicle seat with a lap/shoulder belts and Lower Anchor Connectors.
DO NOT install in the front passenger seat with an active airbag, unless the air bag can be turned OFF.

text_image
Diagram showing vehicle control panel with checkmarks and directional arrows, indicating status or warning zonesWARNING
DEATH OR SERIOUS INJURY CAN OCCUR
Make sure the Vehicle Lap & Shoulder Belt are not loose.
The Vehicle Shoulder Belt should rest on the child's shoulder and across the center of the chest.
The Vehicle Lap Belt must remain snug across the child's thighs.
NEVER leave a booster unsecured in your vehicle. An unsecured booster can be thrown around and may injure occupants in a sharp turn, sudden stop or crash. Remove it or make sure that it is secured in the vehicle.
NEVER leave luggage or other objects unsecured in a vehicle, as they are liable to cause injuries in the event of a collision.
NEVER use a booster if it has damaged or missing parts, or has been in any kind of accident. DO NOT use a cut, frayed or damaged vehicle seat belt.
DO NOT modify your booster or use any accessories or parts supplied by other manufacturers.
WARNING
DEATH OR SERIOUS INJURY CAN OCCUR
Z
Please refer to vehicle owner's manual for recommended or suggested installation positions.
This booster seat can ONLY be used in these classes of vehicles: passenger cars, multi-purpose passenger cars and trucks that have vehicle lap/shoulder belts and Lower Anchor Connectors.
This booster must be installed in the rear vehicle seat.
NEVER leave your child unattended.
Properly position the Vehicle Lap & Shoulder Belt on your child. A loose or improperly positioned Vehicle Lap & Shoulder Belt could cause the child to be ejected in a sudden stop, turn or crash and cause serious injury or death.
According to accident statistics, children are safer when properly restrained in the rear seating positions of the vehicle than in the front seating positions.
For a vehicle with a front passenger air bag, refer to your vehicle owner's manual as well as these instructions for a booster installation.
WARNING
DEATH OR SERIOUS INJURY CAN OCCUR
Use ONLY with children who weigh between 18–54 kg (40–120 lbs) and whose height is 96 to 152 cm
(38 to 60 inches)
High Back Belt Positioning Booster seat: At least four years old, 18–50 kg (40–110 lbs), 96–152 cm (38–60 inches) tall.
No Back Belt Positioning Booster seat: At least five years old, 23–54 kg (50–120 lbs), 96–152 cm (38–60 inches) tall.
The booster can become very hot if left in the sun. Contact with these parts can burn your child's skin. Always touch the surface of any metal or plastic parts before placing your child in the booster.
NEVER give this booster to another person without also giving them these instructions.
Parts List
1 Head Support
2 Side Support
3 Seat Covers
4 Instructional Manual (under seat)
5 Cup Holder
6 Seat Bottom
7 Armrest
8 Seat Back
9 Shoulder Belt Guides
10 Head Support Adjustment Lever
11 Side Impact Protection (SIP) Pod
12 Lower Anchor Connectors
13 Lower Anchor Release Lever or Recline Lever (under seat)
14 Lower Anchor Guides
15 Shoulder Belt Positioning Clip

text_image
Diagram of car seat with numbered labels pointing to different seat positions
text_image
10 11 12
text_image
13 4

text_image
15Installation
DO NOT install the booster on vehicle seats with Lap Belts only. (1)
DO NOT install the booster on vehicle seats with lap belts and motorized shoulder belts. (2)
DO NOT install the booster on vehicle seats with belts that are attached to the door or that move along a track. (2, 3)

text_image
1N3

text_image
2
text_image
3This booster seat must be installed in vehicle seats with lap and shoulder belts. (4)
This booster seat can be installed with lap and shoulder belts in a vehicle seat that includes Lower Anchors. The Lower Anchors must be at standard spacing of 28 cm (11 inches) only. (5)
Please refer to the vehicle owner's manual for designated Lower Anchor locations in the vehicle.

natural_image
Interior view of a car seatbelt with seatbelt and seat, no text or symbols visible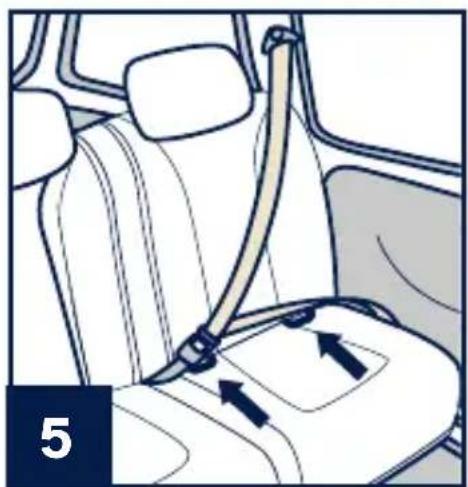
natural_image
Interior view of a car showing seatbelt and belt drive mechanism (no text or symbols)The child must be restrained using the Vehicle Shoulder Belt and Lap Belt.
DO NOT use the Lower Anchors to restrain the child. The Lower Anchors are only to be used for securing the booster seat in the vehicle and to function the recline feature in the High Back booster mode. The Lower Anchors can only be used in the No Back booster mode for securing the booster seat in the vehicle.
The recline feature is NOT available in the No Back booster mode.
Product Set Up and Use
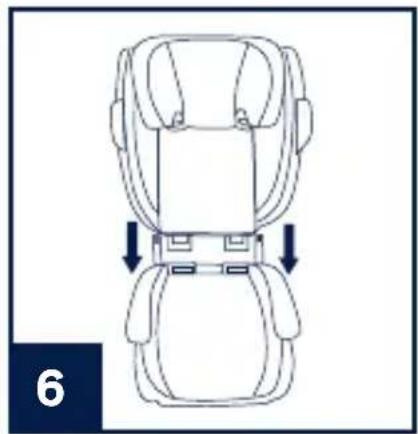
Seat Assembly
1 With the seat lying flat, attach the Seat Back to the booster Seat Bottom by hooking the Seat Back hooks over the Seat Bottom as shown. (6)
2 Now rotate the Seat Back up until it clicks into position and the seat is fully upright as shown. (7)
Side Impact Protection (SIP) Pods
1 To open the SIP Pods pull out on the side tab (8).
2 To close push button (9)-1 and push in (9)-2.
SIP PODS SHOULD BE DEPLOYED WHENEVER THE cHILD RESTRAINT IS INSTALLED IN A VEHICLE.
natural_image
Top-down line drawing of a car seat assembly with two arrows indicating fastening or clearance (no text or symbols)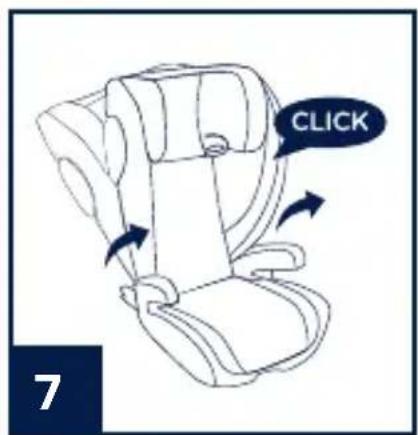
text_image
CLICK 7
text_image
8 CLICK
text_image
1 2 CLICK 9Seat Adjustment for Head Support and Shoulders
1 The Head Support height can be adjusted for best fit to your child and proper placement of the Vehicle Shoulder Belt.
Bottom of Head Support MUST be even with the top of your child's shoulder.
2 To adjust, squeeze the Head Support Adjustment Lever, then pull up (10) or push down (11) the Head Support until it locks into one of the nine positions as shown.
Before adjusting the Head Support height have your child lean forward slightly.

natural_image
Illustration of a hand pressing down on a curved object with directional arrows indicating motion (no text or symbols)
natural_image
Illustration of a hand pressing down on a curved object with directional arrows indicating motion (no text or symbols)As the Head Support is adjusted up, the sides of the seat automatically move outward to provide more shoulder room.
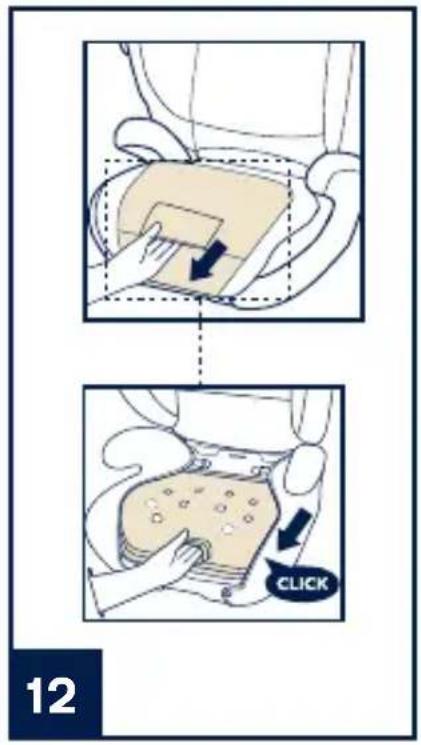
Seat Adjustment for Seat Bottom
The seat bottom depth can be adjusted for added comfort for the child. Three positions are provided for best fit.
1 Reach under the cover as shown to adjust the seating surface in or out. (12)
2 Slide the seating surface in or out as needed to ensure proper thigh support. (12)
Use of Lower Anchor Connectors
If vehicle is equipped with Lower Anchors they may be visible in the vehicle seat where the vehicle seat back meets the vehicle seat bottom. See your vehicle owner's manual for exact locations, Lower Anchor identification, and requirements for use.
1 To use the Lower Anchor Connectors, release the connectors by pulling and holding the Lower Anchor Release Lever on the bottom of the booster seat as shown in (13).
text_image
12 CLICK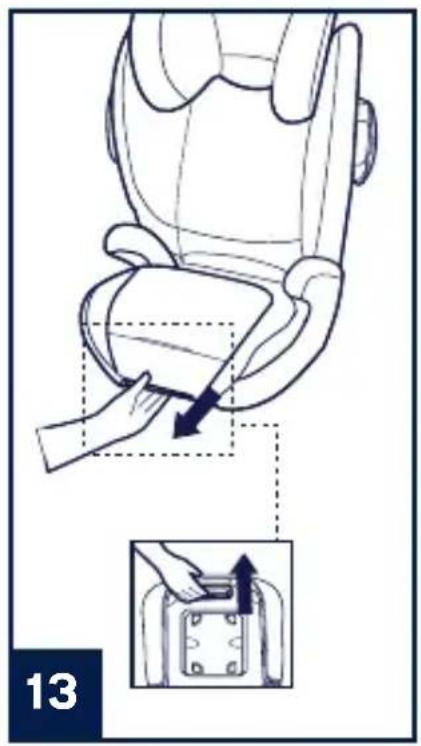
text_image
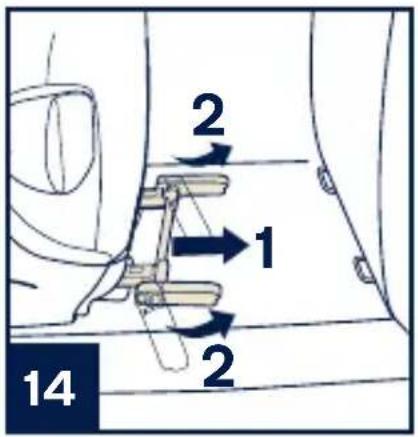
132 While holding the Lower Anchor Release Lever, pull out and fully extend the Lower Anchor Connectors (14)-1 and rotate them 180 degrees (14)-2 until they are pointing toward the Lower Anchors in the vehicle.
To ease attachment of the Lower Anchor Connectors, if desired, attach the provided Nuna Lower Anchor Guides by hooking them onto the vehicle Lower Anchors, then hook the Lower Anchor Connectors. (15)
3 Line up the Lower Anchor Connectors with the vehicle's Lower Anchors and press both connectors firmly until a click is heard and both are securely fastened. (16)
Make sure that both Lower Anchor Connectors are securely attached to the vehicle's Lower Anchors.
text_image
2 1 2 14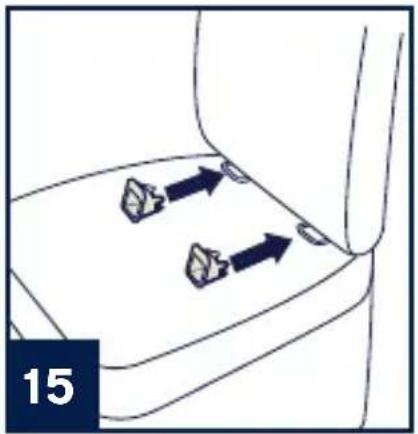
natural_image
Diagram of a car interior showing two directional arrows pointing to a vehicle (no text or symbols)
text_image
CLICK 1 ✓ × 164 The Lower Anchor Connectors will both show green when secured properly. (16)-1
5 Check to make sure the booster seat is securely installed by pulling out on both the Lower Anchor Connectors.
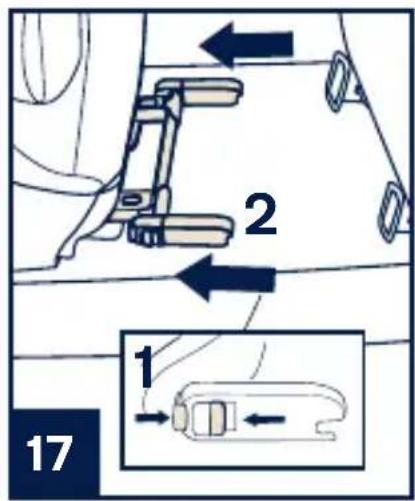
To detach the Lower Anchor Connectors from the vehicle, move seat bottom completely out, then squeeze the release buttons on the Lower Anchor Connectors (17)-1 while pulling out. (17)-2
text_image
2 1 17Use as a High Back Belt Positioning Booster
Your child must meet ALL of the following requirements below:
Age: At least 4 years old
Weight: 18–50 kg (40–110 lbs)
Height: 96–152 cm (38–60 in) tall
natural_image
Line drawing of a child seated in a car seat with a belt buckle (no text or symbols)
text_image
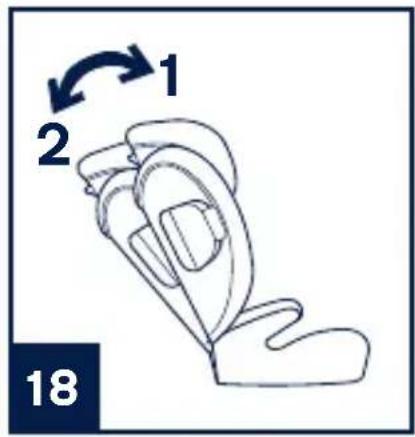
High Back Belt Positioning Booster At least 4 years old 18 kg (40 lbs) 50 kg (110 lbs)Your booster has two seat back positions as shown, fully upright (18)-1 and reclined (18)-2.
Use without Lower Anchors
1 The back of the booster seat MUST fit tightly against the back of the vehicle seat back when not using the Lower Anchors. (19)
2 Adjust or remove the vehicle headrest as needed to remove interference.
If you remove your vehicle headrest, be sure to stow it in a secure place; check your vehicle owner's manual.
3 Do not use with seat back beyond position 2. (20)
The front of the booster MUST NOT hang over the front of the vehicle seat.
text_image
1 2 18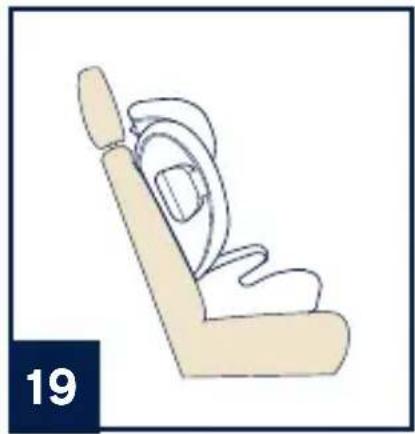
natural_image
Simple line drawing of a car seat with no text or symbols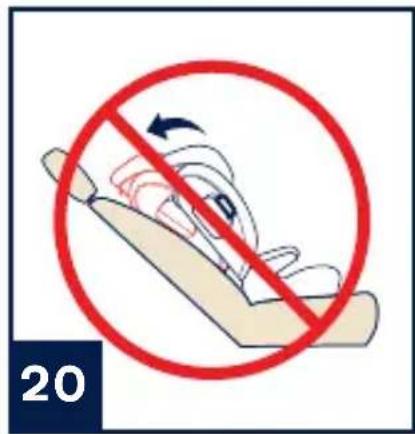
text_image
20Use with Lower Anchors and Recline Feature
The booster has a recline feature to best fit your vehicle and provide maximum comfort to your child.
1 Place vehicle seat back in normal upright position.
2 Connect booster to vehicle Lower Anchors (see Use of Lower Anchors). Ensure bottom of booster is in full contact with vehicle seat. (22)-1
3 Adjust the seat bottom by holding the Recline Lever and moving the seat in or out to obtain desired recline as shown in (22)-1.
4 Ensure the back of the booster is in contact with vehicle seat as shown in (22)-2.
5 Adjust or remove vehicle headrest as needed to remove interference.
If you remove your vehicle headrest, be sure to stow it in a secure place; check your vehicle owner's manual.
Warning! Never use booster when reclined beyond the recline position 2. (23)

natural_image
Line drawing of a car seat with labeled parts (no text or symbols beyond numbers)
text_image
2 1←→ 22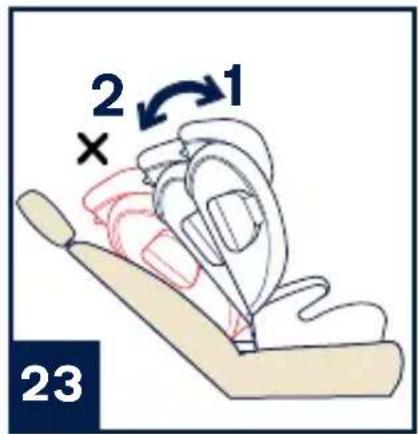
text_image
2 × 1 23Securing a Child in the High Back Booster Mode
1 With the booster correctly positioned in the vehicle, raise the Head Support and route the Vehicle Shoulder Belt through the RED shoulder belt guide (24)-1. The bottom of the Head Support should be at the top of the child's shoulder.
2 Route the Vehicle Shoulder Belt across the child's chest through the RED lower belt path, located under the armrest (24)-2, toward the vehicle buckle then secure the vehicle buckle and listen for a “click.” (24)-3
The vehicle lap belt must lie flat and snug across the child's thighs. The Vehicle Lap Belt must be positioned low on the pelvis.
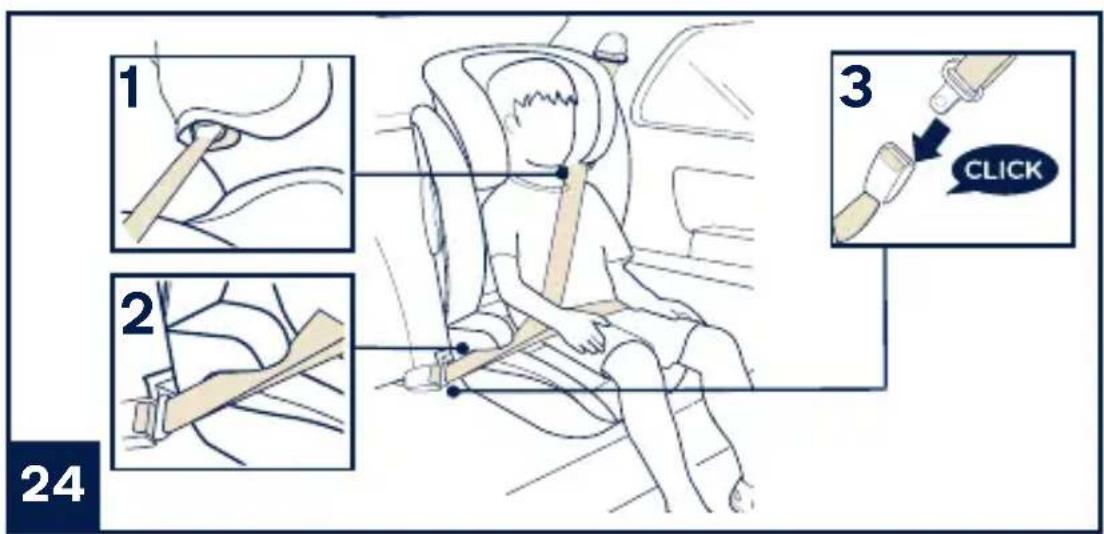
text_image
1 2 3 CLICK 24DO NOT position the Vehicle Lap Belt over the armrest. It must pass under the armrest.
Make sure the Vehicle Shoulder Belt is routed completely through the shoulder belt guide.
3 To properly adjust the Head Support, have your child sit in the booster with their back flat against the back of the booster seat.
The correct Head Support height is obtained when the bottom of the Head Support is even with the top of your child's shoulders and the Vehicle Shoulder Belt is laying flat across their chest. (25)
4 Pull up towards the vehicle belt retractor to remove slack. (25)
5 The Vehicle Shoulder Belt must route completely through the RED Shoulder Belt Guide and not fall off the child's shoulder. (26)

text_image
25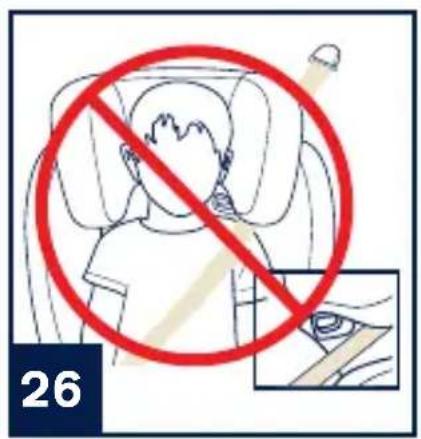
text_image
26Use as a No Back Belt Positioning Booster
Z
Your child must meet ALL of the following requirements below:
Age: At least 5 years old
Weight: 23–54 kg (50–120 lbs)
Height: 96–152 cm (38–60 in) tall

natural_image
Line drawing of a person sitting in a chair with a belt and seatbelt (no text or symbols)
text_image
23 kg (50 lbs) 54 kg (120 lbs) No Back Belt Positioning Booster At least 5 years oldThe No Back Booster can be installed with or without the Lower Anchor Connectors.
If installing without the Lower Anchor Connectors, ensure the Lower Anchor Connectors are stored in the seat bottom, refer to “Use of Lower Anchor Connectors.” If the seat back is attached, remove the seat back by reversing the steps shown in “Seat Assembly.”
Installing without Lower Anchor Connectors
Place the back of the booster against the back of the vehicle seat back.
In the No Back Booster mode, the recline function cannot be used.
Installing with Lower Anchor Connectors
1 Remove the seat back by reversing steps shown in “Seat Assembly.”
2 Connect the Lower Anchor Connectors to the vehicle's Lower Anchors. See “Use of Lower Anchor Connectors.”
3 While holding the Lower Anchor Release Lever, adjust the booster until it is in contact with the vehicle's seat back. Refer to “Use of Lower Anchor Connectors.”
Securing a Child in the No Back Booster Mode
1 With the booster correctly positioned in the vehicle, have the child sit on the booster seat with their back against the vehicle's seat back. (27)
2 Route the Vehicle Belt through the RED lower belt path, located under the armrest (27)-1 and toward the vehicle buckle then secure the vehicle buckle and listen for a “click”. (27)-2
3 The Vehicle Shoulder Belt should lie flat across the child's chest and the Vehicle Lap Belt should be snug across the child's thighs. The shoulder belt must lie across the child's shoulder. (27)

text_image
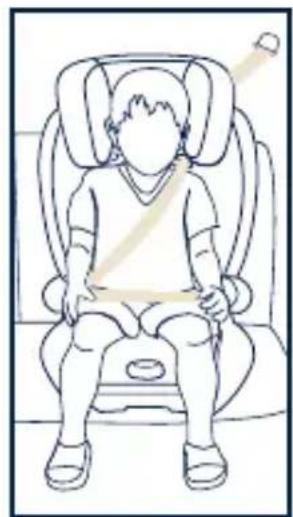
1 2 CLICK 274 If the Vehicle Shoulder Belt falls outside the peach zone shown in image (28), use the Shoulder Belt Positioning Clip for proper placement of the Vehicle Shoulder Belt. Refer to Shoulder Belt Positioning Clip.
5 Route the Vehicle Shoulder Belt through the Shoulder Belt Positioning Clip. Adjust the Shoulder Belt Positioning Clip by pulling down on the strap so the Shoulder Belt Positioning Clip is slightly above the child's shoulder as shown (29).
The top of the child's ears should be AT or BELOW the top of the vehicle seat back or the vehicle's headrest.
Use of Shoulder Belt Positioning Clip
1 The Shoulder Belt Positioning Clip must be attached to the horizontal bar located on either side of the booster seat bottom. (30)

natural_image
Line drawing of a person sitting in a chair wearing a seatbelt, with a belt buckle attached (no text or symbols)
natural_image
Illustration of a person sitting in a chair with a belt and head, no text or symbols present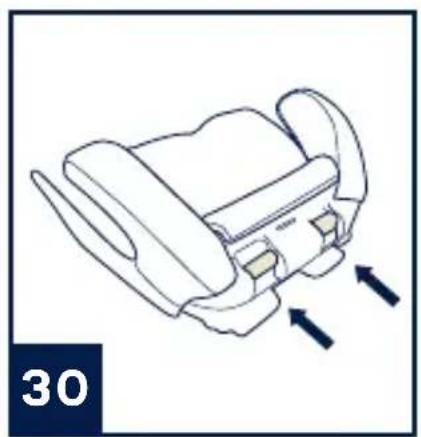
natural_image
Technical line drawing of a mechanical component with directional arrows indicating movement (no text or symbols)2 The Shoulder Belt Positioning Clip can be installed on either side of the booster to achieve the best fit for your child in your vehicle. (31, 32).

natural_image
Line drawing of a car interior with a vertical pole and a rectangular device (no text or symbols)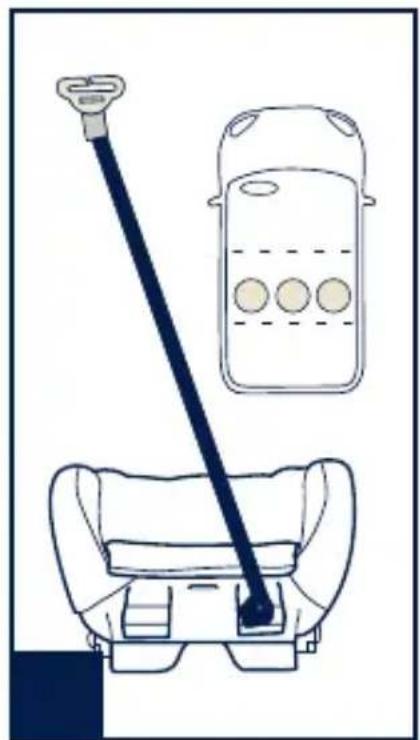
natural_image
Line drawing of a car interior with a horizontal bar and three circular elements, no text or symbols present.3 Insert the loop end of the strap around the horizontal bar on the back of the booster (33), pass the Shoulder Belt Positioning Clip through the loop (34) and pull up on the strap. (35)

natural_image
Illustration of hands using a tool to adjust or install a mechanical component (no text or symbols visible)
natural_image
Illustration of a hand adjusting a car seatbelt mechanism (no text or symbols visible)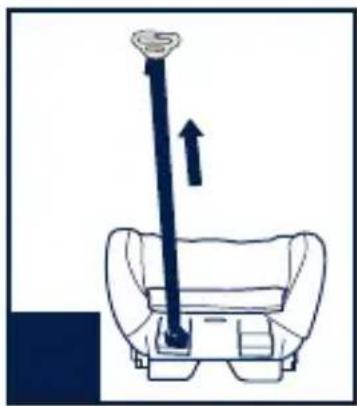
natural_image
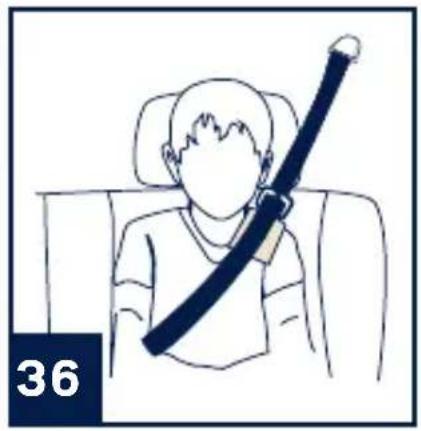
Diagram of a car seat with a vertical pole and upward arrow indicating motion (no text or symbols)It is important for the Vehicle Shoulder Belt to fall within the peach zone, shown in (36).
natural_image
Line drawing of a person sitting in a chair wearing a seatbelt, no text or symbols presentZ
Cup Holder Assembly
1 Insert the Cup Holder clip into the opening on either side of seat. (37) Make sure the Cup Holder clip is fully inserted into both the fabric and plastic slot on booster. (38)
Never place hot liquids in the Cup Holder.

natural_image
Line drawing of a car seat with two downward arrows indicating motion or pressure (no text or symbols)
natural_image
Line drawing of a car seat with a cup, no text or symbols presentDetach Covers
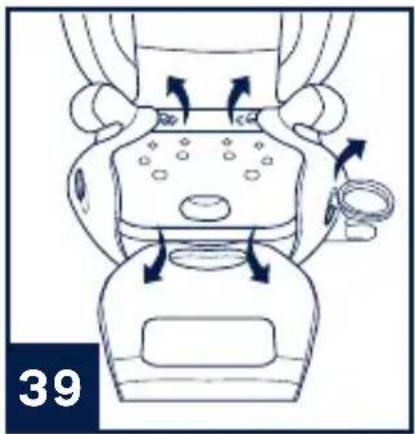
1 Remove the Cup Holder and pull out the seat bottom fabric by removing the 3 plastic attachments. (39)
2 Open 8 snaps on seat bottom and remove cover. (40)
3 On the main seat back cover, open the 2 snaps and unhook 4 elastic bands on the back side and remove. (41)
4 On the Head Support, raise to highest position, then unhook 4 elastic bands and remove. (41)
To reassemble the covers simply reverse the steps above.
Use care not to damage energy absorbing foam when removing seat covers.
natural_image
Line drawing of a car interior with directional arrows indicating movement or force (no text or symbols)
natural_image
Technical line drawing of a car interior showing top and side views with directional arrows indicating movement (no text or symbols)
natural_image
Technical line drawing of a mechanical device with directional arrows indicating motion (no text or symbols)Cleaning and Maintenance
Wash the covers with cold water and mild detergent on the delicate cycle.
Use only mild detergent, cold water and a soft cloth to clean the booster seat shell. Air dry.
Do not use undiluted detergents or solvents to clean the booster. It may cause damage to the booster.
Do not twist the covers with great force to dry. It may leave the covers wrinkled.
Hang dry the covers in the shade.
Do not iron the covers.
Do not bleach or dry clean the covers.
Remove the booster seat from the vehicle seat if not in use for a long period of time. Put the booster in a cool, dry place and somewhere your child cannot access it.
IMPORTANT! CONSERVEZ CES INSTRUCTIONS POUR UNE UTILISATION FUTURE!
LIRE ATTENTIVEMENT
Table des matières
text_image
Diagram of a car with directional control buttons and checkmarks, including red X marks for cancellation or rejection.text_image
Technical diagram of a car seat assembly with numbered parts for identification and assembly reference.Installation
natural_image
Interior view of a car seatbelt and backrest, showing seat, seat, and rear panel (no text or symbols)natural_image
Interior view of a car showing seatbelt and seatbelt buckle (no text or symbols)natural_image
Line drawing of a car seat assembly with two arrows indicating downward motion (no text or symbols)
text_image
CLIC 7
text_image
CLIC 8
text_image
1 2 CLIC 9LES DISPOSITIFS DE PROTEcTION LATÉRALE DOIVENT ÊTRE DÉPLOYÉS LORSQUE LE SIÈGE D'APPOINT EST INSTALLÉ DANS UN VÉHICULE.
natural_image
Illustration of a hand pressing down on a curved object with directional arrows indicating motion (no text or symbols)
natural_image
Illustration of a hand pressing down on a curved object with directional arrows indicating motion (no text or symbols)text_image
Diagram illustrating car seatbelting technique with labeled instructions and magnified viewnatural_image
Line drawing of a car interior with two directional arrows indicating movement or movement (no text or symbols)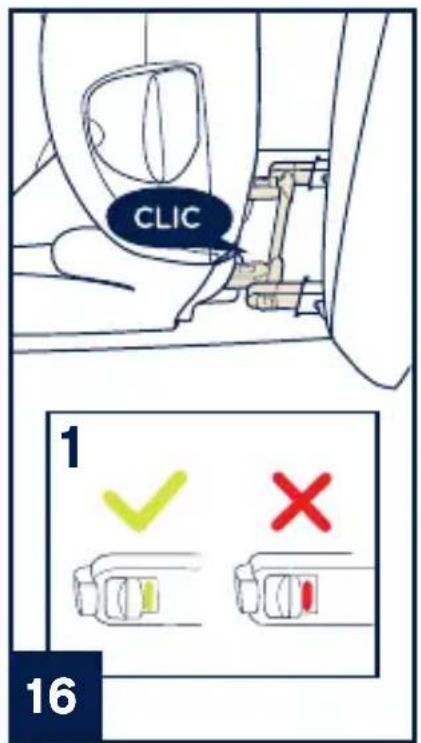
text_image
CLIC 1 ✓ × 16natural_image
Line drawing of a child sitting in a car seat with a belt applied, no text or symbols present
natural_image
Simple line drawing of a car seat with no text or symbols
text_image
20natural_image
Line drawing of a car seat with labeled parts (no text or symbols beyond numbers)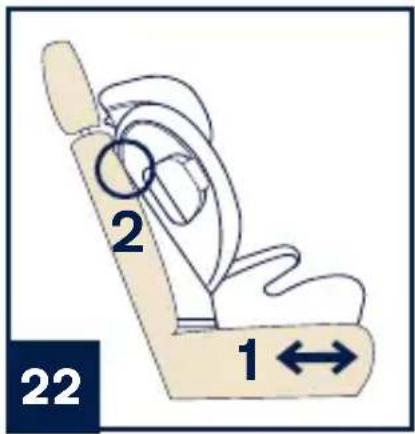
text_image
2 1 ← 22
text_image
2 × 1 23natural_image
Illustration of a person seated in a chair with an inset showing a medical device (no text or symbols present)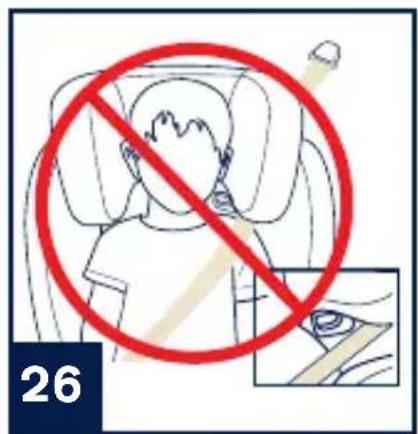
text_image
26natural_image
Line drawing of a person sitting in a car seat with a belt and seatbelt (no text or symbols)
natural_image
Illustration of a person sitting in a car seat with a dark belt and seatbelt (no text or symbols)
natural_image
Line drawing of a person sitting in a chair with a belt and pointer, no text or symbols presentnatural_image
Technical line drawing of a mechanical component with directional arrows indicating movement (no text or symbols)natural_image
Line drawing of a car interior with a vertical pole and a rectangular device (no text or symbols)
natural_image
Line drawing of a car interior with a horizontal bar and three circular elements, no text or symbols present.natural_image
Illustration of hands using a tool to adjust or install a mechanical component (no text or symbols visible)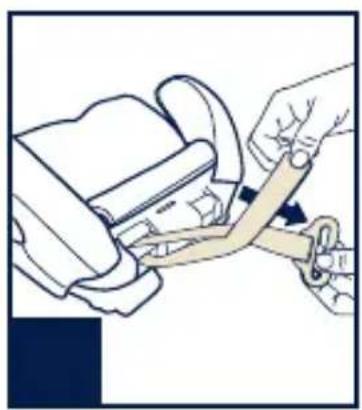
natural_image
Illustration of a hand adjusting a car seatbelt with a belt (no text or symbols)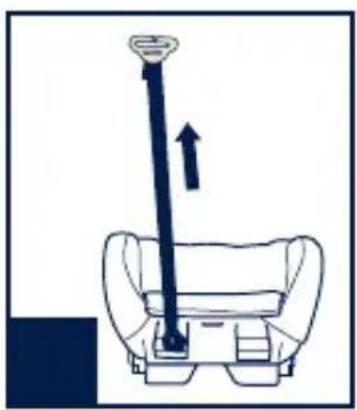
natural_image
Line drawing of a car seat with a vertical pole and upward arrow indicating motion (no text or symbols)natural_image
Line drawing of a person sitting in a car seat with a belt buckle (no text or symbols)
natural_image
Line drawing of a car seat with two downward arrows indicating motion or pressure (no text or symbols)
natural_image
Line drawing of a car seat with seatbelt and seat, no text or symbols presentDéhoussage
natural_image
Line drawing of a mechanical device with directional arrows indicating motion or movement (no text or symbols)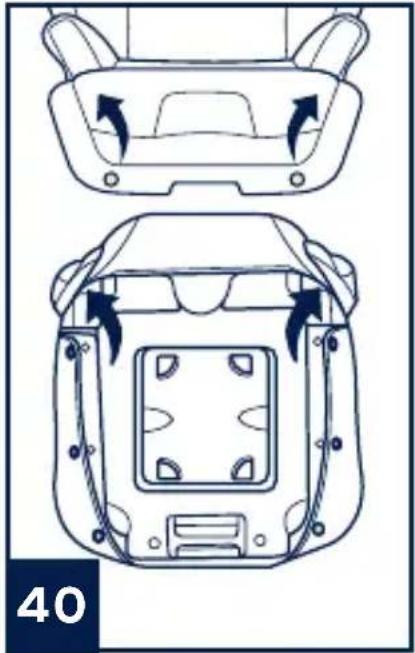
natural_image
Technical line drawing of a car front panel showing top and side views with directional arrows (no text or symbols)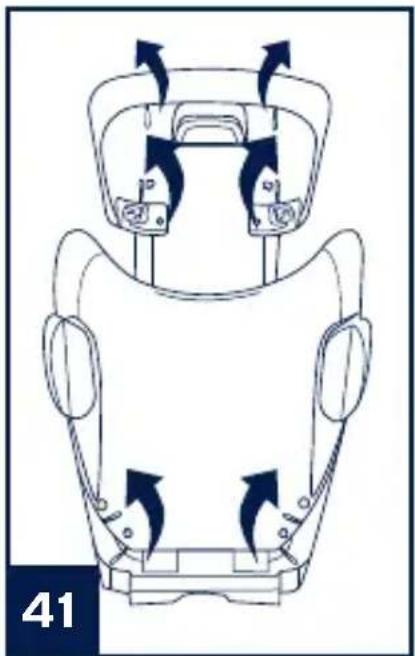
natural_image
Technical line drawing of a mechanical device with directional arrows indicating motion (no text or symbols)natural_image
Abstract pattern of blue brushstroke-like shapes on beige background, no text or symbols presentnuna®
Find out more at: nuna.eu/caen